Run Higson Using AMI#
Launch the AMI#
The latest Higson versions are available as AMI (Amazon Machine Images) at Amazon Marketplace.
Higson Studio#
Visit the Higson Studio Amazon Marketplace. You can read basic information about Higson Studio. Click Continue to subscribe and read Terms and Conditions. After getting yourself familiar with the license, click Continue to configuration. On the next screen, you can choose the Higson Studio version and region you want to launch your instance in. Next, click Continue to launch. Select Launch through EC2 in the Choose Action section.
Higson Runtime#
Visit the Higson Runtime Amazon Marketplace. You can read basic information about Higson Runtime. Click Continue to subscribe and read Terms and Conditions. After getting yourself familiar with the license, click Continue to configuration. On the next screen, you can choose the Higson Runtime version and region you want to launch your instance in. Next, click Continue to launch. Select Launch through EC2 in the Choose Action section.
Configure#
This step is required to be able to specify the user-data script, which allows passing environment variables to the application without the need to log in to the instance.
AWS Systems Manager Parameter Store#
By default, Higson Studio uses AWS Systems Manager Parameter Store to fetch properties at the start of the application. You need to specify AWS_ACCESS_KEY_ID and AWS_SECRET_KEY in the user-data script to connect to the AWS Systems Manager Parameter Store. If you do not define those properties, Studio will not launch.
Default Configuration#
- key: /config/higson-studio/higson.database.url
description: JDBC address of dedicated postgresql database
value: jdbc:postgresql://address_to_your_postgressql_server:port/postgres?currentSchema=public - key: /config/higson-studio/higson.database.username
description: username for application’s connection to the dedicated database
value: admin - key: /config/higson-studio/higson.database.password
description: password for application’s connection to the dedicated database
value: admin
If you prefer to connect to H2 database in order not to setting up a standalone database - you can set up following properties:
-
key: /config/higson-studio/higson.database.url
description: JDBC address of dedicated postgresql database
value: jdbc:h2:/home/ec2-user/higson.test.db;AUTO_SERVER=TRUE;NON_KEYWORDS=VALUE -
key: /config/higson-studio/higson.database.username
description: username for application’s connection to the dedicated database
value: sa -
key: /config/higson-studio/higson.database.password
description: password for application’s connection to the dedicated database
value: sa
Environment Properties#
To set up environment variables for containers you can manually create a /home/ec2-user/environment.conf file or prepare user-data-script like in the example below. Both are available and its main aim is to configure instance system environments.
|
|
AWS_ACCESS_KEY_ID and AWS_SECRET_KEY you will be able to generate from your IAM page.
Both are needed if you want to use your AWS Parameter Store to pass your configuration.
You can inject this script directly into your container in EC2 console using:
Actions -> Instance settings -> Edit user data button.
Following script add 2 environment variables to your container.
You can learn more about bootstrapping AWS EC2 instance here.
Configure Without AWS Parameter Store#
If you don’t want to use AWS Parameter Store simply turn this off with AWS_PARAMSTORE_ENABLED=FALSE
Now you have to pass HIGSON_DATABASE_URL, HIGSON_DATABASE_USERNAME, HIGSON_DATABASE_PASSWORD properties in your user-data script
Properties Customization Precedence#
Higson Studio allows you to define properties in several locations. The properties are processed in the order as defined below. This implies that the last one overwrites other overlapping properties if you define the same property in two different locations.
- /home/ec2-user/conf/application.properties
- /home/ec2-user/higson-studio/conf/mpp-sensitive.properties
- /home/ec2-user/higson-studio/conf/application.properties
- /home/ec2-user/application.properties
- /home/ec2-user/higson-studio/conf/higson.properties
- “HIGSON_CONFIG_PATH” environment variable (can be defined in user-data script)
- environment variables (from/home/ec2-user/environment.conf)
- AWS Systems Manager Parameter Store
Instance Launch Options#
Below, you can find a few instance launch options:
- version - by default you should launch the latest version available on Amazon Marketplace.
- region - select the region you would like to launch your instance in. The image is available in all of Amazon’s publicly available regions.
- EC2 Instance Type - select the instance type you would like to use for your launched Higson Studio.
- Security Groups - Expose ports to access EC2 instances and Higson Studio:
- TCP/22 – SSH - used to administrate your instance remotely.
- TCP/38080 – default port for Higson Studio, this is the port on which you can access Higson Studio
- Key Value pair settings - generate or use an existing one key and secret pair that will be needed later to access the EC2 instance.
Connect the Instance#
In order to log in, you can use the following command:
ssh-i PATH_TO_PEM_FILE ec2-user@IP_HERE
You need to use a PEM file with a public key downloaded while creating the EC2 Instance.
Type the ssh command in a terminal. Application is deployed at /home/ec2-user/higson-studio-X.X.X where X.X.X is the version of
deployed Studio.
Systemd service is configured to manage the Higson Tomcat instance. You can use standard systemctl commands to
disable or check status such as sudo systemctl status higson-studio
All logs can be found under the following path /home/ec2-user/higson-studio-x.x.x/logs/
Log in to Running Higson Studio#
Studio stores temporary password at higson.log file. Login to your EC2 instance and grep a string ‘Copy password’ in the log file using:
|
|
as a result, you will find a string similar to: Copy password from file 'gifzWEZl' in home directory, where the filename
is different every time higson is bootstrapped. This file contains an admin user password. Copy the password. Now go to a browser and
open a page: http://IP_HERE:38080/higson/app . At login page please fill form with credentials: pass username: admin and password:
copied string here. You will be asked to change your temporary password. After that, you can login to higson as an admin with a
new set password
Supported Databases#
Higson supports various SQL databases, including PostgreSQL, Oracle, MySQL, Microsoft SQL and H2. By default, we have built the AMI with PostgreSQL and H2 support. This means that the PostgreSQL and H2 JDBC drivers are present in the Tomcat lib directory, and we only need you to provide the URL and credentials for the database. If you want to connect to another database, then add a proper JDBC driver to the Tomcat lib directory, which is located under the path: /home/ec2-user/higson-studio/lib
Run Higson Using ECS#
It is possible to run the Higson application in Amazon Elastic Container Service (ECS). The following steps will allow you to quickly and easily run Higson Studio or Higson Runtime REST:
- Log in to AWS Management Console
- Go to Elastic Container Service
- Create a Cluster:
- Define the cluster name (this is the only required field), e.g.: higson-cluster
- Verify the remaining optional settings
- Finish the process by creating a cluster
- Create a Task definition (using the configuration form):
- Define the task definition family name, e.g.: higson-studio or higson-runtime-rest
- Define the container name and the application image URI - an official DockerHub images for decerto/higson-studio or decerto/higson-runtime-rest are available at https://hub.docker.com/r/decerto/ (e.g.: decerto/higson-studio:4.2.0 or decerto/higson-runtime-rest:4.2.0)
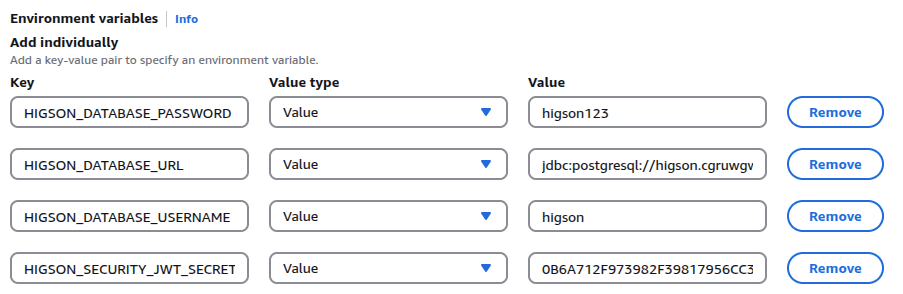
- Define environment variables (check the list of required properties). Remember of correct environment variables notation!
- Configure log collection, e.g.: select Amazon CloudWatch
- Verify the remaining optional settings
- Finish the process by creating a task definition
- Go to cluster and create a service:
- Select task definition family, e.g.: previously created higson-studio or higson-runtime-rest
- Define service name, e.g.: higson-studio-service or higson-runtime-rest-service
- Finish the process by creating a service
- Verify the status of deployment and start using application!
If you would like to use Higson Studio and Higson Runtime REST both must have configured environment variable: HIGSON_SECURITY_JWT_SECRET_KEY with the same key value!
See an example of minimal required environment variables for Higson Studio:
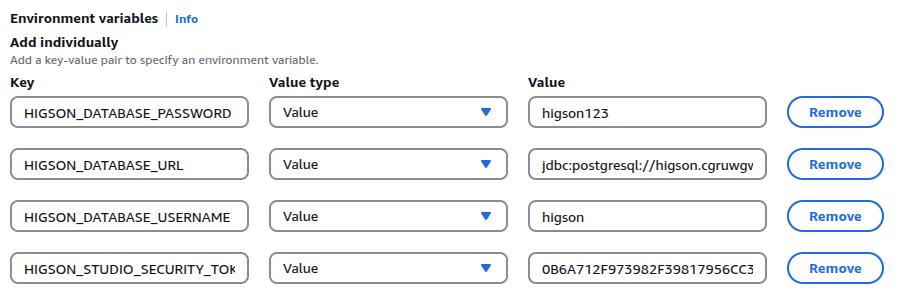
See an example of minimal required environment variables for Higson Runtime REST: