Flows are another powerful tool for parametrization. Flows enable users to design business logic visually—without any programming skills. This means that even those with no coding experience can independently create complex algorithms and processes. Within a flow, logic is represented as a diagram composed of blocks, decision gates, and arrows that define how the process unfolds. The intuitive, user-friendly interface makes it easy to understand the operation of even complex schemes.
To start working with flows, go to the Flows tab on the Main Toolbar.
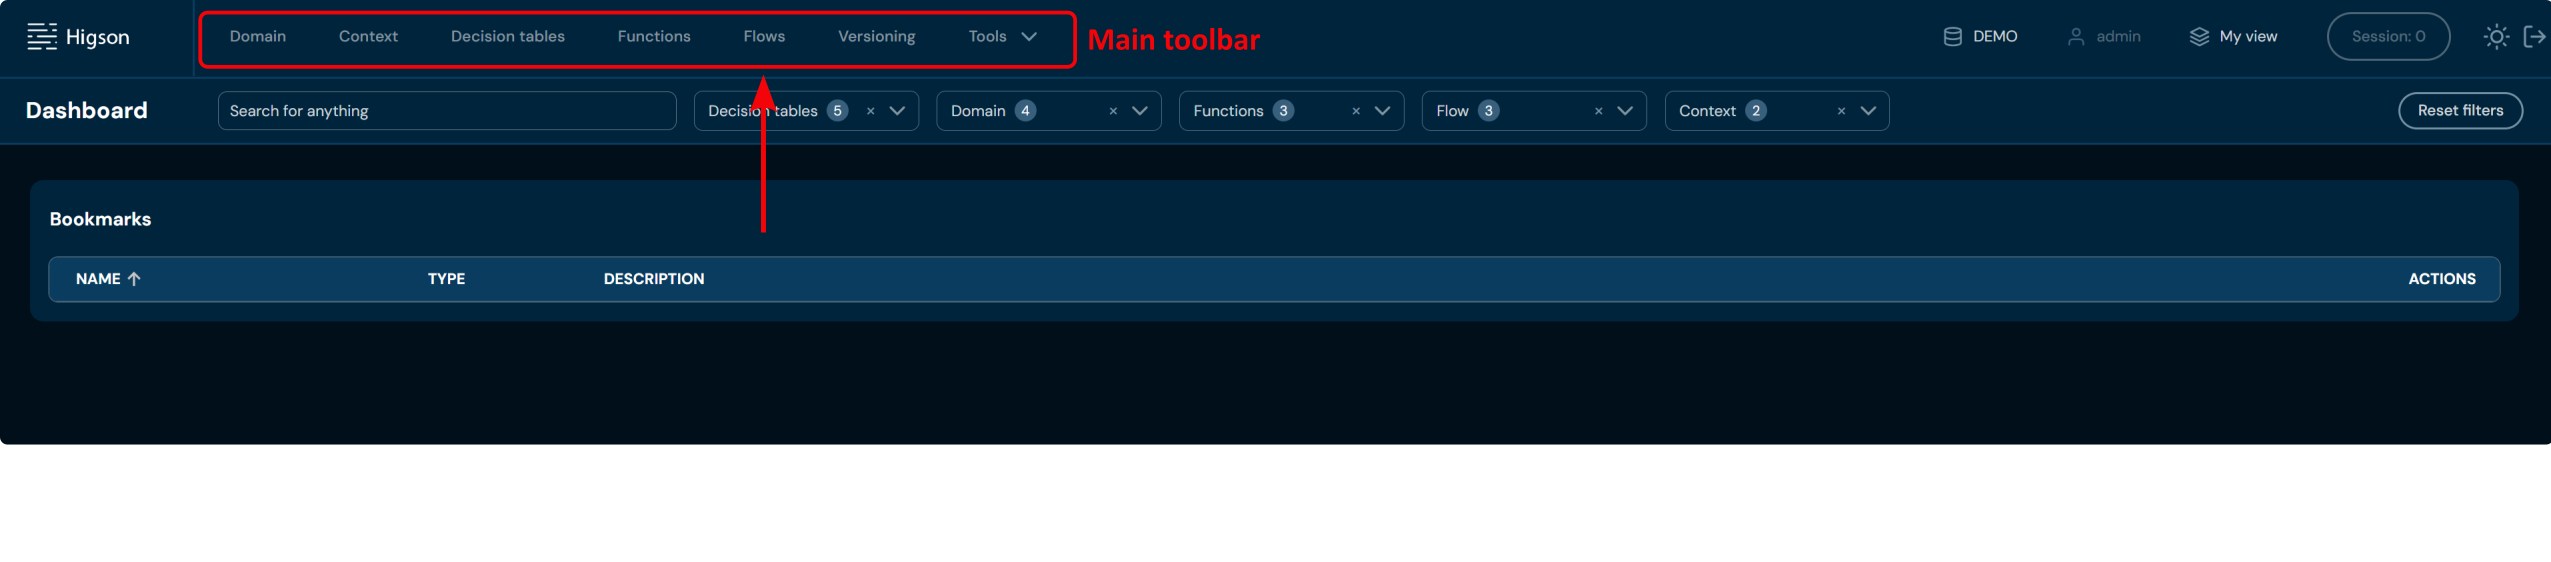
After selecting Flows, you are redirected to a view listing all flows created in the given environment.
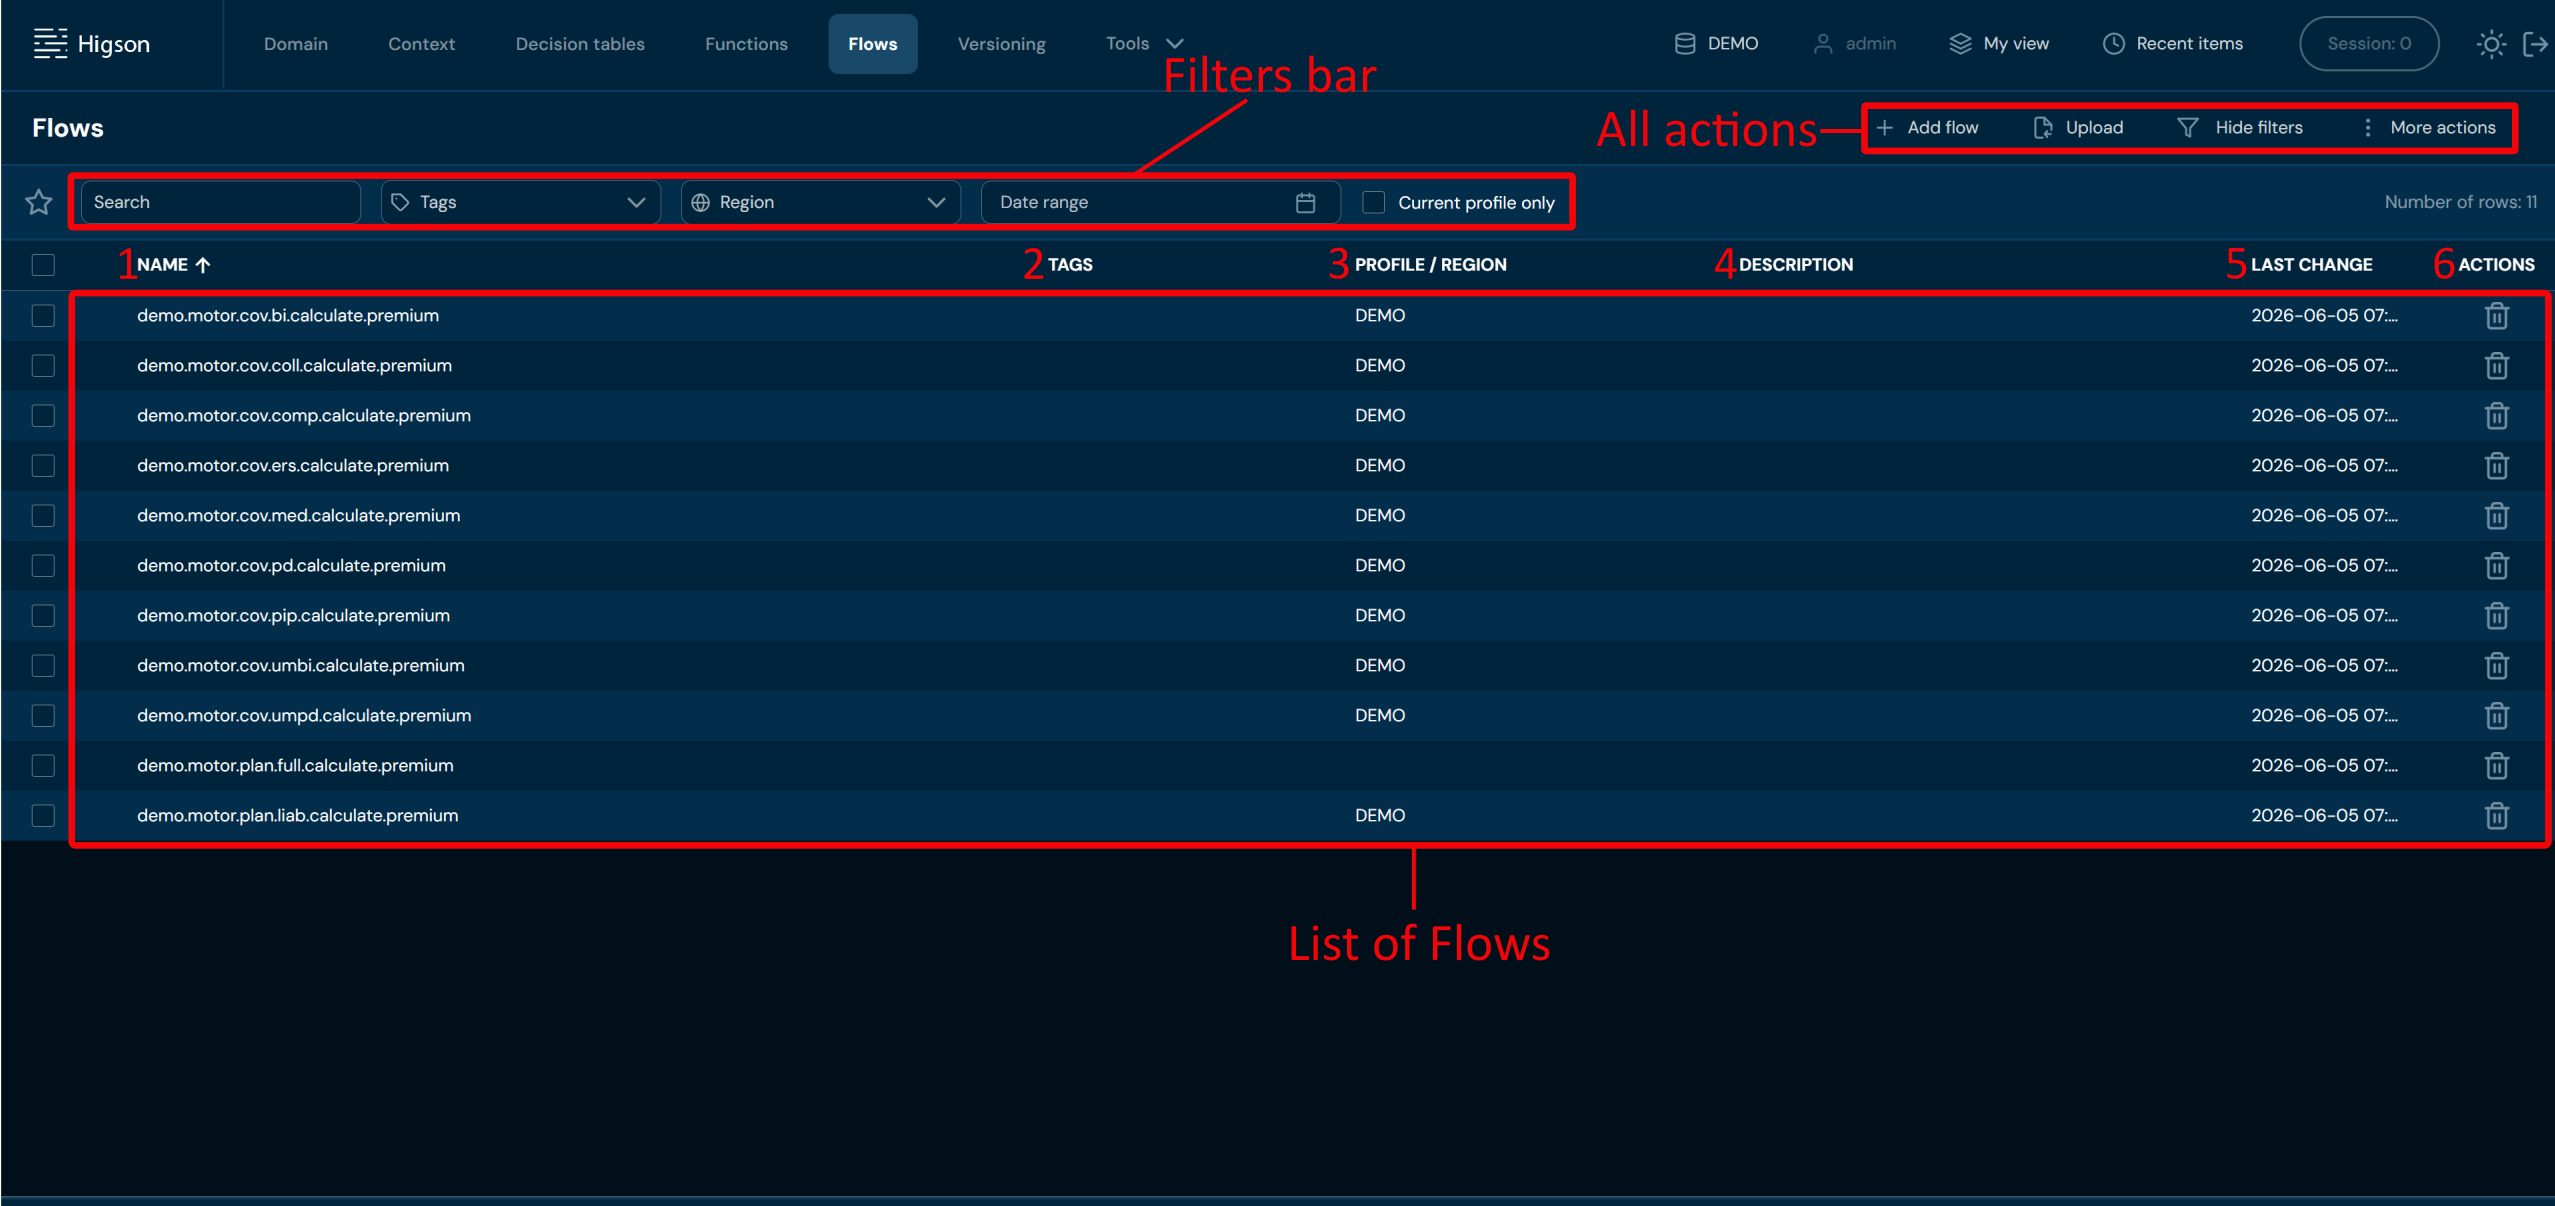
| No. | Column name | Description |
|---|---|---|
| 1 | Name | Full name of the flow. |
| 2 | Tags | List of all tags assigned to the flow. |
| 3 | Profile/Region | Profile and Region the flow is assigned to. |
| 4 | Description | Description of the flow. |
| 5 | Last Change | The last modification date of the flow. |
| 6 | Actions | List of quick access actions. The remove action deletes the flow. |
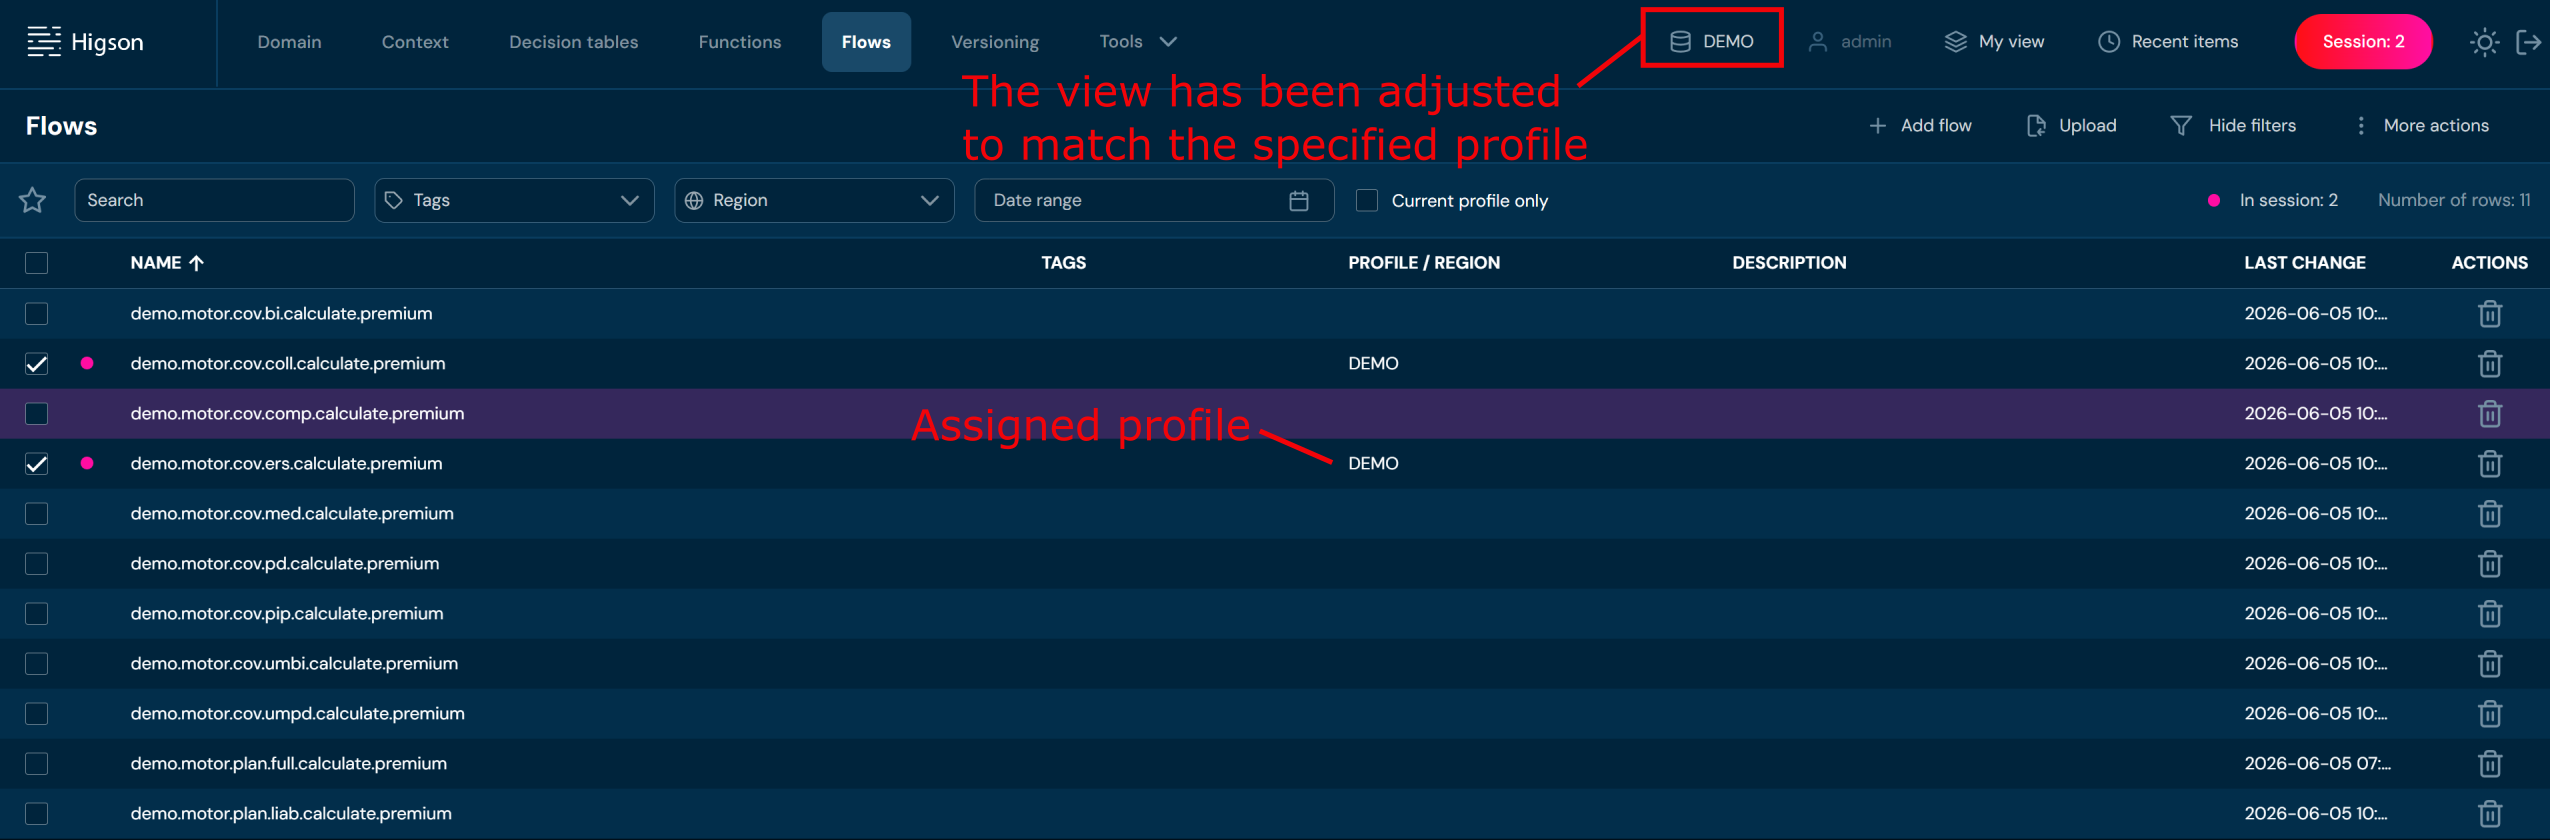
The flows list view depends on the selected profile.
If a profile is selected, both global items and items assigned to the selected profile are displayed.
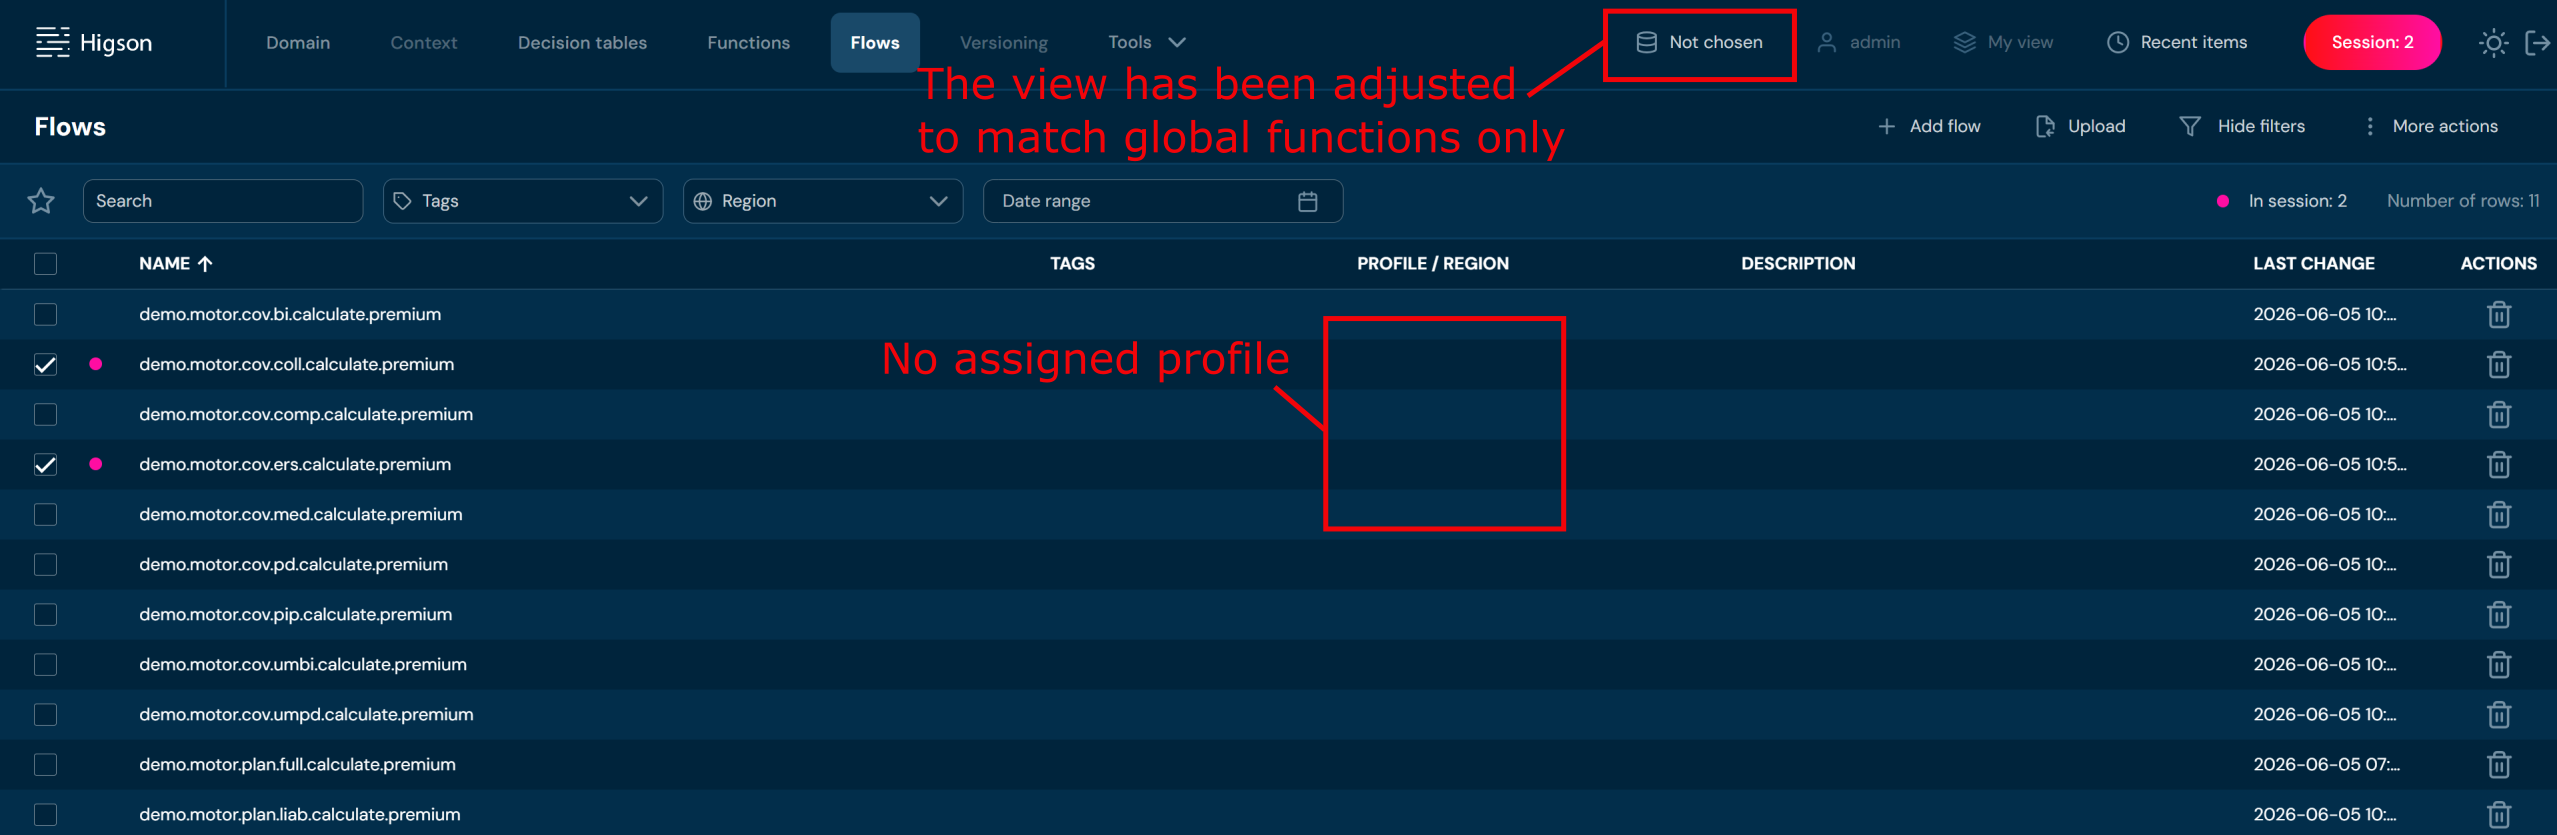
If no profile is selected (not-chosen), only global items are visible.
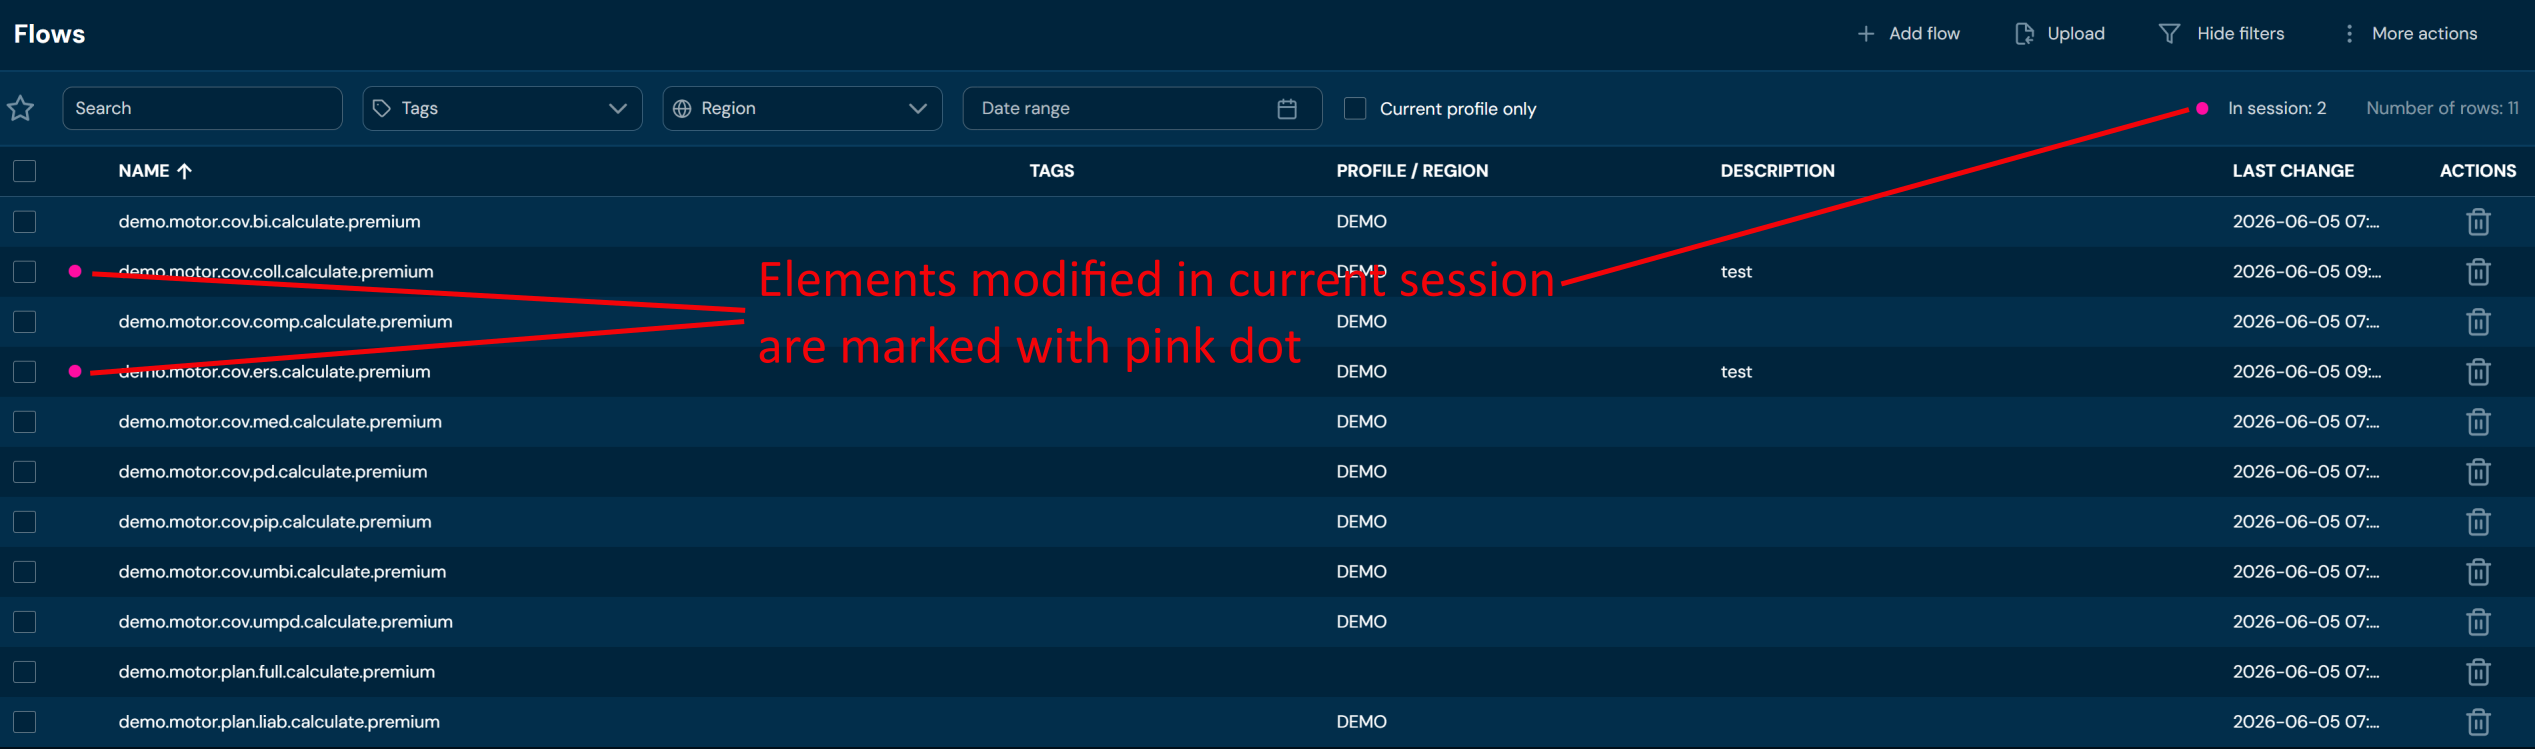
Elements modified in current session are marked with pink dot:
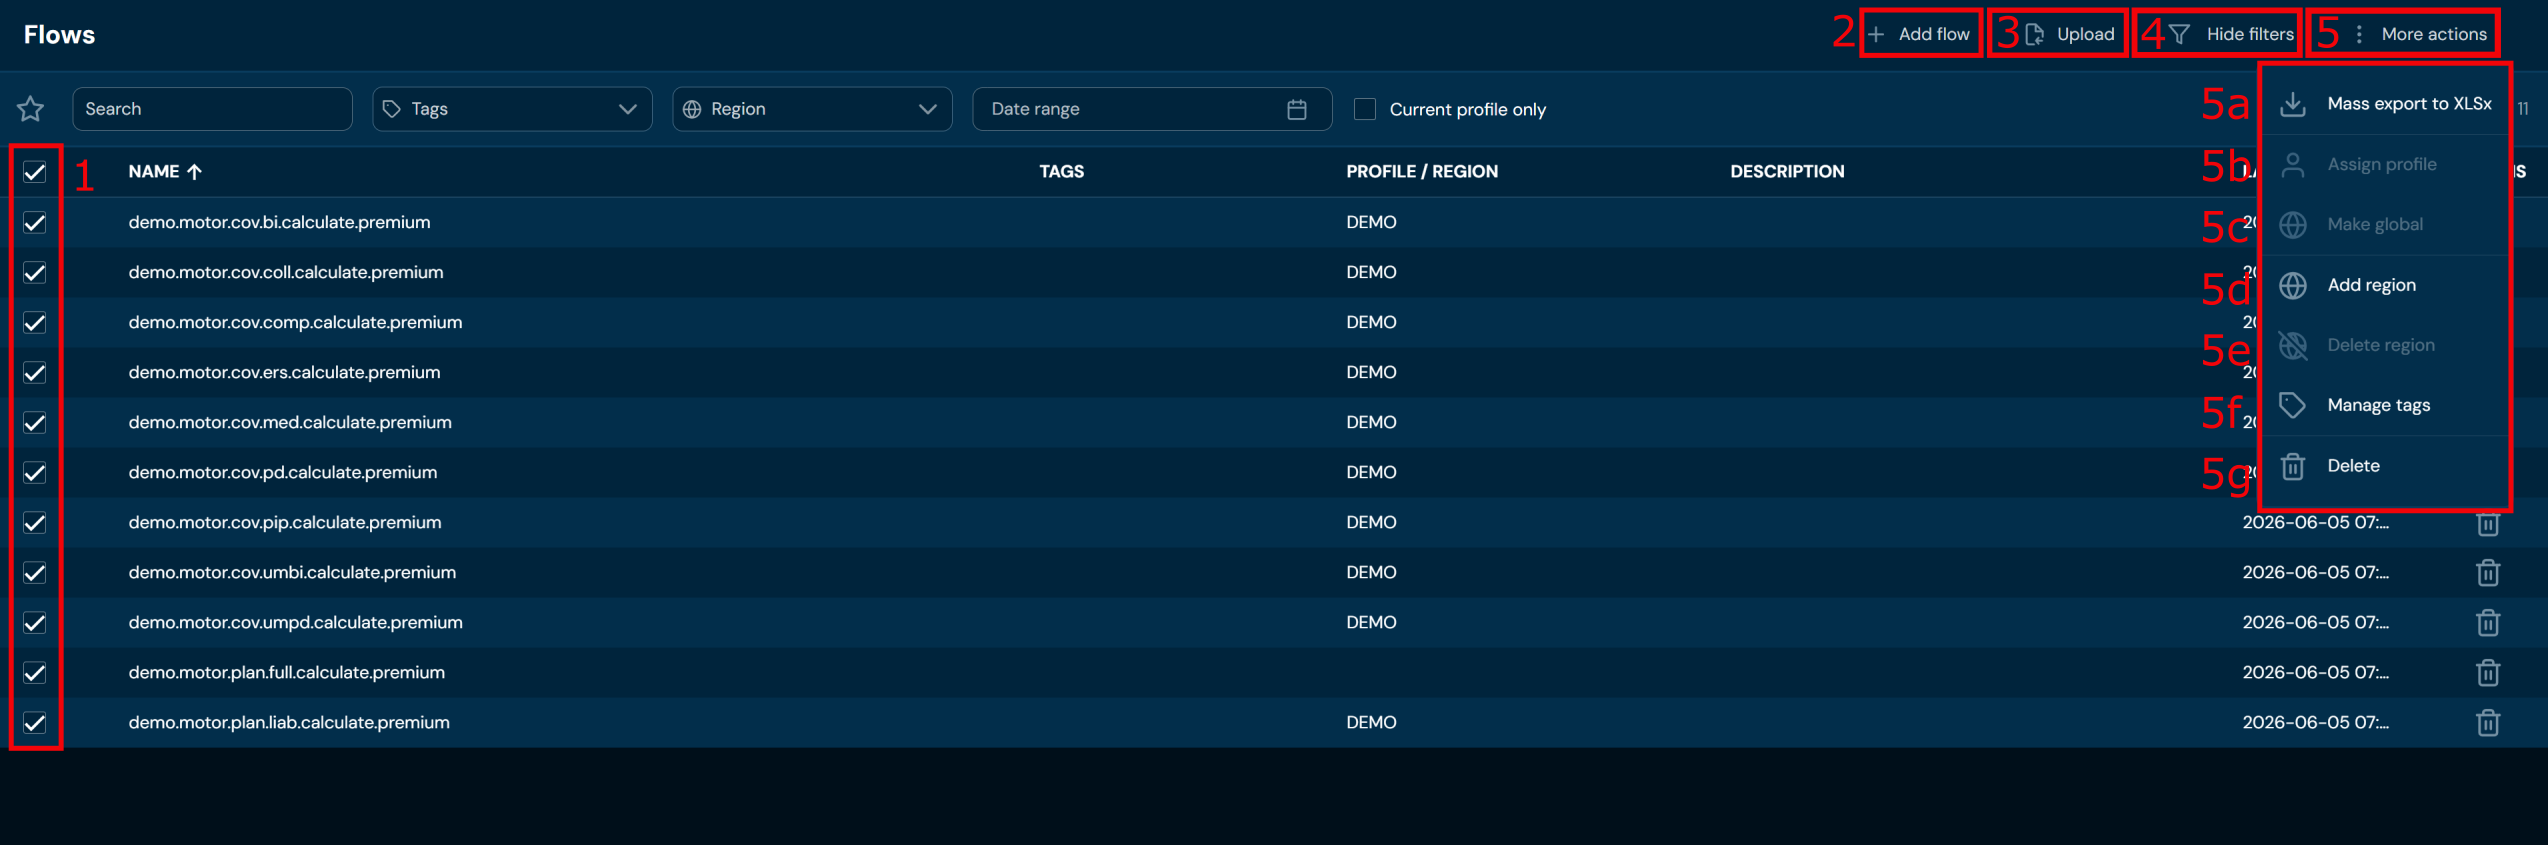
On this screen, you can apply Filters to search for specific flow or to narrow down the number of displayed flows. You can also perform actions on one or multiple flows. You can see All Actions available for the flows below:
| No. | Action | Description |
|---|---|---|
| 1 | Checkboxes | Select the top checkbox to select all flows in the view or select individual checkboxes to group flows for actions 5a, 5b, 5c, 5d, 5e, 5f, 5g. |
| 2 | Add flow | Opens a step-by-step flow wizard. Allows you to create a new flow. |
| 3 | Upload | Allows importing flows from a ZIP or XLSX file. |
| 4 | Hide filters | Hides or reveals the Filters bar accordingly. If the Filter bar is visible, then the Hide filters action is available. If it’s hidden, then the Show filters action is available. |
| 5 | More actions | The drop-down menu that contains actions 5a–5g. Bear in mind that actions 5a, 5b, 5c, 5d, 5e, 5f, 5g are available only if at least one flow is selected (at least one checkbox is checked). Otherwise, the mentioned actions will be greyed out. |
| 5a | Mass export to XLSX | Downloads a ZIP file that contains flows (XLSX + JSON). |
| 5b | Assign profile | Assigns a profile to all selected flows. To learn more about assigning profiles go here. |
| 5c | Make global | Makes all selected flows global. To learn more about making flows global go here. |
| 5d | Add region | Adds regions to all selected flows. |
| 5e | Delete region | Removes regions from all selected flows. |
| 5f | Manage tags | Allows adding or removing tags to/from selected flows. |
| 5g | Delete | Deletes all selected flows. |
You can see all Filters available for flows below:
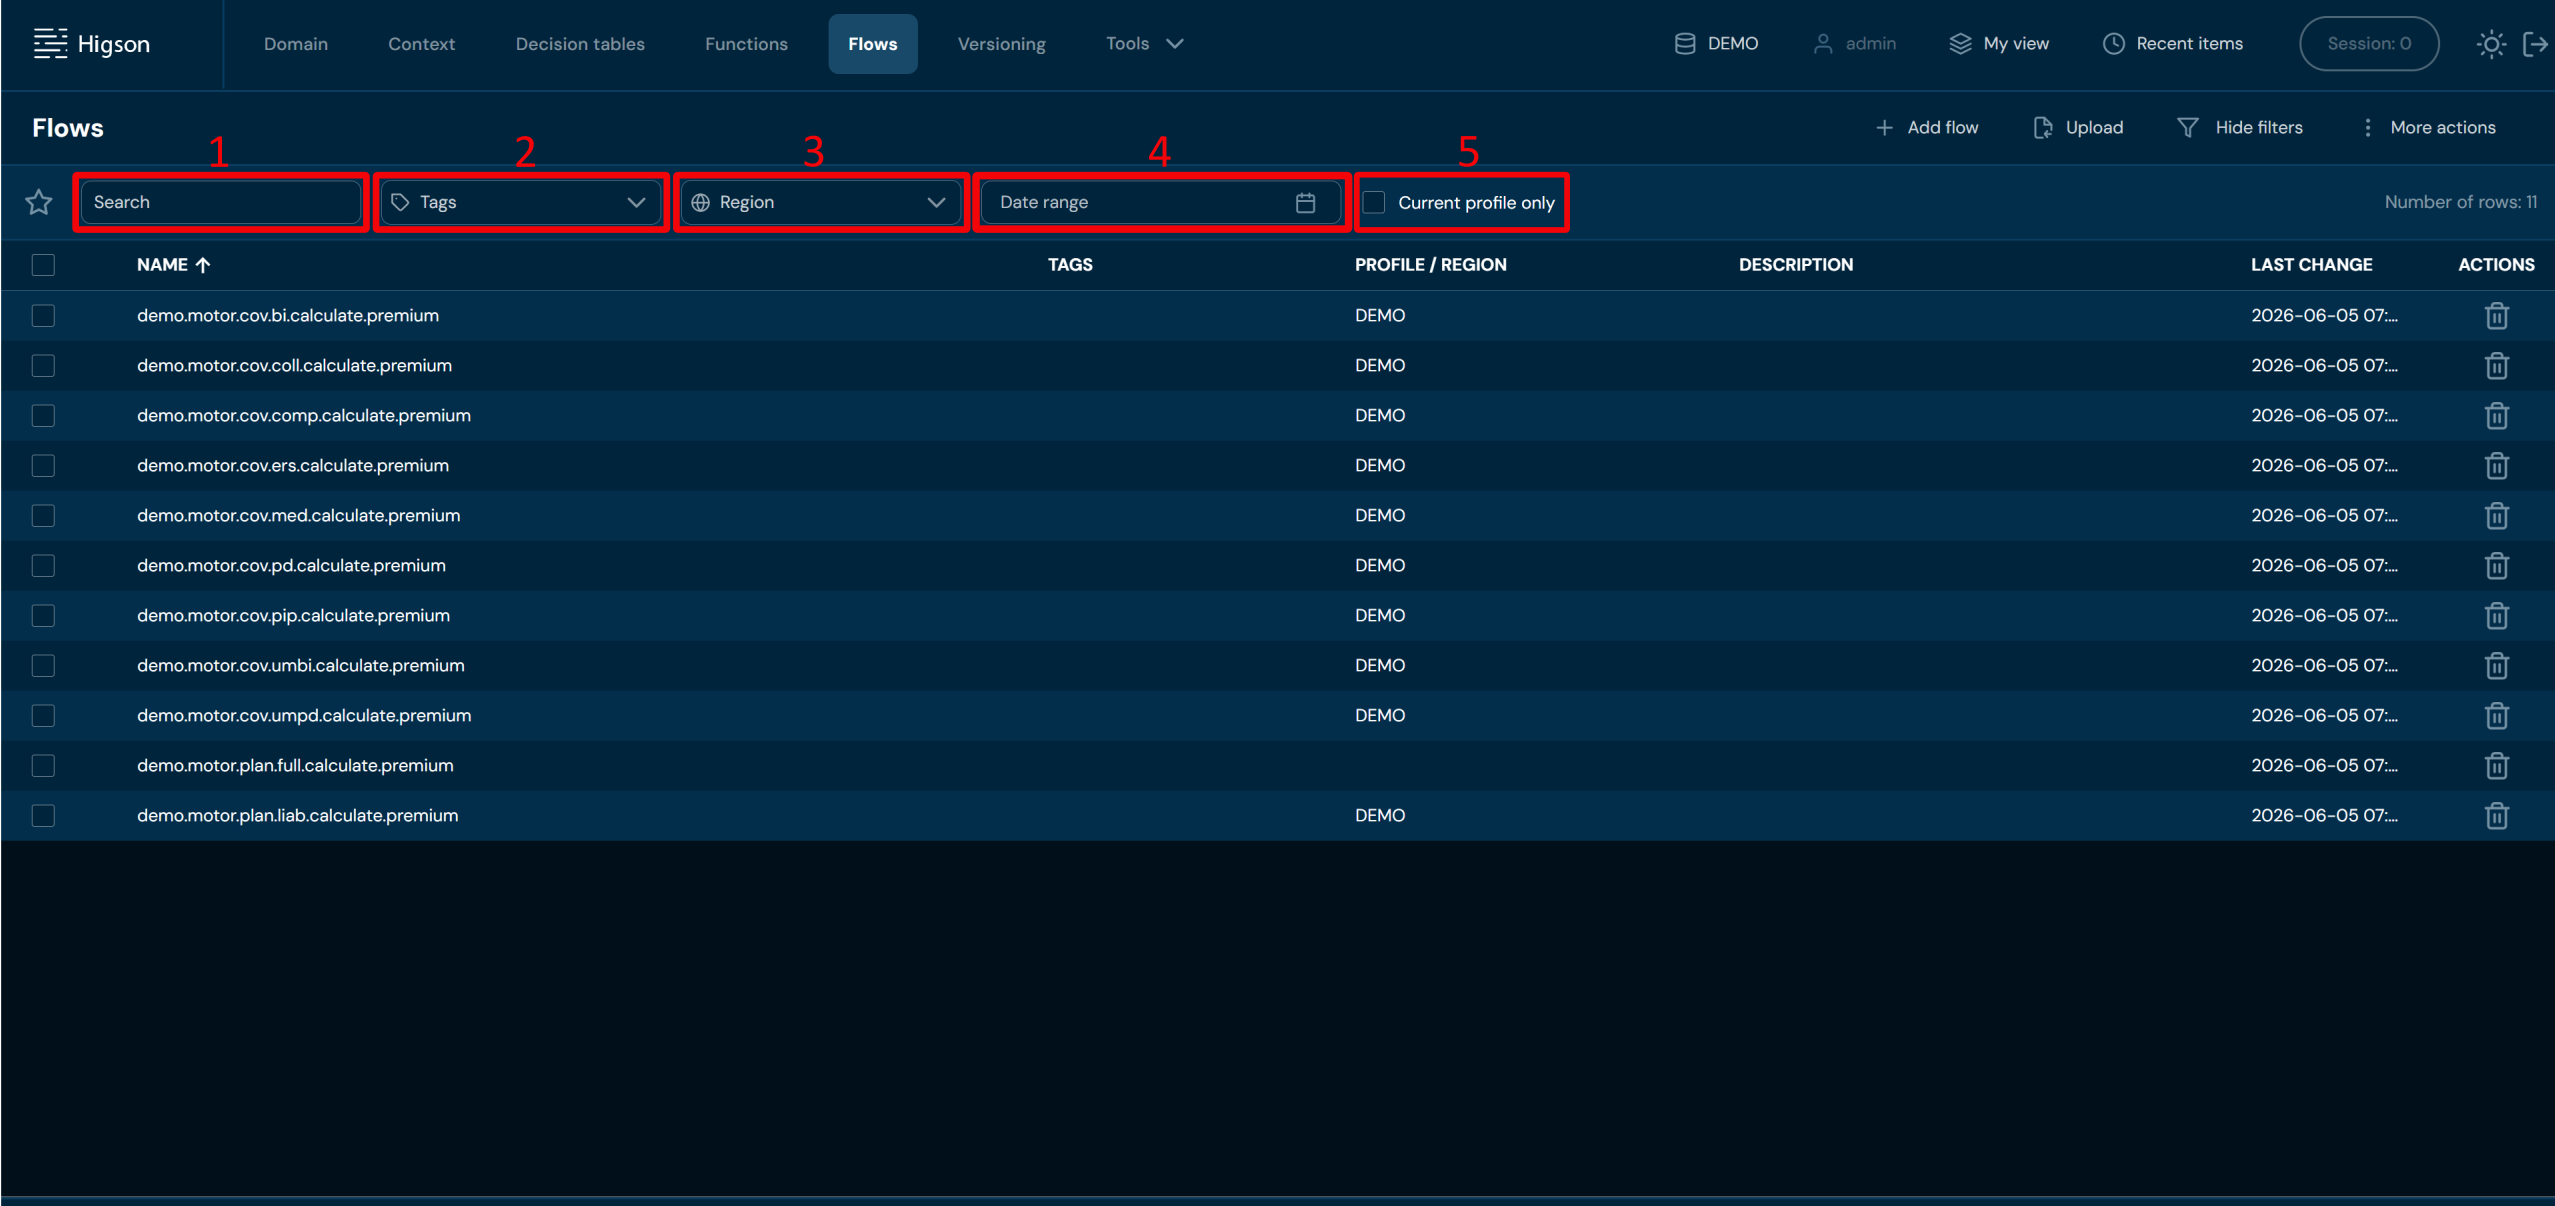
| No. | Filter name | Description |
|---|---|---|
| 1 | Search text field | Filter by any string provided by the user. |
| 2 | Tags | Filter by assigned tags; only tags assigned to at least one flow are visible for selection. |
| 3 | Region | Filter by assigned regions; only regions assigned to at least one flow are visible for selection. |
| 4 | Date range | Filter by last change date in format YYYY/MM/DD - YYYY/MM/DD. |
| 5 | Current profile only | Check this box to limit the view to flows assigned to the currently selected profile. Otherwise, global flows will also be displayed. |
Upload Flow#
If you want to upload flow from ZIP file, follow these steps:
-
Choose Flows on the Main toolbar.
-
Choose Upload in All actions bar.
a. Choosing Upload brings up the Upload screen.
-
Drag & drop desired file or click to upload a file and choose file in File explorer.
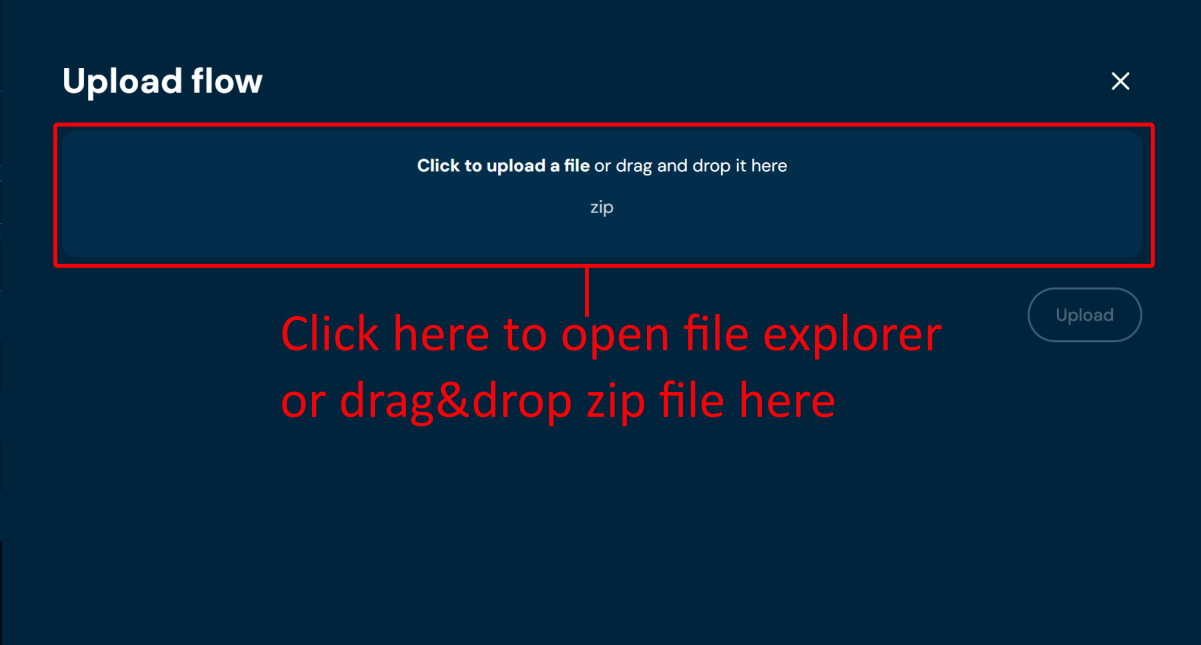
- If the file loads correctly, it may be uploaded to the environment. File will load correctly if there is no file format problem.
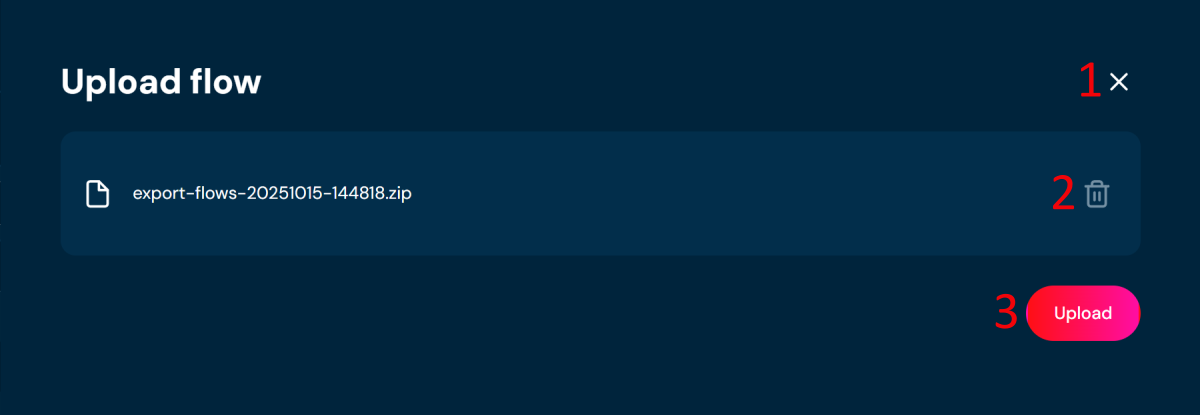
| No. | Button | Description |
|---|---|---|
| 1 | Close | Aborts the upload process. |
| 2 | Delete | Removes the loaded file. When clicked, you will need to provide the file to load for the upload process to be completed. |
| 3 | Upload | Uploads the loaded file to the system. The report of the upload will show. |
-
Click Upload.
-
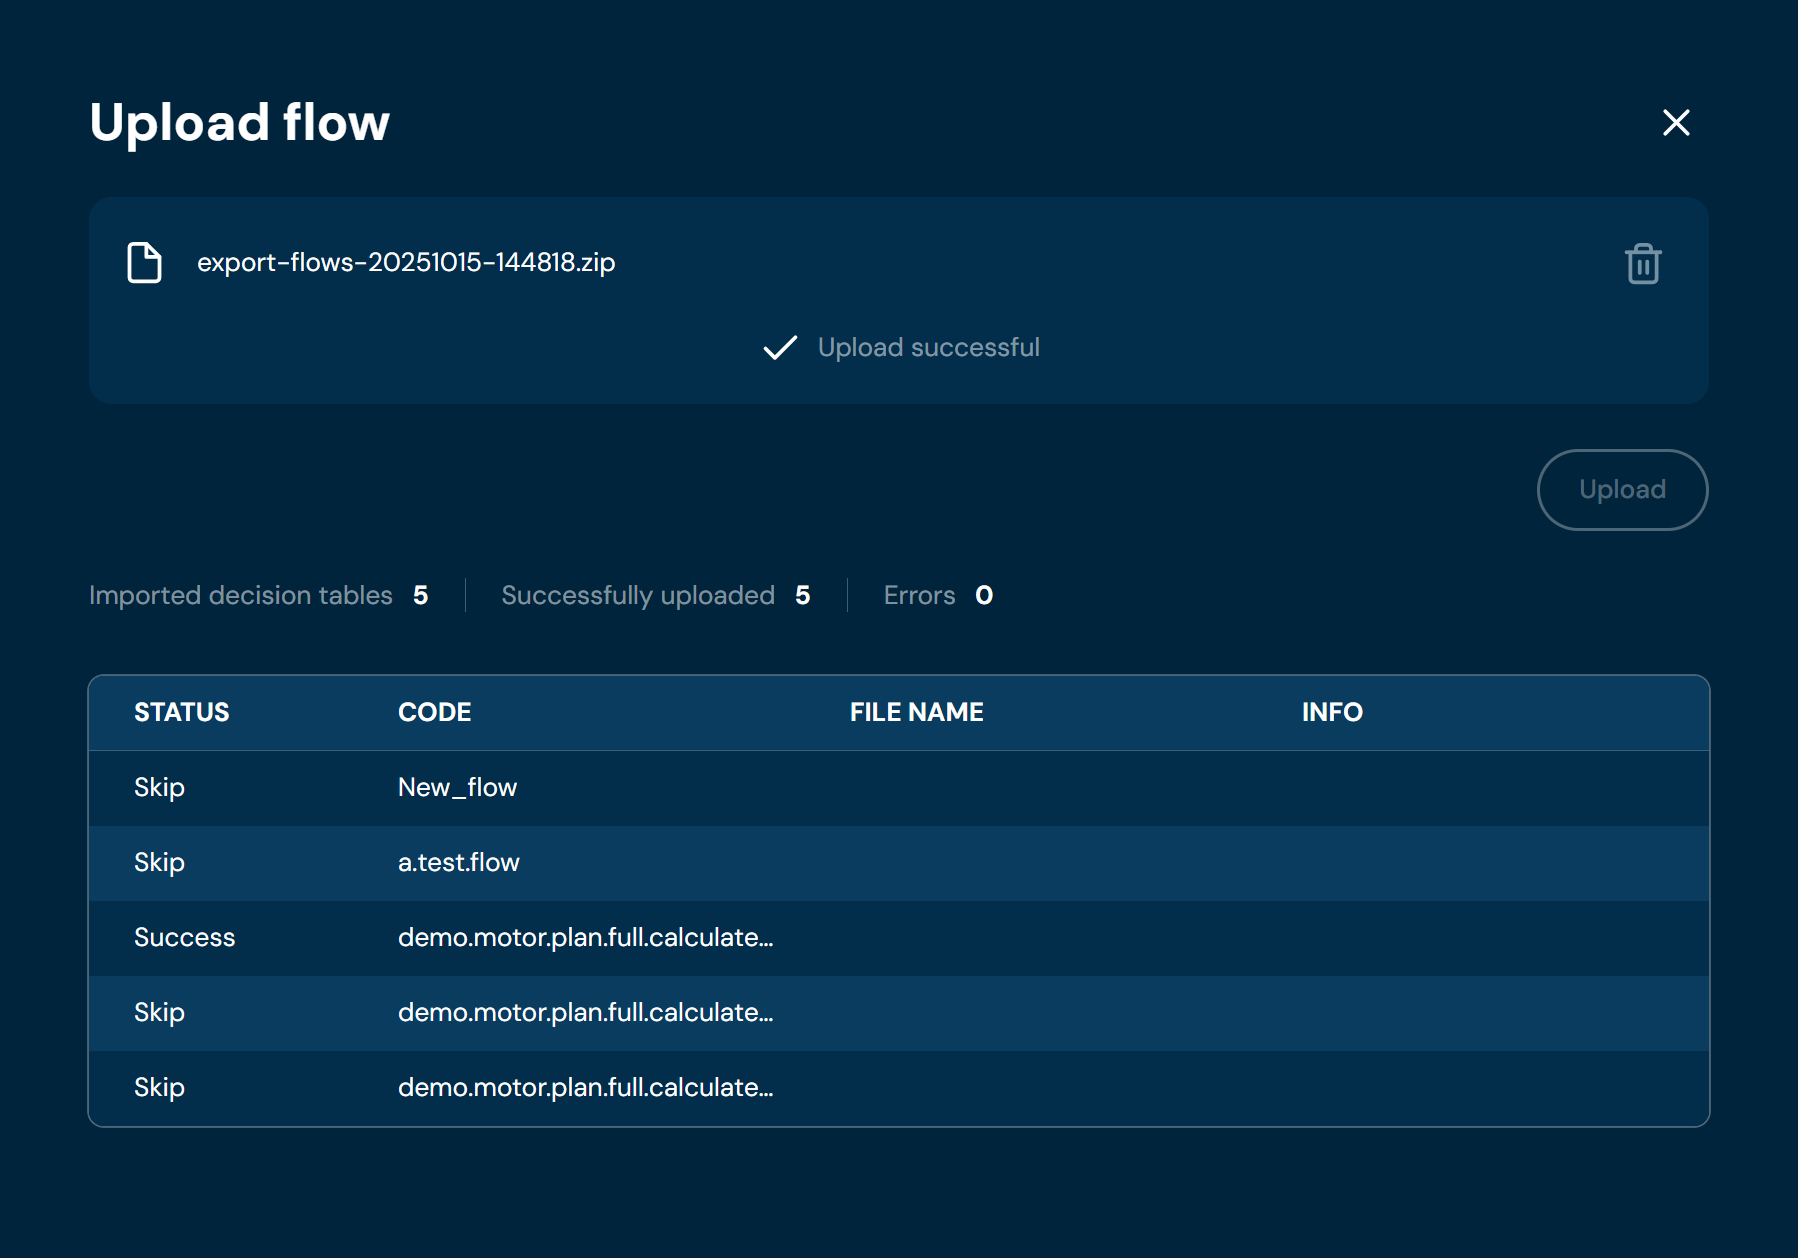
When Upload is completed, you will see message Upload successful and the upload report. It allows you to check if any problems during upload occurred.
Mass Export to XLSx#
If you want to download one or more flow, follow these steps:
-
Choose Flows on the Main toolbar.
-
Select one or more flow.
a. Select the top checkbox to select all flows in the view, or select individual checkboxes to select one or multiple flows.
-
From drop-down menu More actions choose Mass export to XLSx.
a. If action Mass export to XLSx is greyed out, it means that no flow has been selected.
b. Choosing Mass export to XLSx downloads a ZIP file that contains json files with flows body (one file per flow) and XLSX file with flows details.

Assign Profile#
If you want to assign a profile to one or more flows, follow these steps:
-
Select Flows from the Main toolbar.
-
Select the flows without an assigned profile by checking the boxes on the left side of the list.
-
From the More Actions drop-down menu, choose Assign Profile.
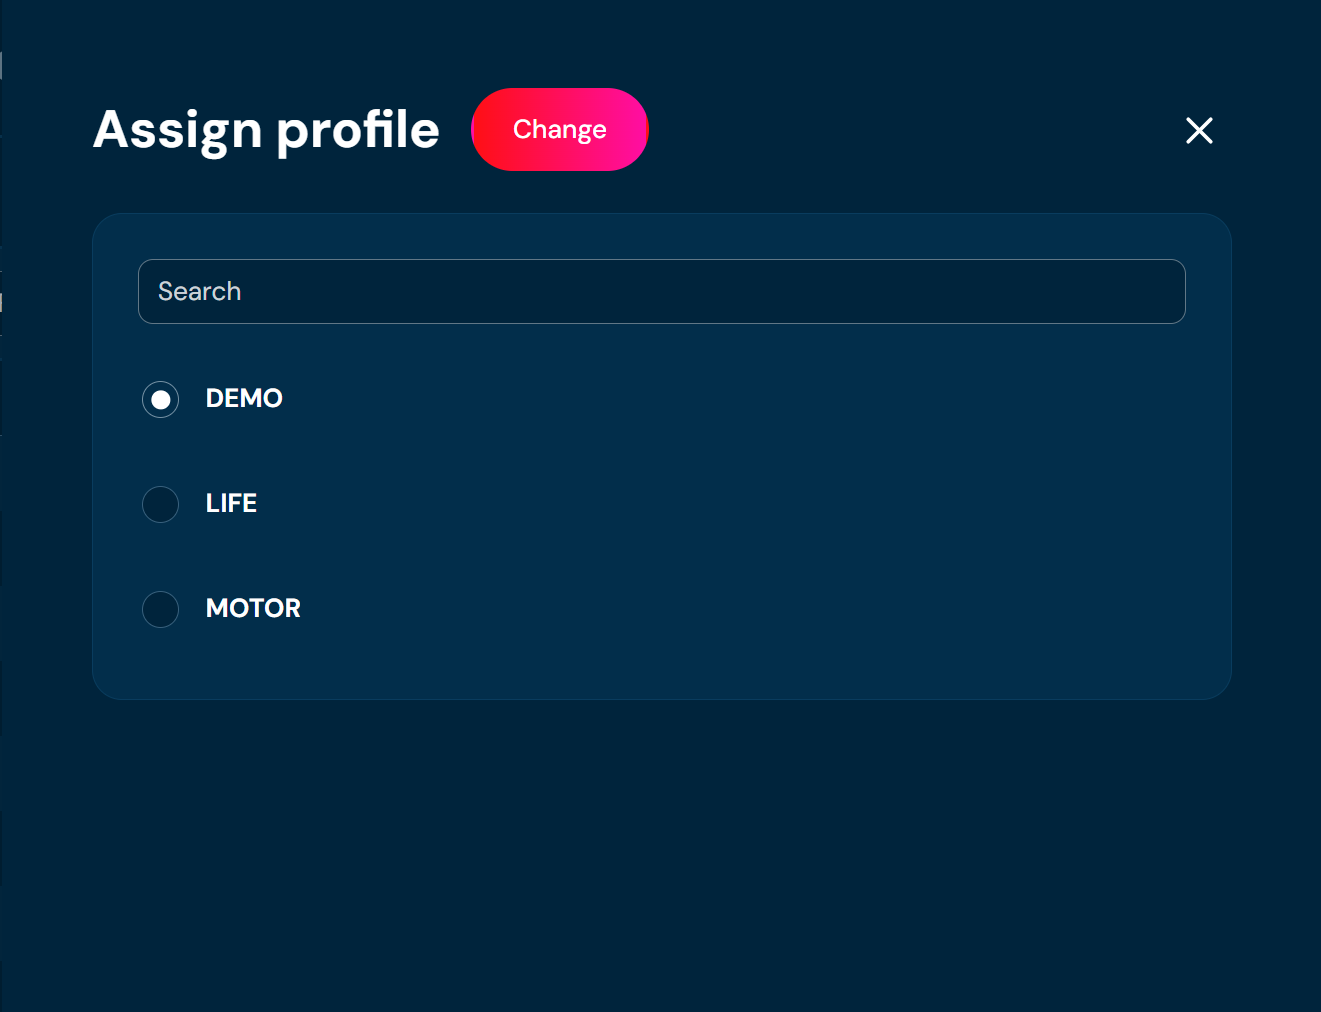
a. Selecting Assign Profile opens the Assign Profile screen.
-
Select the profile to which you want to assign the flow and confirm by clicking Change.
On the flows list view, a profile entry will appear for the assigned flows. The view will also be updated to reflect the selected profile.
Make Global#
If you want to detach one or more flows from a profile, follow these steps:
-
Select Flows from the Main toolbar.
-
Select the flows with an assigned profile by checking the boxes on the left side of the list.
-
From the More Actions drop-down menu, choose Make Global.
a. A confirmation pop-up will appear.
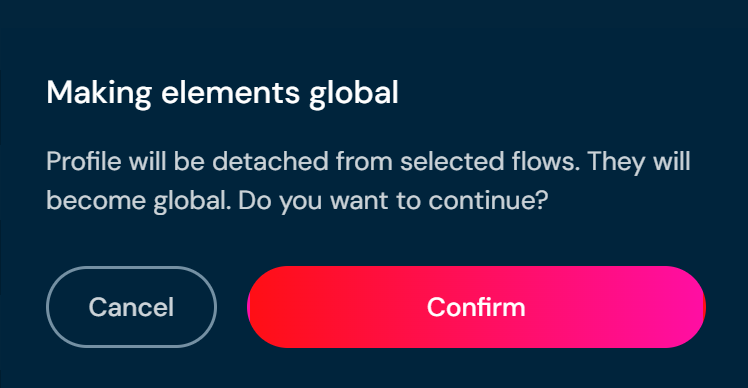
- Click Confirm.
On the flows list view, the profile entry will disappear for the selected flows. The view will also be updated to global.
Add Region#
To attach a flow to a region, flow must first be assigned to a profile. A region belongs to a profile.
If you want to add a region to one or more flows, follow these steps:
-
Choose Flows on the Main toolbar.
-
Select one or more flow without a Region.
a. Select the top checkbox to select all flows in the view, or select individual checkboxes to select one or multiple flows.
-
From drop-down menu More actions choose Add region.
a. If action Add region is greyed out, it means that no flow has been selected or selected flows already have region attached.
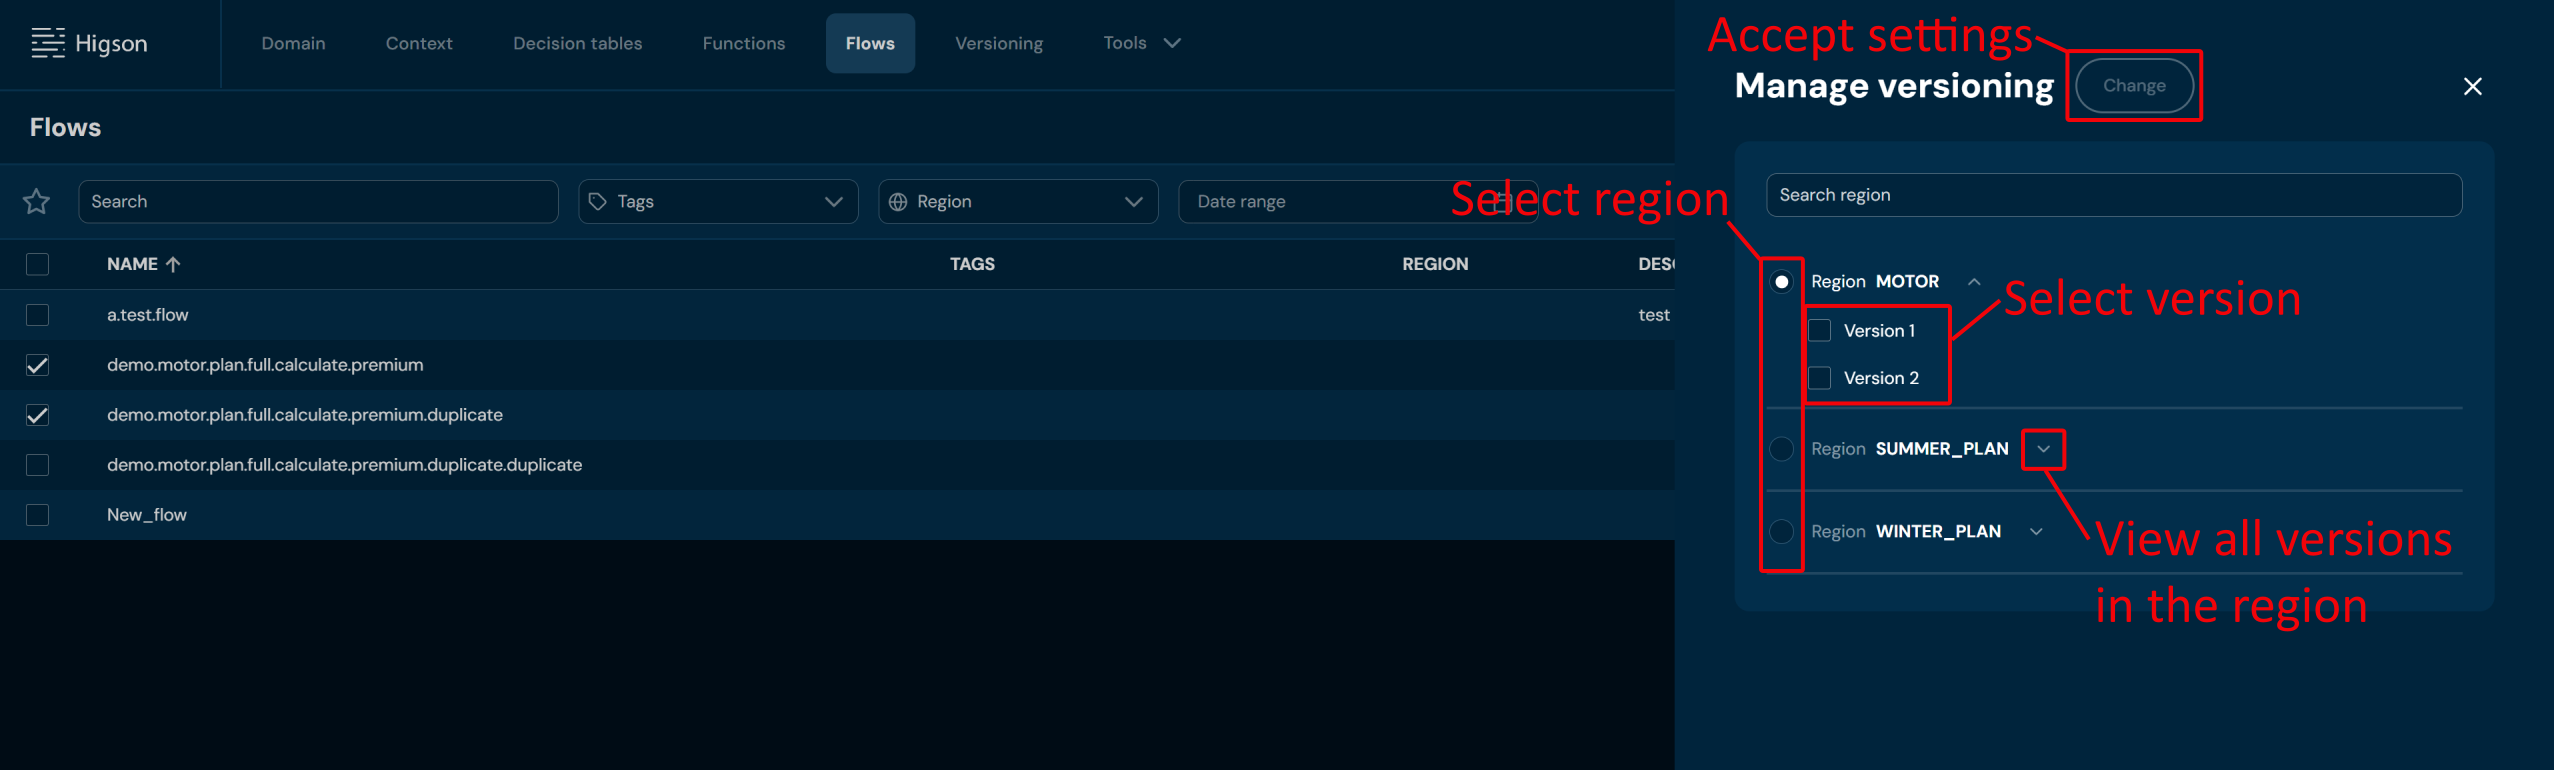
b. Choosing Add region brings up the Manage versioning screen.
-
Select Region and one or more Version.
-
Choose Change to save settings.
a. Region is being assigned to all flows selected in Step 2.
Delete Region#
If you want to remove region from one or more flows, follow these steps:
-
Choose Flows on the Main toolbar.
-
Select one or more flows with a Region assigned.
a. Select the top checkbox to select all flows in the view, or select individual checkboxes to select one or multiple flows.
-
From drop-down menu More actions choose Delete region.
a. If action Delete region is greyed out, it means that no flow has been selected or the selected flows does not have assigned any region.
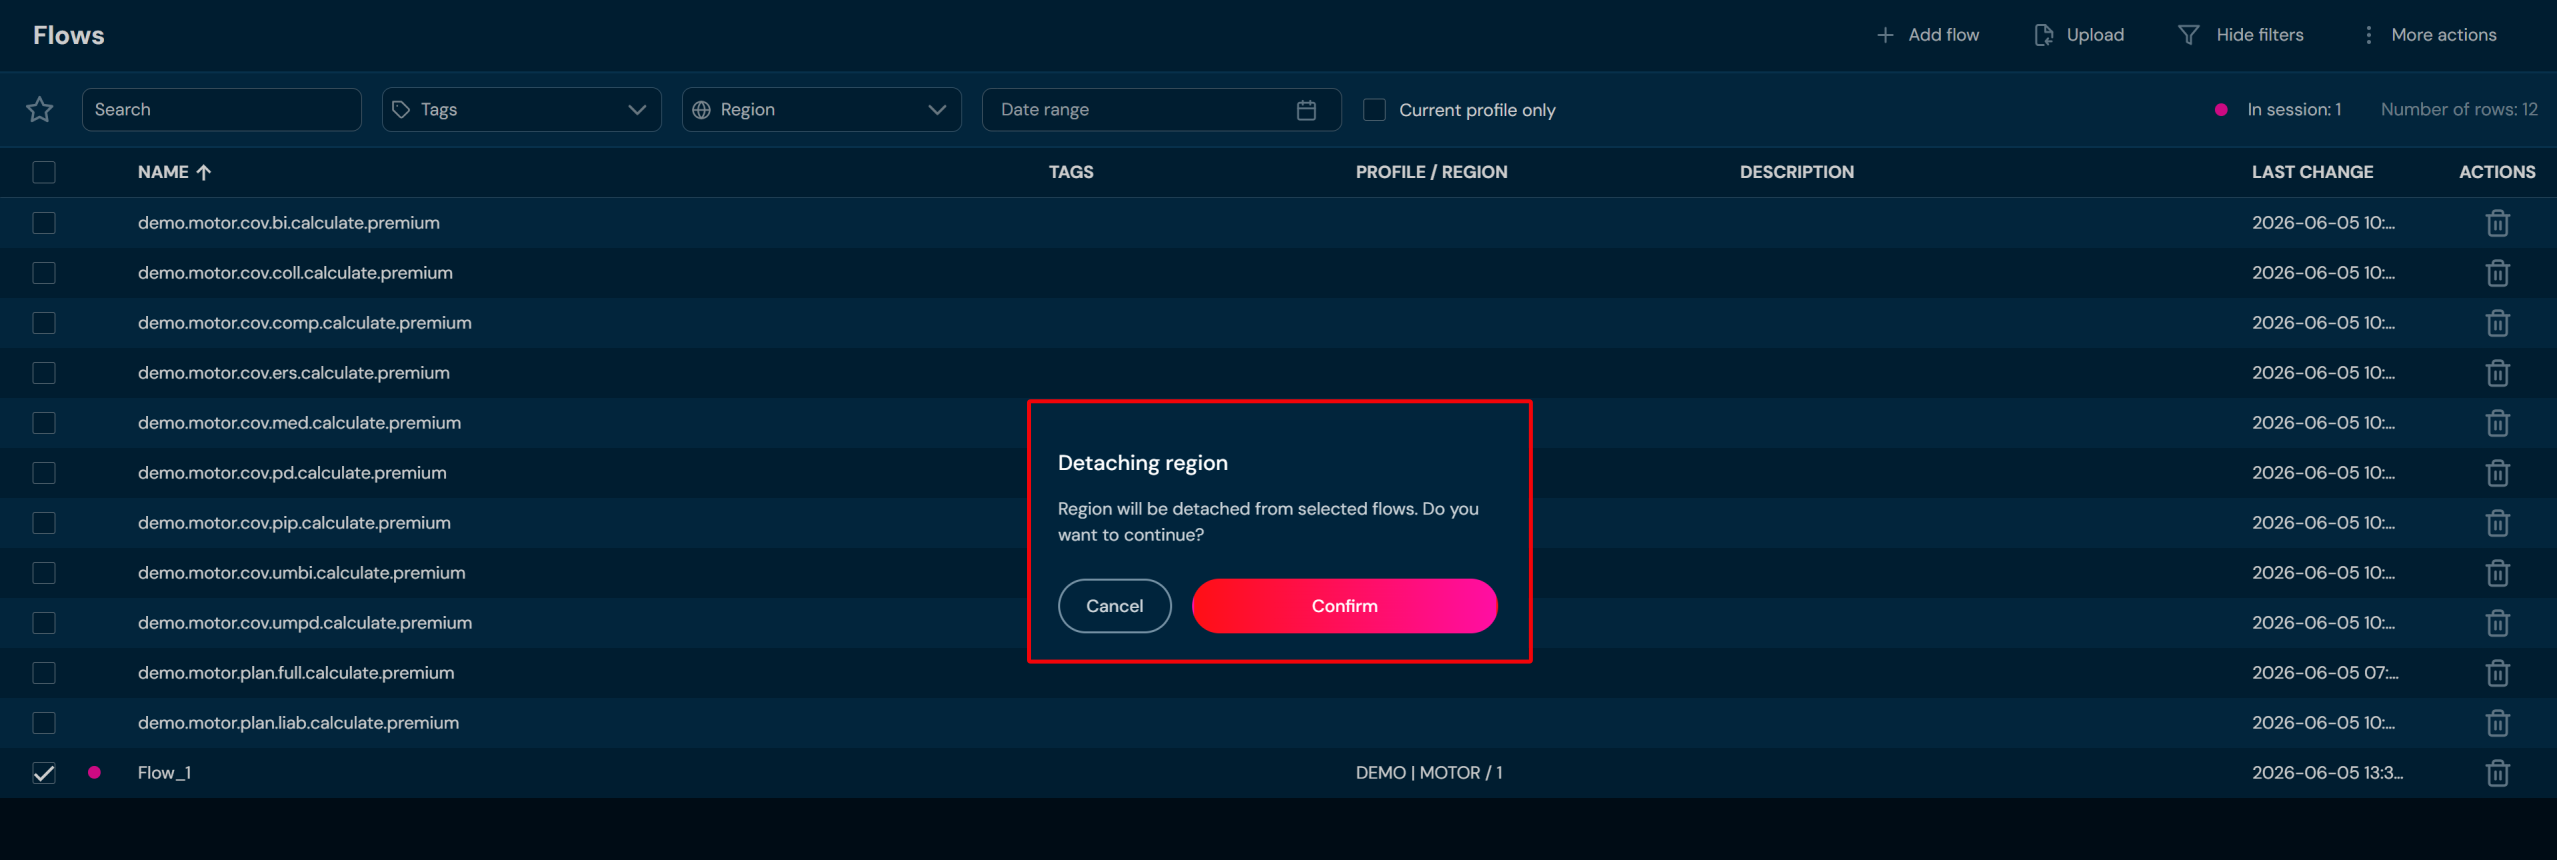
b. After choosing Delete region action, confirmation pop-up will appear.
-
Choose Confirm.
a. Regions are being removed from all selected flows.
Manage Tags#
If you want to manage tags for one or more flows, follow these steps:
- Select the Flows on the Main toolbar.
- Select one or more flows.
- From the More Actions drop-down menu, select Manage Tags.
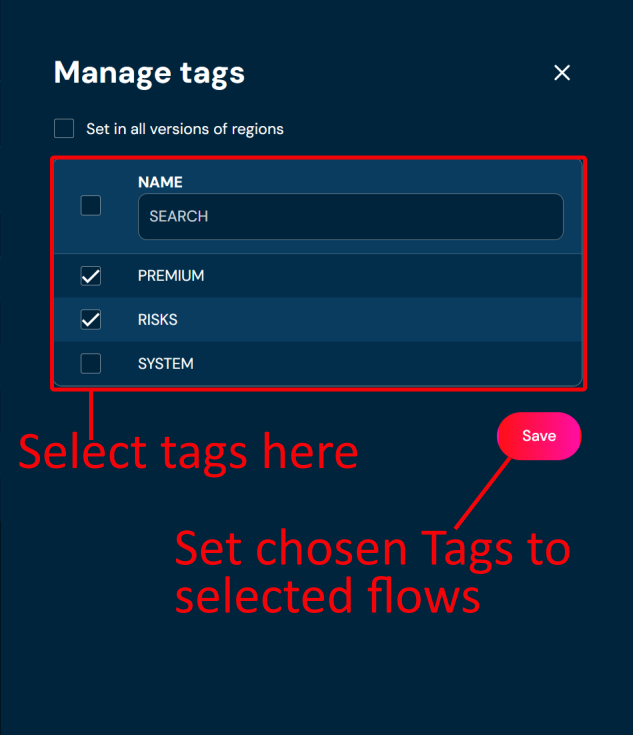
- Select the tags you are interested in and click Save.
Delete Flow#
If you want to delete one or more flow, follow the steps below:
-
Choose Flows on the Main toolbar.
-
Select one or more flows.
a. Select the top checkbox to select all flows in the view, or select individual checkboxes to select one or multiple flows.
-
From the drop-down menu More actions choose Delete.
a. If action Delete is greyed out, it means that no flow has been selected.
b. After choosing Delete action, confirmation pop-up will appear.
-
Choose Confirm.
a. All selected flows are deleted from the environment.
Add Flow#
If you want to add Flow follow these steps:
-
Choose Flows on the Main toolbar.
-
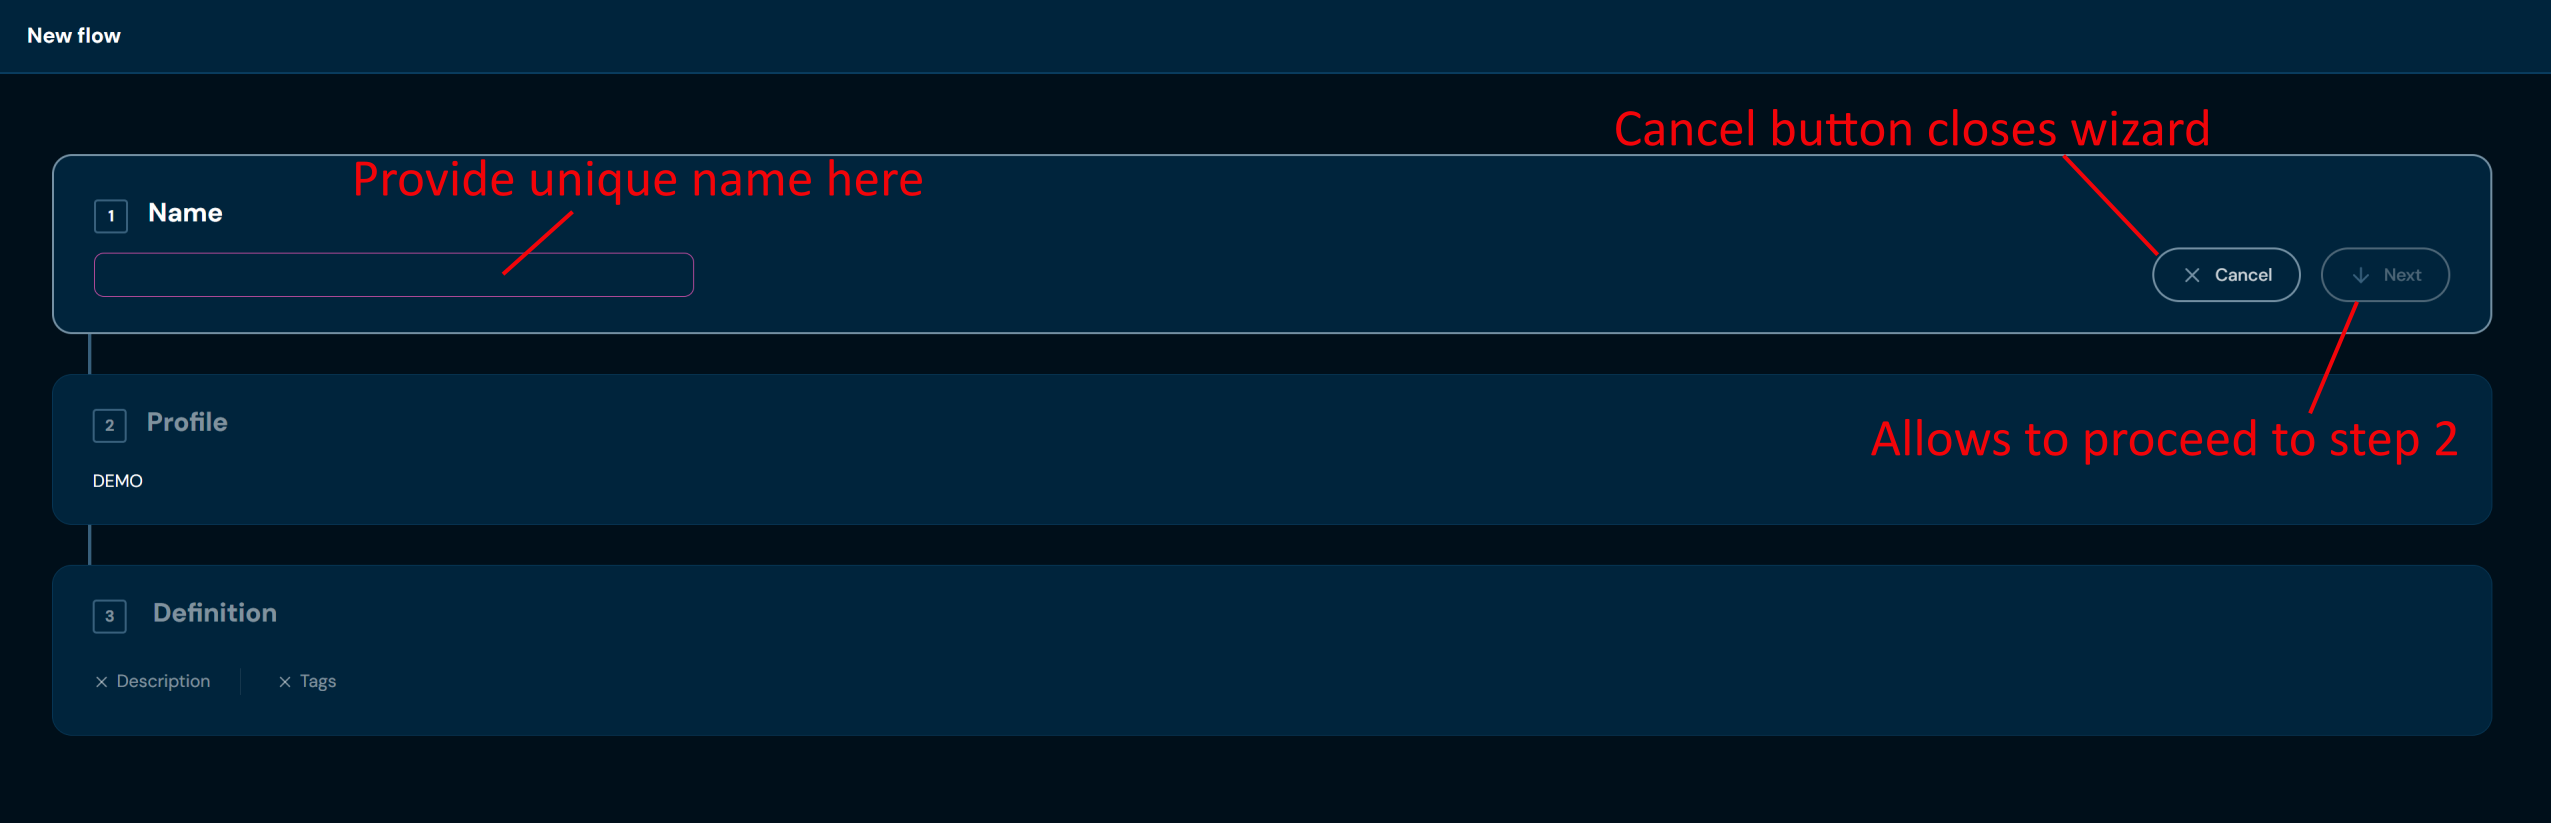
Choose Add flow in All actions bar. Choosing Add flow opens a step-by-step wizard.
-
In step 1. Name, you need to provide a unique flow code/name. Name can contain only characters from collection a-z; 0-9; “.”; “-”; “_” and it can’t start with “-”.
a. If you changed your mind and don’t want to create a new flow, you can choose Cancel in step 1. Name.
-
Select Next.
-
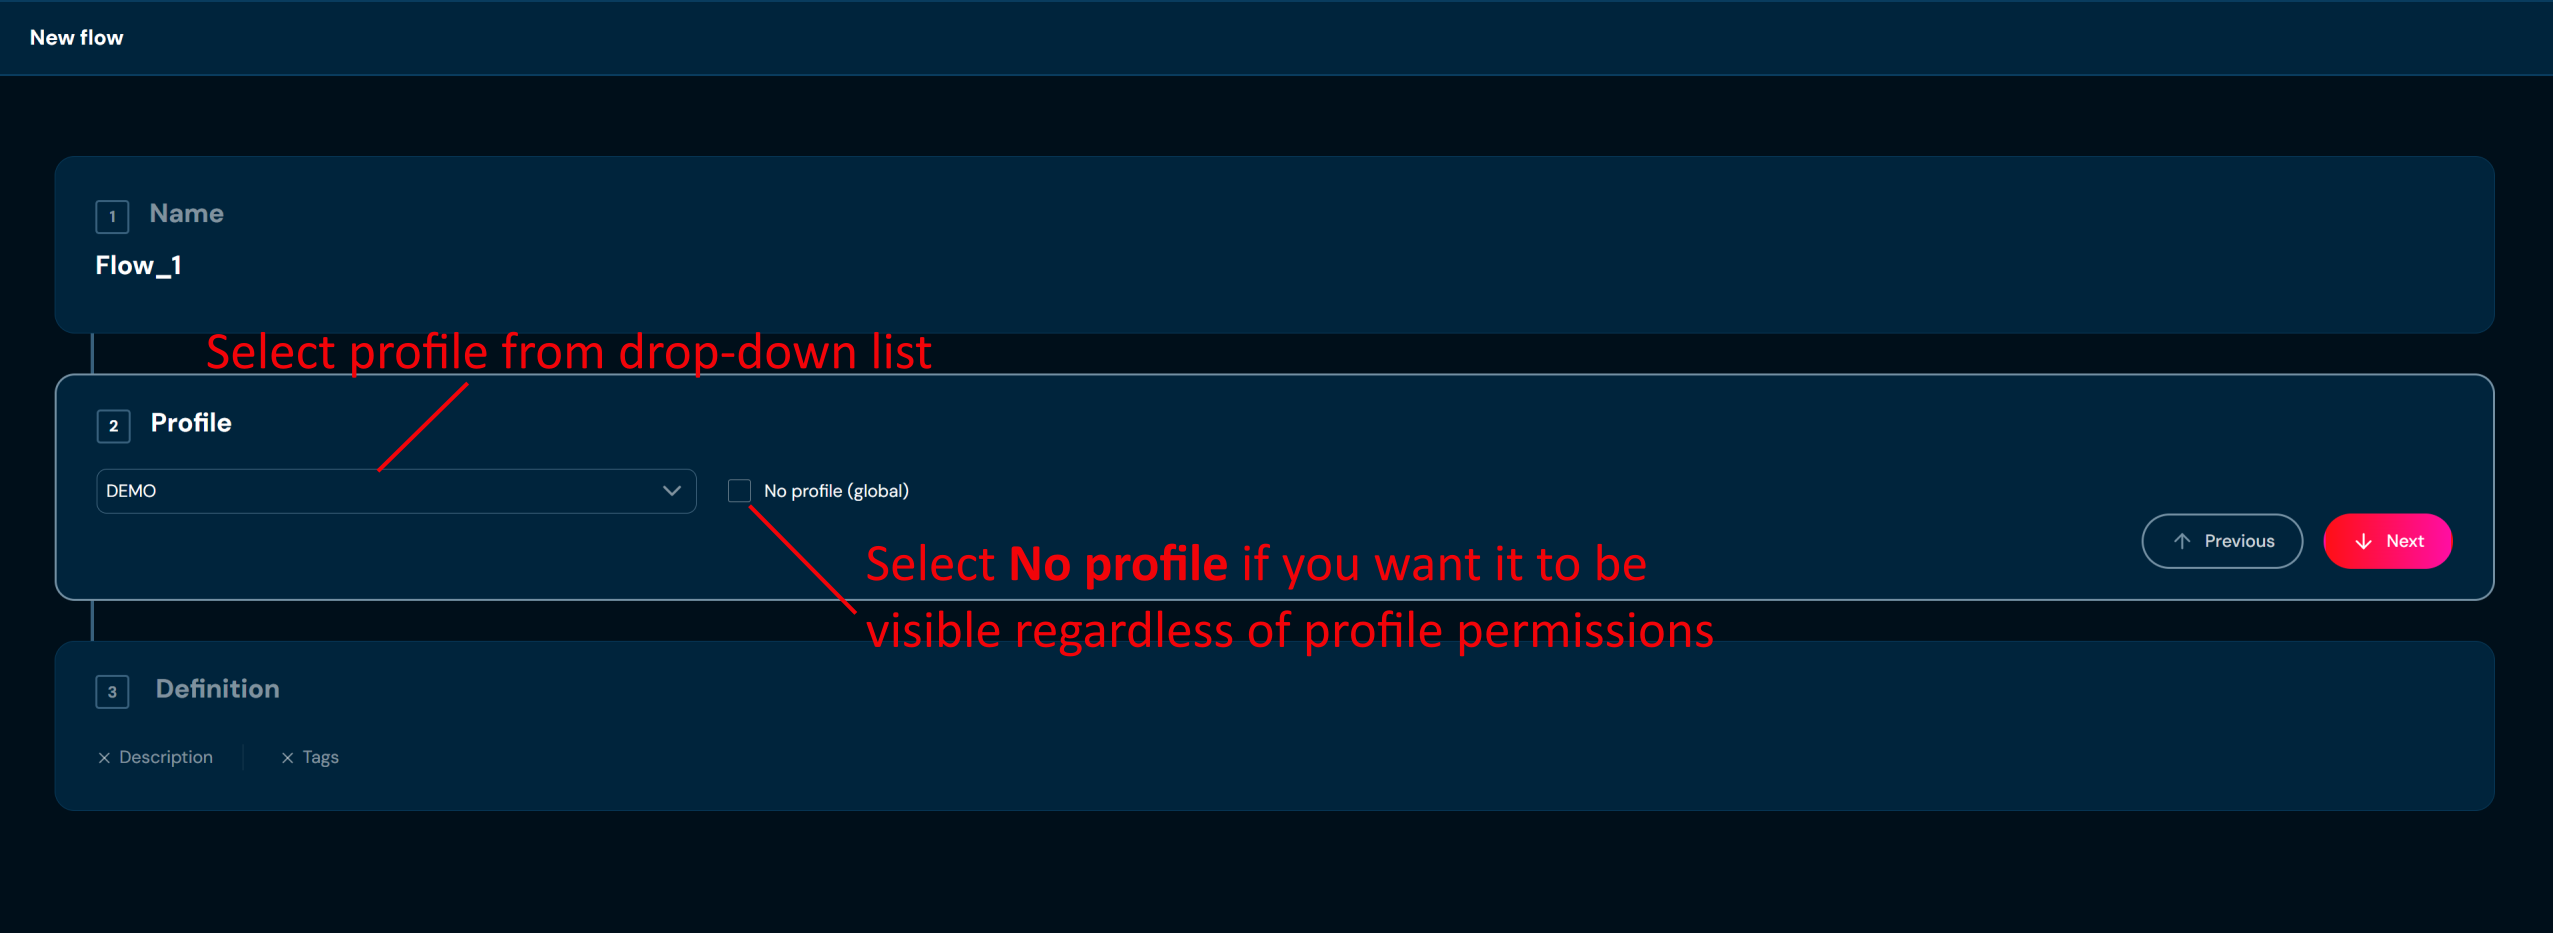
In step 2. Profile you may assign the flow to a profile by selecting a profile from the drop-down list, or create a global flow by checking No profile (global). Assigning the flow to a profile will ensure that only users with permissions for that profile can access it. Global flows are visible regardless of profile permissions.
- In step 3. Definition you may optionally add a description and assign tags.
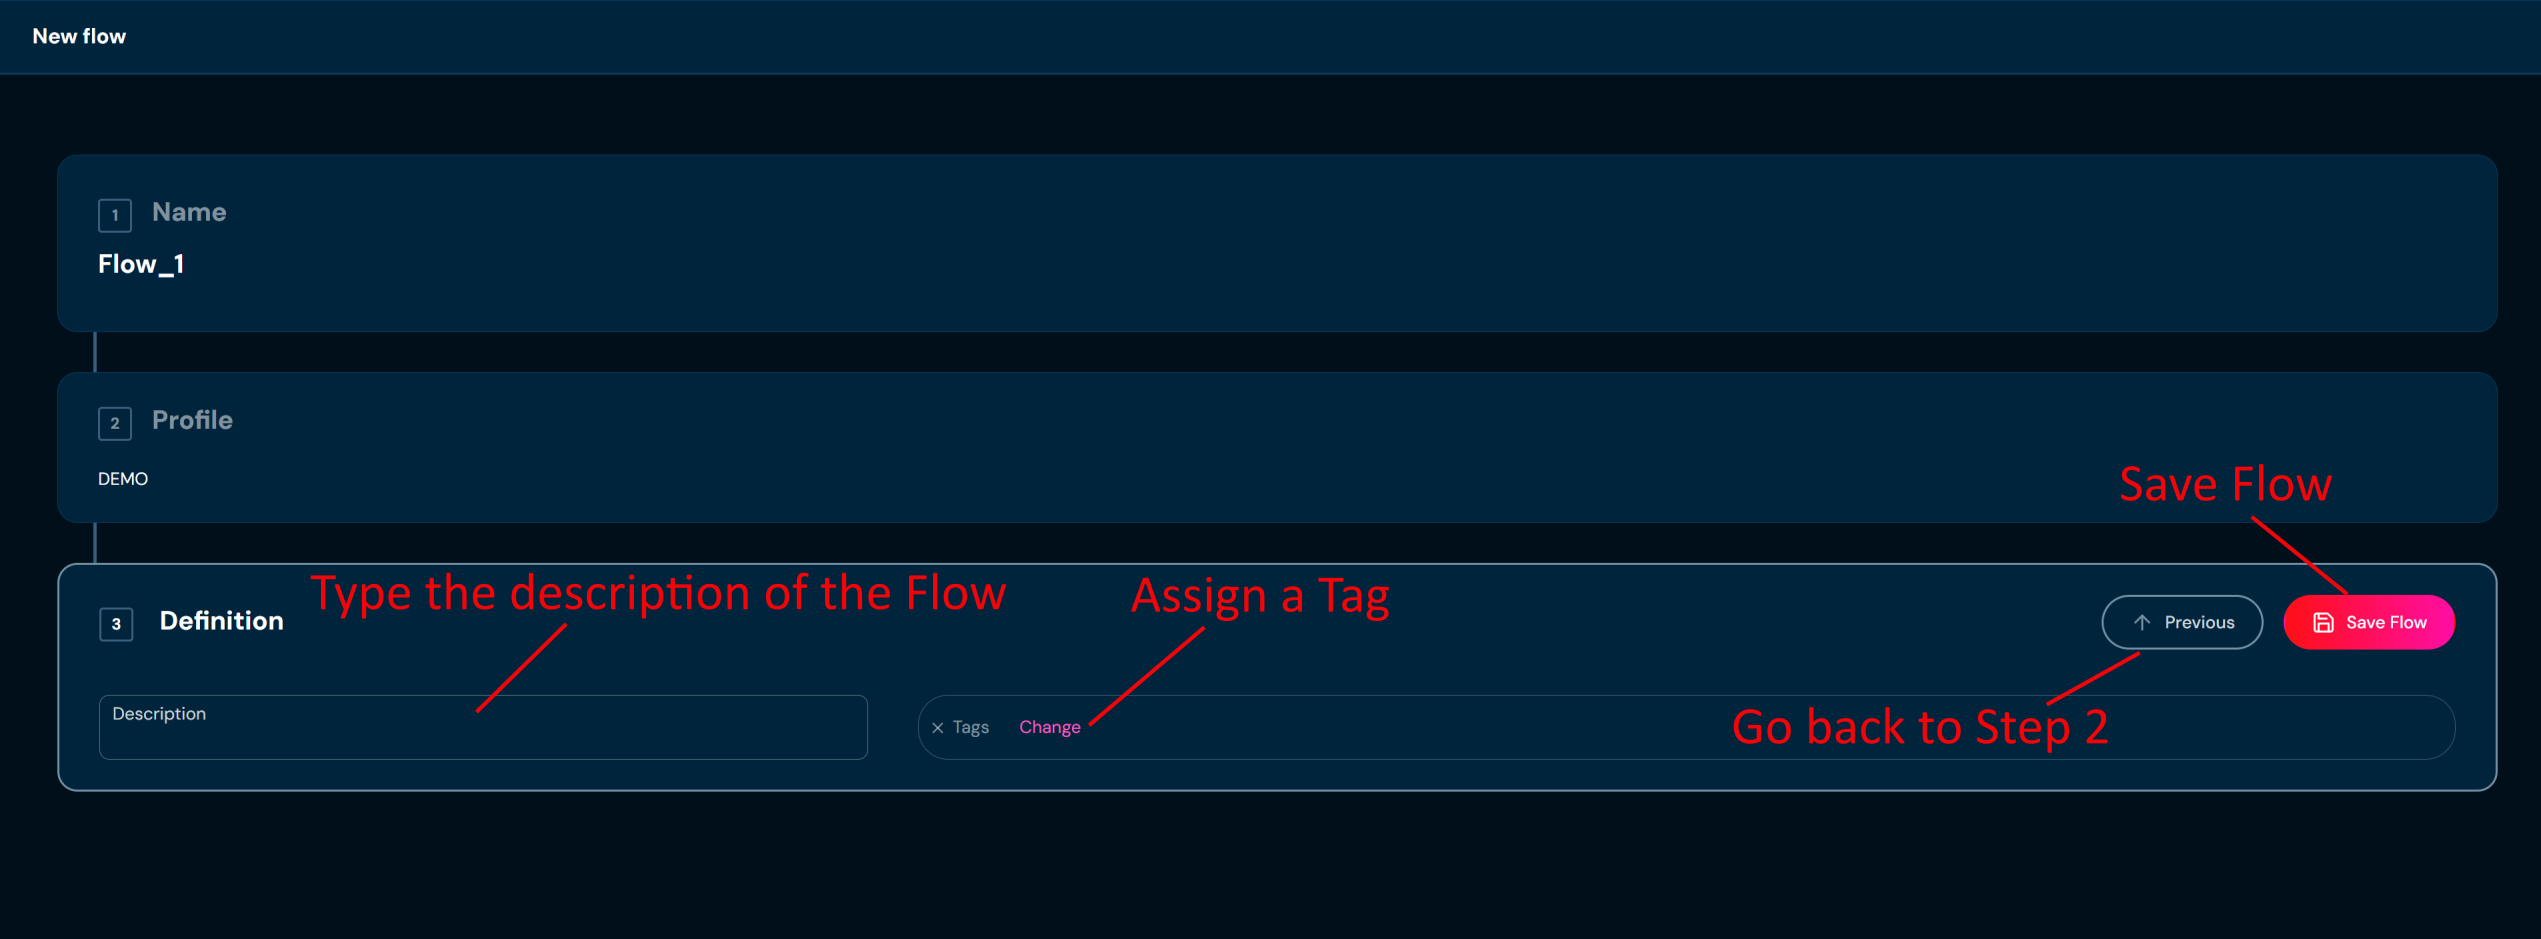
- Save the flow
After saving the flow, you are redirected to the flow details view.
Flow Details Screen#
You can access Flow details by left-clicking on the specific flow in the List of all flows. Flow details screen contains all information about the flow, its Description, assigned Region/Tags, flows body, arguments and variables.
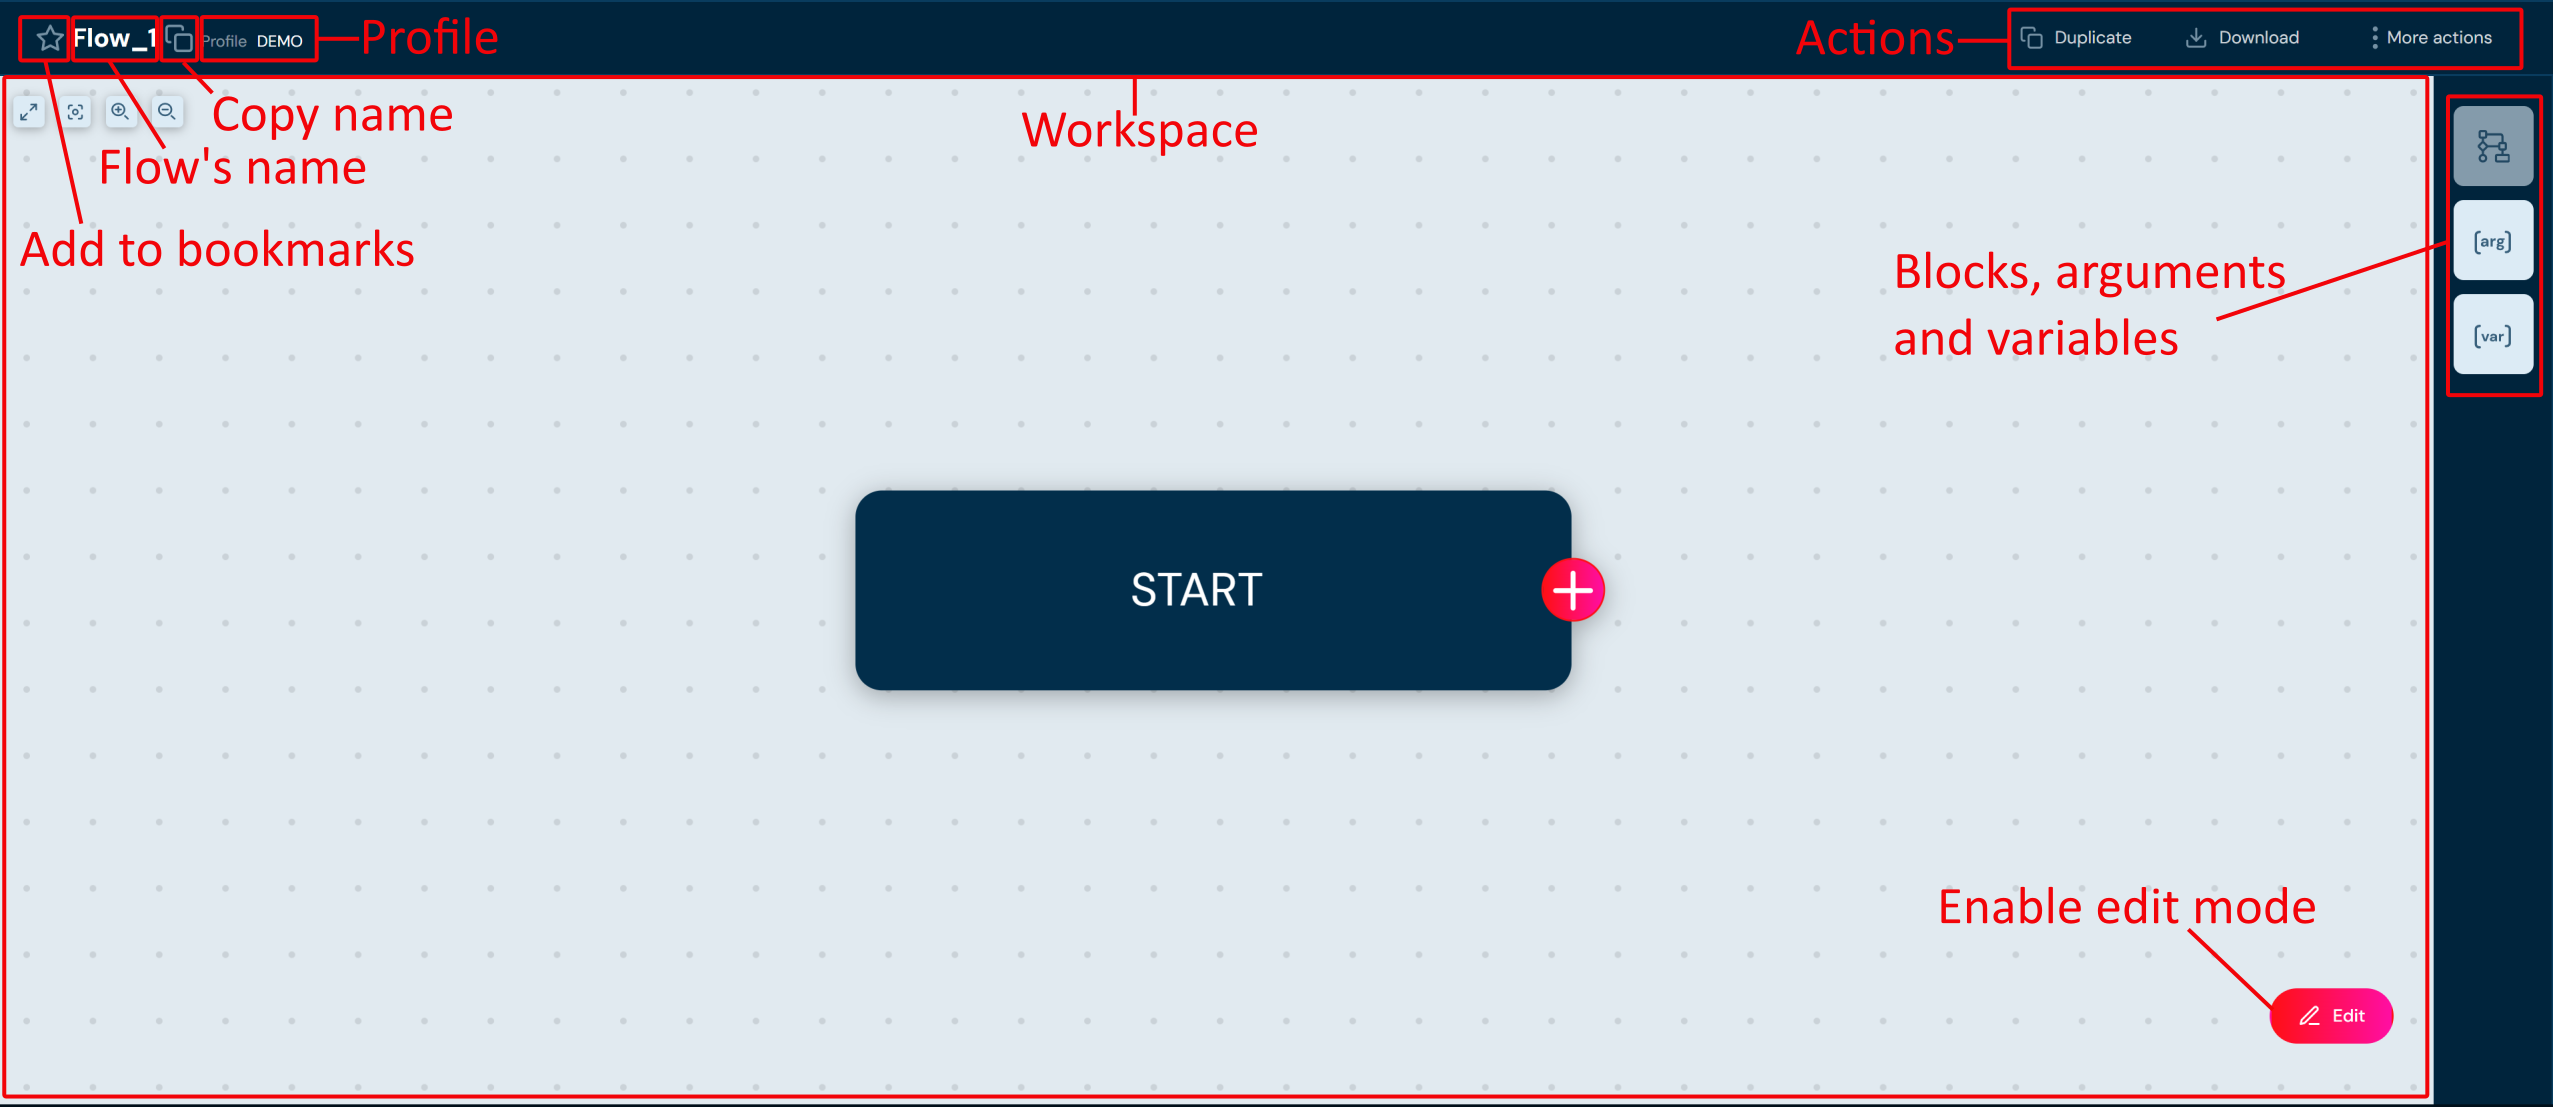
On the flow details screen following actions are available:
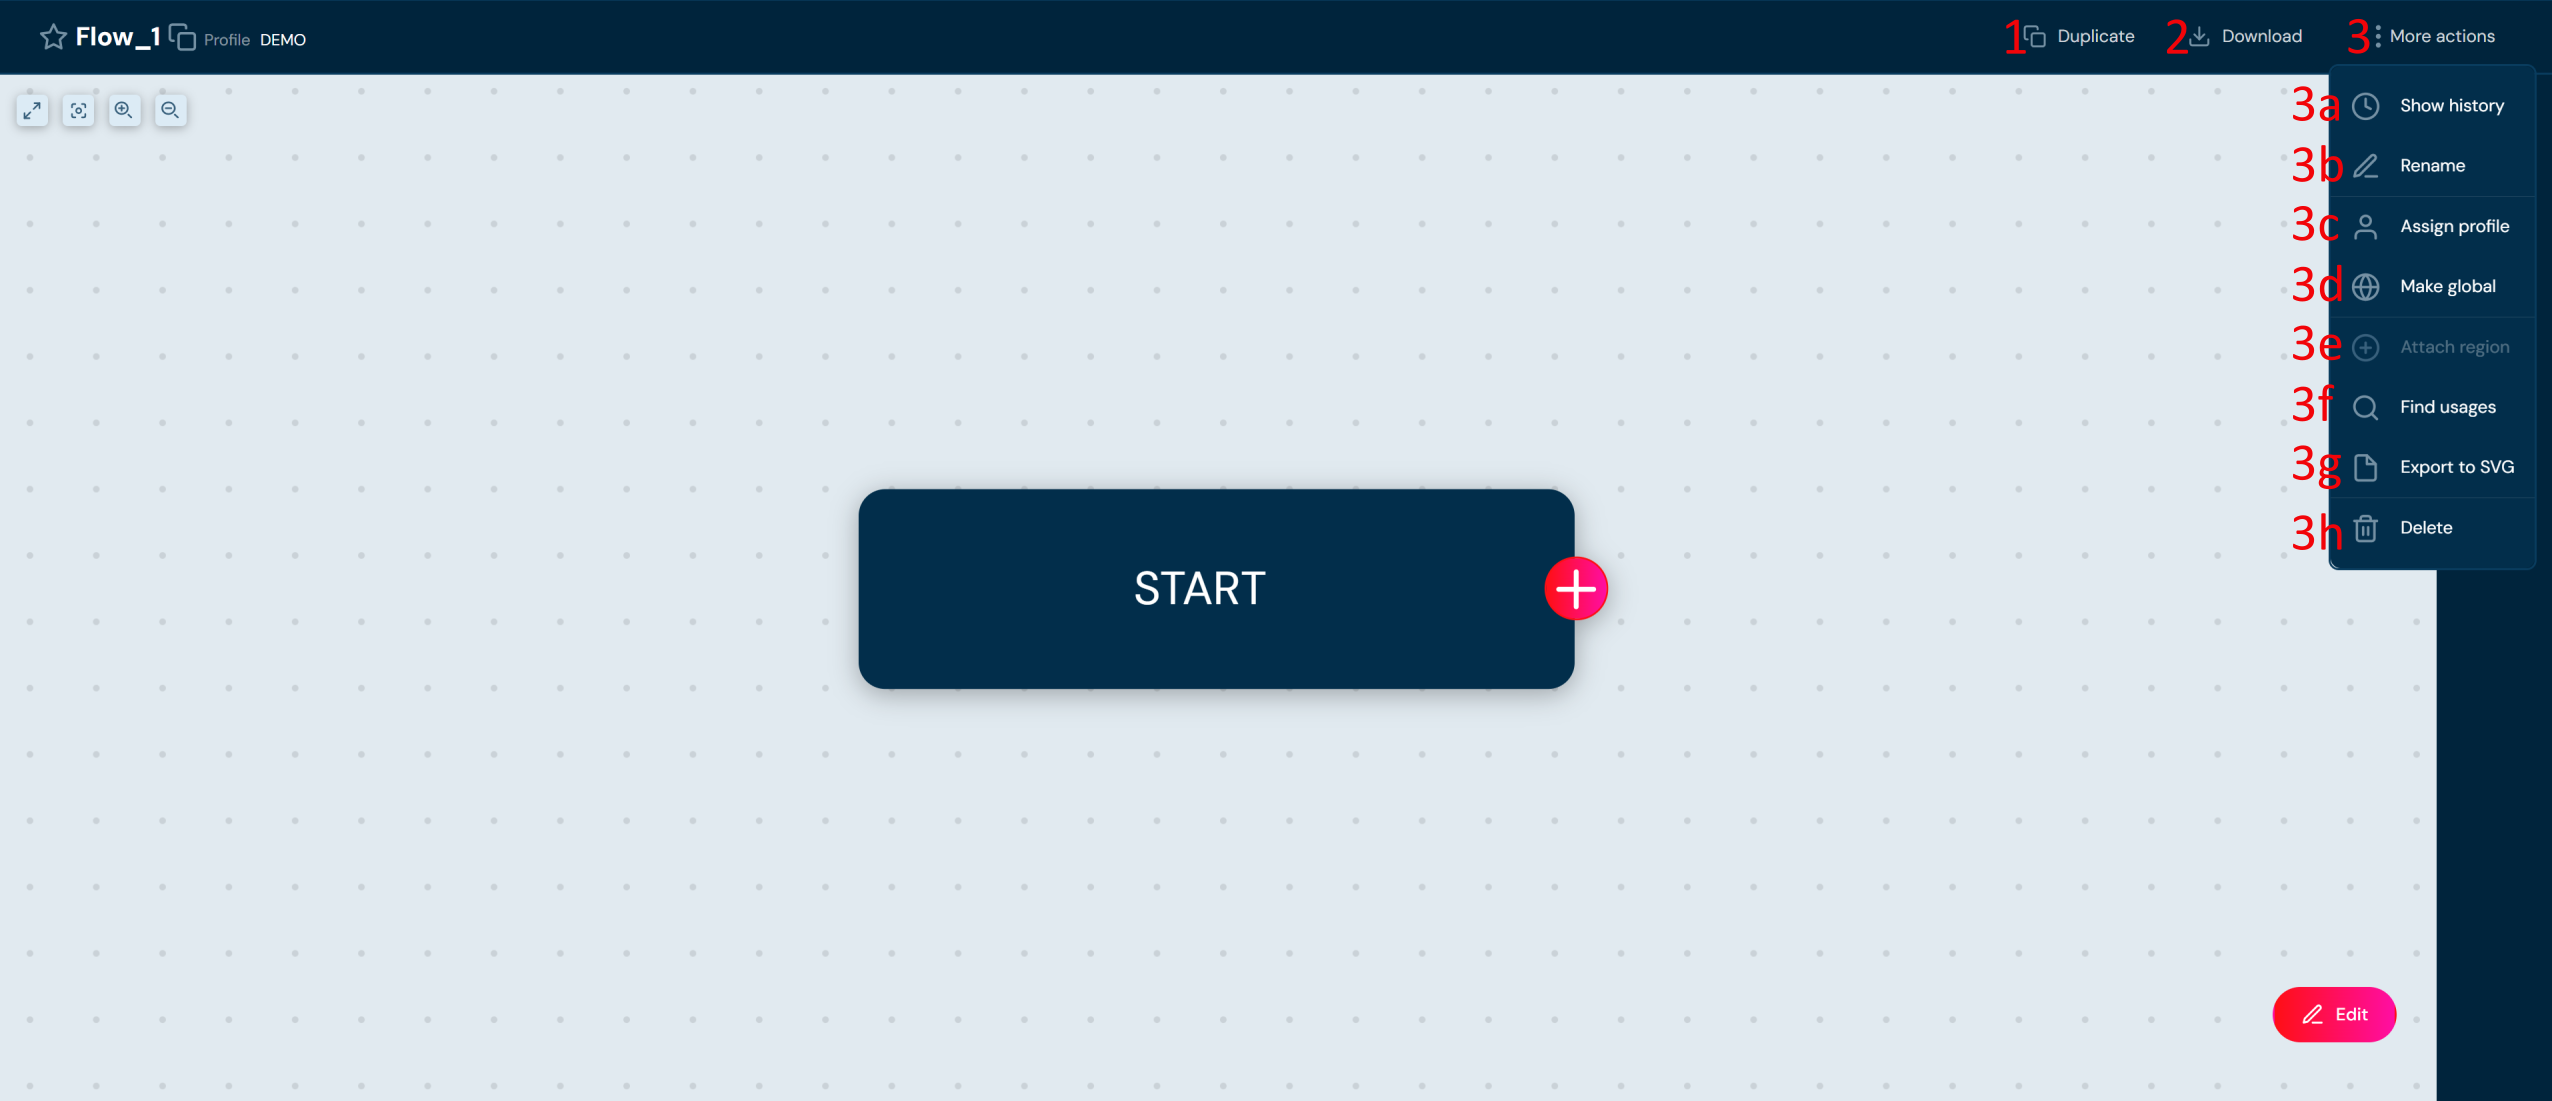
| No. | Action | Description |
|---|---|---|
| 1 | Duplicate | Allows to duplicate the flow. |
| 2 | Download | Allows to download flow to a zip file. |
| 3 | More actions | The drop-down menu that contains actions 3a–3h. |
| 3a | Show history | Allows to view archive versions of the flow. |
| 3b | Rename | Allows to change the name of the flow. |
| 3c | Assign profile | Assigns the flow to a profile. Assigning the flow to a profile will ensure that only users with permissions for that profile can access it. |
| 3d | Make global | Makes the flow global. Global flows are visible regardless of profile permissions. |
| 3e | Attach/Detach region | Allows to attach/detach region and version to the flow. |
| 3f | Find usages | Redirects you to Find usages search where you may find every reference to that flow. |
| 3g | Export to SVG | Allows to export the body of the flow to an SVG file. |
| 3h | Delete | Action removes the flow. |
Edit Flow#
To edit the body of the flow, go to the flow details view and select Edit, to turn on edit mode. In edit mode additional actions are available.
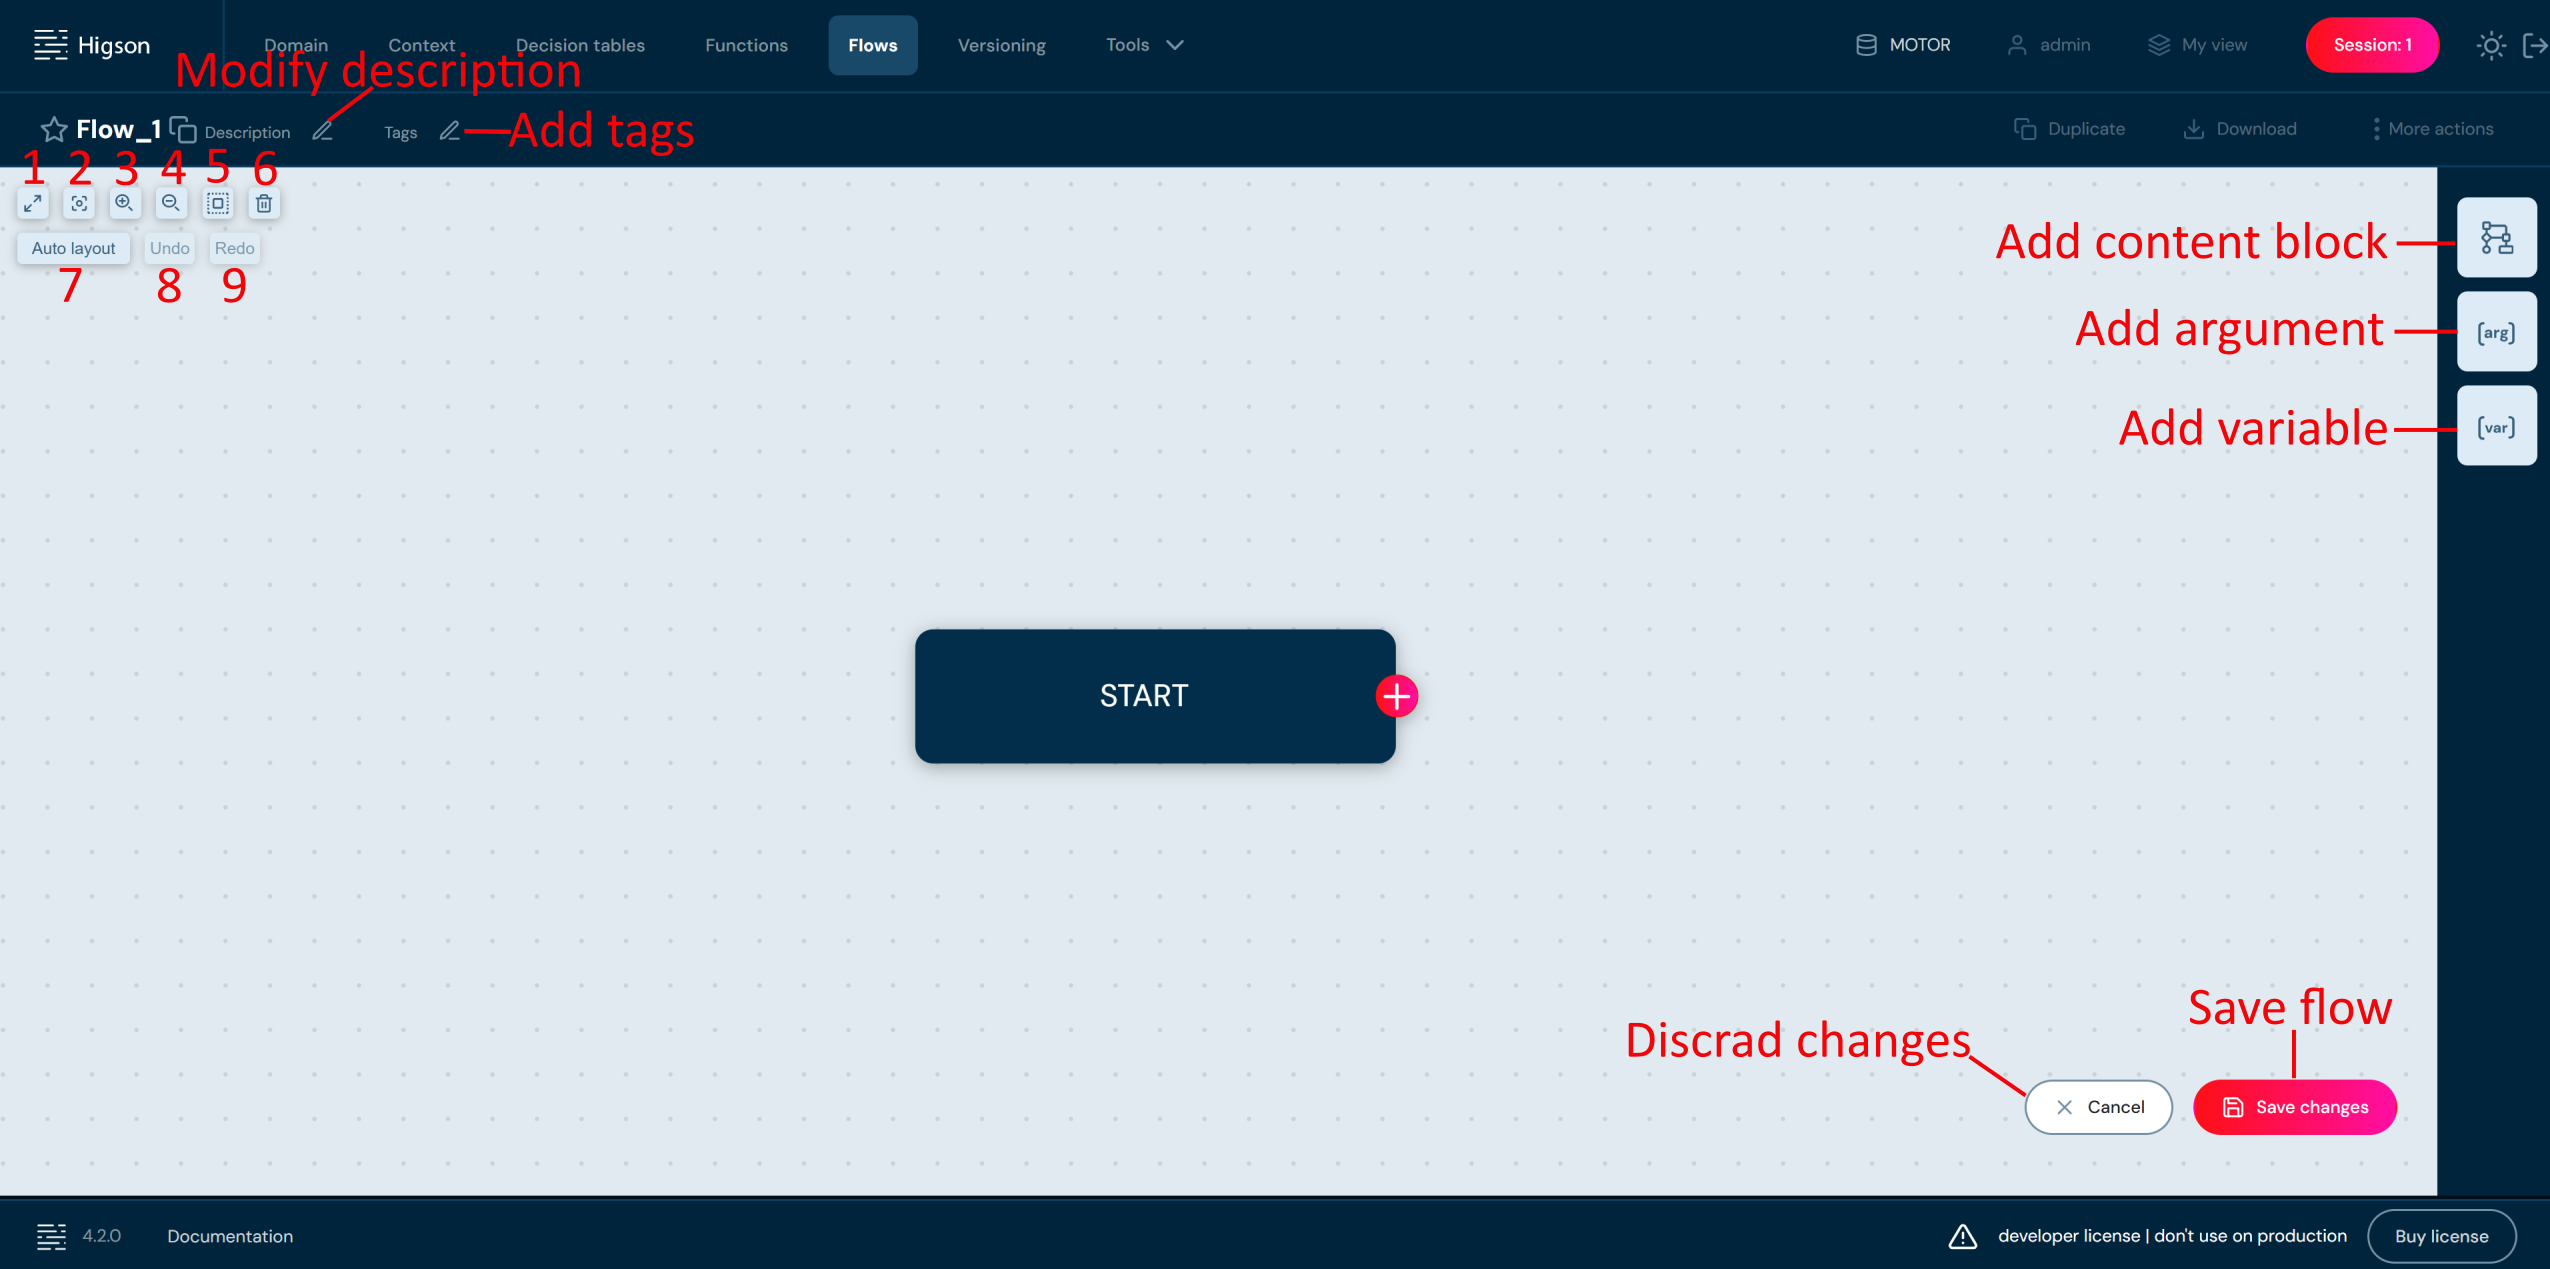
| No. | Action | Description |
|---|---|---|
| 1 | Fit to screen | Fits all content blocks to the screen. |
| 2 | 1:1 | Restores the original scale. |
| 3 | Zoom in | Zoom in. You can also zoom in using mouse scroll. |
| 4 | Zoom out | Zoom out. You can also zoom out using mouse scroll. |
| 5 | Select all | Selects all elements in the workspace. |
| 6 | Delete | Removes selected element. |
| 7 | Auto layout | Automatically positions the elements. |
| 8 | Undo | Reverses a previous action. |
| 9 | Redo | Restores an action that was reversed. |
Add a Variable#
Variables are used to store the results of individual blocks. At least one variable must have the Returned flag selected, which means that it returns the result of the entire flow.
- To add a viariable select Variables button and click Add new variables.
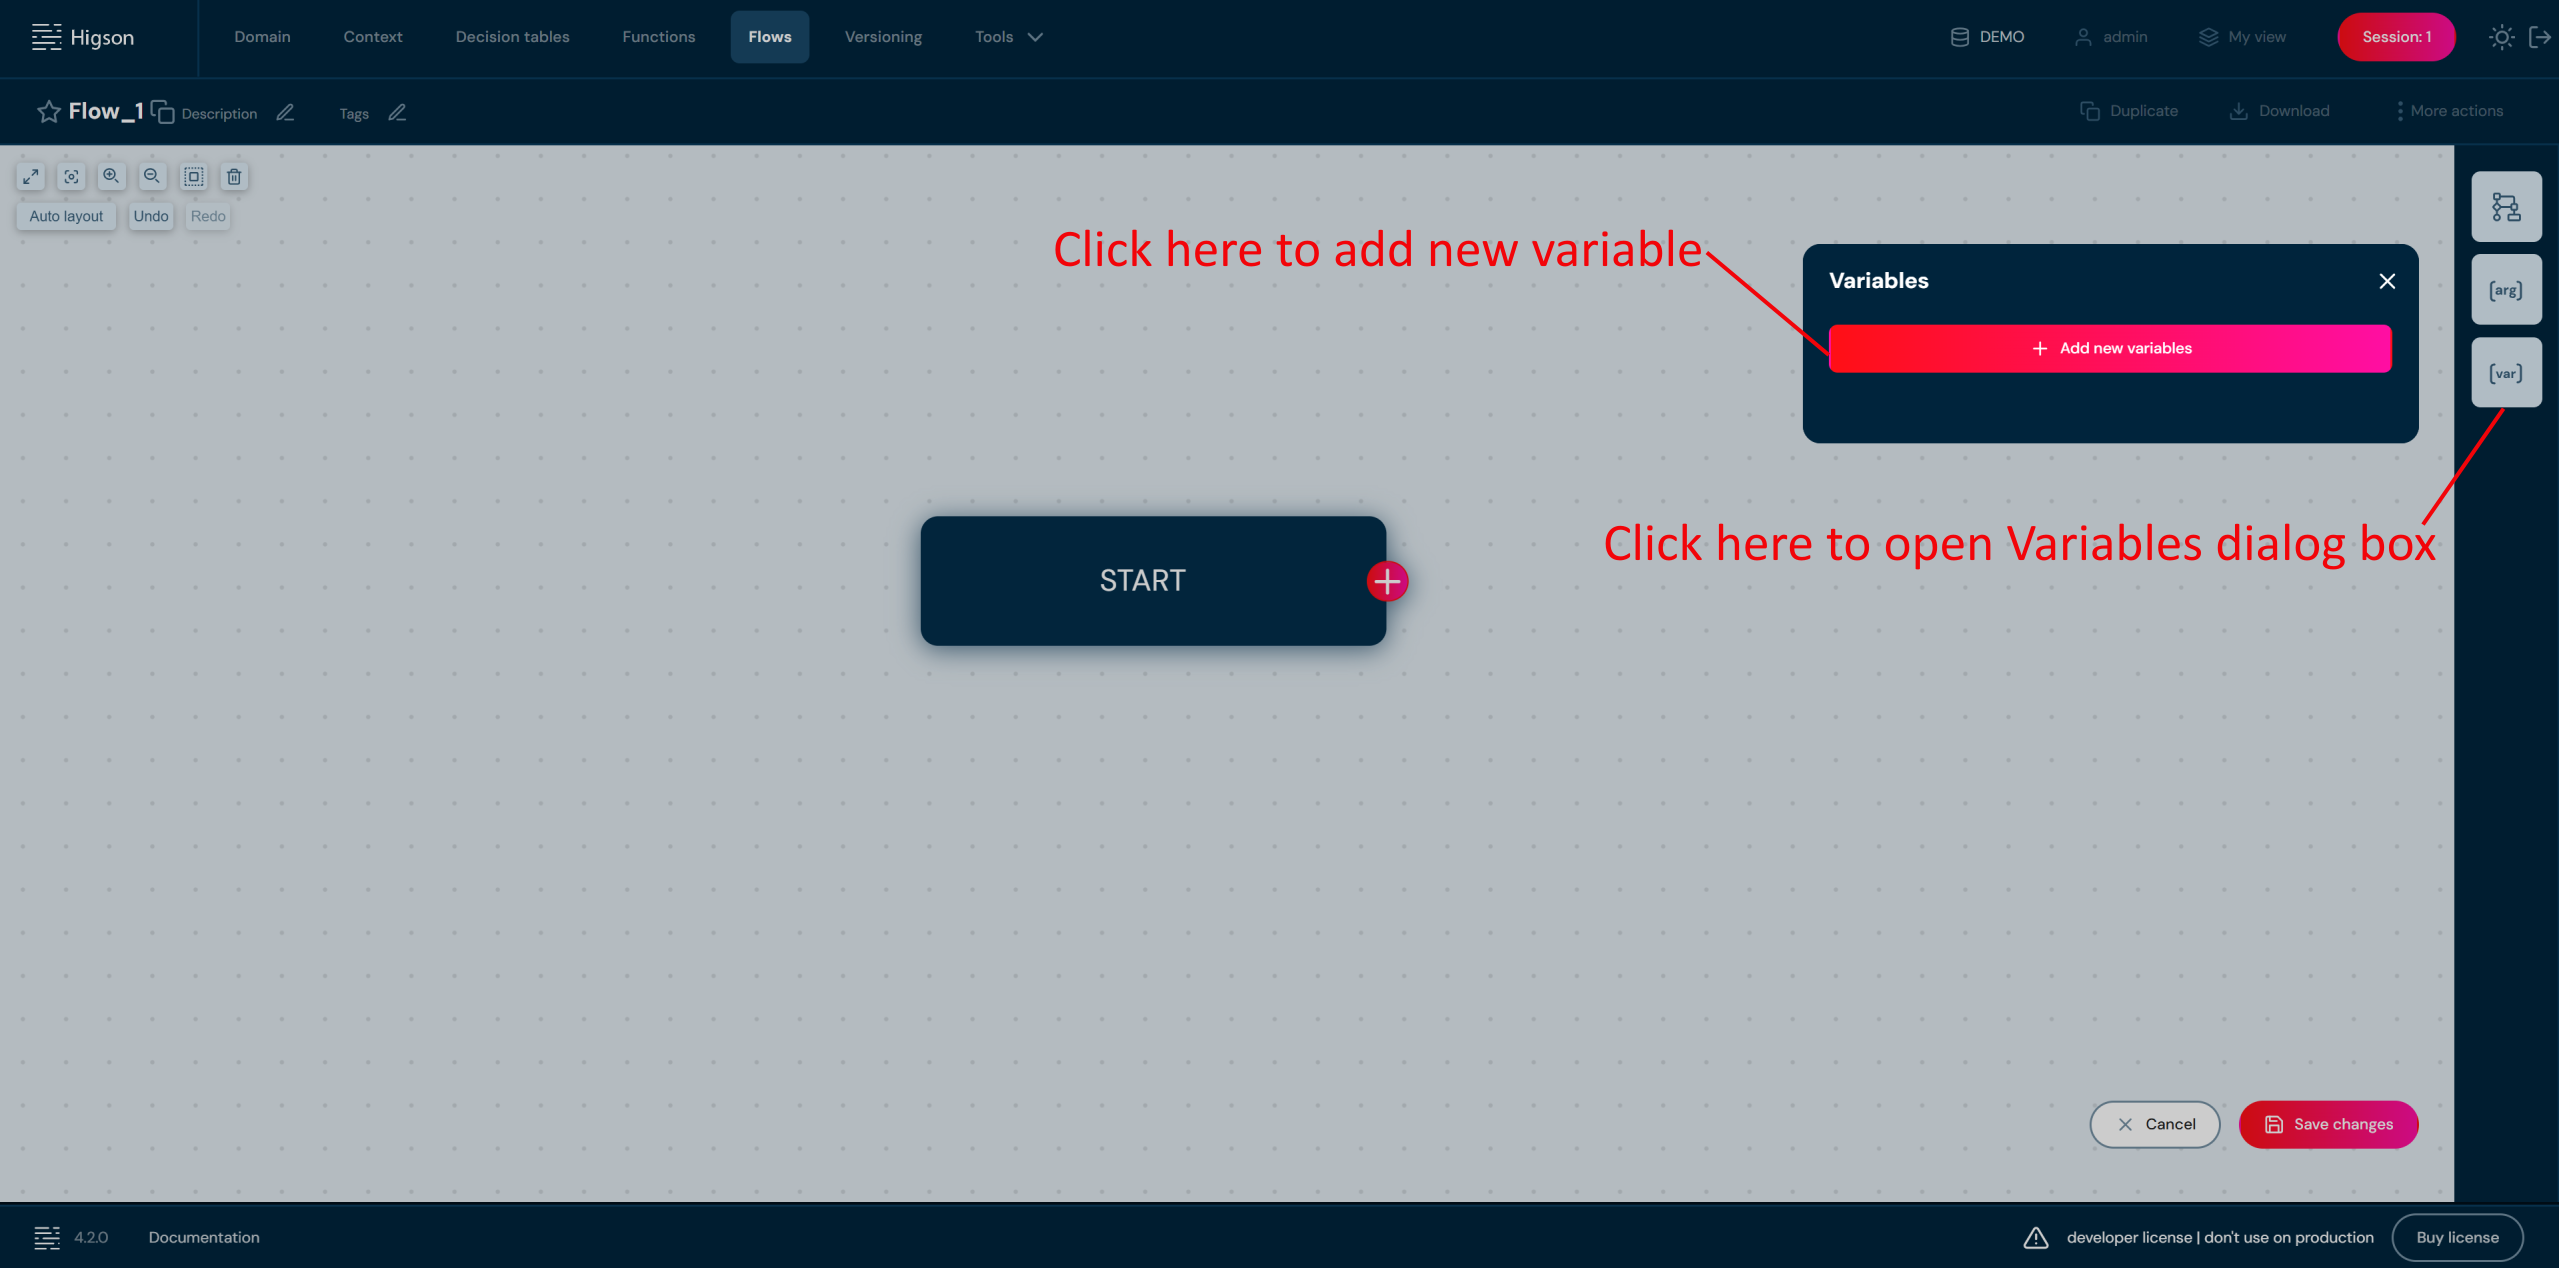
- In pop-up window select Add new variables and fill in the data.
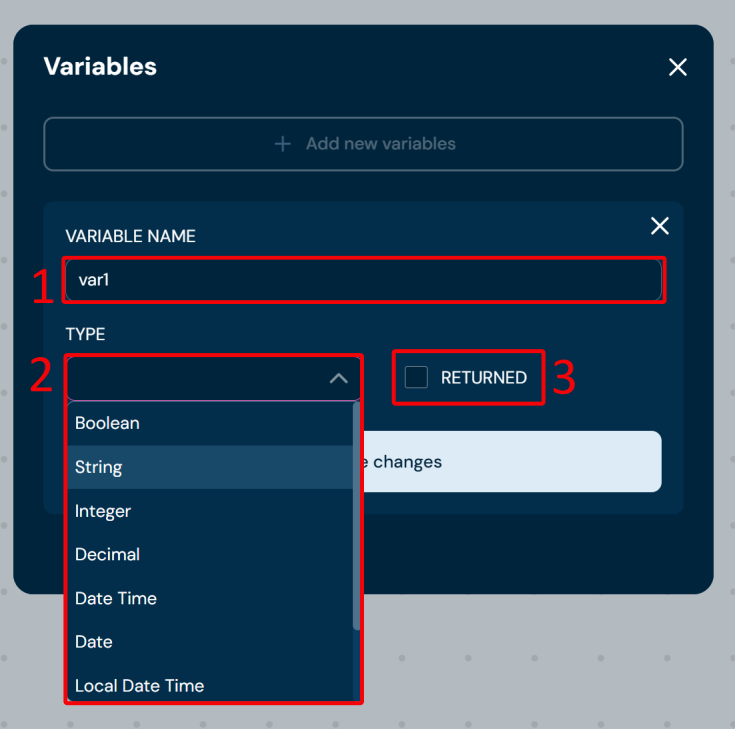
| No. | Name | Description |
|---|---|---|
| 1 | Variable name | Variable name is a mandatory field. Name of the variable must be unique within the flow. |
| 2 | Type | Select data type for the variable. |
| 3 | Return flag | Checking the return flag means that the variable will return the result of the flow. |
- Click Save changes.
Add an Argument#
- If your process requires it, you can add an argument. To add an argument select the Arguments button.
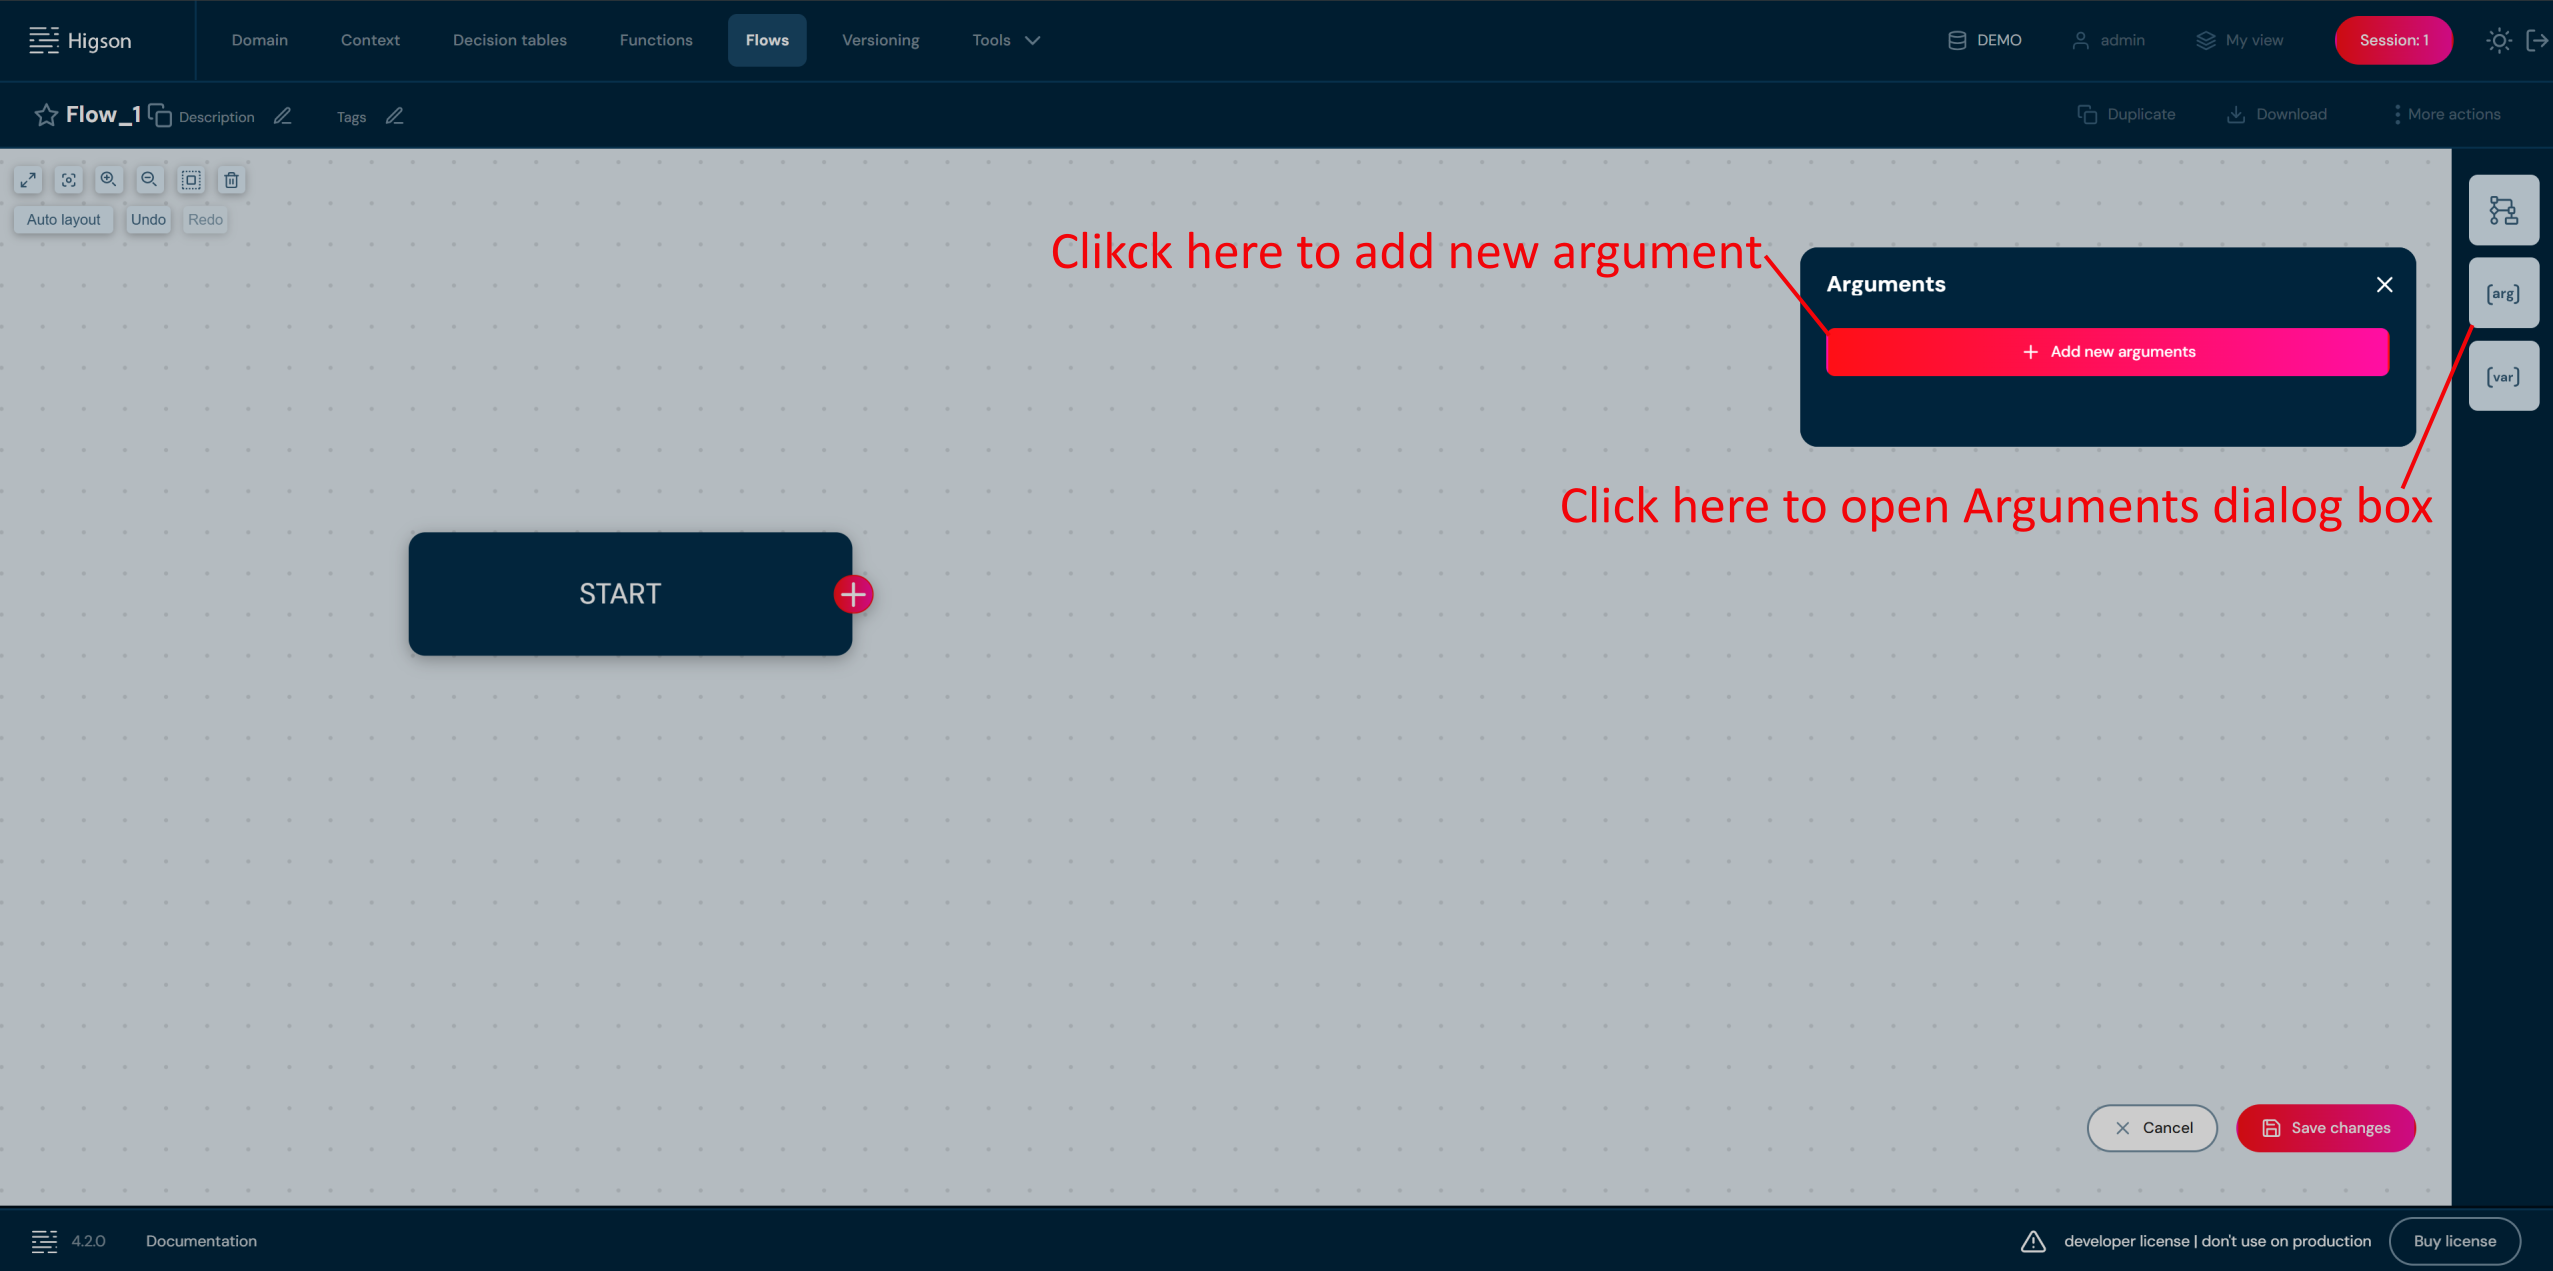
- Complete data:
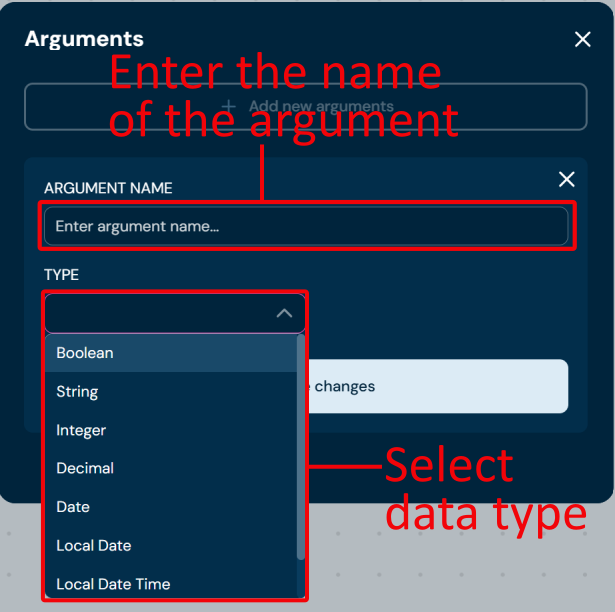
Argument name must be unique within the flow.
- Save changes.
Argument may be used in a flow. The value of the argument is specified when calling the flow.
Adding Decision Table Block#
Decision Table Block runs a selected decision table and assigns its result to a variable. Choose this block when the outcome depends on input conditions organized as rows. It is the best fit for tabular business rules that business users can maintain without coding.
- To add Decision table block select Content blocks button and choose Decision table by double-click or drag & drop to the workspace.
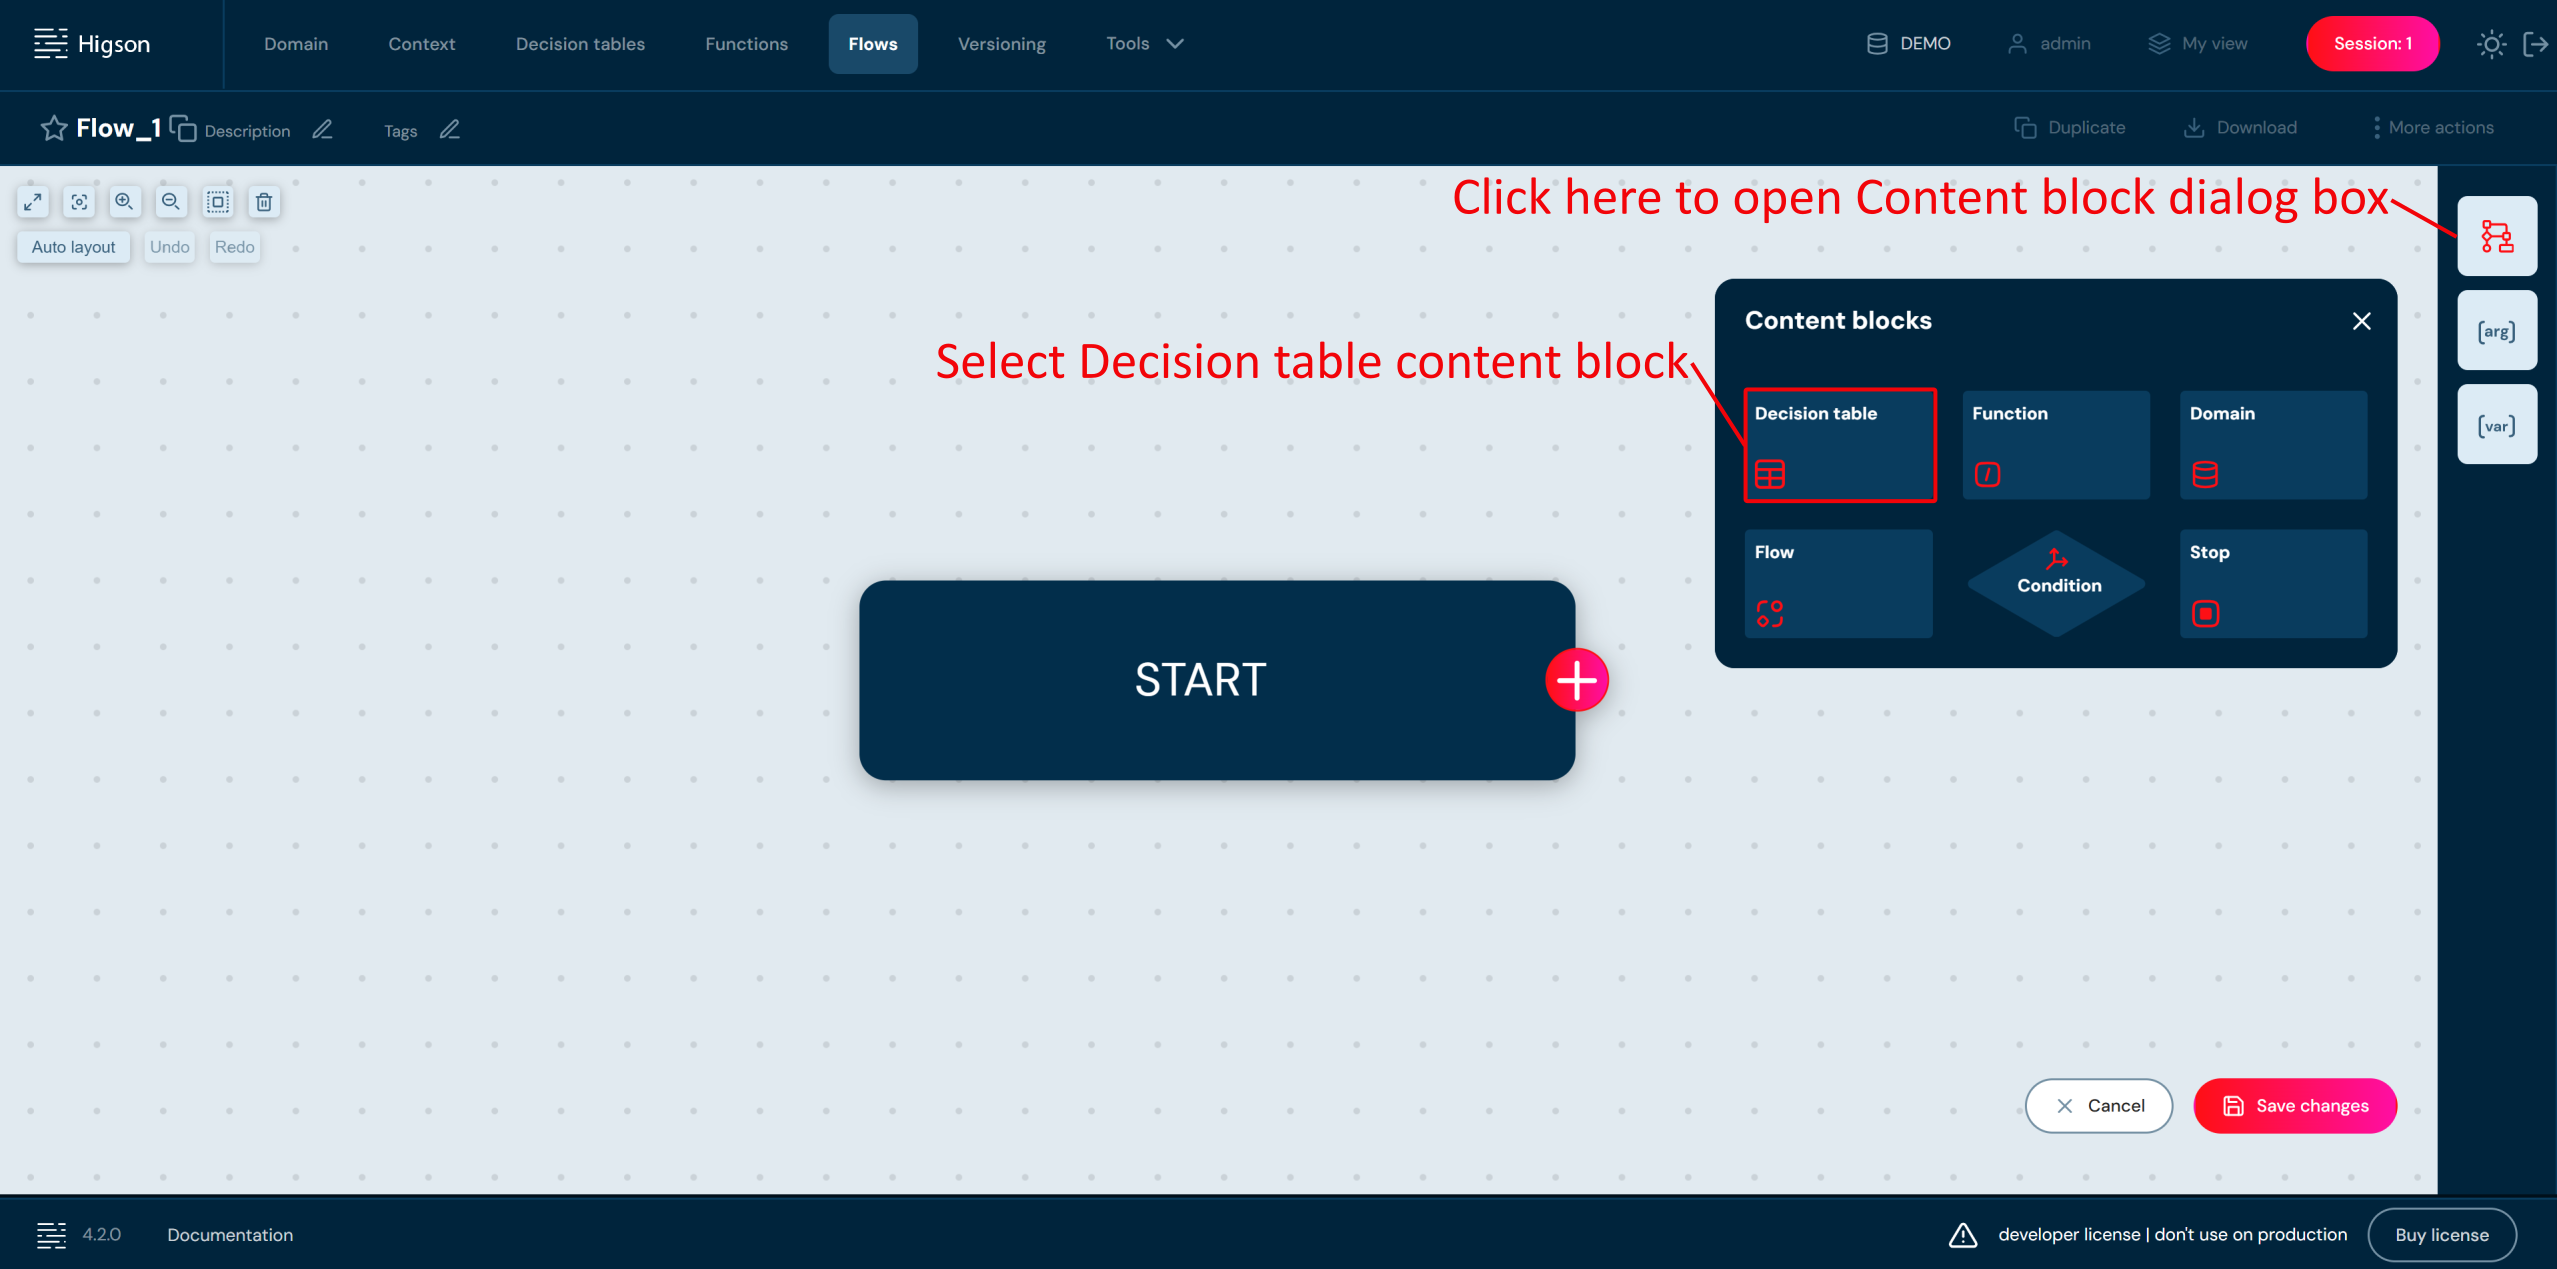
- Double click on a Decisions tables block and complete fields:
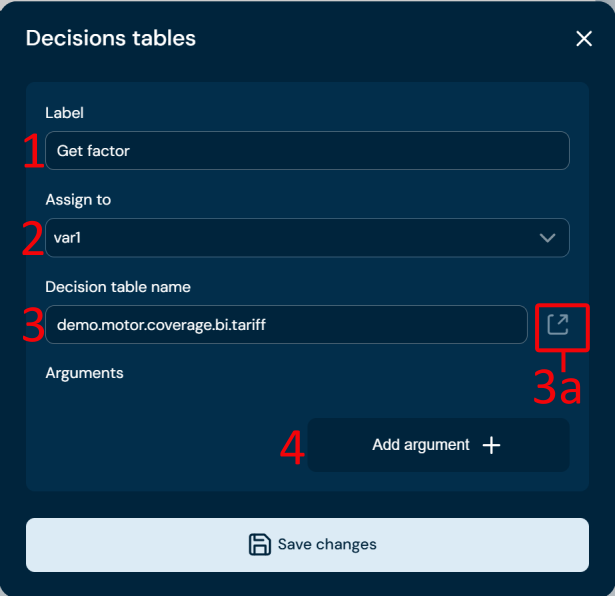
| No. | Field name | Description |
|---|---|---|
| 1 | Label | Label is visible on a tile in a layout view. By default, it will be filled with the name of the decision table. |
| 2 | Assign to | Drop-down list of variables defined in a flow. Choose a variable to which you want to assign the result of the decision table. |
| 3 | Decision table name | Choose the decision table from the list. |
| 3a | Open details | Opens the details of the decision table in a new browser tab. |
| 4 | Add argument | Optionally, it is possible to pass arguments. |
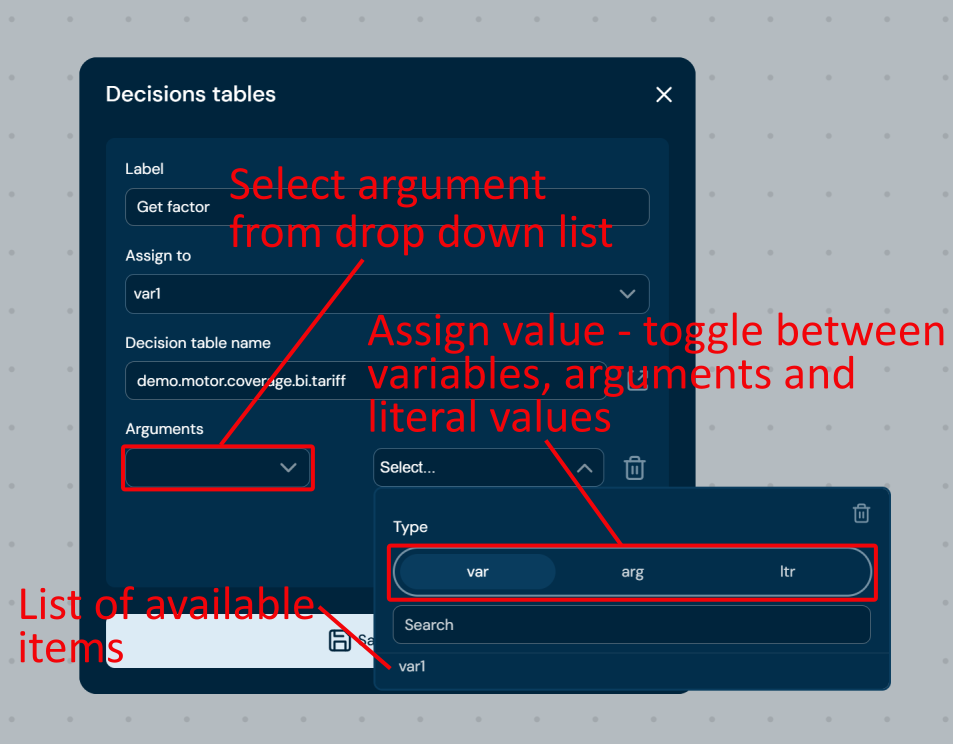
Optionally it is possible to pass arguments. From drop down list you can choose one of the value source of the in levels. As a value, you can specify a variable or argument defined in the flow, or specify a literal value.
- Save changes.
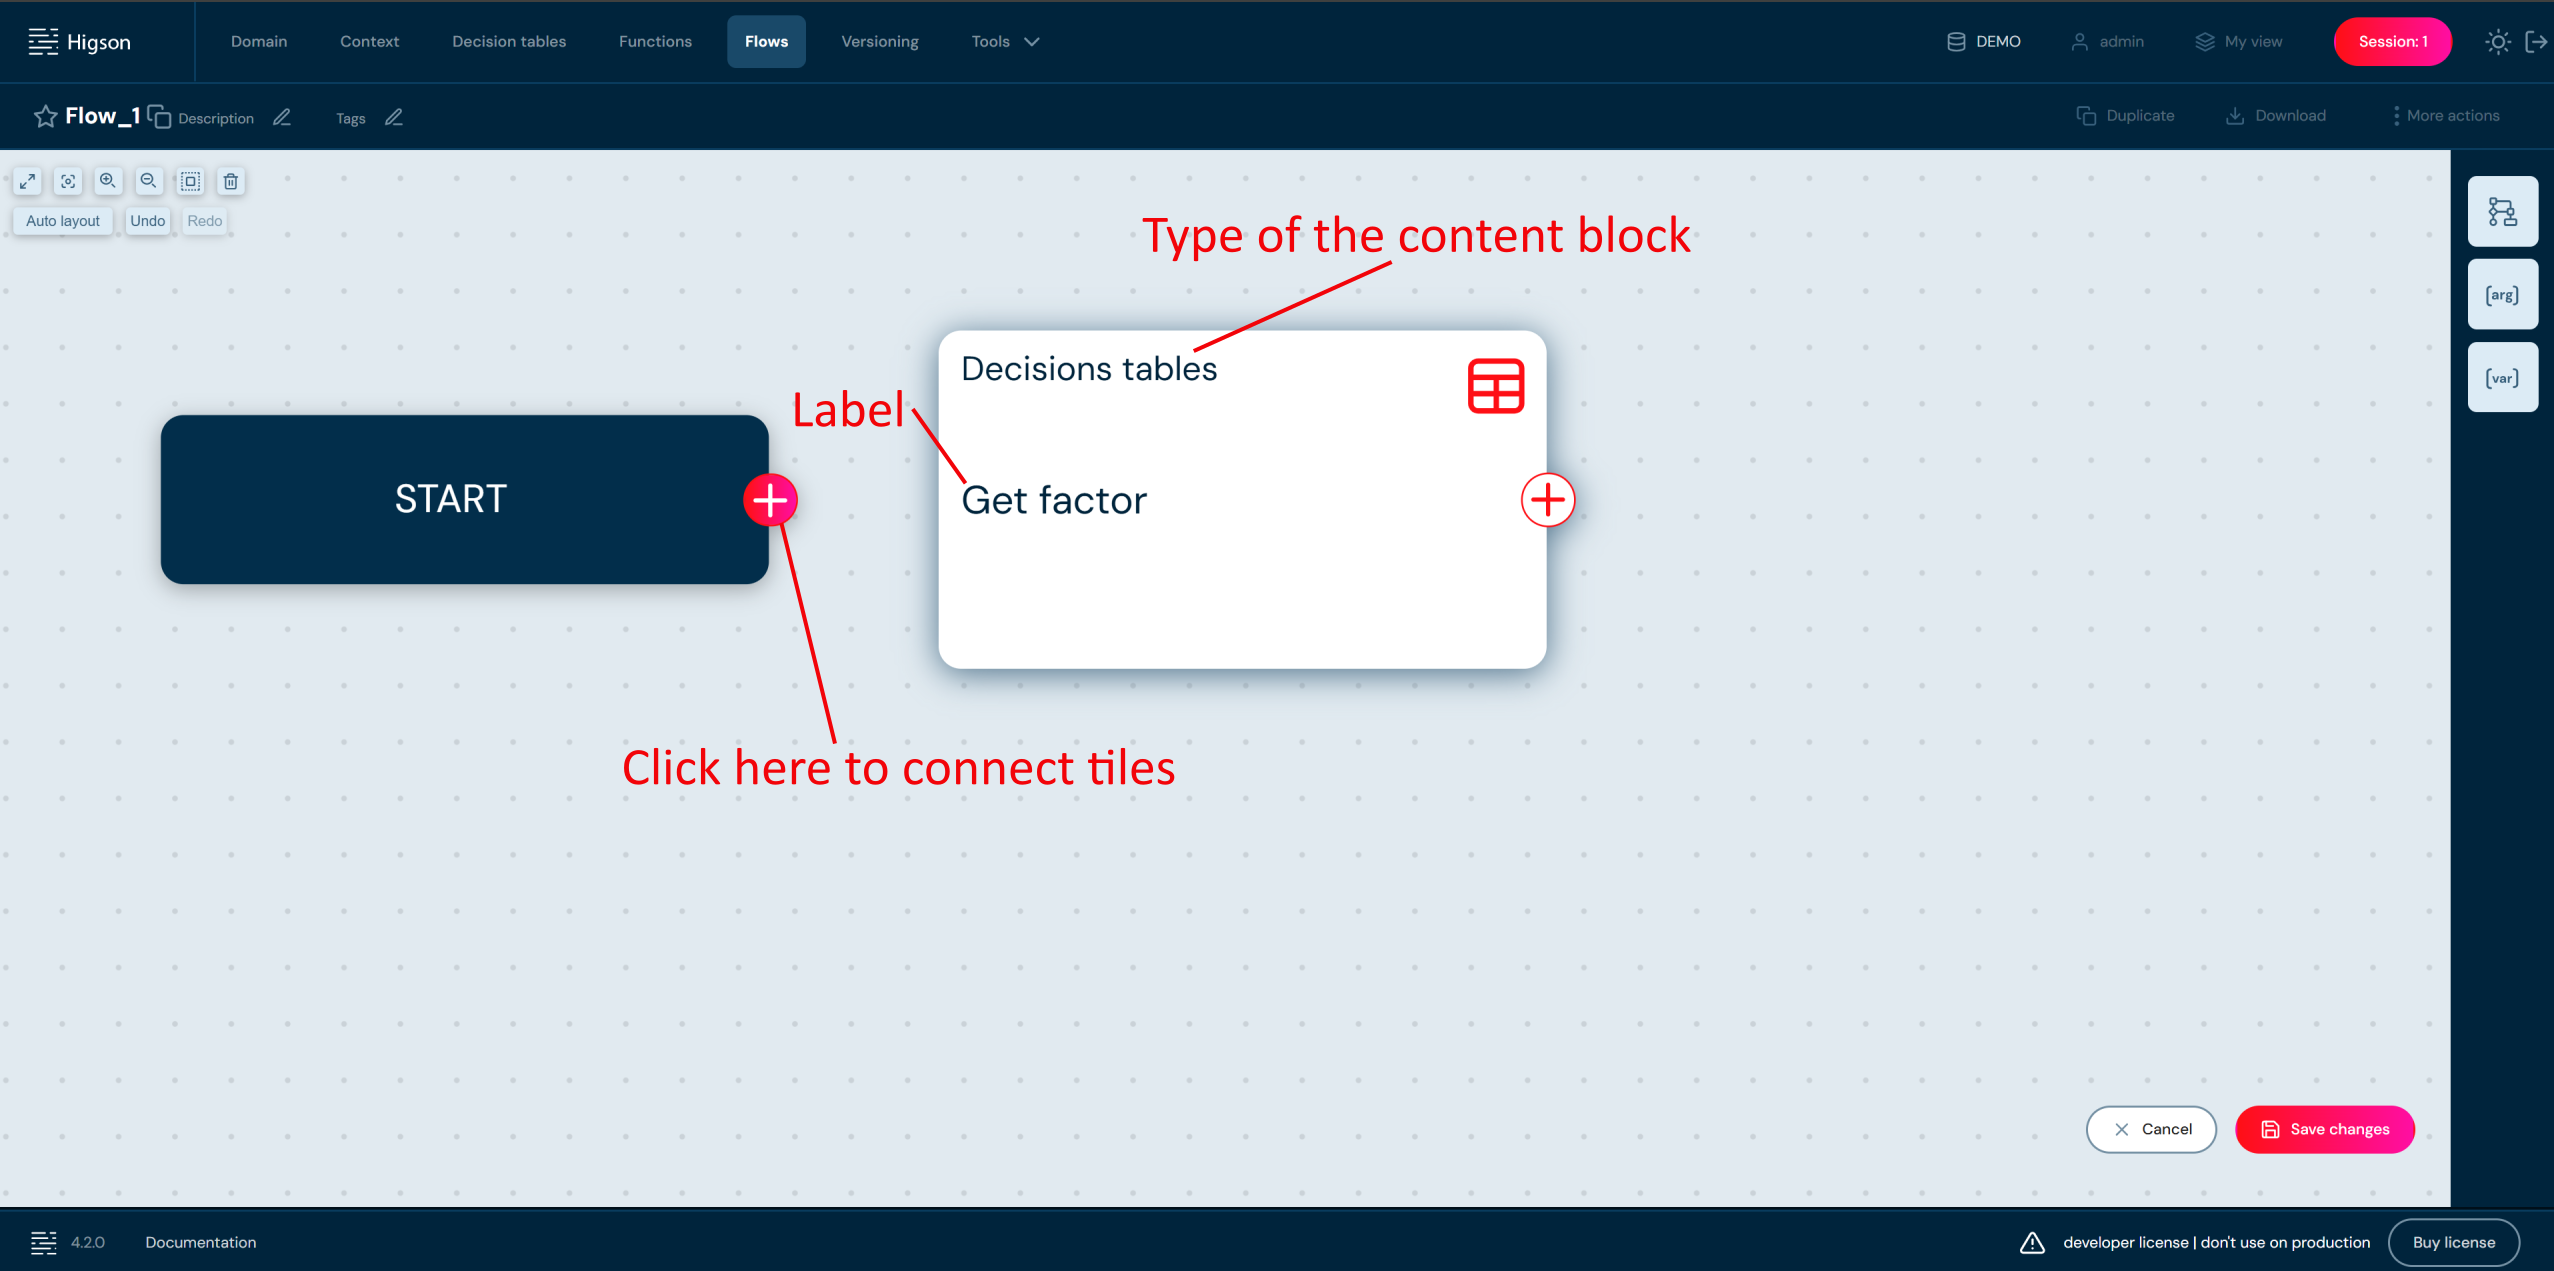
Decision table content block on a layout view:
Adding Function Block#
Function Block executes a Groovy or Python function defined in the environment and assigns its result to a variable. Choose this block when the logic requires calculations, data transformations, or programming that a decision table cannot express (for example computing a premium or applying a formula).
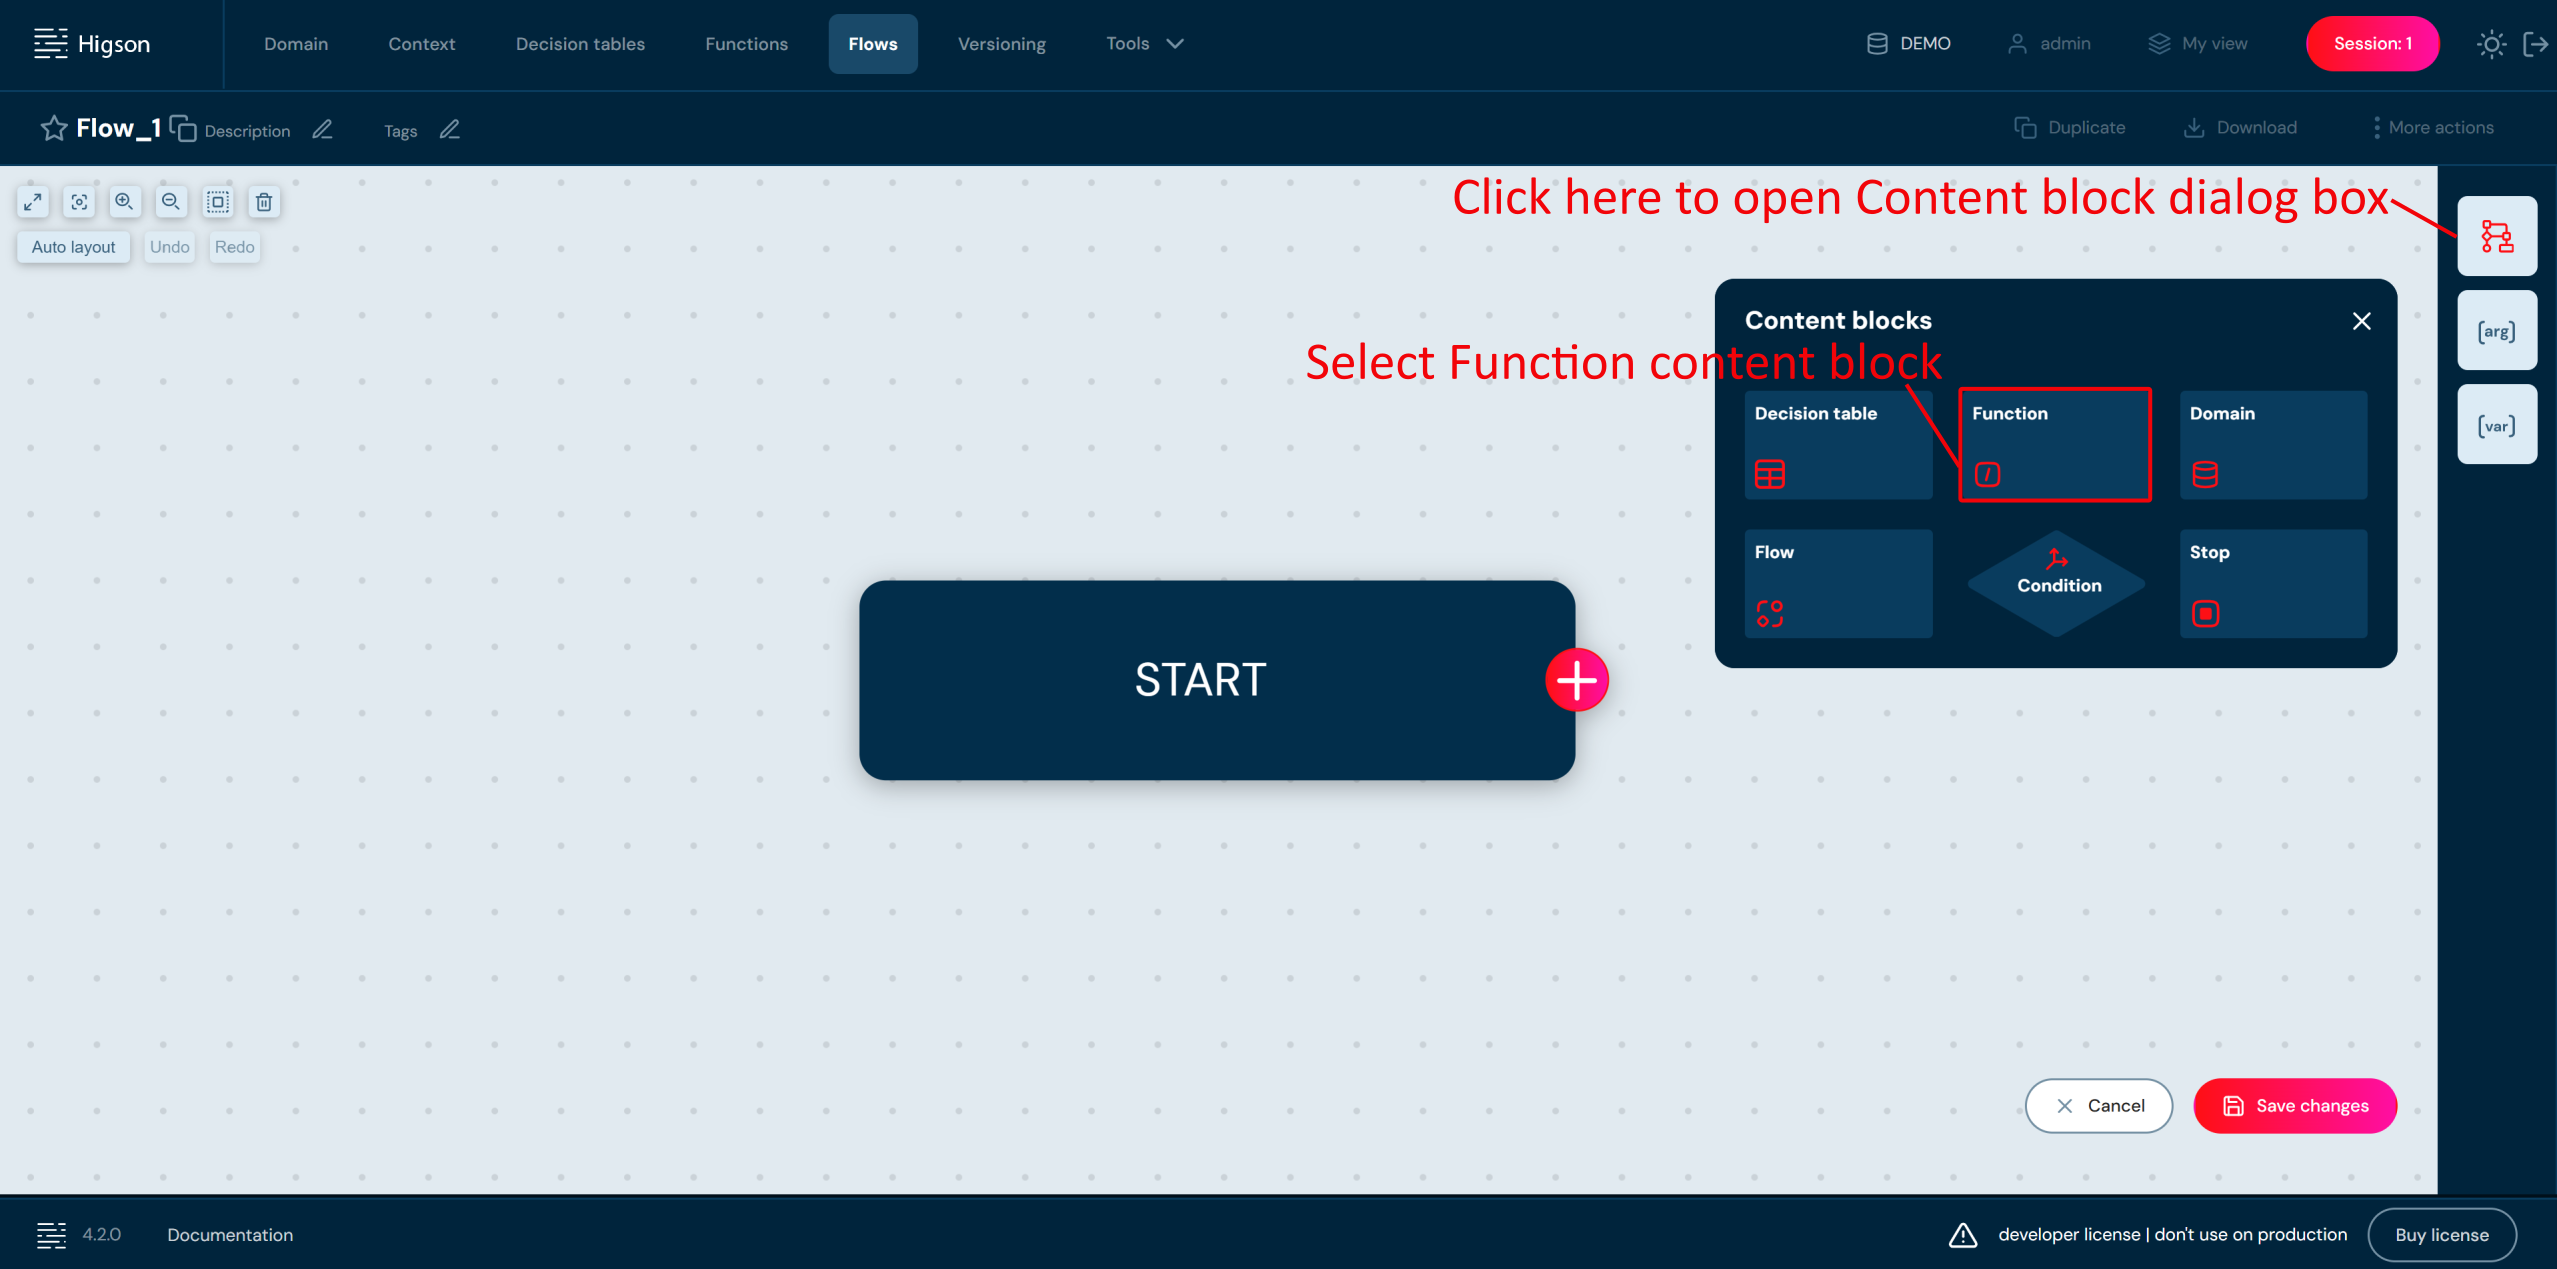
- To add Function block select Content blocks button and choose Function by double-click or drag & drop to the workspace.
- Double click on a Function tile and complete fields.
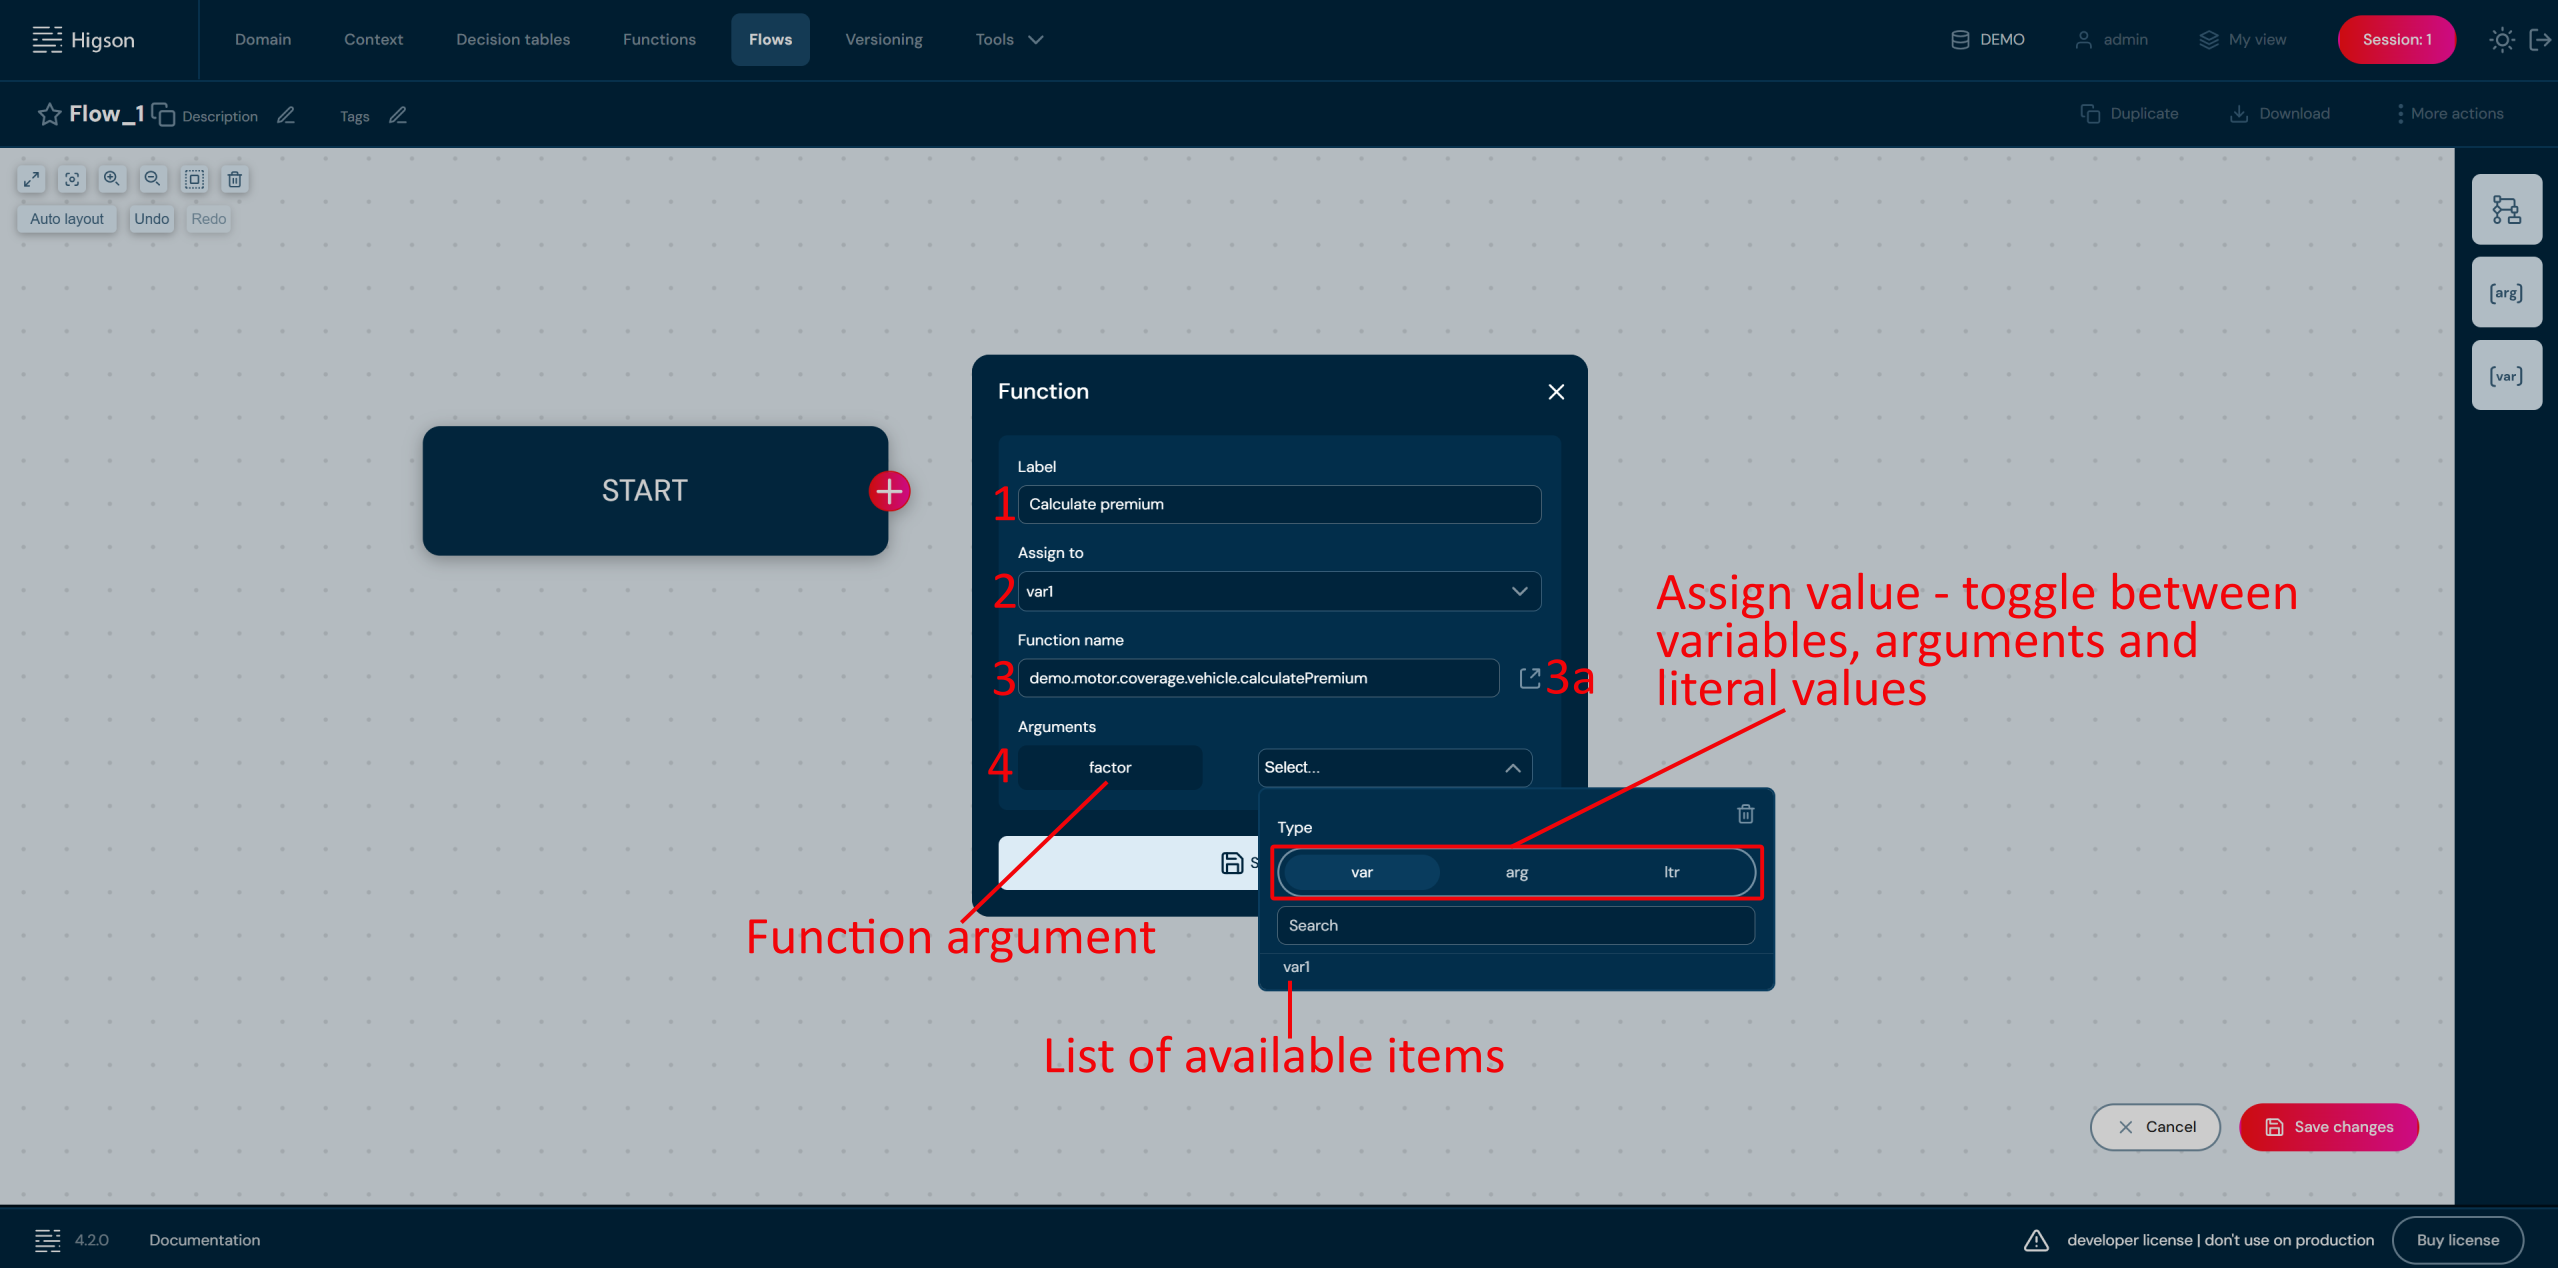
| No. | Field name | Description |
|---|---|---|
| 1 | Label | Label is visible on a tile in a layout view. By default it will be filled with the name of Function. |
| 2 | Assign to | Drop-down list of variables defined in a flow. Choose a variable to which you want to assign the result of Function. |
| 3 | Function name | Choose Function you want to call from the list of functions defined in the environment. |
| 3a | Open details | Opens the details of the function in a new browser tab. |
| 4 | Arguments | Optionally, it is possible to pass arguments. |
- Save changes.
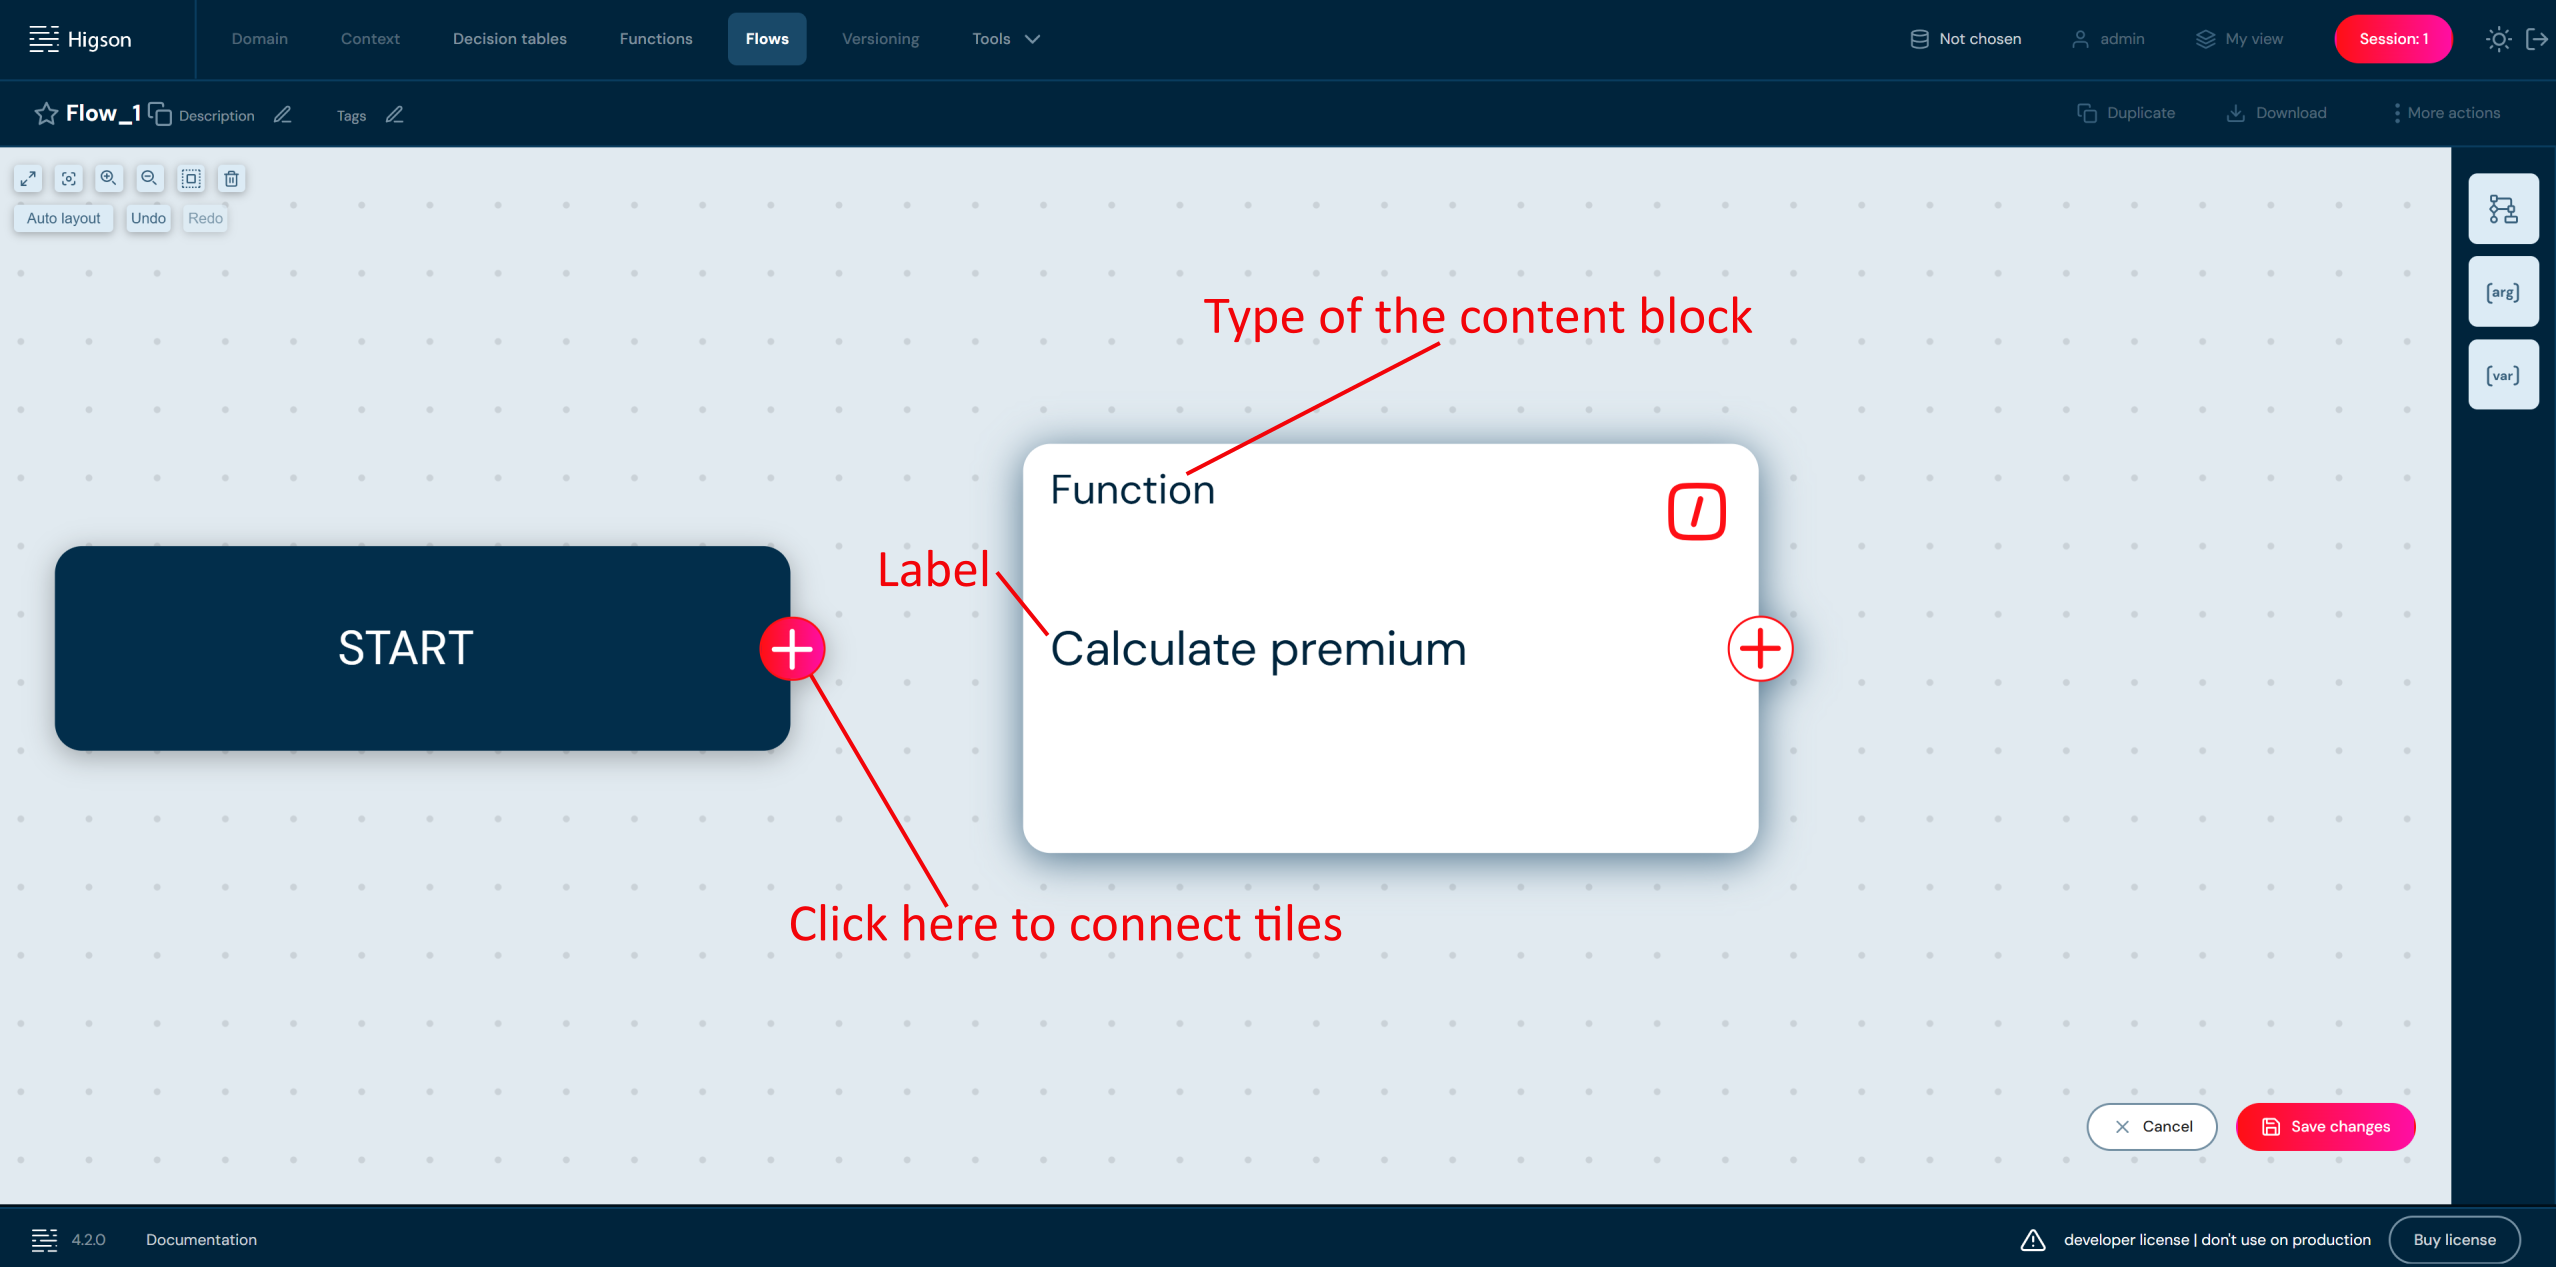
Function content block on a layout view:
Adding Domain Block#
Domain Block reads a value of a domain element attribute from the product configuration and assigns it to a variable. Choose this block when the flow needs a parameter configured in the Domain model.
- To add Domain block select Content blocks button and choose Domain by double-click or drag & drop to the workspace.
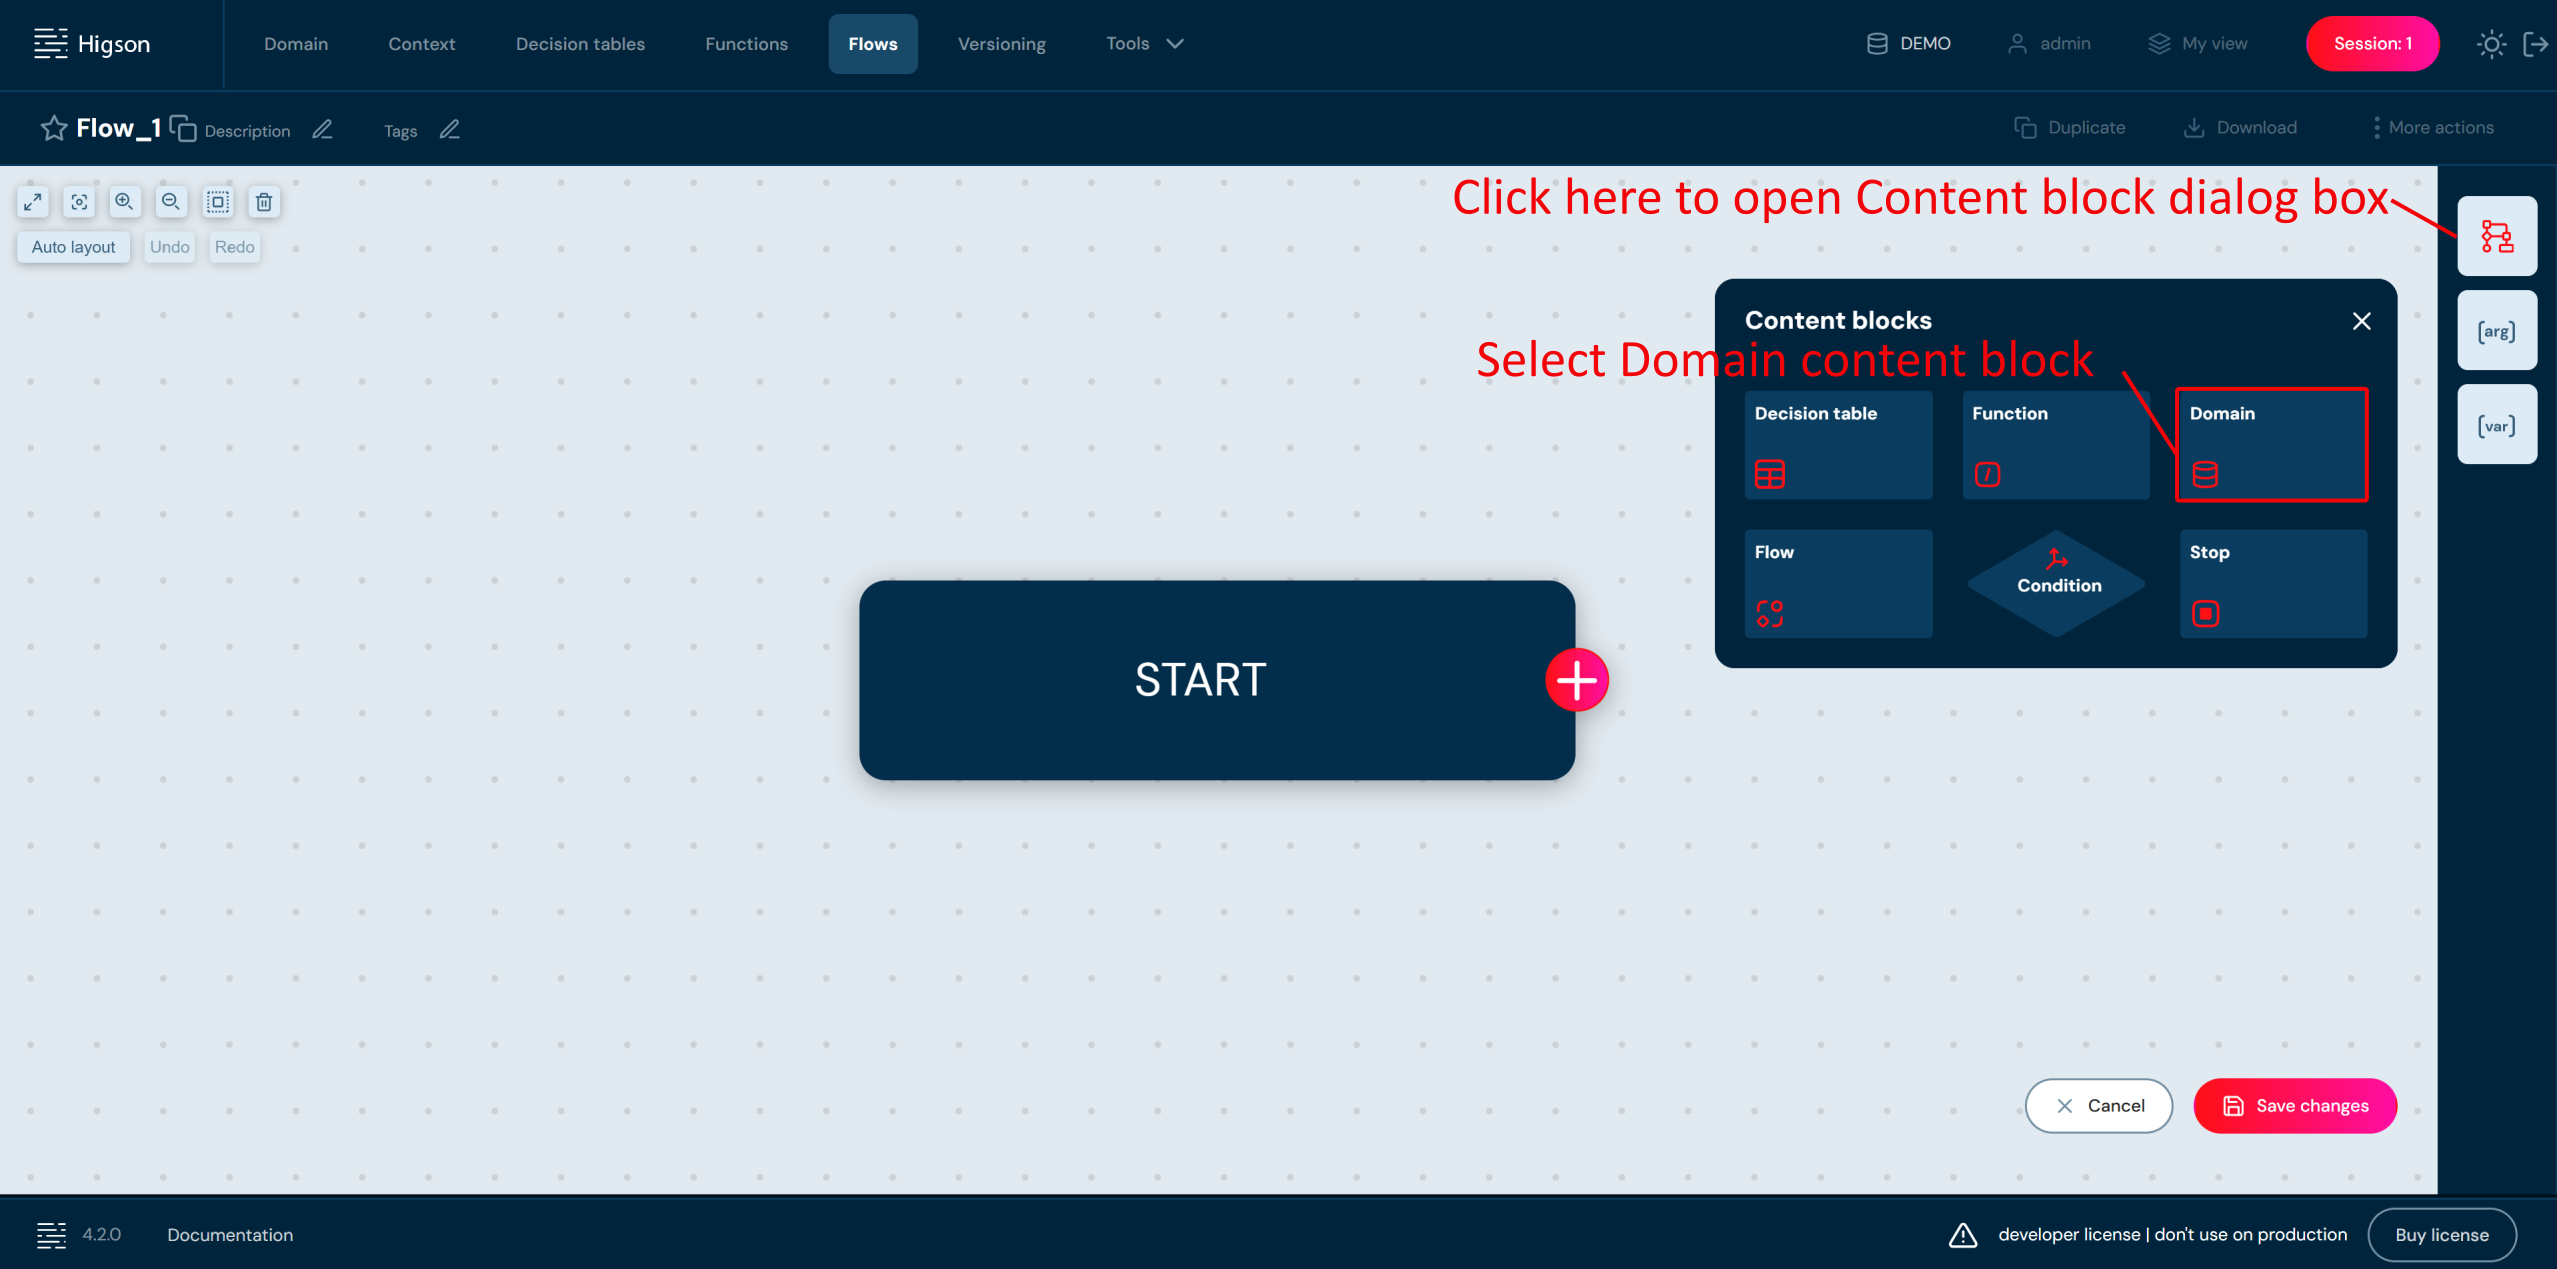
- Double click on a Domain tile and complete fields.
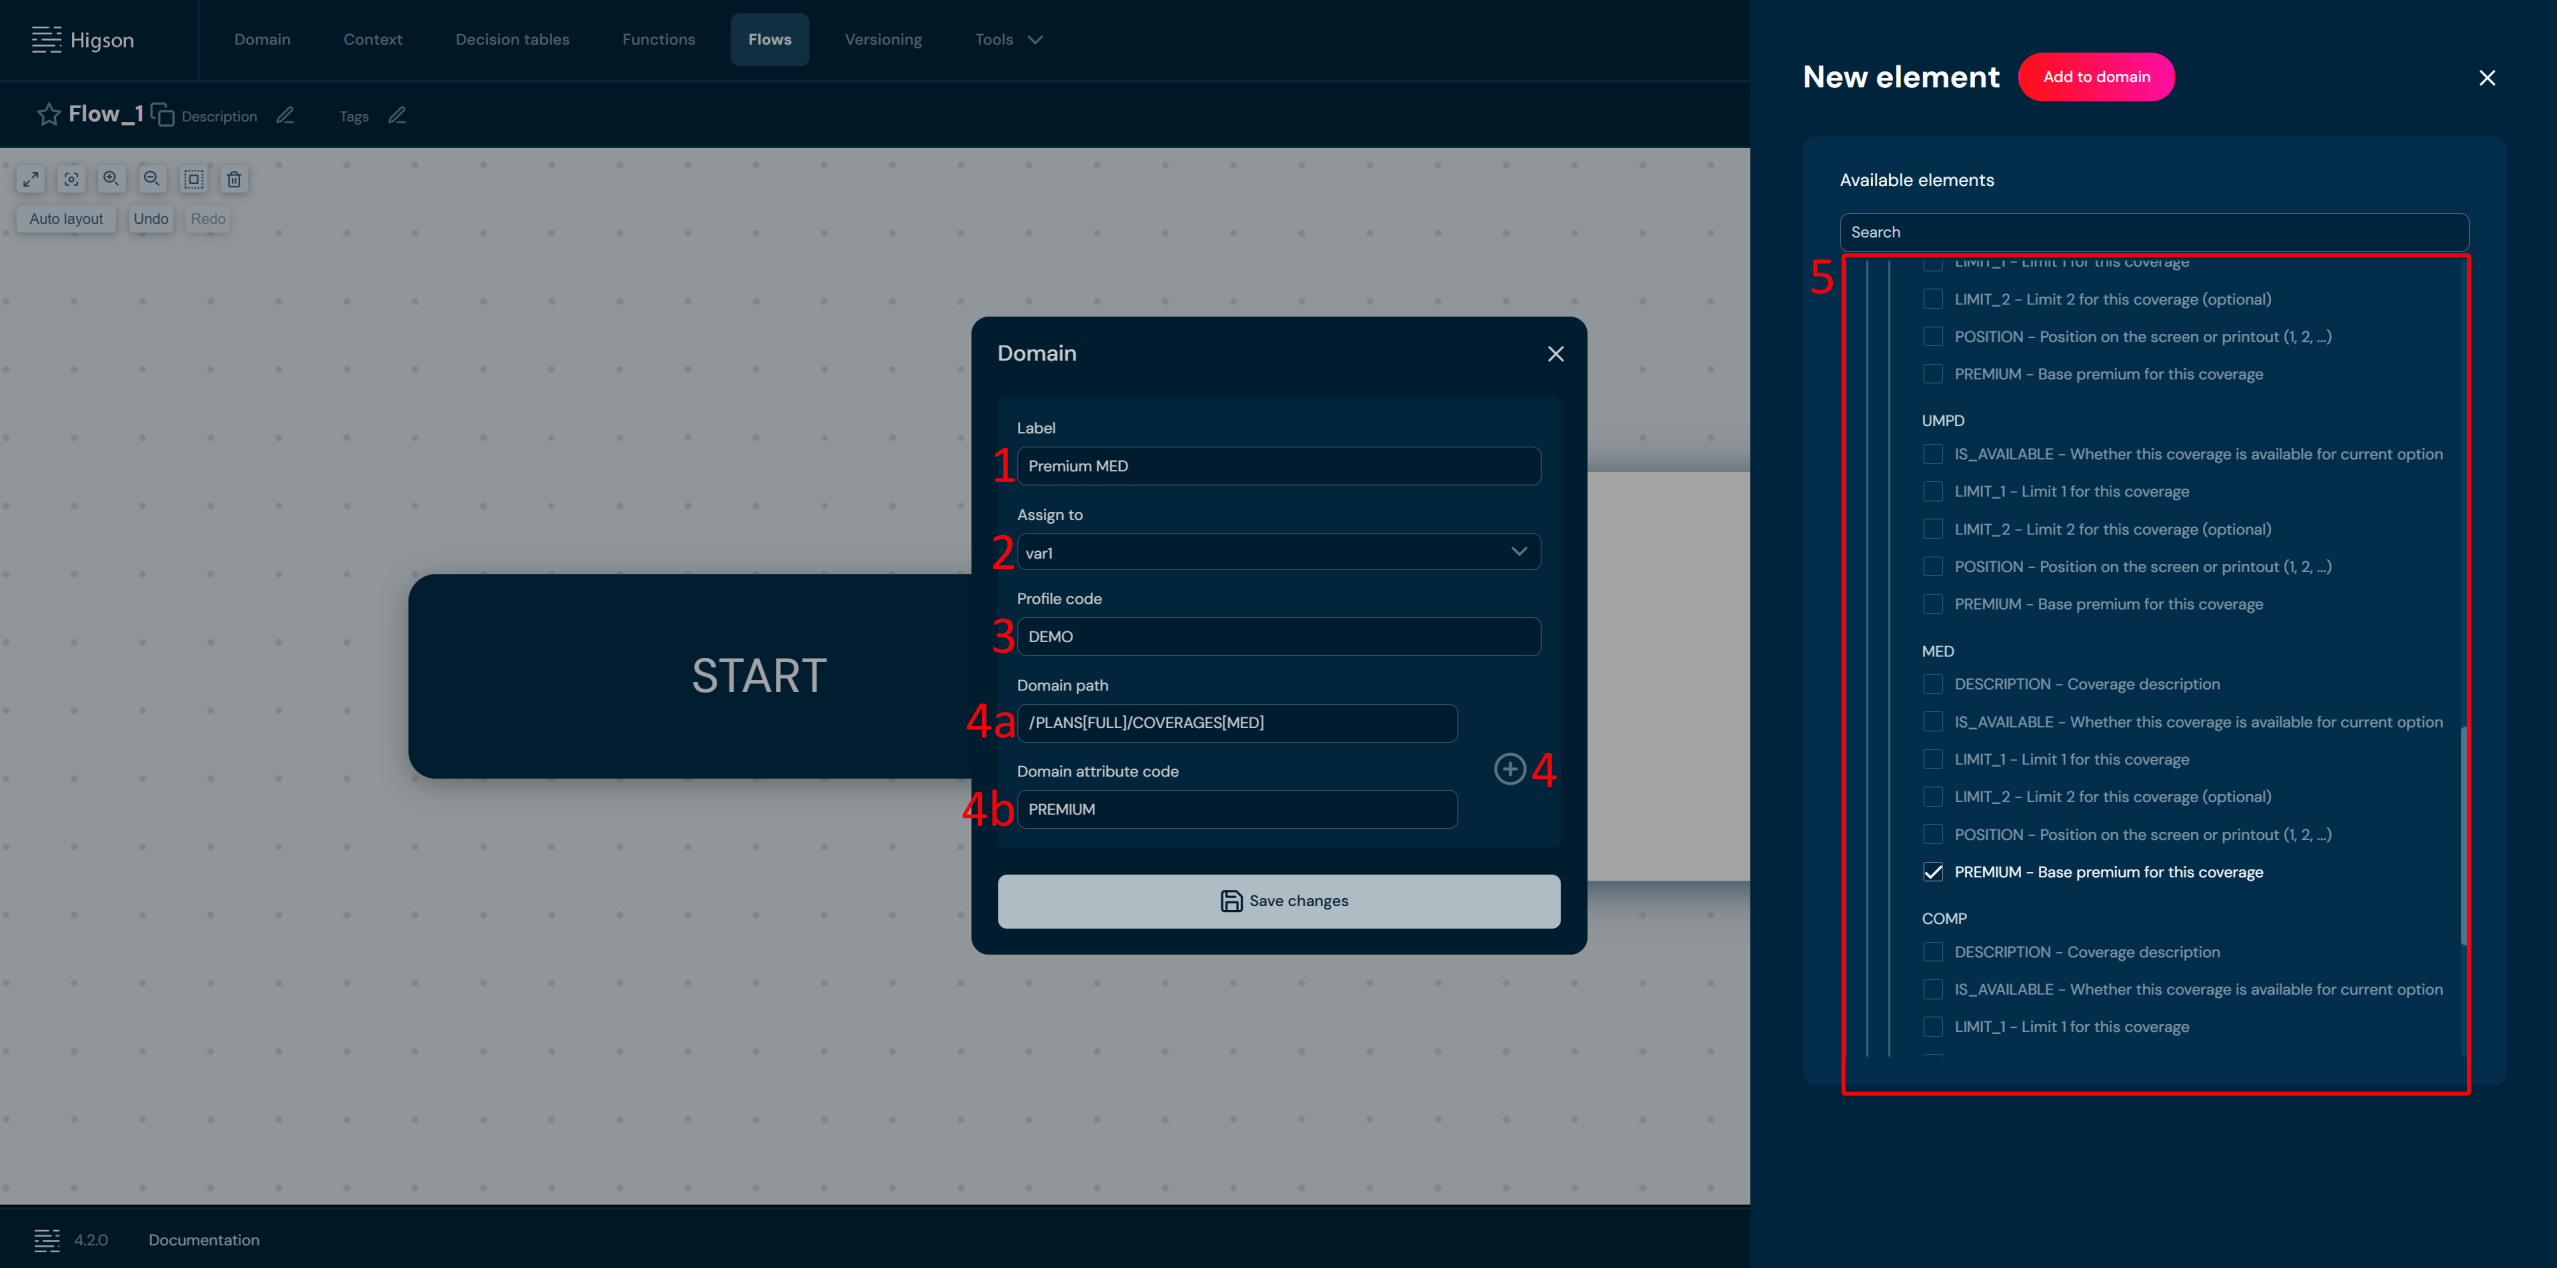
| No. | Field name | Description |
|---|---|---|
| 1 | Label | Label is visible on a tile in a layout view. By default it will be filled with the name of a profile. |
| 2 | Assign to | Drop-down list of variables defined in a flow. Choose a variable to which you want to assign the result of calling a domain element. |
| 3 | Profile code | Complete field with the profile name which domains you want to use. |
| 4 | Add | Add domain path and domain attribute code from the list. By clicking on the plus icon you will be able to choose an element from the domain configuration tree. |
| 4a | Domain path | This field is filled automatically after selecting an item from the list. |
| 4b | Arguments | This field is filled automatically after selecting an item from the list. |
| 5 | List of elements | The list of elements available on a domain configuration tree. After selecting an element fields 4a and 4b will be filled automatically. |
- Save changes.
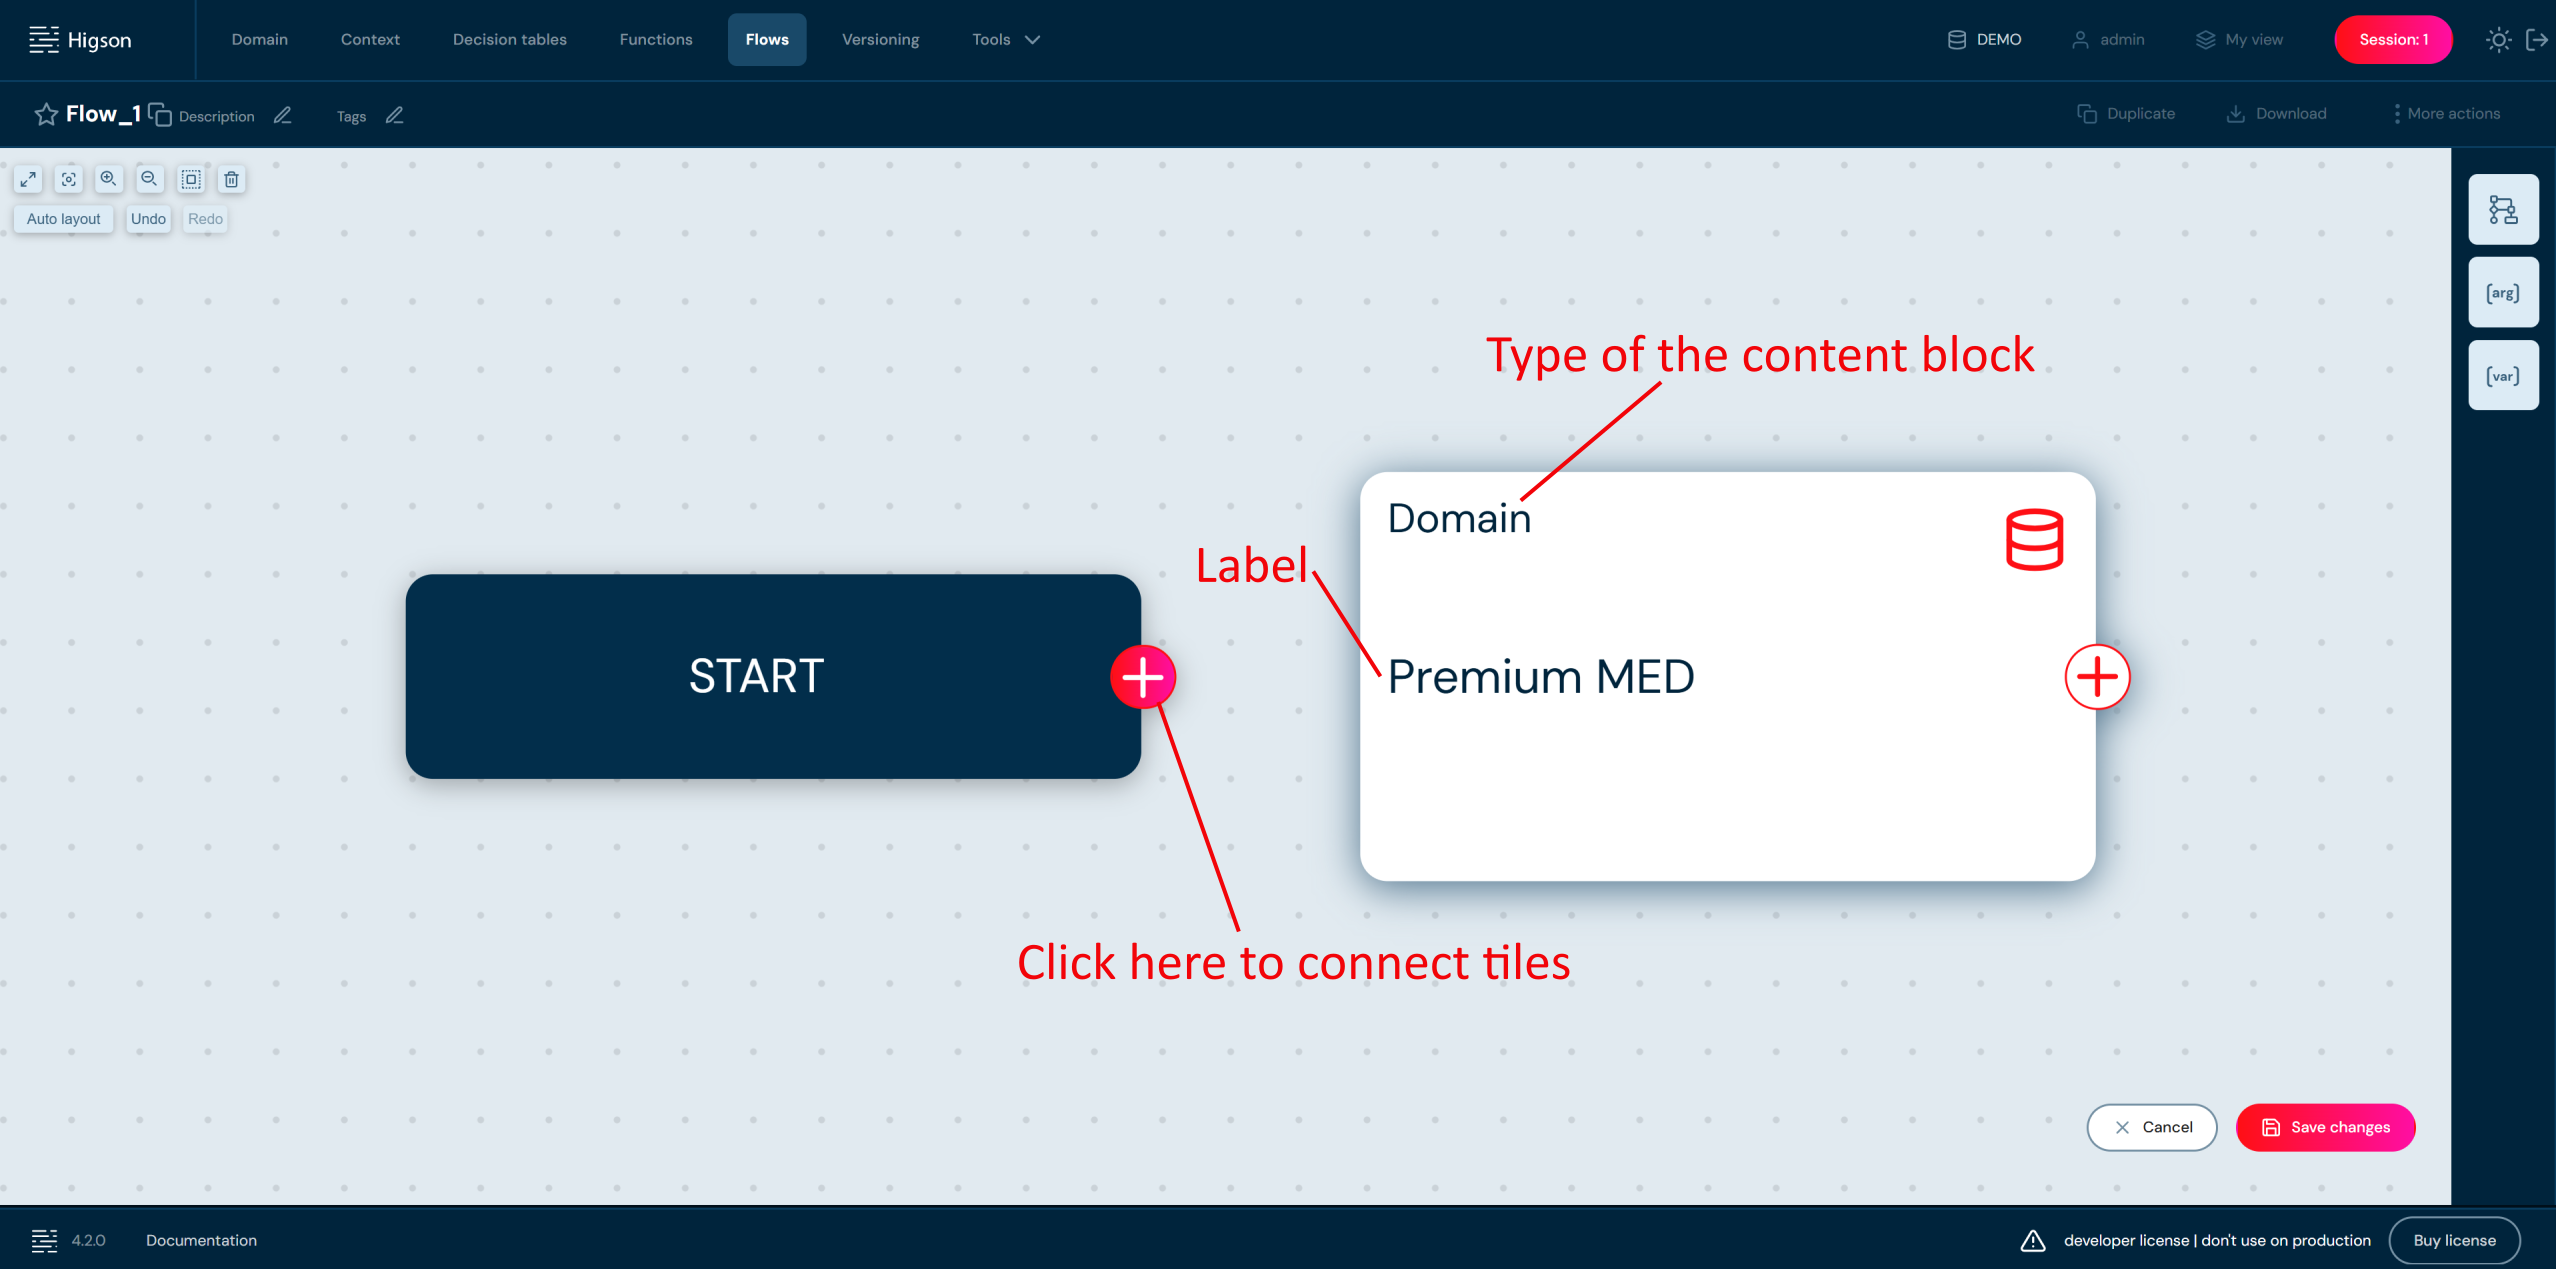
Domain content block on a layout view:
Adding Flow Block#
Flow Block calls another flow as a sub-process and assigns its result to a variable. Choose this block to reuse existing logic and split a complex process into smaller, self-contained flows that can be called from many places instead of being rebuilt each time.
- To add Flow block select Content blocks button and choose Flow by double-click or drag & drop to the workspace.
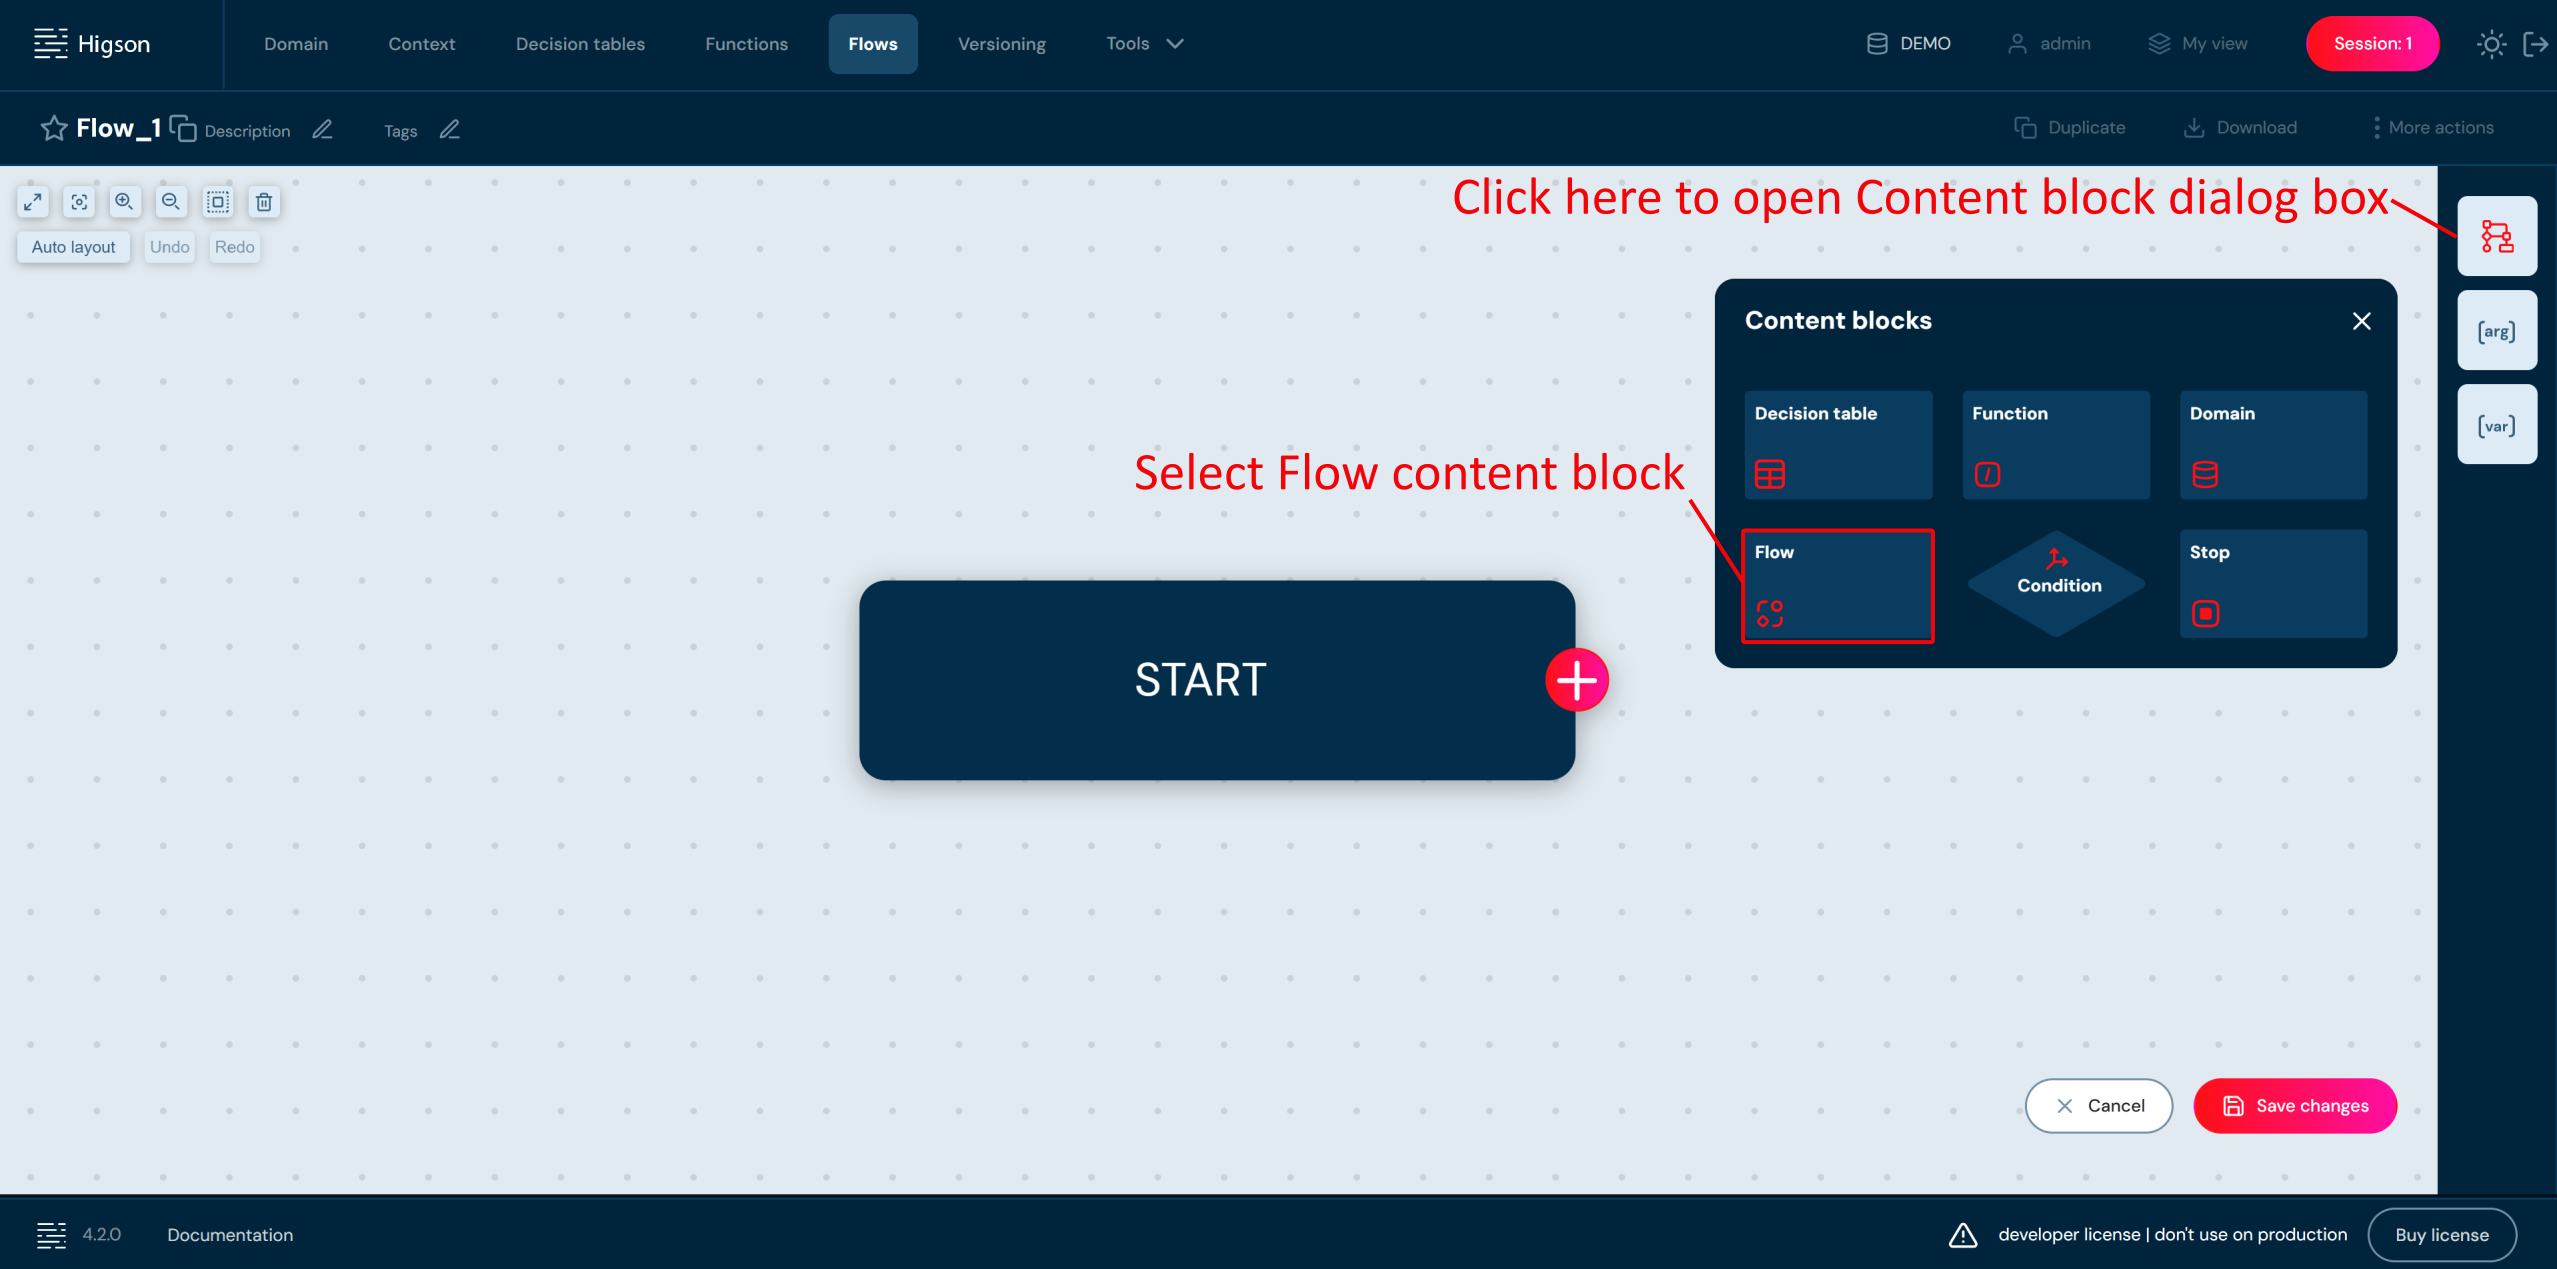
Double click on a Flow tile and complete fields.
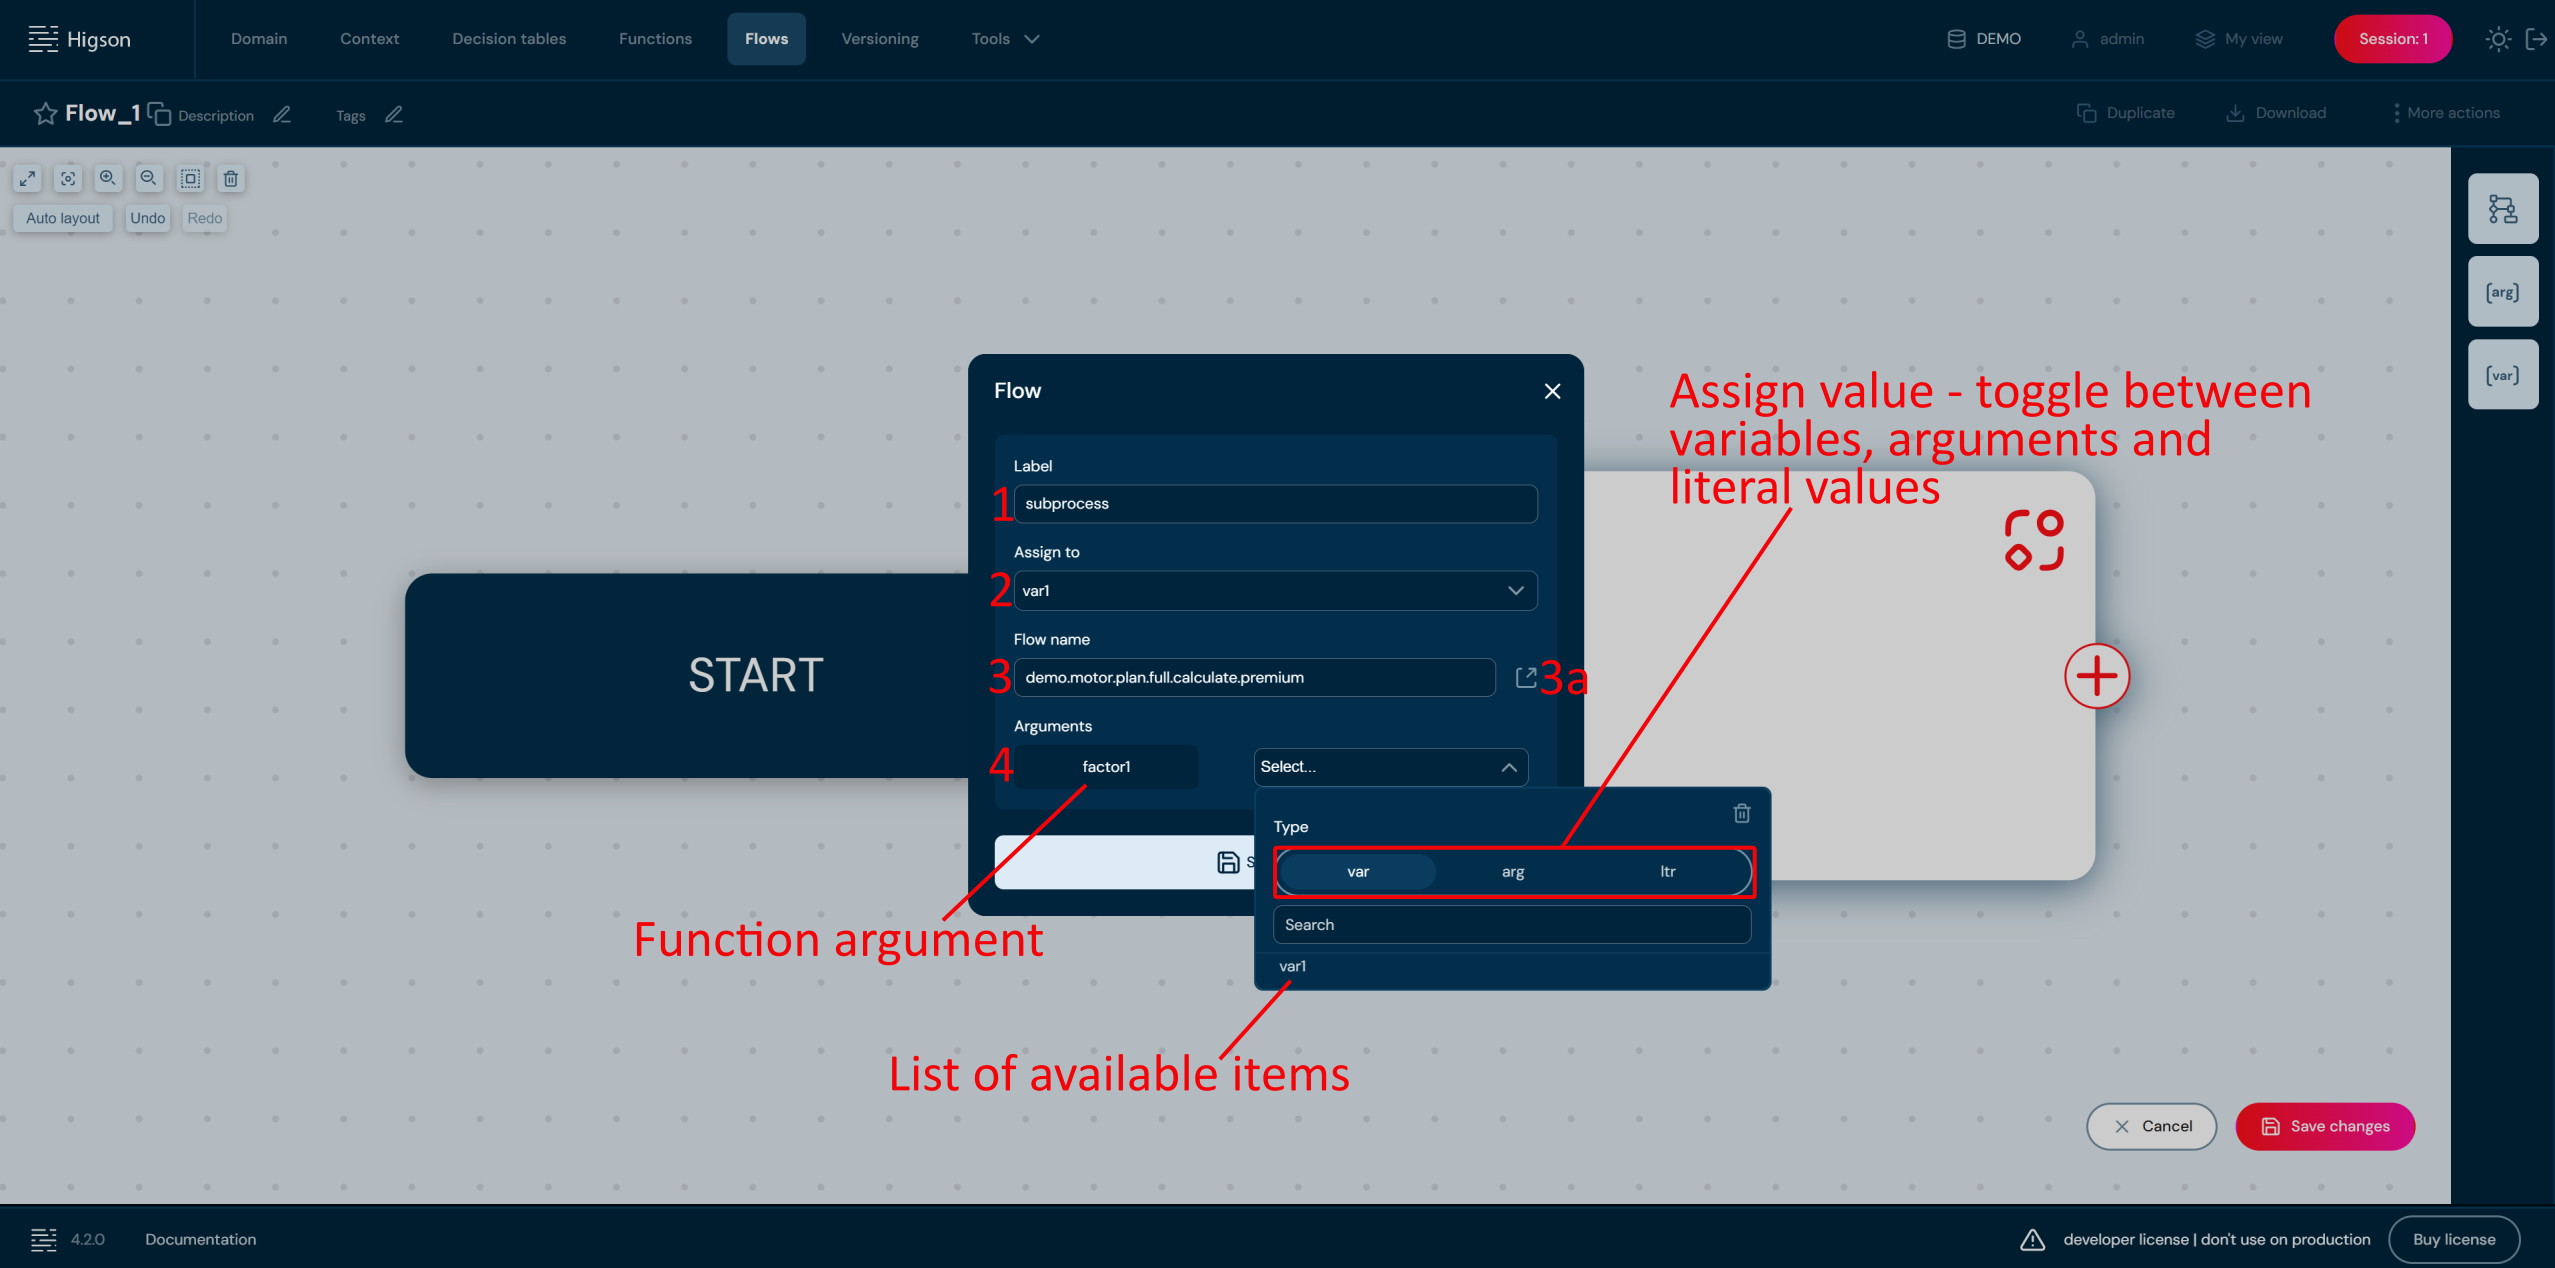
| No. | Field name | Description |
|---|---|---|
| 1 | Label | Label is visible on a tile in a layout view. By default it will be filled with the name of Flow. |
| 2 | Assign to | Drop-down list of variables defined in a flow. Choose a variable to which you want to assign the result of calling a flow. |
| 3 | Flow name | Choose Flow you want to call from the list of flows defined in the environment. |
| 3a | Open details | Opens the details of the flow in a new browser tab. |
| 4 | Arguments | Optionally, it is possible to pass arguments. If flow requires arguments you must pass the value using a variable or an argument defined in the flow, or specify a literal value. |
- Save changes.
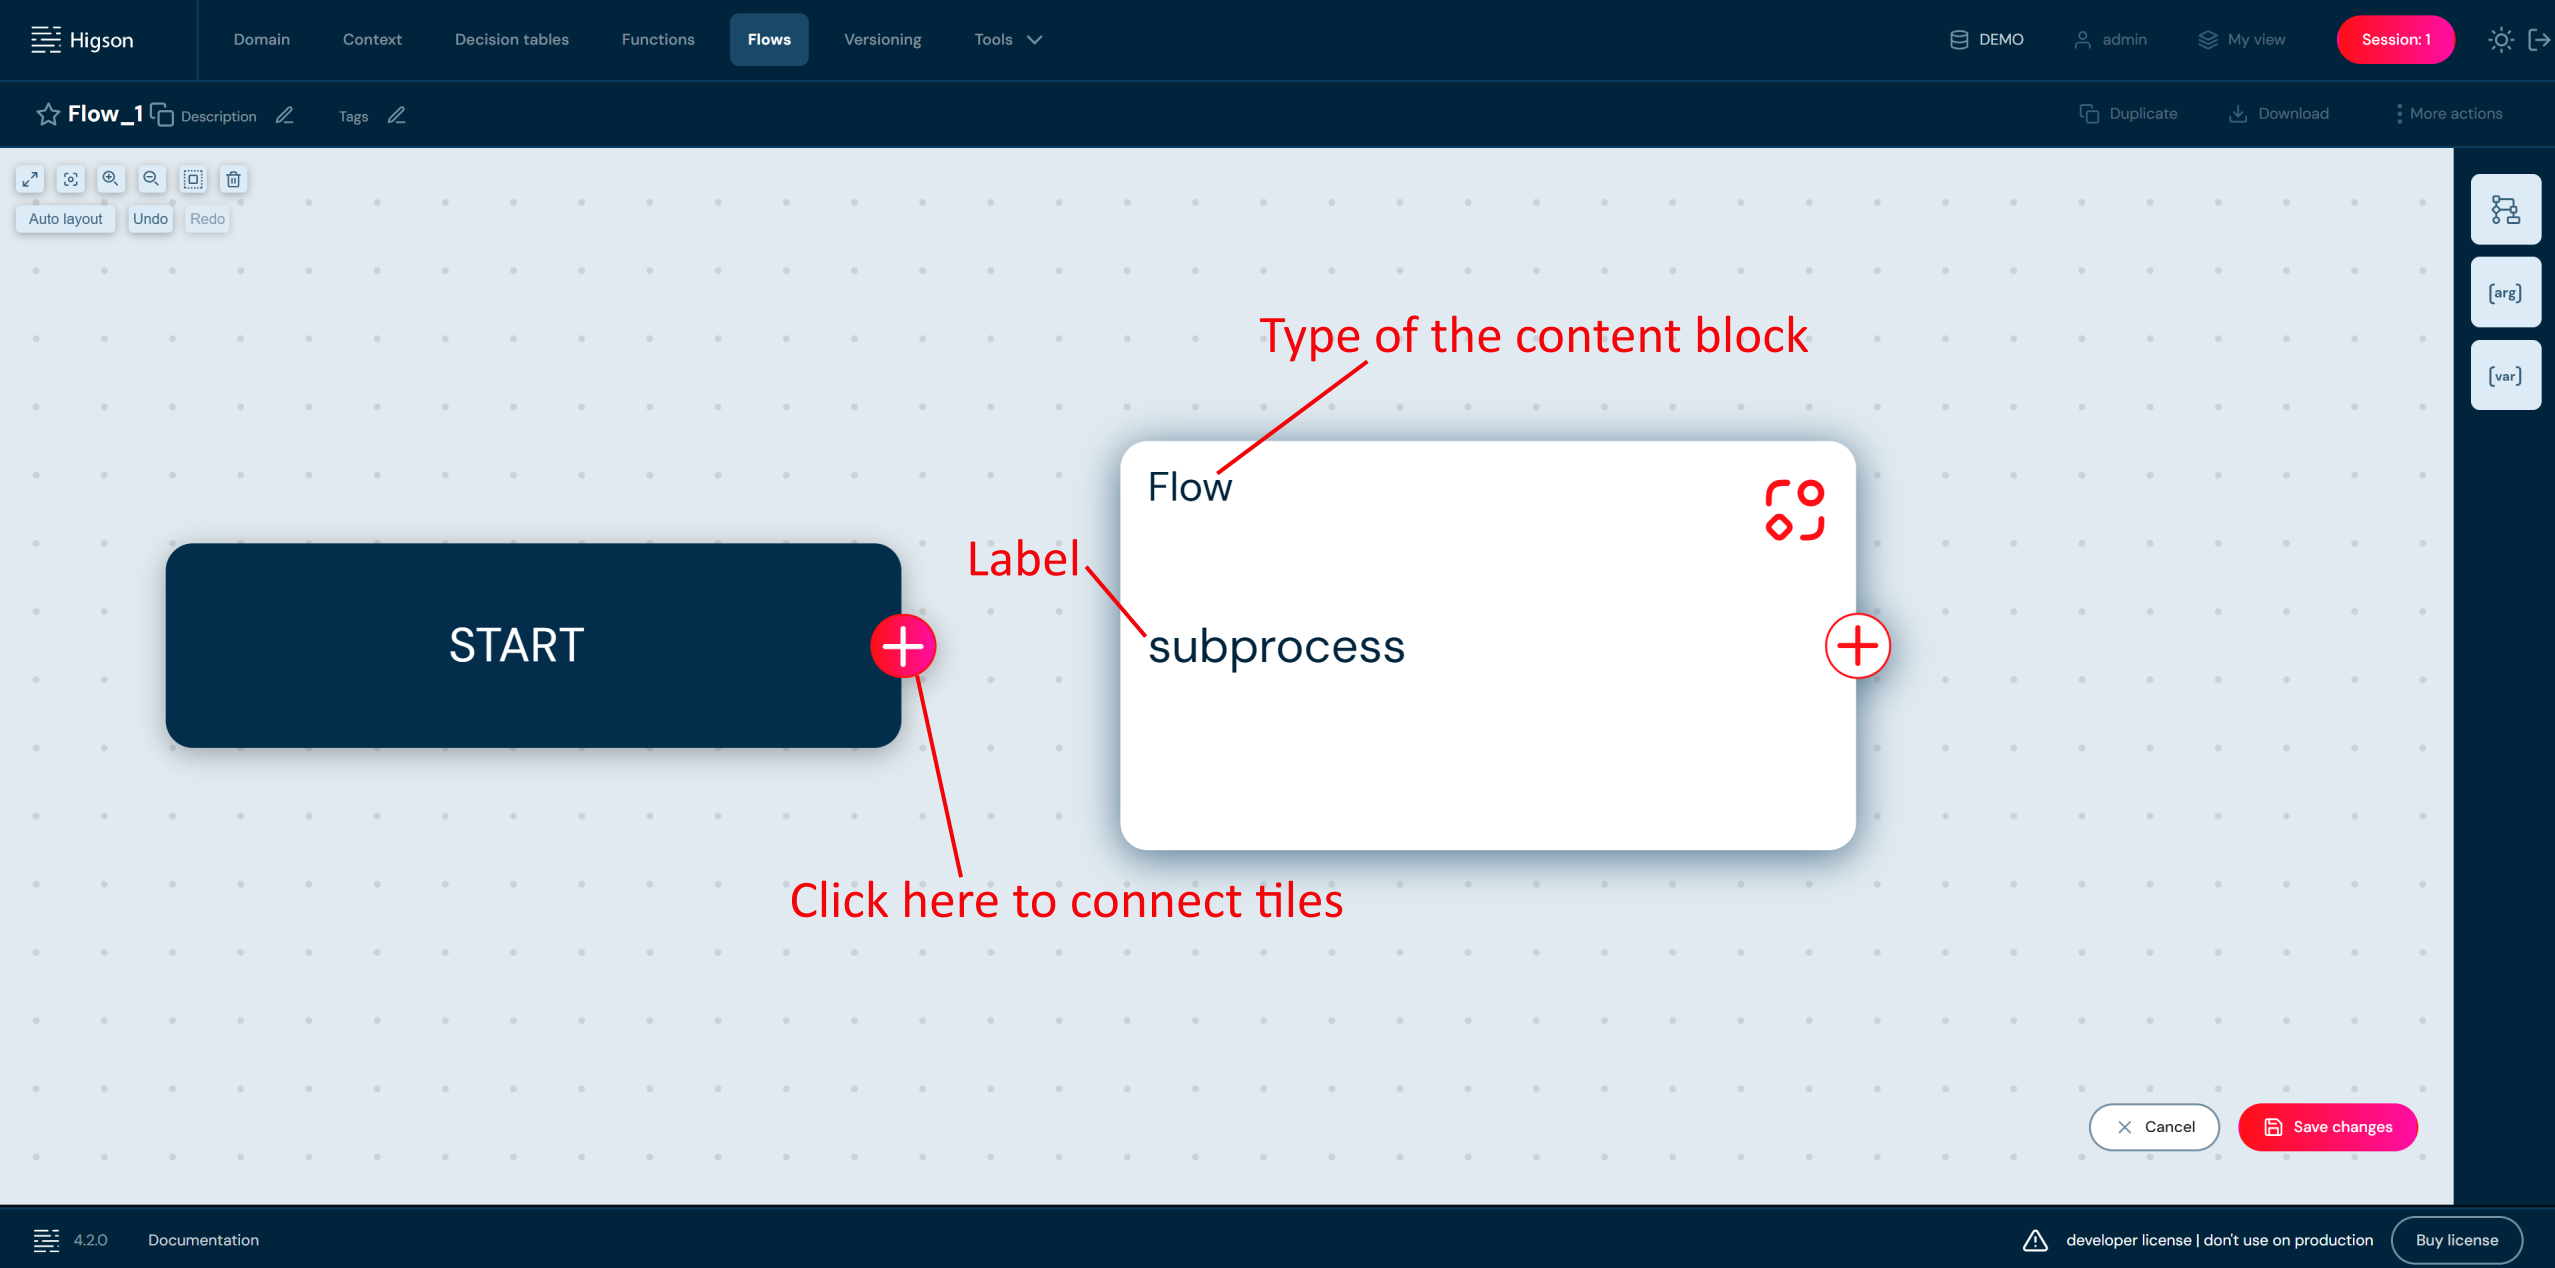
Flow content block on a layout view:
Adding Condition Block#
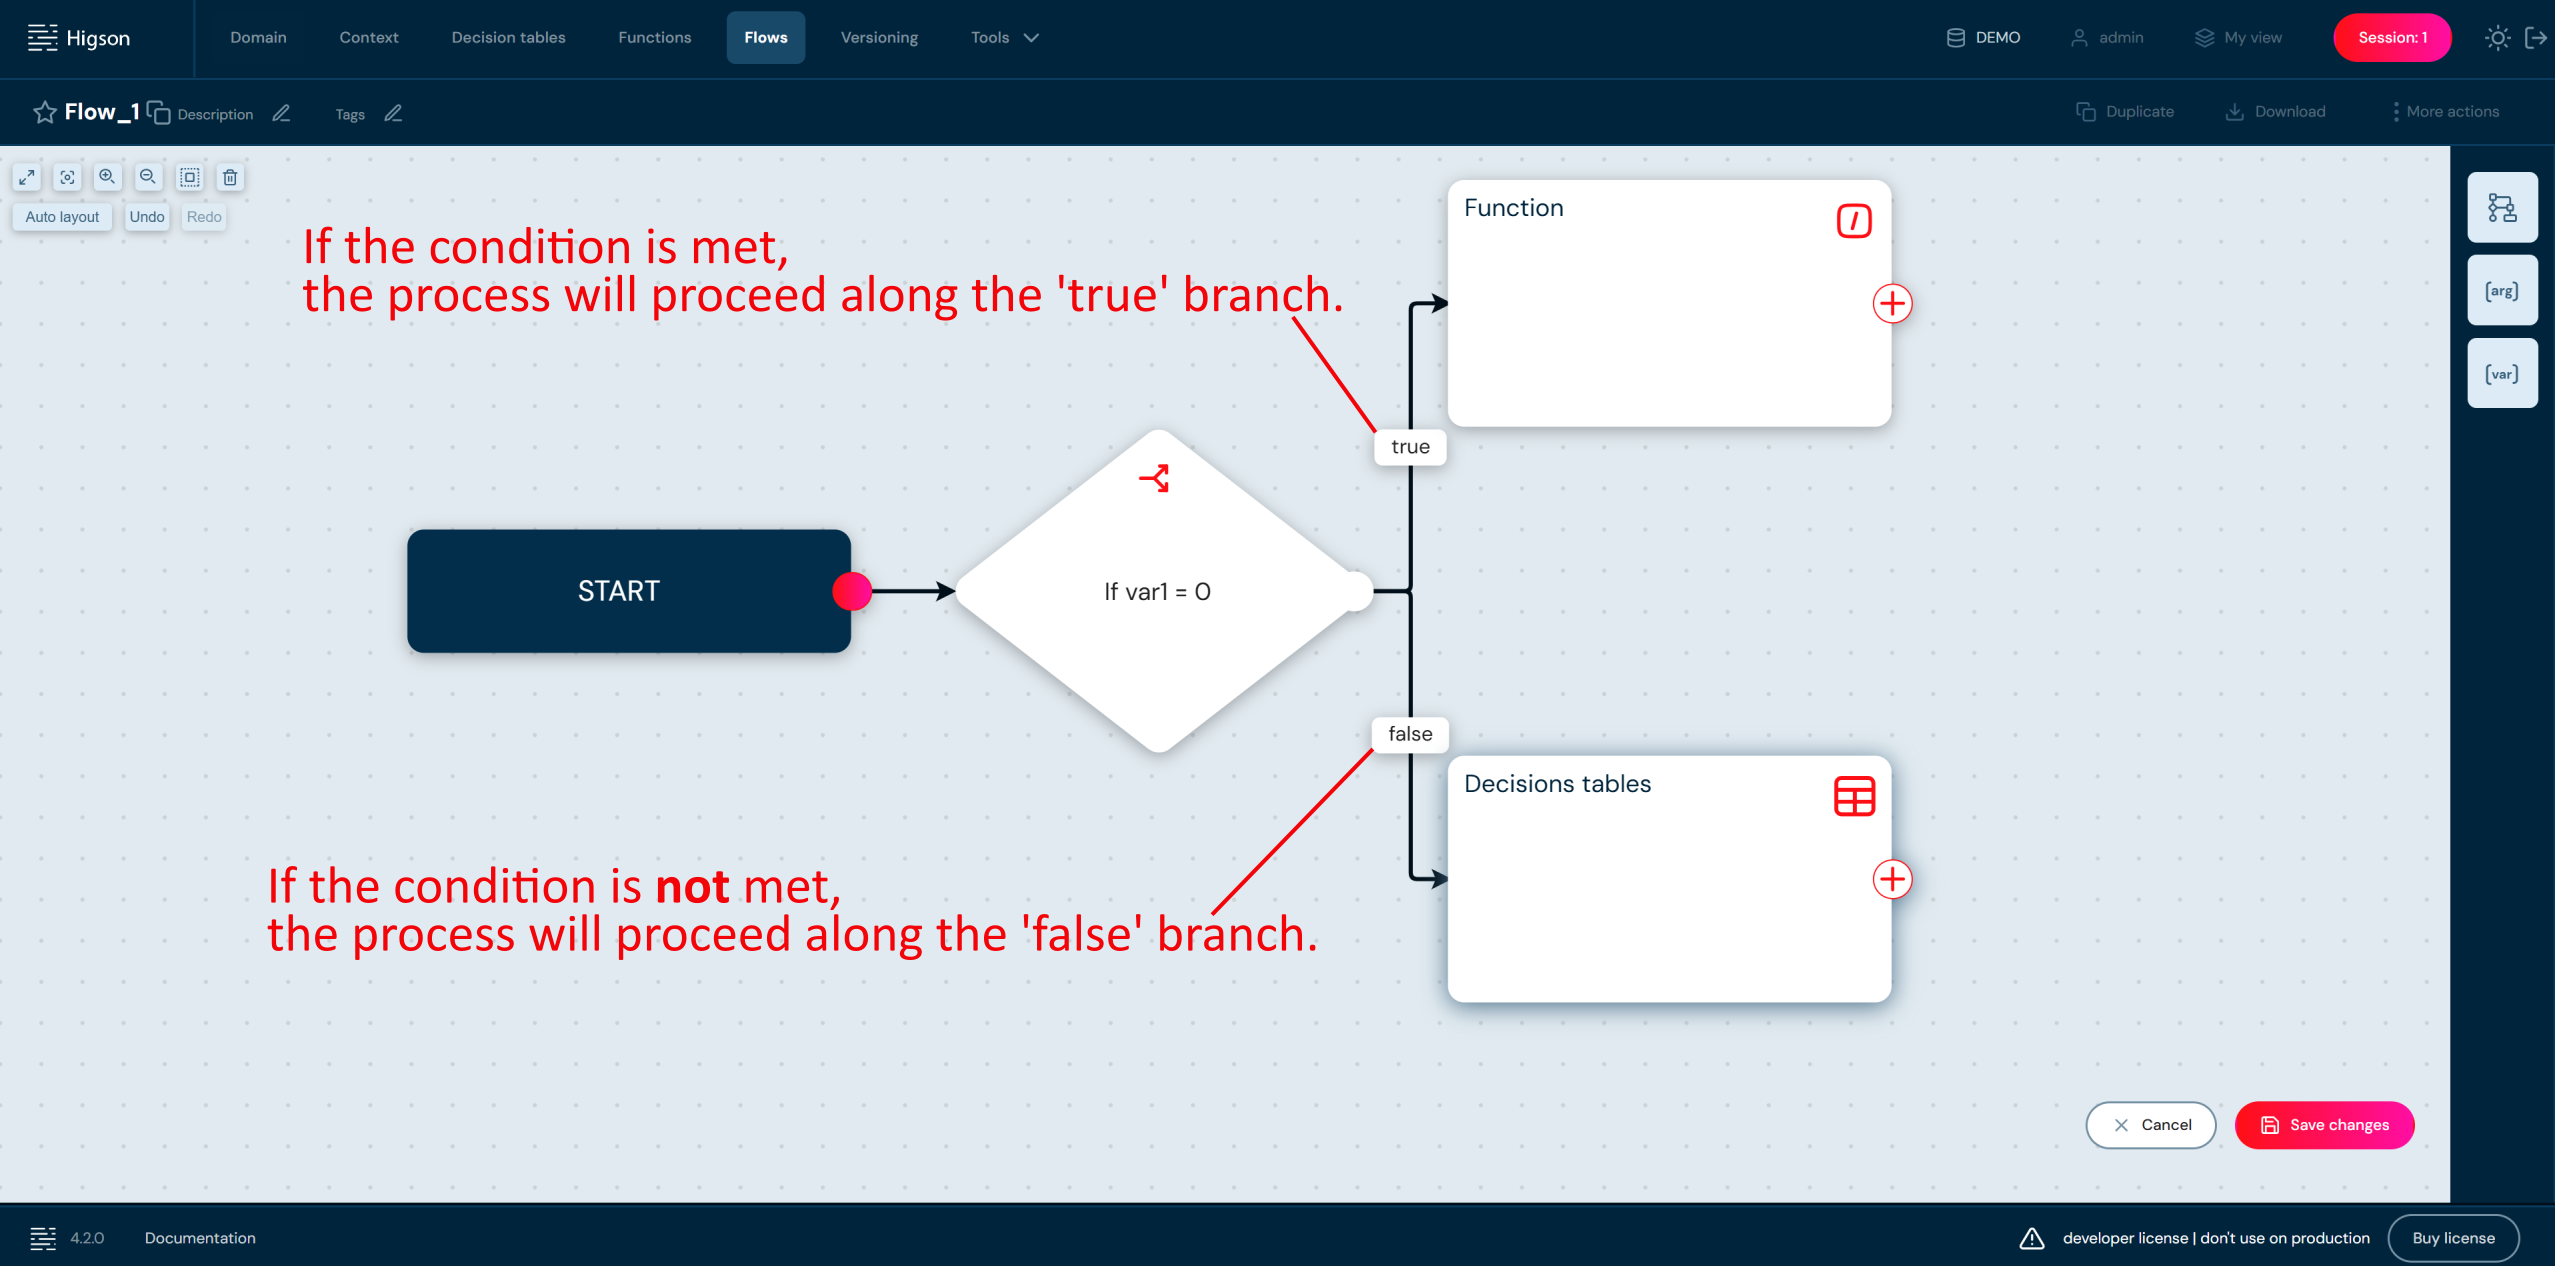
Condition Block is a decision gate that evaluates a condition and branches the process into two paths—true and false. Choose this block when the process should follow different paths depending on the data (for example, apply a minimum premium only when the calculated premium equals 0). It is the block that introduces branching logic into a flow.
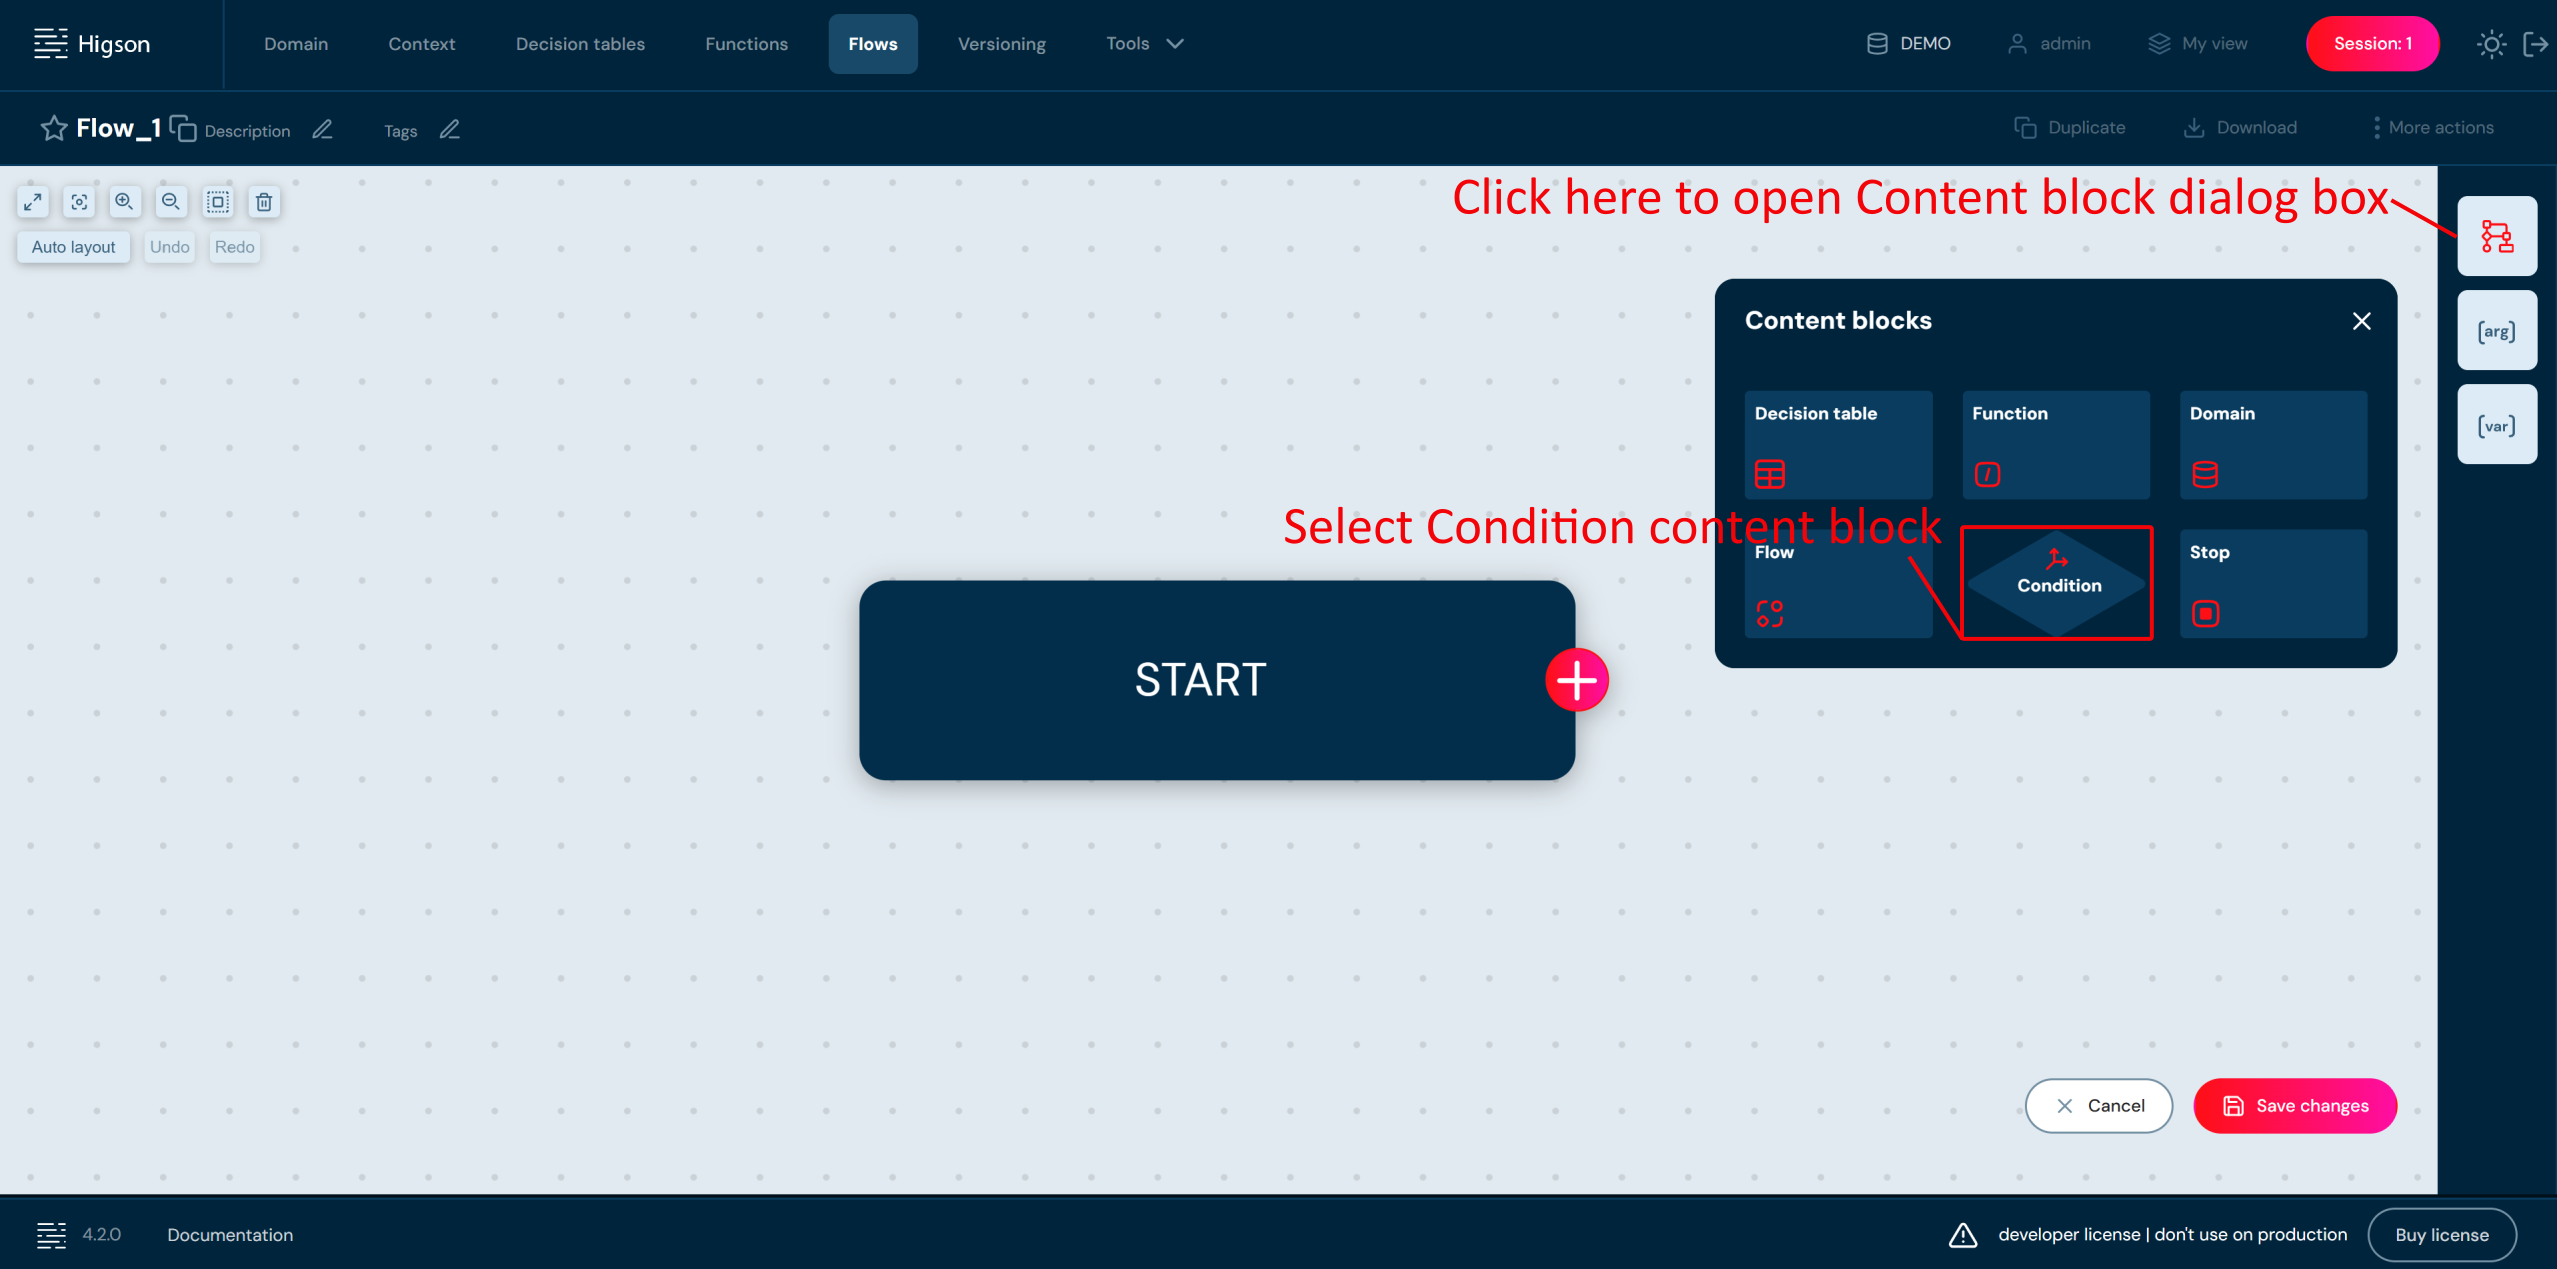
- To add Condition block select Content blocks button and choose Condition by double-click or drag & drop to the workspace.
- Double click on a Condition tile and complete fields.
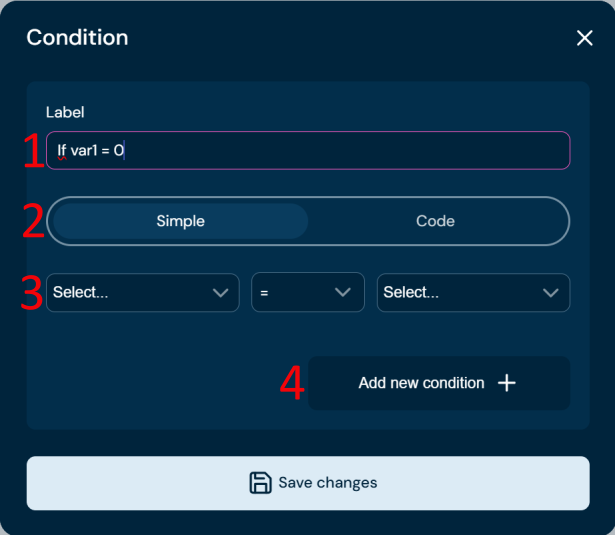
| No. | Field name | Description |
|---|---|---|
| 1 | Label | Label is visible on a tile in a layout view. This field is mandatory. |
| 2 | Condition type | Toggle between Simple and Code. |
| 3 | Condition | Choose element from template. |
| 4 | Add new condition | If necessary, add another condition. |
There are two methods to define a condition Simple and Code. Simple method is by using template with predefined components and operators. On both sides of the condition, we can choose context path, variable, argument or literal value. Code method allows to enter the code manually. It is possible to add multiple conditions by combining them with the operator AND or OR.
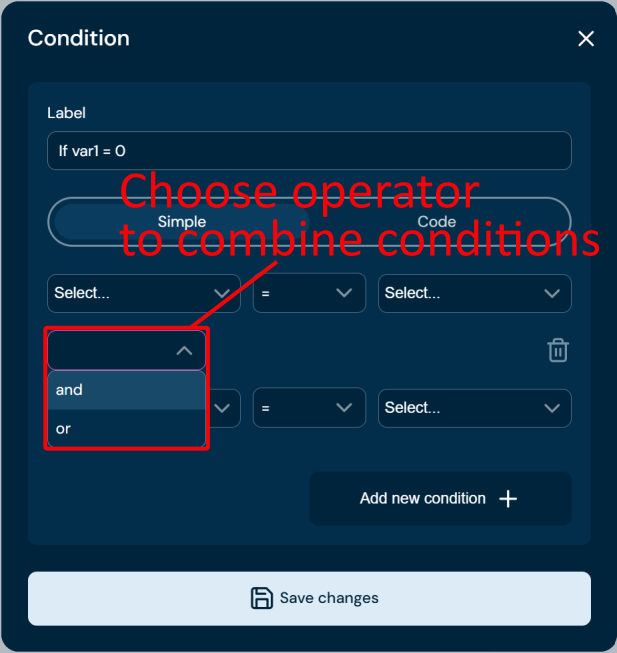
- Save changes.
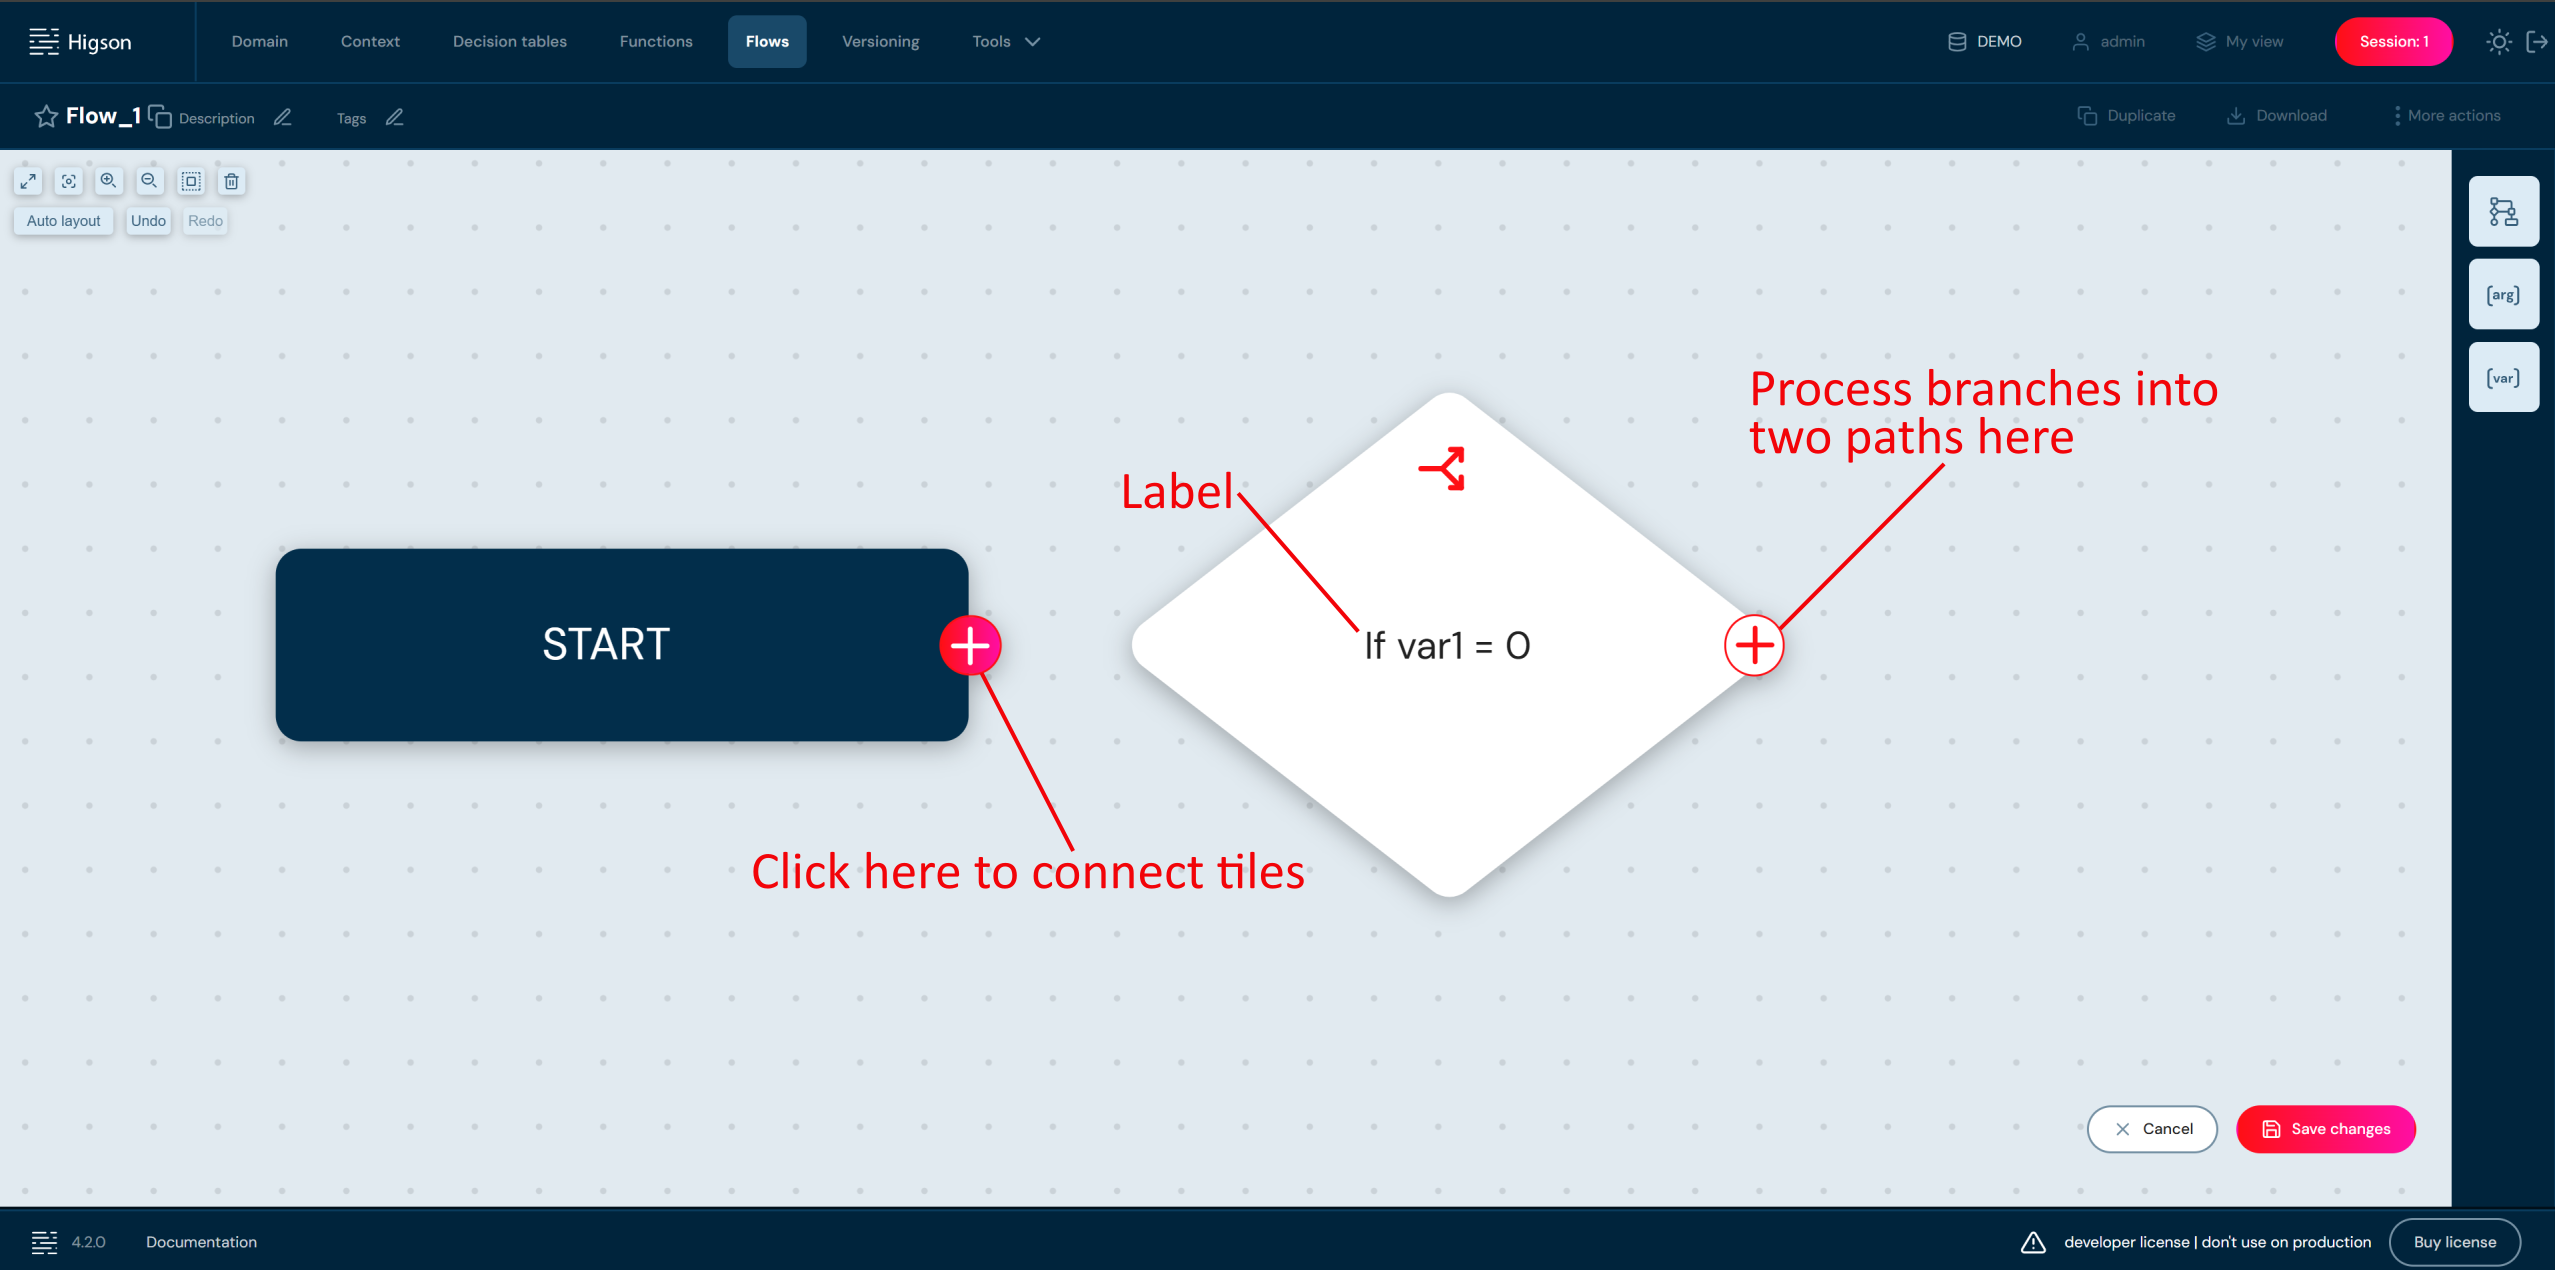
After adding the decision gate, the process branches into two paths depending on the condition met (true/false).
Adding Stop Block#
Stop Block marks the end of a path and completes the process. When the flow reaches a Stop block, it returns the value held by the variable(s) with the Returned flag selected. Add a Stop block to close every path of the flow. A flow can be saved only when at least one Stop block is present and all nodes are connected. It is the counterpart of the START point that begins every flow.
- To add Stop block select Content blocks button and choose Stop by double-click or drag & drop to the workspace.
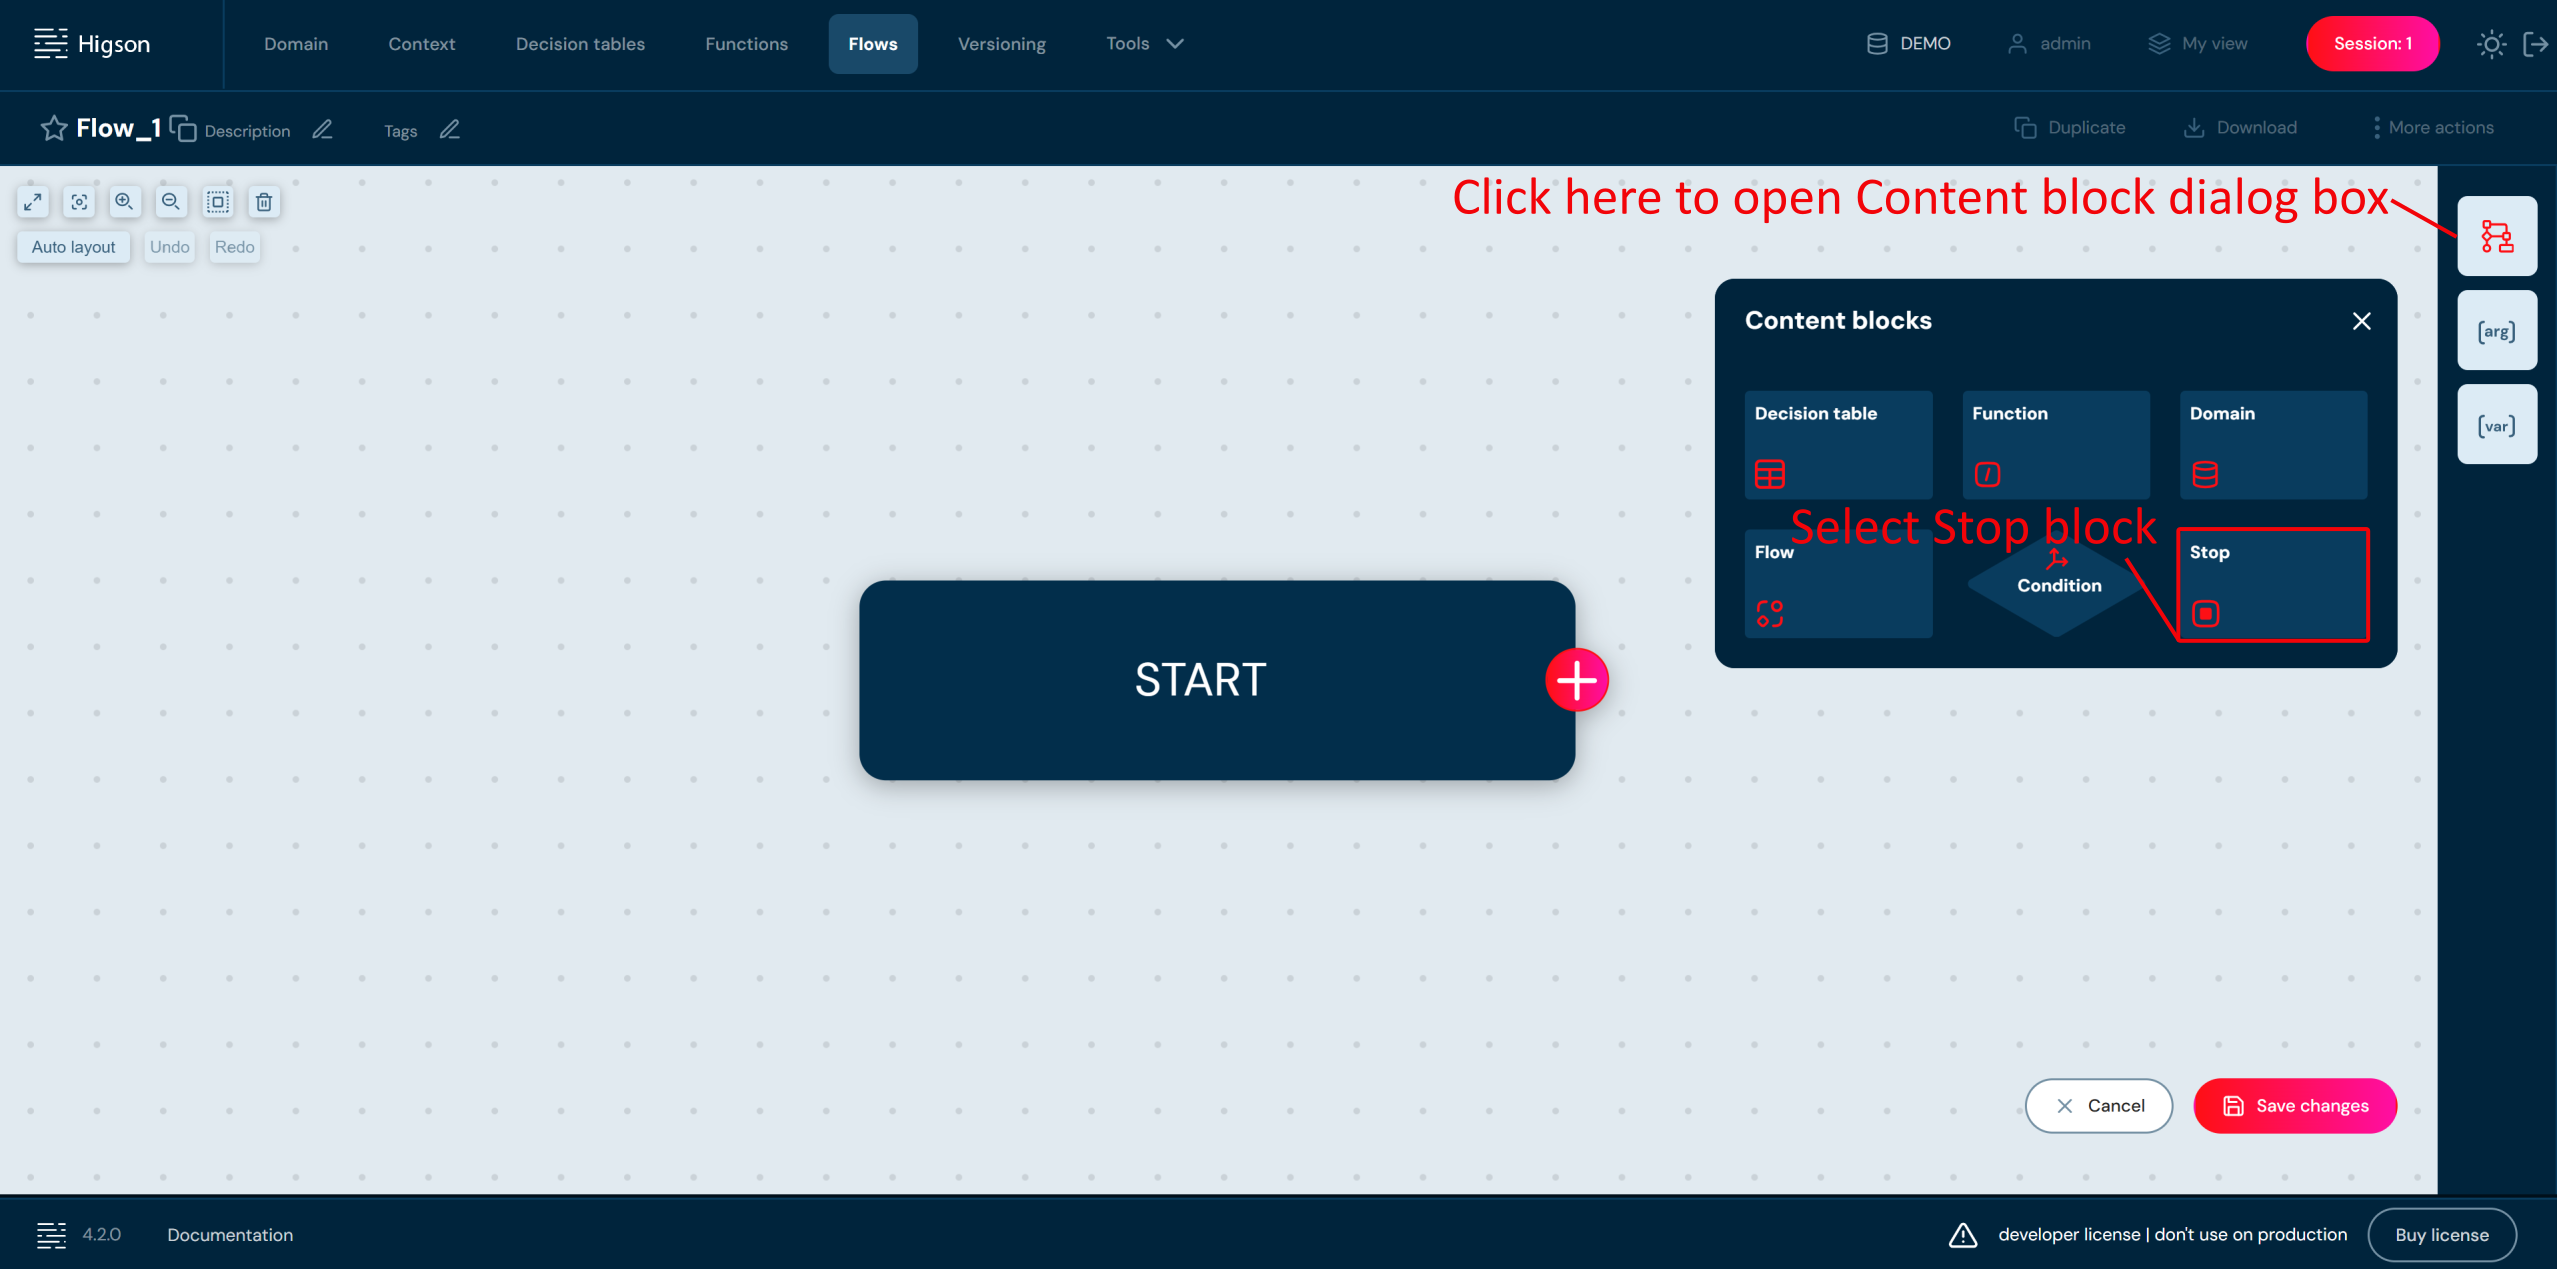
To complete the process you must select Stop tile and connect it accordingly.
- Save changes. Saving the flow is possible if there is at least one variable that returns true and all nodes are completed.