Decision Tables
A decision table presents values in rows and columns. Each row describes a situation when given inputs (columns) result in certain outputs (also columns). In other words, a decision matrix displays decisions based on certain criteria. You can create a decision table in Higson (so-called a parameter), where you define input and output columns and then populate data with values in rows.
If you are new to Higson decision tables, you may want to read the introductory section Introduction to Decision Tables.
Since version 4.3, Higson Studio also includes an AI Assistant that can help you conversationally design and refine decision tables. To learn how to enable it, see AI Assistant Configuration, and for usage instructions see AI Features in Decision Tables.
In order to see all Decision Tables select Decision Tables in the Main Toolbar.
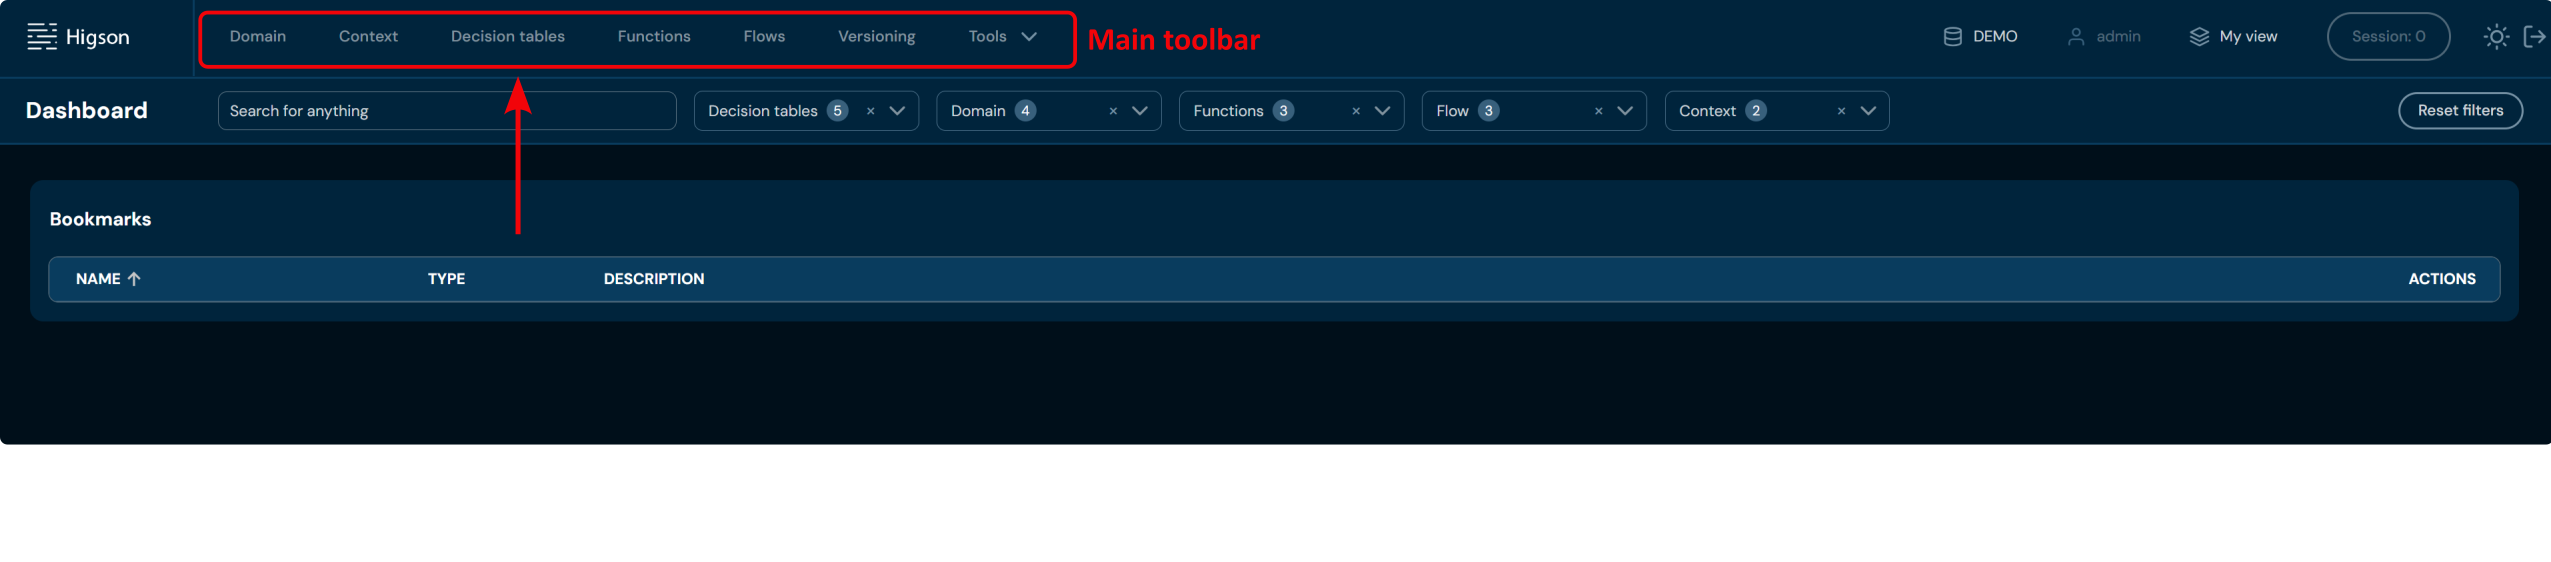
After that, when you enter Decision tables, you will see a screen of Decision Tables
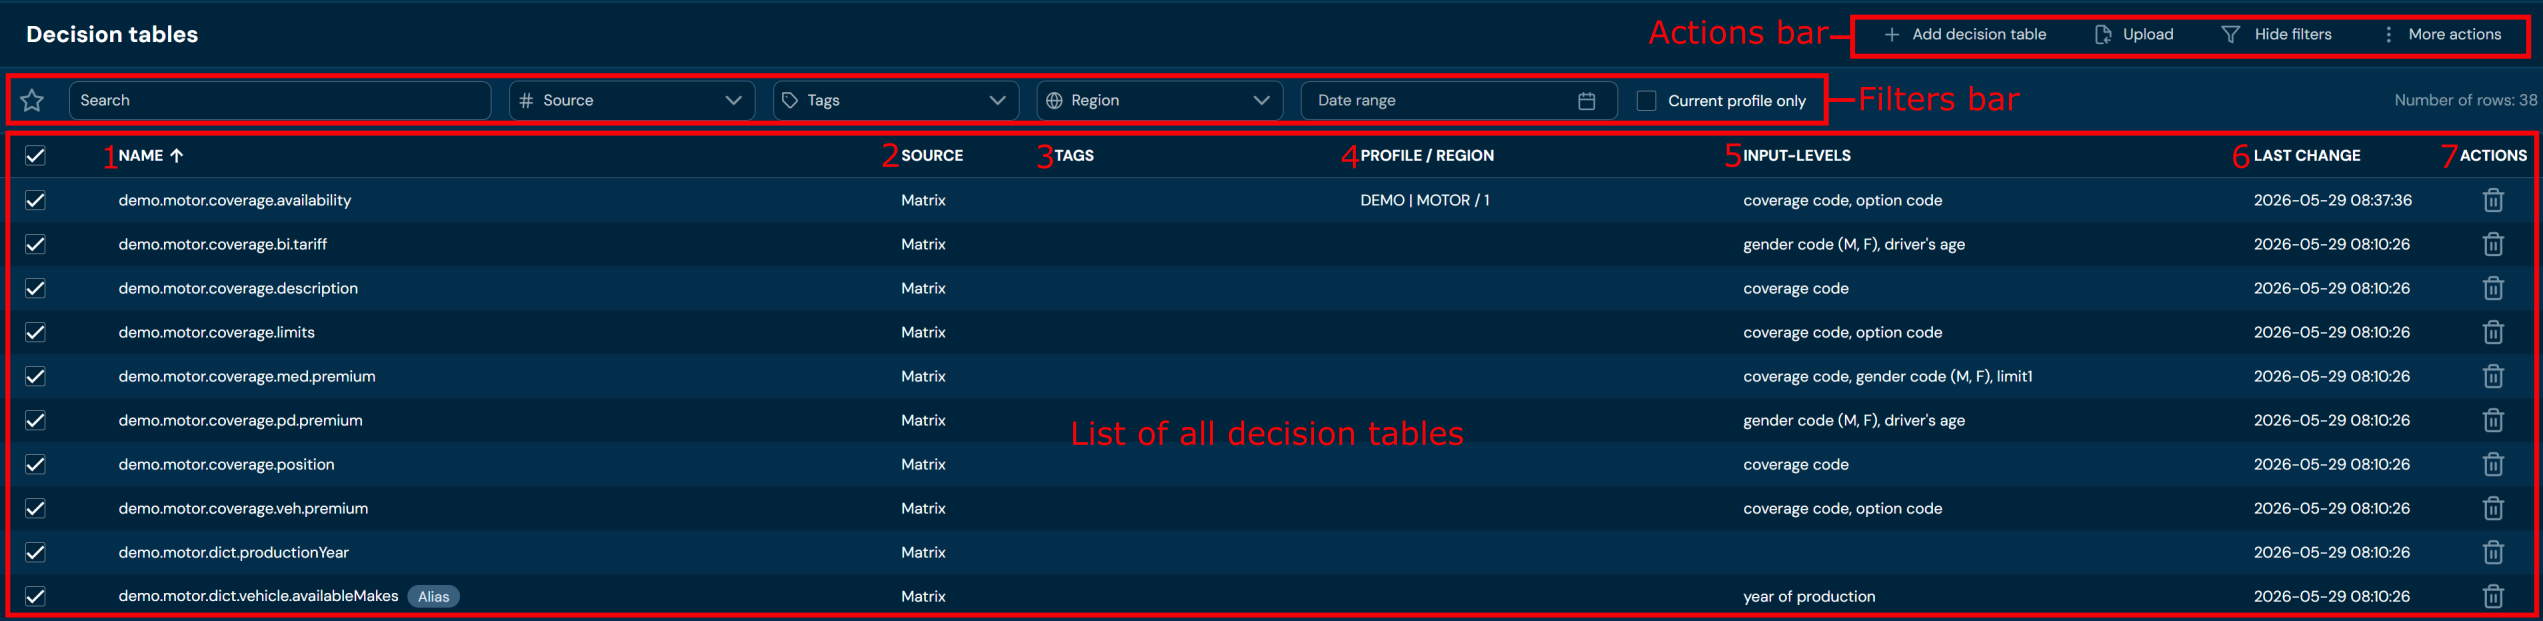
| No. | Column name | Description |
|---|---|---|
| 1. | Name | Full name of Decision table. |
| 2. | Source | Data source in the matrix. |
| 3. | Tags | List of all Tags assigned to the Decision table |
| 4. | Profile/Region | Profile and Region the decision table is assigned to. |
| 5. | Input levels | List of input levels for business data. |
| 6. | Last change | The last modification date of the decision table. |
| 7. | Actions | List of quick access actions. Remove action deletes decision table |
The decision tables list view depends on the selected profile.
If a profile is selected, both global items and items assigned to the selected profile are displayed.
If no profile is selected (not-chosen), only global items are visible.
Elements modified in current session are marked with pink dot:
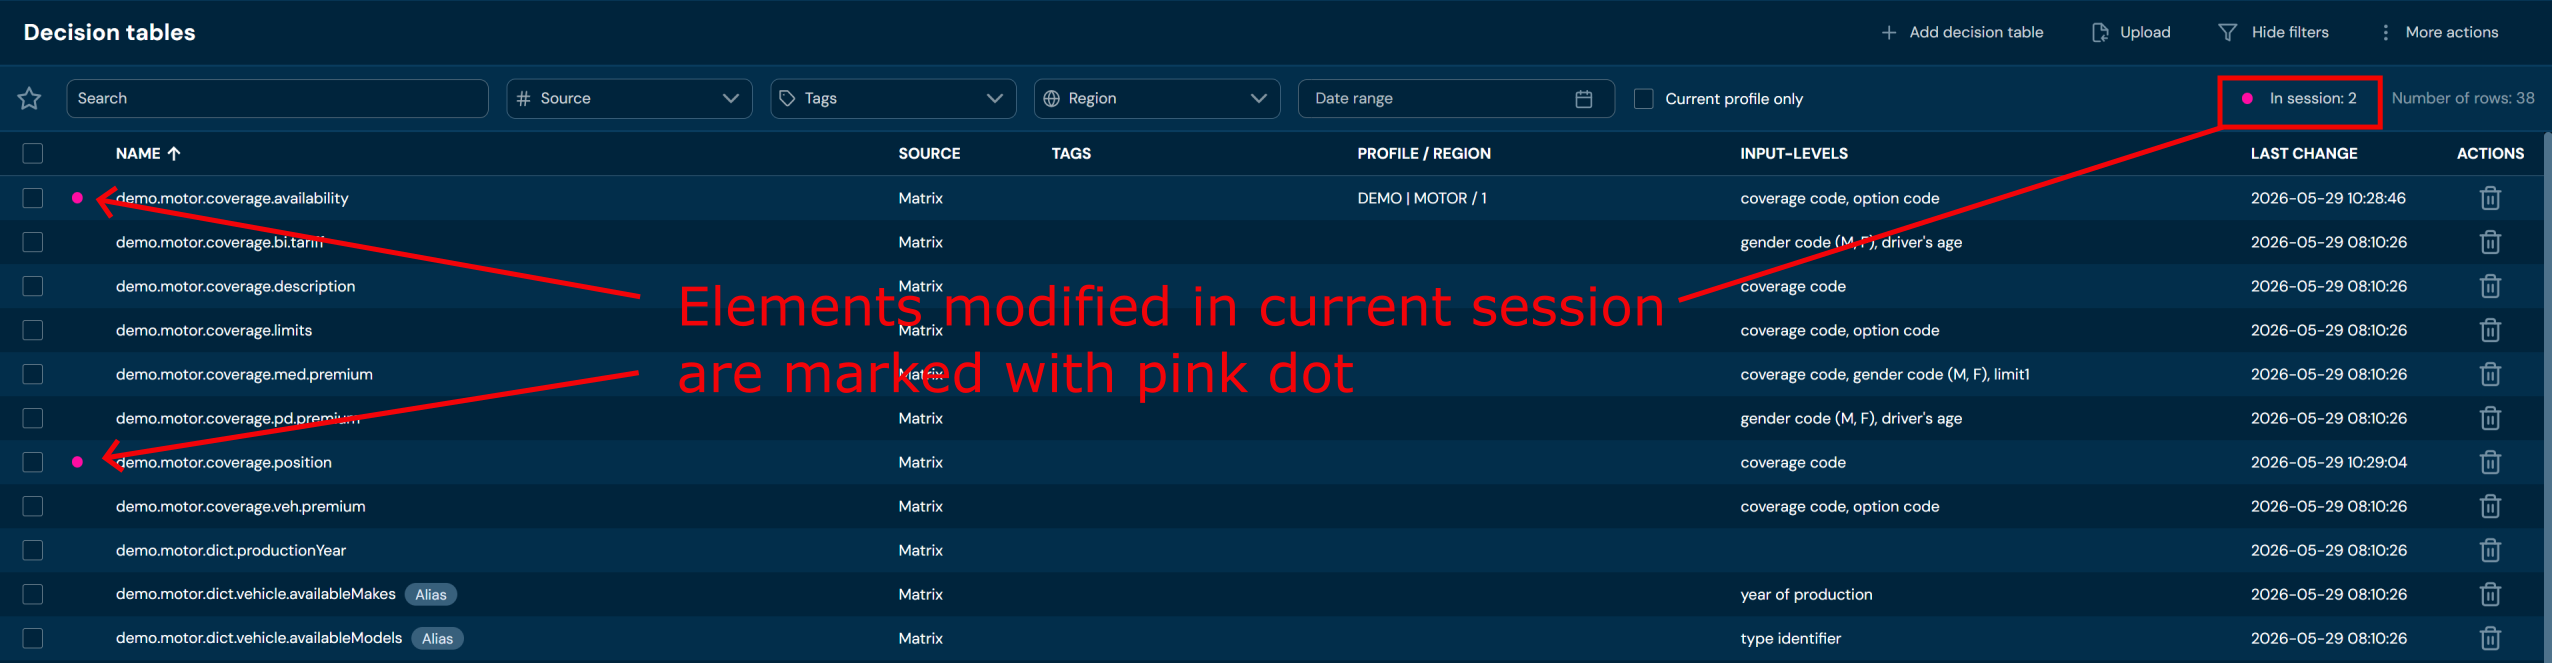
On this screen, you can apply Filters to search for specific decision table or to narrow down the number of displayed decision tables. You can also perform actions on one or multiple decision tables.
You can see All Actions available for the decision tables below:
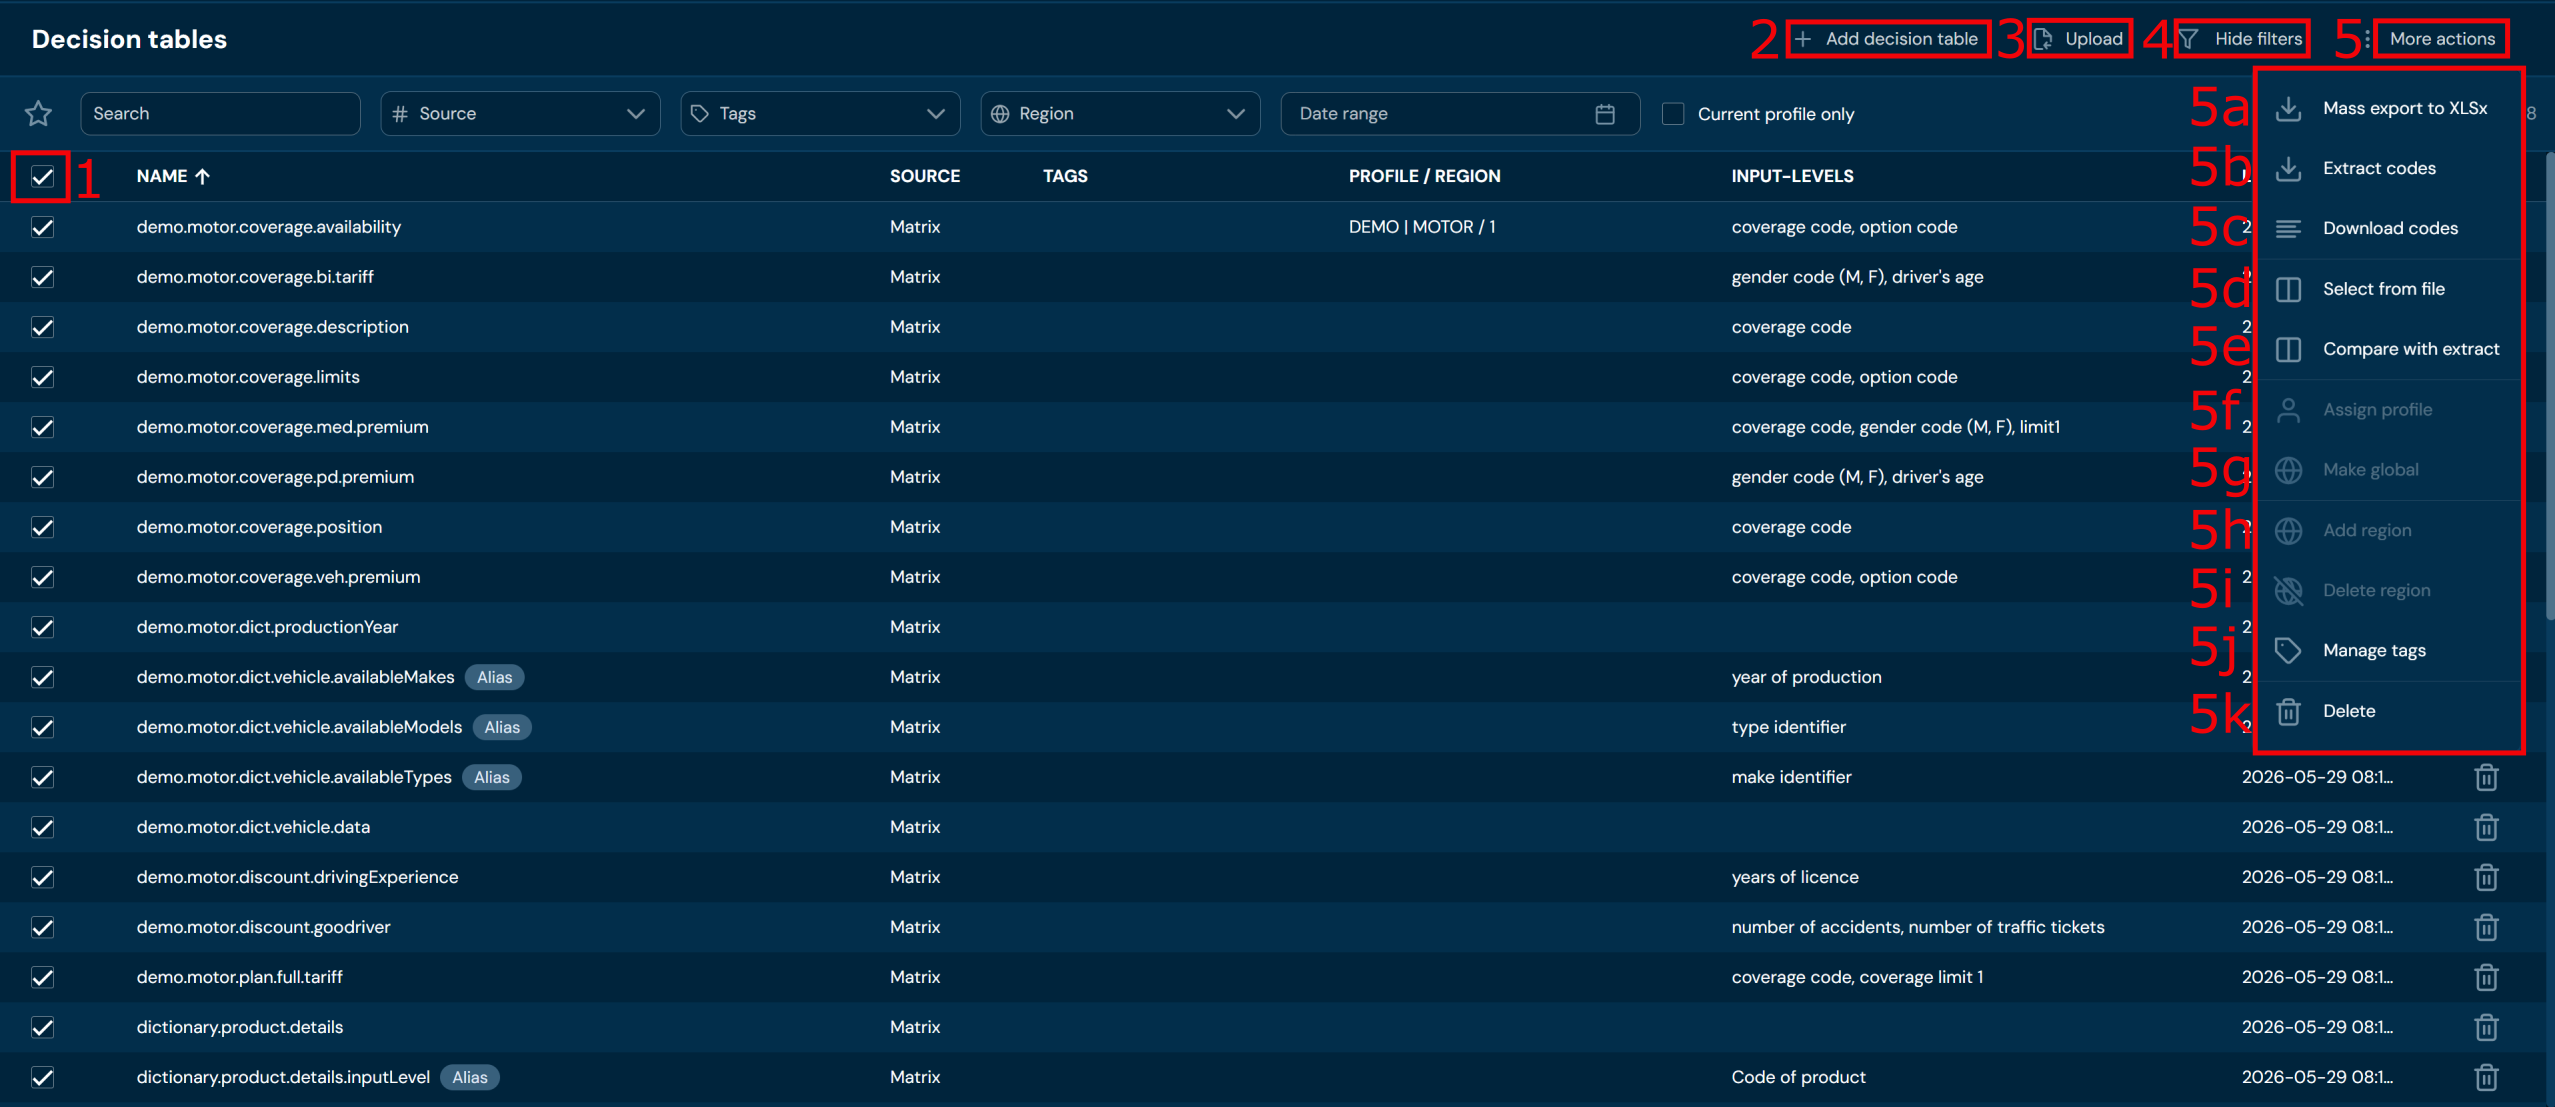
| No. | Action | Description |
|---|---|---|
| 1 | Checkboxes | Select the top checkbox to select all decision tables in the view or select individual checkboxes to group decision tables for actions 5a, 5b, 5c, 5f, 5g, 5h, 5i, 5j, 5k. |
| 2 | + Add decision tables | Opens a step-by-step decision tables wizard. Allows you to create new decision tables. |
| 3 | Upload | Allows importing decision tables from a ZIP or xlsx file. |
| 4 | Hide filters | Hides or reveals the Filters bar accordingly. If Filter bar is visible, then action Hide filters is available. If it’s hidden, then action Show filters is available. |
| 5 | More actions | The drop-down menu that contains actions 5a-5k. Bear in mind that actions 5a, 5b, 5c, 5f, 5g, 5h, 5i, 5j, 5k are available only if at least one decision table is selected (at least one checkbox is checked). Otherwise, the mentioned actions will be greyed out (see picture below the table). |
| 5a | Mass export to XLSx | Downloads a ZIP file that contains XLSX file and files with decision tables body. |
| 5b | Extract codes | Downloads an XLSX file that contains decision tables extract. |
| 5c | Download codes | Download a TXT file with decision tables names. |
| 5d | Select from file | Allows uploading a TXT file with decision tables. After uploading, all decision tables present in the file will be selected. |
| 5e | Compare with extract | Allows uploading an XLSX file with decision tables extract. Makes comparison between the provided file and the environment. |
| 5f | Assign profile | Assign profile to selected decision tables. |
| 5g | Make global | Make global selected decision tables. |
| 5h | Add region | Adds regions to all selected decision tables. |
| 5i | Remove region | Removes regions from all selected decision tables. |
| 5j | Manage tags | Allows adding/removing tags to/from selected decision tables. |
| 5k | Remove | Delete all selected decision tables. |
Some of the actions in the More actions drop-down menu are grayed out, when no decision tables are selected
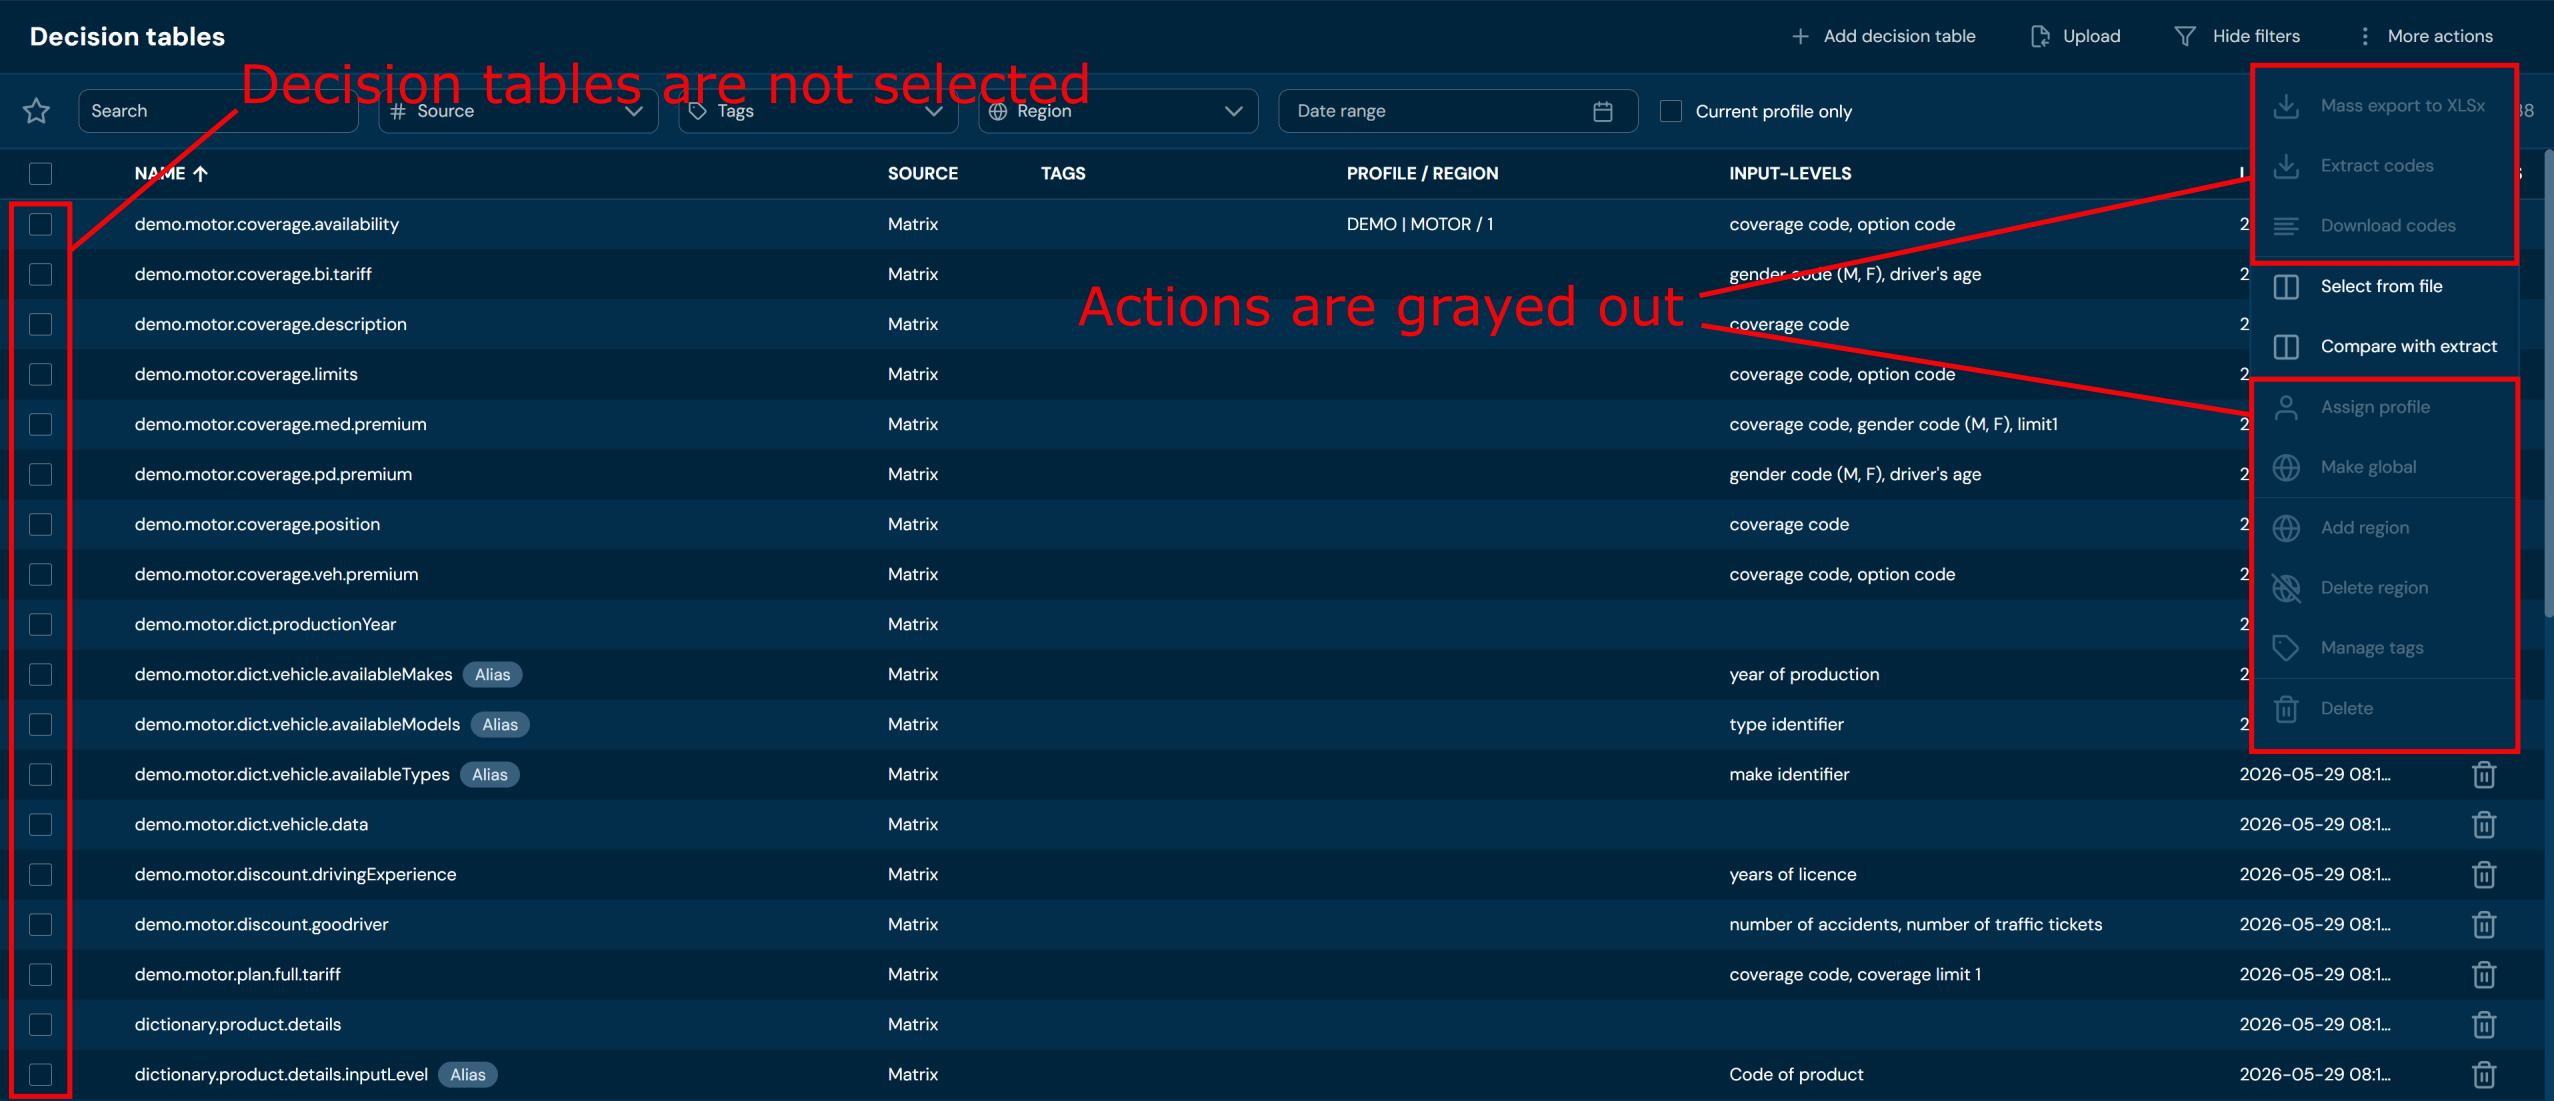
You can see all Filters available for decision tables below:

| No. | Filter name | Description |
|---|---|---|
| 1 | Search text field | Filter by any string provided by the user. |
| 2 | Source | Filter by data source for the matrix. |
| 3 | Tags | Filter by assigned tags; only tags assigned to at least one decision table are visible for selection. |
| 4 | Region | Filter by assigned regions; only regions assigned to at least one decision table are visible for selection. |
| 5 | Date range | Filter by last change date in format YYYY/MM/DD - YYYY/MM/DD. |
| 6 | Current profile only | Check this box to limit the table view to those assigned to the currently selected profile. Otherwise, global tables will also be displayed. |
Add Decision Table#
If you want to add Decision tables follow these steps:
-
Choose Decision tables in Main toolbar.
-
Choose + Add Decision table in All actions bar.
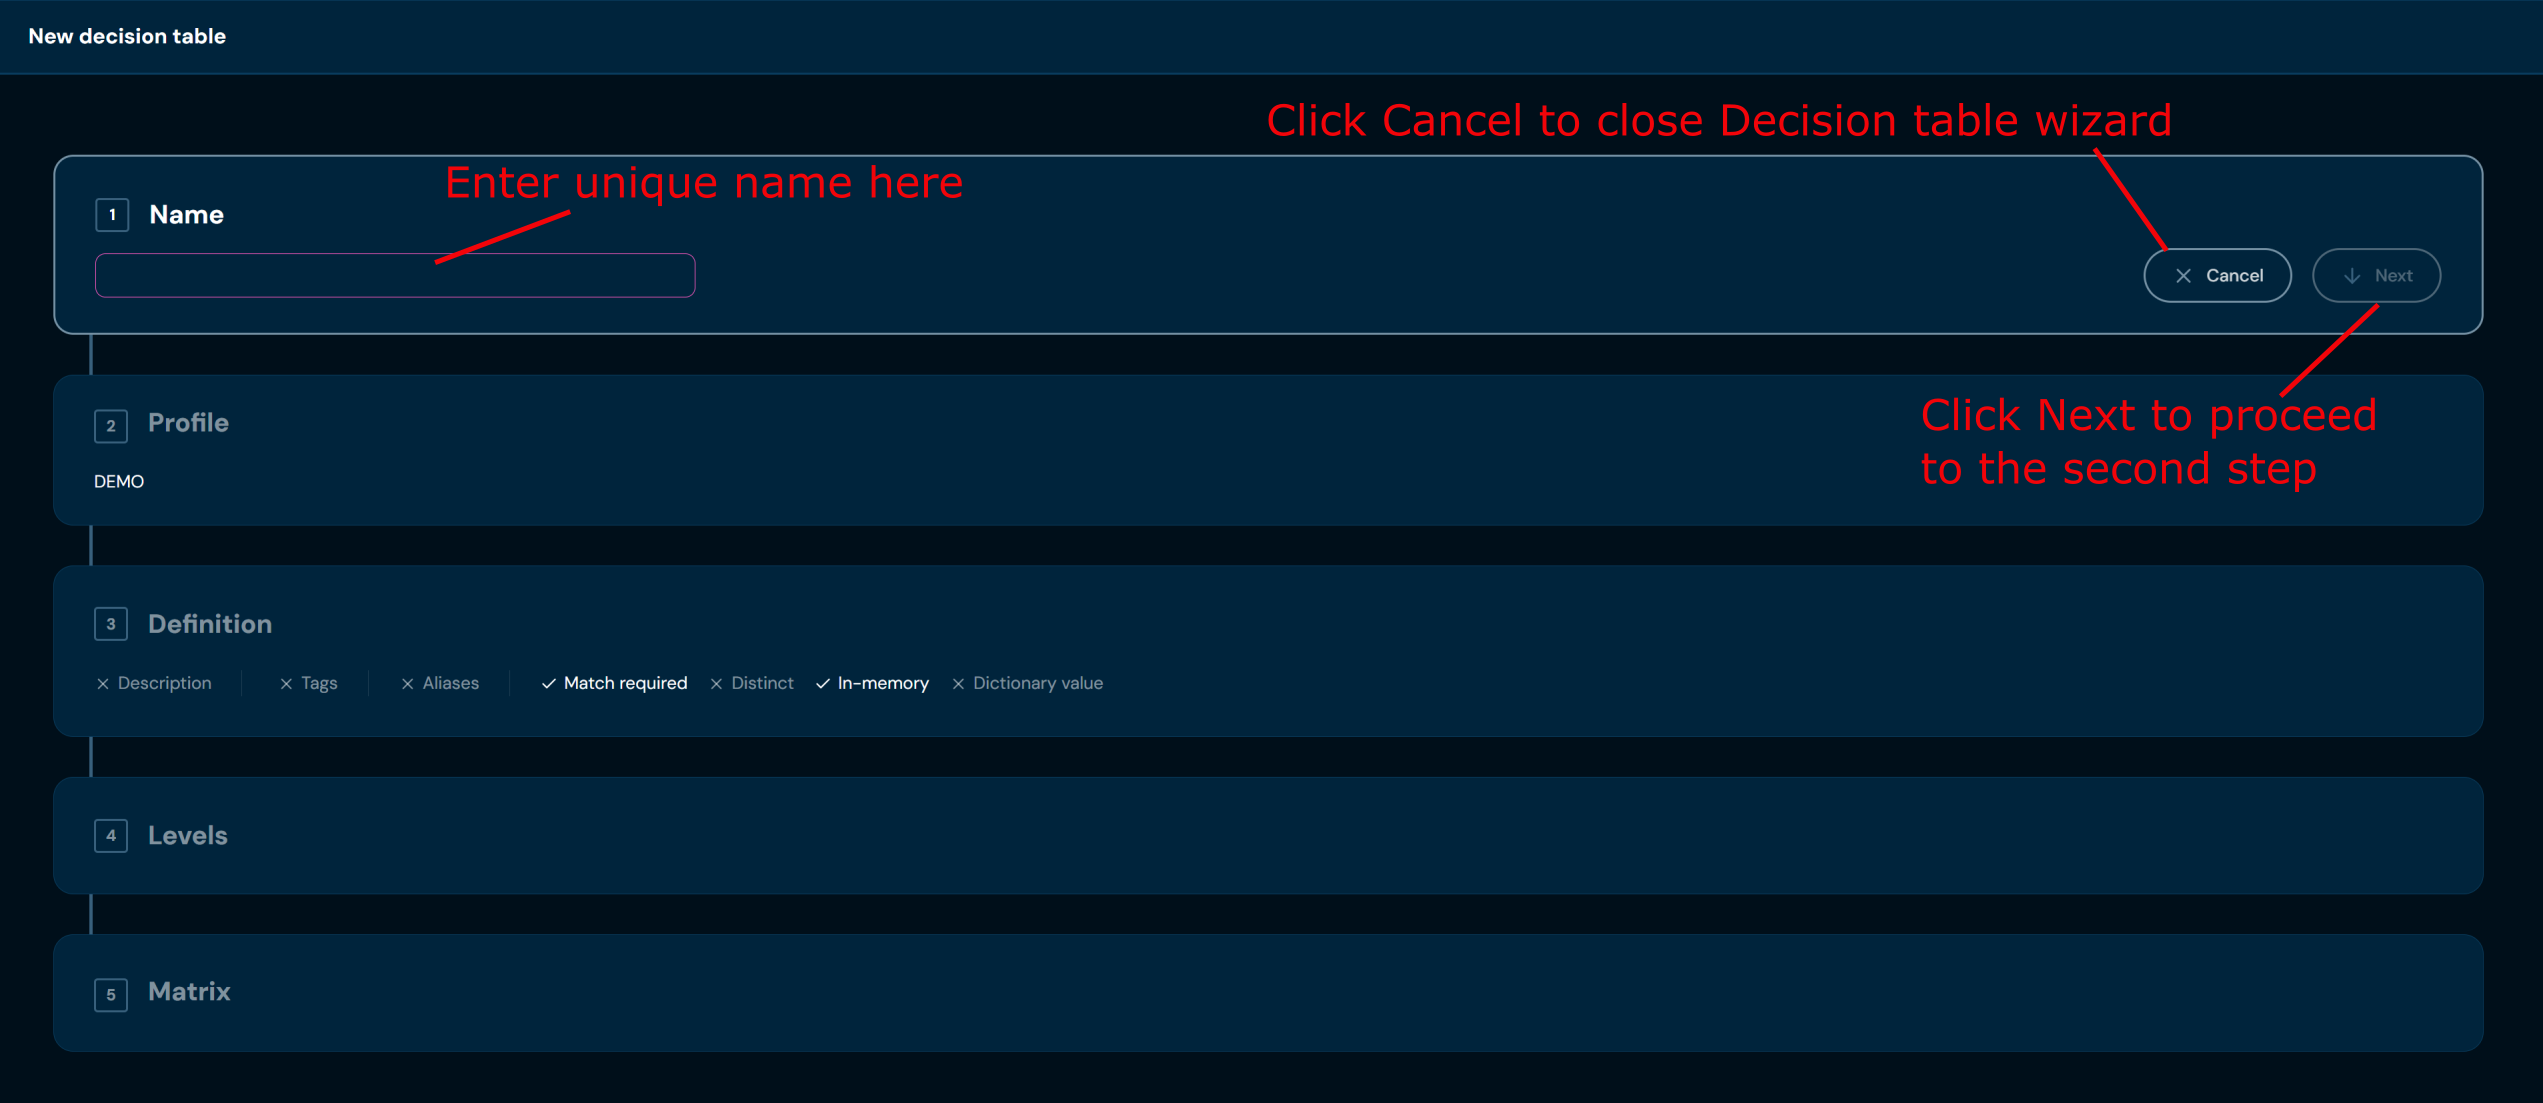
a. Choosing + Add Decision table opens a step-by-step wizard.
-
In step 1. Name, you need to provide a unique decision table code/name. Name can contain only characters from collection a-z; 0-9; “.”; “-”; “_” and it can’t start with “-”.
a. If you changed your mind and don’t want to create a new decision table, you can choose Cancel in step 1. Name.
-
Choose Next.
a. If you enter illegal characters, then the validation error will appear

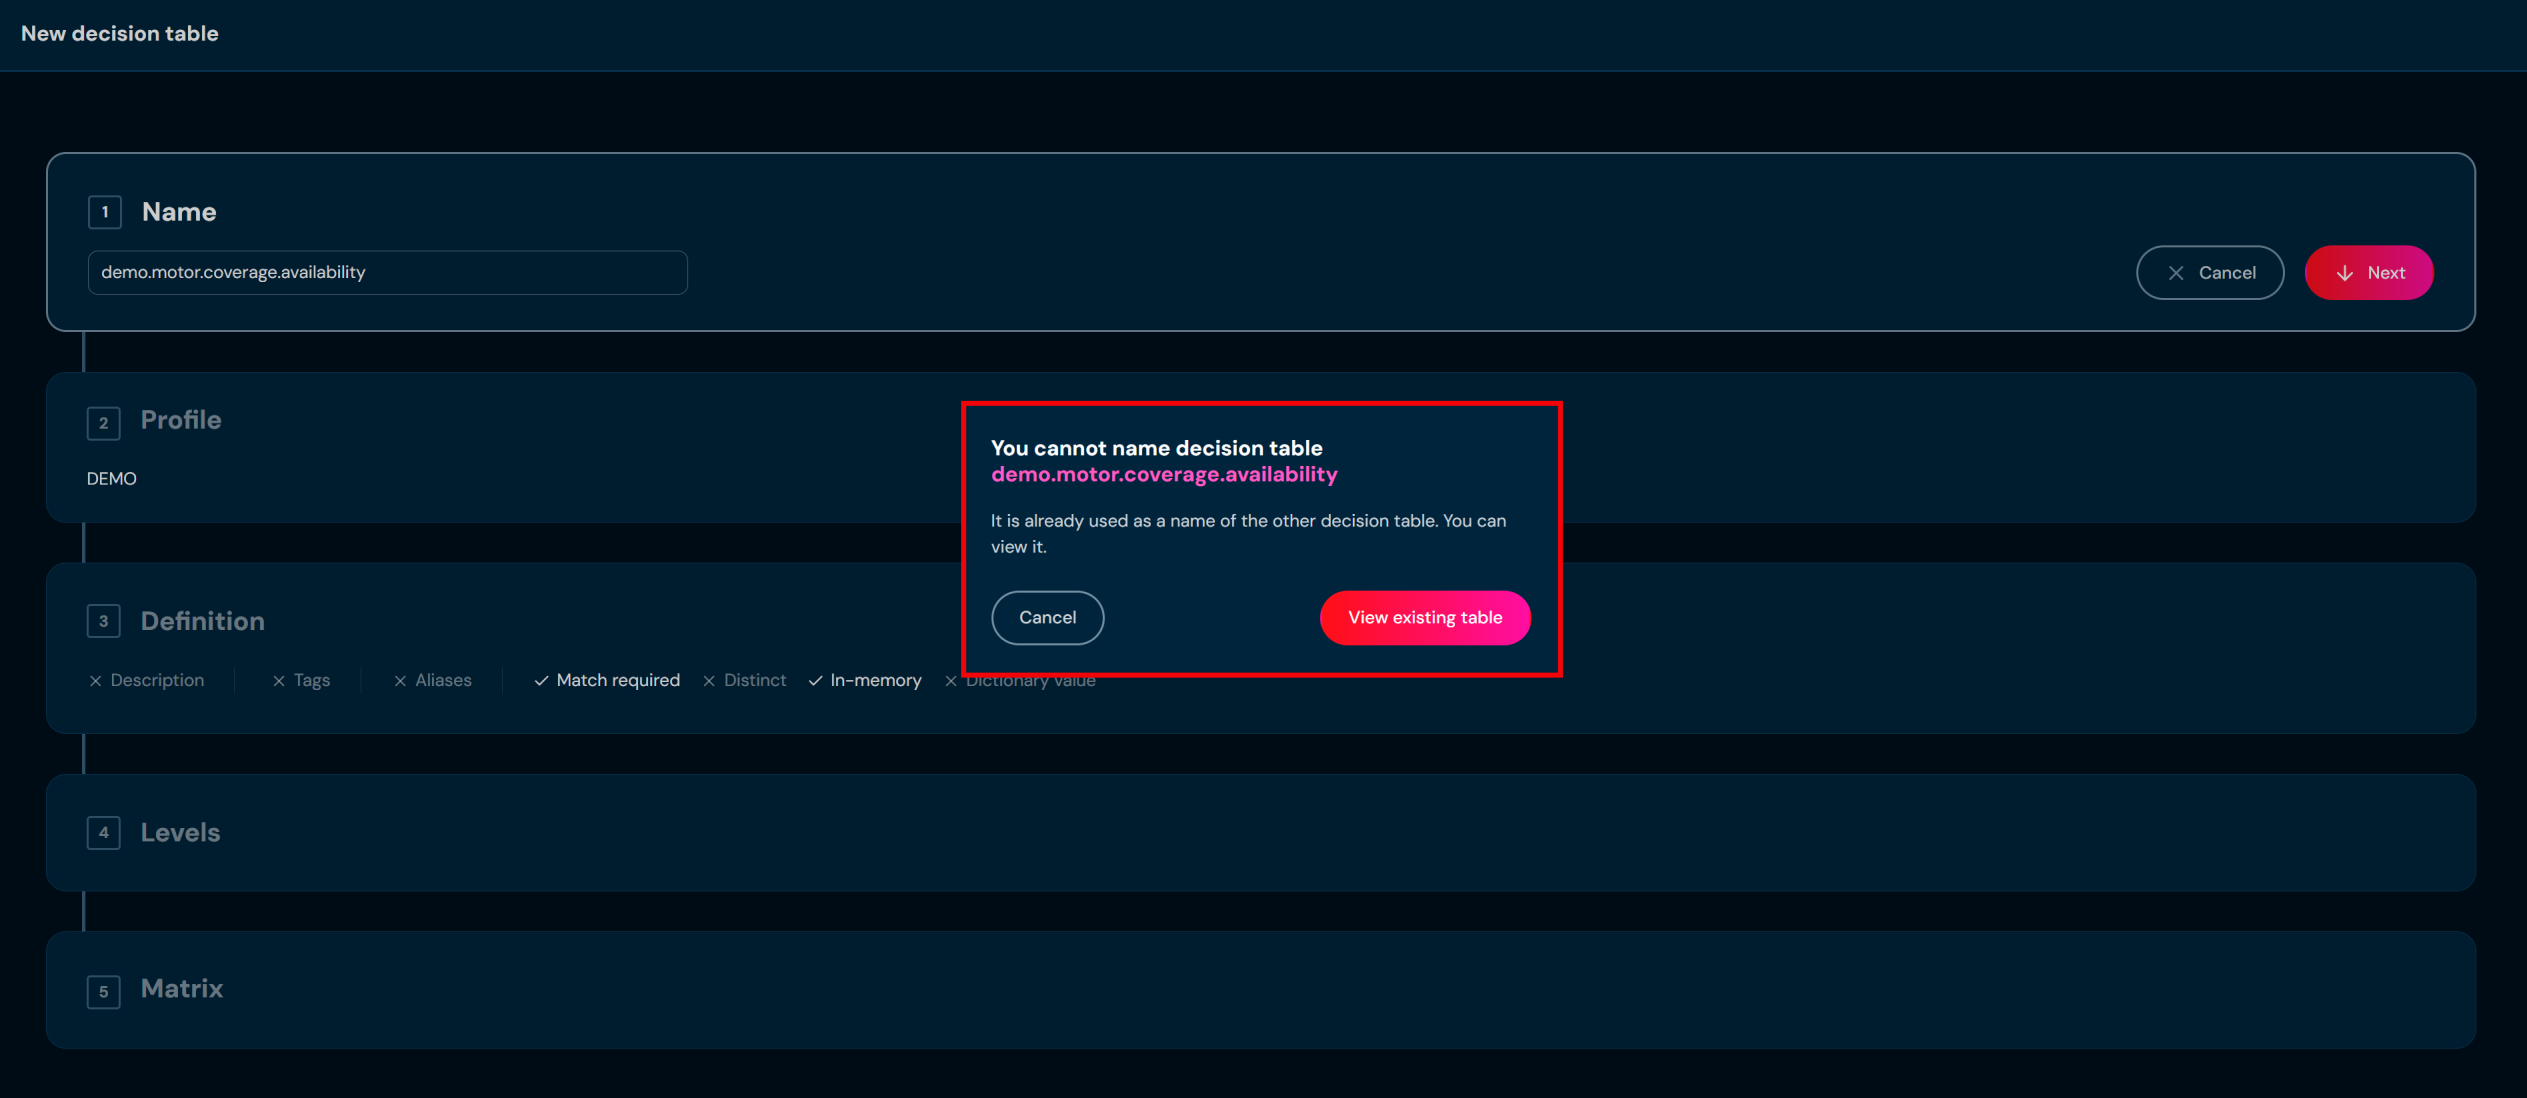
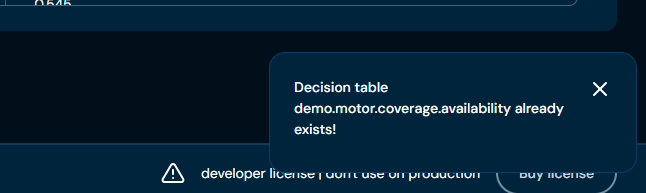
b. If the name you provided is already used by another decision table, then a pop-up dialog will appear, either close the pop-up by clicking Cancel or View existing decision table, that will redirect you to the appropriate Decision table and close the Decision table wizard.
-
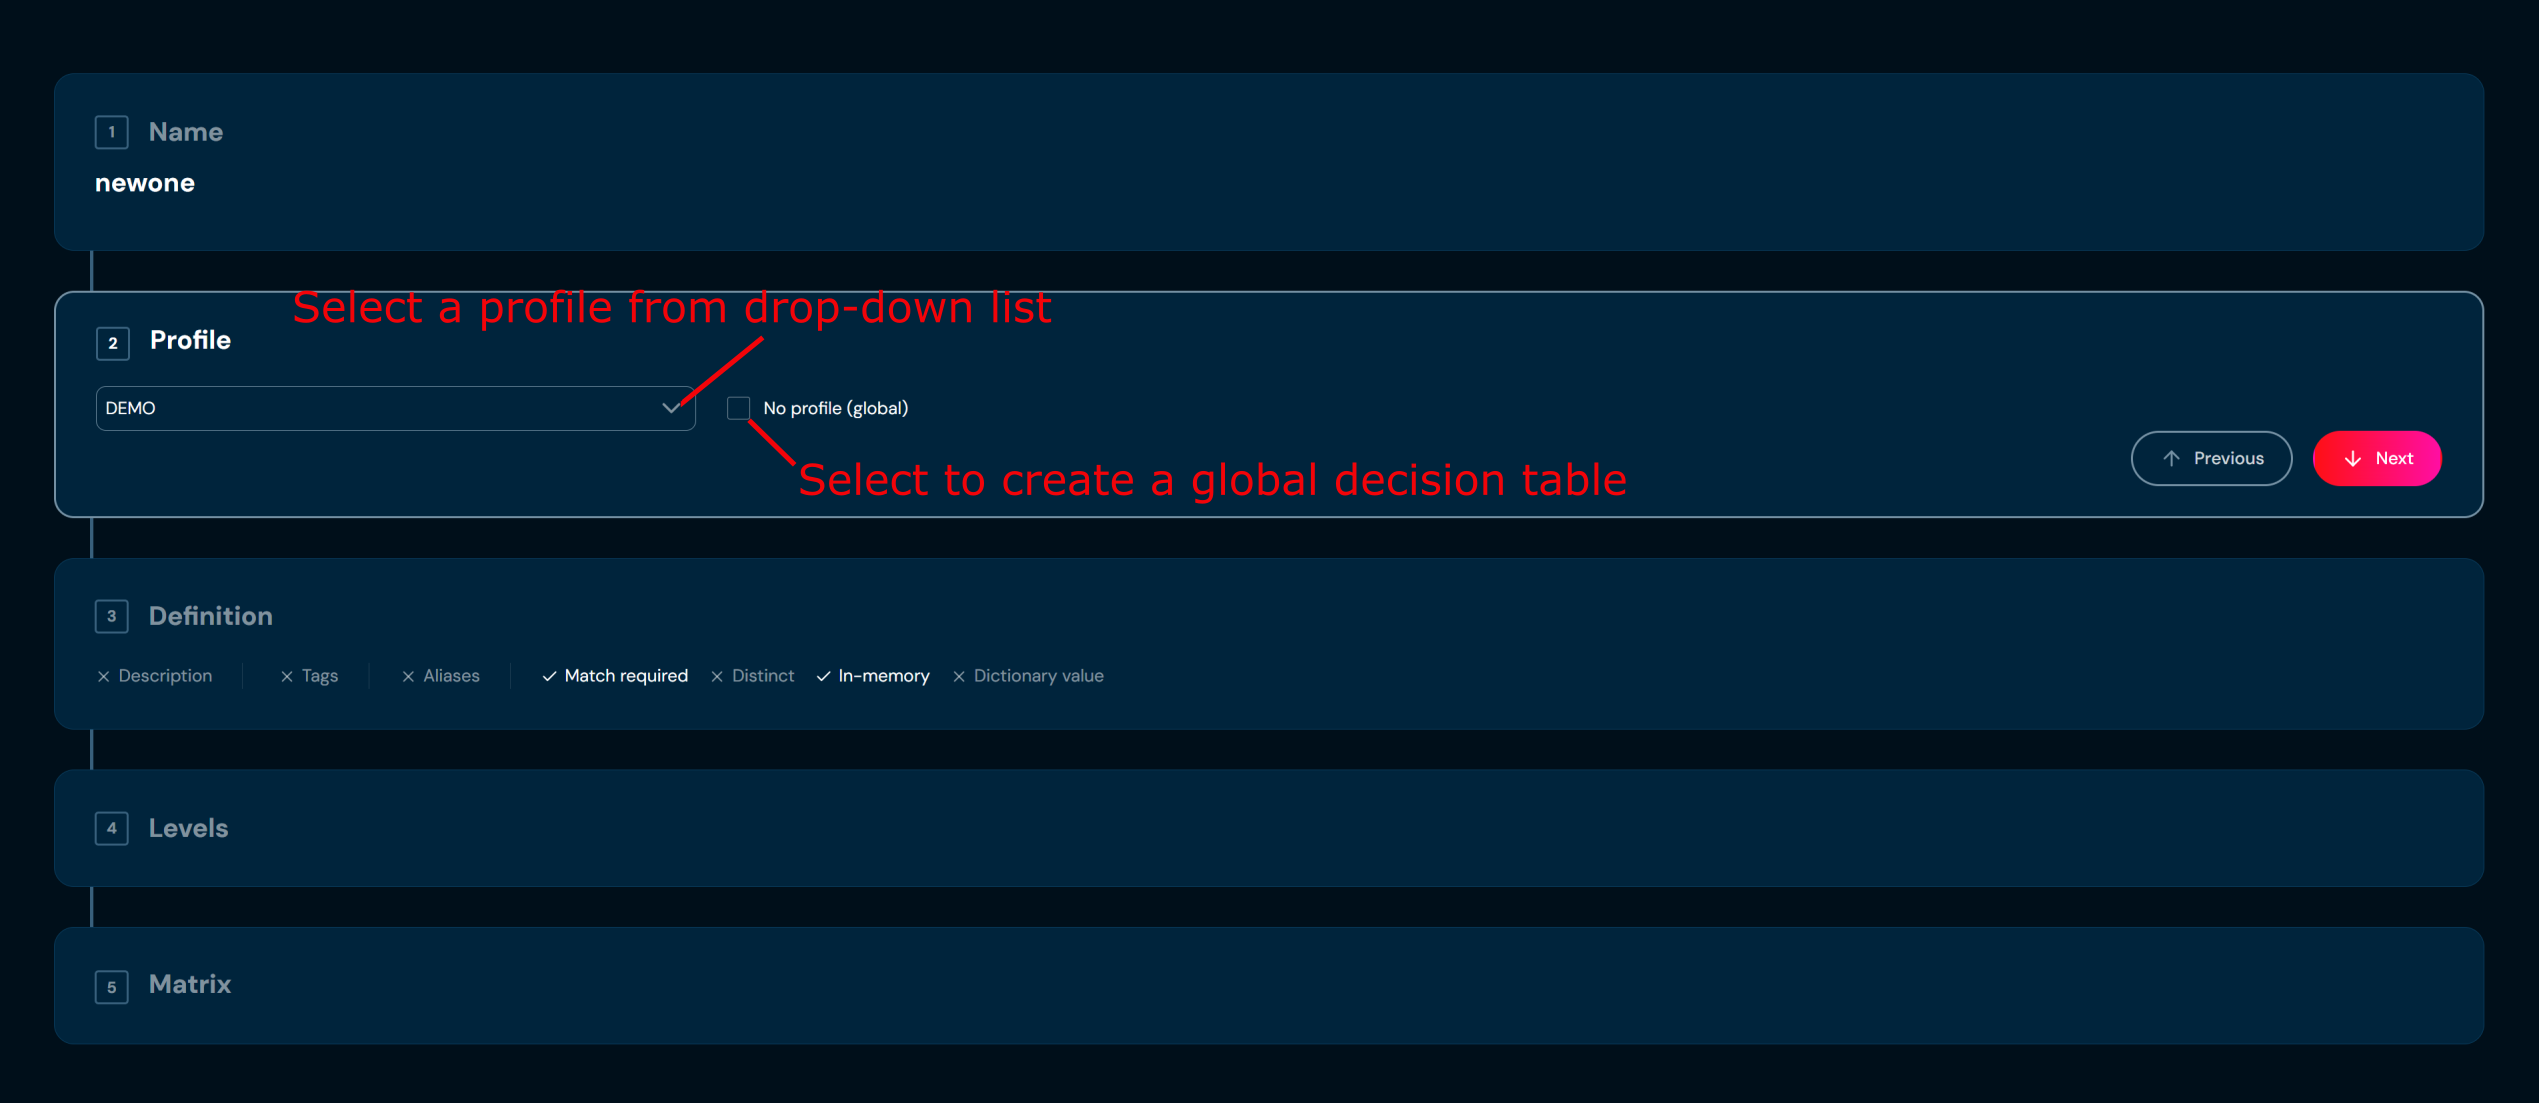
In step 2. Profile you may assign decision table to a profile by selecting a profile from drop down list or create a global table by checking No profile (global). Assigning this table to a profile will ensure that only users with permissions for that profile can access it. Global decision tables will be visible regardless of profile permissions.
-
In step 3. Definition you may optionally add a description and assign tags. You must choose a data source for a matrix. External source and AI Model Source are described later in this document.
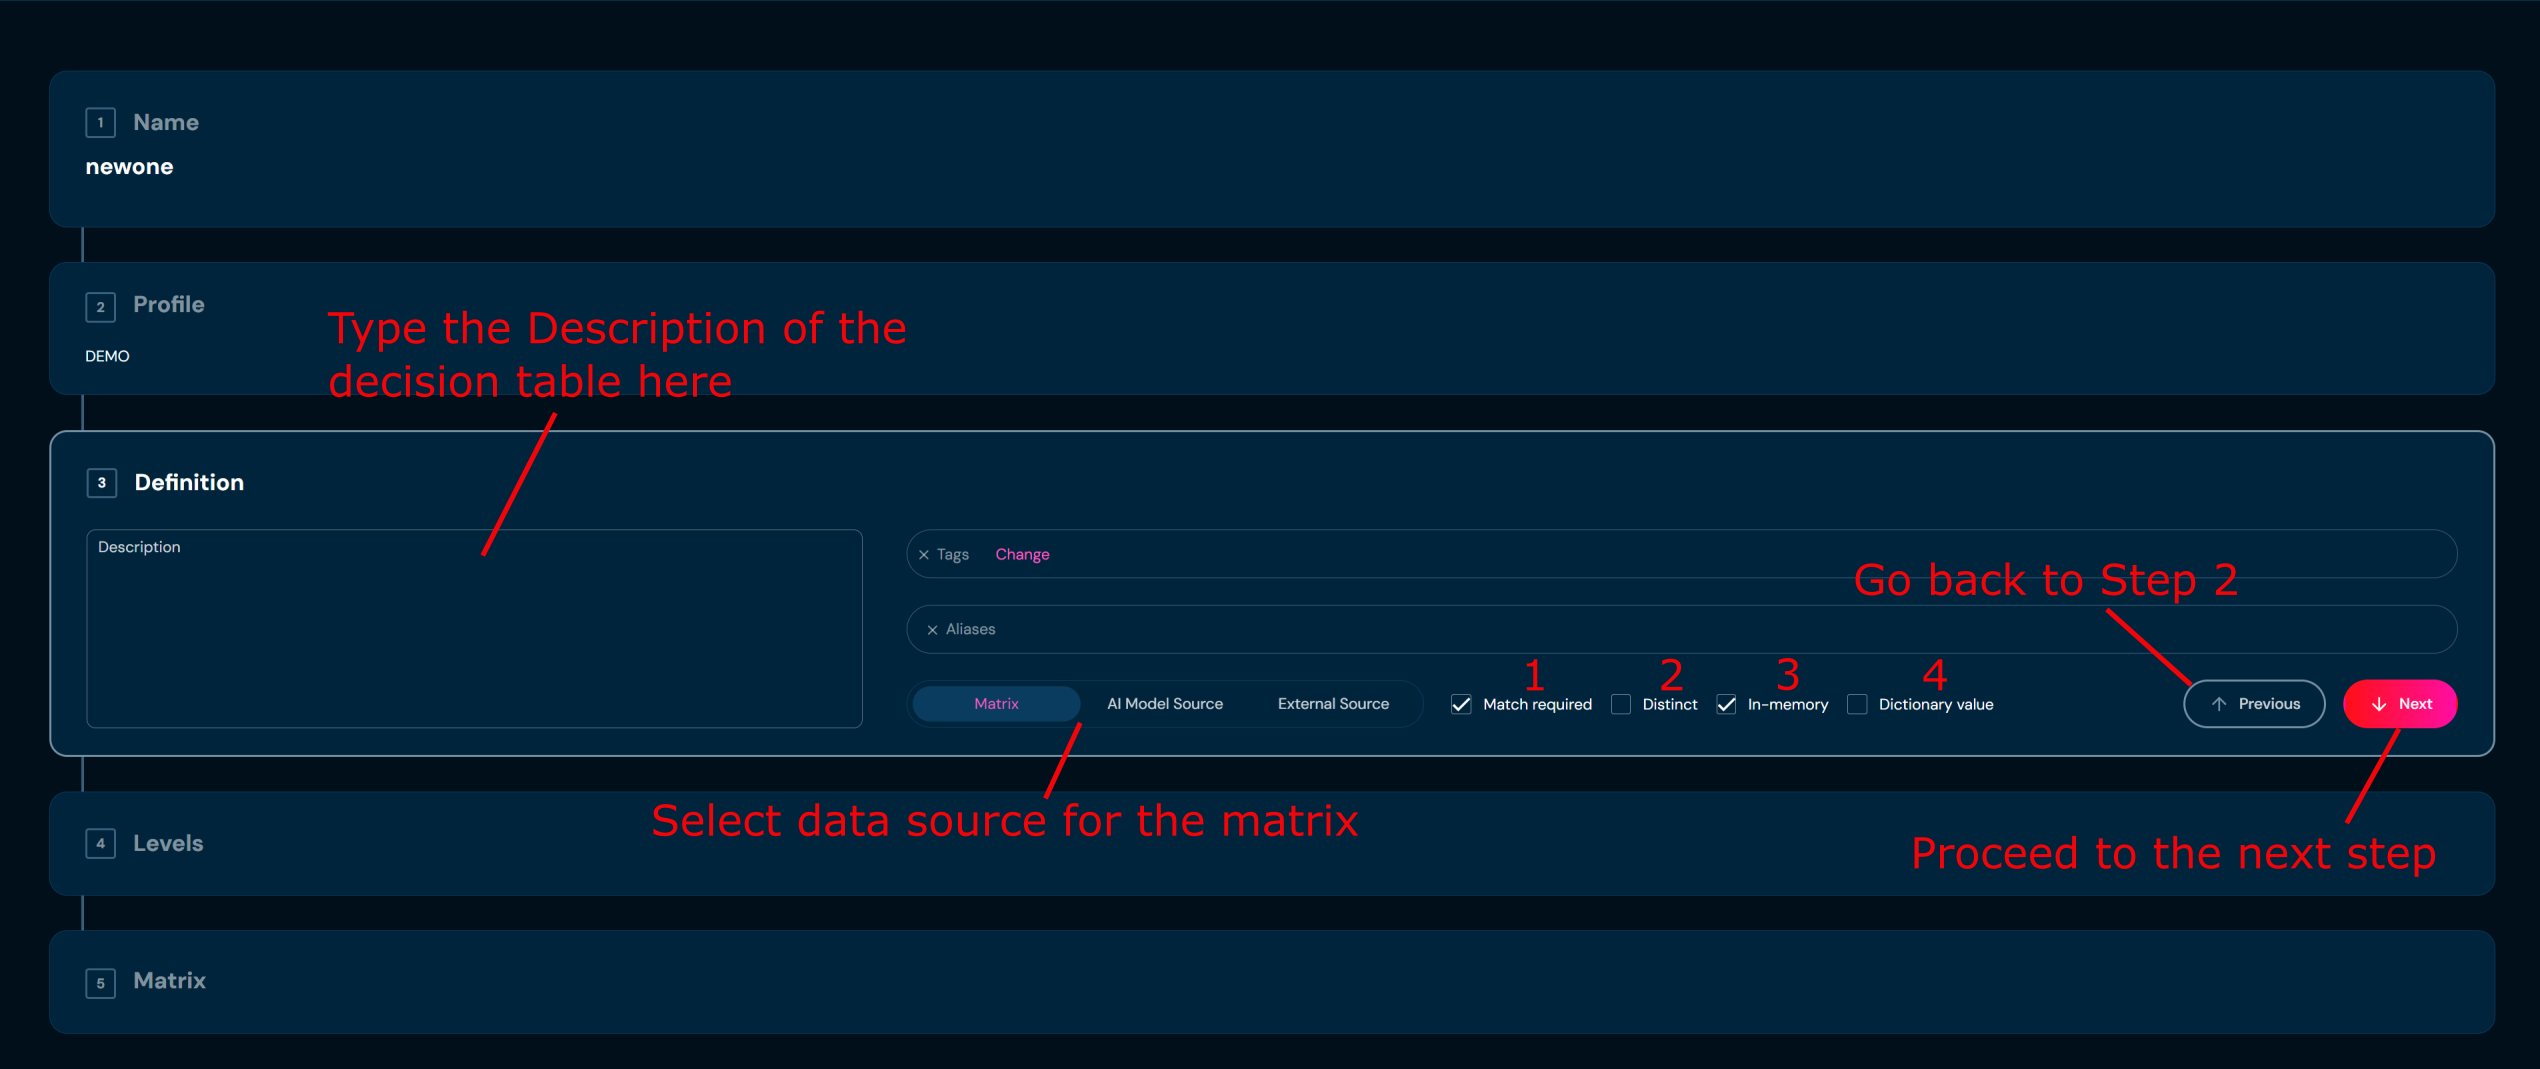
Additional options available to configure a decision table are described in the table below.
| No. | Name | Description |
|---|---|---|
| 1 | Match required | If checked: when in matrix value won’t be found, it will return an error; if checked and no match is found in the matrix, the decision table will return null. |
| 2 | Distinct filters | Removes duplicated records from the result list. |
| 3 | In memory index | If not checked, then with every call to that decision table, its definition and matrix must be reloaded from the database. This checkbox is flagged if the decision table should be stored in the application cache. |
| 4 | Dictionary value | To define the decision table as a dictionary, there is a checkbox “Dictionary” that needs to be marked. See Dictionary table for details. |
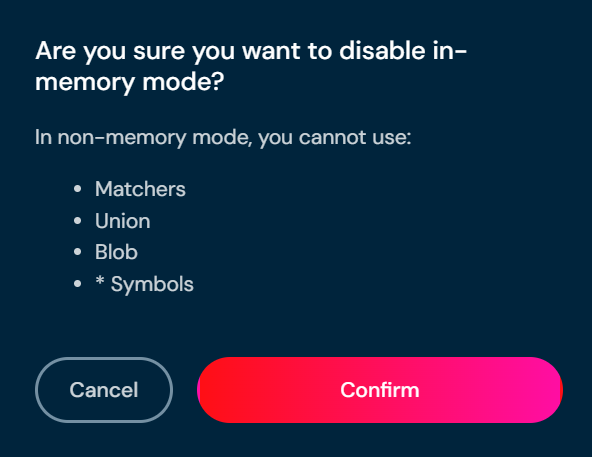
a. The match required and In-memory flags are checked by default. Unchecking the In-memory checkbox means that you will not be able to use the matchers, union, blob and asterisk. The confirmation pop-up will appear.
-
Choose Next.
-
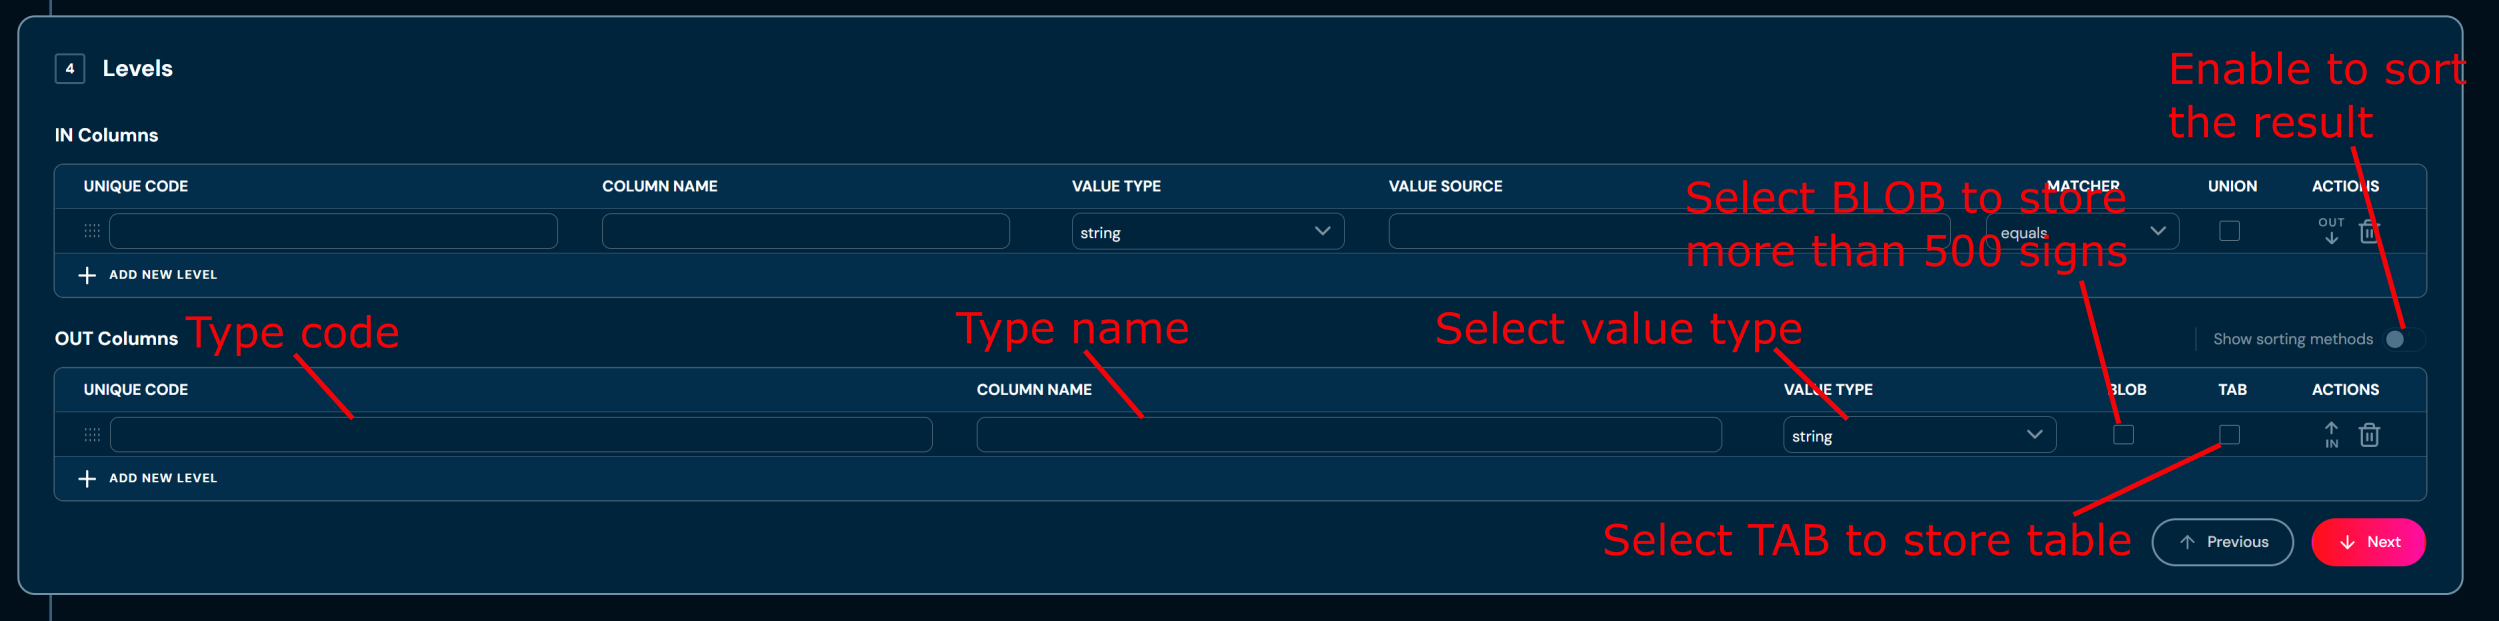
In step 4. Levels you may add IN and OUT columns, but this is not necessary to proceed to the next step.

When selecting the “date” value type, be sure to use the correct recording format: yyyy-MM-dd.
When selecting the “data time” value type, be sure to use the correct notation format: yyyy-MM-dd HH:mm:ss
-
Choose Next.
-
In step 5. Matrix you may add matrix cells, but this is not necessary to proceed to the next step.

-
Choose Save changes.
a. Decision table with data you provided is created. You will be redirected to Decision table’s details screen.
Upload Decision Table#
If you want to upload decision tables from a ZIP file, follow these steps:
-
Choose Decision Tables in the Main Toolbar.
-
Choose Upload in the “All Actions” bar.
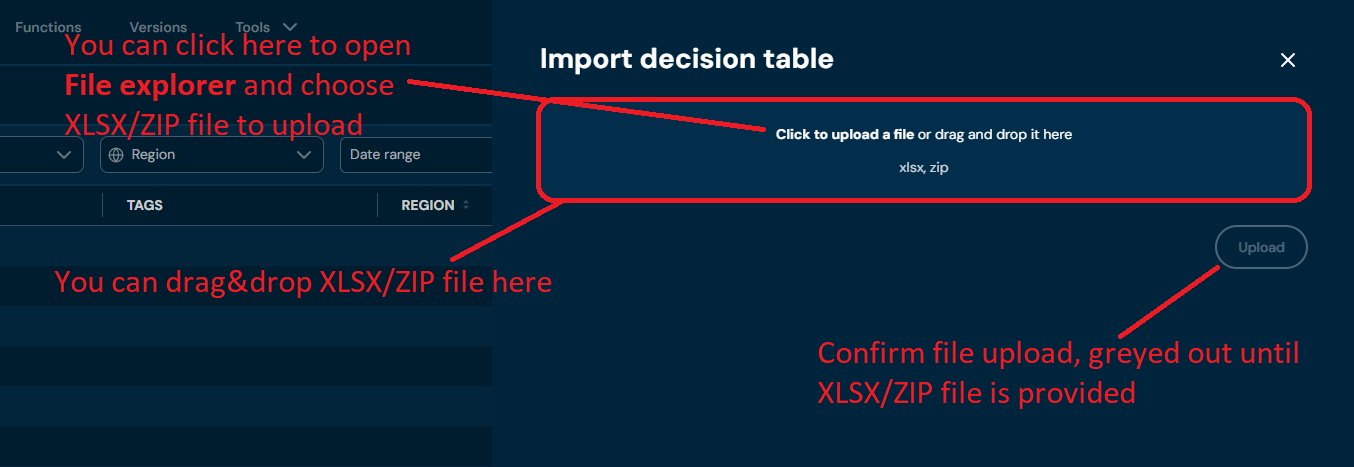
a. Choosing Upload brings up the Import decision table screen.
-
Drag and drop the desired file or Click to upload a file and choose file in File Explorer.
a. If you choose a file with an extension other than ZIP, then a validation error will pop up.
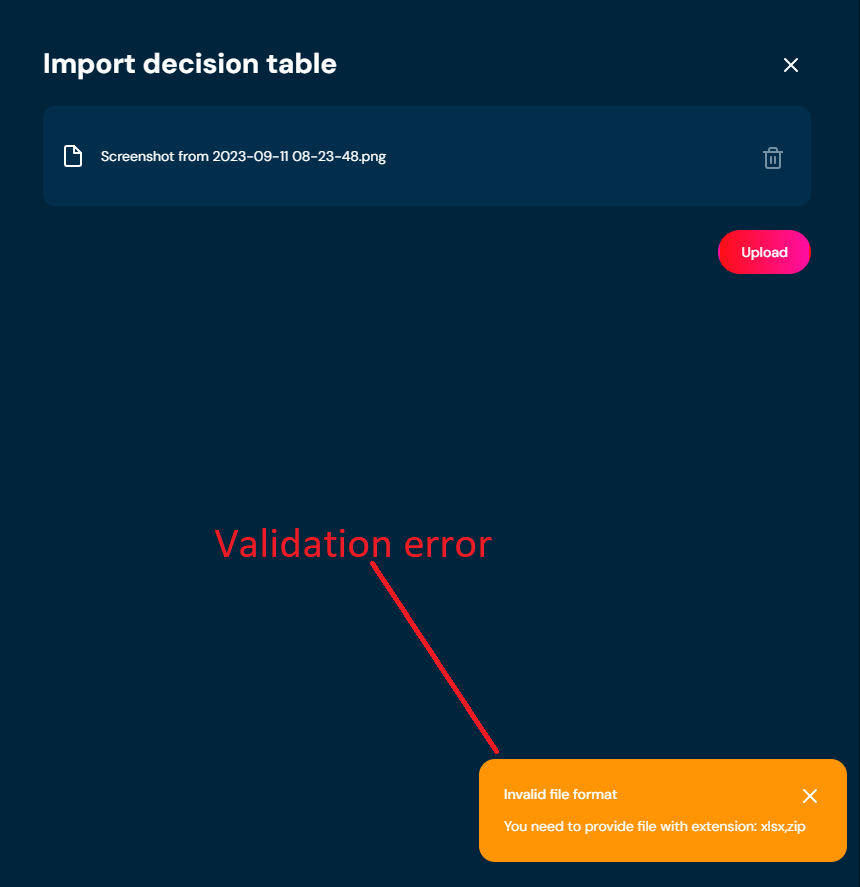
-
After uploading, the upload report appears.
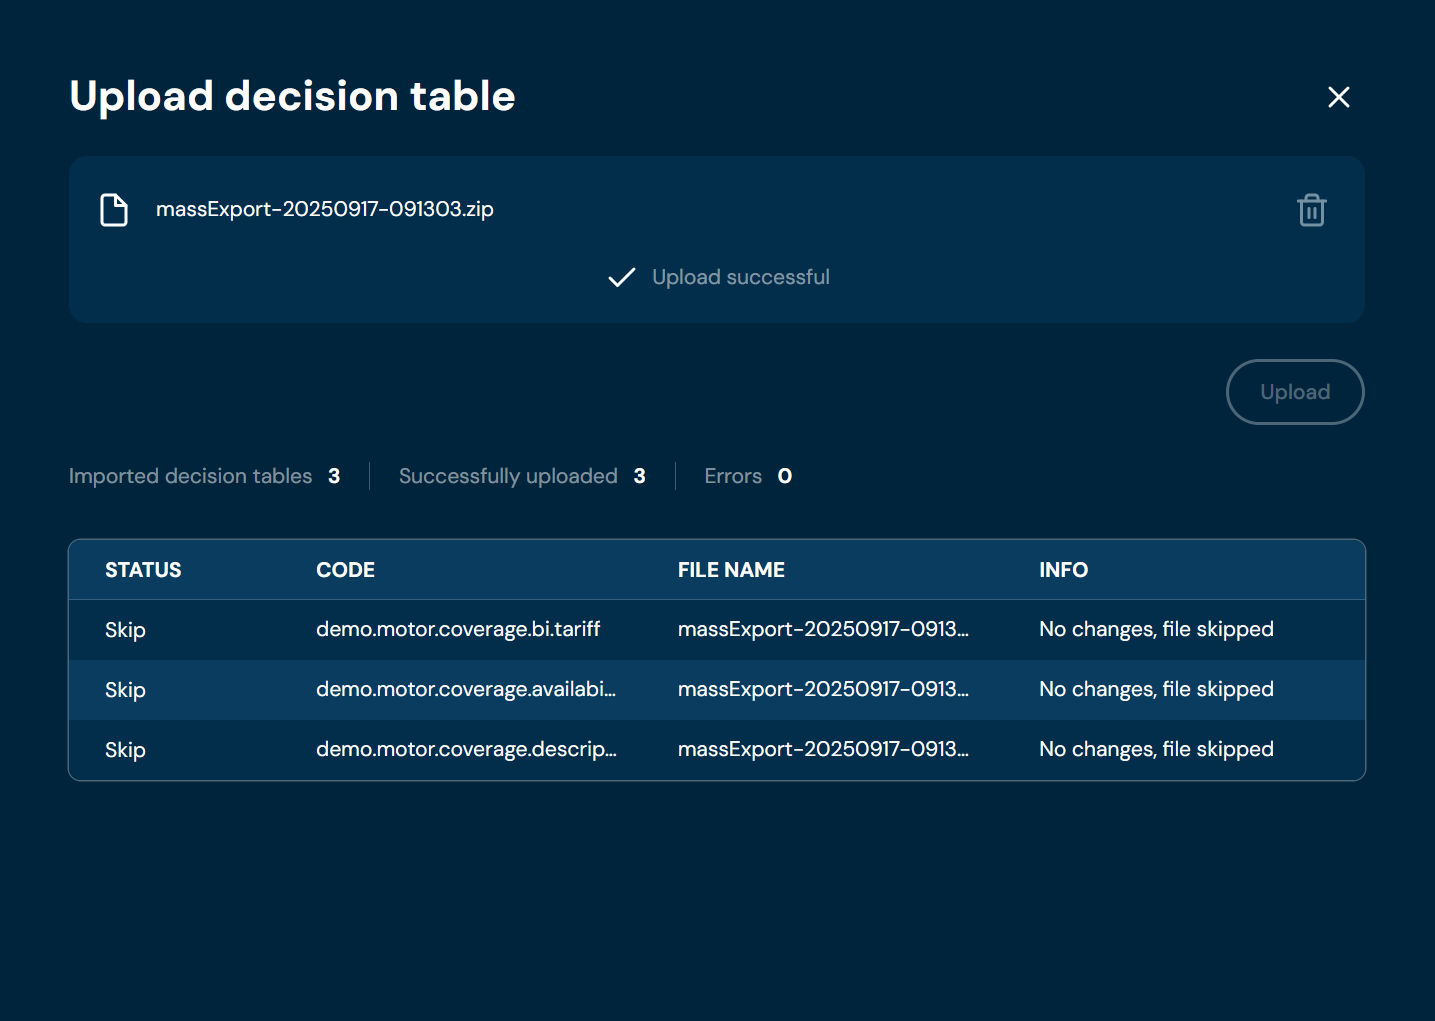
Mass Export to XLSX#
If you want to download one or more decision tables, follow these steps:
-
Choose Decision Tables in the Main Toolbar.
-
Select one or more.
a. Select the top checkbox to select all decision tables in the view, or select individual checkboxes to select one or multiple
-
From the drop-down menu More actions: choose Mass export to XLSx.
a. If action Mass export to XLSx is grayed out, it means that no decision tables have been selected.
b. Choosing Mass export to XLSx downloads a ZIP file that contains files with decision tables.

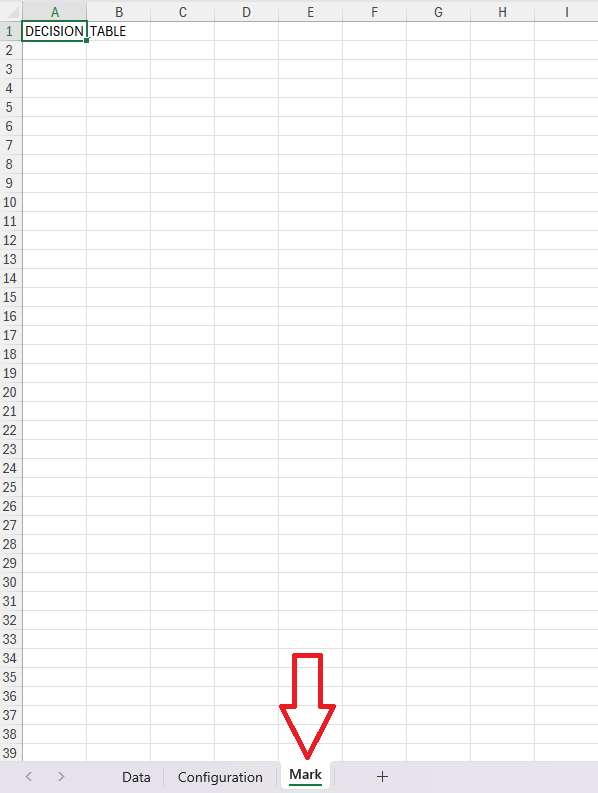
Details of zip
Sheet Data contains matrix.
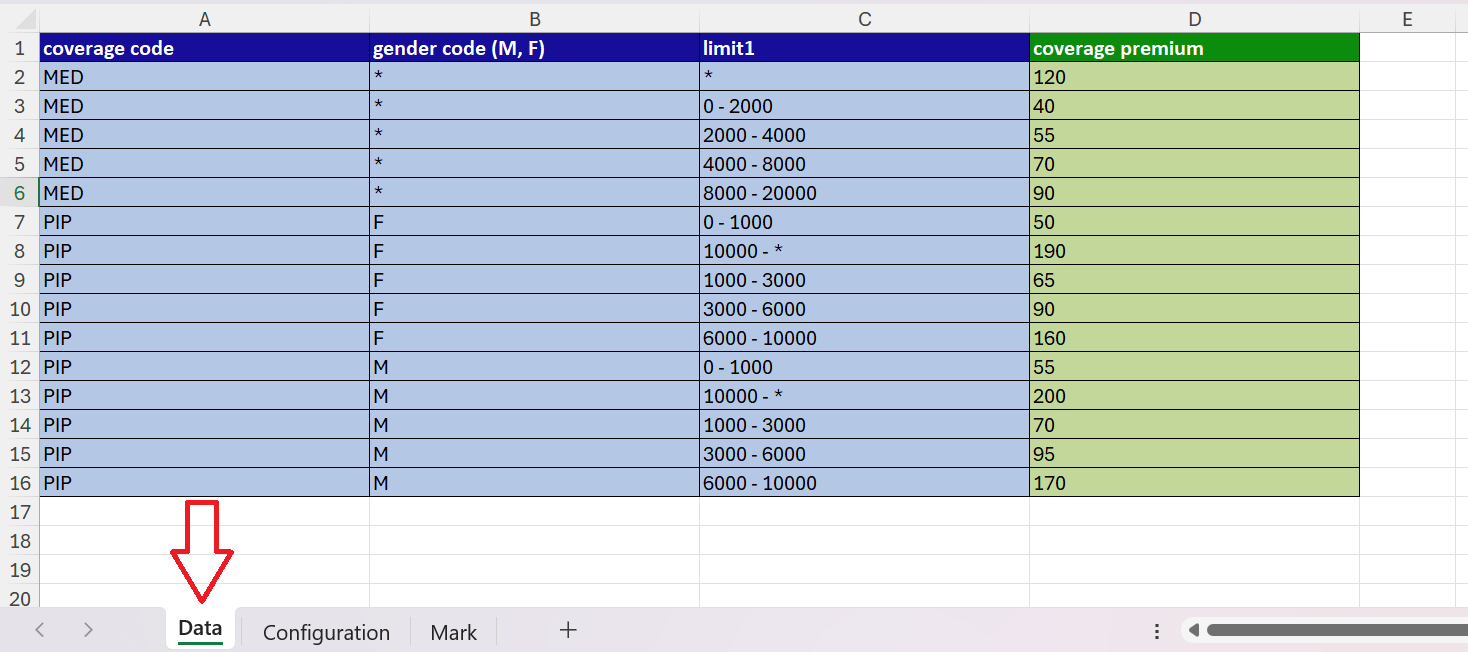
Sheet Configuration contains details of levels and definition.
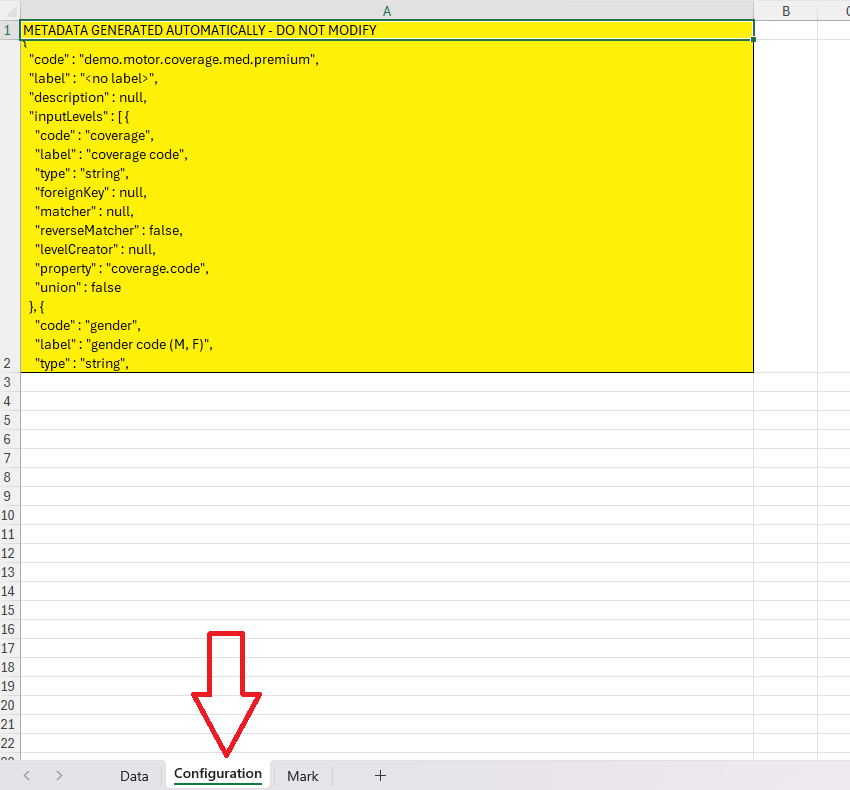
Sheet Mark contains information on object type, it is used for validation when uploading file into Higson Studio.
Extract Codes#
If you want to extract one or more decision tables, follow these steps:
-
Choose Decision tables in Main toolbar.
-
Select one or more decision tables
a. Select the top checkbox to select all decision tables in the view or select individual checkboxes to select one or multiple.
-
From drop-down menu More actions choose Extract codes
a. If action Extract codes is greyed out, it means that no decision tables have been selected.
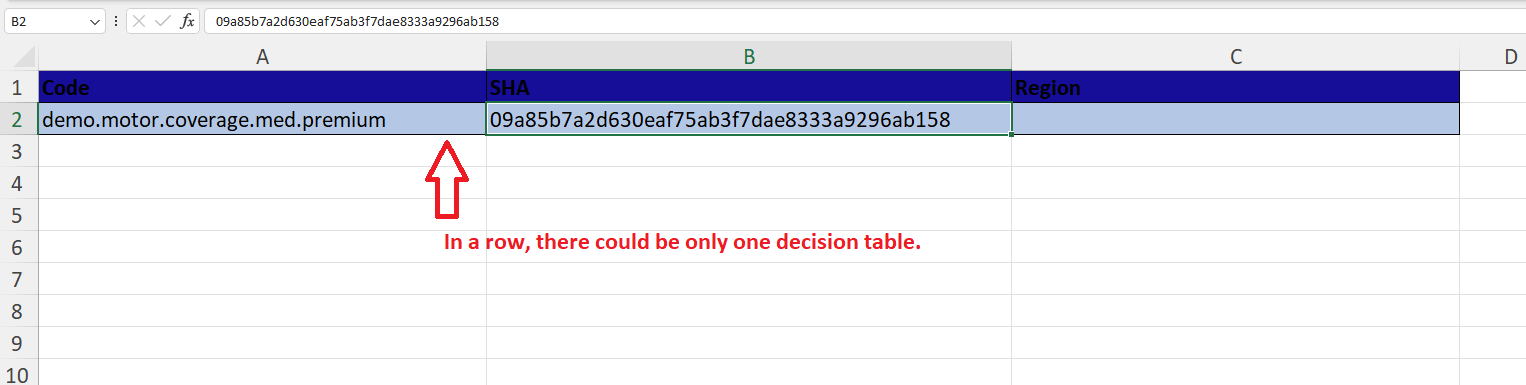
b. Selecting Extract codes downloads a XLSX file that contains Code, SHA and Region columns
Download Codes#
If you want to download one or more decision tables codes, follow these steps:
-
Choose decision table in Main toolbar.
-
Select one or more decision tables.
a. Select the top checkbox to select all decision tables in the view, or select individual checkboxes to select one or multiple
-
From drop-down menu More actions choose Download codes
a. If Download codes action is greyed out, it means that no decision tables have been selected.
b. Selecting Download codes downloads a TXT file that contains decision tables’ codes

Select from File#
If you want to select one or more Decision tables from the file, follow these steps:
-
Choose Decision tables in Main toolbar.
-
From drop-down menu More actions choose Select from file
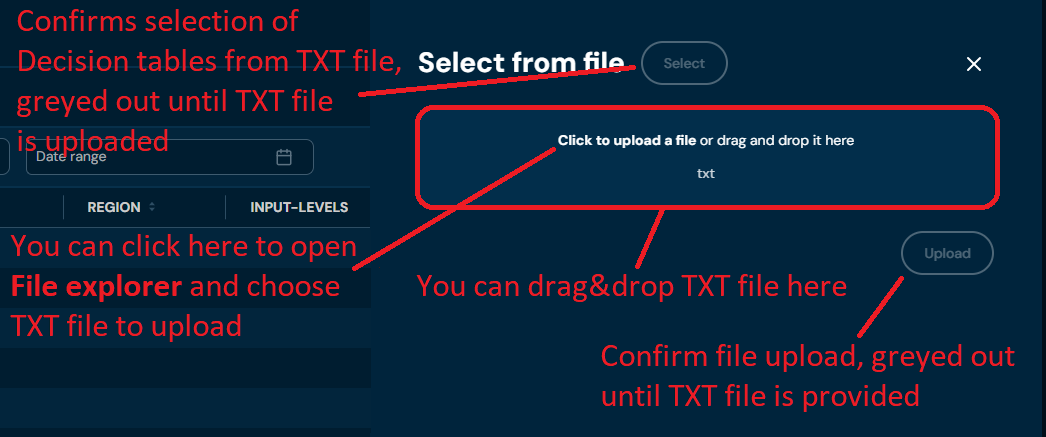
a. Choosing Select from file brings up the Select from file screen
-
Drag and drop the desired file or Click to upload a file and choose file in File explorer.
a. Correct TXT file should look like this:
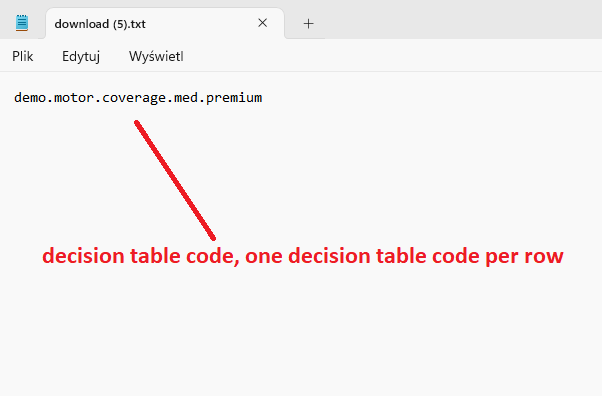
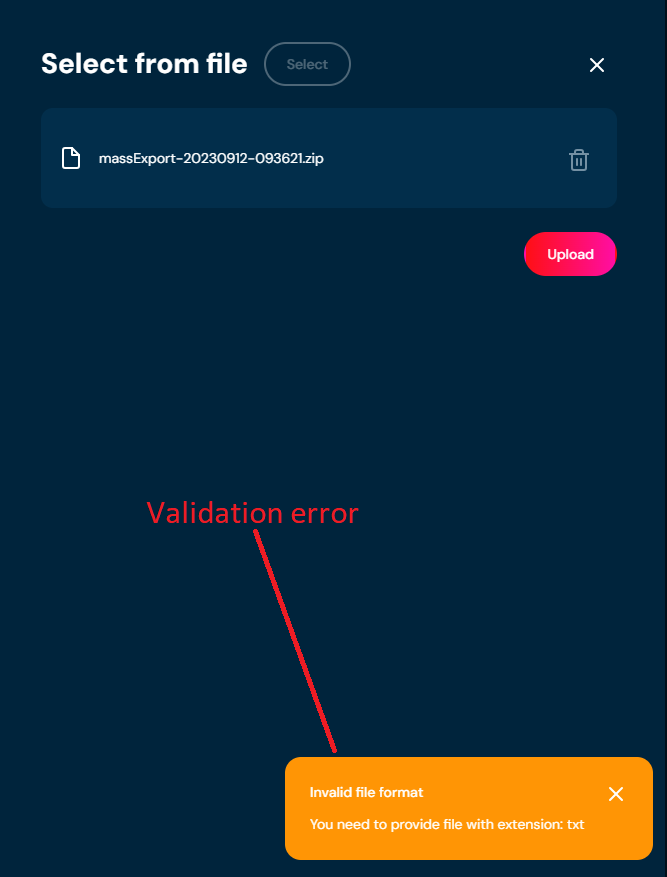
b. If you choose a file with an extension other than TXT, then a validation error will pop up.
-
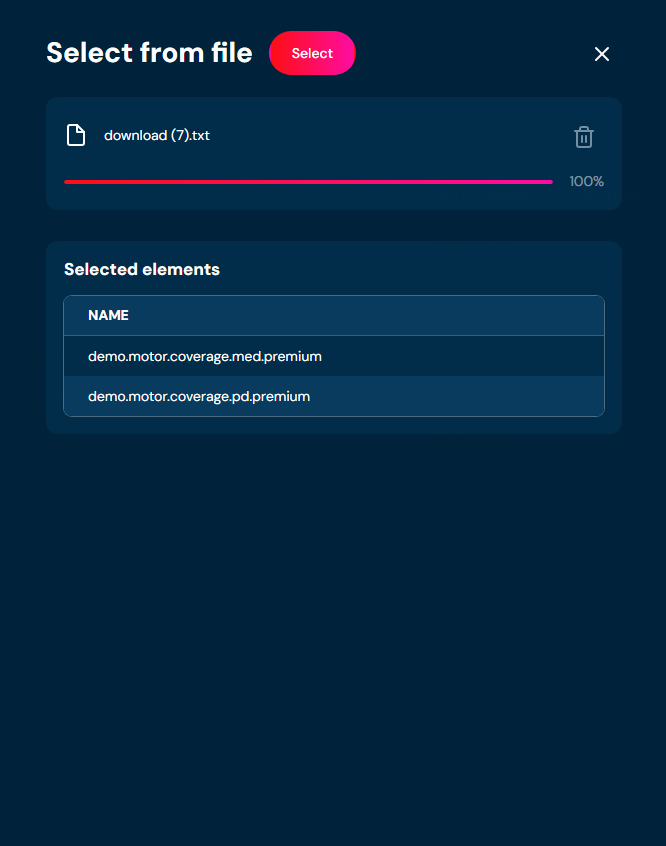
When the progress bar reaches 100%, you will be informed which decision tables will be selected.
-
Choose Select.
a. All decision tables that were present in the Selected Elements table get selected.
Compare with Extract#
Makes a comparison between the file and the environment, and gives information on which elements are the same, and which changes are only in the file or only in the environment.
-
Choose Decision tables in Main toolbar.
-
From drop-down menu More actions choose Compare with extract.
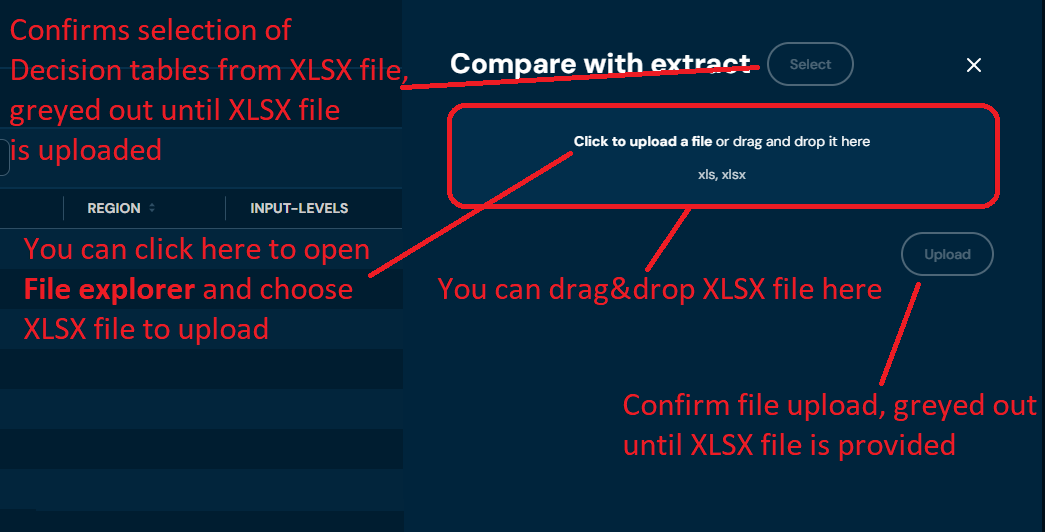
a. Choosing Compare with extract brings up the Compare with extract screen.
-
Drag and drop the desired file or Click to upload a file and choose file in the File explorer.
a. Correct XLS/XLSX file should look like this
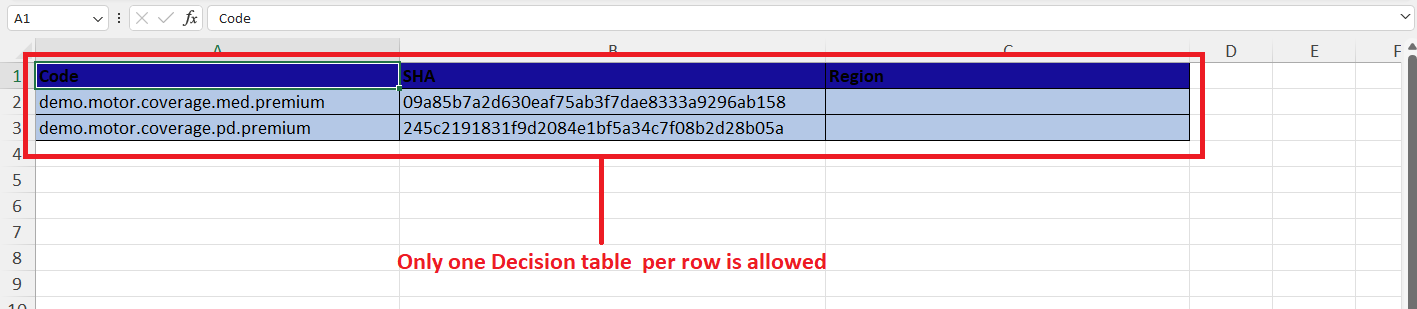
b. If you choose a file with extension other than XLS/XLSX, then validation error will pop up
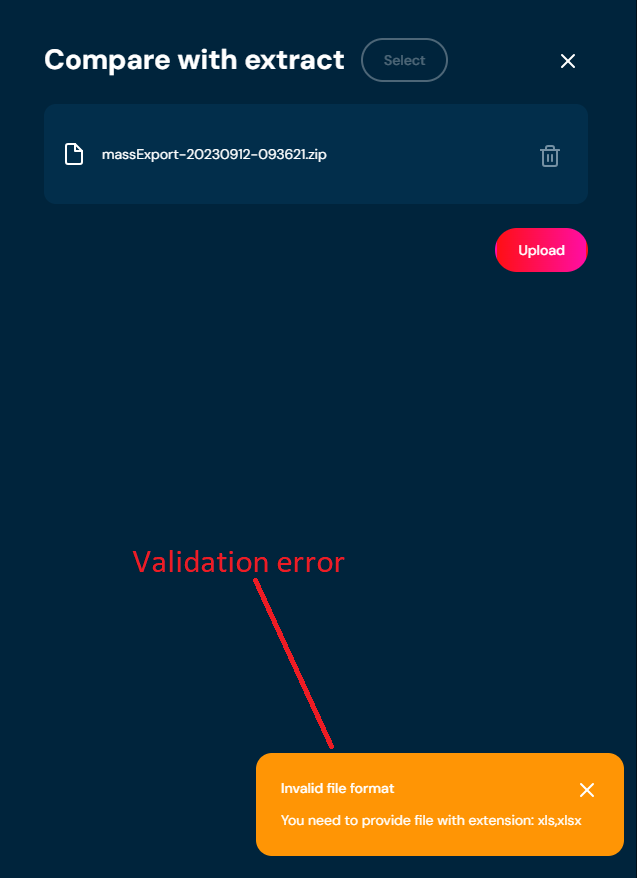
-
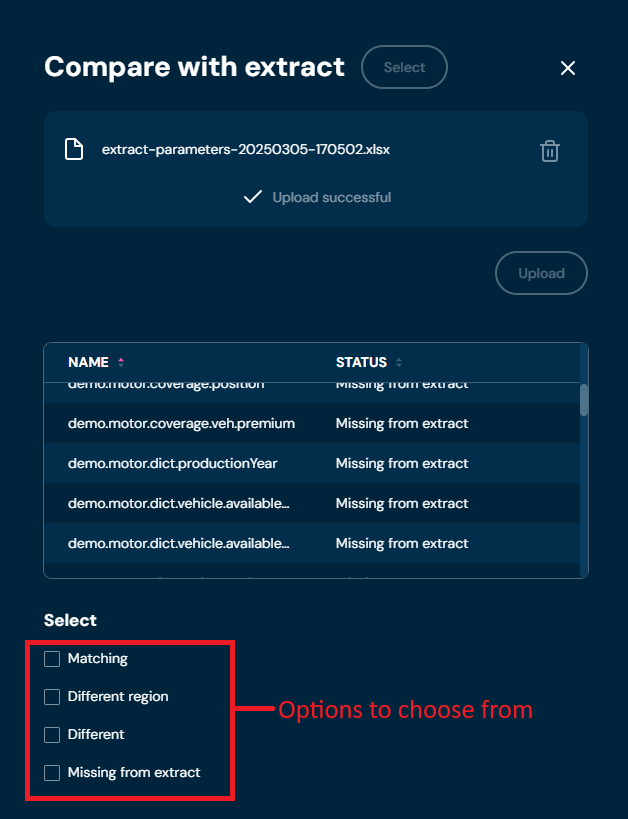
When the import is successful you will be informed about it with the appropriate status Upload succesful. You will be informed about the status of all decision tables present in the environment and the extract file you provided.
-
In the Select section (visible below the table with decision table status), choose which Decision tables will be selected.
a. You can select multiple options.
b. Matching: decision tables that are equal between the environment and the extract file will be selected.
c. Different regions: decision tables that are equal but with different regions between the environment and the extract file will be selected.
d. Different name: decision tables that are equal but with different names between the environment and the extract file will be selected.
e. Missing from extract: decision tables that are present in the environment but absent from the extract file will be selected.
-
Choose the Select Button.
a. If the Select button is grayed out, it means that no checkboxes were selected in step 5.
b. All Decision Tables that match the criteria provided in step 5 are selected.
Assign Profile#
If you want to assign a profile to one or more Decision Tables, follow these steps:
-
Select Decision Tables from the main toolbar.
-
Select the Decision Tables without an assigned profile by checking the boxes on the left side of the list.
-
From the More Actions drop-down menu, choose Assign Profile.
a. Selecting Assign Profile opens the Assign Profile screen.
-
Select the profile to which you want to assign the Decision Table and confirm by clicking Change.

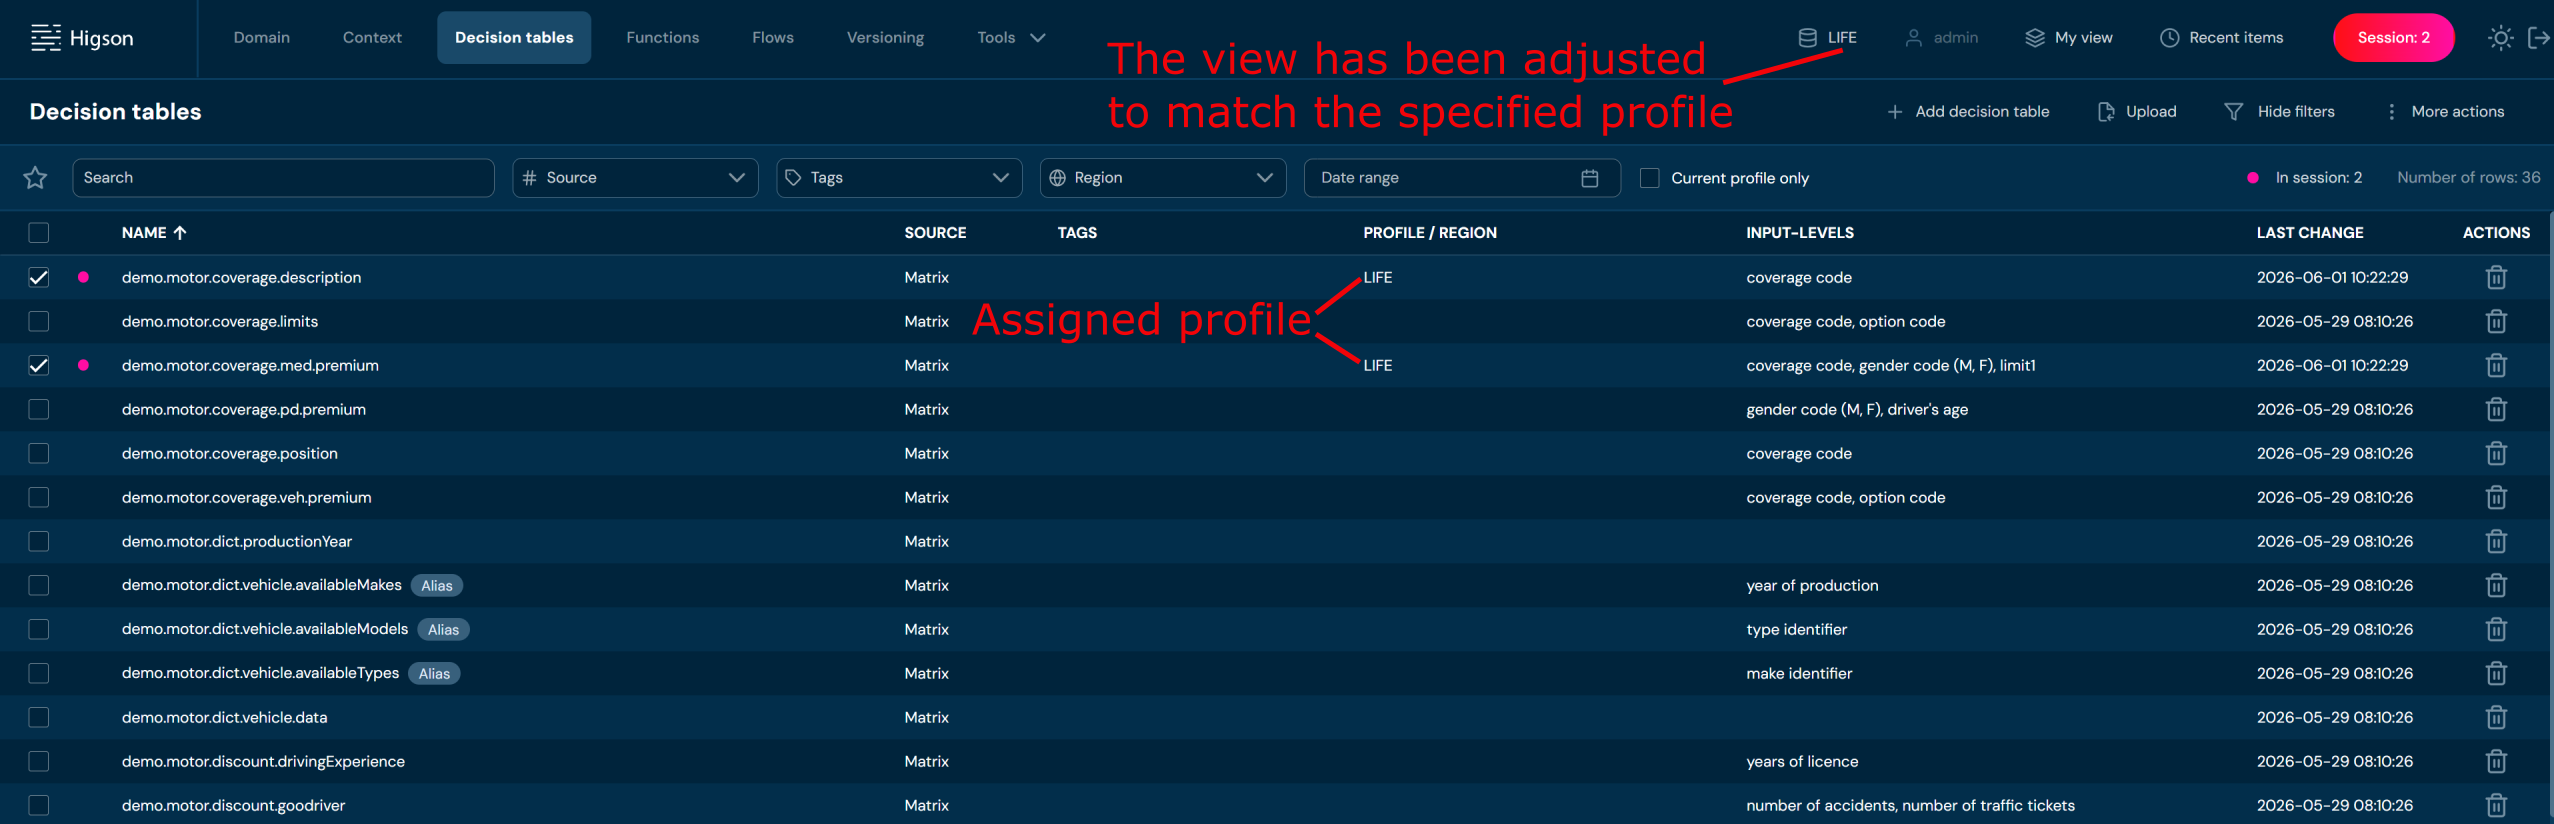
On the Decision Tables list view, a profile entry will appear for the assigned Decision Tables. The view will also be updated to reflect the selected profile.
Make Global#
If you want to detach one or more Decision Tables from profile, follow these steps:
-
Select Decision Tables from the main toolbar.
-
Select the Decision Tables with an assigned profile by checking the boxes on the left side of the list.
-
From the More Actions drop-down menu, choose Make Global.
a. The pop up will appear.

- Click Confirm.
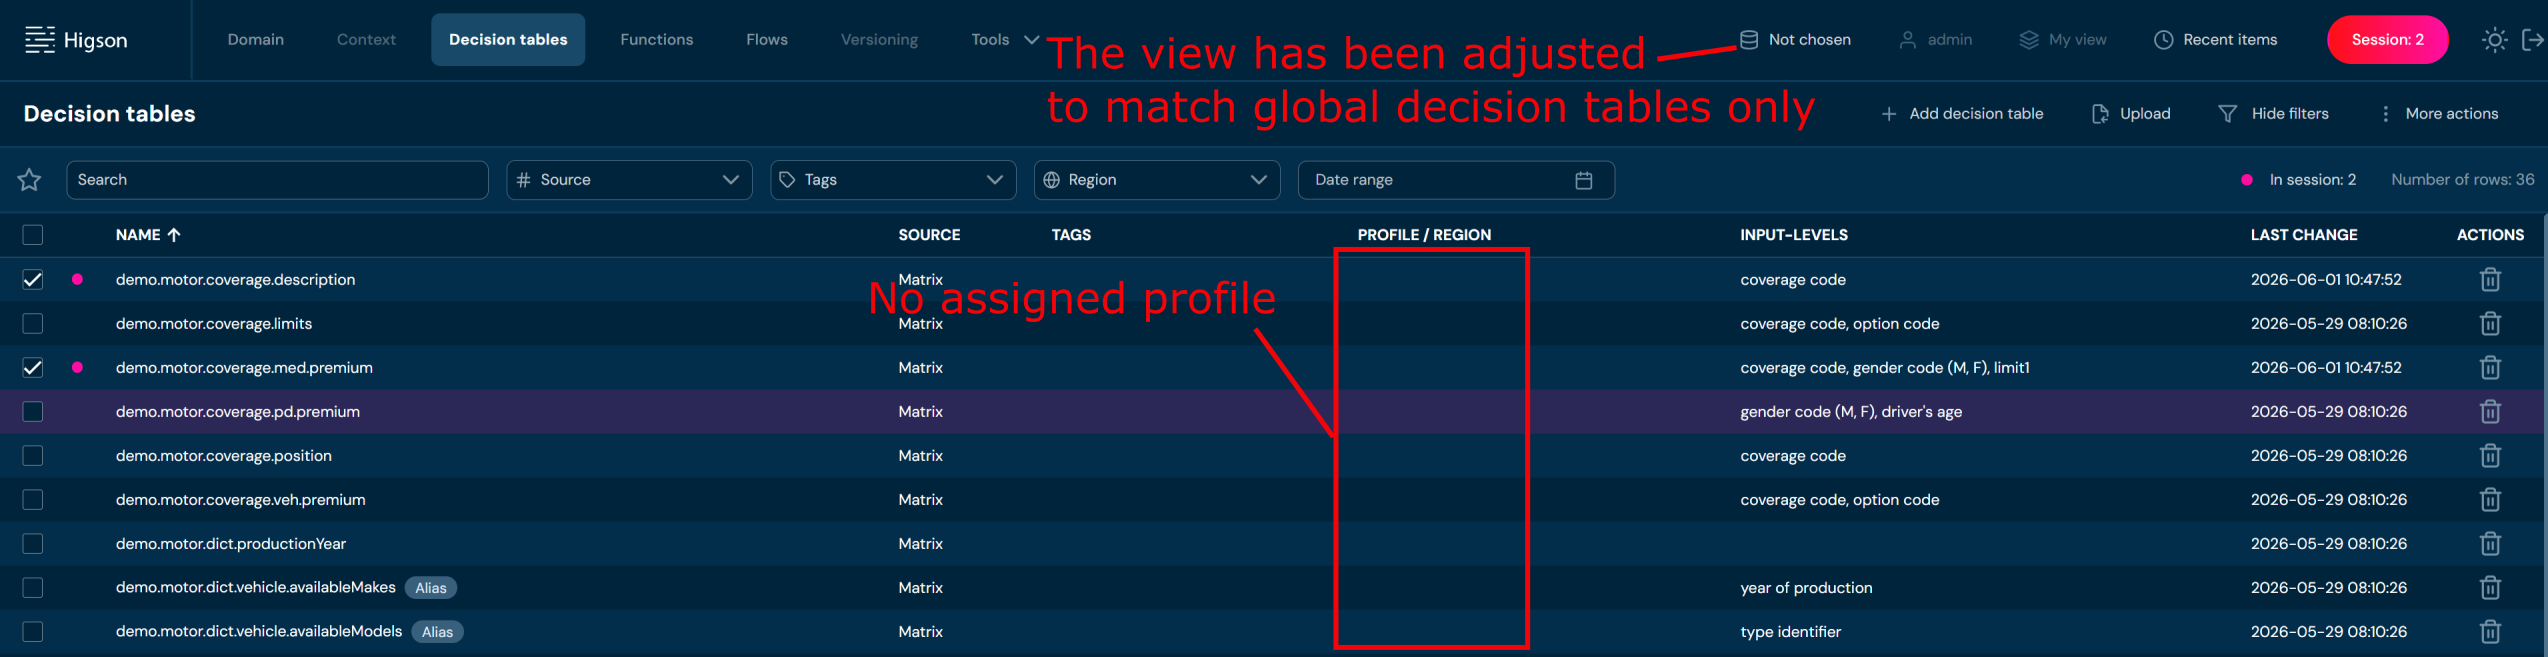
On the Decision Tables list view, a profile entry will disappear for the selected Decision Tables. The view will also be updated to global.
Add Region#
If you want to add a region to one or more decision tables, follow these steps:
-
Choose Decision Tables in the Main Toolbar.
-
Select one or more decision tables without a Region.
a. Select the top checkbox to select all decision tables in the view or select individual checkboxes to select one or multiple decision tables.
-
From the drop-down menu More actions, choose Add region.
a. If action Add region is grayed out, it means that no decision tables have been selected.
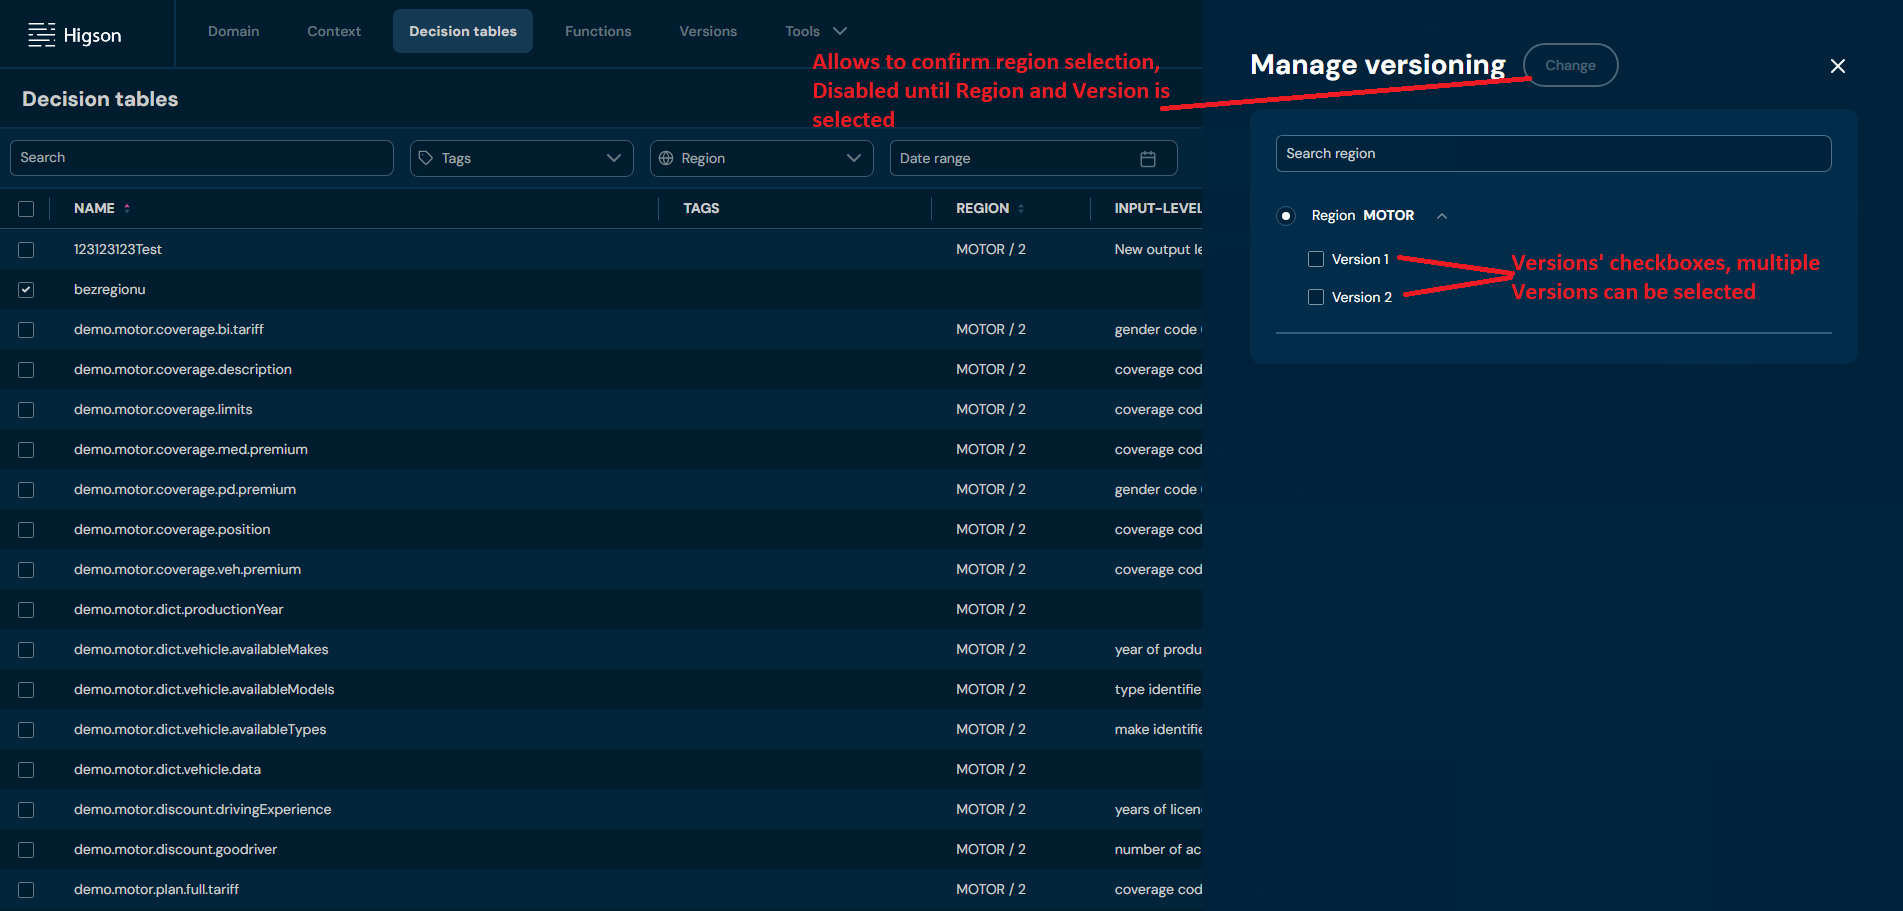
b. Choosing Add Region brings up the Manage Versioning screen.
-
Select a Region and one or more versions.
-
Select Change.
-
The region has been assigned to the decision tables
Remove Region#
If you want to remove a region from one or more decision tables, follow these steps:
-
Choose Decision tables in Main toolbar.
-
Select one or more Decision tables with a Region.
a. Select the top checkbox to select all decision tables in the view or select individual checkboxes to select one or multiple.
-
From drop-down menu More actions choose Remove region.
a. If action Remove region is greyed out, it means that no function has been selected.
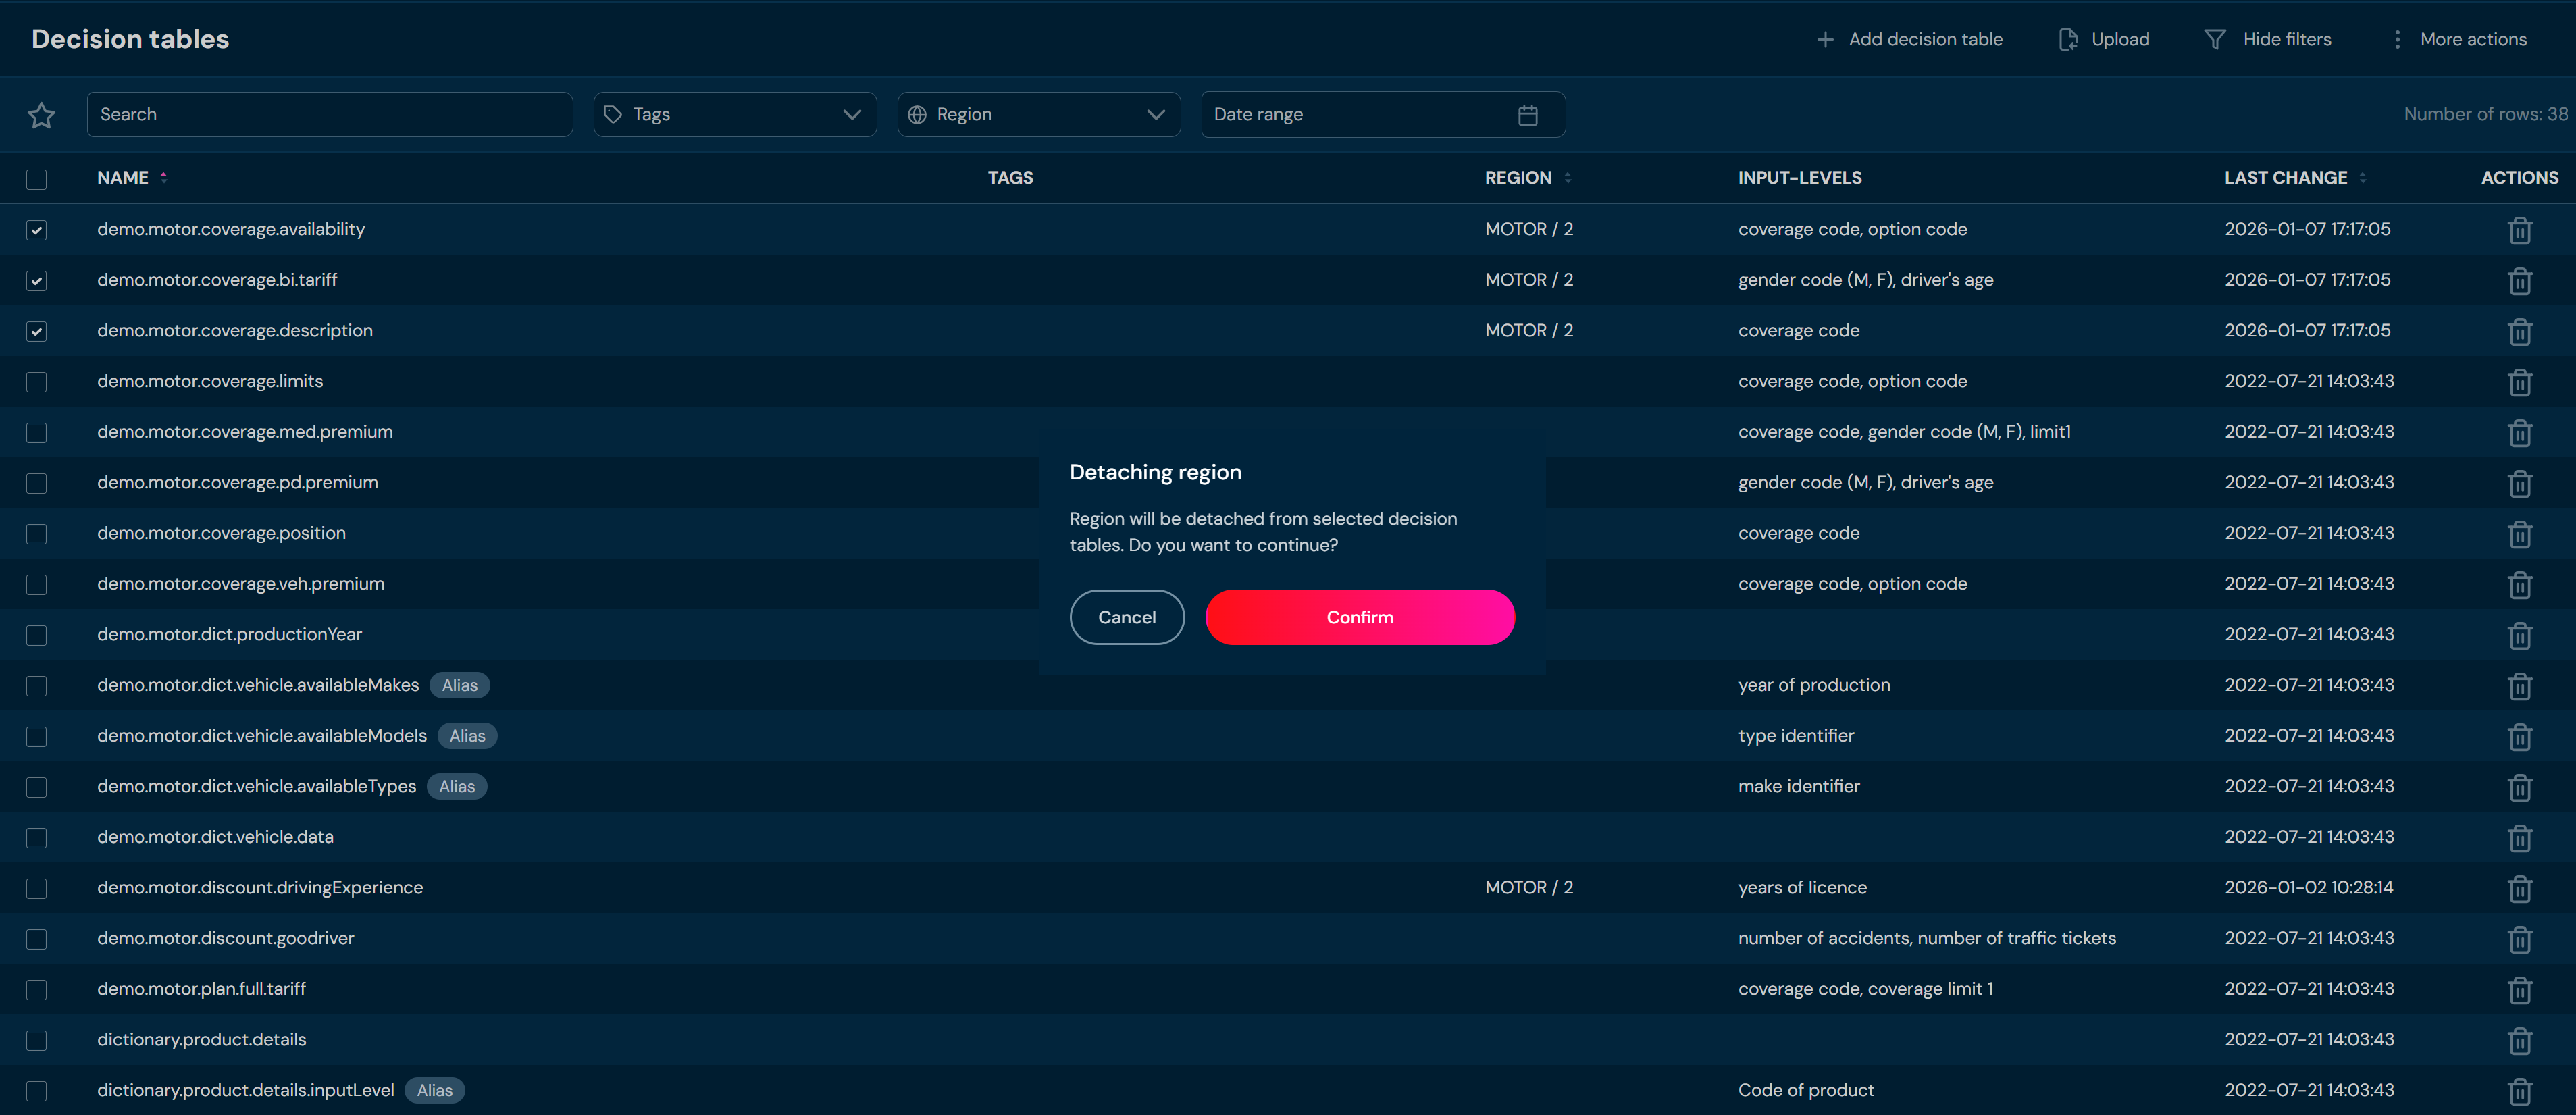
b. After choosing Remove region action, confirmation pop-up will appear.
-
Choose Confirm.
a. Regions are being removed from all selected decision tables.
Manage Tags#
If you want to manage tags from one or more decision tables, follow these steps:
-
Select the decision tables on the main toolbar.
-
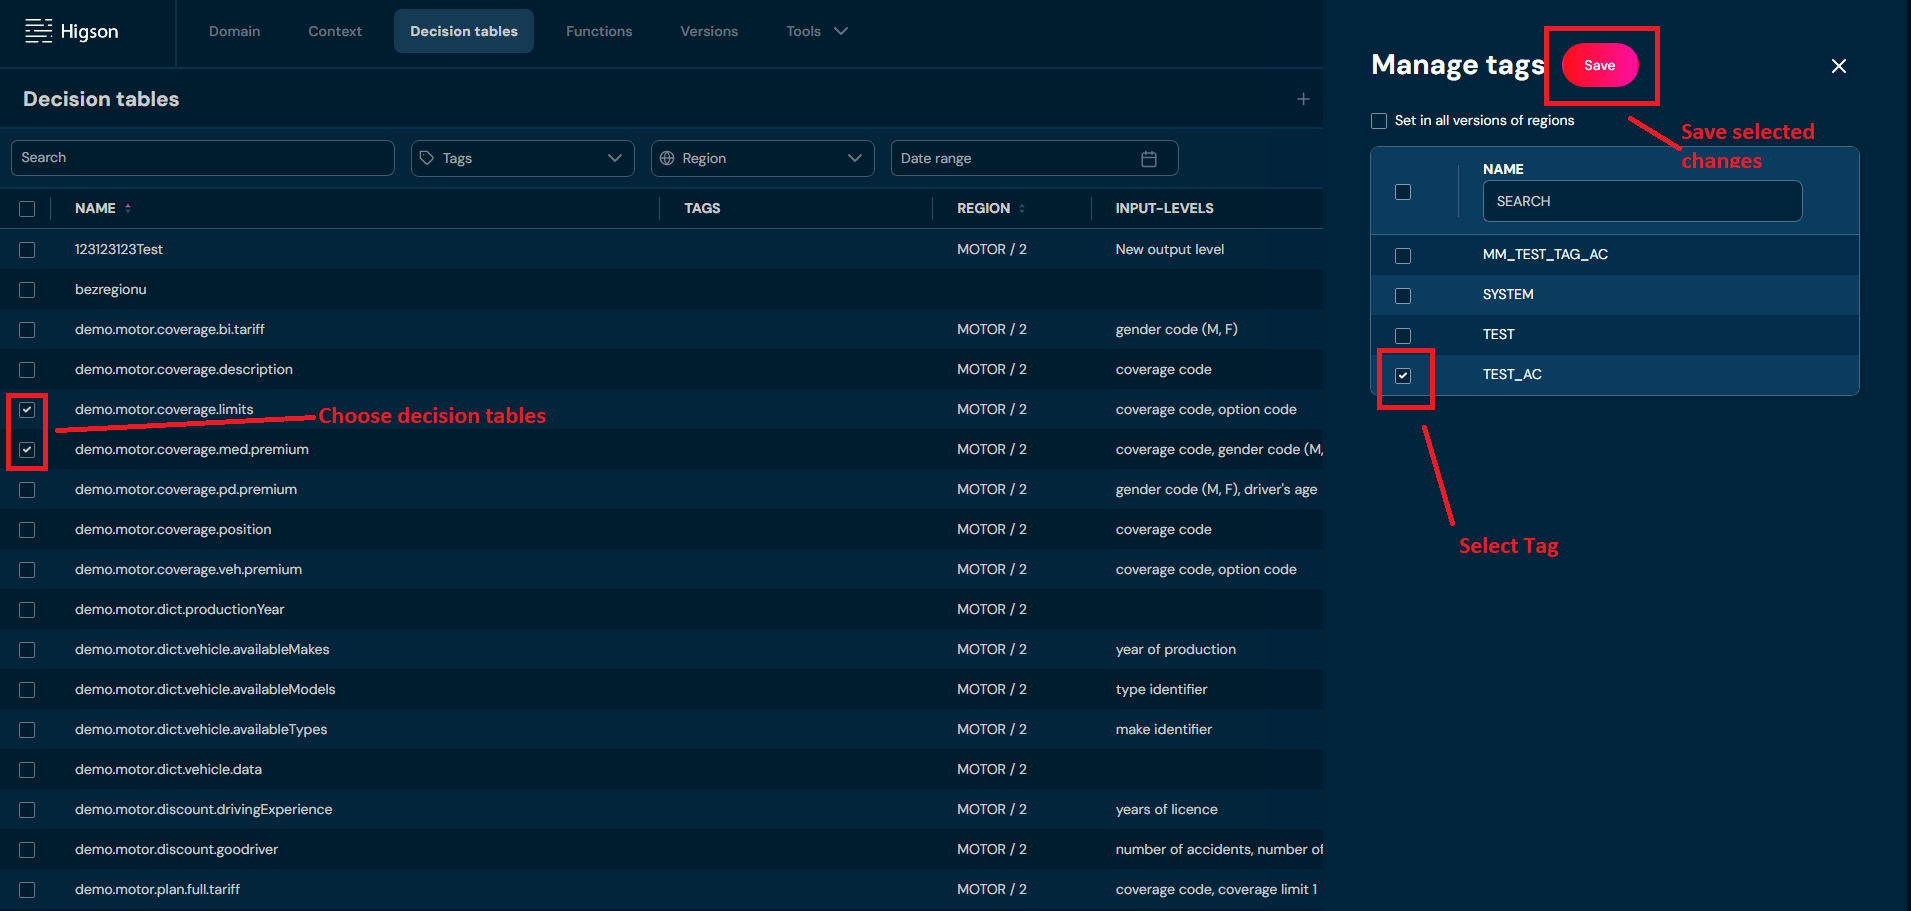
Select one or more untagged decision tables.
-
From the More Actions drop-down menu, select Manage Tags.
-
Select the tags you are interested in and click Save.
Remove Decision Table#
If you want to delete one or more decision tables, follow the steps below:
-
Choose the Decision tables in the Main toolbar.
-
Select one or more decision tables.
a. Select the top checkbox to select all decision tables in the view, or select individual checkboxes to select one or multiple
-
From the drop-down menu More actions, choose Remove.
a. If action Remove is grayed out, it means that no decision tables have been selected.
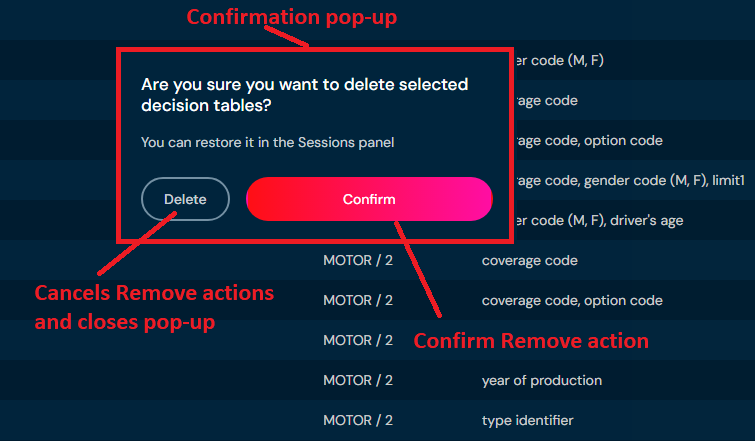
b. After choosing Remove action, a confirmation pop-up will appear.
-
Choose Confirm.
-
All selected decision tables are deleted from the environment
Details View#
You can access decision table details by left-clicking on the specific decision table in the List of all decision tables. The decision tables details screen contains all information about the decision tables, including their description, assigned regions, tags, and others.
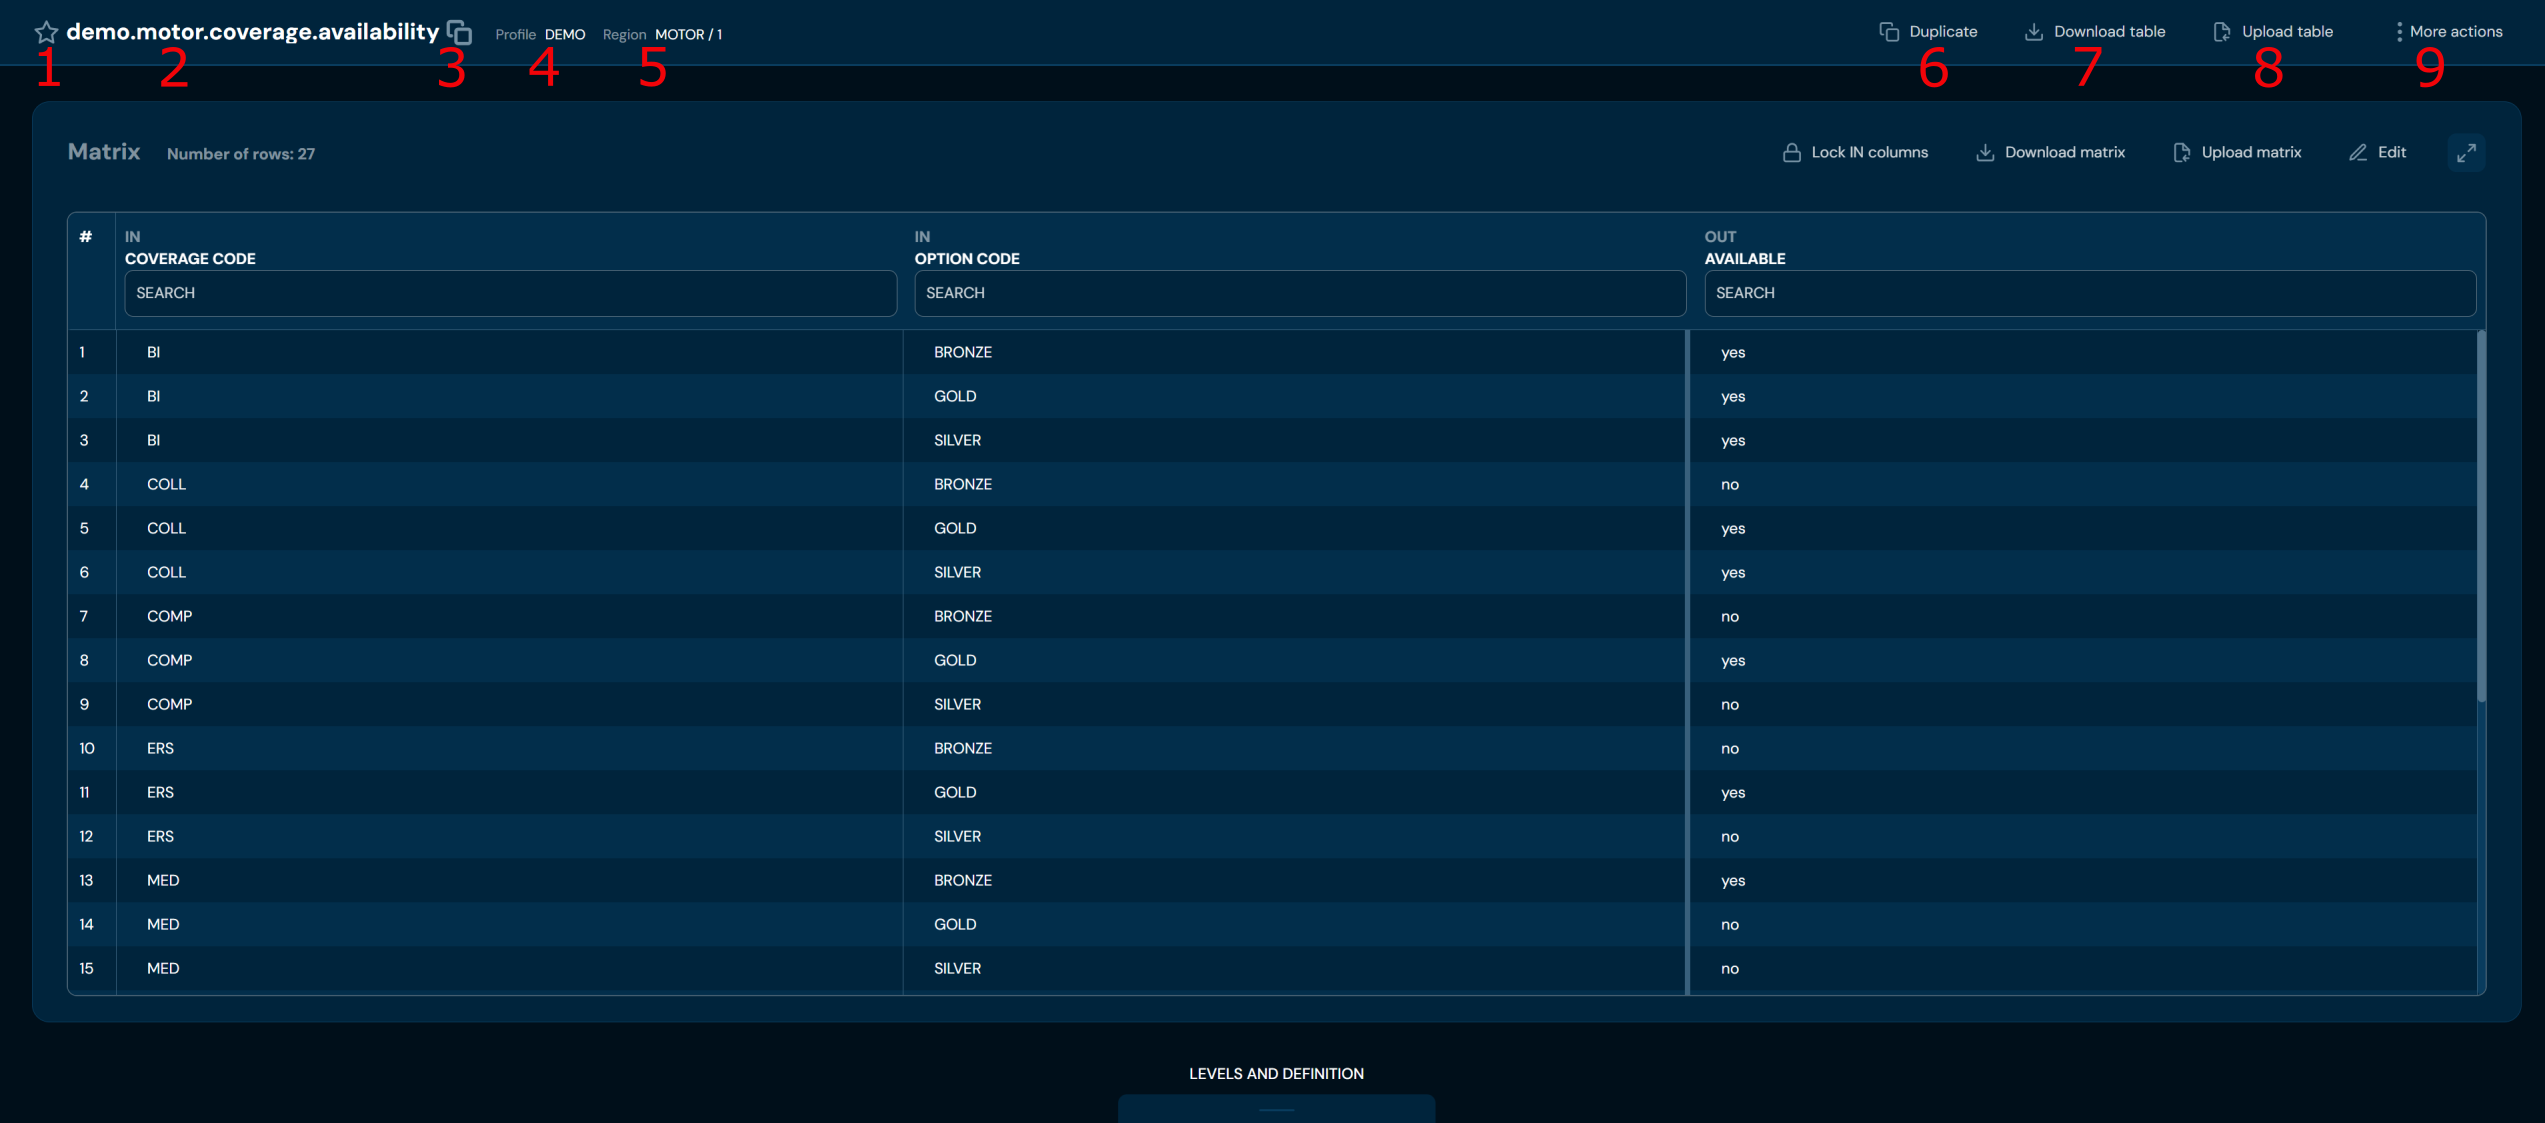
And you can see the available actions below:
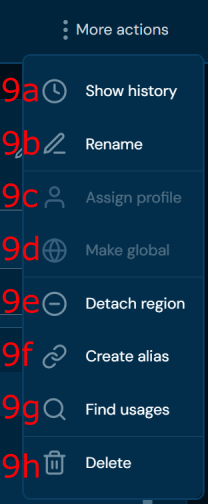
| No. | Name | Description |
|---|---|---|
| 1 | Bookmarks | Adds decision table to bookmarks. |
| 2 | Name | Name of decision table |
| 3 | Copy | Copy to clipboard |
| 4 | Profile | Assigned profile. |
| 5 | Region/Version | Assigned region and version |
| 6 | Duplicate | Allows to duplicate decision table. |
| 7 | Download table | Downloads XLSX file with decision table. |
| 8 | Upload table | Allows to upload decision table from xlsx file. |
| 9 | More actions | Drop-down list that contains actions 9a-9h. |
| 9a | Shows history | Opens a new screen with a table of all modifications made on the decision table. |
| 9b | Rename | Allows you to change the name. |
| 9c | Assign profile | Assigns the decision table to a profile. Assigning the decision table to a profile will ensure that only users with permissions for that profile can access it. |
| 9d | Make global | Makes the decision table global. Global decision tables are visible regardless of profile permissions. |
| 9e | Attach/Detach | Allows you to add/remove a region to/from the Decision table. Attach region is available if there are no regions added to the Decision table. Detach region is available if there is a region added to the Decision table. |
| 9f | Create Alias | Creates a copy of the decision table with its own code. |
| 9g | Find usages | Redirects you to Find usages search where you may find every reference to that decision table. |
| 9h | Delete | Action removes the decision table. |
Left-click on LEVELS AND DEFINITION to see more details about the Decision table.
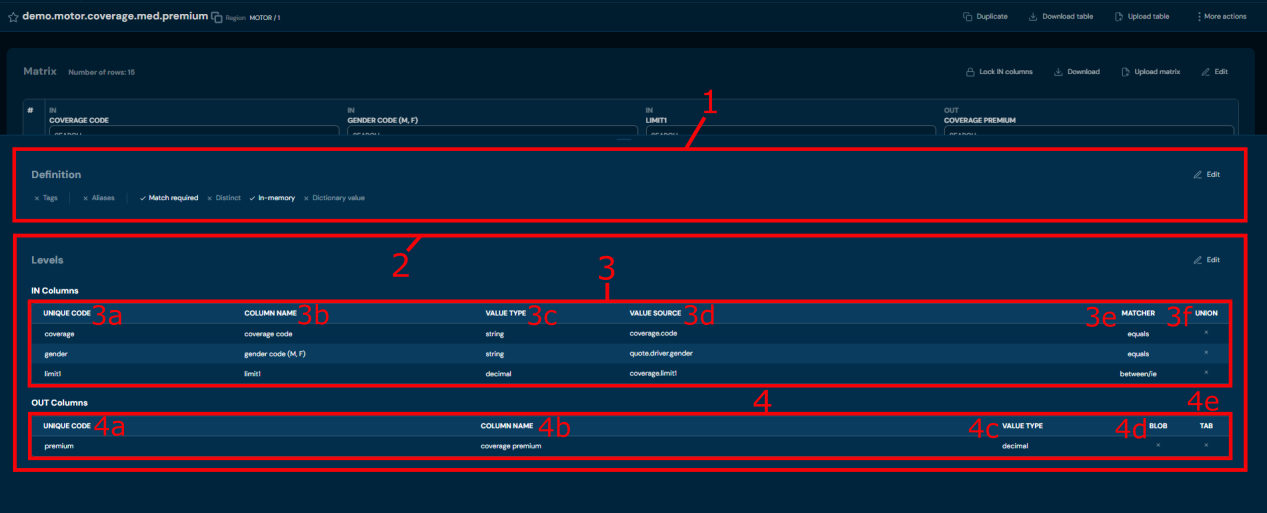
| No. | Name | Description |
|---|---|---|
| 1 | Definition section | Definition of Decision table. Contains information such as: - Description of Decision table - Assigned Tags - Created Aliases |
| 2 | Levels section | Levels of Decision table. Contains information about created IN Columns and OUT Columns. |
| 3 | IN Columns section | IN Columns table contains all IN Columns created in Decision table. |
| 3a | Unique Code | Unique Code of IN Column. |
| 3b | Column Name | Name of IN Column. |
| 3c | Value Type | Informs about Value Type of IN Column. |
| 3d | Value Source | Value Source of IN Column. |
| 3e | Matcher | Informs about the selected matcher for IN Column. To learn more about matchers go here. |
| 3f | Union | Informs if Union checkbox was selected for IN Column. |
| 4 | OUT Columns section | OUT Columns table contains all OUT Columns created in Decision table. |
| 4a | Unique Code | Unique Code of OUT Column. |
| 4b | Column Name | Name of OUT Column. |
| 4c | Value Type | Informs about Value Type of OUT Column. |
| 4d | Blob | Informs if Blob checkbox was selected for OUT Column. |
| 4e | Tab | Informs if Tab checkbox was selected for OUT Column. |
Value Source#
The Value Source field is used to define the source of a value for an IN level in a decision table. It can accept two types of references:
- context paths,
- functions.
Context Paths in the Value Source Field
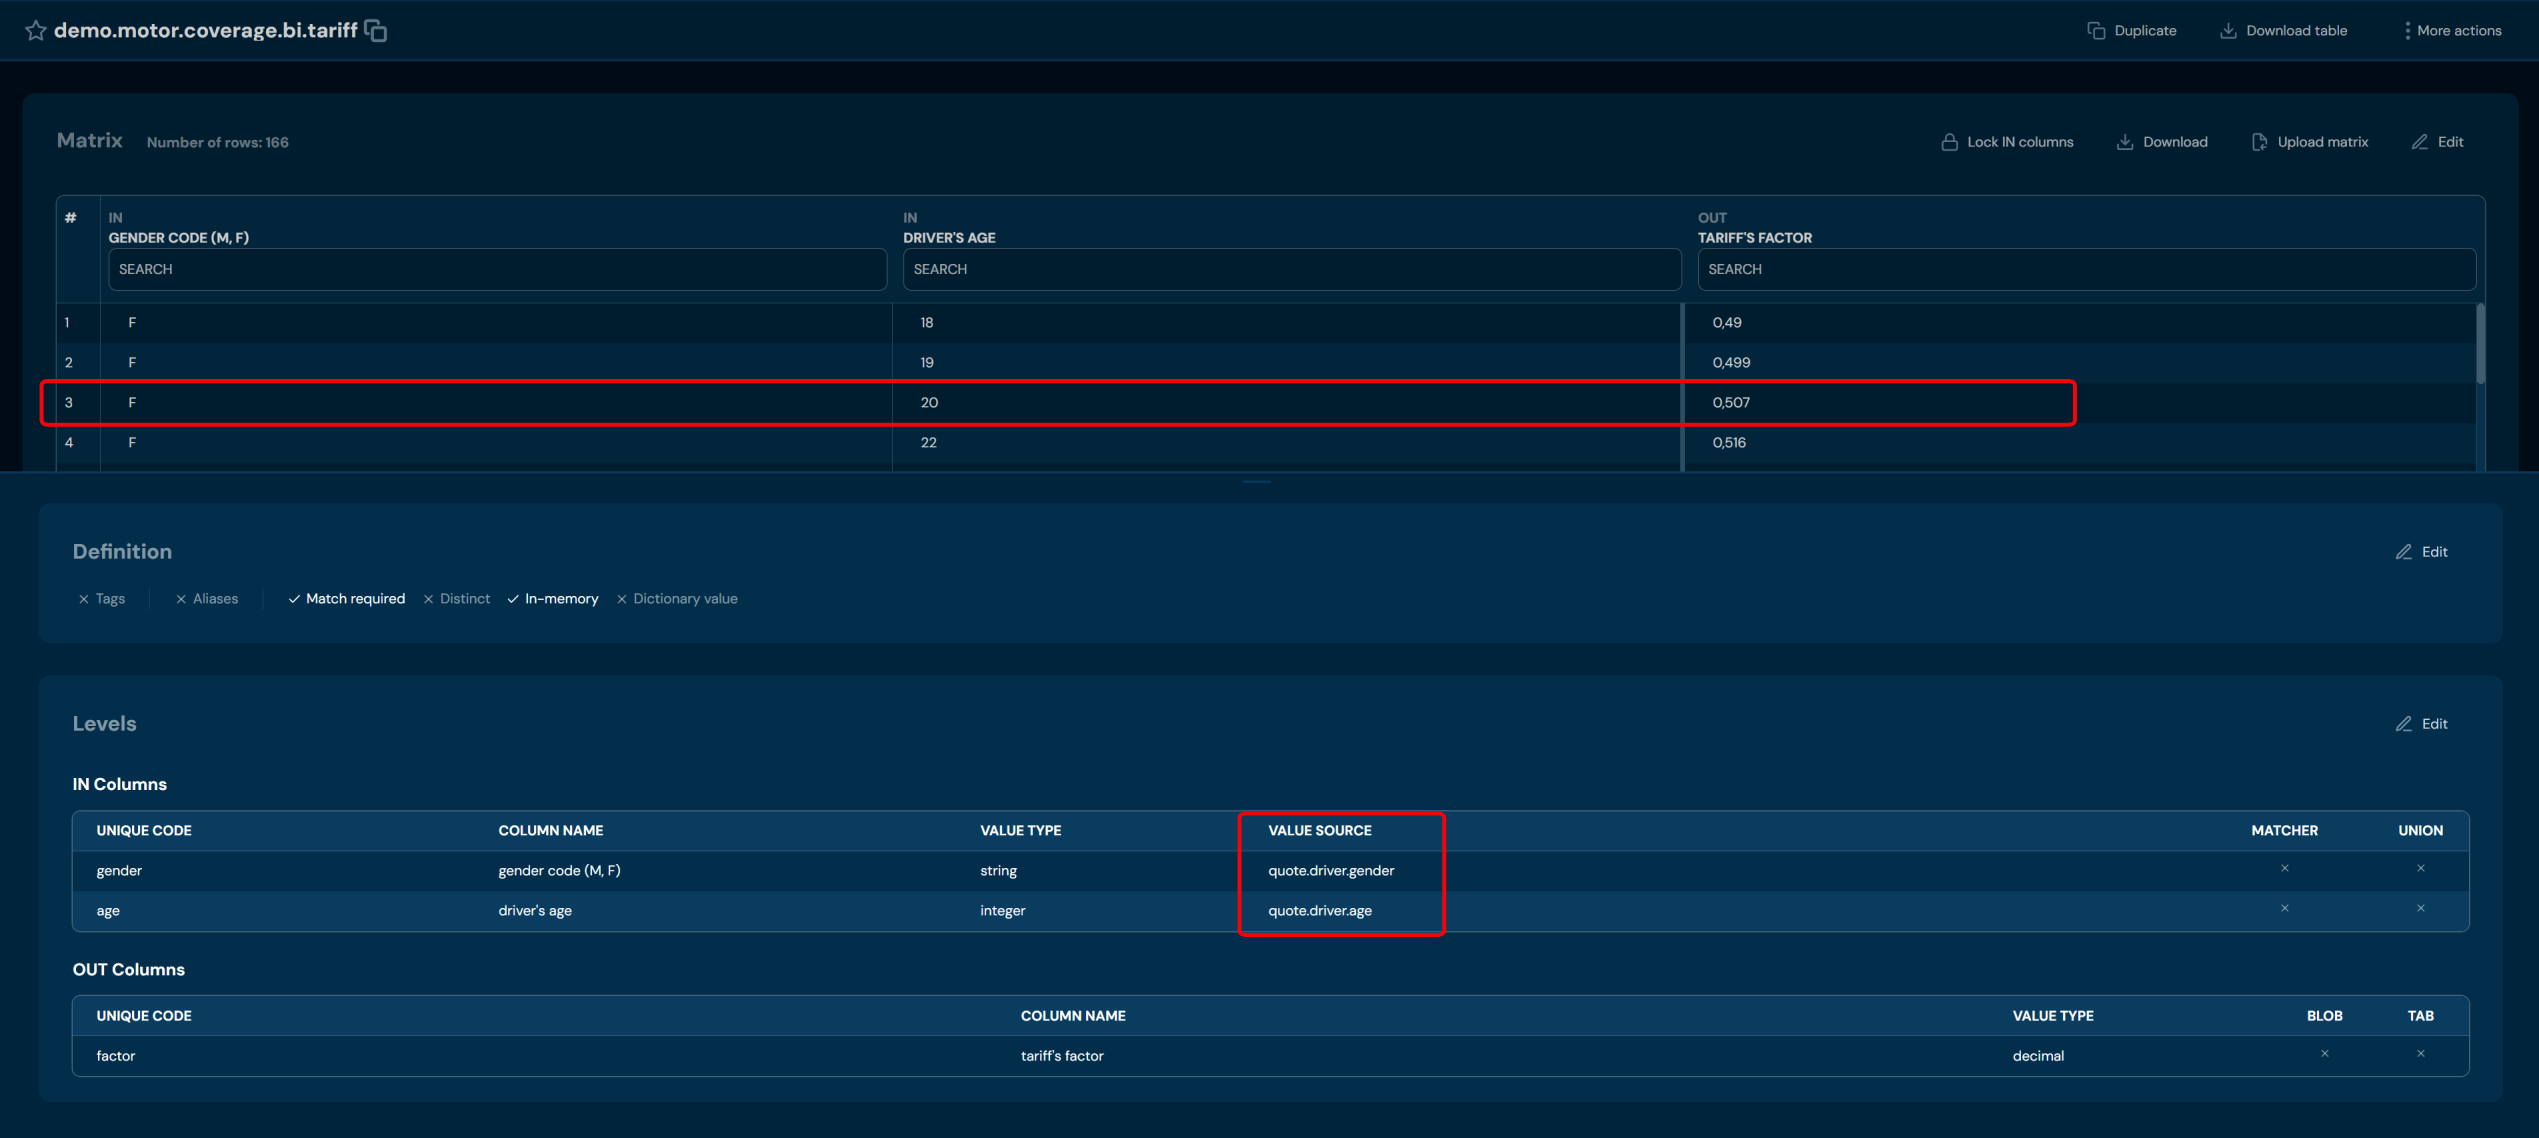
If the value in the IN level should be read from the context, an appropriate context path must be provided, for example: quote.driver.age.
In this example, the value of the age attribute is read from the Driver type, which is a subtype of the Quote type.
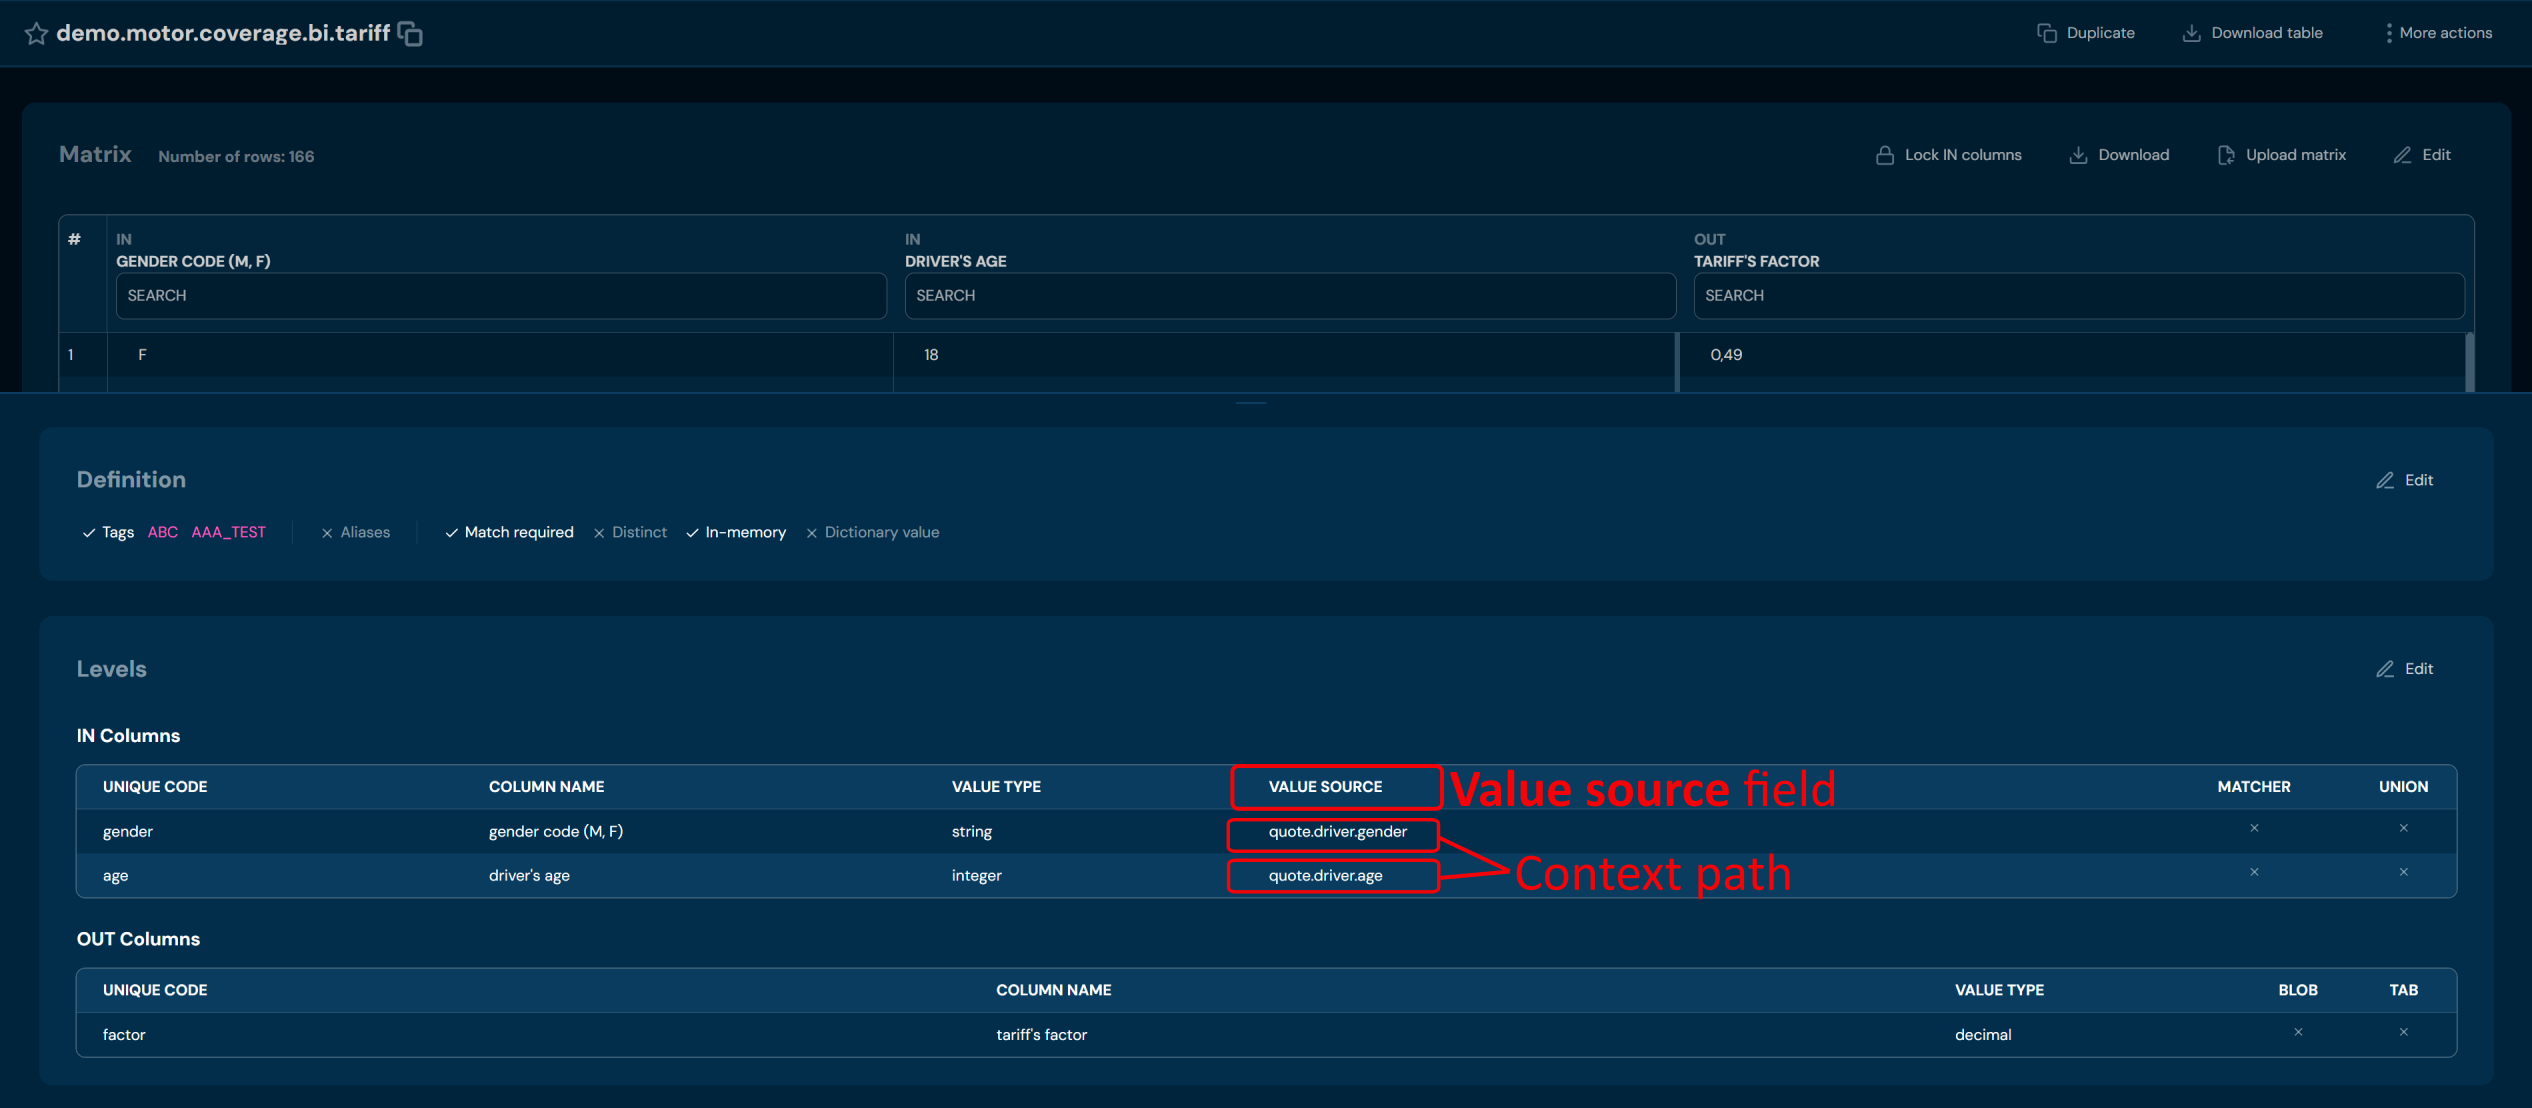
EXAMPLE
For the following data taken from the context:
quote.driver.gender = F
quote.driver.age = 20
the resulting Tariff’s factor is 0.507.
Functions in the Value Source Field
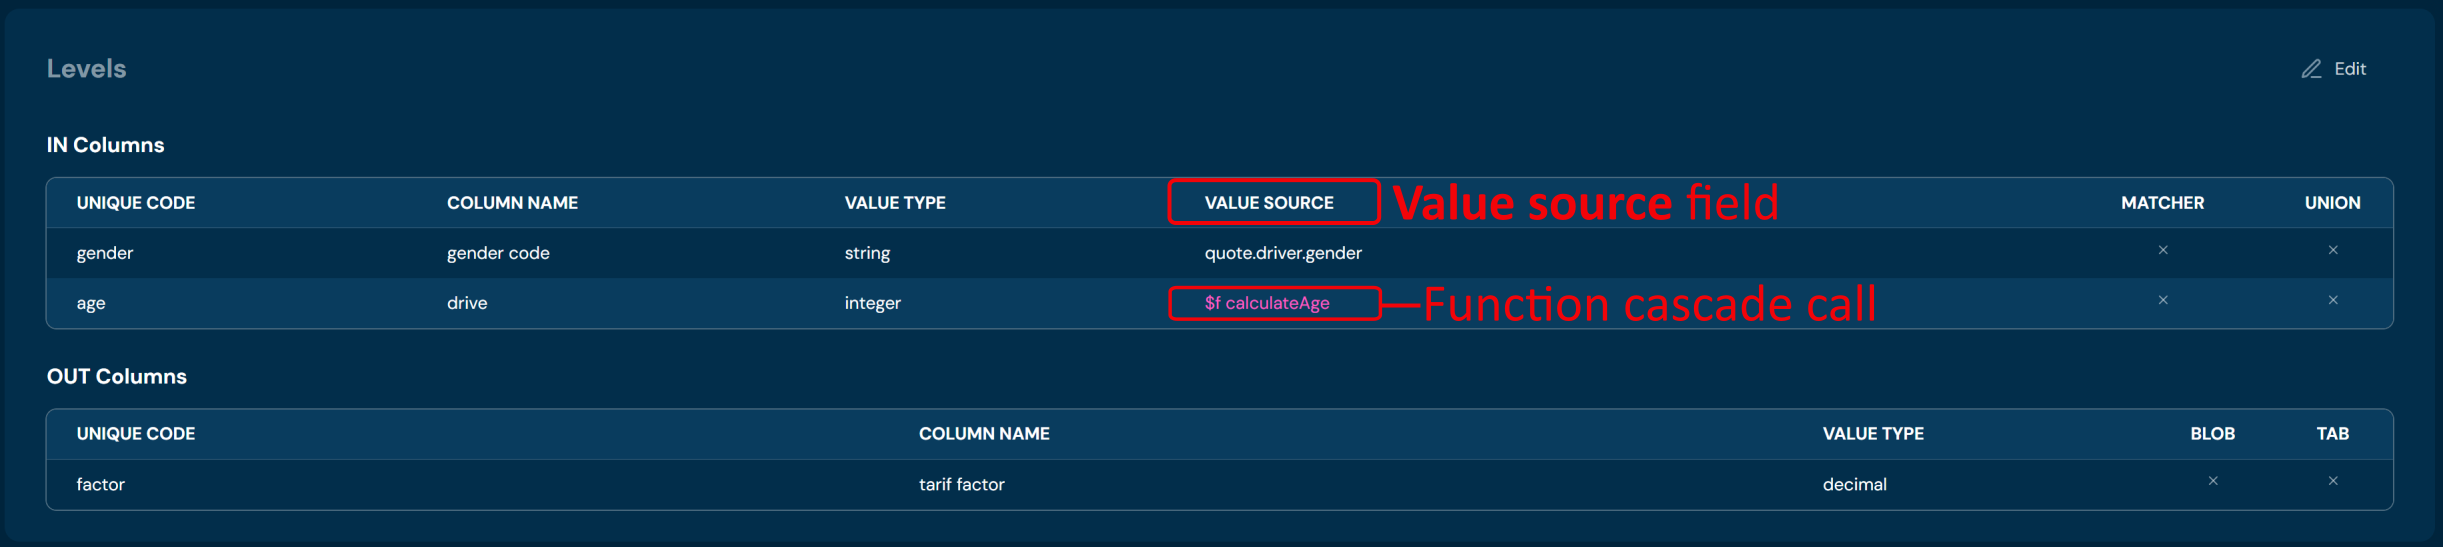
The Value Source field also supports references to functions using the $f notation. In this case, the value evaluated in the decision matrix is the result of a function execution.
Duplicate Decision Table#
If you want to duplicate specific Decision table, follow these steps:
-
Choose Decision tables in Main toolbar.
-
Left-click on the Decision table you wish to duplicate.
a. Left-clicking on Decision table opens Decision table details screen.
-
Choose Duplicate in Available actions.
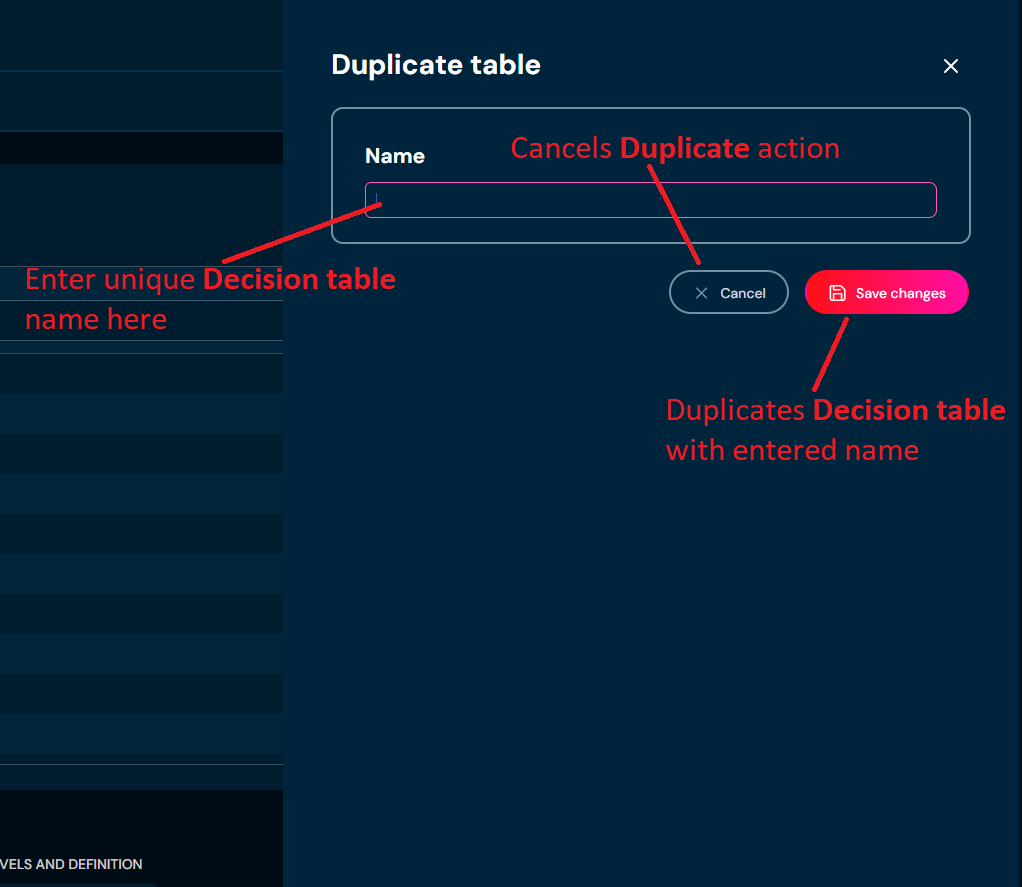
a. Choosing Duplicate brings up the Duplicate table screen.
-
Enter unique Decision table name. Name can contain only characters from collection a-z; 0-9; “.”; “-”; “_” and it can’t start with “-”.
-
Choose Save changes.
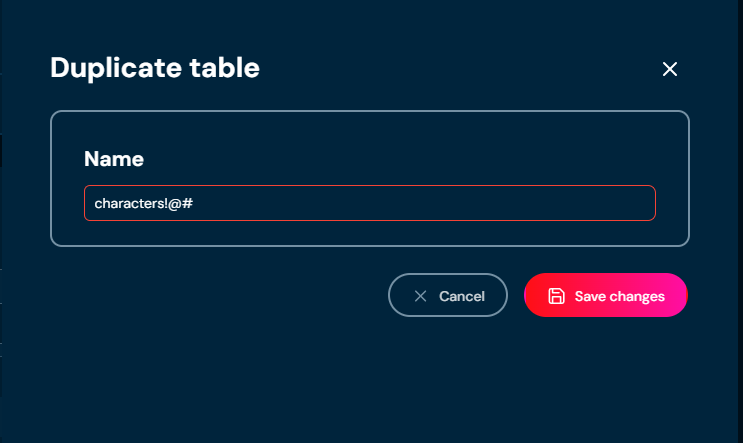
a. If you entered illegal characters, then name filed will highlight with red color.
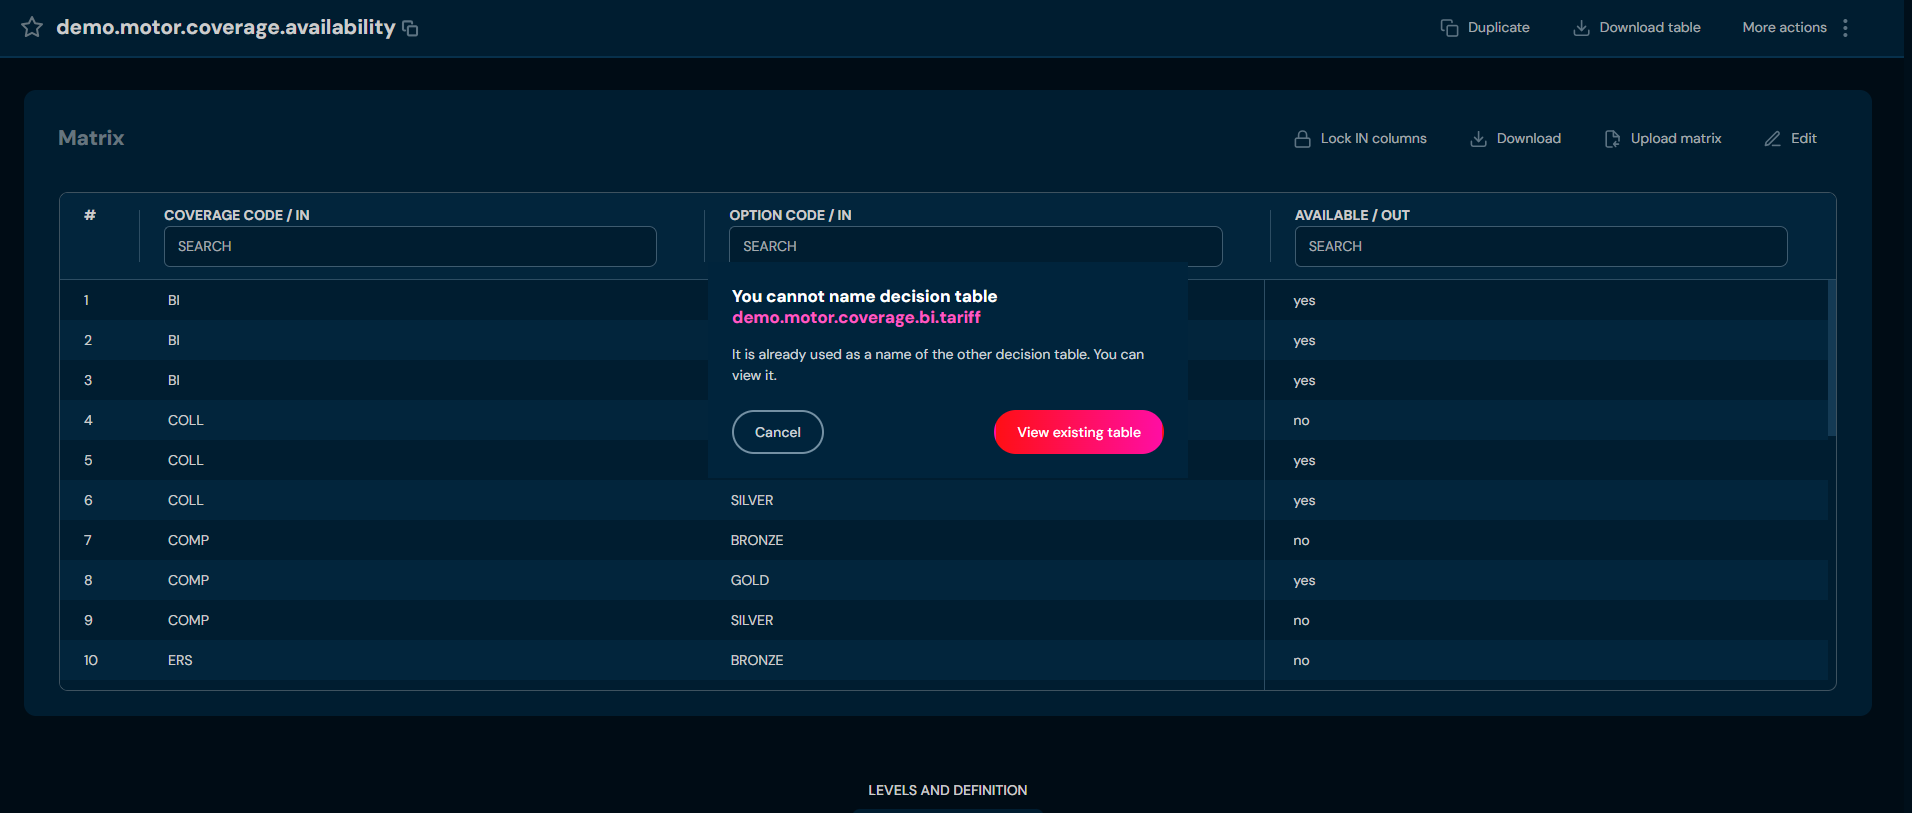
b. If the name you provided is already used by another Decision table, then pop-up dialog will appear. You can either close the pop-up by clicking Cancel or you can click View existing Decision table, that will redirect you to the appropriate Decision table.
Download Decision Table#
If you want to download a specific Decision table, follow these steps:
-
Choose Decision tables in Main toolbar.
-
Left-click on the Decision table you wish to download.
a. Left-clicking on Decision table opens Decision table details screen.
-
Choose Download in Available actions.
a. Choosing Download downloads an XLSX file that contains data of Decision table.
Show History#
If you want to check all modifications made on Decision table, follow these steps:
-
Choose Decision tables in Main toolbar.
-
Left-click on the Decision table you want to check.
a. Left-clicking on Decision table opens Decision table details screen.
-
From drop-down menu More actions choose Show history.
a. Choosing Show history brings up the Decision table history screen.
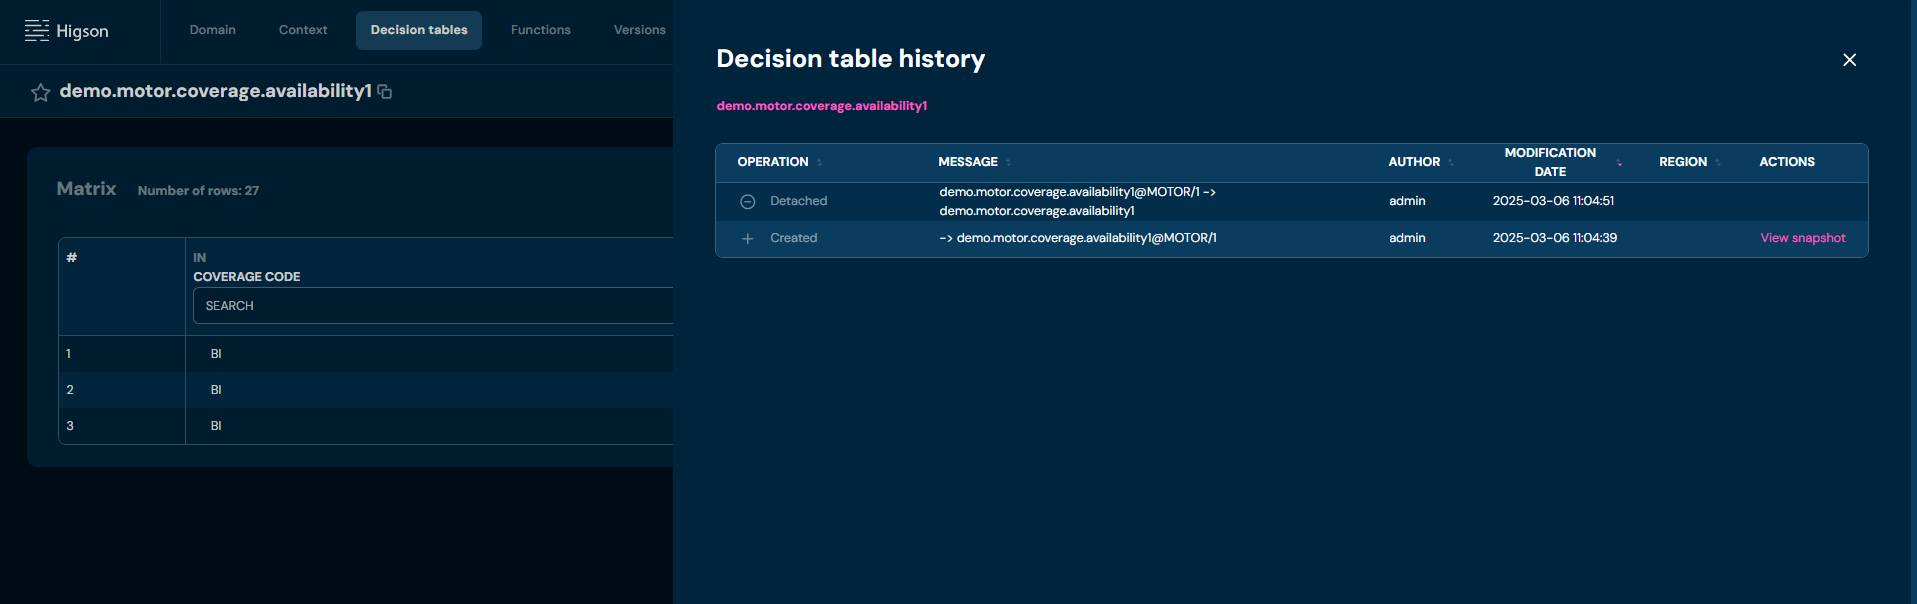
No. Column name Description 1 Operation Type Type of operation made on the Decision table. 2 Message Deatailed information on operation. 3 Author User’s login that made an operation. 4 Modification Date Date of the published session that made an operation. 5 Region Region and version assigned to the Decision table at the time of modification. 6 Digest Decision table’s hash. 7 Actions View redirects to an archived version of the Decision table. In this screen, you can choose Restore to restore that version of the Decision table.
Rename#
If you want to rename a Decision table, follow these steps:
-
Choose Decision tables in Main toolbar.
-
Left-click on the Decision table you wish to rename.
a. Left-clicking on Decision table opens Decision table details screen.
-
From drop-down menu More actions choose Rename.
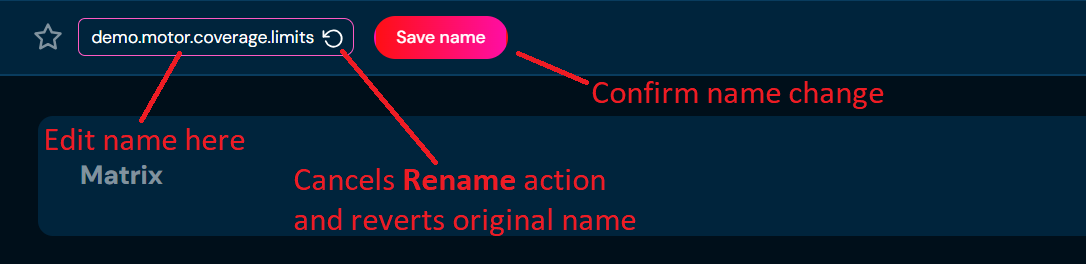
a. The Highlighted border around the Decision table name indicates that the name is editable.
-
Enter unique Decision table name. Name can contain only characters from collection a-z; 0-9; “.”; “-”; “_” and it can’t start with “-”.
-
Choose Save name.
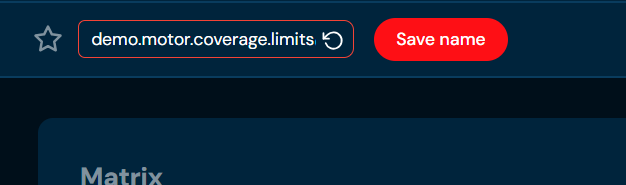
a. If you enter illegal characters, then the rename field will highlight with red color.
b. If the name you provided is already used by another Decision table, then pop-up dialog will appear. You can either close the pop-up by clicking Cancel or you can click View existing decision table, that will redirect you to the appropriate Decision table.
Attach Region#
To attach a decision table to a region, decision table must first be assigned to a profile. A region belongs to a profile.
If you want to attach a region to a specific Decision table from Decision table details level, follow these steps:
-
Choose Decision tables in Main toolbar.
-
Left-click on Decision table with no region assigned you want to attach a region.
a. Left-clicking on Decision table opens Decision table details screen.
-
From drop-down menu More actions choose Attach region
a. If Detach region action is available, it means that the Decision table has assigned the region already. You need to Detach region (hyperlink) before you will be able to attach a new region.
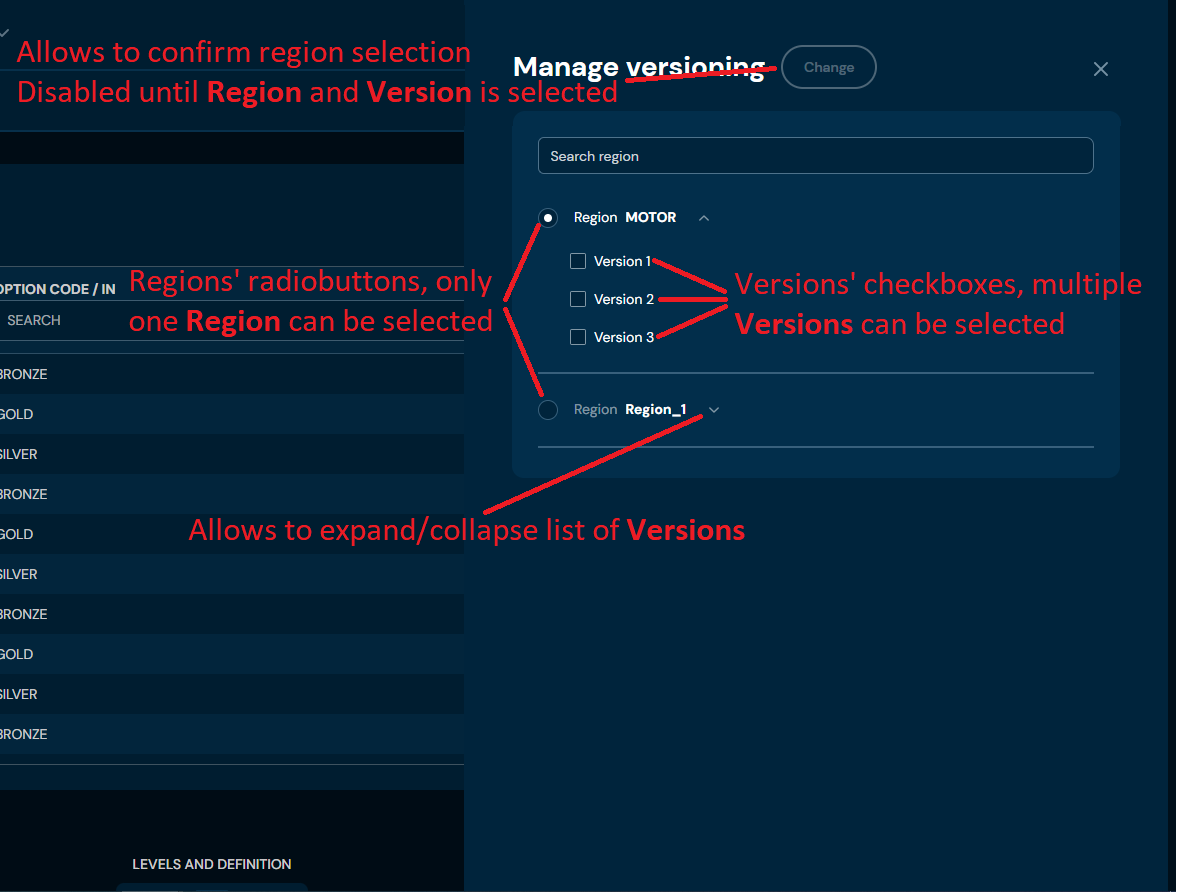
b. Choosing Attach region brings up Manage versioning screen.
-
Select Region and one or more Version.
-
Choose Change
a. The Region is being assigned to the Decision table.
Detach Region#
If you want to detach a region from a specific Decision table from Decision table details level, follow these steps:
-
Choose Decision tables in Main toolbar.
-
Left-click on the Decision table with a region assigned you want to detach region.
a. Left-clicking on Decision table opens Decision table details screen.
-
From drop-down menu More actions choose Detach region.
a. If Attach region action is available, it means that the Decision table has no region assigned.
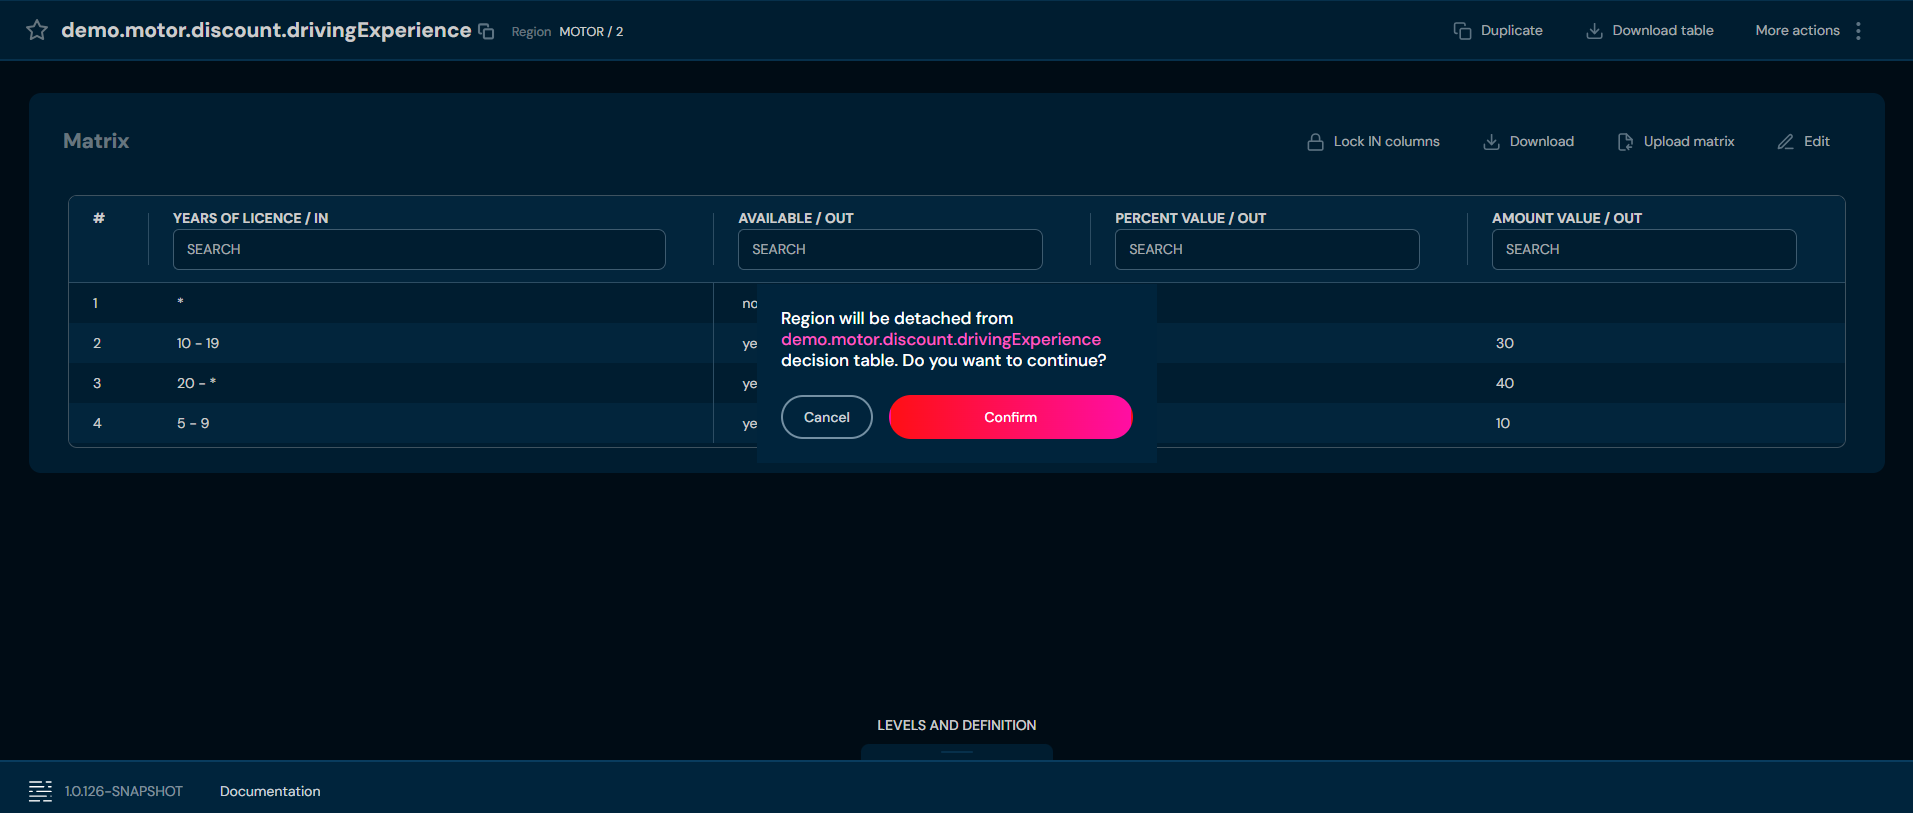
b. After choosing Detach region action, confirmation pop-up will appear.
-
Choose Confirm.
a. The Region is being detached from the Decision table.
Create Alias#
If you want to create an alias to specific Decision table, follow these steps:
-
Choose Decision tables in Main toolbar.
-
Left-click on Decision table you want to create alias.
a. Left-clicking on Decision table opens Decision table details screen.
-
From drop-down menu More actions choose Create alias.
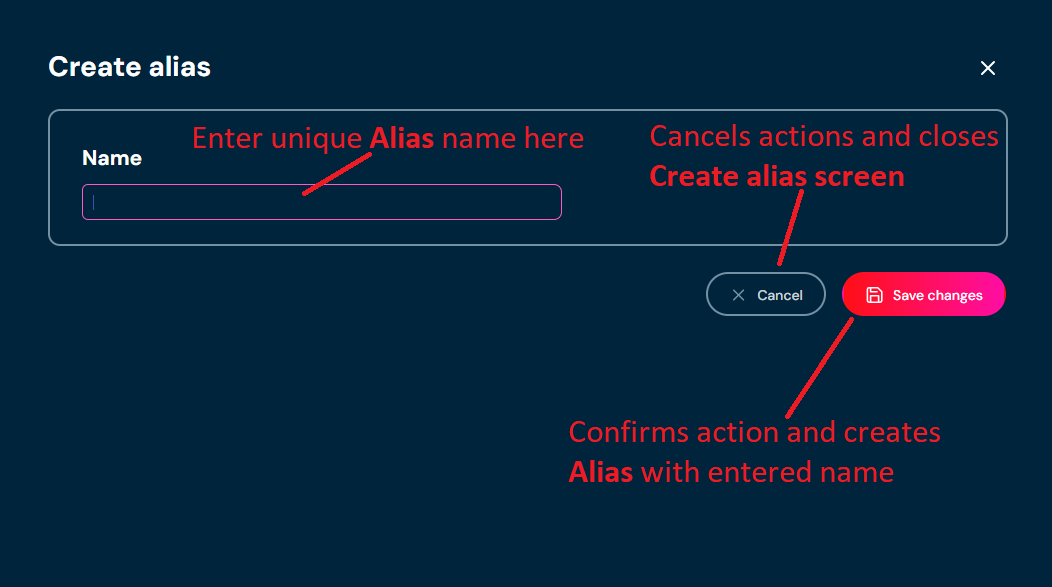
a. Choosing Create alias brings up the Create alias screen.
-
Enter unique alias name. Name can contain only characters from collection a-z; 0-9; “.”; “-”; “_” and it can’t start with “-”.
-
Choose Save change.
a. If you enter illegal characters, then the rename field will highlight with red color.
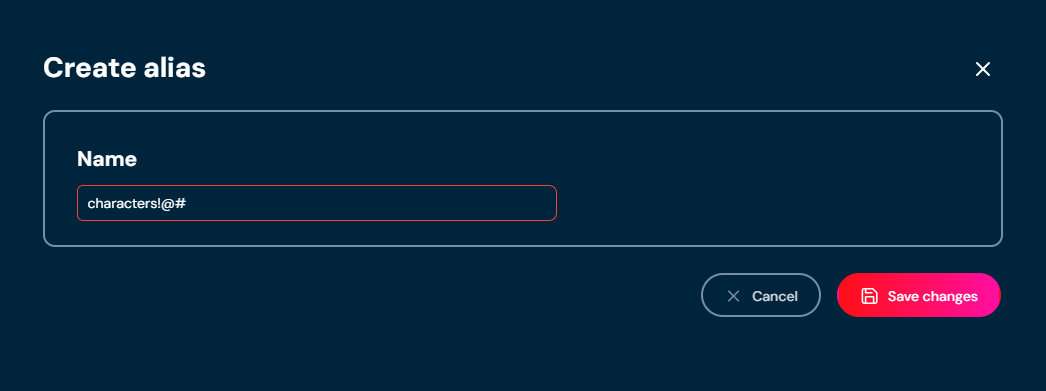
b. If the name you provided is already used by another Decision table, then a pop-up message will appear.
Find Usages#
If you want to check where Decision table is used, follow these steps:
-
Choose Decision tables in Main toolbar.
-
Left-click on the Decision table you want to check.
a. Left-clicking on Decision table opens Decision table details screen.
From drop-down menu More actions choose Find usages.
a. Choosing Find usages brings up the Find usages screen.
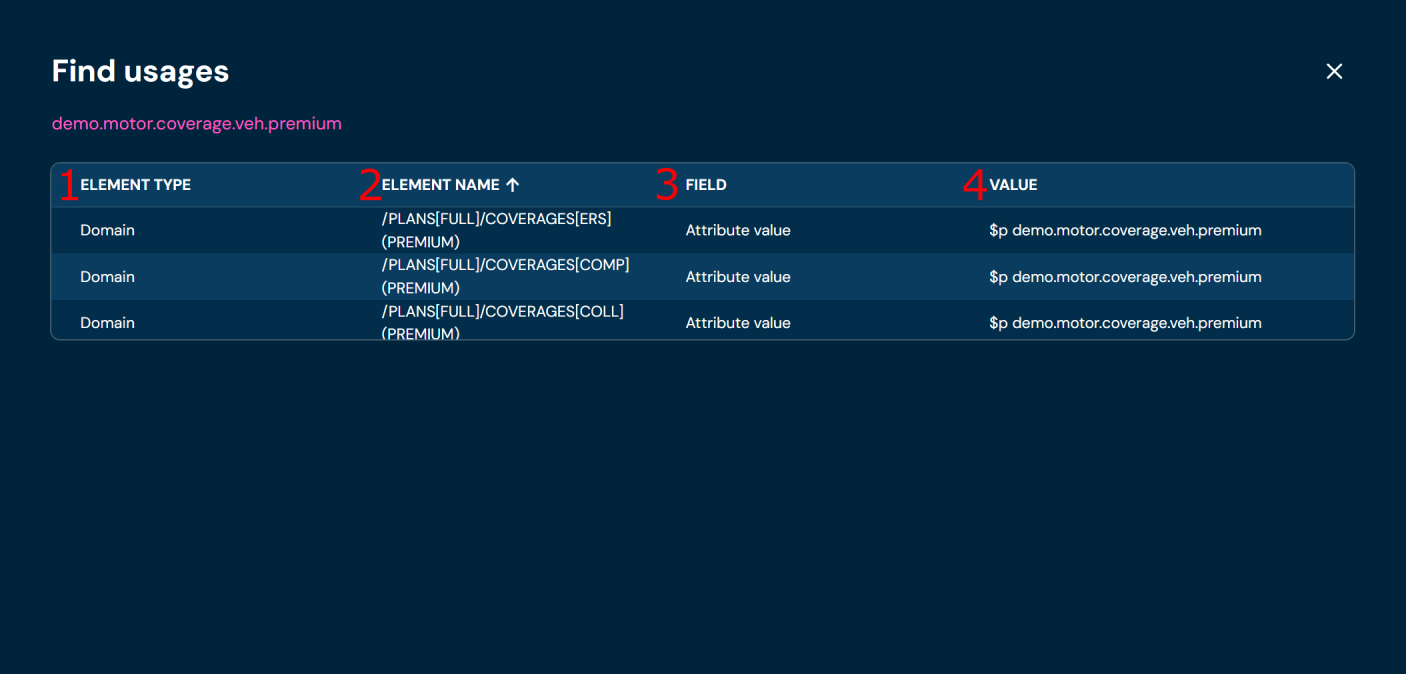
| No. | Column name | Description |
|---|---|---|
| 1 | Element Type | Type of element that uses this Decision table. |
| 2 | Element Name | Name of the element that uses this Decision table. |
| 3 | Field | Informs about the type of field where the Decision table is used. |
| 4 | Value | Value of the element that uses this Decision table. This column is filled only for Attribute value element; for other elements, this column is empty. |
Remove (Details View)#
If you want to delete specific Decision table from Decision table details level, follow these steps:
-
Choose Decision tables in Main toolbar.
-
Left-click on the Decision table you wish to remove.
a. Left-clicking on Decision table opens Decision table details screen.
-
From drop-down menu More actions choose Remove.
a. After choosing Remove action, confirmation pop-up will appear.
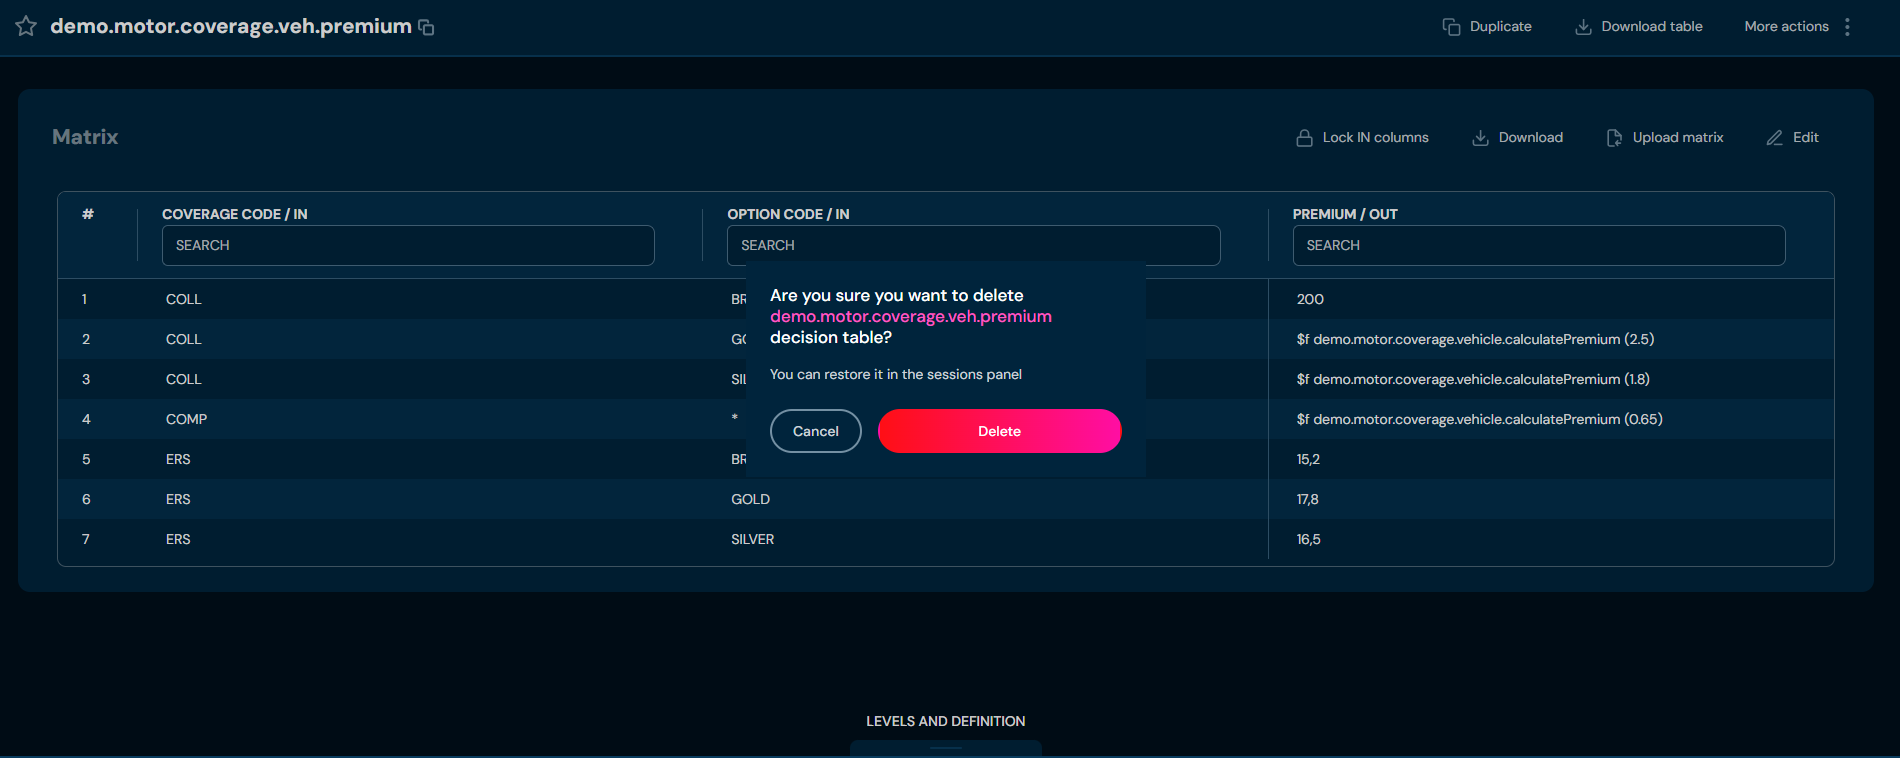
-
Choose Confirm.
a. The Decision table is deleted from the environment.
Matrix#
The Matrix section displays the decision table data in rows and columns. The section header shows the current number of rows.
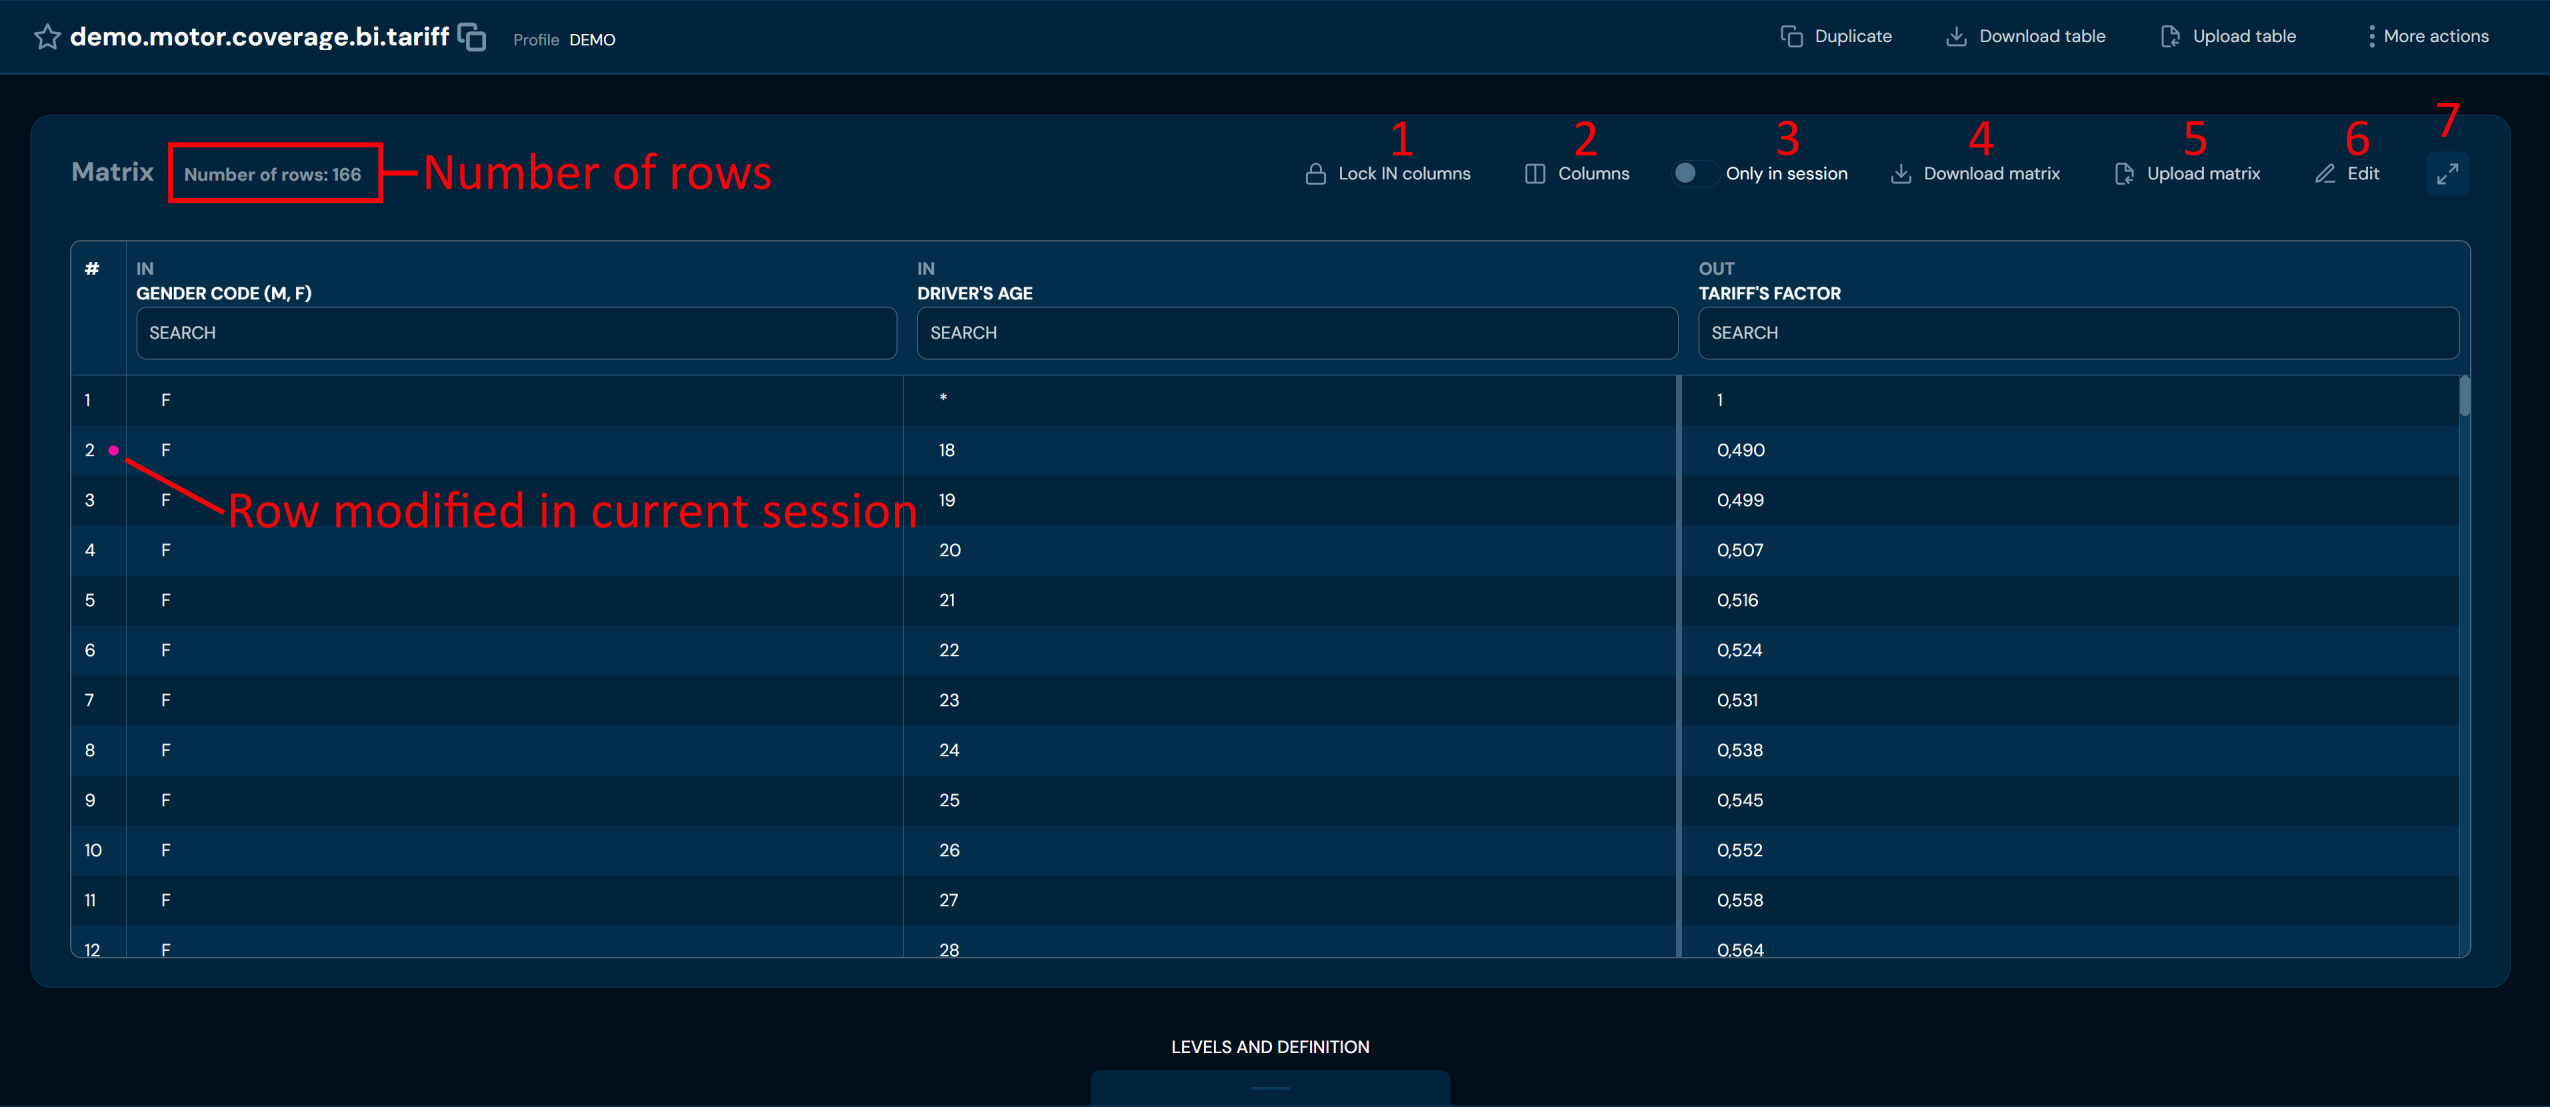
The following actions are available in the Matrix section toolbar:
| No. | Action | Description |
|---|---|---|
| 1 | Lock IN columns | Locks the IN columns in place so they remain visible while scrolling horizontally through the matrix. |
| 2 | Columns | Opens a panel for showing or hiding individual columns in the matrix view. |
| 3 | Only in session | Toggle switch. When enabled, any changes made to the matrix are applied only for the duration of the current session and are not persisted. |
| 4 | Download matrix | Downloads the matrix data as an XLSX file. |
| 5 | Upload matrix | Uploads matrix data from an XLSX file, replacing the current matrix content. |
| 6 | Edit | Activates edit mode for the matrix. Highlighted borders indicate that edit mode is active. |
| 7 | Expand | Expands the matrix to full screen for a larger working area. |
Each row in the matrix that has been modified in the current session is preceded by a colored dot indicator. Each column has a Search field that allows you to filter rows by the values in that column.
Edit Matrix#
If you want to edit matrix in a specific decision table, follow these steps:
-
Choose Decision tables in Main toolbar.
-
Left-click on the Decision table you wish to edit.
a. Left-clicking on the Decision table opens the details screen.
-
Choose Edit in Matrix section.
a. Highlighted borders indicate that the edit mode is active.
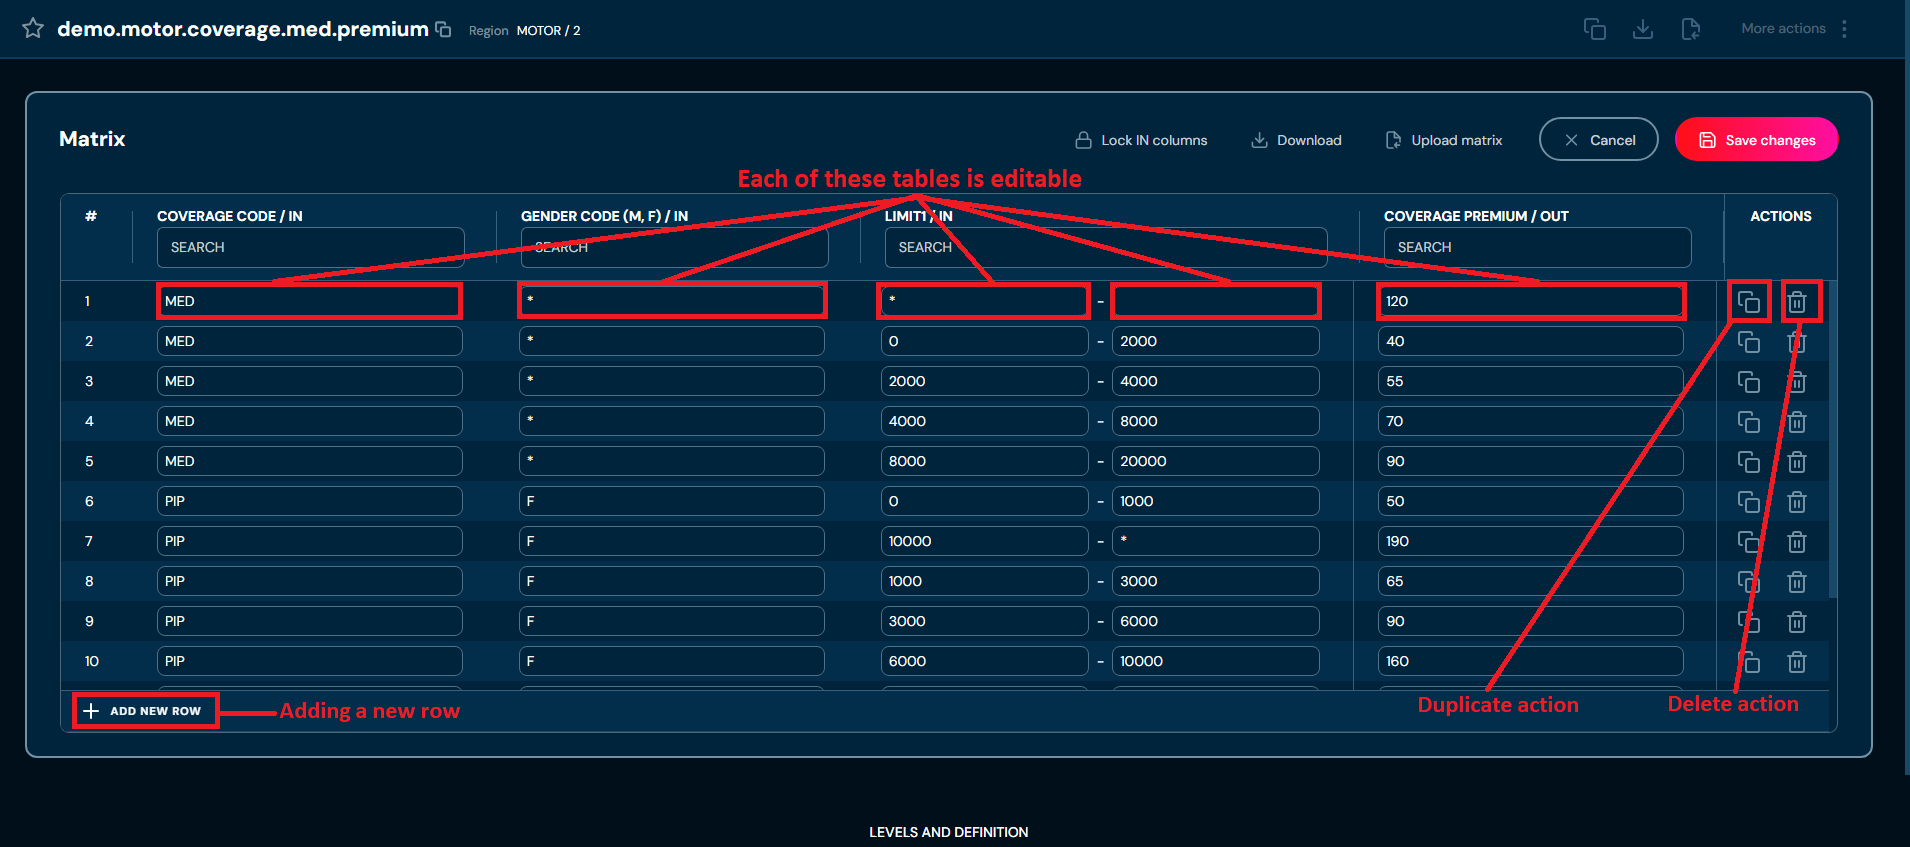
-
Edit any data you need.
-
Choose Save changes to save all changes made in the Decision table.
a. Cancel reverts all changes.
Edit Levels and Definition#
If you want to edit levels or definition in a specific decision table, follow these steps:
-
Choose Decision tables in Main toolbar.
-
Left-click on the Decision table you wish to edit.
a. Left-clicking on Decision table opens Decision table details screen.
-
Expand LEVELS AND DEFINITION
-
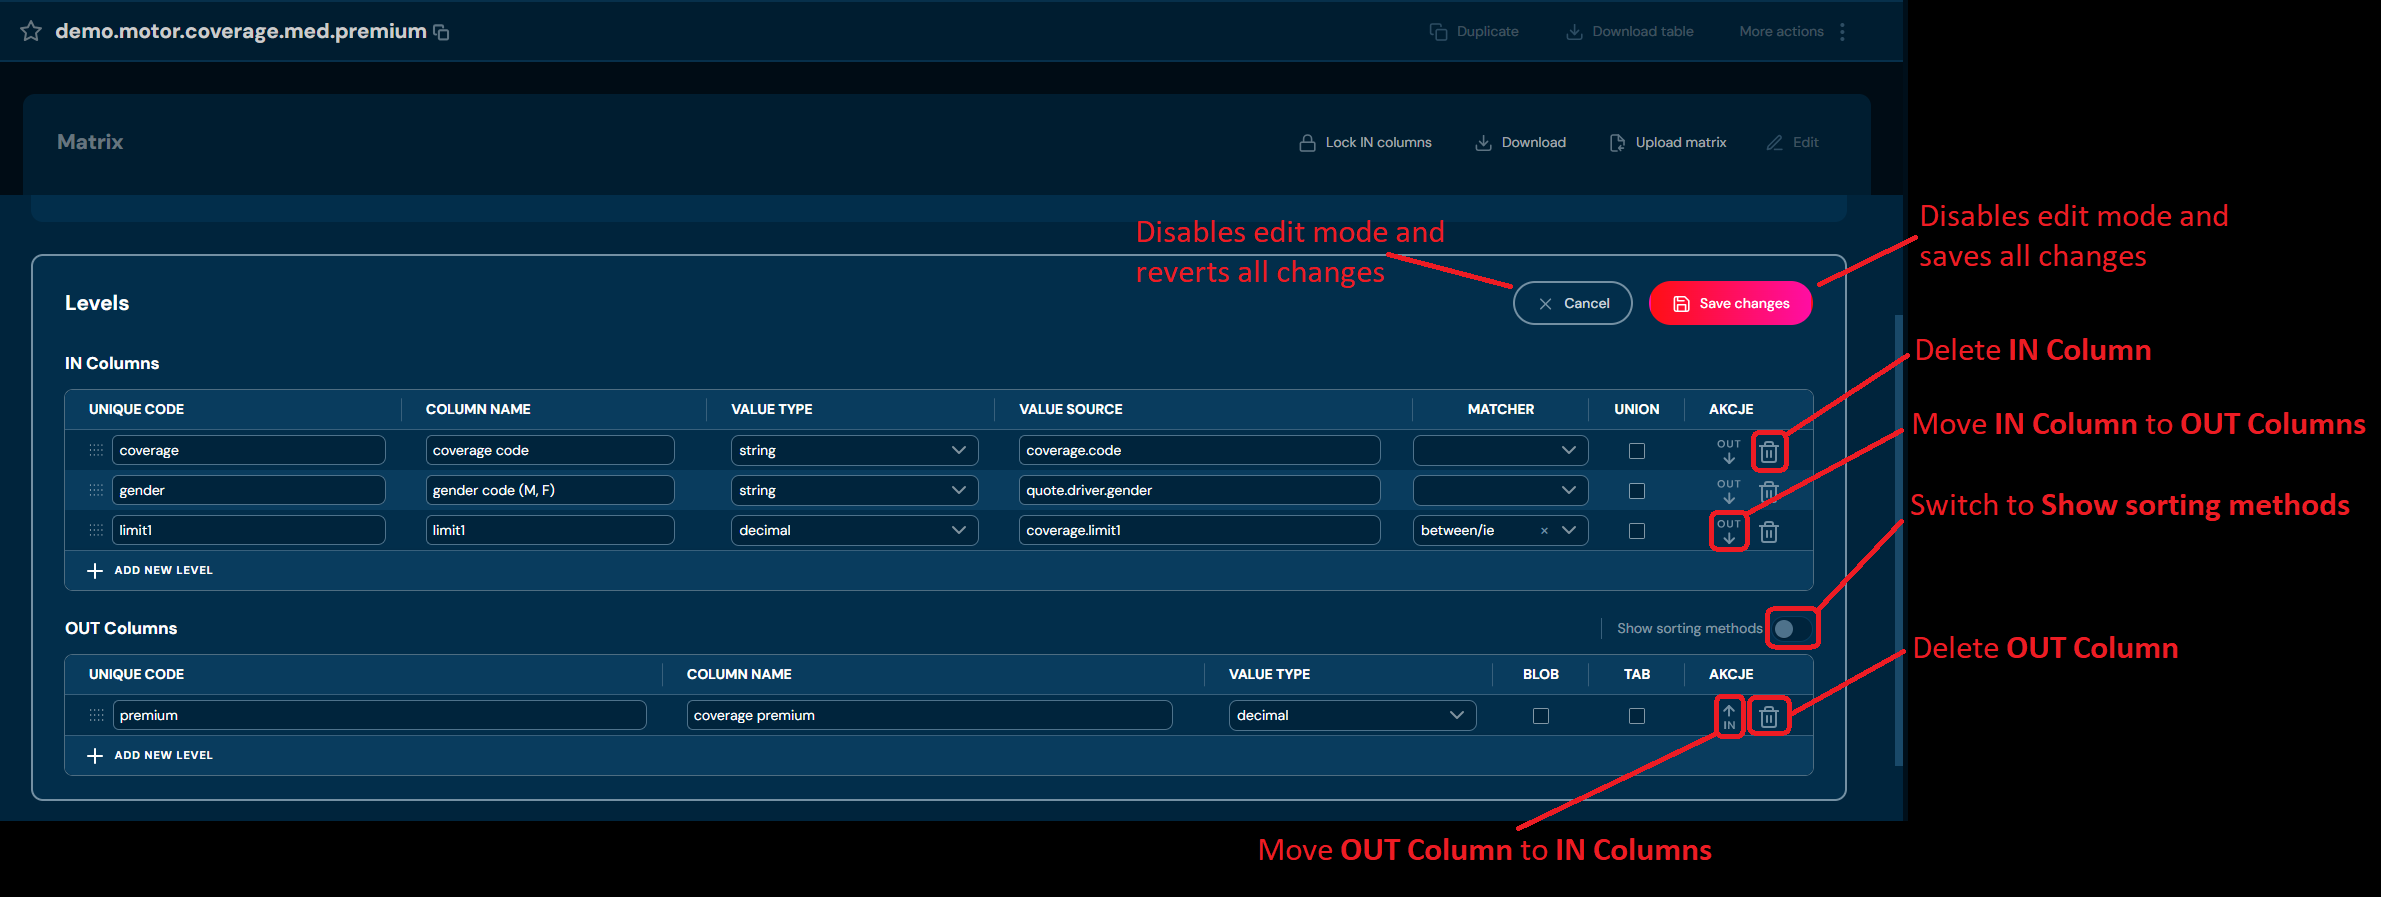
Choose Edit in Definition section or in Levels section. Only one section can be edited at given time.
a. Edit mode for Definition section.
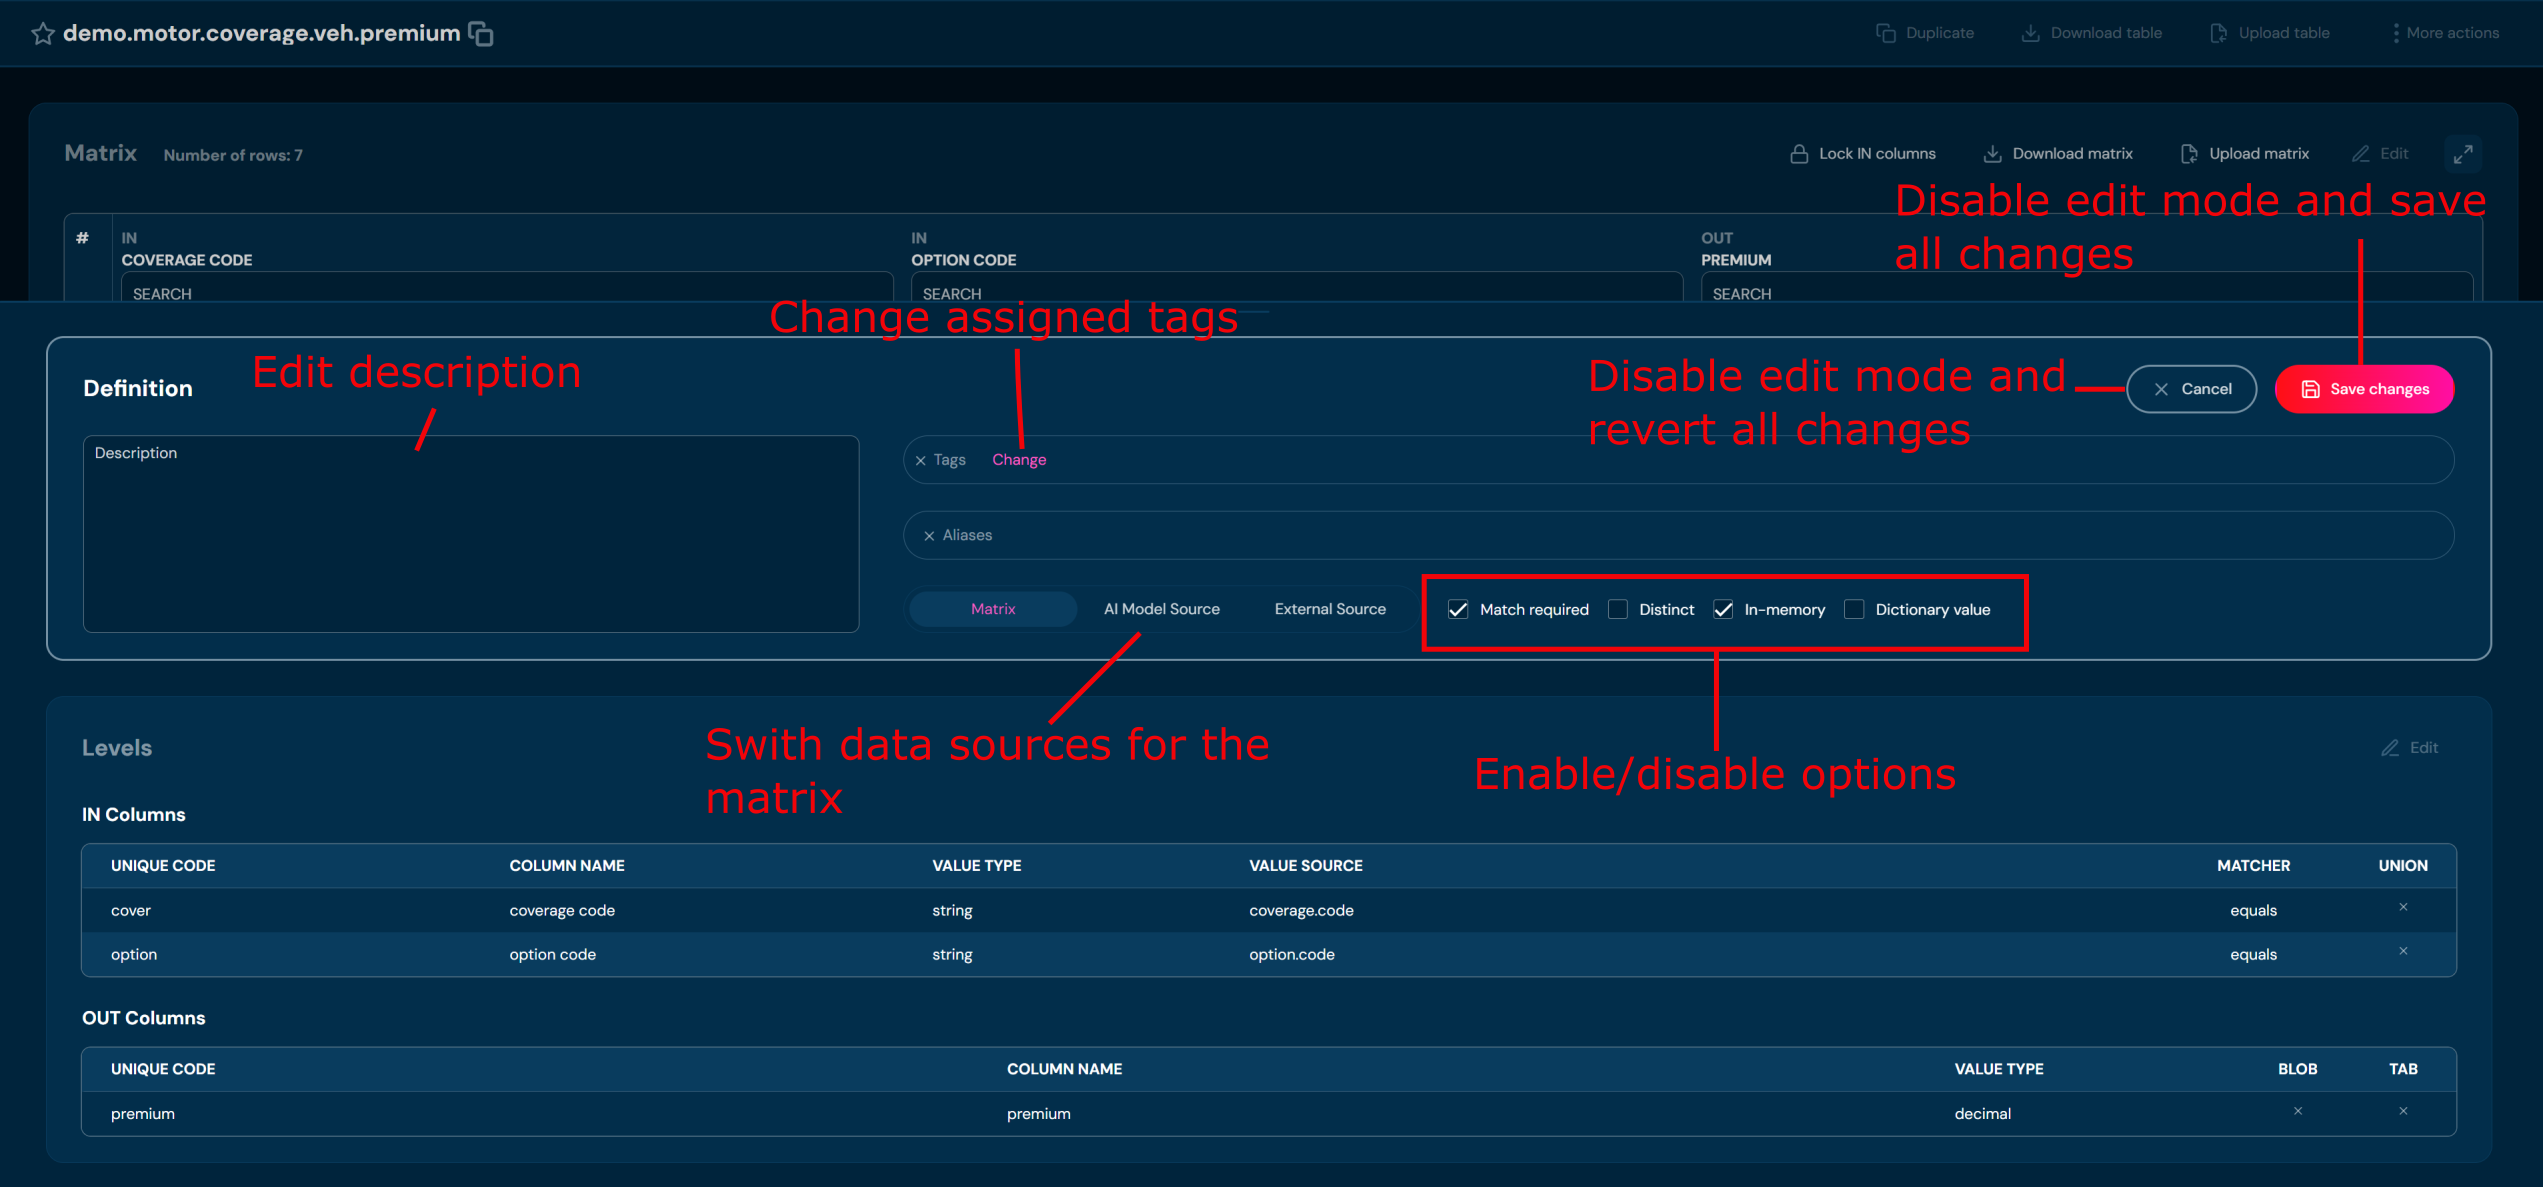
b. Edit mode for Levels section.
-
Edit any data you need.
-
Choose Save changes to save all changes made in the Decision table.
a. Cancel reverts all changes.
Decision tables - Cascade call#
In each OUT cell of the decision table, the value can be specified in three ways:
- as a literal
- as a value retrieved from another decision table (cascade get)
- as a value retrieved from a function (cascade call)
Cascade call - how to call#
In the cell, enter an expression that means returning the result from the specified function.
| Cascade expression | Description |
|---|---|
$f fun |
execution of a function named “fun”. |
$f fun (1, 5, active) |
Passing arguments to the function always as strings, meaning the function will receive the arguments: "1", "5", "active". |
$f fun (1; 5; active) |
The argument separator can also be a semicolon. If a semicolon appears in the expression, Higson will treat it as the argument separator; otherwise, the separator will be a comma. |
$f fun (ctx:insured.age, 5) |
Passing arguments coming from the context. The function will receive one argument retrieved using: ctx.get("insured.age"). |
$f fun [idx] |
If the function returns a composite object of type ParamValue, MultiValue, Java array, Collection, or Iterable, only the element at index idx will be retrieved. |
$f fun [code] |
If the function returns a composite object of type ParamValue, MultiValue, or Map, only the value associated with the key code will be retrieved. |
$f fun (1, ctx:risk.code) [factor] |
Example: one argument passed as a literal, the second coming from context, and additionally retrieving the result under the key “factor”. |
Cascade call – implicit type conversion#
If we use a cascade call expression to function F returning an object of any type T2 in decision table P at level T1, then:
- cascade call will internally return an object of type T2
- then T2 will be converted to HolderT1
- the conversion will take place according to the logic of the methods from the family: _dec(), _num(), _int(), _str() , _date(), _bool()
- the conversion may be lossy
Cascade call – example#
Function calc.factors:
age = _num(age)
var factor1 = 1.0 + age / 100
var factor2 = 3.0 + age / 10

// function returns a map
return util.map(
    'f1', factor1,
    'f2', factor2
)
Decision table client.factors:
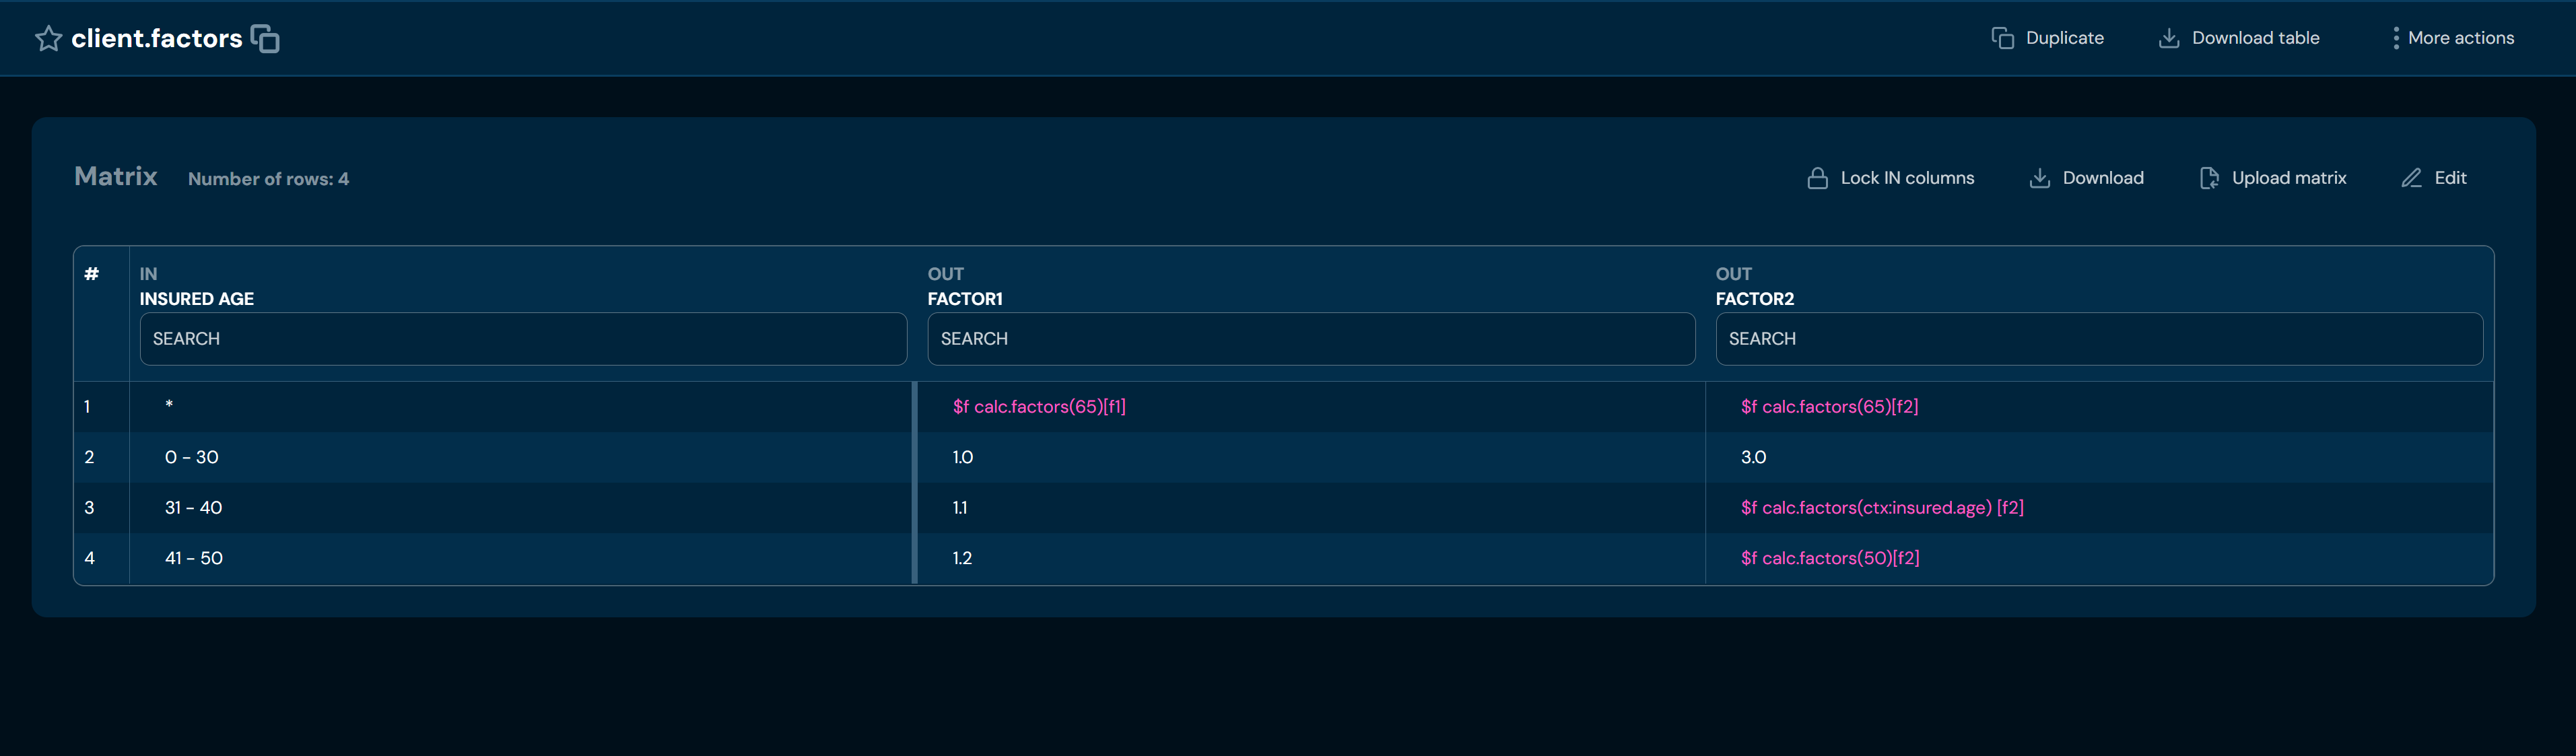
Result of get( “client.factors”, ctx ):
| insured.age | factor1 | factor2 |
|---|---|---|
| 22 | 1.0 | 3.0 |
| 37 | 1.1 | 6.7 |
| 44 | 1.2 | 8 |
| 61 | 1.65 | 9.5 |
Cascade get – invocation method#
In a cell, we enter an expression that represents returning a value from another decision table.
| Cascade expression | Description |
|---|---|
$p decisionTable.name |
Returns the value of a decision table from the first cell; equivalent to calling:higson.get("decisionTable.name", ctx).getHolder() |
$p decisionTable.name [idx] |
Returns the value of a decision table from the output level at index idx; equivalent to calling:higson.get("decisionTable.name", ctx).getHolder(idx) |
$p decisionTable.name [code] |
Returns the value of a decision table from the output level with the code code; equivalent to calling:higson.get("decisionTable.name", ctx).getHolder(code) |
Cascade get - implicit type conversion#
If, in decision table P1 at level T1, we use the cascade get expression to decision table P2 at level T2, then:
- cascade get will internally return a Holder of type T2
- then HolderT2 will be converted to HolderT1
- the conversion will take place according to the logic of one of the functions: _dec(), _num(), _int(), _str(), _date(), _bool()
- the conversion may be lossy
Cascade get - example#
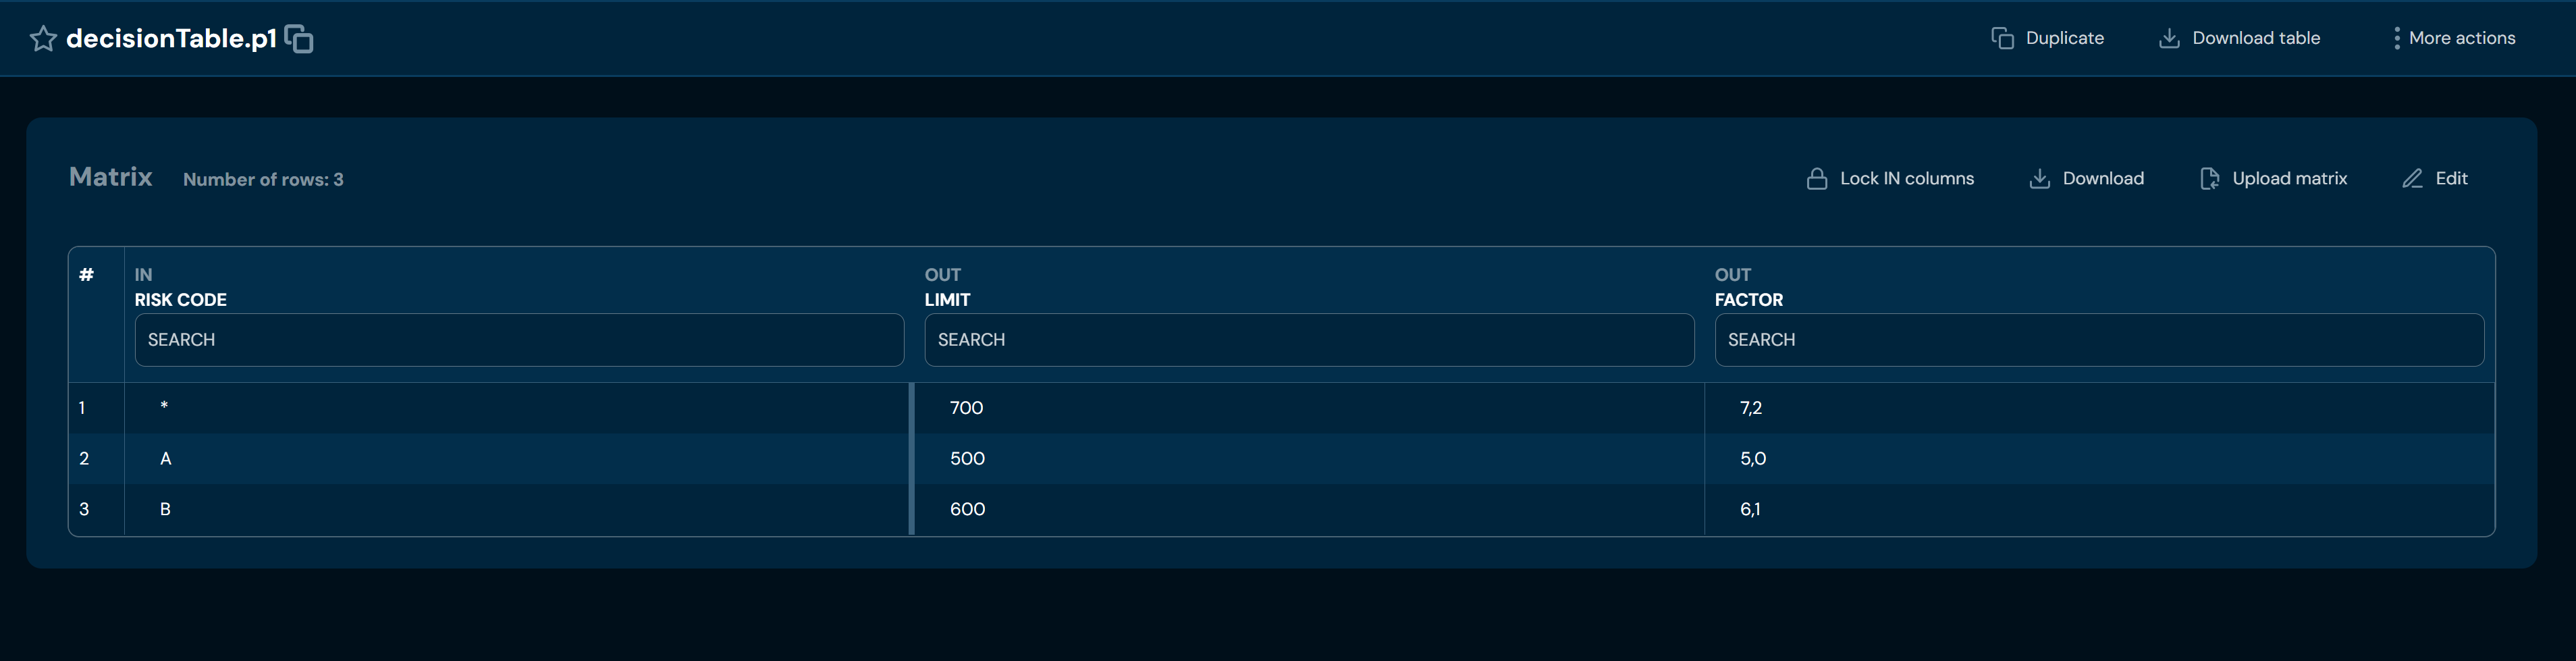
Decision table decisionTable.p1:
Decision table decisionTable.p2:
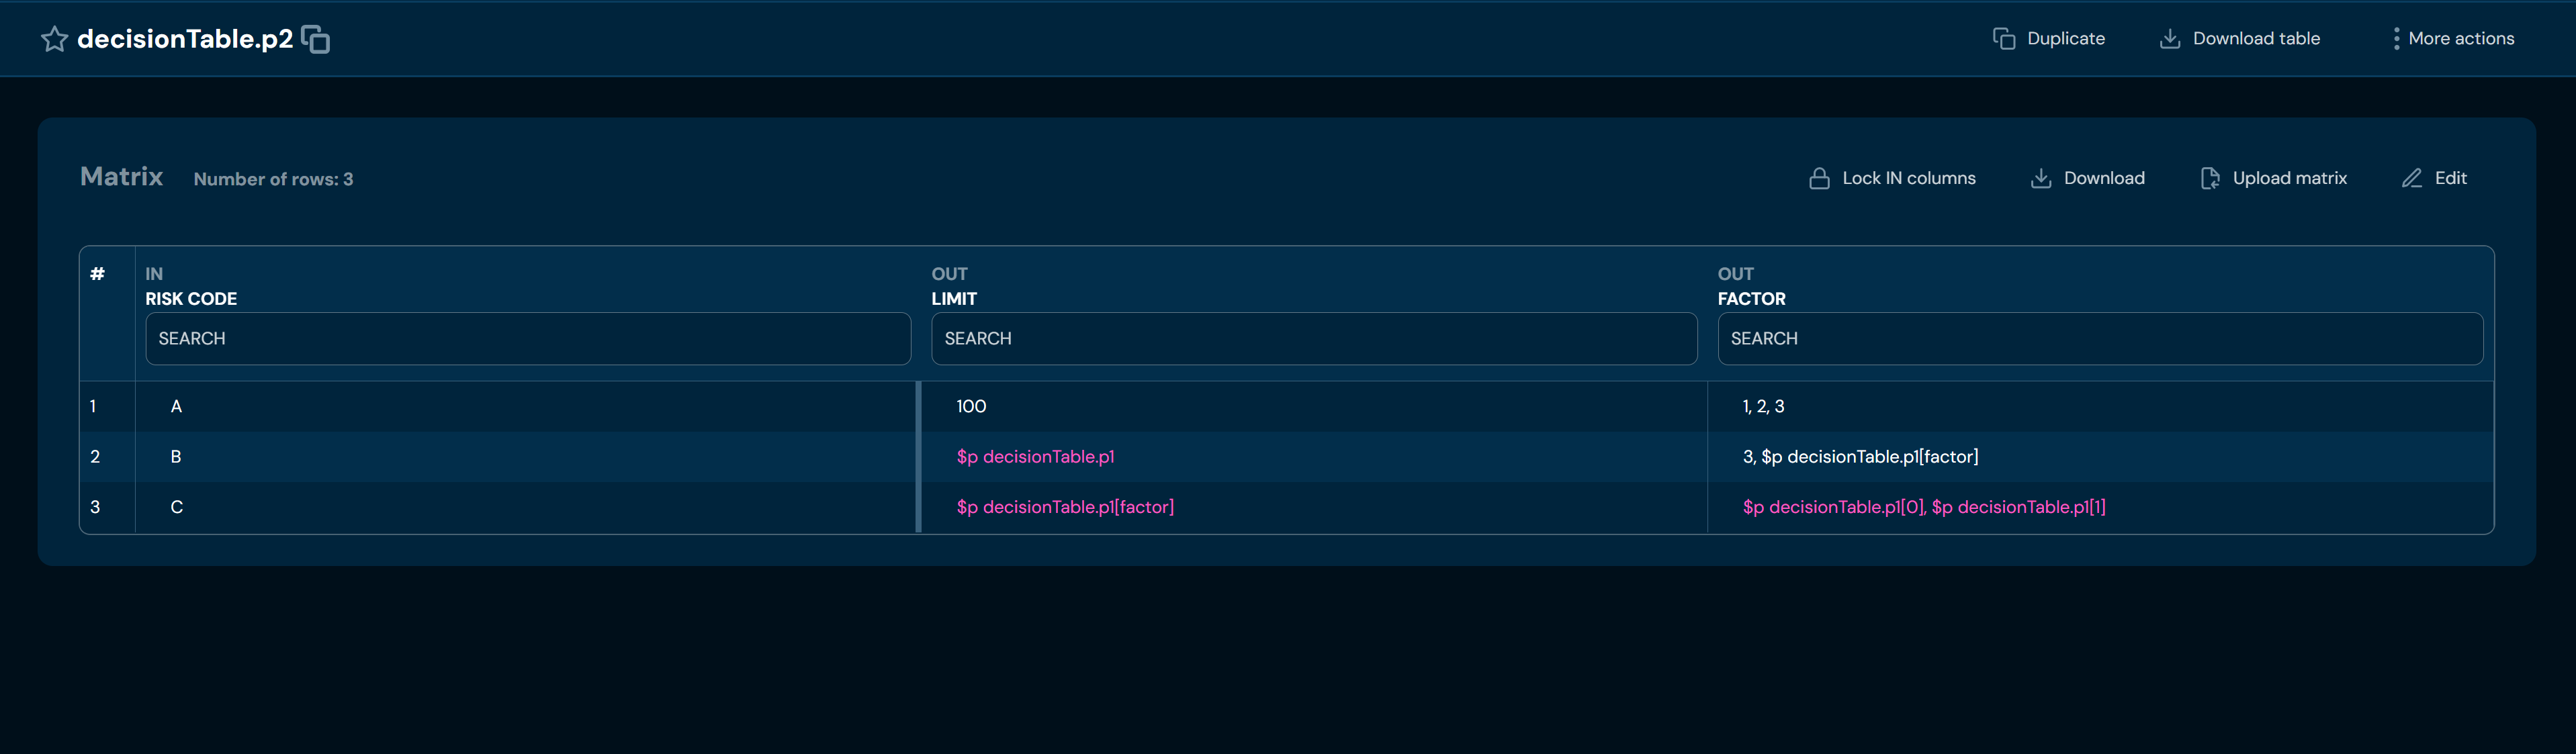
Result of get(decisionTabl.p2):
| ctx: risk.code | decisionTable.p2 | OUT1 | OUT2 |
|---|---|---|---|
| A | 100 | 1 | 2 |
| B | 600 | 1 | 6.1 |
| C | 7 | 700 | 7.2 |
When retrieving values for decisionTable.p2, the same context is used as for the initial decisionTable.p1.
A cascade calls cycle is not permitted: P1 -> P2 -> …. -> P1
Decision Table Search Mechanism#
There are two mechanisms for searching the matrix of a decision table: best match and union match.
Best match#
Best match is the default search mode. It searches the In levels sequentially, looking for an exact match. The asterisk (*) is considered only if no exact match is found at a given level. In this mode, subsequent levels have progressively lower priority. Therefore, the order of the columns affects the search result.
Let’s examine this using the following decision table:
| in1 | in2 | out1 |
|---|---|---|
| * | 1 | 100 |
| b | * | 200 |
| c | 1 | 300 |
EXAMPLE
context values: In1 = b, In2 = 1
An exact match for value In1 = b is found at the In1 level, so for that row we search the In2 level for the value 1. No exact match is found, but there is an asterisk, so the result in best match mode is 200.
Union match#
In union match mode, asterisk(*) is treated the same as an exact match. To enable uniion mode select union checkbox in the in-levels section.
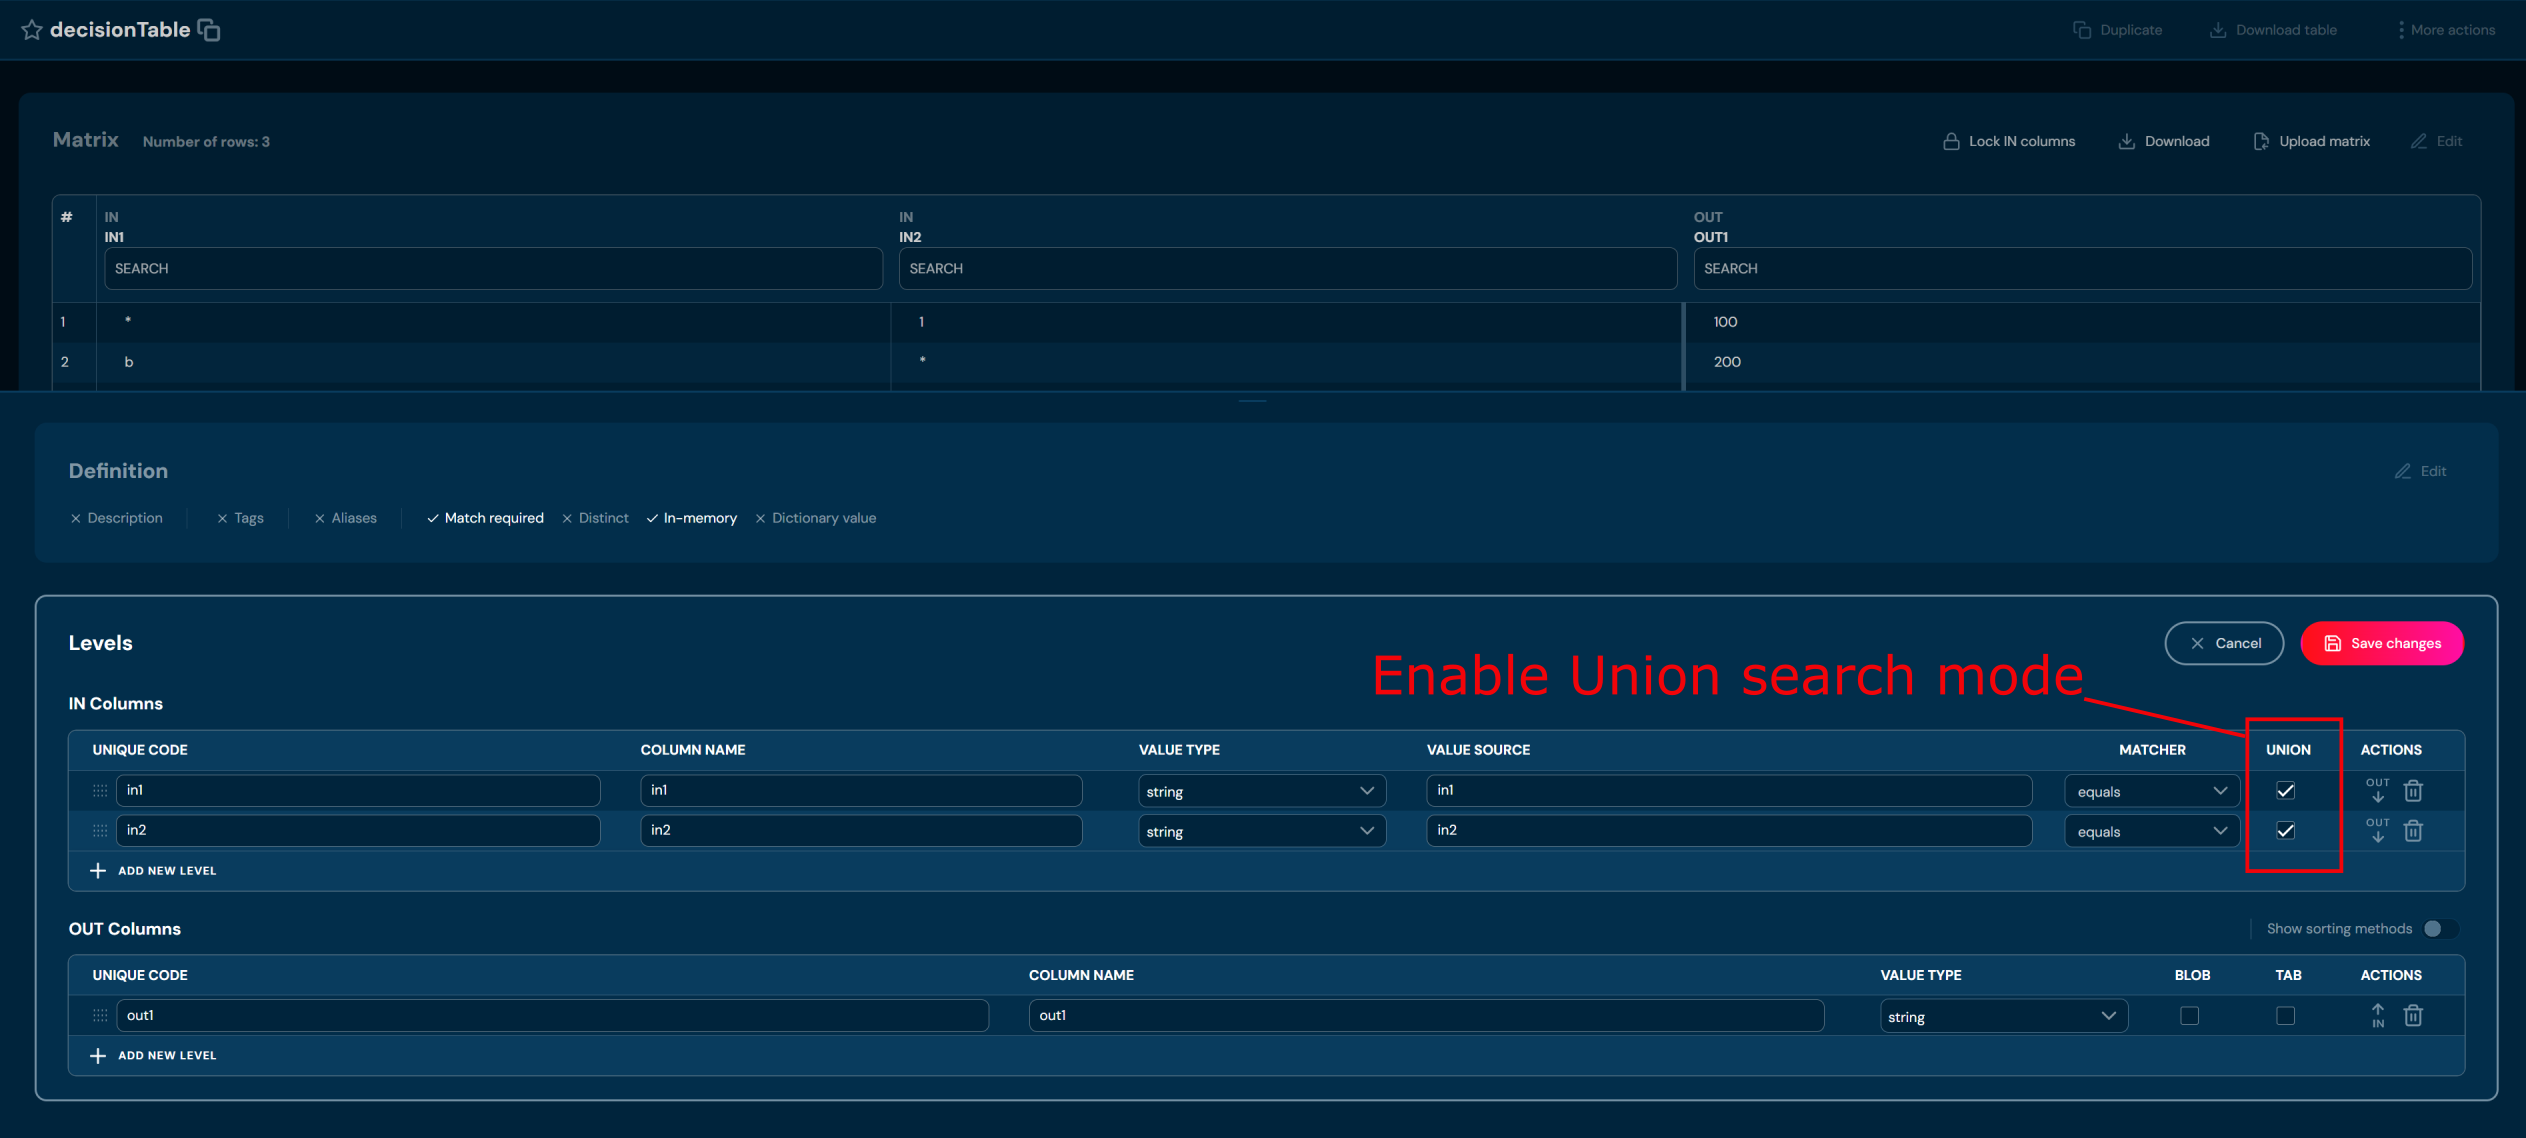
EXAMPLE
context values: In1 = b, In2 = 1
An exact match for value In1 = b is found at the In1 level, but there is also an asterisk so both rows are taken into account. We then search the In2 level for the value 1. Both asterisk(*) and an exact match are found, so the result in union mode is 100 and 200. In this case, both rows are returned.
Creating AI Model-Based Decision Tables in Higson Studio#
Higson Studio allows the creation of decision tables utilizing artificial intelligence (AI) models. In this approach, the AI model serves as the matrix of the decision table. The definition and levels are configured similarly to standard decision tables; however, the matrix is represented by the ONNX file. Higson Studio does not perform model training – it is assumed that the model has been previously prepared in an external environment and converted to the ONNX format.
Use Case#
Use a trained AI model (in ONNX format) to predict a client’s monthly insurance premium based on their demographic and lifestyle data. Below is a description of the process for configuring and deploying such a table using an AI model in the ONNX format.
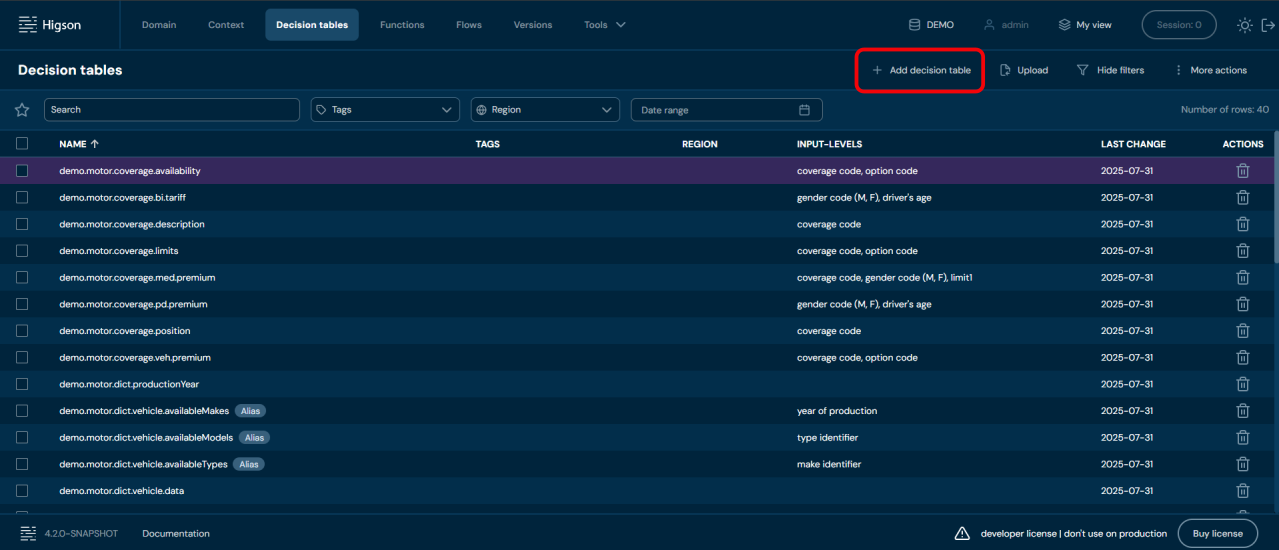
To get started, create a new decision table in Higson Studio. Navigate to the Decision tables tab and select the Add decision table action.
-
Assign a name to your decision table and click Next to proceed to the next step.
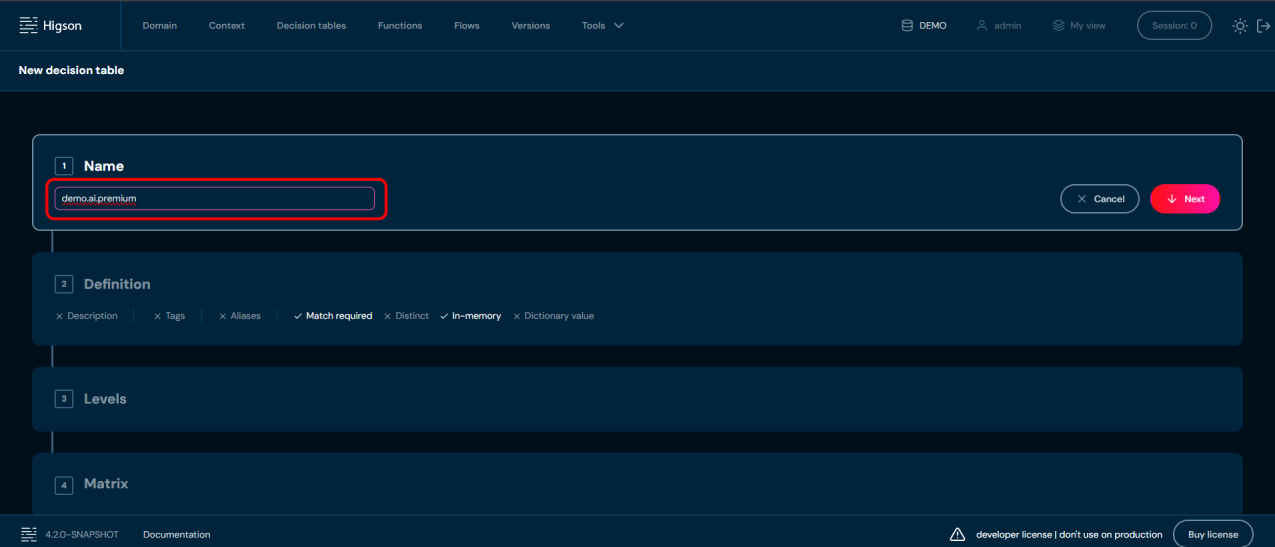
-
In the second step, under the Definition section, set AI Model Source as the data source for decision-making. Then, click Next to continue.
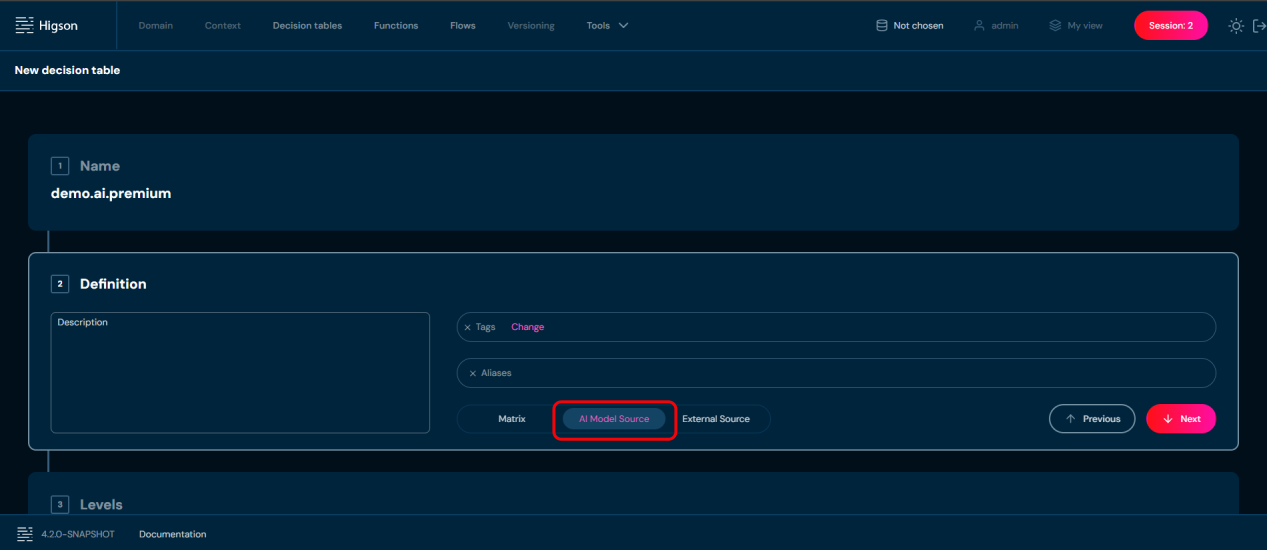
-
In step 3, similar to standard decision tables, you need to define:
- Input levels (in) – the input data passed to the AI model.
- Output levels (out) – the expected responses generated by the AI model.
Please note, that for decision tables with an AI model data source, only decimal data type is available.
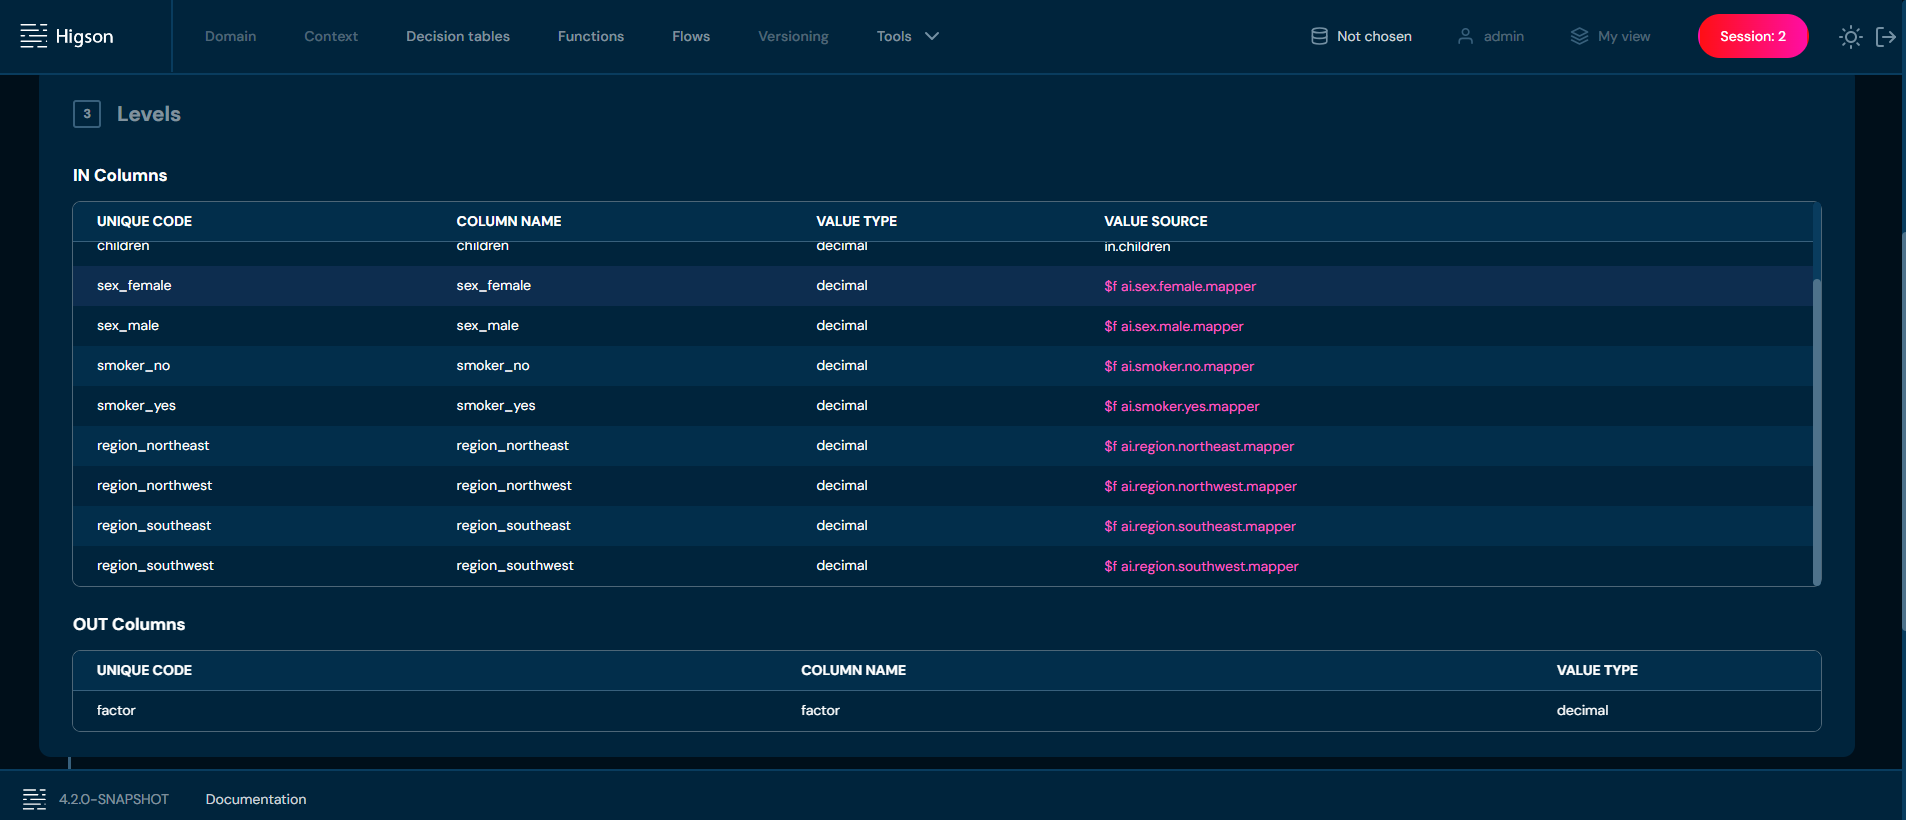
- In step 4 of the configuration wizard:
- You need to upload a onnx file containing the trained AI model.
- During upload, the file is automatically validated for correct format and model structure.
The onnx file added in this way serves as the matrix of our decision table.
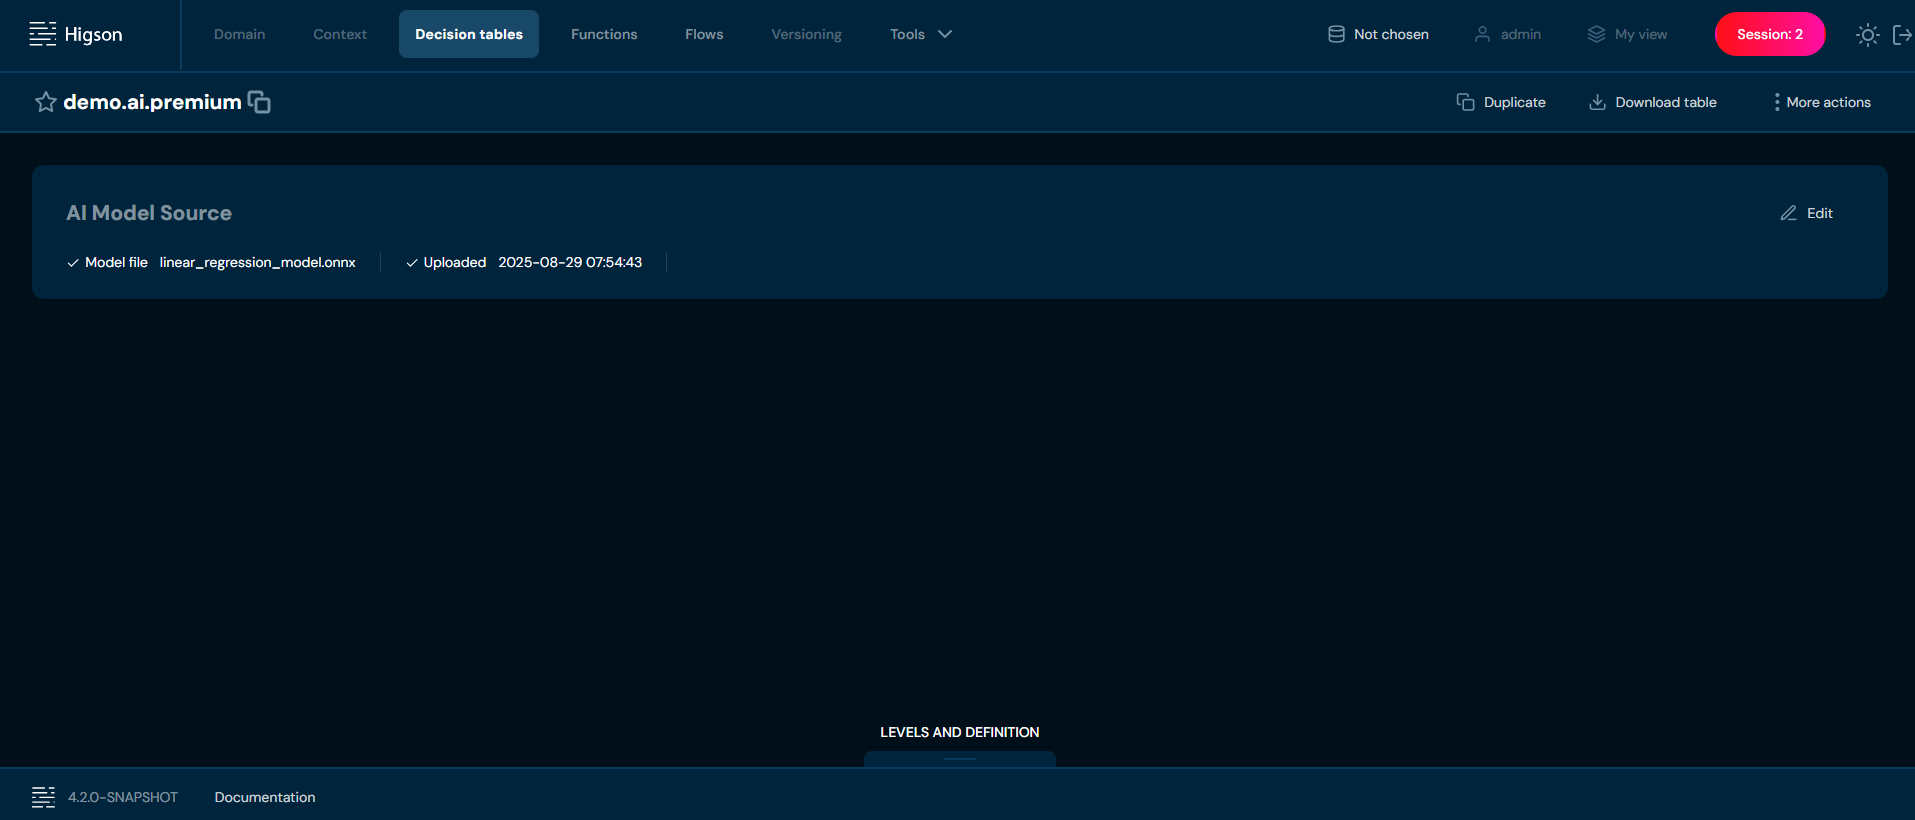
Once the decision table is correctly configured and saved, it can be invoked through Higson Runtime REST. At this stage, the ONNX file logic is validated.
Mapping Decision Table Levels to Model Inputs and Outputs#
Higson binds decision table levels to model features by position, not by name. The codes and labels assigned to input and output levels are never compared with the input and output names declared inside the ONNX file — they are identifiers used only inside Higson.
Input Levels#
All input levels are passed to the model as a single tensor of type float with shape [N, number_of_input_levels], where N is the number of value rows evaluated in one call. The column order of that tensor is exactly the order in which input levels are defined in the decision table.
Only the first input declared by the model is used. Its name is read from the ONNX file and the tensor is bound to it, whatever that name happens to be (for example input or float_input).
Every input level value is parsed as a float, so all values reaching the table must be numeric.
Output Levels#
Only the first output declared by the model is read, and it must be a float tensor with shape [N, number_of_output_levels]. Its columns are assigned to output levels positionally, in the order the output levels are defined.
The result row produced by the runtime is the concatenation of the input values and the predicted values, so output levels are always read after all input levels.
Example#
A table predicting an insurance premium defines eleven input levels and one output level. The model exported from scikit-learn declares a single input named input with shape [N, 11] and a single output named variable with shape [N, 1]. The names input and variable play no role — only the positions do:
| Position in the model tensor | Decision table level | Level kind |
|---|---|---|
| 0 | age |
in |
| 1 | bmi |
in |
| 2 | children |
in |
| 3 | sex_female |
in |
| 4 | sex_male |
in |
| 5 | smoker_no |
in |
| 6 | smoker_yes |
in |
| 7 | region_northeast |
in |
| 8 | region_northwest |
in |
| 9 | region_southeast |
in |
| 10 | region_southwest |
in |
| 0 (output tensor) | price |
out |
Note that the categorical features sex, smoker and region are one-hot encoded during training, and each encoded column is declared as a separate input level — in exactly the same order that was used to train the model.
Requirements for the Model#
- Exactly one input, a
floattensor of shape[N, number_of_input_levels]. - The first output must be a
floattensor of shape[N, number_of_output_levels]. - All input and output levels must use the decimal data type.
- Input levels must not use a matcher, a reverse matcher, or a union.
- Output levels must not be arrays and must not be blobs.
- The decision table must not use match required, distinct or in-memory, and must not be a dictionary (user-defined type).
- Categorical features must be encoded numerically (for example one-hot) and exposed as separate input levels, in the same order that was used when training the model.
What Is Validated and What Is Not#
Higson Studio validates the following when the model file is uploaded and when the table is saved:
- the file extension is
.onnxand the file can be opened as a valid ONNX session, - every input and output level uses the decimal data type,
- input levels have no matcher, no reverse matcher and no union,
- output levels are not arrays and not blobs,
- the decision table definition does not use match required, distinct, in-memory and is not a dictionary.
The following is not validated at any point:
- the number of features expected by the model against the number of input levels,
- the number of values returned by the model against the number of output levels,
- any agreement between level codes and the input/output names declared in the ONNX file.
Because of that, a mismatch between the table and the model surfaces only when the parameter is evaluated for the first time in the runtime.
| Change made to the table | When it is detected |
|---|---|
| Input levels reordered | Not detected. Features reach the model in the wrong positions and the predictions are silently incorrect. |
| Input level added or removed without retraining the model | Runtime error on the first evaluation of the parameter. |
| Output level added or removed | Not detected by validation; the extra level is empty or the extra prediction is dropped. |
| Non-numeric value passed to an input level | Runtime error on evaluation, raised while parsing the value. |
Note: Whenever you change the order or the number of input levels, the model has to be retrained and re-exported with the matching column order. Renaming a level is safe, because names are not part of the binding.
Limitations#
- Multi-input models are not supported. A model that declares a separate named input per feature will not work — only its first input receives data and the evaluation fails.
- Classification models exported with
skl2onnxare not supported when their first output islabelof typeint64. The first output must be afloattensor; anything else fails during evaluation.
Recommended Way of Exporting the Model#
Export the model with a single input of type FloatTensorType, and keep an explicit, fixed list of feature columns so the training order can be reproduced in the decision table:
|
|
When defining the decision table in Higson Studio, add the input levels in exactly the same order as feature_columns, and add the output levels in the order in which the model returns its predictions.
Enabling AI Model Source in Higson Runtime#
Evaluating AI-model decision tables relies on the ONNX Runtime library. To keep the runtime lightweight for deployments that do not use AI models, this library is optional and the feature is disabled by default.
To run AI-model decision tables in your own application you have to do two things:
-
Add the ONNX Runtime dependency to your application’s classpath. It is declared with
providedscope inhigson-runtime, so it is not pulled in transitively and must be added explicitly:<dependency> <groupId>com.microsoft.onnxruntime</groupId> <artifactId>onnxruntime</artifactId> <version>1.20.0</version> </dependency>Supported version: Higson is tested and verified against
onnxruntime1.20.0. Using any other version of the library is not guaranteed to work correctly and is not supported.The pre-built Higson Runtime REST application already ships with this dependency, so no change is required when you use it.
-
Enable the feature switch so the runtime initializes the ONNX environment on startup:
higson:
  runtime:
    ai-model:
      enabled: true
When using the
HigsonEngineFactorydirectly (without the Spring Boot starter), callfactory.setAiModelEnabled(true)beforefactory.create().
The effective value is printed in the runtime configuration banner on startup as AI model source enabled.
Note: If a decision table backed by an AI model is evaluated while the feature is disabled, the runtime throws an
AiModelSourceDisabledExceptionnaming the affected parameter and reminding you to sethigson.runtime.ai-model.enabled=trueand add theonnxruntimedependency.
A matcher is a functionality available for IN levels in a decision table. It is easy to use but has a significant impact on how values in matrix columns are interpreted.
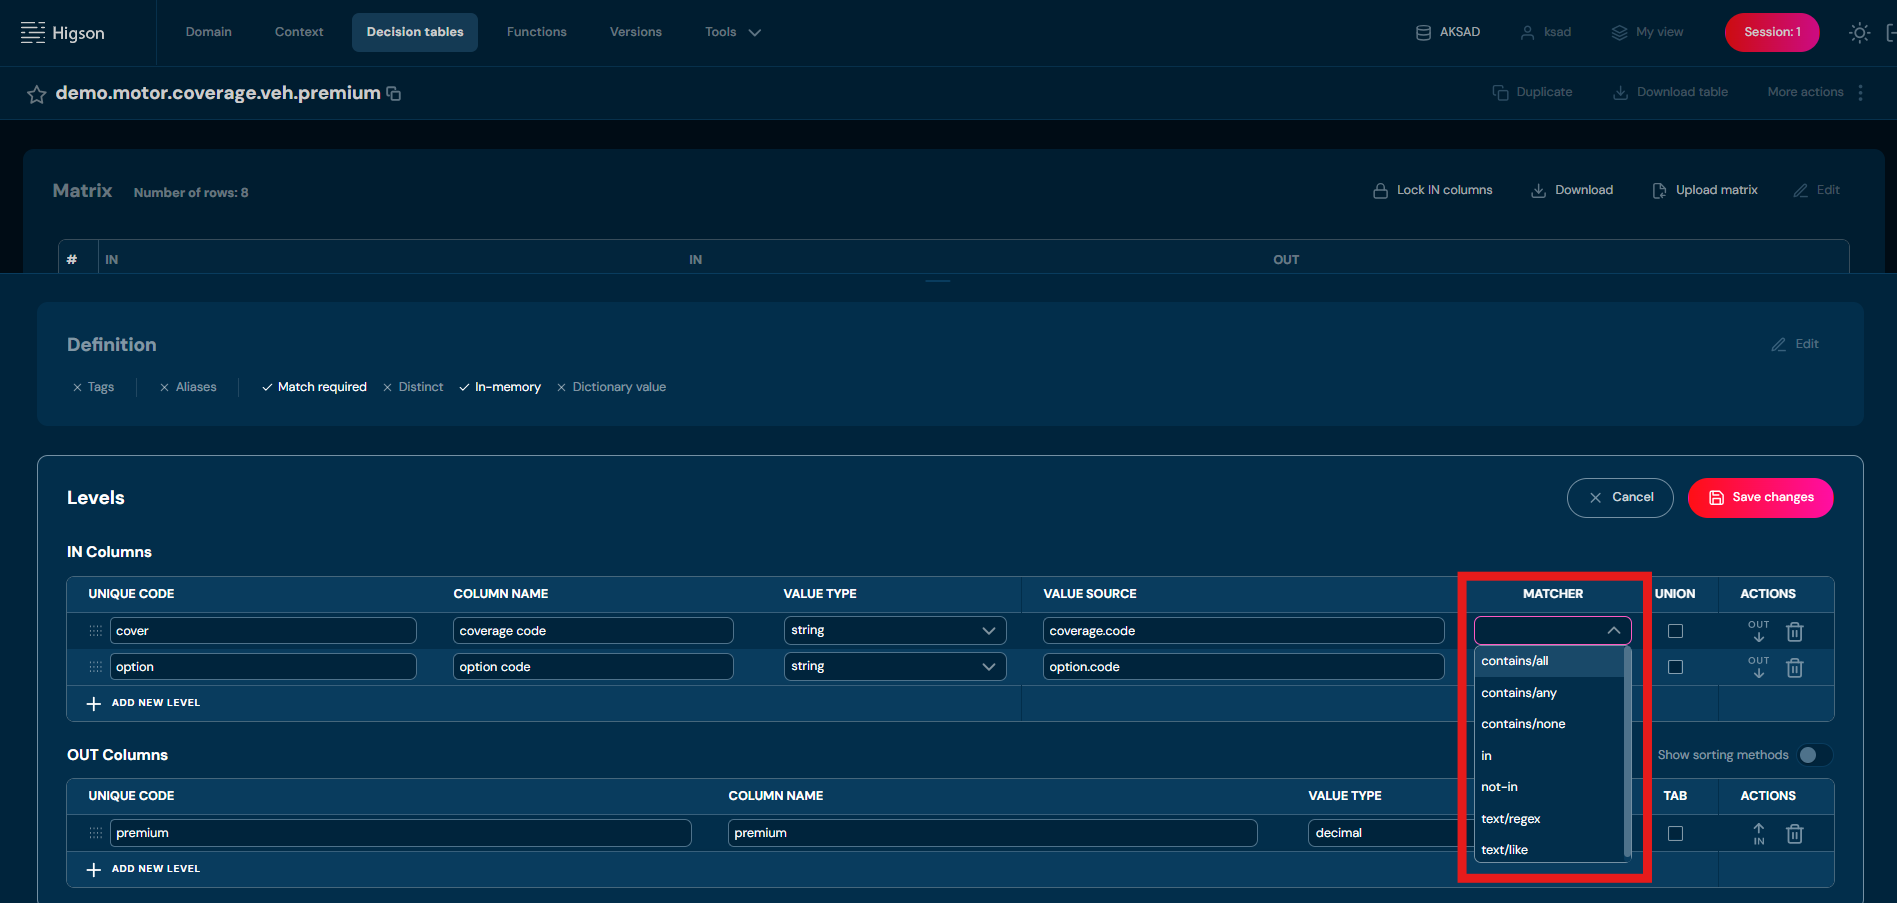
Matchers are divided into three main groups:
- Between
- Contains
- Like
Between Group – Defining Numerical Ranges#
These matchers allow the definition of a numerical range in a matrix column:
- between/ii – closed interval on both sides.
- between/ie – left-inclusive, right-exclusive interval.
- between/ei – left-exclusive, right-inclusive interval.
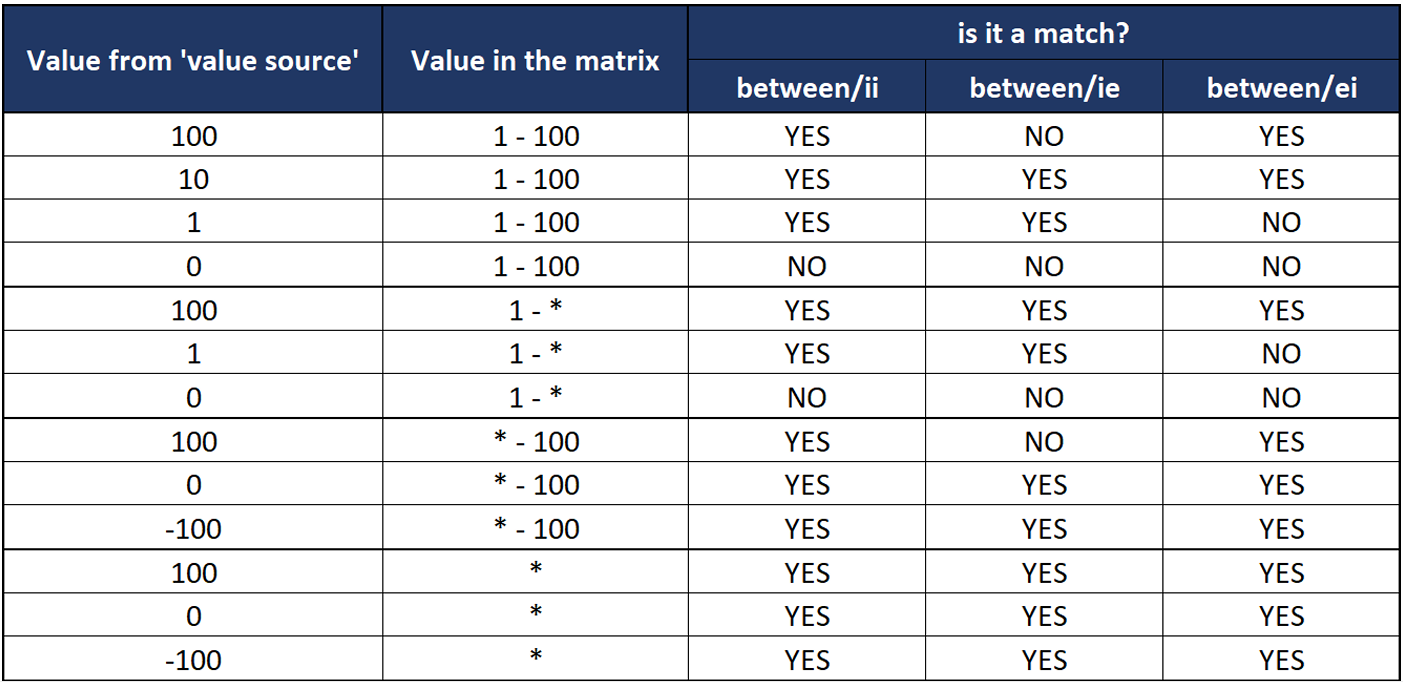
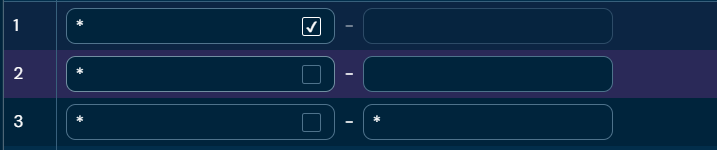
Wildcards and ranges in matrix cells for “Between” matcher columns#
- * — wildcard; matches any value.
In Best Match mode it’s only considered if no exact match exists in other rows.
Use one of two notations for unbounded ranges:
- * — * unbounded range (−∞ … +∞); matches any non-null value.
- * + checkbox — also an unbounded range, but null-safe; it matches any value including null.
Tip: Use * + checkbox for a default/fallback row that should also handle missing input; use *-* when null is handled elsewhere.
Contains Group – Matching Based on Value Sets#
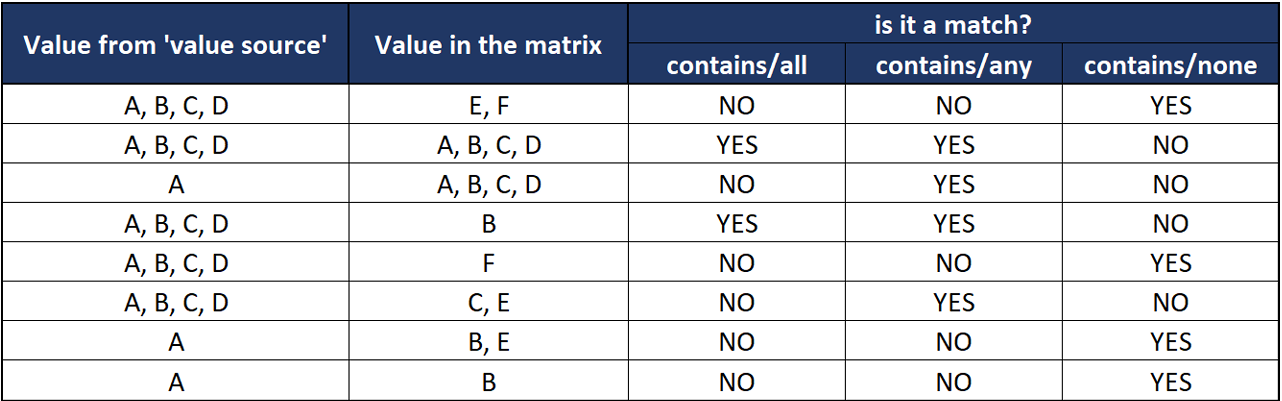
This group enables the introduction of value lists into matrix columns and allows values to be compared as sets:
- contains/all – checks whether all values in the matrix exist in the dataset from the data source (comparison direction matters!).
- contains/any – checks whether the two sets have at least one common element.
- contains/none – checks whether the sets are disjoint; if they are, the matcher returns a match.
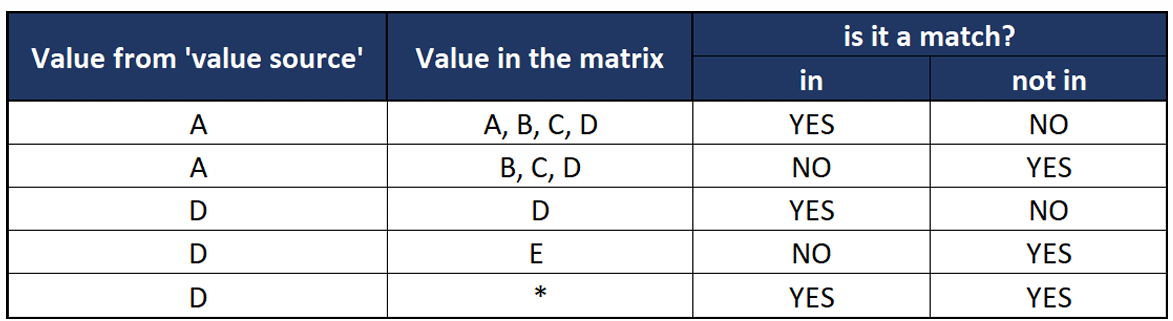
- in / not in
- in – checks whether the value from the data source is present in the list of values in the matrix cell.
- not in – checks whether the sets are disjoint. Contains matchers assume that:
- The value source is a set of values (e.g., A, B, C, D).
- The value in the matrix cell also represents a set.
- The matcher verifies whether the value source set has a common part with the matrix set.
In / Not In matchers assume that:
- The value source is a single value (scalar).
- The value in the matrix cell represents a set.
- The matcher checks whether the value source belongs to that set. Performance Considerations: The contains and in/not in matchers produce the same result. Contains matchers are more general, so if performance is a priority, use in/not in whenever possible.
Like Group – Pattern Matching#
This group allows for pattern-based text matching:
- text/like – compares a string value from the data source with the string value in the matrix. The values in the matrix can use asterisk as a wildcard character.
- text/regex– checks whether the value from the data source matches the regex pattern stored in the matrix cell.
When to Use Matchers?#
Matchers are useful when you need to precisely define how values in a column should be interpreted, such as:
- Value Ranges (Range)
- Lists of Values (List)
- Pattern Matching (RegEx, Like) Each matcher can be defined separately for every IN level in a decision table, providing flexibility in business logic modeling.
Each column of any decision table has a specific type. This type is defined when creating a decision table.
There are many built-in types available:
stringdecimalintegerdatedatetimeboolean
However, sometimes we need to limit the values that can be entered by the user. In this case we need to be able to define an enumeration of allowed values or in other words a dictionary.
Higson has the answer to this need - a Dictionary mode.
Creating a Dictionary Table#
To create an enumeration of allowed values,
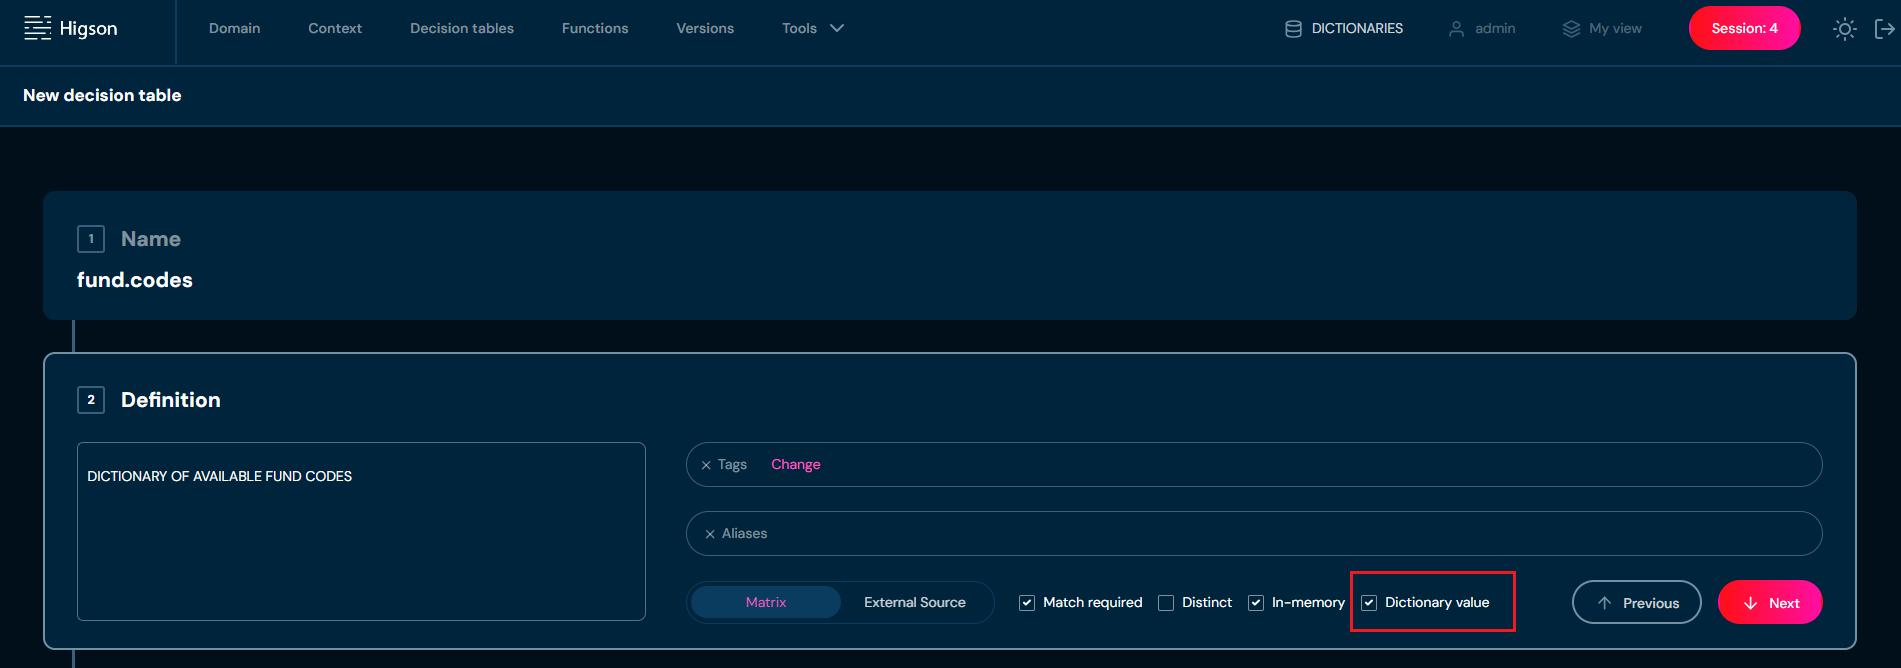
we just need to create a decision table and select the Dictionary value checkbox:
Then we define a single OUT column and enter (or import from the Excel file) all dictionary values.
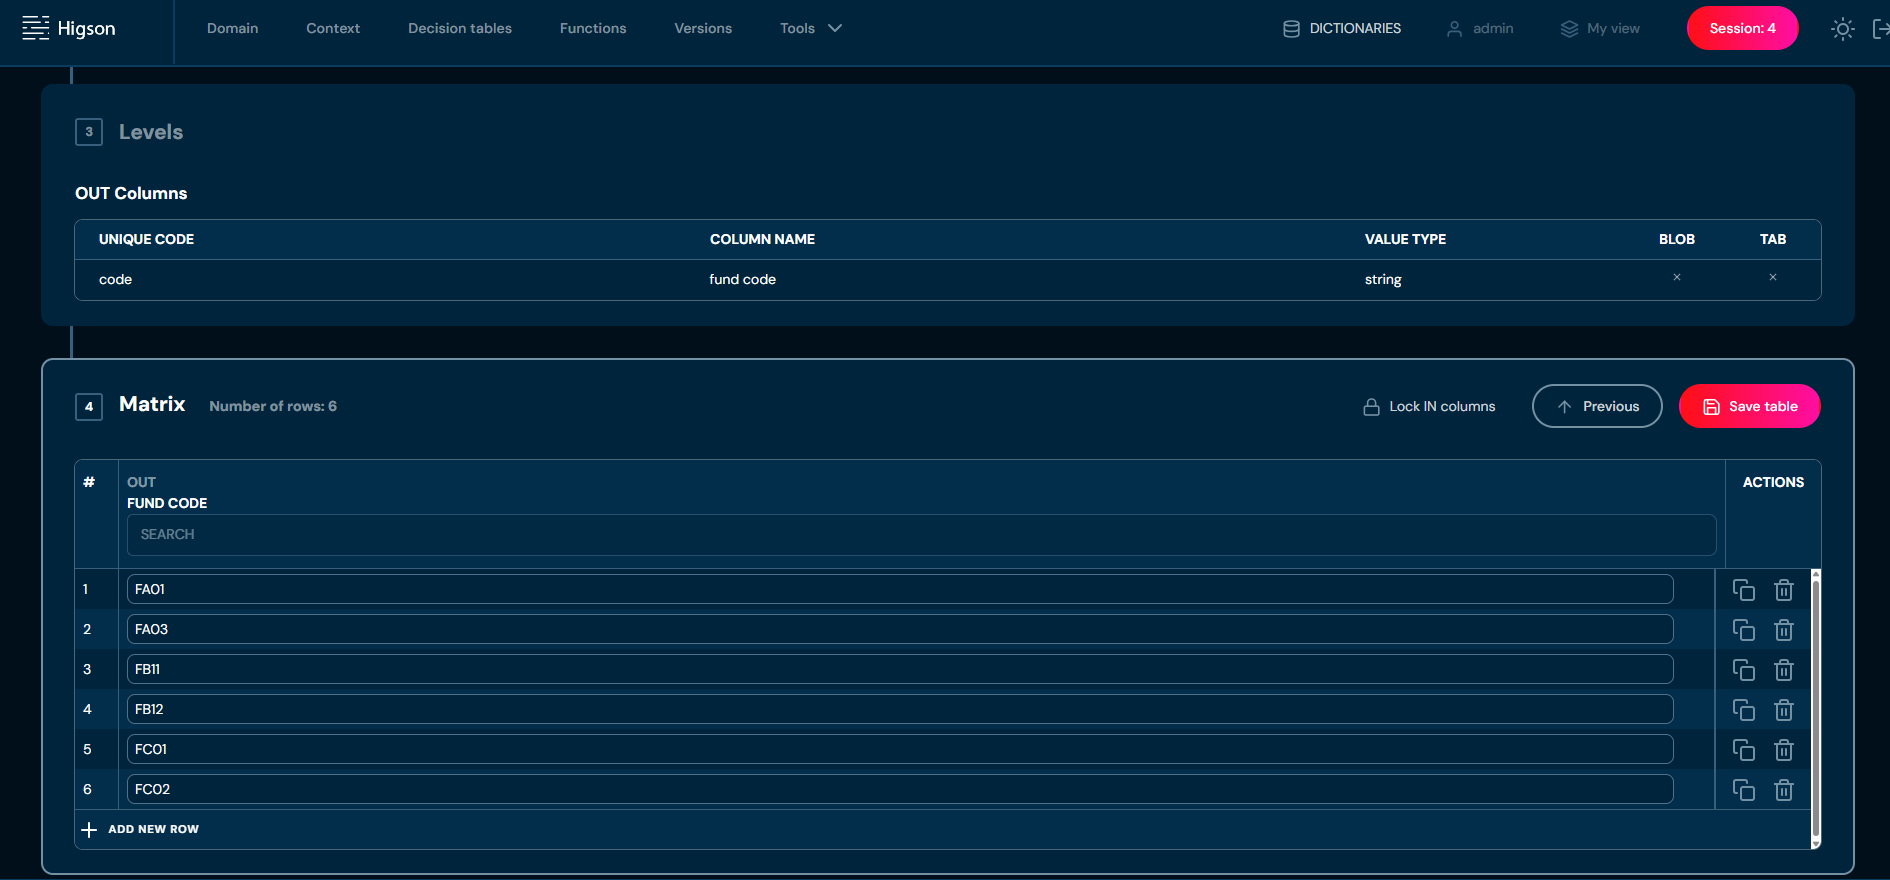
Let’s say we need a dictionary of available fund codes.
So we can create a decision table called fund.codes (for example)
and enter all valid fund codes into a single OUT column, like in the image below:
By creating this dictionary decision table we just defined new type available for other decision tables.
Now, we can create an ordinary decision table and define a column type to be fund.codes.
Using a Dictionary Table#
Once we have created a dictionary we can use it in another table.
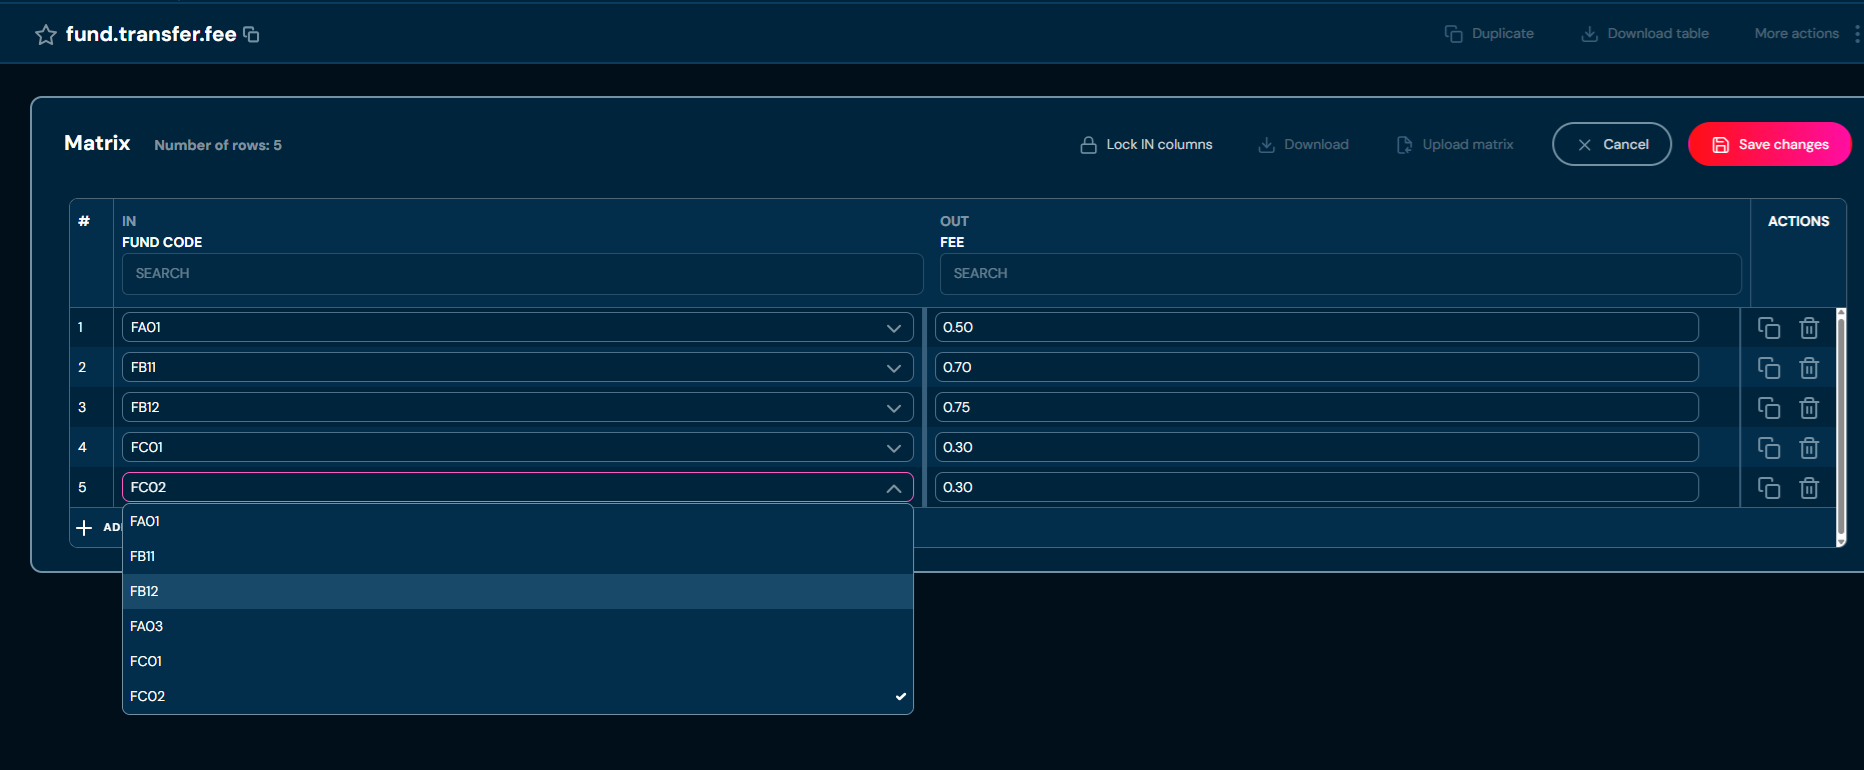
The following image shows an example decision table called fund.transfer.fee
that uses IN column with dictionary type fund.codes:
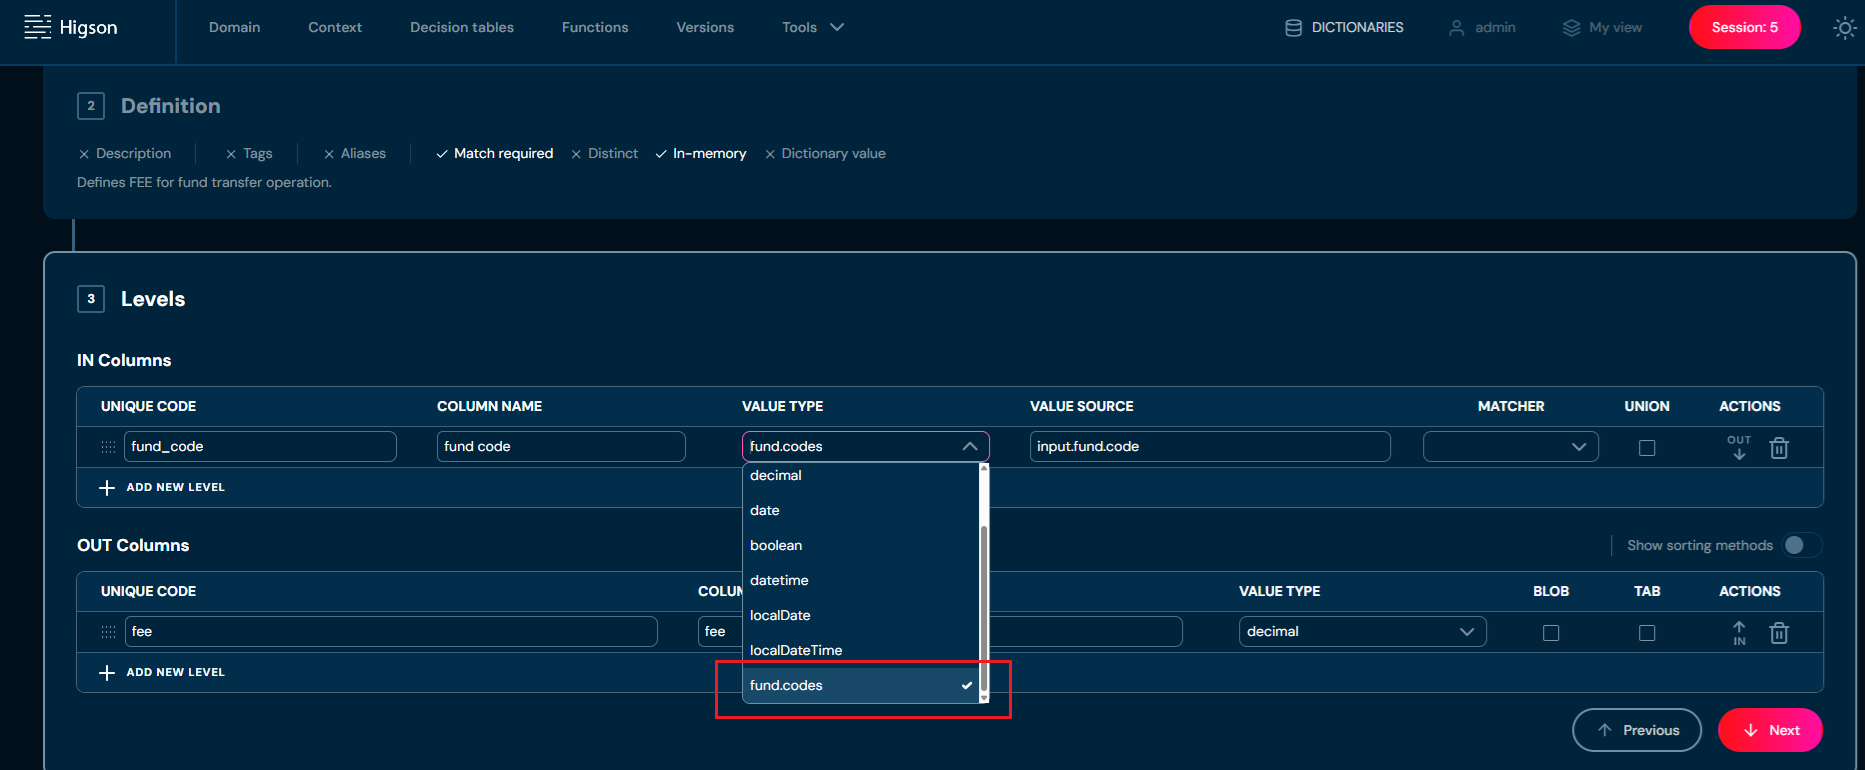
From now on, only codes defined in the fund.codes dictionary can be entered into this column:
Below is a list of restrictions related to the use of dictionary decision tables:
- dictionary table must have exactly one output column
- dictionary table cannot be deleted if it is used by another decision table
- dictionary table cannot be defined as an external source
- dictionary table cannot be attached to any region
- dictionary table cannot be unmarked as a dictionary if it is used
External Source is a feature that allows you to retrieve data from an external database (using an SQL query) and treat this data as if it were defined in a decision table matrix.
With this option you can create decision tables that are fully dependent on data coming from an external source, managed by an external application, etc. For example, you could create a database table with daily updated prices of investment fund units and then have Higson treat these prices as a decision table matrix.
Let’s see how External Source feature fits into the bigger picture.
Ordinary Decision Table#
Every ordinary decision table consists of two main parts:
- input/output columns configuration (types, matchers, matching mode etc.)
- matrix with data
The ordinary decision table is the owner of the matrix data. The matrix data is managed by Higson and is stored in the Higson DB. It can be exported or imported from excel or snapshot files.
Ordinary decision tables can work in 2 modes:
- in-memory mode (default)
- non-memory mode
In-memory mode means that during the first use the matrix is converted into fast index kept in memory for fast decision table lookups.
Non-memory mode means that every time, the decision table is used, Higson executes an SQL query to fetch the result from the Higson DB.
Now we are ready to see what change the external-source brings.
External-Source Decision Table#
The matrix data is stored in an external database and can be fetched when needed. Once the data is downloaded, the decision table behaves like an ordinary decision table.
So, in case of external-source decision table, instead of creating a matrix, we need to create an SQL query.
Higson provides 2 modes that need to be described in more detail.
In-Memory External-Source Decision Table#
To configure decision table to use in-memory external source, we need to:
- check the
External Sourcetoggle button - check the
In-memorycheckbox.
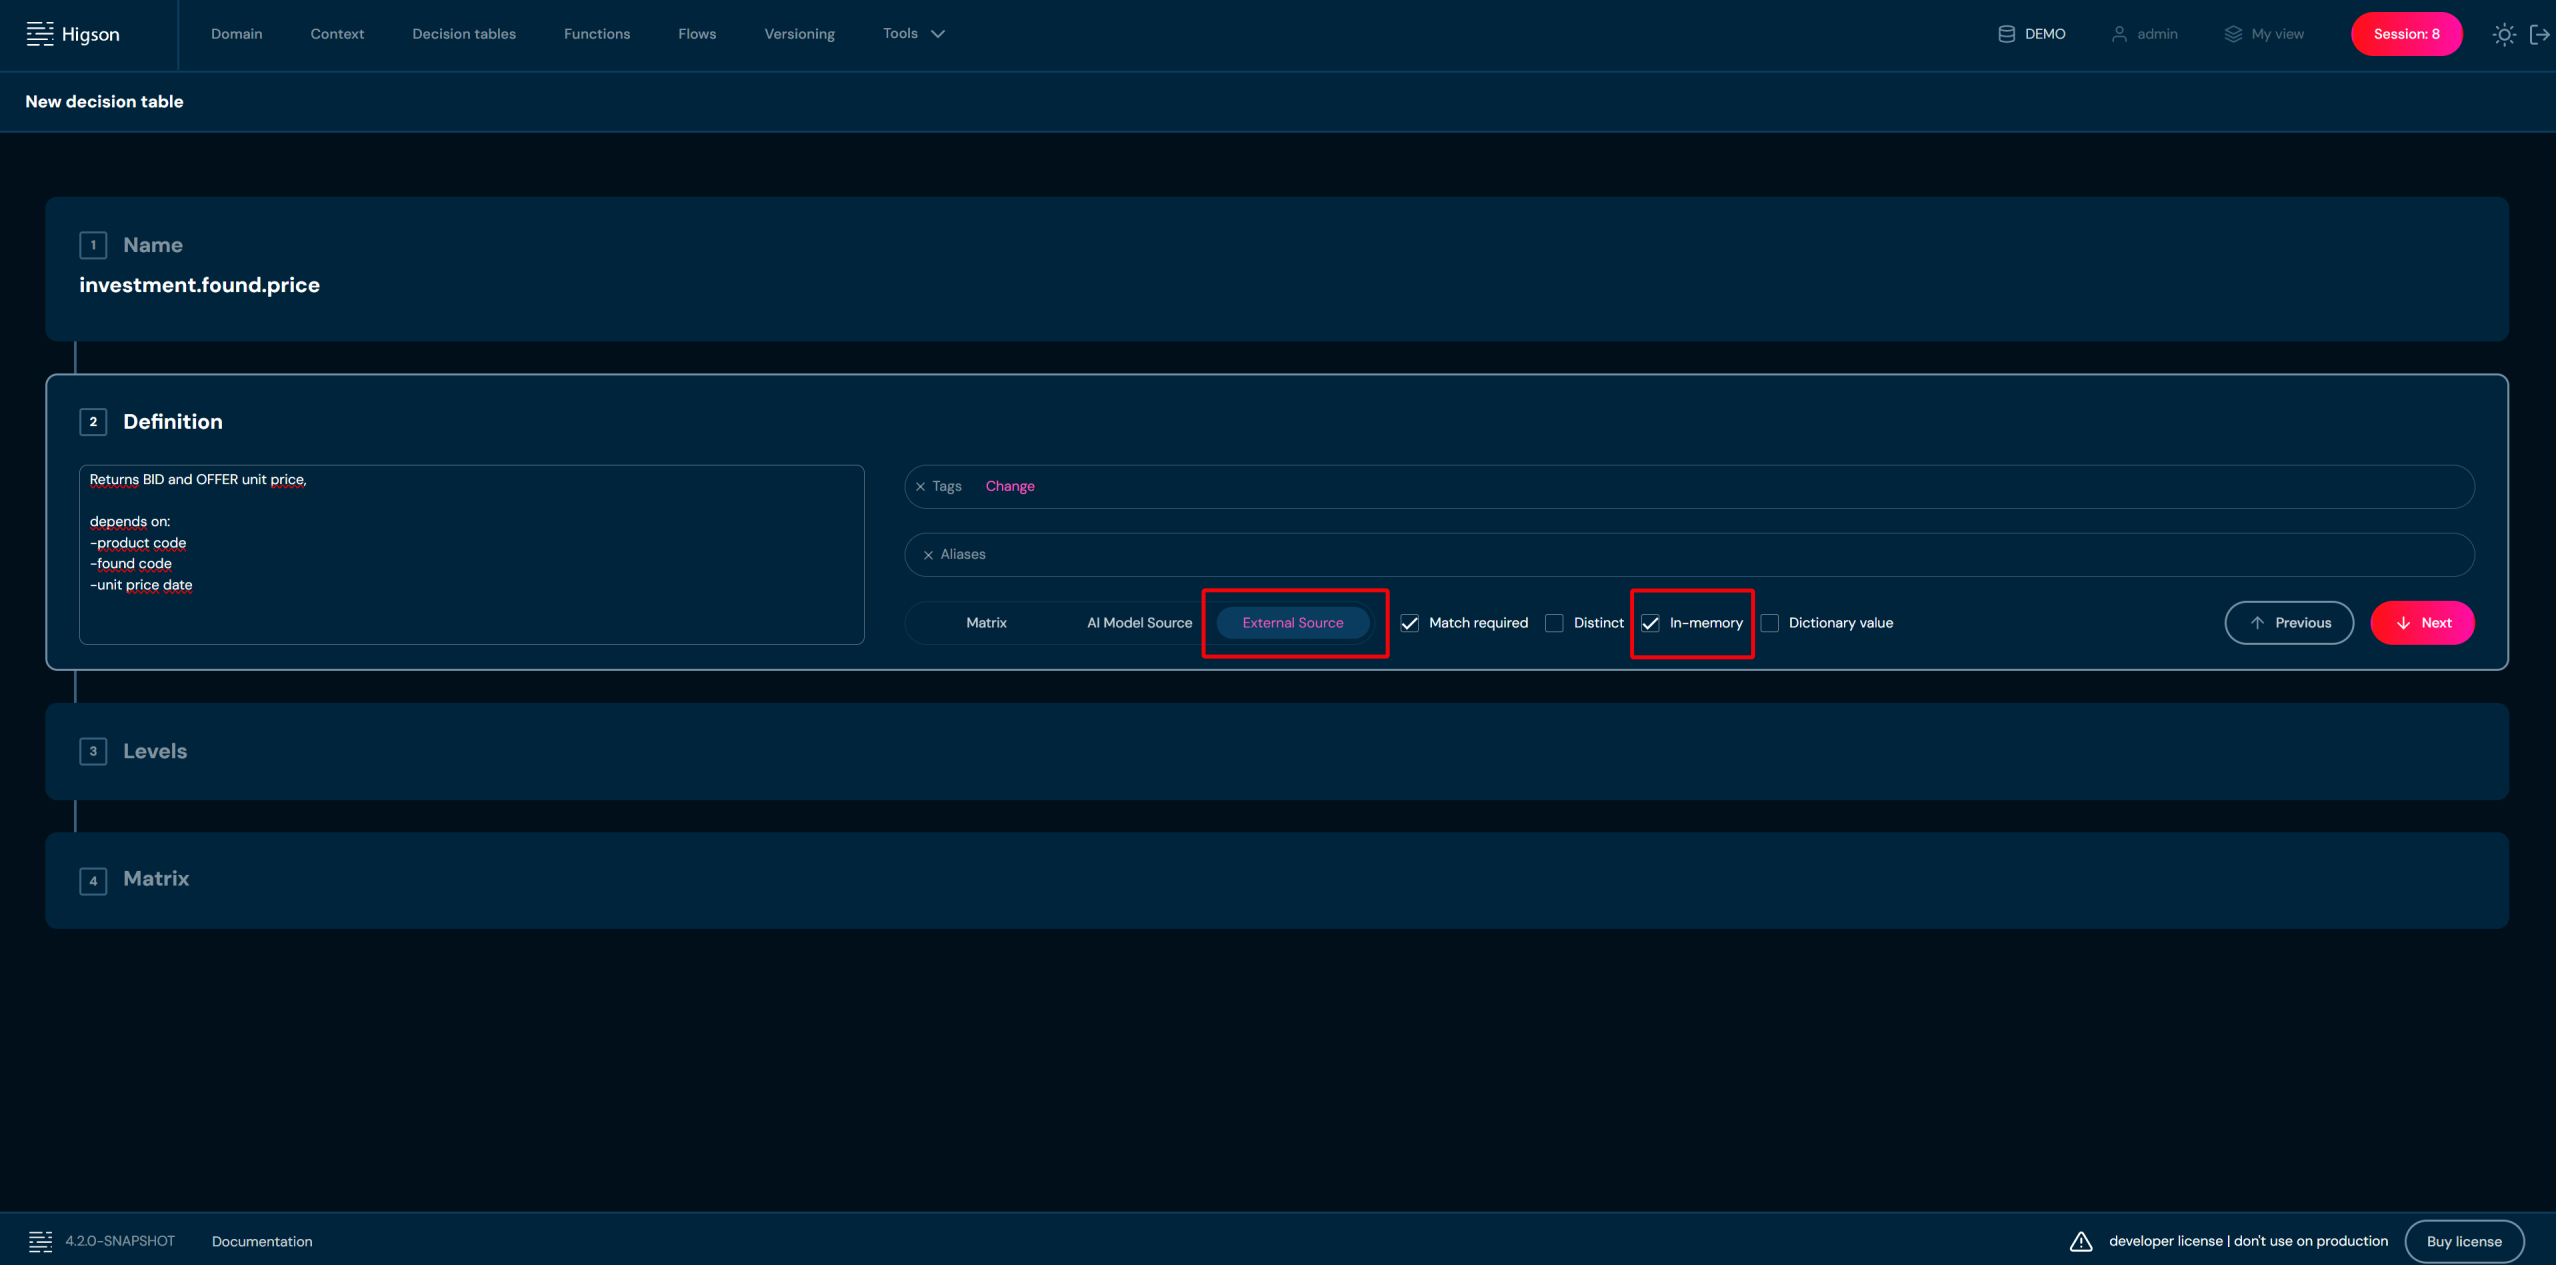
Then we need to define input/output columns like in an ordinary decision table.
Finally, we can configure External Source panel by:
- selecting datasource from
External data sourcedropdown, - writing SQL query in
In-memory SQL Templatetext area, - setting
auto refreshandrefresh periodif needed.
Writing SQL Query for In-Memory Mode#
As mentioned earlier, in-memory decision table takes the entire matrix (input and output columns) and converts it into fast search index. So, the SQL query must also return the entire matrix, both input and output columns.
Consider a decision table with 3 input columns and 2 output columns:
- input column:
product_code - input column:
fund_code - input column:
unit_price_date - output column:
unit_bid_price - output column:
unit_offer_price
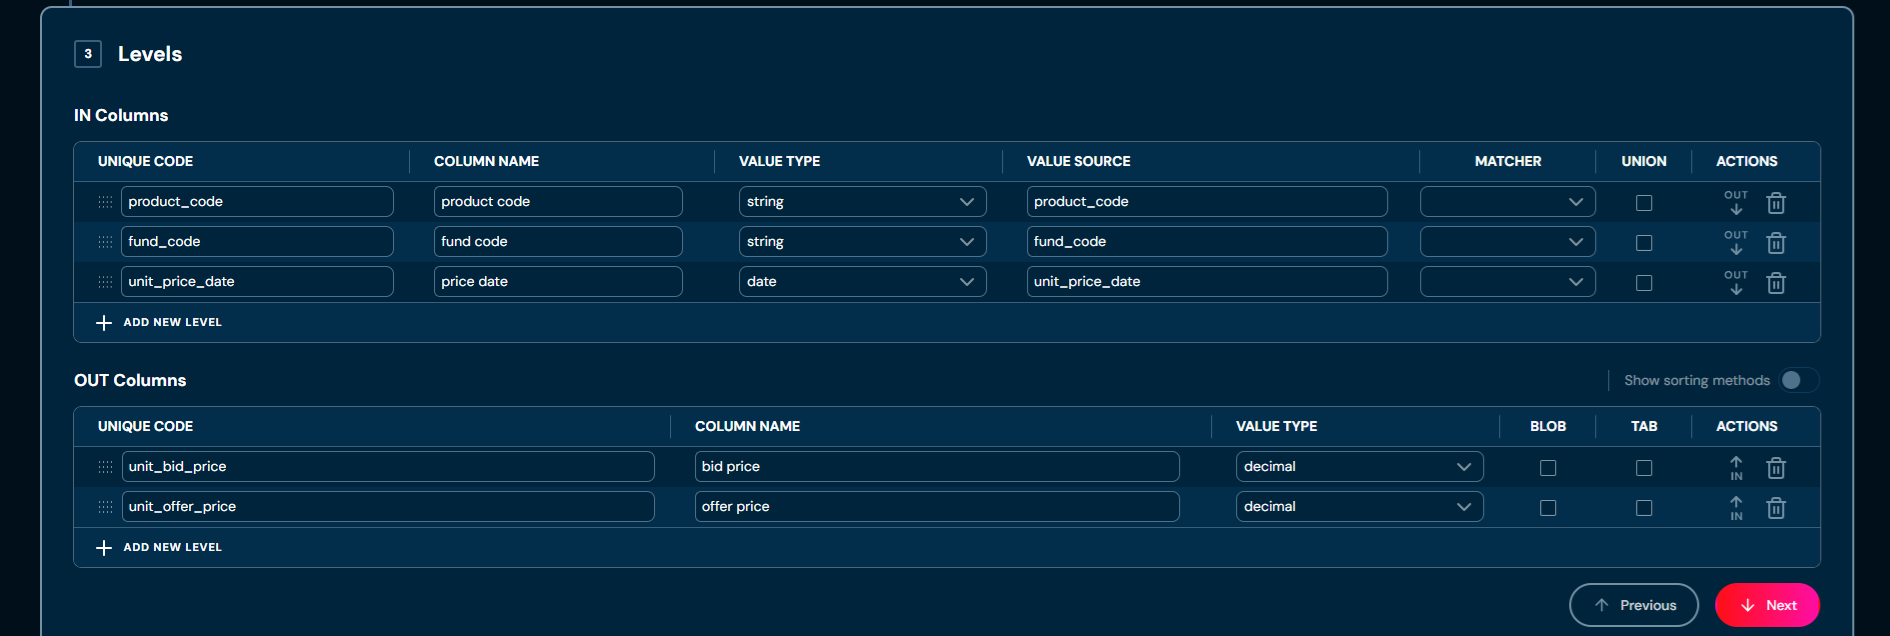
So, the SQL query must return dataset with 5 columns that will match 5 columns from decision table definition.
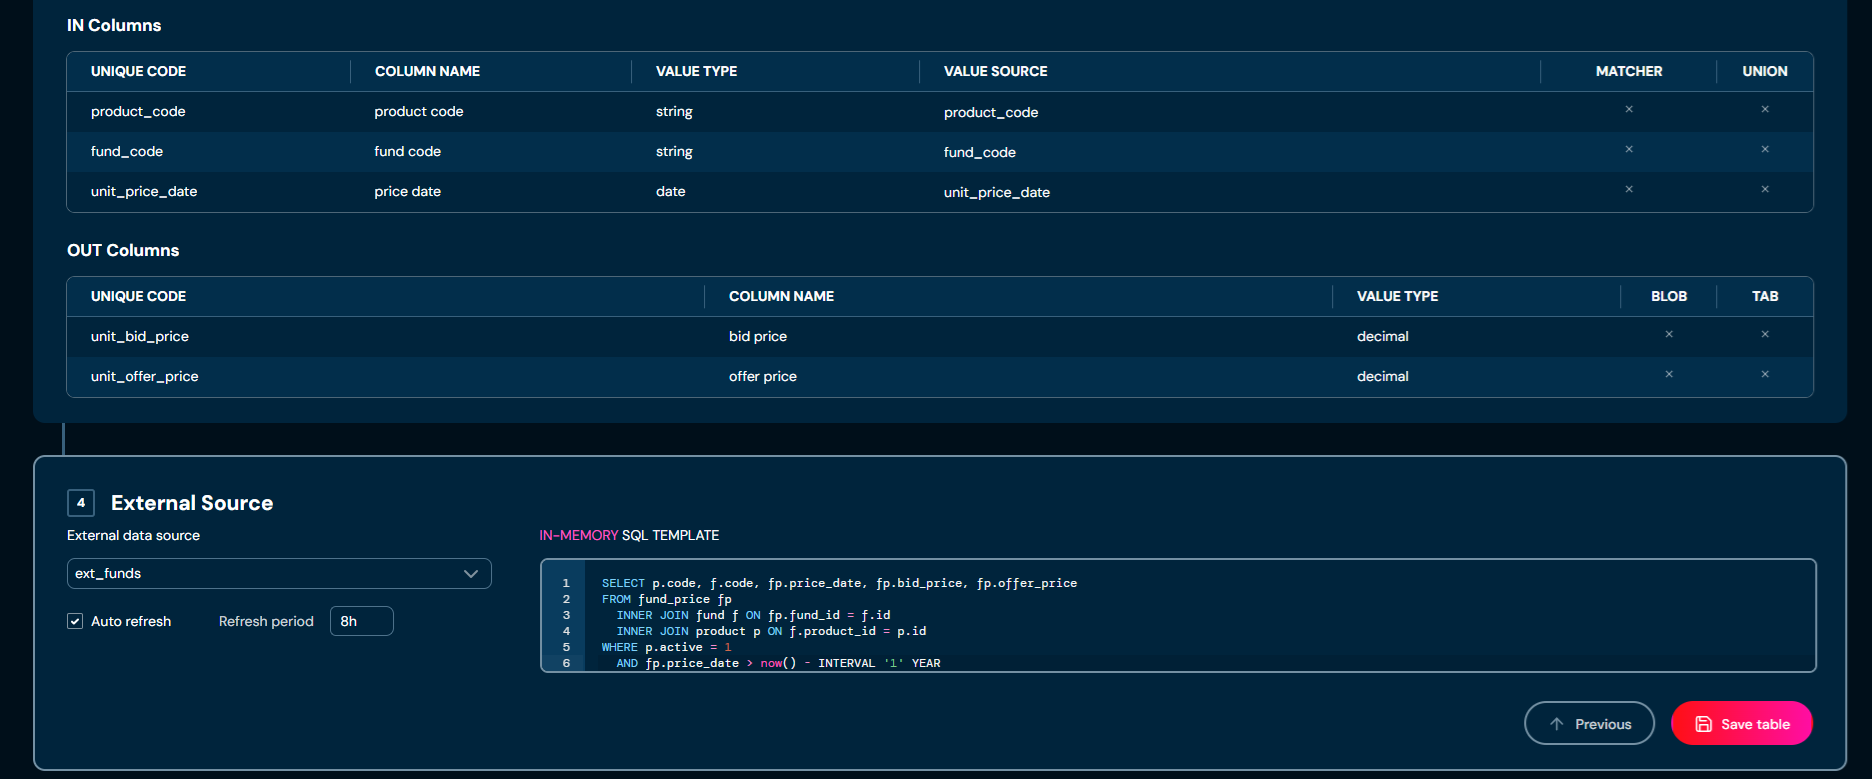
For example:
SELECT p.code, f.code, fp.price_date, fp.bid_price, fp.offer_price
FROM fund_price fp
  INNER JOIN fund f ON fp.fund_id = f.id
  INNER JOIN product p ON f.product_id = p.id
WHERE p.active = 1
  AND fp.price_date > now() - INTERVAL '1' YEAR
When this decision table is used for the first time, Higson executes this SQL query to obtain full data set (matrix). This matrix will be converted to in-memory index like in ordinary decision table.
Auto Refresh#
The SQL query is executed only once, when decision table is used for the first time. All subsequent lookups will be extremely fast, because they will be handled by in-memory index. What if the underlying database table changes in the meantime?
We can force Higson to periodically refresh the index in memory.
Just check the Auto refresh checkbox and provide Refresh period expression.
Refresh period consist of a number followed by a duration unit, for example:
| Refresh period | Meaning |
|---|---|
90s |
90 seconds |
15m |
15 minutes |
3h |
3 hours |
An empty Refresh period means 1h by default.
The image below shows the sample configuration:
Non-Memory External-Source Decision Table#
To configure decision table to use non-memory external source, we need to:
- check the
External Sourcetoggle button - uncheck the
In-memorycheckbox.
Then we need to define input/output columns like in an every decision table.
Finally, we can configure External Source panel by:
- selecting datasource from
External data sourcedropdown, - writing SQL query in
Non-memory SQL Templatetext area.
Writing SQL Query for Non-Memory Mode#
As mentioned earlier, non-memory decision table does not cache anything. It executes SQL query for every evaluation request.
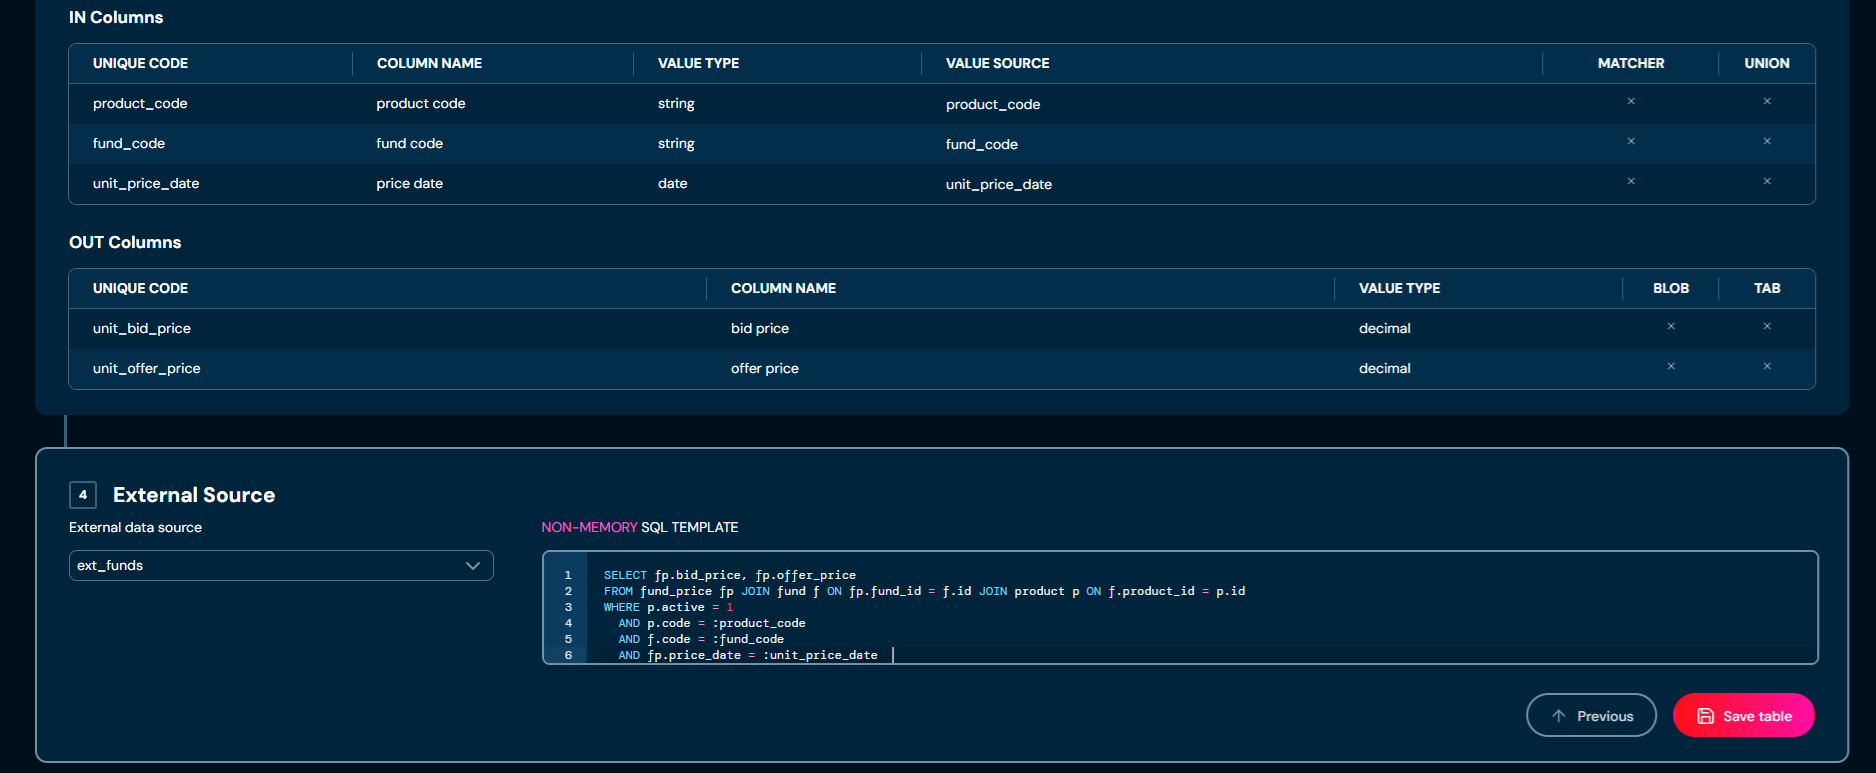
So, the SQL query:
- must return only output column
- may use input values to make conditions in SQL (
whereclause)
Consider a decision table with 3 input columns and 2 output columns:
- input column:
product_code - input column:
fund_code - input column:
unit_price_date - output column:
unit_bid_price - output column:
unit_offer_price
So, the SQL query must return dataset with only 2 columns,
for unit_bid_price and unit_offer_price.
It may use 3 inputs (product_code, fund_code, unit_price_date) to narrow the result.
For example:
SELECT fp.bid_price, fp.offer_price
FROM fund_price fp
  INNER JOIN fund f ON fp.fund_id = f.id
  INNER JOIN product p ON f.product_id = p.id
WHERE p.active = 1
  AND p.code = :product_code
  AND f.code = :fund_code
  AND fp.price_date = :unit_price_date
The above query will use input values in where clause.
If we evaluate decision table with such context:
ctx = new HigsonContext('product_code', 'AUL1', 'fund_code', 'FCB', 'unit_price_date', '2025-01-01');
result = engine.get(decisionTable, ctx);
Higson executes SQL query (PreparedStatement) with where clause:
select fp.bid_price, fp.offer_price
...
where p.active = 1
and p.code = 'AUL1'
and f.code = 'FCB'
and fp.price_date = '2025-01-01'
Configuring Datasources in Higson Studio#
For an datasource to be available on the External data source dropdown
it must be configured in Higson Studio configuration file.
The following is the part of the conf/application.properties file
with sample external source configuration:
higson.runtime.external-datasource.sql.names=ext_data, ext_funds, analytics

higson.runtime.external-datasource.sql.ext_data.url=jdbc:postgresql://...:5432/db1
higson.runtime.external-datasource.sql.ext_data.username=...
higson.runtime.external-datasource.sql.ext_data.password=...

higson.runtime.external-datasource.sql.ext_funds.url=jdbc:postgresql://...:5432/funds_history
higson.runtime.external-datasource.sql.ext_funds.username=...
higson.runtime.external-datasource.sql.ext_funds.password=...

higson.runtime.external-datasource.sql.analytics.url=jdbc:postgresql://...:5432/analytics
higson.runtime.external-datasource.sql.analytics.username=...
higson.runtime.external-datasource.sql.analytics.password=...
The above file configures 3 datasources that can be used by External Source decision tables:
ext_dataext_fundsanalytics
Higson Studio creates simple javax.sql.DataSource for every defined external datasource.
The configuration uses following properties:
| property | meaning |
|---|---|
higson.runtime.external-datasource.sql.names |
comma separated names of external datasources (logical names) |
higson.runtime.external-datasource.sql.[name].url |
JDBC url for external datasource using this [name] |
higson.runtime.external-datasource.sql.[name].username |
user name to establish jdbc connection |
higson.runtime.external-datasource.sql.[name].password |
password to establish jdbc connection |
Configuring Datasources in Higson Runtime#
If the application uses the Higson Runtime (embedded engine), it is necessary to provide external data sources and add them to the engine runtime:
HyperonEngineFactory factory = new HyperonEngineFactory(higsonDataSource);
...
DataSource dataDs = createDataSource(...)
DataSource fundsDs = createDataSource(...)
DataSource analyticsDs = createDataSource(...)
...
factory.addExternalDataSource( "ext_data",      dataDs );
factory.addExternalDataSource( "ext_funds",     fundsDs );
factory.addExternalDataSource( "ext_analytics", analyticsDs );
...
HigsonEngine engine = factory.create();
The deduplication process for decision tables is an automatic, cyclic background process running on the Higson Studio server. Its purpose is to optimize the storage of decision table matrices by detecting and deduplicating (reusing) identical matrices.
Problem It Solves#
Decision tables in Higson Studio may contain identical matrices. In such cases, the same data is stored multiple times — separately for each decision table. The deduplication process detects such situations and eliminates redundancy:
- one decision table is designated as the owner of the matrix,
- while the others become hard links pointing to that owner.
The physical data exists only once, regardless of how many decision tables share it.
Benefits#
- Lower memory (heap) – the DT lookup index is reused whenever possible
- Database storage – the matrix is stored only once in the database
- Smaller snapshot size – DTs that are hard links do not contain matrix files (
*.mat) - Faster DT loading time by the engine (no need to rebuild the lookup index if another DT uses the same matrix)
- Faster snapshot export time
- Faster export time for the list of decision tables
Functionality#
In addition to the deduplication process, hard links may also be created in other scenarios. For example, attaching a global decision table (DT) to multiple versions no longer requires creating deep copies of the DT. Only one DT will contain the matrix, while the others will become hard links.
Configuration#
Configuration is available via four properties:
| Property | Description | Default value |
|---|---|---|
| higson.studio.deduplication.enabled | Enables or disables the hard link feature | false |
| higson.studio.deduplication.job-enabled | Enables or disables the background deduplication process | false |
| higson.studio.deduplication.job-interval | Interval between consecutive runs of the deduplication process (if enabled). Format: number followed by a unit (s, m, h, d) |
30m |
| higson.studio.deduplication.matrix.min-size | The minimum number of matrix rows required for a matrix to qualify for deduplication by the background process |