Higson Runtime REST is a web application that provides REST API for decision table/function/domain access. It is a REST implementation of Java’s Higson Runtime jar. It is available in two forms:
- Spring boot’s executable jar, available here: https://www.higson.io/docs/d-success
- Docker image, available here: https://hub.docker.com/repository/docker/decerto/higson-runtime-rest
Environment#
Higson Runtime REST is a Java application and can run with any Java 8 or higher on Windows, MacOS X and Linux/Unix.
CLI#
To run Runtime-Rest from cli you must pass four properties:
- loader.path - path to jdbc driver
- higson.database.url
- higson.database.username
- higson.database.password
Download latest version of higson runtime rest and database driver (postgresql for example)
|
|
Docker#
To run Higson Runtime REST as a docker image, there is need to build a separate docker image based on decerto/higson-runtime-rest image, add your database driver jar and run Higson Runtime REST jar with additional path.
Example:
|
|
Additionally, you need to pass 3 properties:
- higson.database.url
- higson.database.username
- higson.database.password
An invocation example:
|
|
Using Higson Runtime REST#
This short tutorial will guide you through the process of running Higson Runtime REST as a docker image and invoking decision table/function/domain element.
Prerequisites#
In order to run examples from this article you will need:
- running docker. See https://docs.docker.com/installation/#installation for details on setting Docker up for your machine.
- a favorite REST API Client to send requests such as Postman
- a favorite internet browser
Setting Up Docker Images#
The tutorial will be based on our motor insurance. It consists of the insurance web application, Higson Studio, and Higson Runtime REST modules. There is a docker-compose.yml file that makes the whole application easy to run. Just download a project from GitHub, open terminal in that directory, and run the following command:
|
|
If you look closely inside the docker-compose.yml file, you will see that Higson Runtime REST docker image needs three additional properties to be passed to run properly:
- higson.database.url : JDBC url to Higson’s database
- higson.database.username : Higson’s database username
- higson.database.password : Higson’s database password
If you want to connect to other database types such as Oracle, Postgres, MsSQL or MySQL, then you must build your own docker image and provide your database driver. Here’s a Docker file example that copies custom database driver and runs Runtime REST application:
|
|
- Demo app should be available at
localhost:48080/demo - Higson Studio should be available at
localhost:38080/higson/app - Higson Runtime REST should be available at
localhost:8081
To access higson services use followed credentials: User: admin Password: admin
Getting Decision Table Value#
We will be using a decision table examples from this article. Let’s get the value of a demo.motor.coverage.position decision table for the BI coverage code. Here’s the request we’re going to use:
|
|
It consists of 2 main parts: ctx and elements. The former represents the input values we want to pass to Higson. We can pass there simple as well as complex objects. The latter is a list of Higson elements to invoke.
When we send this request to the localhost:8081/api/execution/invoke url, we should receive the following response:
|
|
We receive a list of executed Higson elements with corresponding values.
Let’s see how the response will look like if more than one row will be returned from the decision table. In this example, we are going to use the demo.motor.dict.vehicle.available decision table. Here’s the request:
|
|
Besides a new decision table (parameter) code and context property, you can see how to invoke more than one Higson element in a single JSON request. Let’s see the response:
|
|
As we see, each element has its own JSON section in returned array. What’s more, each row in the decision table’s matrix corresponds to one complex element in the resultValue array.
Calling Function#
Let’s get the computed value of the demo.insurance.calc.premium function. Here’s the request we’re going to use:
|
|
It’s basically the same request as the one used in the decision tables section. However, we pass here three context key-value pairs instead of one. Here’s the response we should get by calling the localhost:8081/api/execution/invoke endpoint:
|
|
Again, the same response format as in the decision table’s.
Accessing Domain Attributes#
Last but not least, let’s see how to access domain attributes through invoke API. We’ll be using examples from this article. Let’s see how to evaluate a position attribute of a coverage BI domain element:
|
|
The main difference between domain element and decision table/function is the presence of 2 additional attributes: profileCode and attributeCode, which names are self-describing. Let’s look at the response:
|
|
As we see, the response format is the same as in the decision table/function section.
If you want to learn more or discover other available endpoints, there is a Runtime REST swagger online documentation available at: http://localhost:8081/swagger-ui/index.html.
Accessing Swagger UI#
The Swagger UI link is generated automatically based on the installation type (Docker or Bundle). The Swagger UI is accessible at the following address format:
http://[host]:[port]/[appname]/[apiname]/swagger-ui/index.html
For Docker-Based Deployments#
When the application is running in a Docker environment, the URL components are determined as follows:
- host: localhost (or the container’s IP address if accessed externally)
- port: retrieved from the server.port property (e.g., 8080)
- apiname: the value of server.servlet.context-path from the application’s configuration (e.g., /api)
Example: http://localhost:8080/api/swagger-ui/index.html
For Bundle Installations#
In the case of a bundle installation:
-
host: localhost
-
port: retrieved from the conf/server.xml configuration file by locating a line such as:
<Connector port="38080" protocol="HTTP/1.1" ... />In this example, the port is 38080.
-
appname and apiname: determined based on the directory structure within the webapps folder. For version 4.1, the typical folder name is higson#api, which translates to:
- appname = higson
- apiname = api
Example: http://localhost:38080/higson/api/swagger-ui/index.html
By following these rules, you can easily determine the correct Swagger UI URL regardless of the deployment method.
Generating Runtime REST JSON from Tester#
To generate a request to Runtime Rest, navigate to Tools -> Tester. Click “Add Test”, then add the elements for which you want to generate an example request. In the example below, the following elements have been selected:
- Decision Table,
- Function,
- Domain Element,
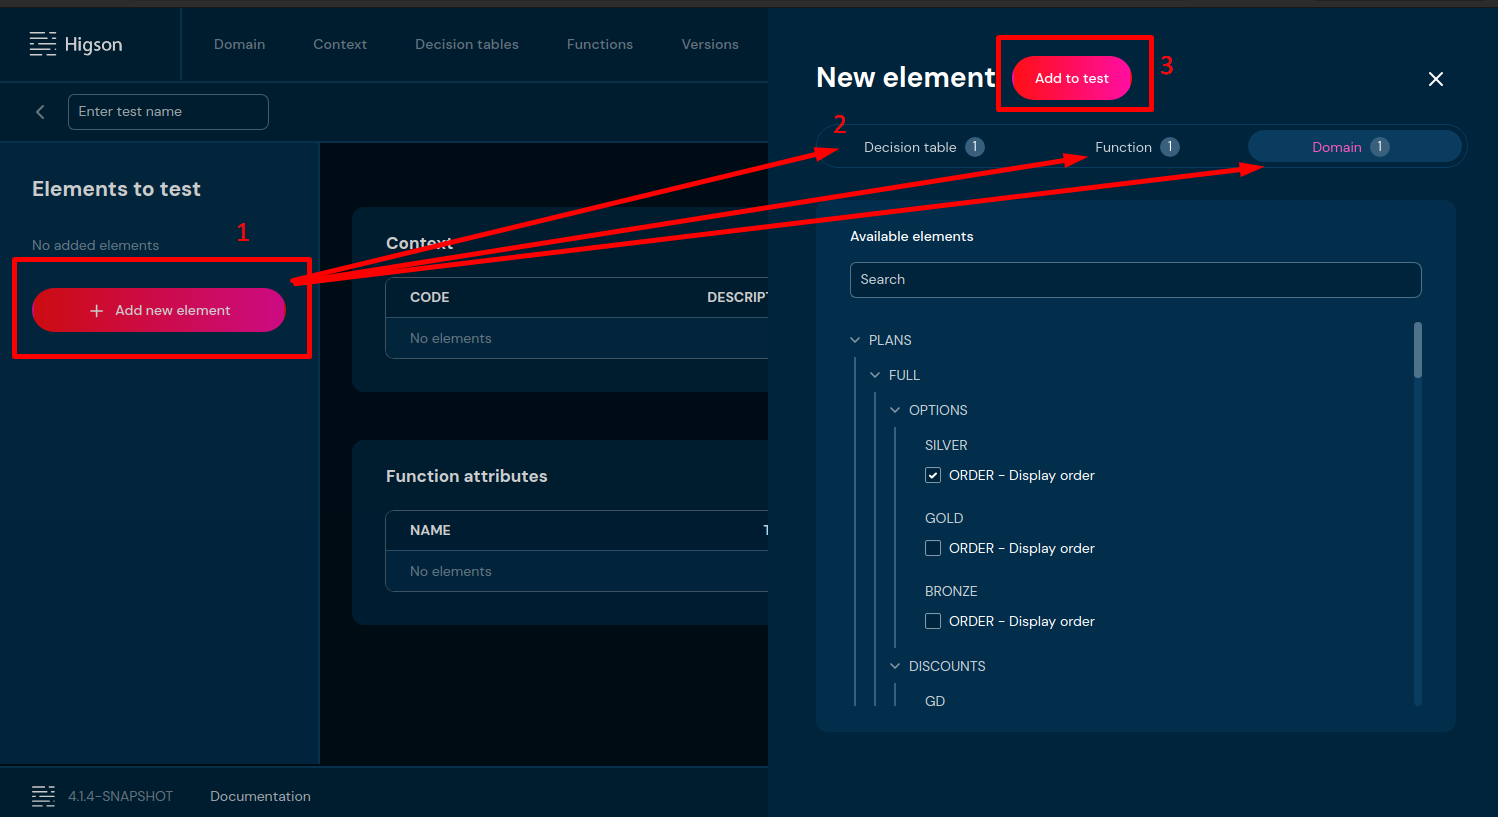
- Click “Add element” on the left side.
- Select the elements for which you want to generate an example request.
- Add the selected elements to the test.
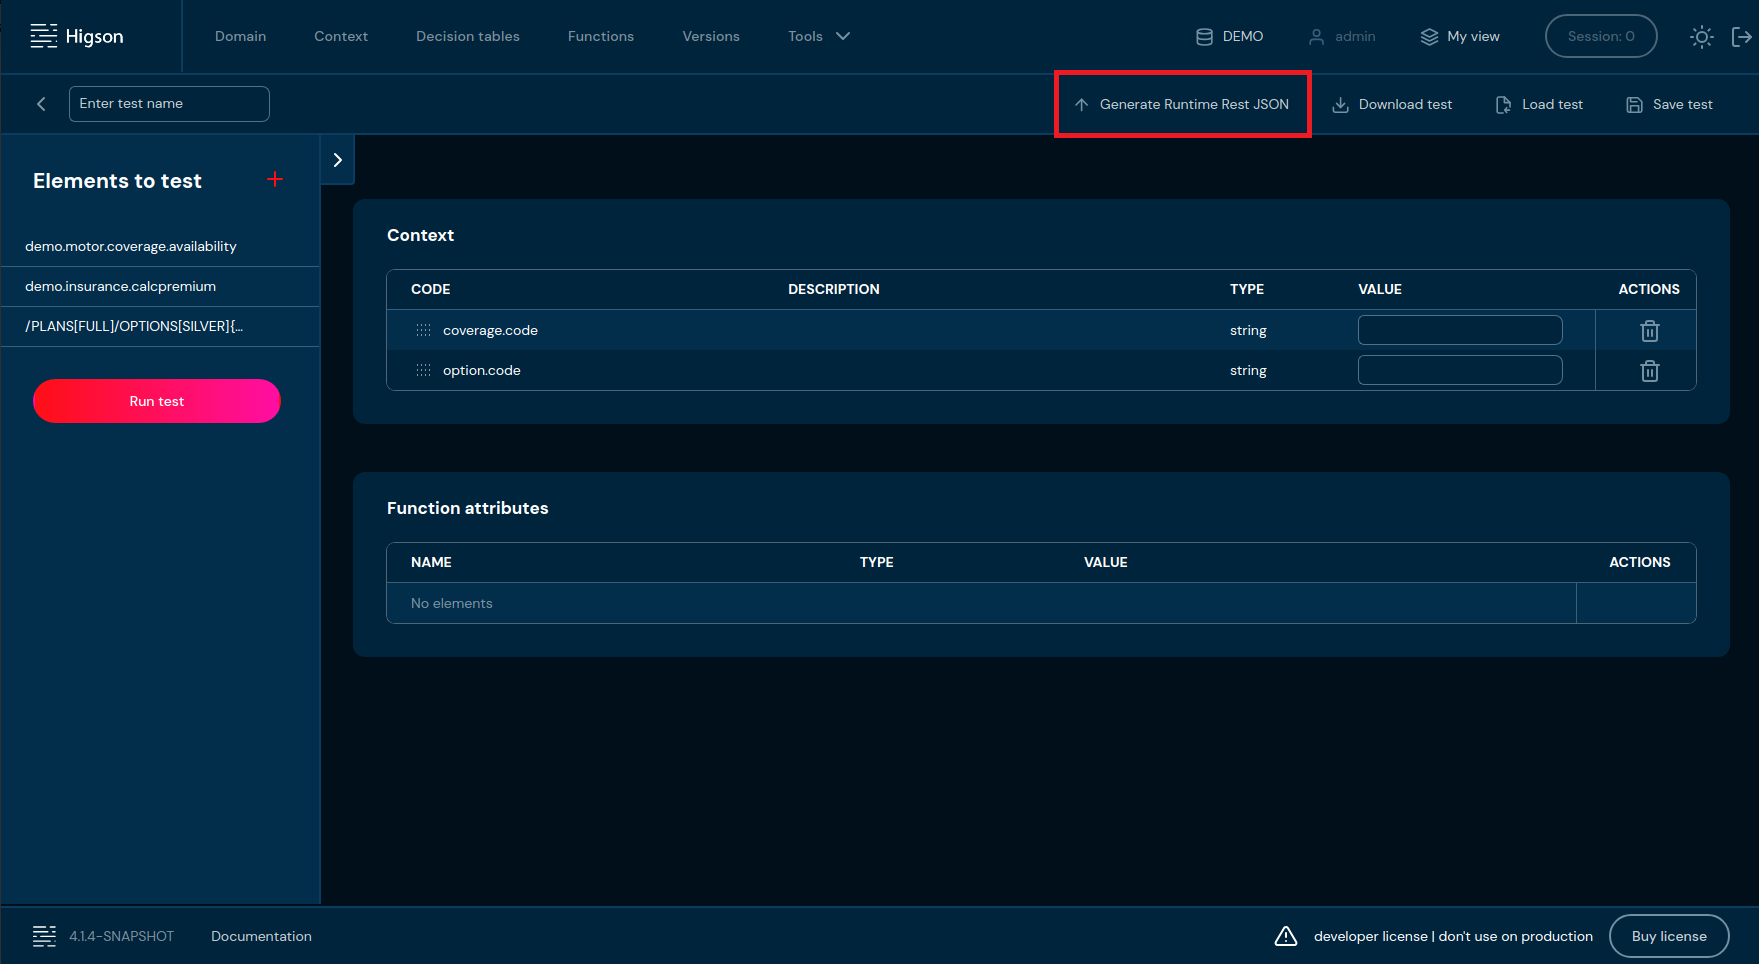
Now you can click the “Generate Runtime Rest JSON” button, which will generate an example request without context values.
|
|
If you need to generate an example request with context values, you must first run the test by clicking “Run Test” button. This will populate the Context table with all available context values.
Next, fill in the desired context values and click “Run Test” again.
Then click “Generate Runtime Rest JSON”.
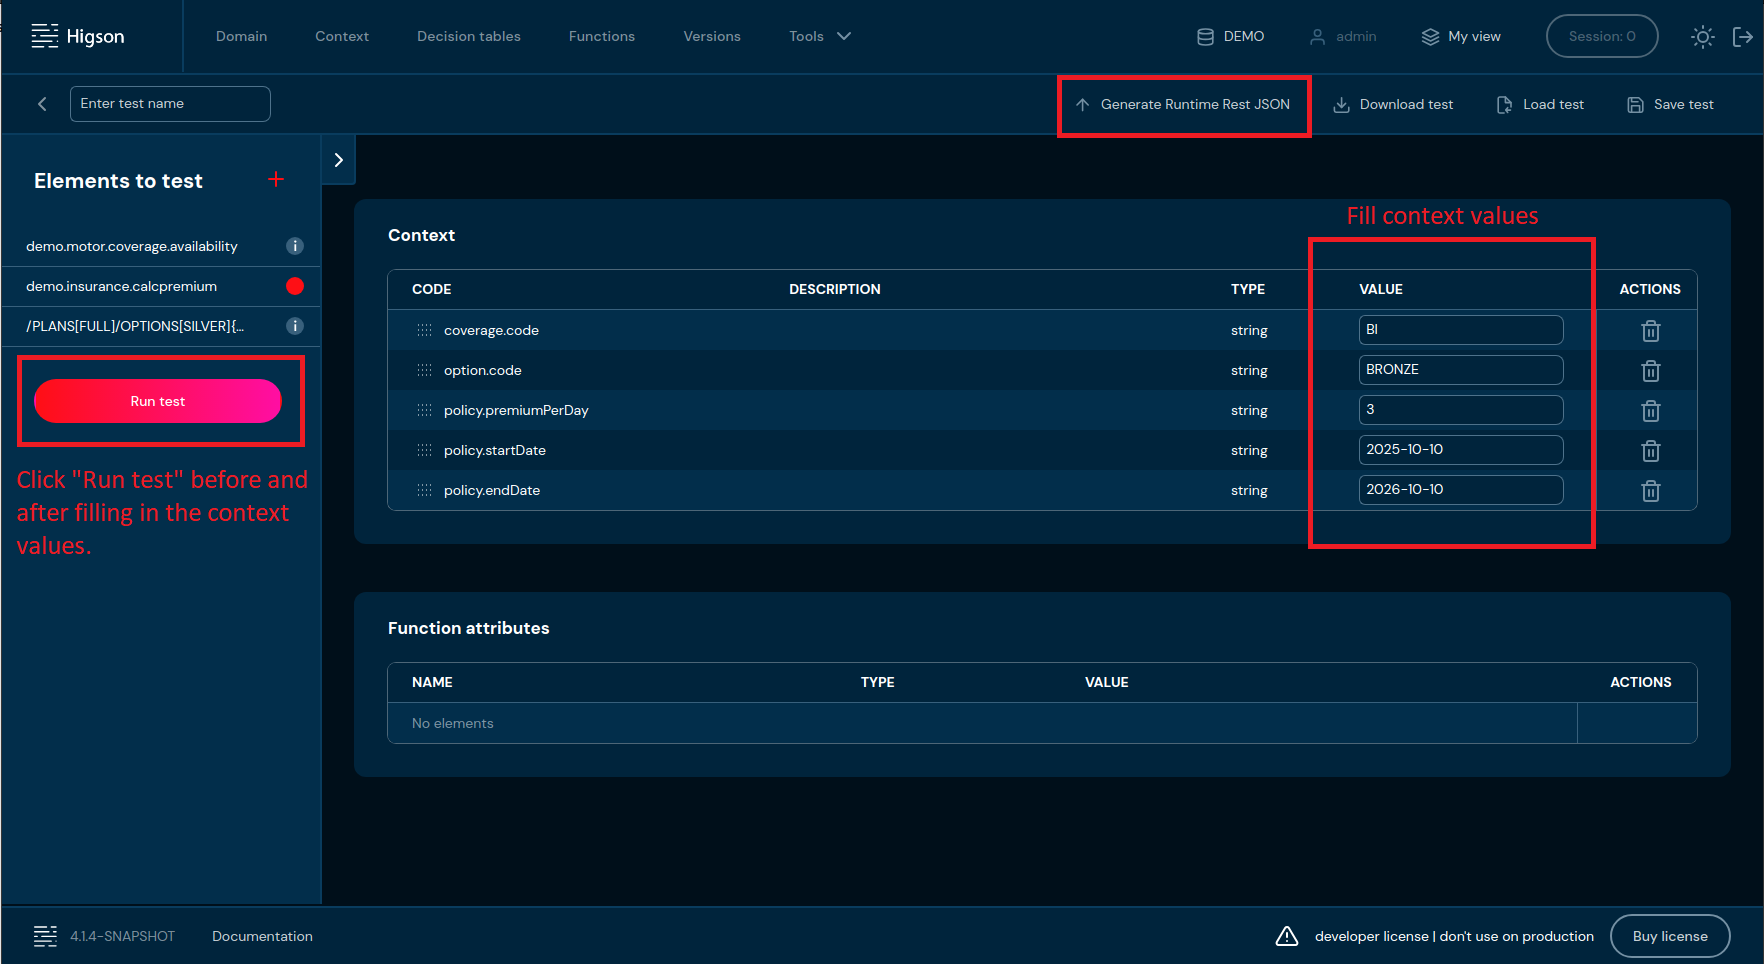
Now the generated example request will include the values from the context.
|
|