Testing modules allows to test parts or the whole algorithm design in Higson Studio. Using batch tester gives the ability to perform test for series of data, not just a singular set. Create and save mass tests to control how changes it the algorithm influence the results. Each batch test is created from unit test (design in singular tester). To learn more about the Unit tests read the Tester chapter.
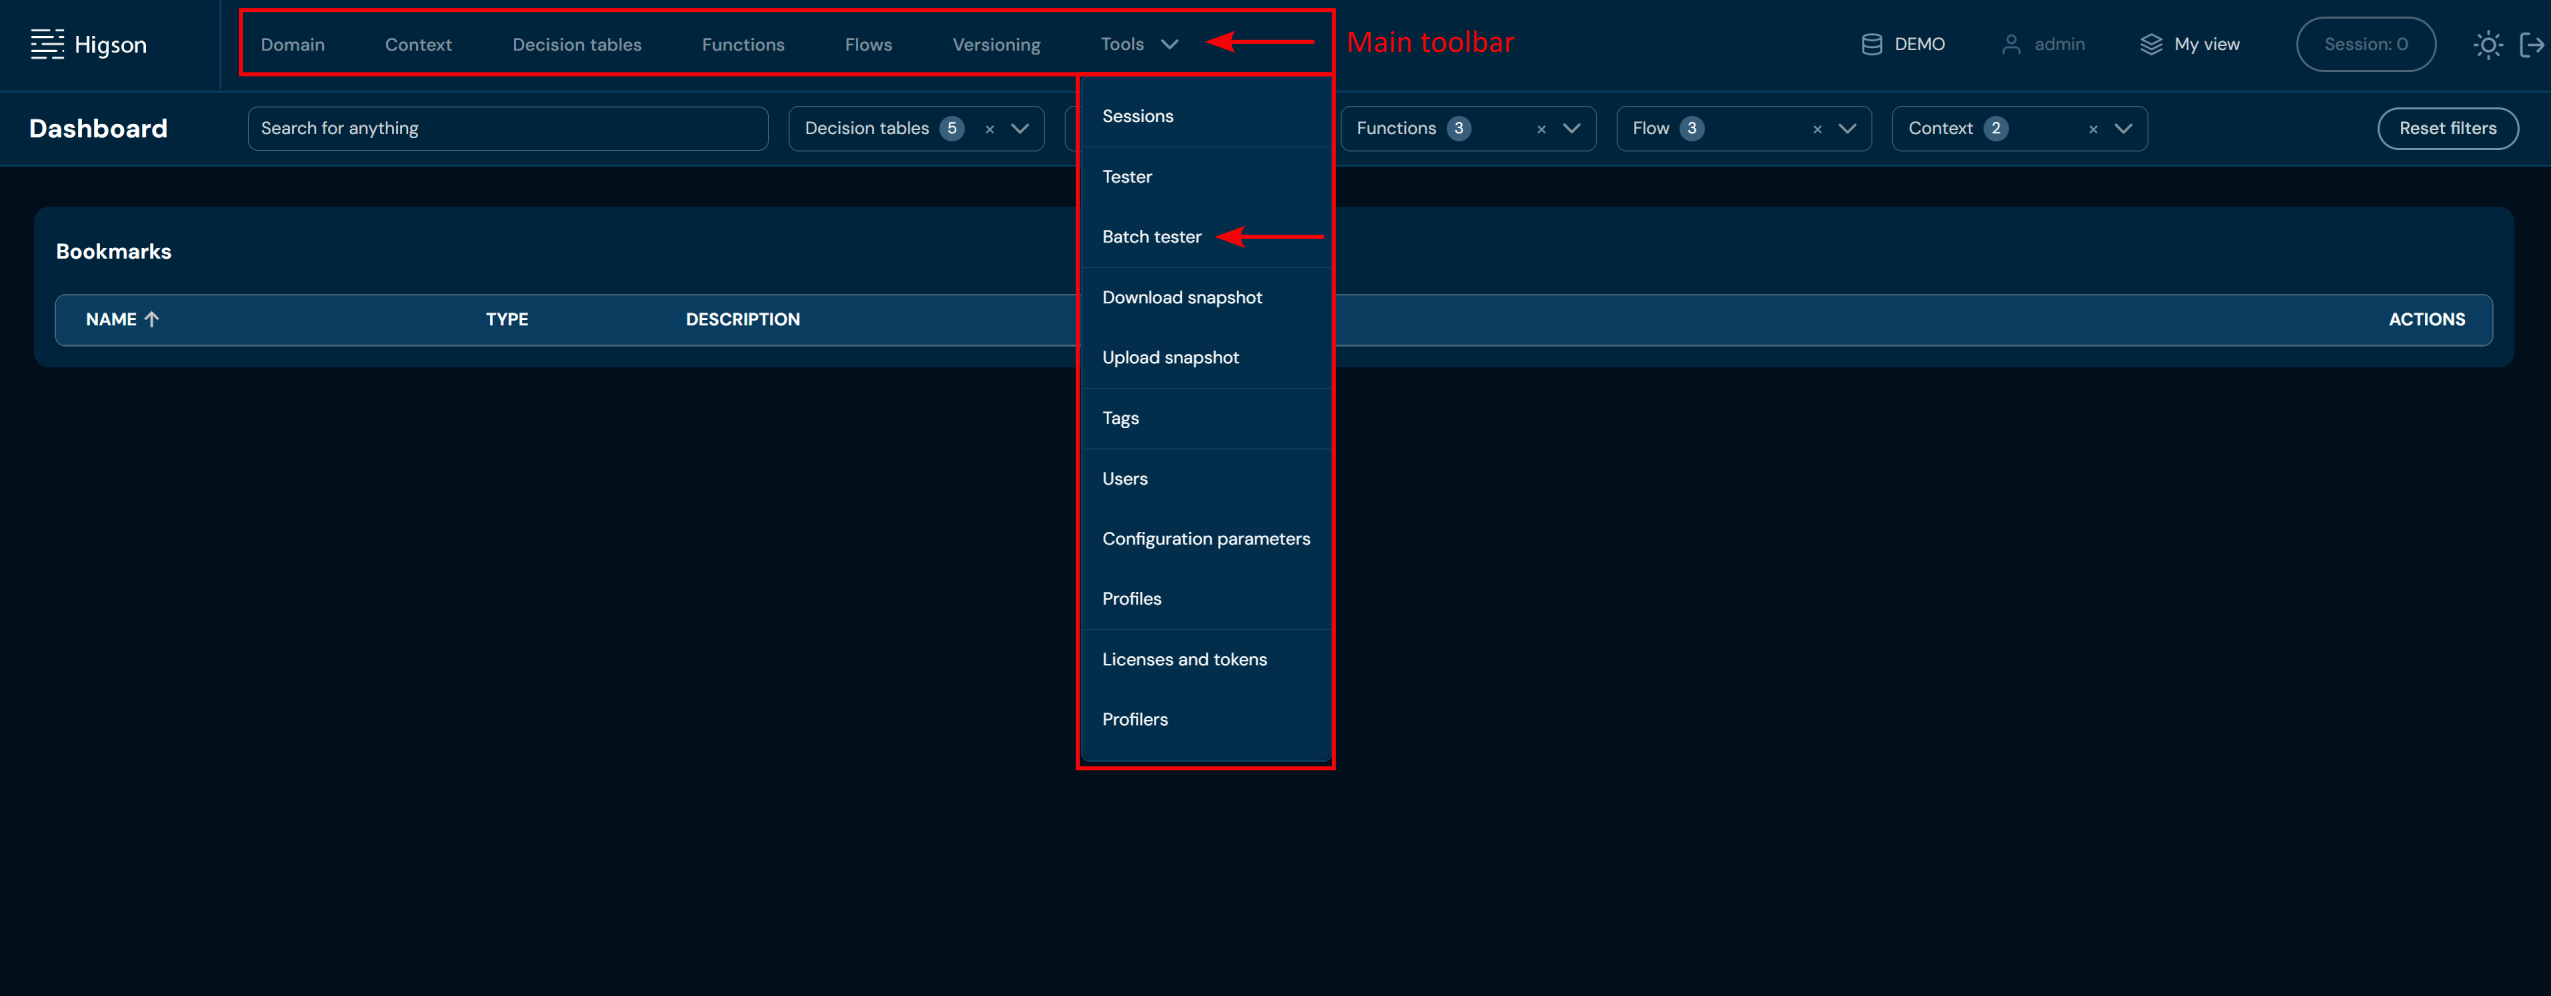
To go to batch tester, select Tools/Batch Tester in Main Toolbar.
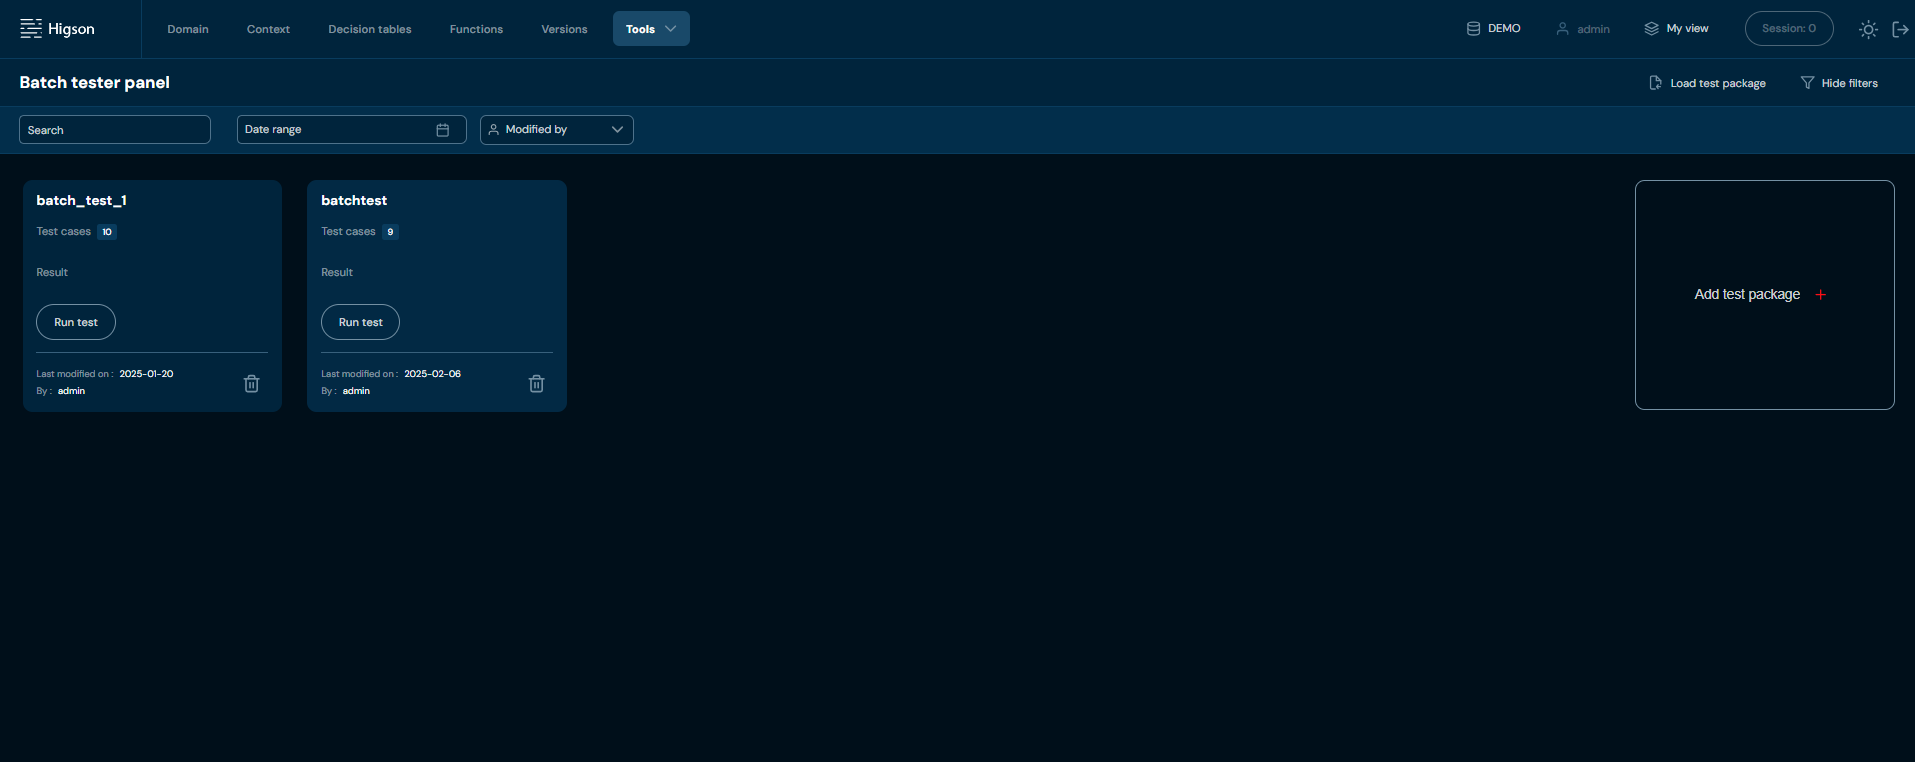
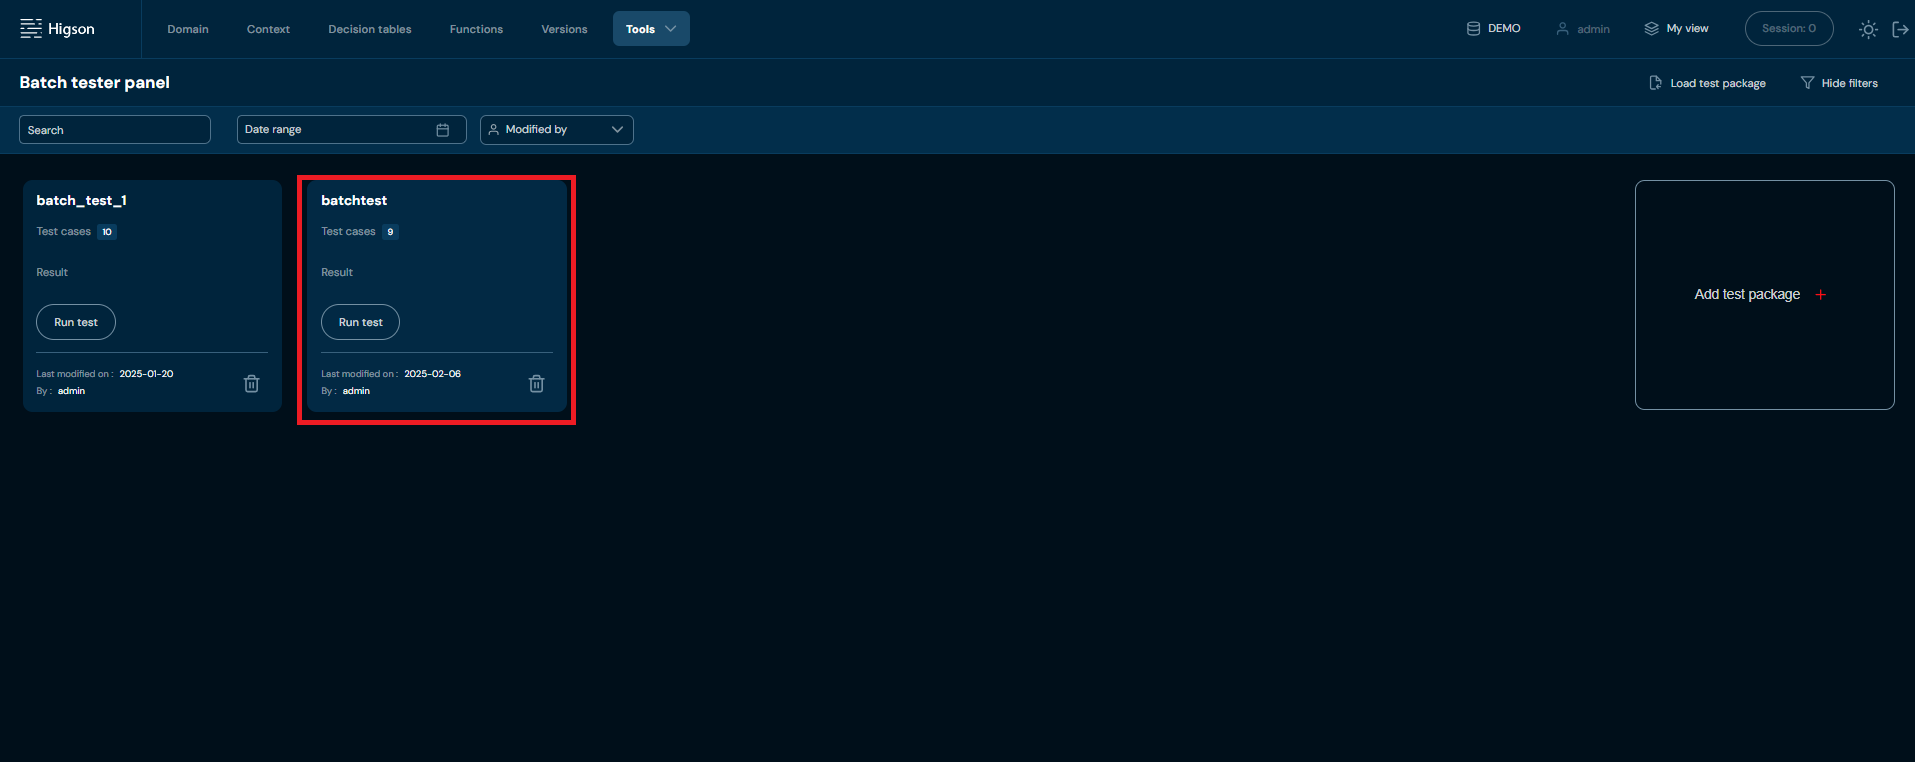
You will see the tile view of all saved batch tests
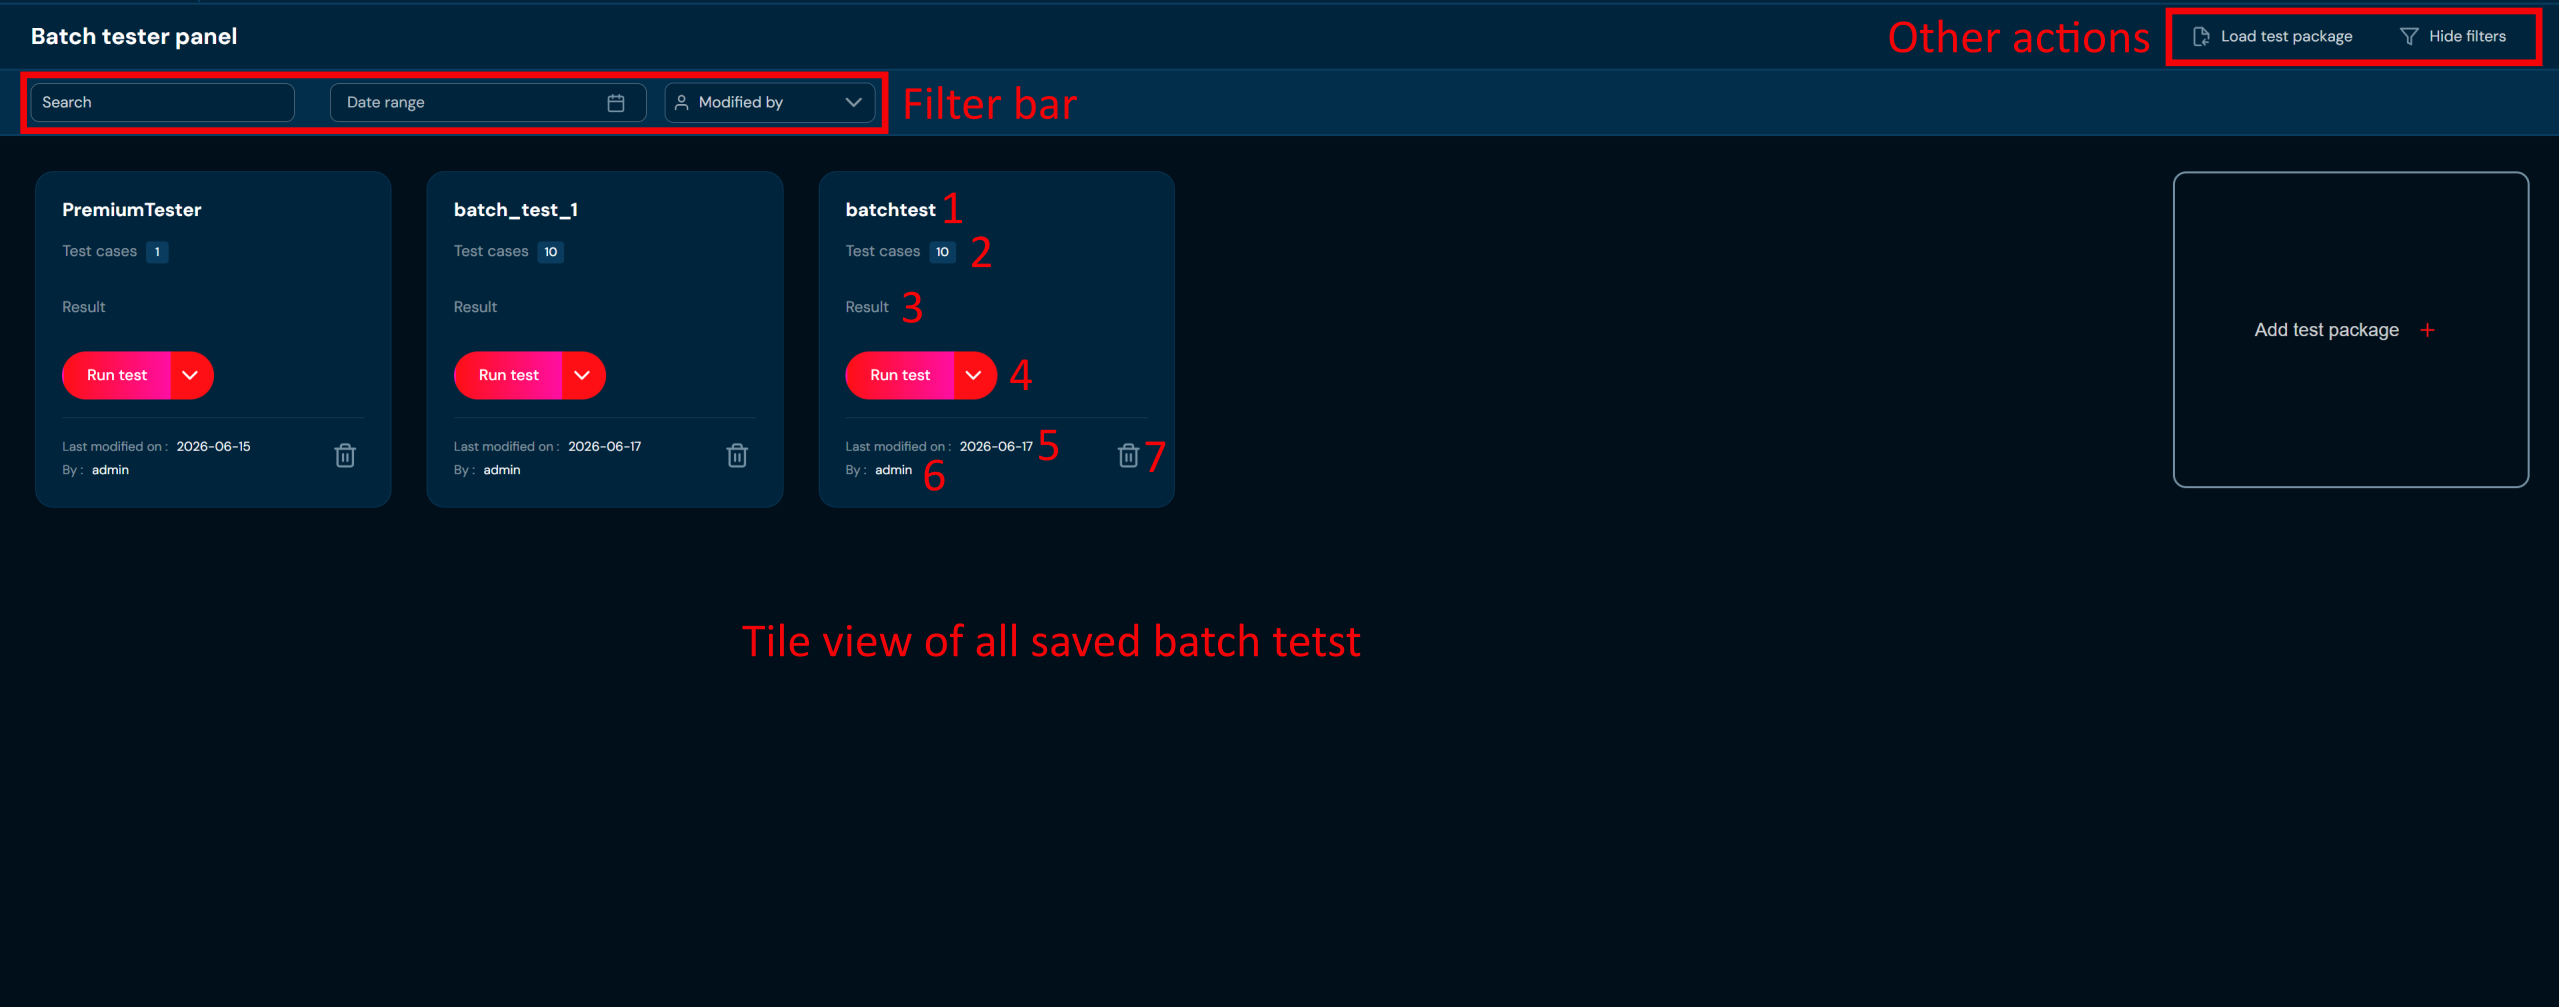
Each tile represents a batch test saved in the environment. Each batch test is described by the following information:
| No. | Item | Description |
|---|---|---|
| 1. | Test Name | Batch test name. Each batch test should have a unique name. |
| 2. | Test cases | Number of test cases in the batch test. |
| 3. | Result | Information about the status of the result is shown after running the batch test. |
| 4. | Run test | Button to execute batch test. |
| 5. | Modification date | Last modification date. |
| 6. | Modified by | Information on the user who modified the batch test. |
| 7. | Delete | Delete action. |
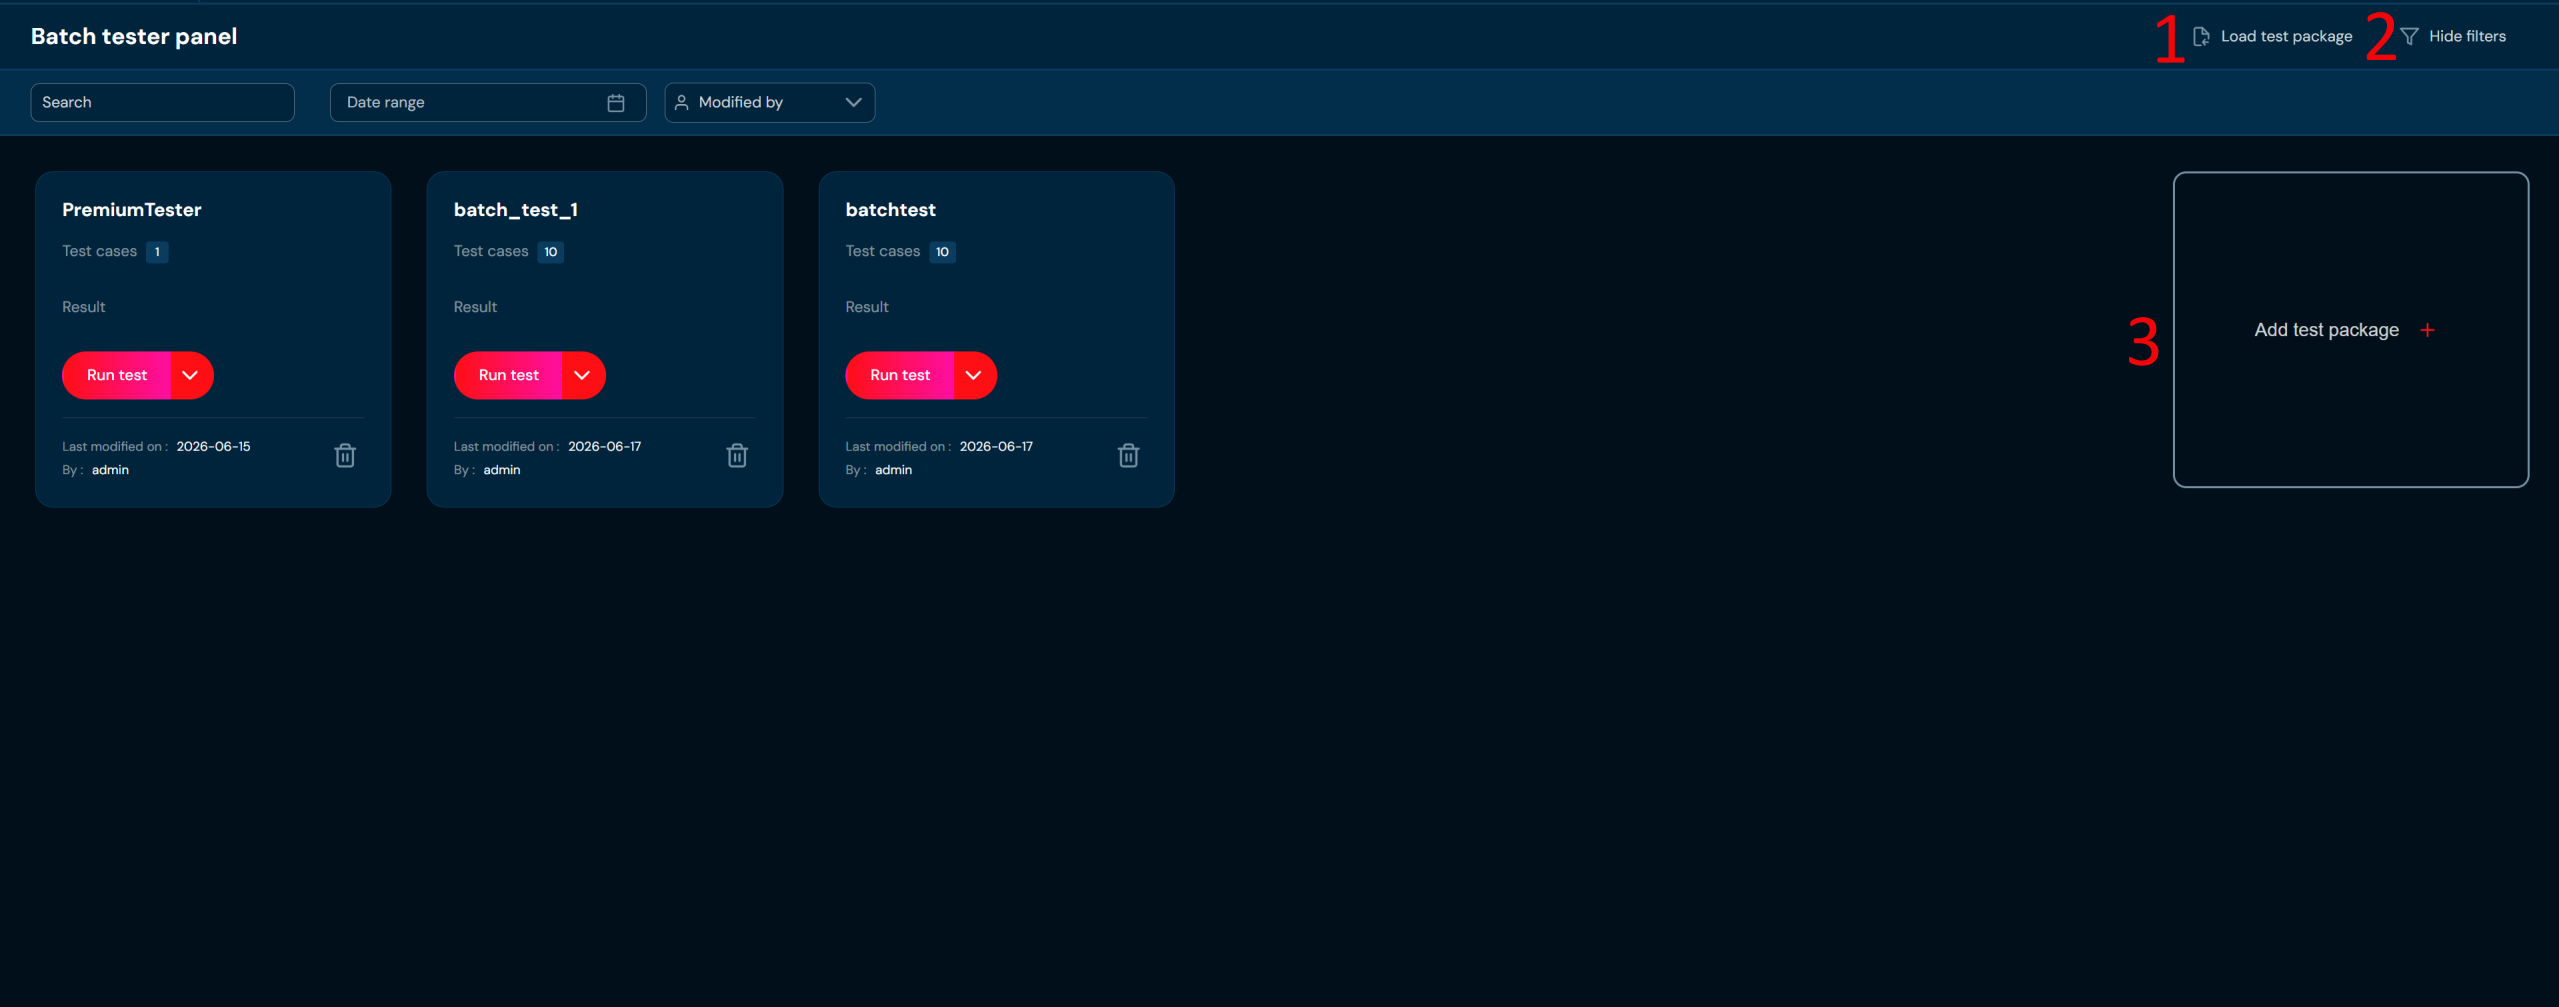
Additionally you can use available actions:
| No. | Action | Description |
|---|---|---|
| 1. | Load test package | Allows to load batch test from XLSx file |
| 2. | Hide/Show filters | Hides or reveals Filters bar accordingly. If Filter bar: - is visible, then action Hide filters is available. - is hidden, then action Show filters is available. |
| 3. | + Add test package | Opens a batch test creator. |
Use filters to search for preferred batch test:

| No. | Filter name | Description |
|---|---|---|
| 1. | Search text field | Filter by any string provided by user. |
| 2. | Date range | Filter by last change date in format YYYY/MM/DD-YYYY/MM/DD . |
| 3. | Modified by | Filter by user who last modified the batch test. |
Batch Tester Creator#
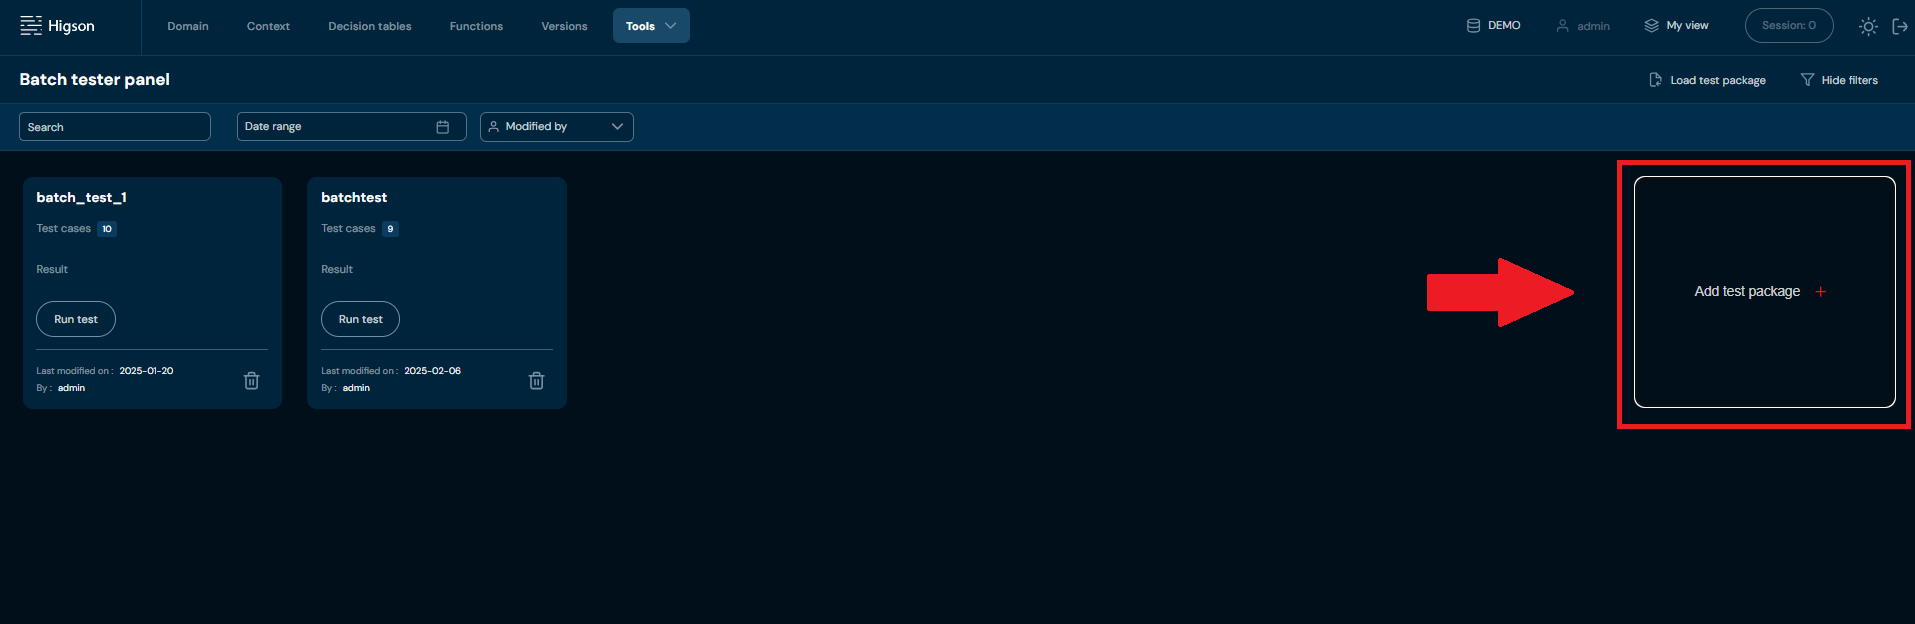
To create new batch test unit test must already exist. You can create unit test using the Tester. When this condition is met you can start creating batch tests based on existing unit tests. To go to the batch test creator you need to click on the Add test package action.
The Batch Test creator:
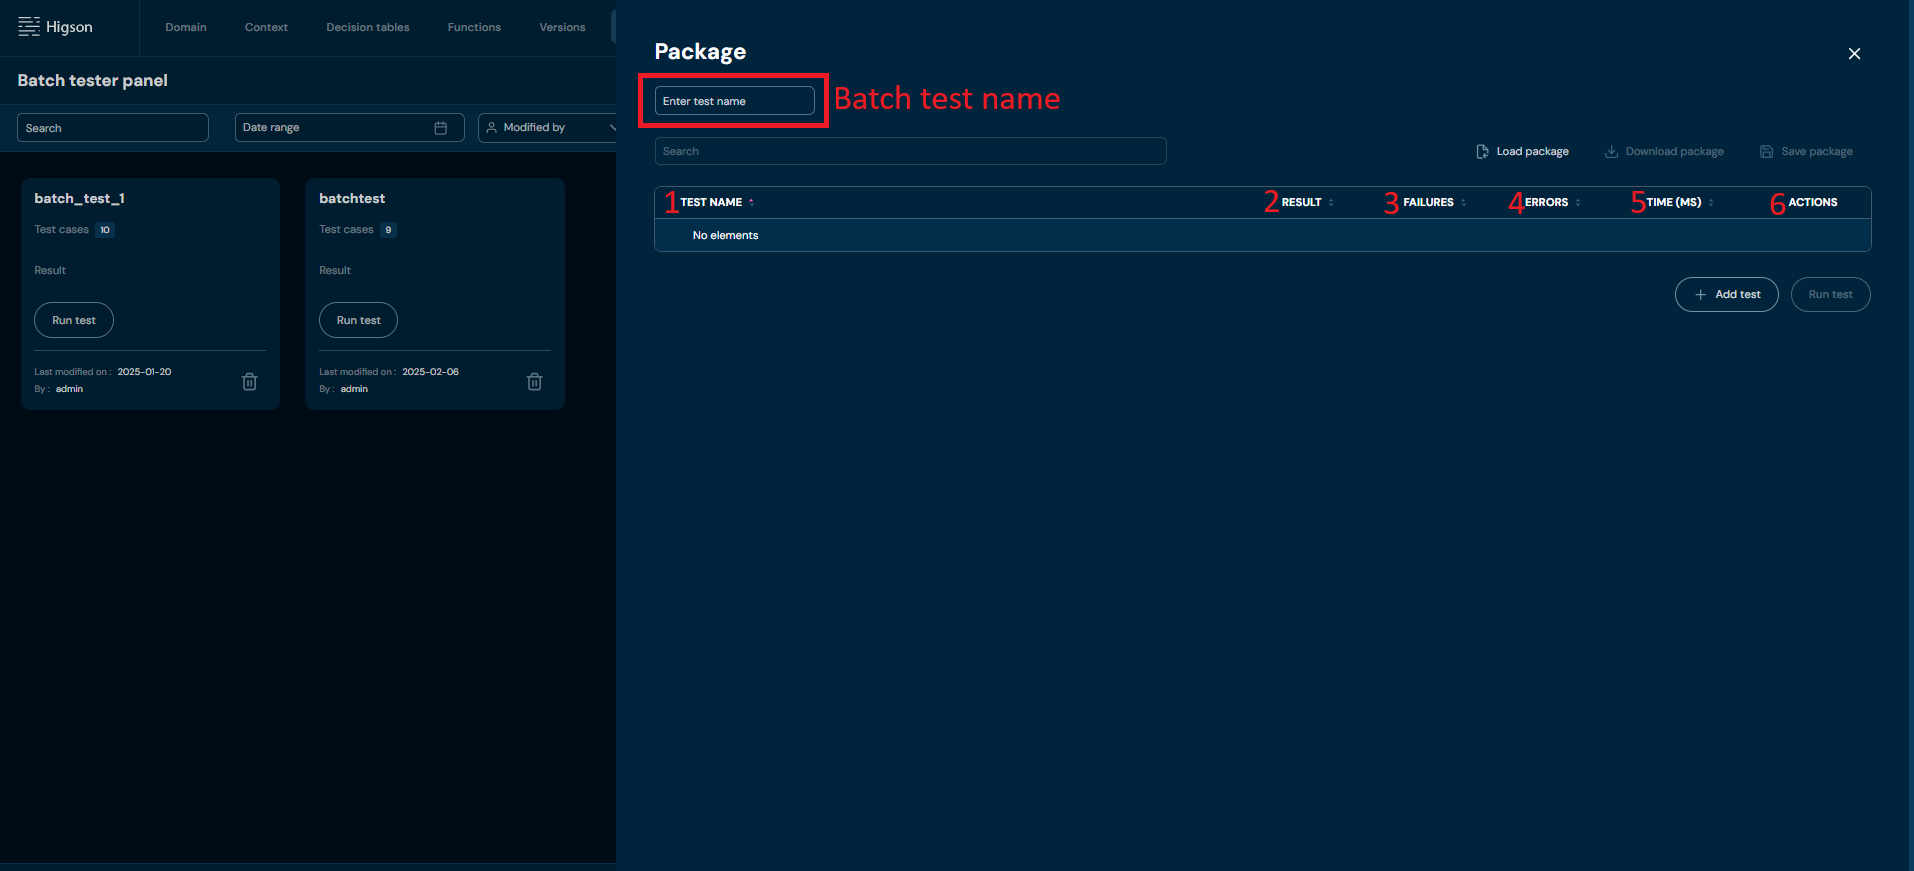
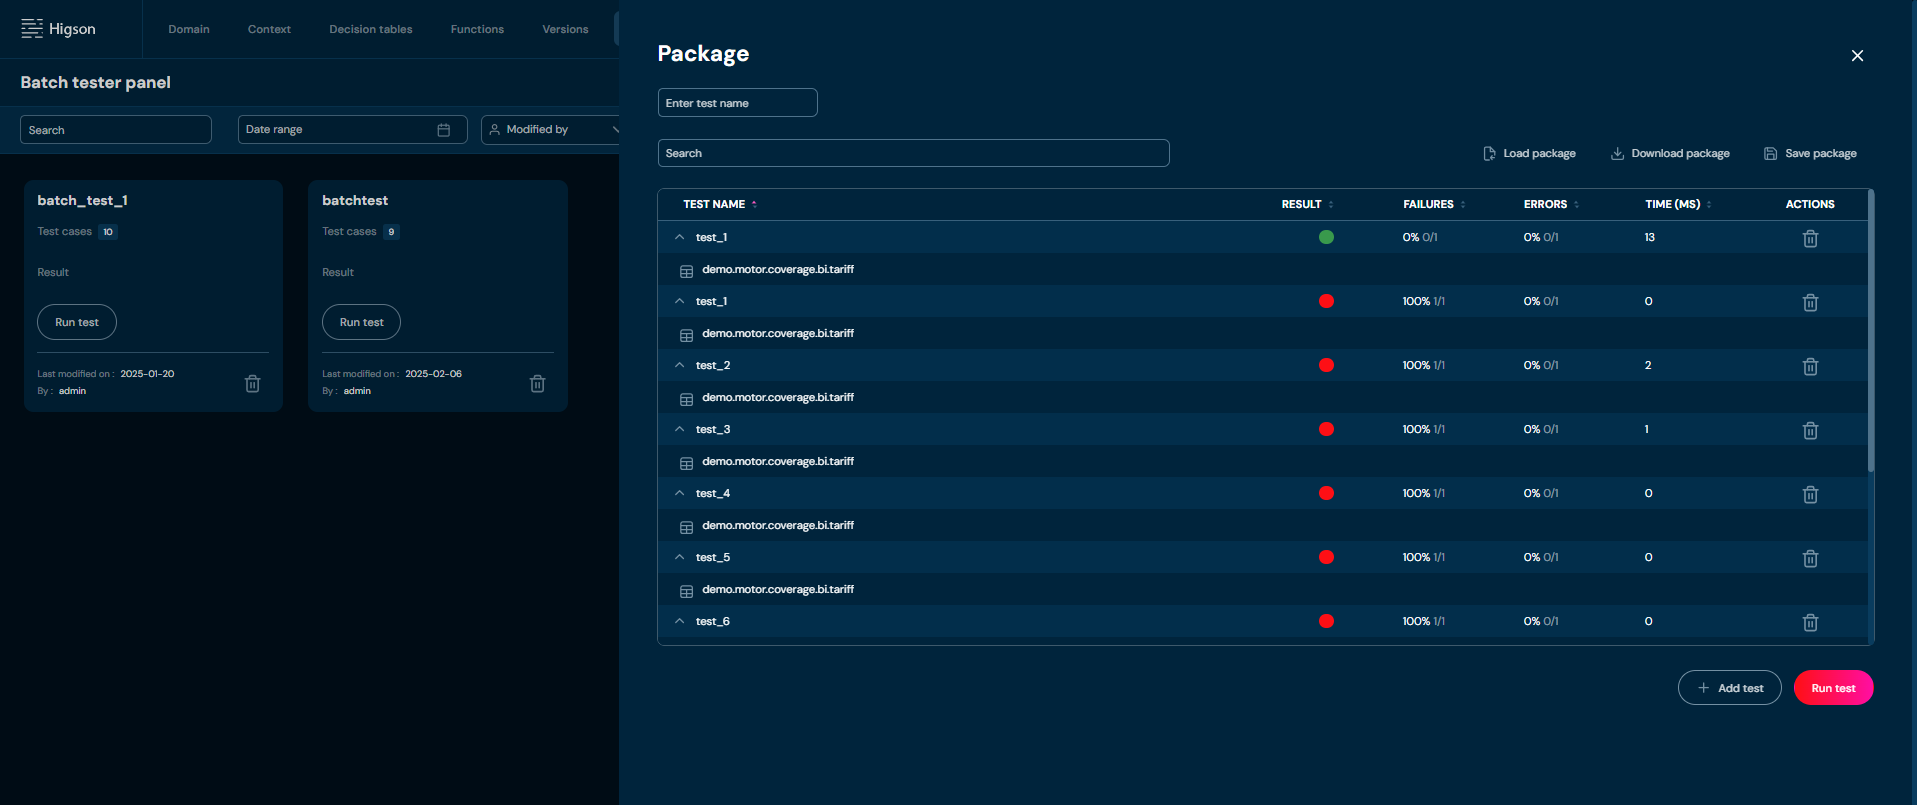
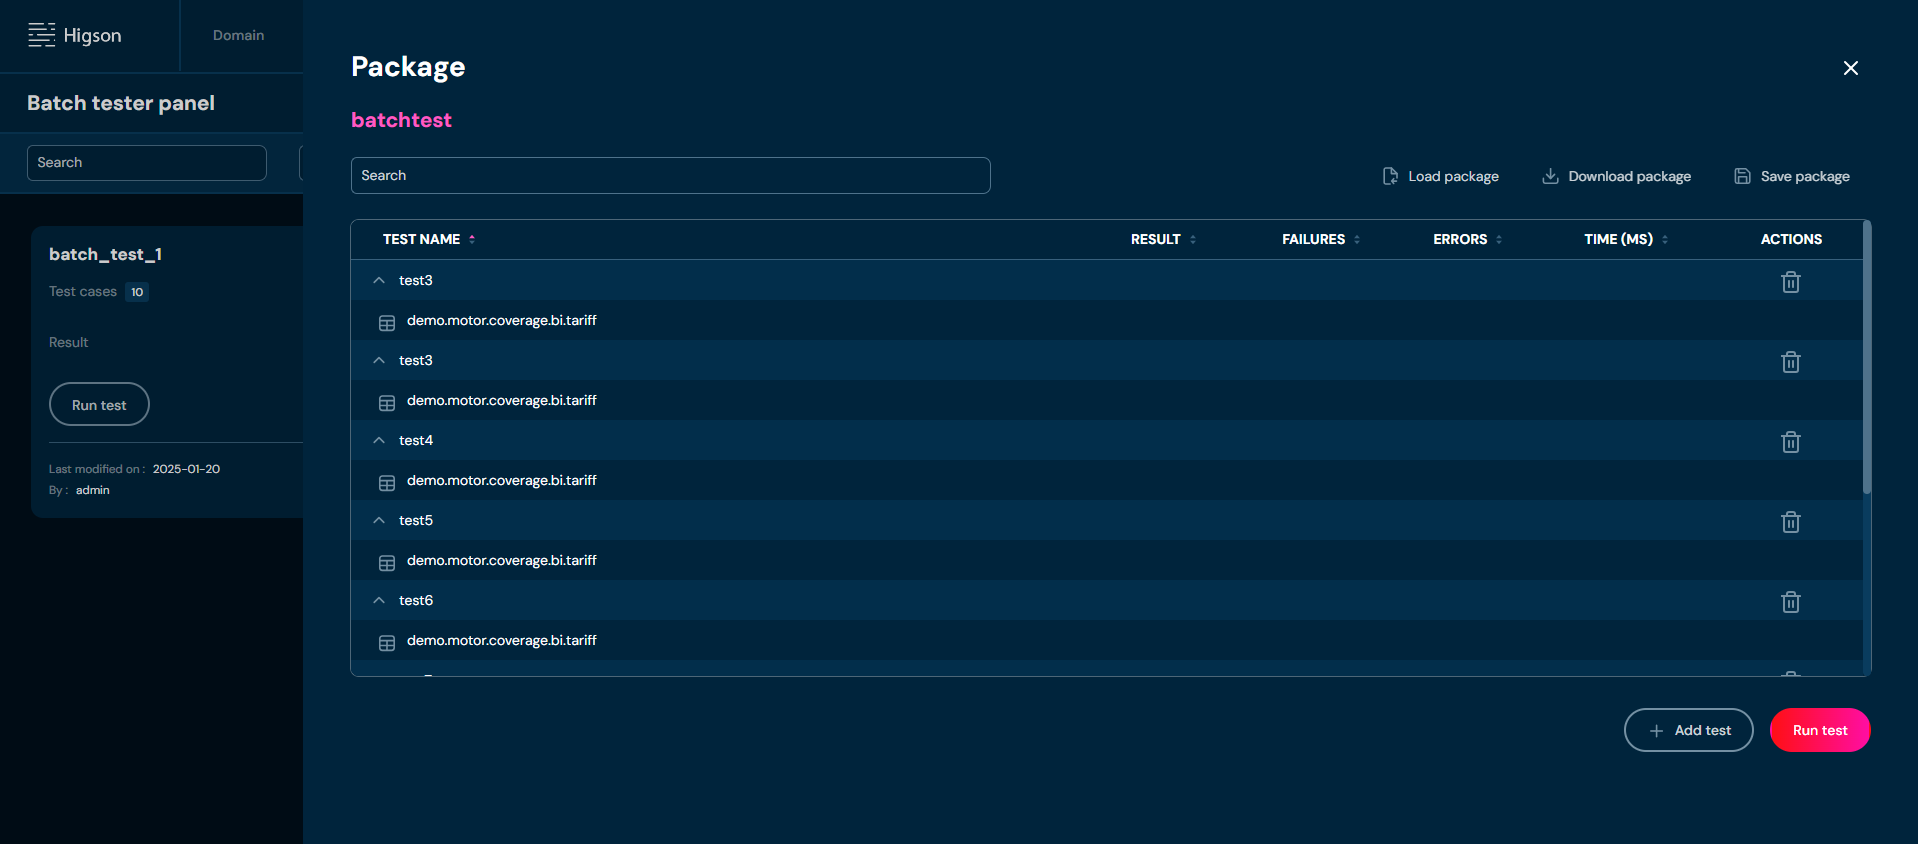
For each unit test, which creates batch test, six information is given:
| No. | Column name | Description |
|---|---|---|
| 1. | Test Name | Full test name. Test name is loaded from selected unit test. Test name can be changed (or added) through import of the XLSx file. |
| 2. | Result | Test case status provided by comparison of the evaluated value with expected value. |
| 3. | Failures | Number of failures within unit test case. Where evaluated value differs from expected value. |
| 4. | Errors | Number of errors which occurred during the unit test. |
| 5. | Time (ms) | Time taken to perform the unit test. |
| 6. | Actions | List of quick access actions. Currently only Remove action (bin icon) is available here. Remove action deletes desired unit test. |
By those the list of unit test can be sorted if needed. In addition, the following actions are available on the batch tester wizard screen:
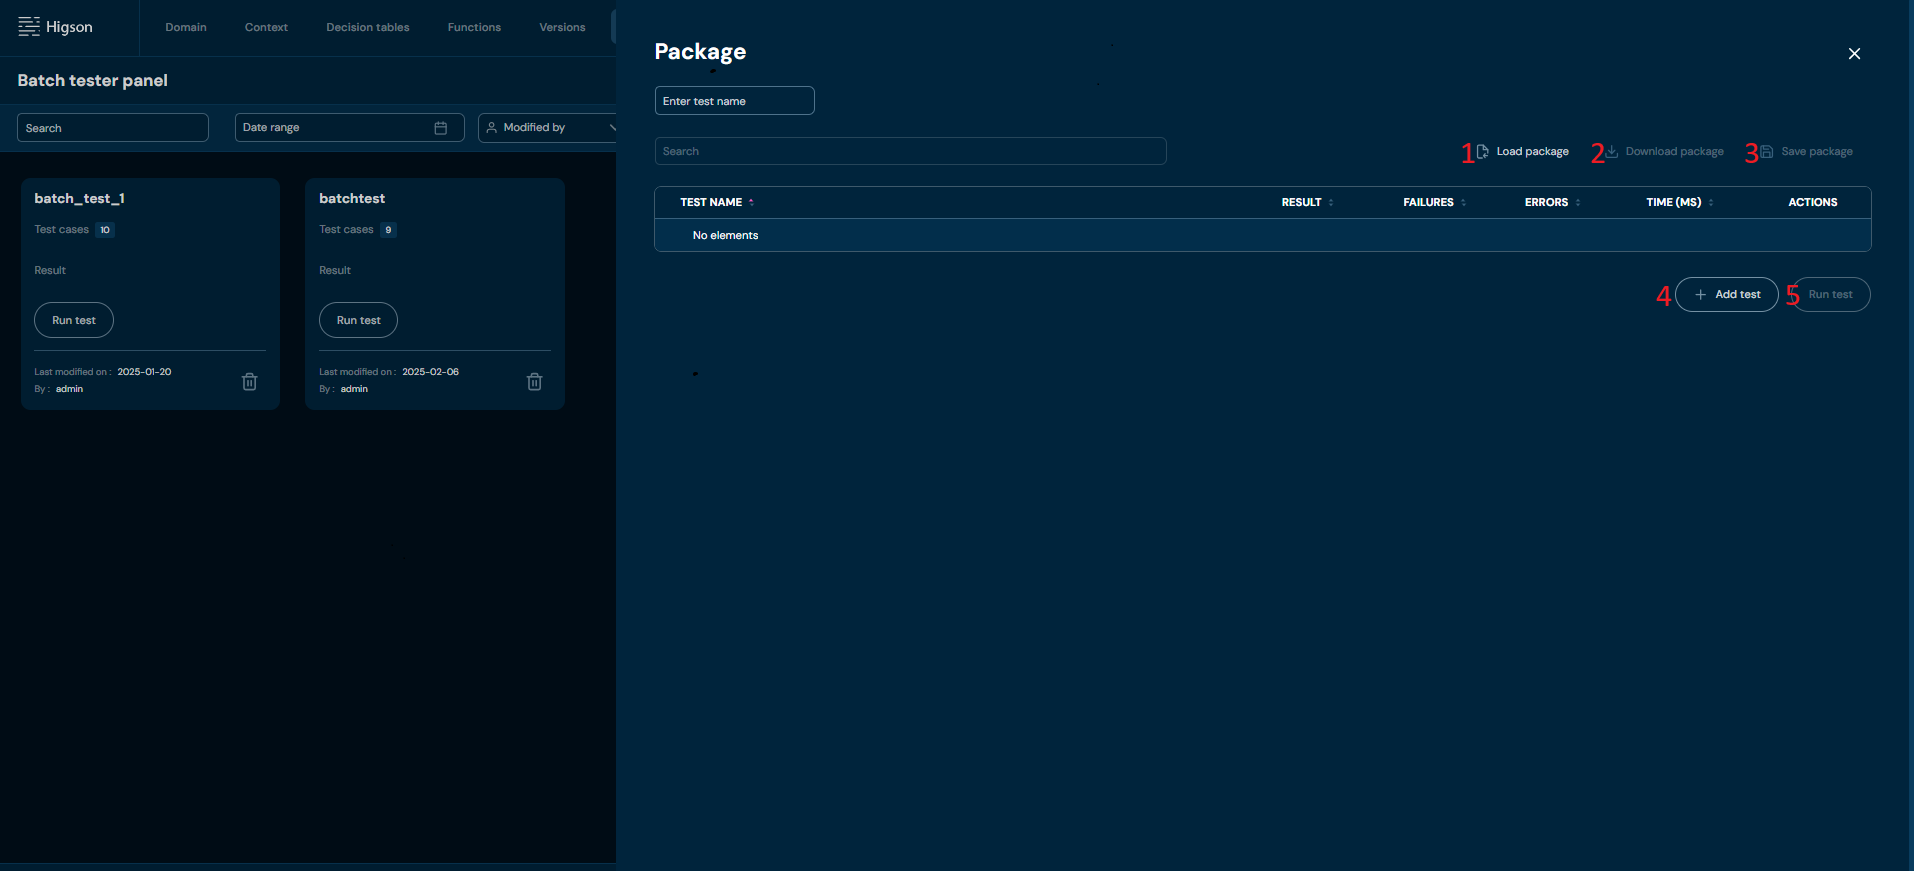
| No. | Action | Description |
|---|---|---|
| 1. | Load package | Allows to load batch test from XLSx file. |
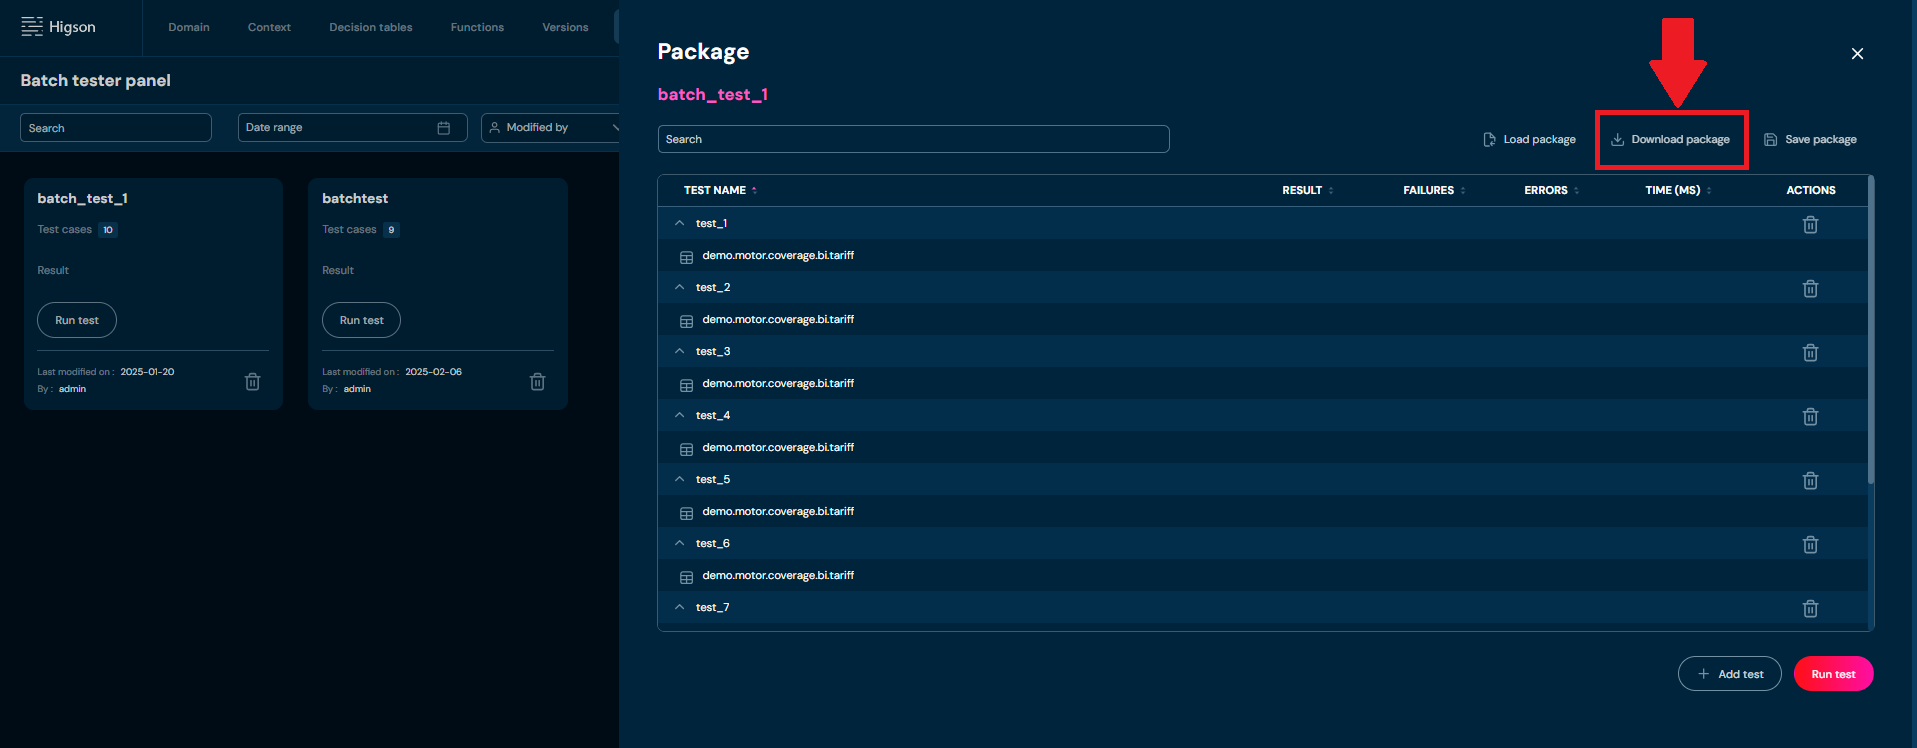
| 2. | Download package | Allows to download batch test from XLSx file. |
| 3. | Save package | Saves batch test for further use. |
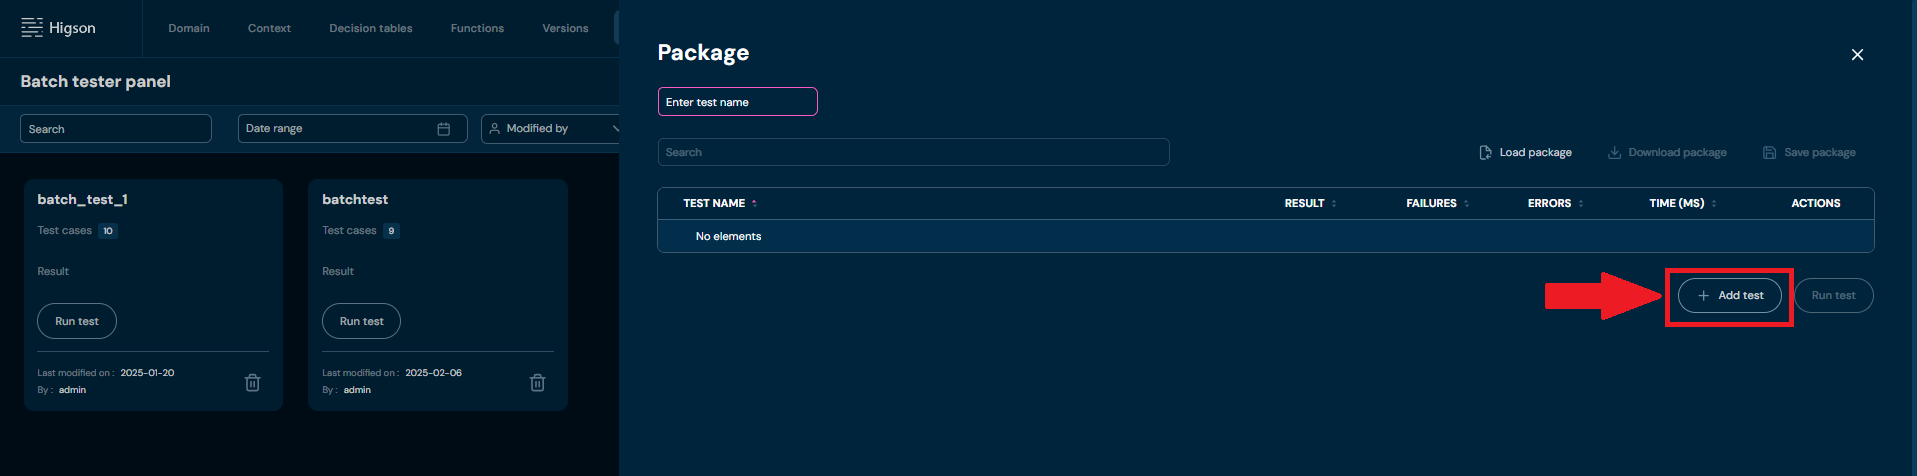
| 4. | + Add test | Opens a batch test creator. |
| 5. | Run test | Runs batch test, performs all unit test cases added to viewed batch test. Every batch test can be run (even not saved). |
Creating a Batch Test#
To create new batch test, follow these steps:
-
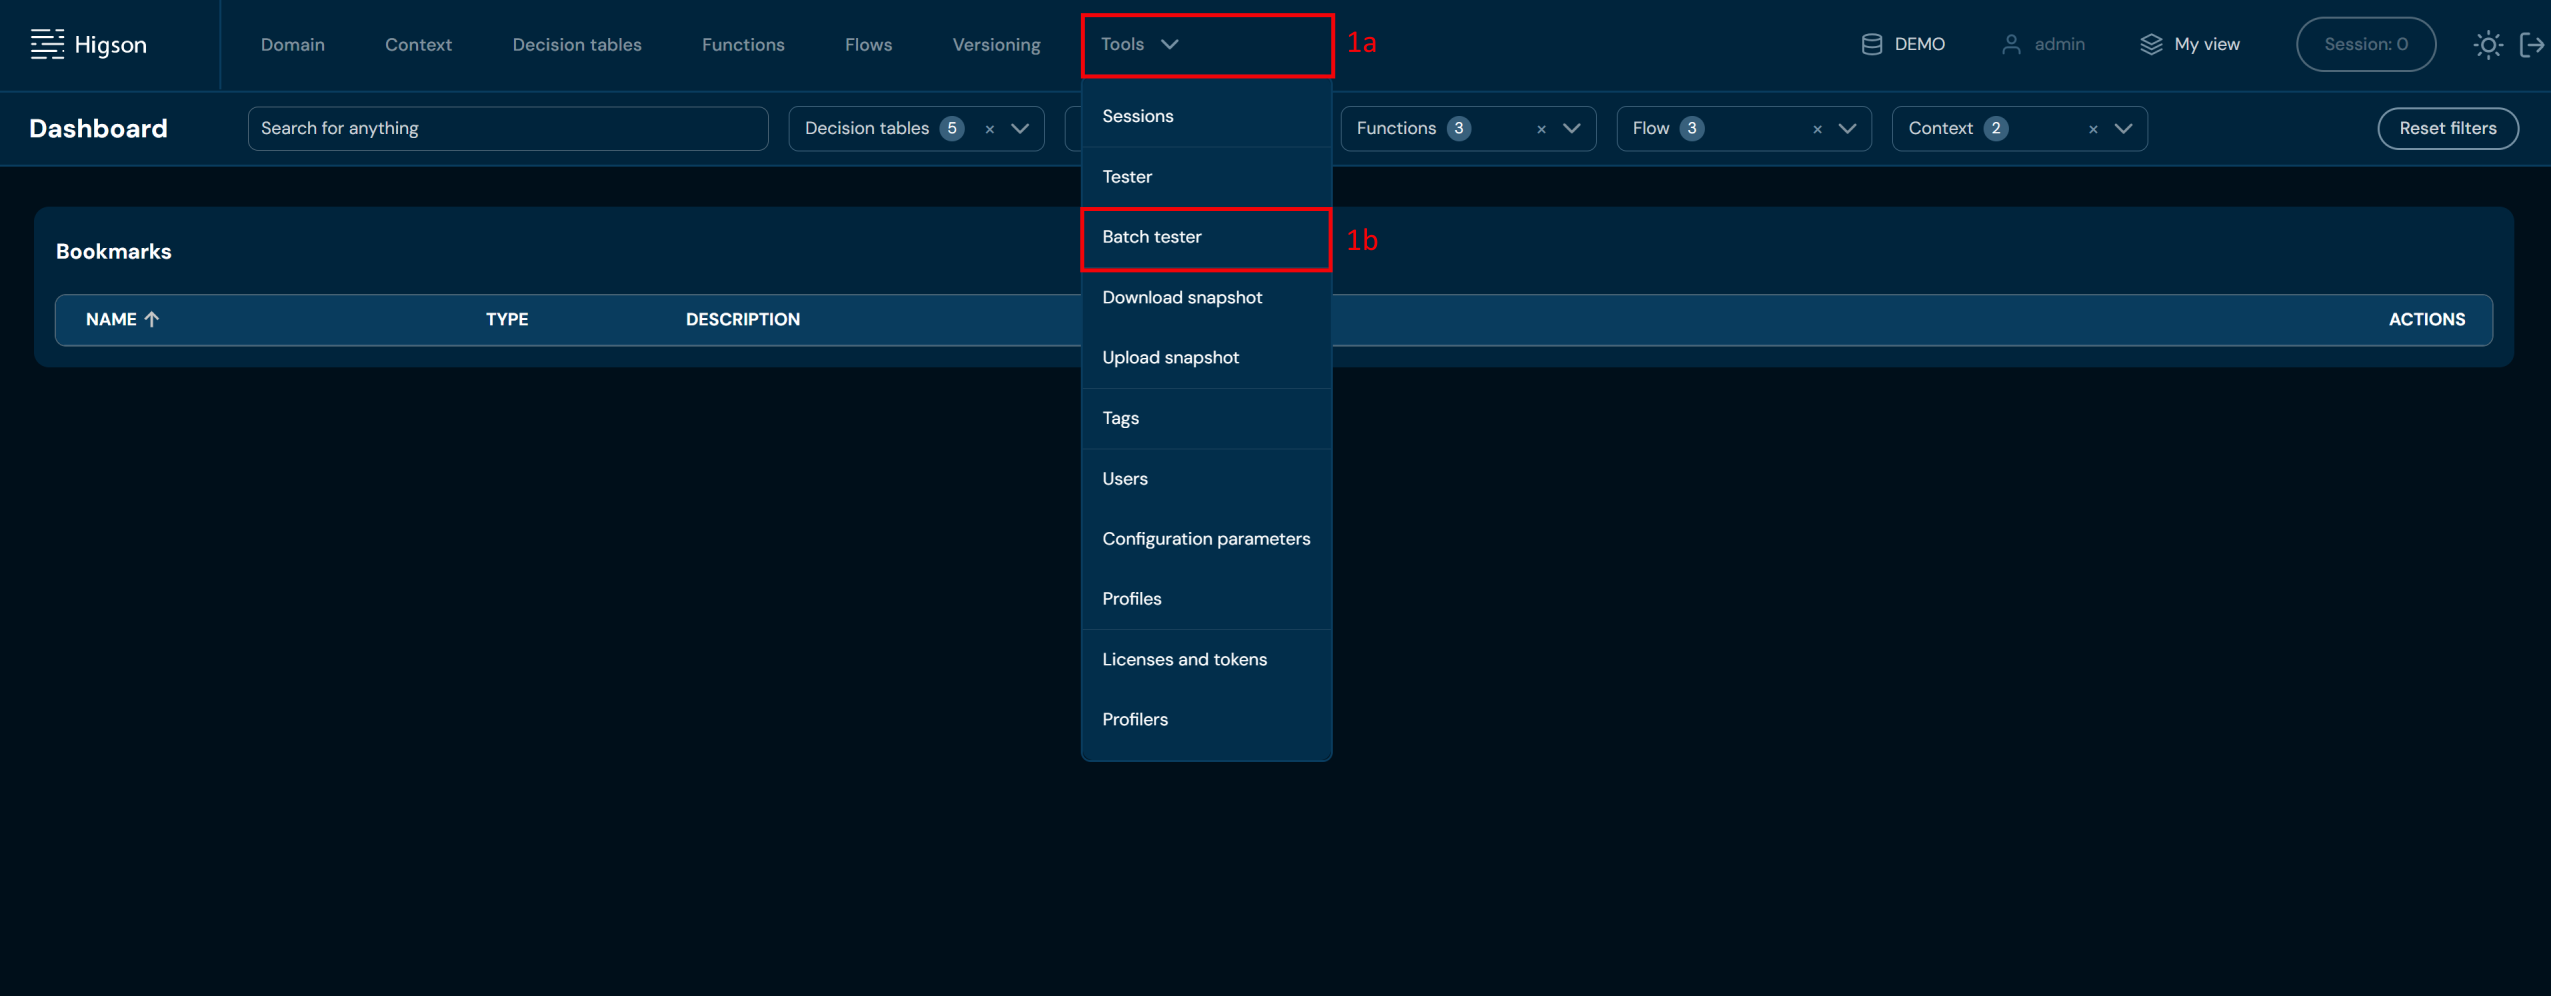
Go to Main Toolbar
a. Select Tools
b. in Tools select Batch Tester
-
Click “Add test package”
-
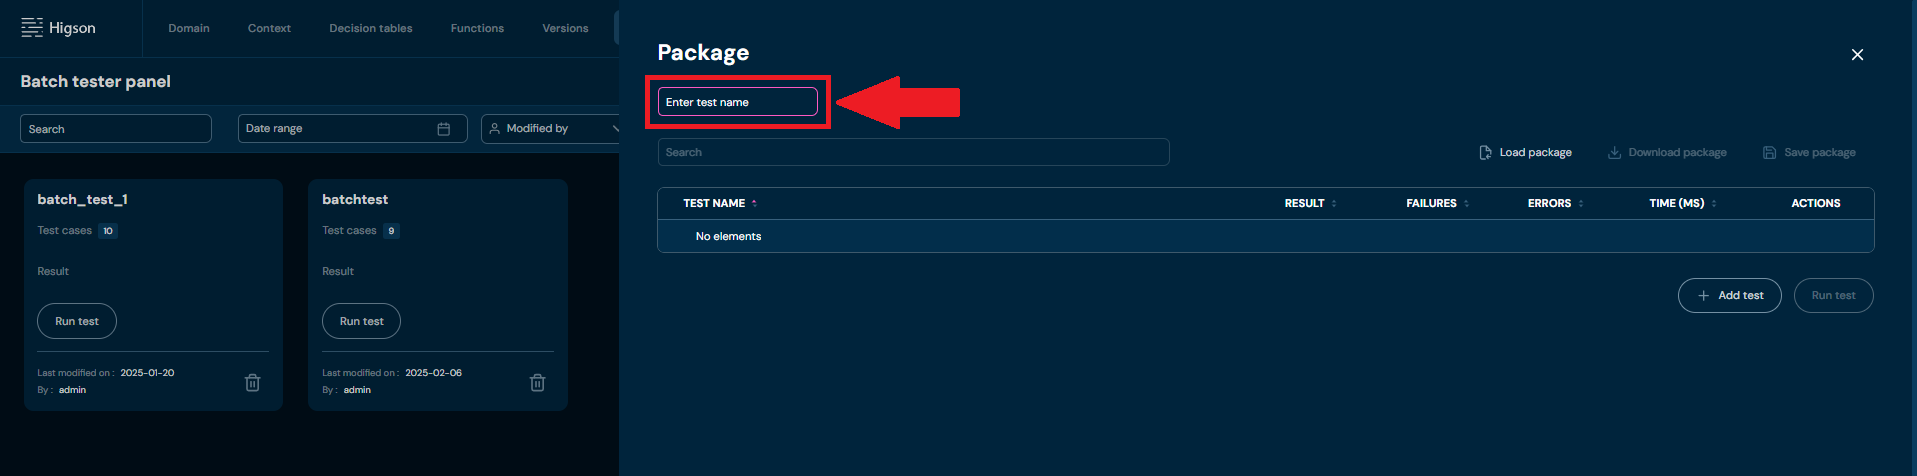
Your first action should be filling the Name for the Batch Test. Name can contain only characters from collection a-z; A-Z; 0-9; “-”; “_”.
-
Next click +Add test
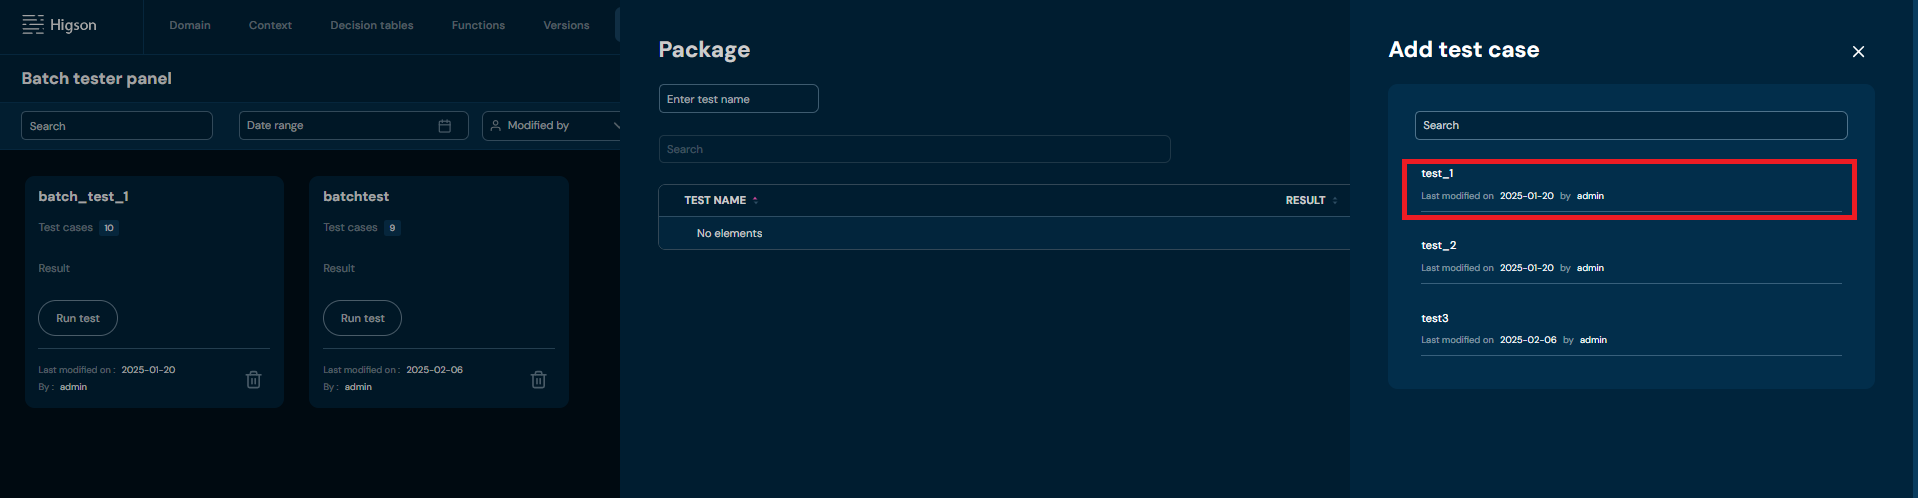
a. Select unit test you wish to base the batch test on
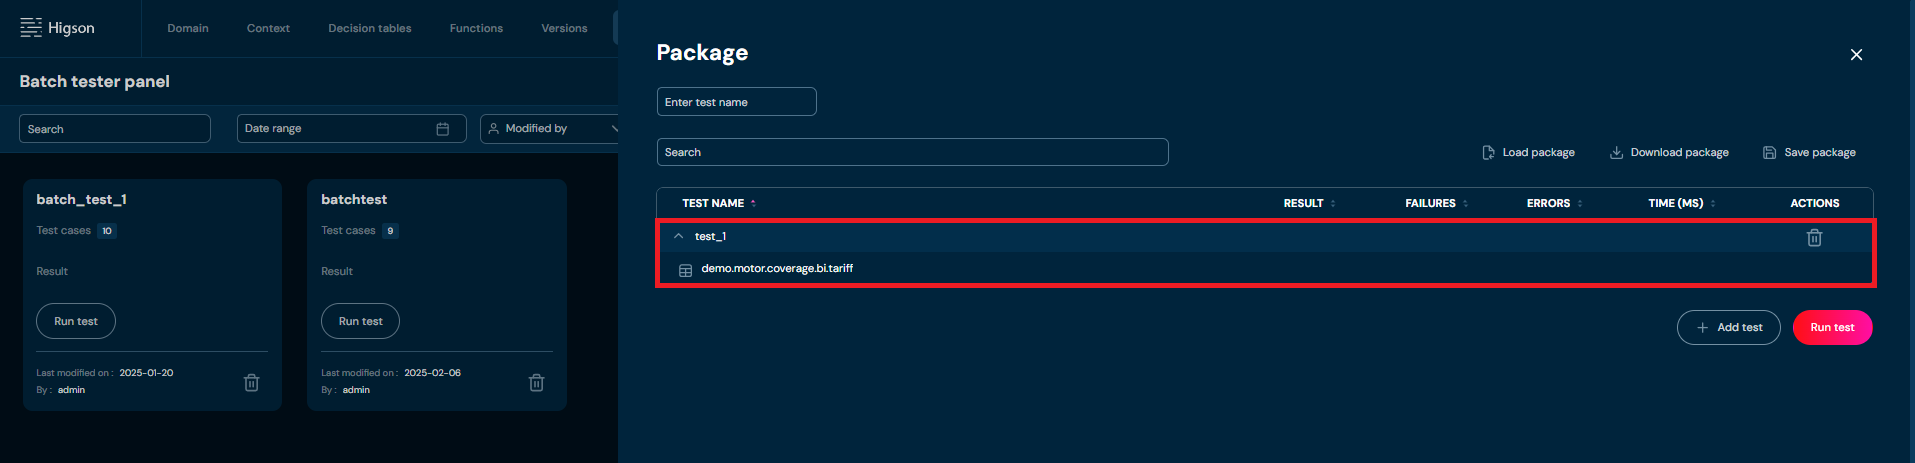
b. If test loaded correctly to batch tester it will show on the list of the unit tests
-
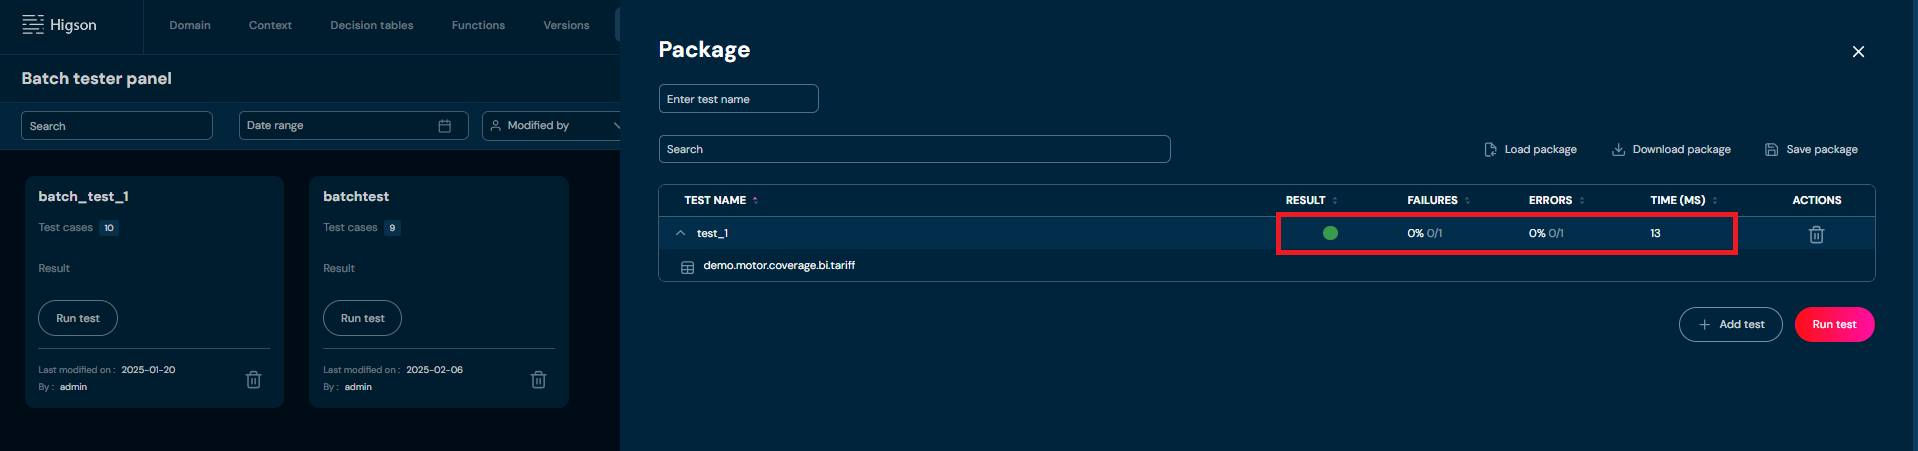
Click on Run test to get the results
-
Now, when the template has been provided you can Download the batch test to your computer as XLSx file. Click on Download package

-
Open the XLSx file
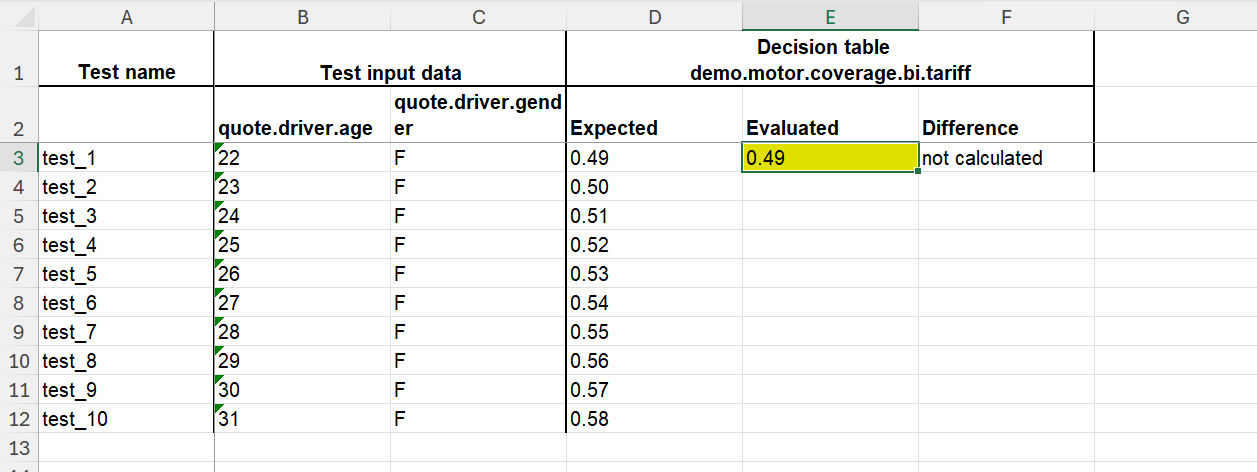
a. The template should look similar to this

b. add data series according to your needs
c. save the edited file
-
Load the batch test:
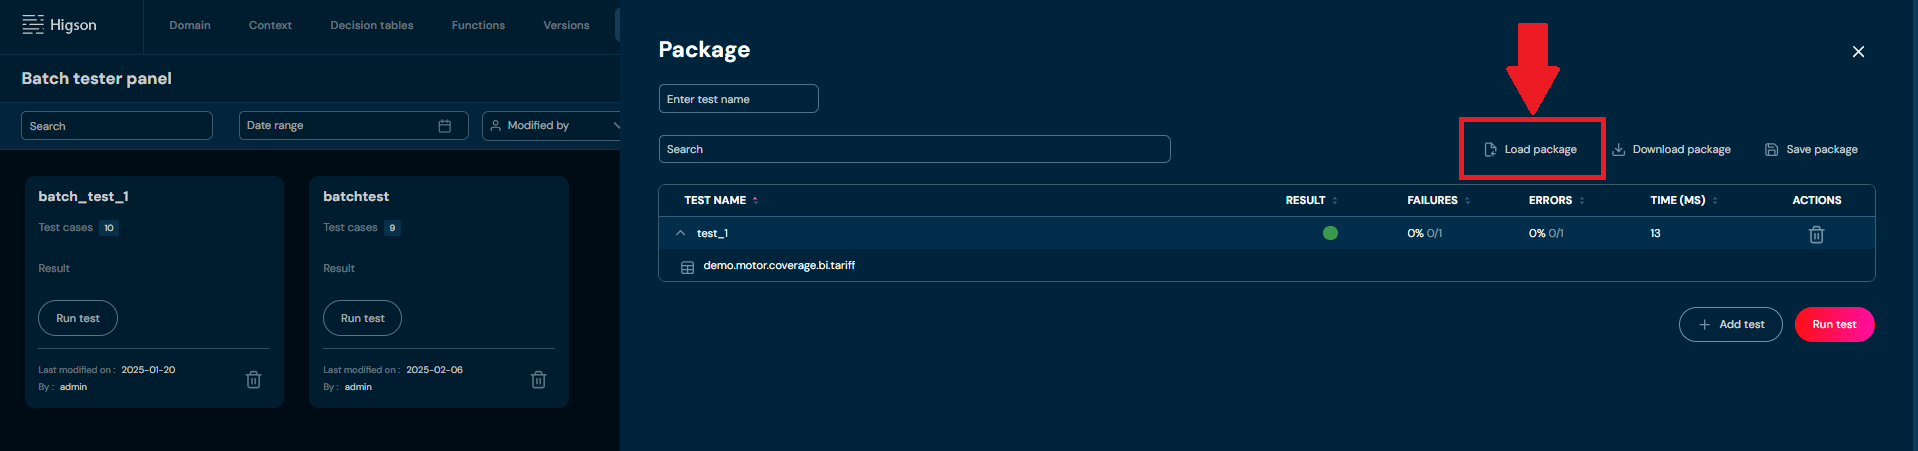
a. Click on Load package
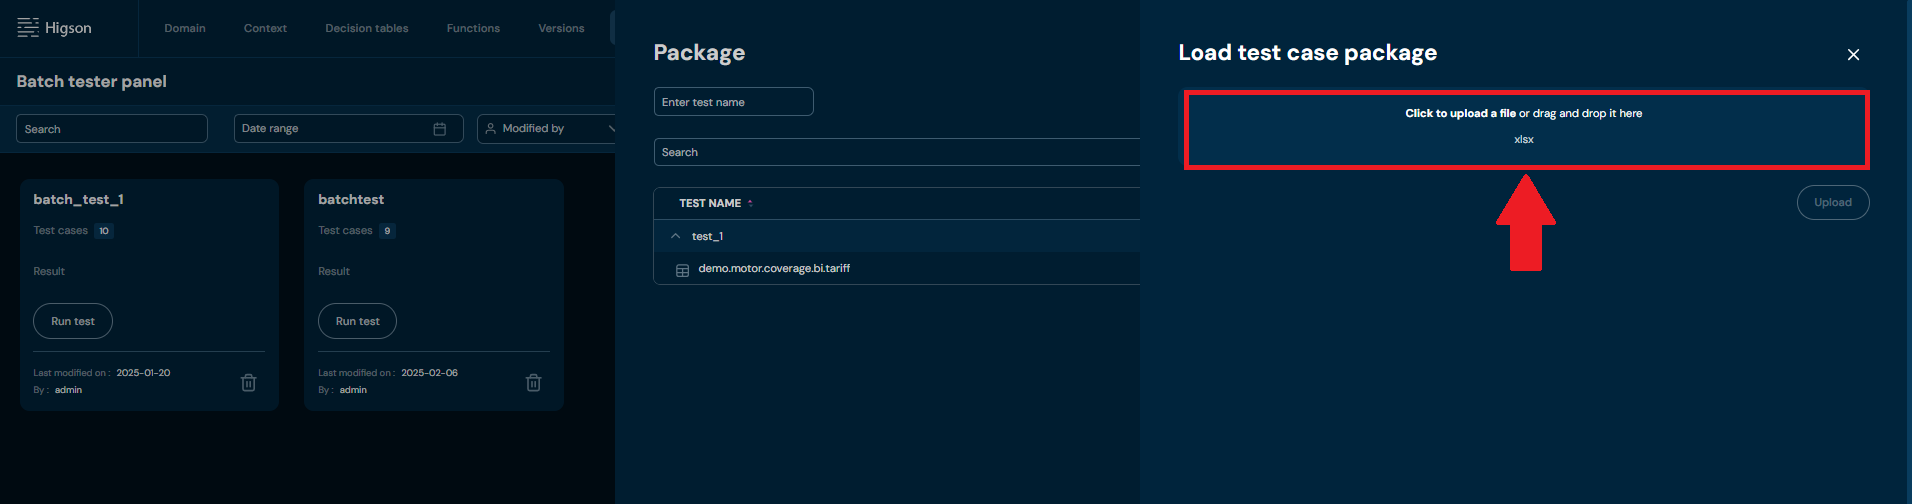
b. Load the updated file from your computer
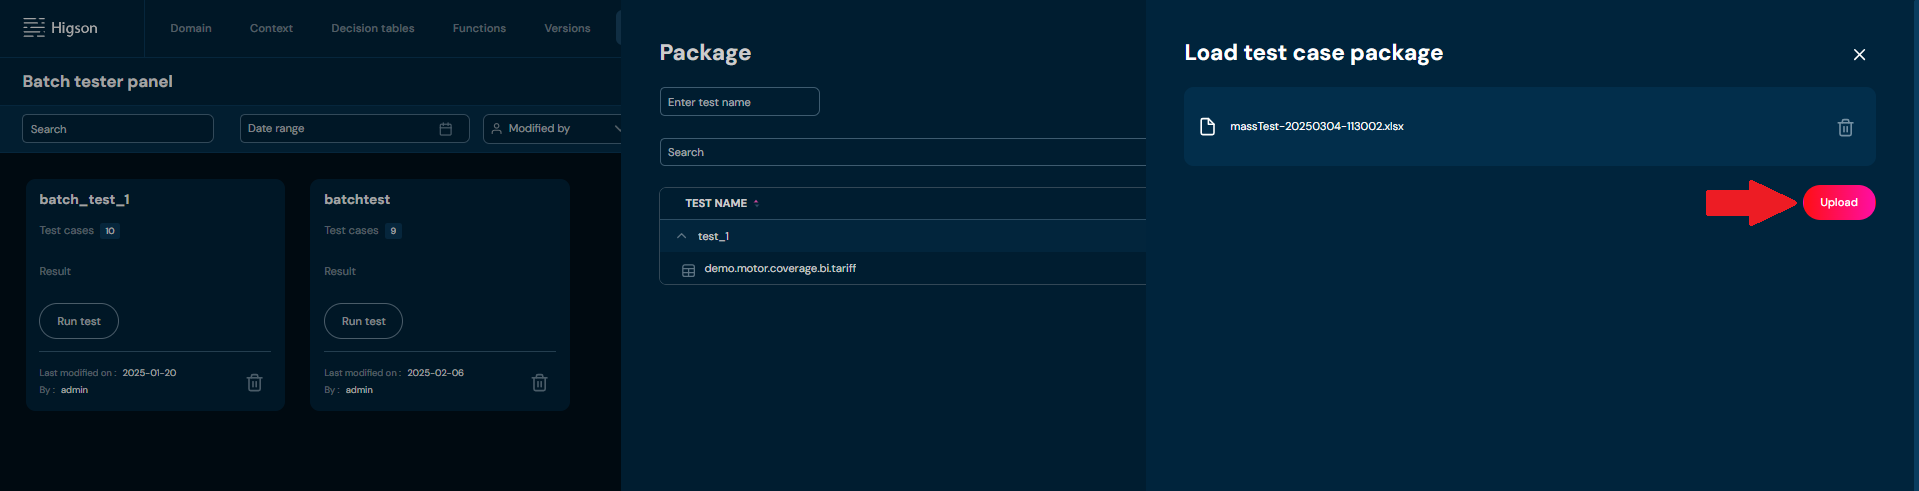
c. Click Upload
-
When the file is loaded correctly and you will click Run test again the result of all loaded test cases should show
-
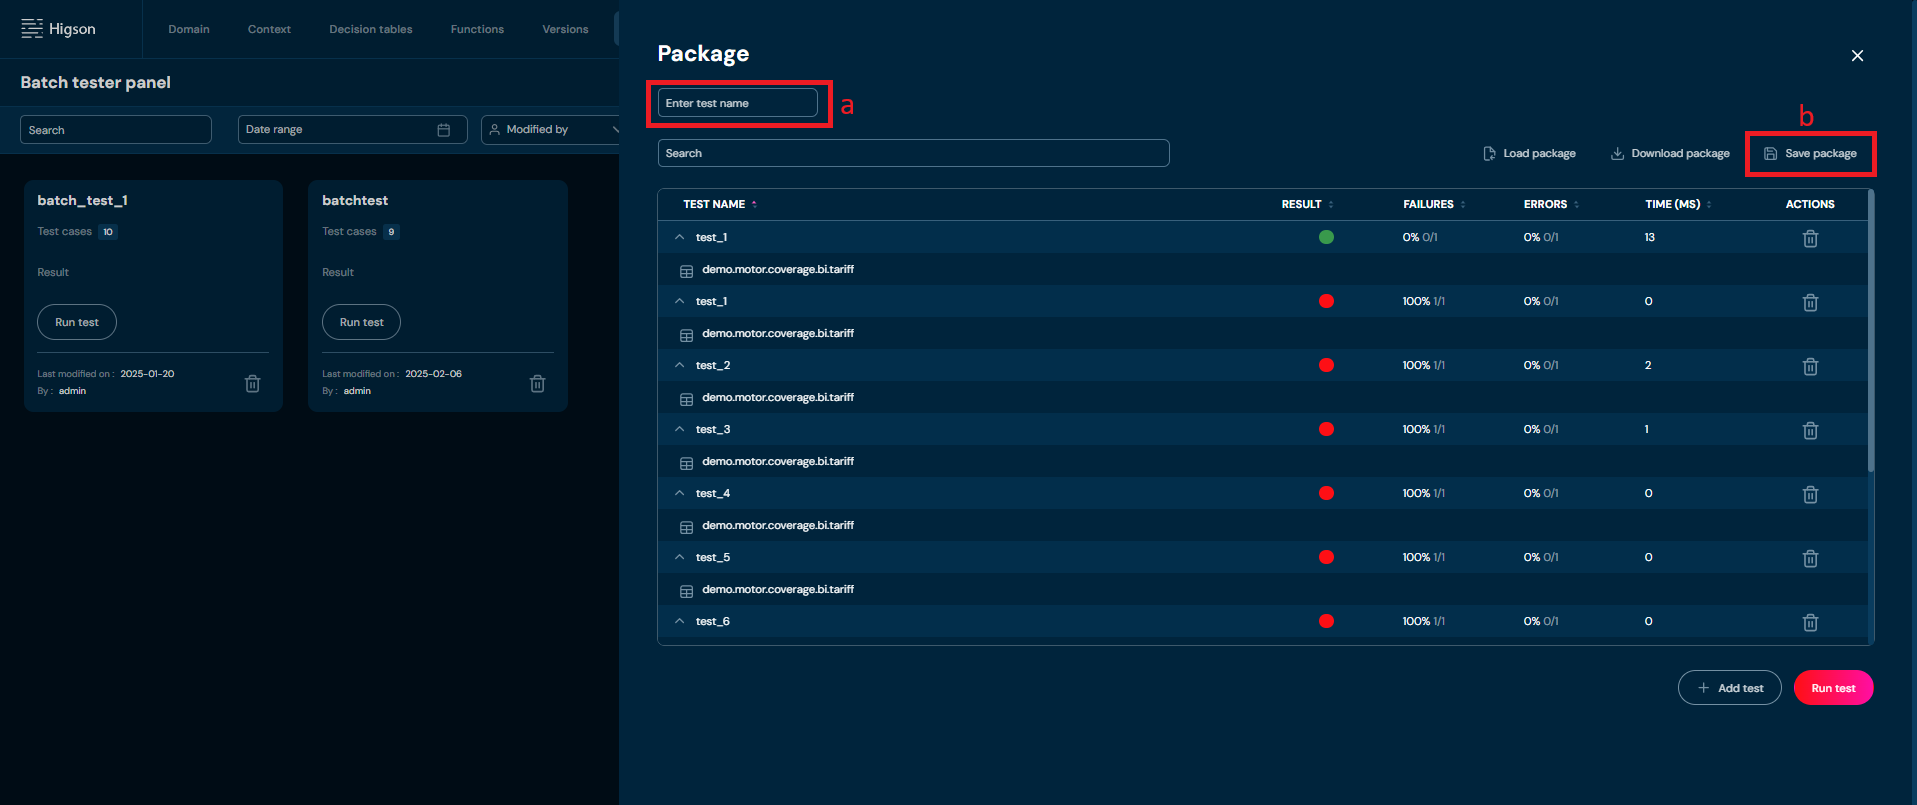
Lastly, to be able to get back to created batch test case you must save it by clicking : Save package:
a. add the name for the batch test, if you have not added it yet. For Batch test name allowed characters are a-z, A-Z and symbols: -_
b. click on Save package
Load a Batch Test#
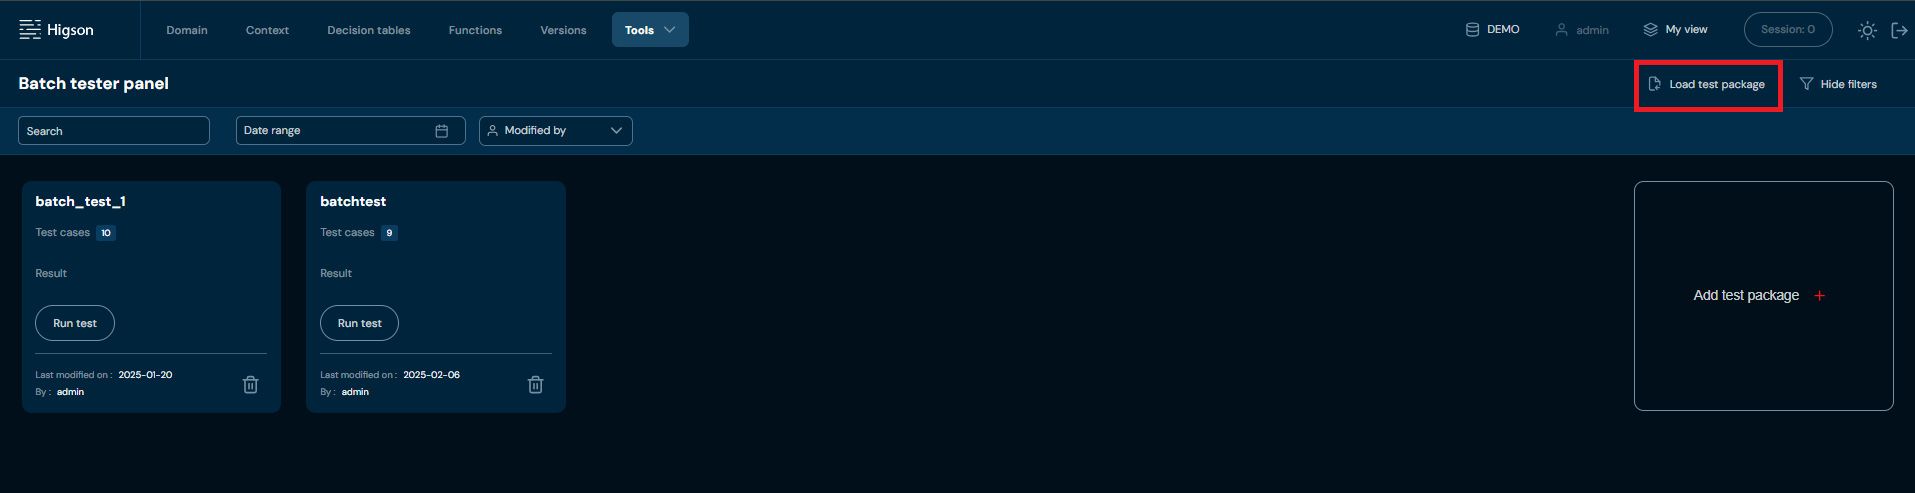
You can load test package in two ways. First from the Batch Tester Panel:
-
Click on Load test package:
-
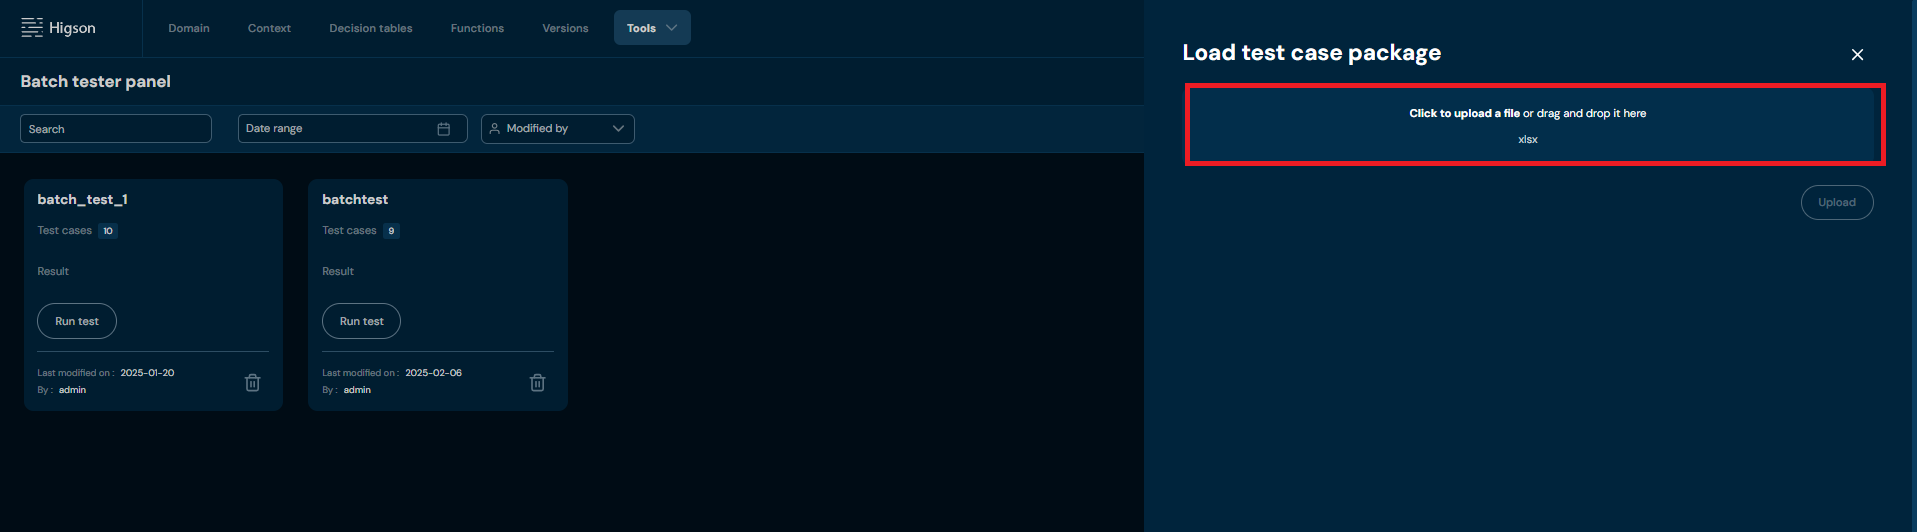
Load the file from your computer
-
Click Upload button to accept the selected file for upload
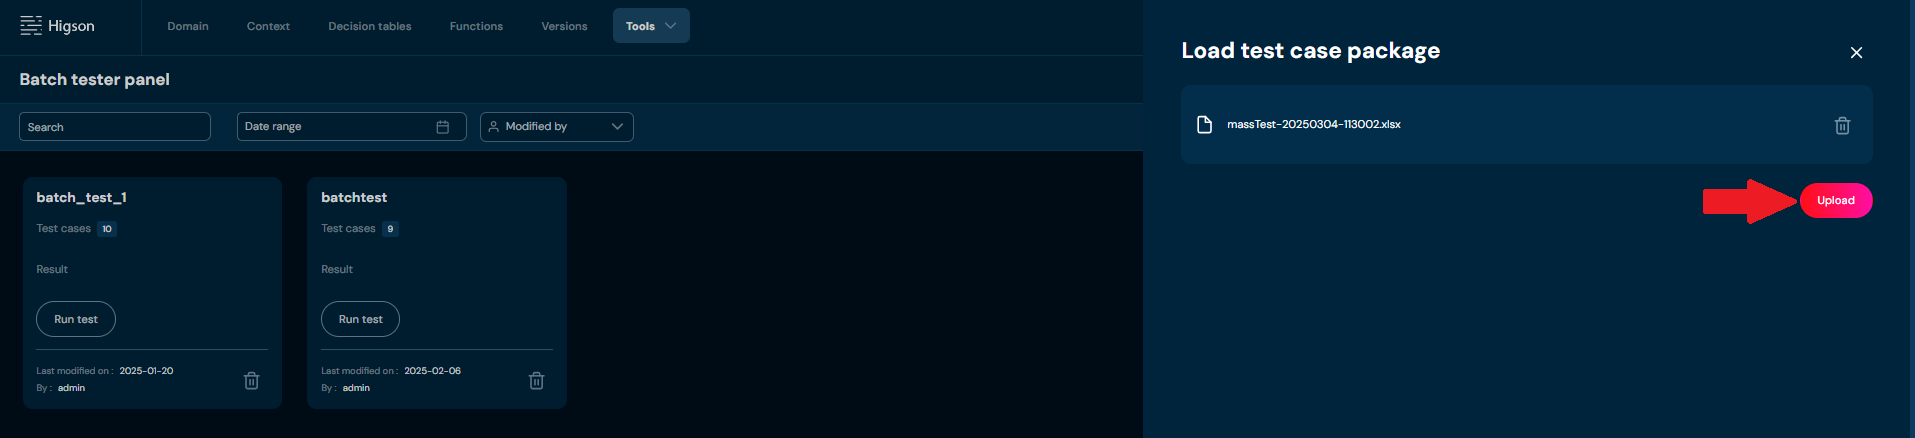
-
The uploaded batch test should show on the list
The other way is to create new batch test:
-
In the Batch Tester Panel click on Add test package (in tile view)
-
On batch test creator view, in action panel click on Load package
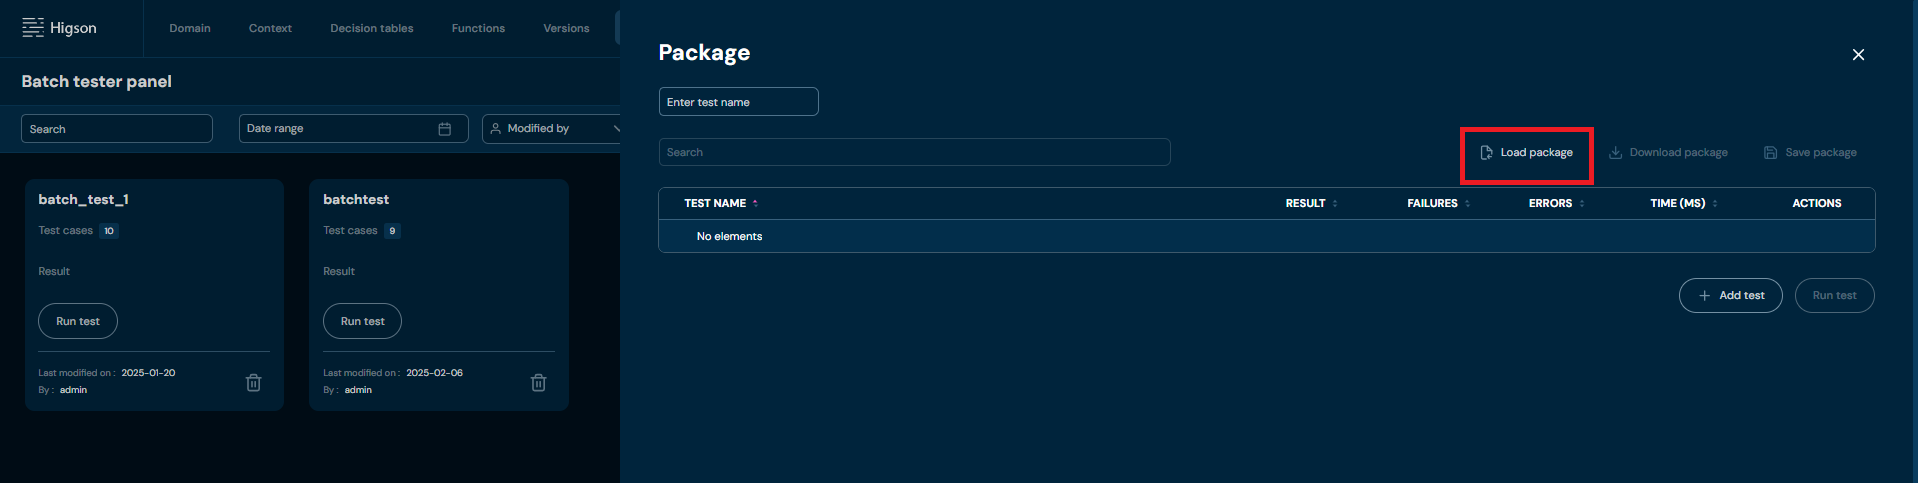
-
Select the XLSx file with the definition of the batch test
a. Load file
b. Click upload
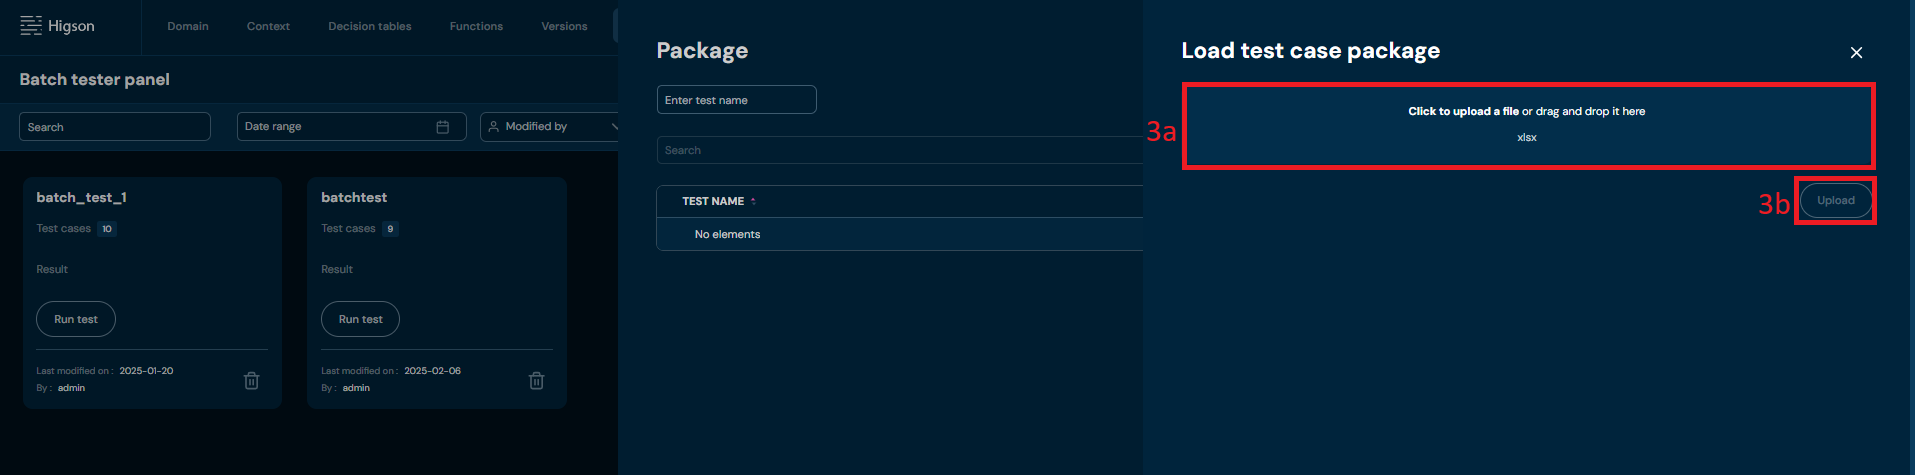
-
After successful upload remember to:
a. Provide the batch test name
a. Save the batch test
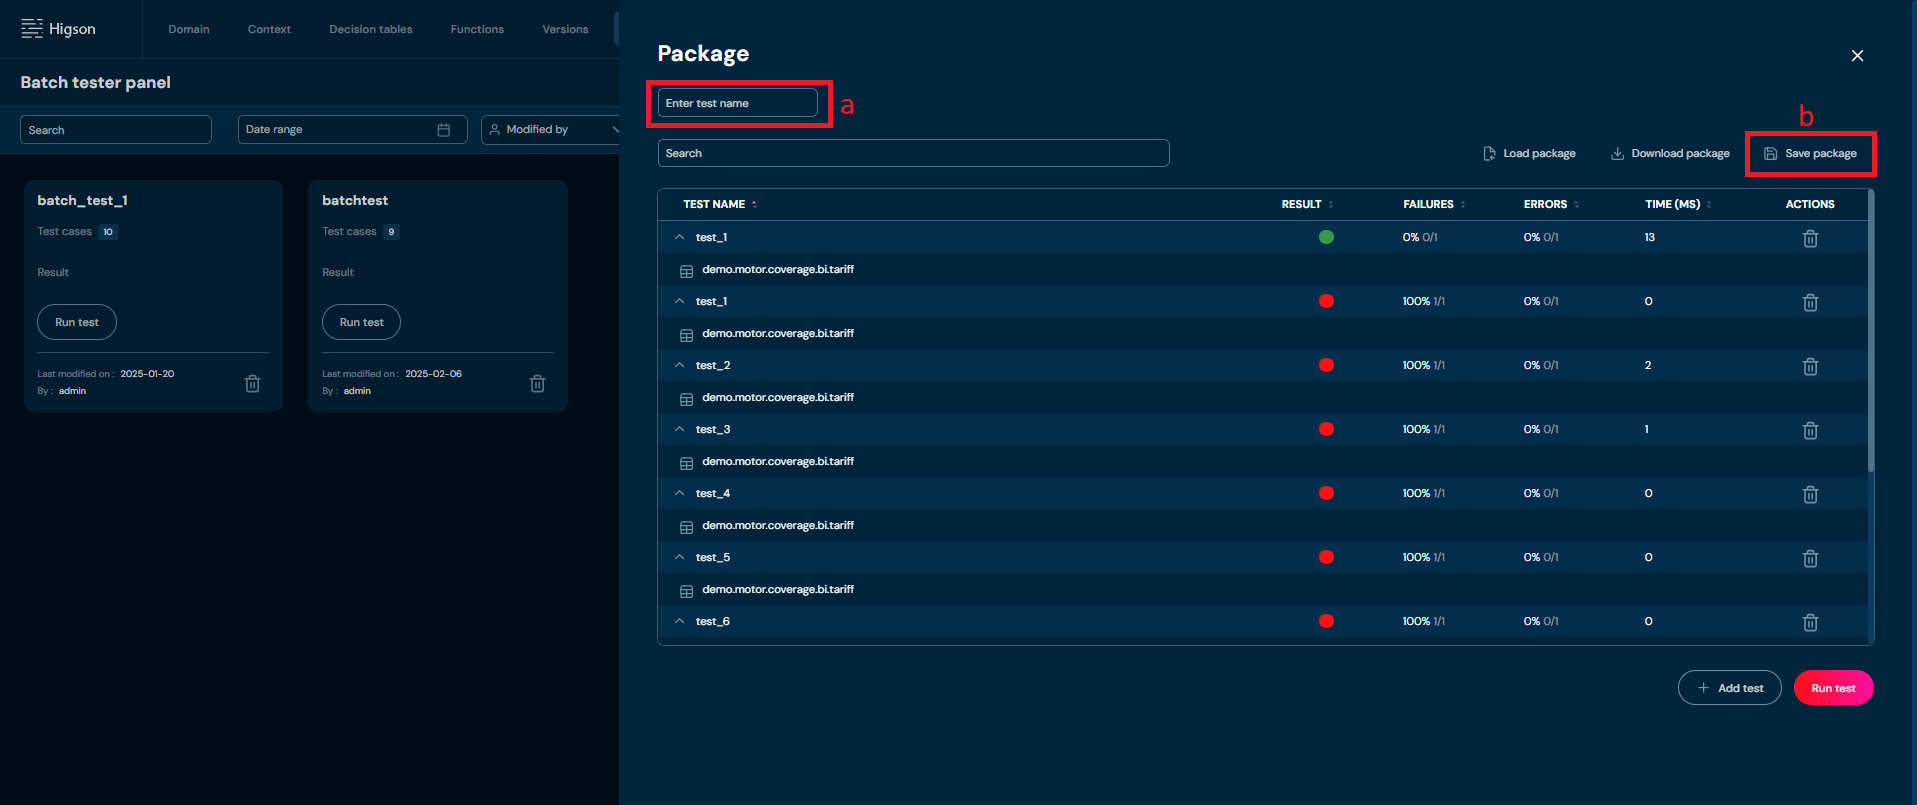
Download a Batch Test#
When working on selected batch test:
-
Click on Download package
-
The XLSx file will be generated with definition of the batch test, save the file.
Reading & Editing the XLSx File#
Each XLSx from batch test is created according to the rules:
- There are always three sections with data
- Each section may have multiple columns
- Data sections are separated by the bold line
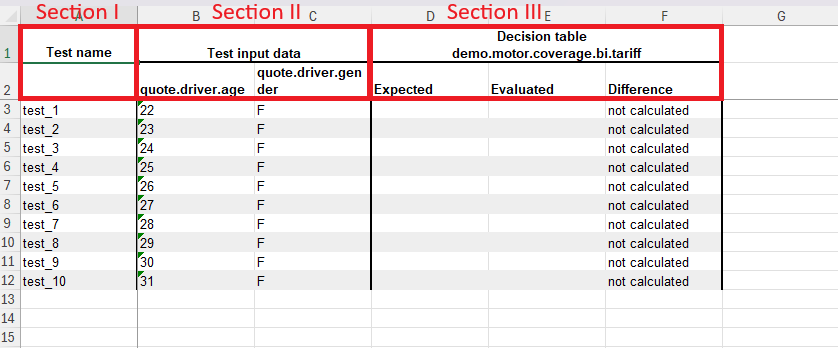
First section:
- contains one column with the test case name
Second section:
- contains columns for input data involved to the test case. Column headers are indicators of what kind of variable is needed. Usually in the context header is a context path which is used in tested elements.
Third section:
- for each tested element three columns are created
- first column contains expected value for one of the tested elements
- second column contains evaluated value for the tested element
- third column contains value of the difference between calculated result and expected result
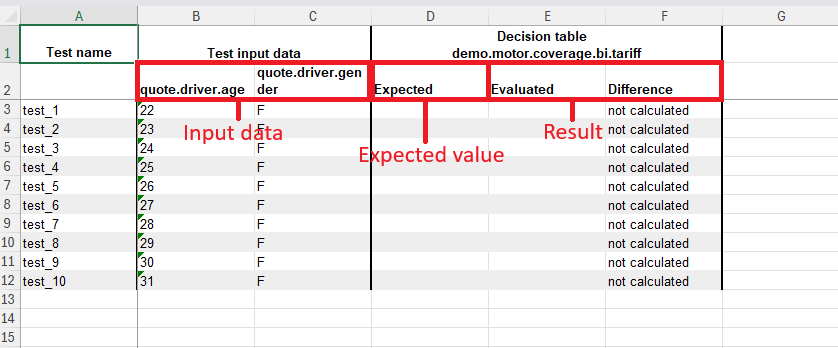
In the header are stored:
-
Type of element in the test case
- Attribute for domain business attribiute
- Decision table for decision table
- Function for function
-
Code of that element
- in case of Attribute after element type domain path is given
- in case of Decision table or Function under element type element code is given
The following values are stored in the columns of the third section:
- Expected - expected value to check if the test case is correct. The value must be provided by business users.
- Evaluated - for columns holding values evaluated by the algorithm
- Difference - for the value of the difference between what was calculated and what was expected
Run Batch Test#
To Run an existing batch test follow these steps:
-
Go to Main Toolbar
a. Select Tools
b. in Tools select Batch Tester
-
You will see Batch Tester Panel, filled with all existing batch tests
-
Click on selected batch test, to view it’s details
-
Batch test view, in our example:
-
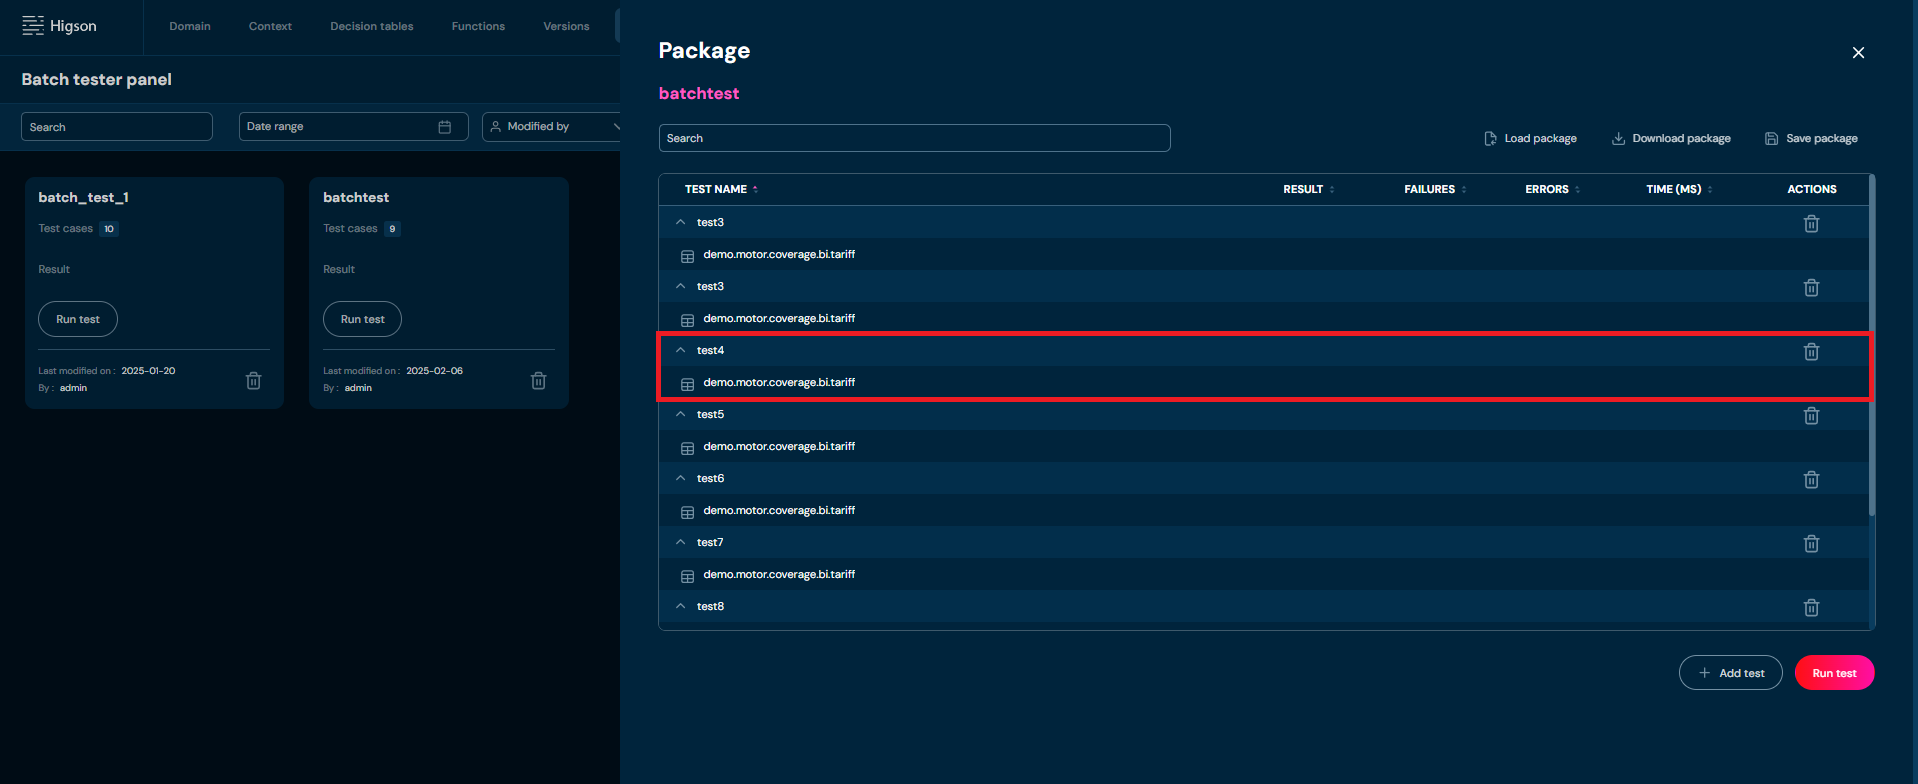
When you click on selected test
-
Here you are able to view test details and if needed change:
a. Input values
b. Expand Elements to test screen
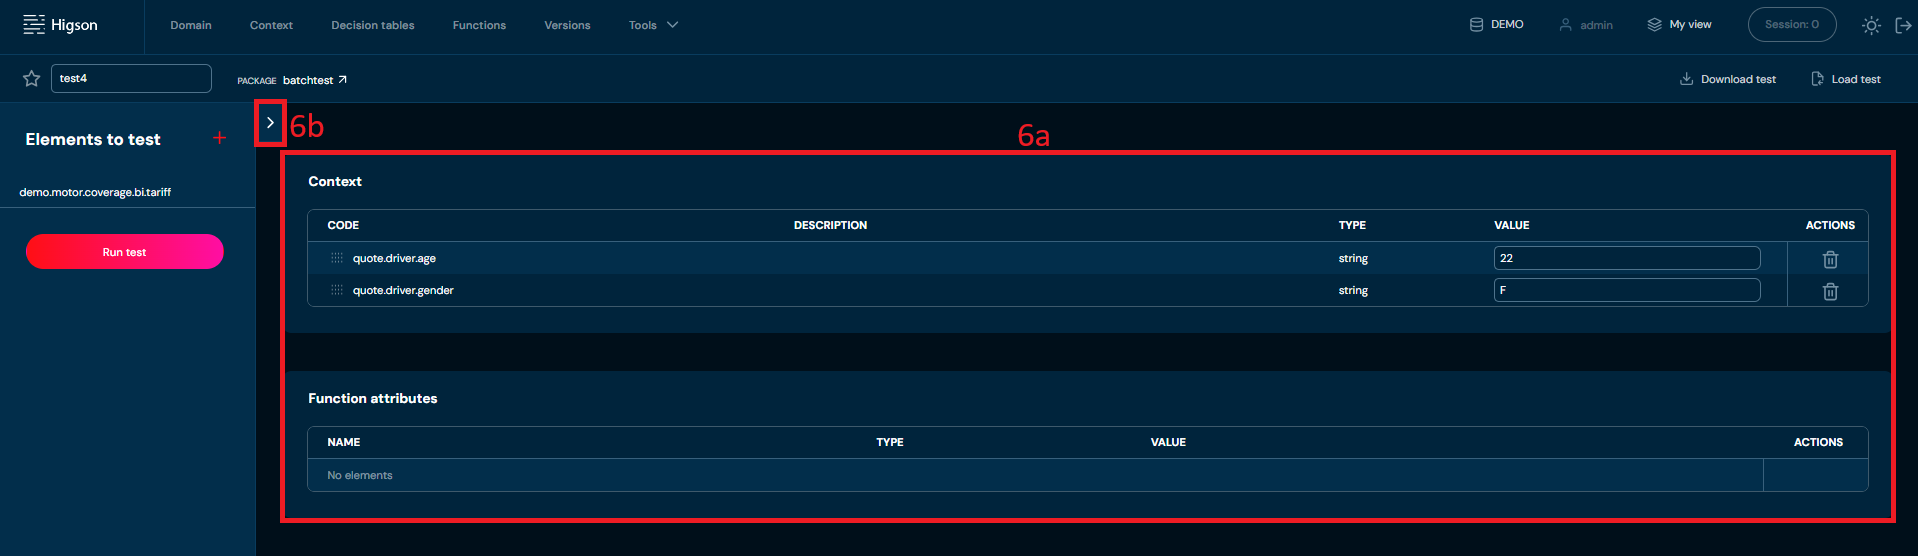
c. Expected values
d. Or even change tested elements in selected unit test case (full description on how to create and edit
Unit Test Cases can be found in the User Guide Tester chapter)
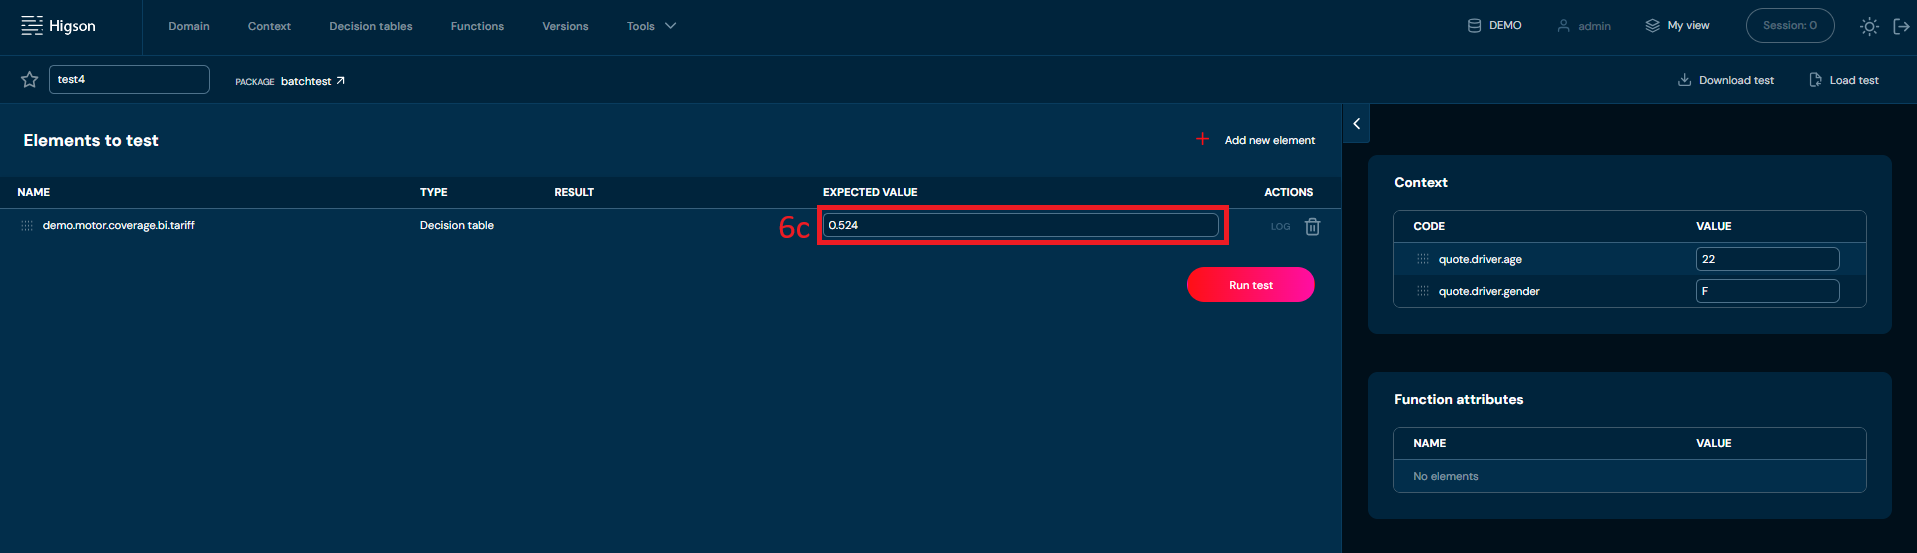
-
When all the changes are made
a. If you want to save this Unit test and be able to view it in singular Tester just click Save test
b. It’s not obligatory to Save test as you would in Unit Tester. Just get back to the batch test by clicking the Package button
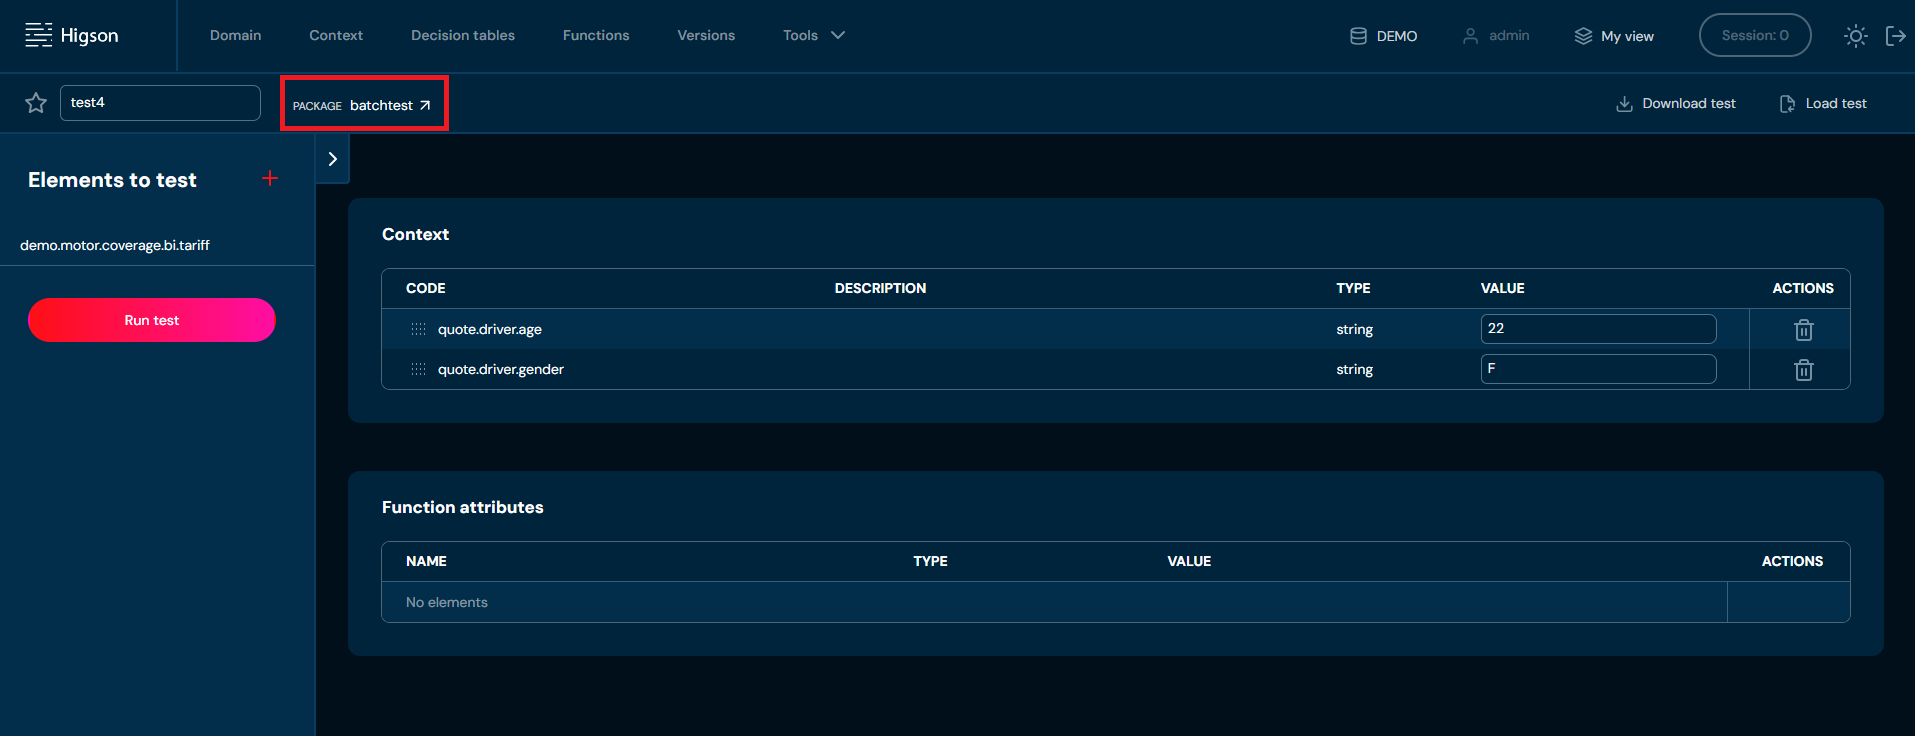
-
On the batch test view click Run test package to perform your tests
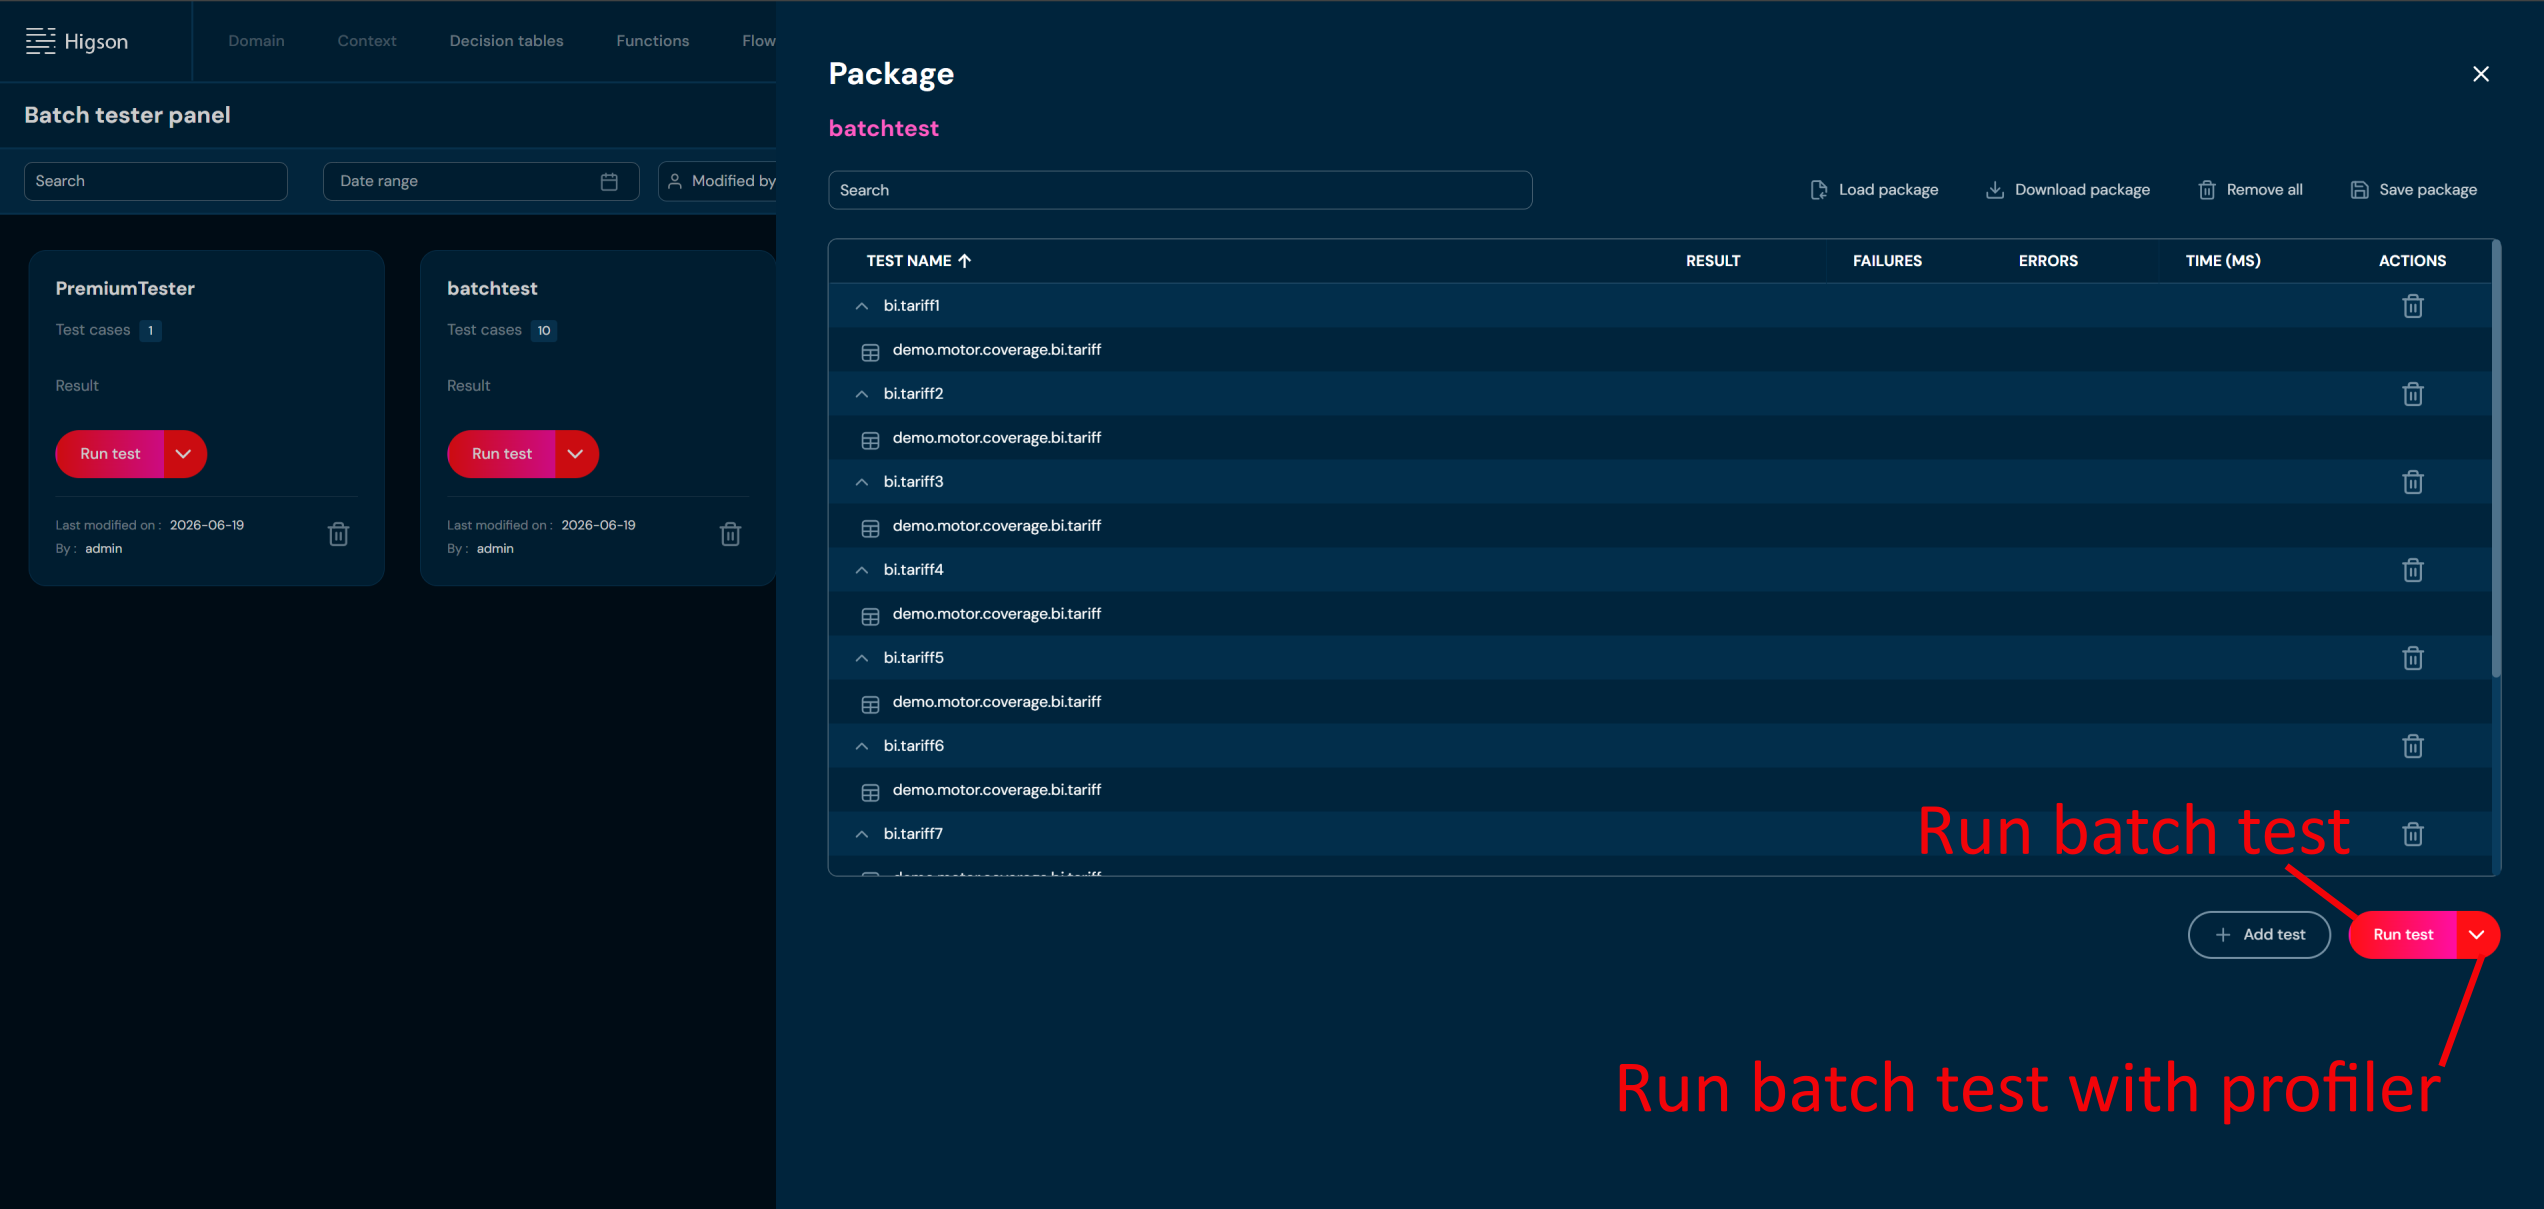
If you want to run a batch test with profiler:
- Select drop-down next to Run test button.
- Select one fo the options By count or By duration.
- Fill in the count/duration [s].
- Click Run.
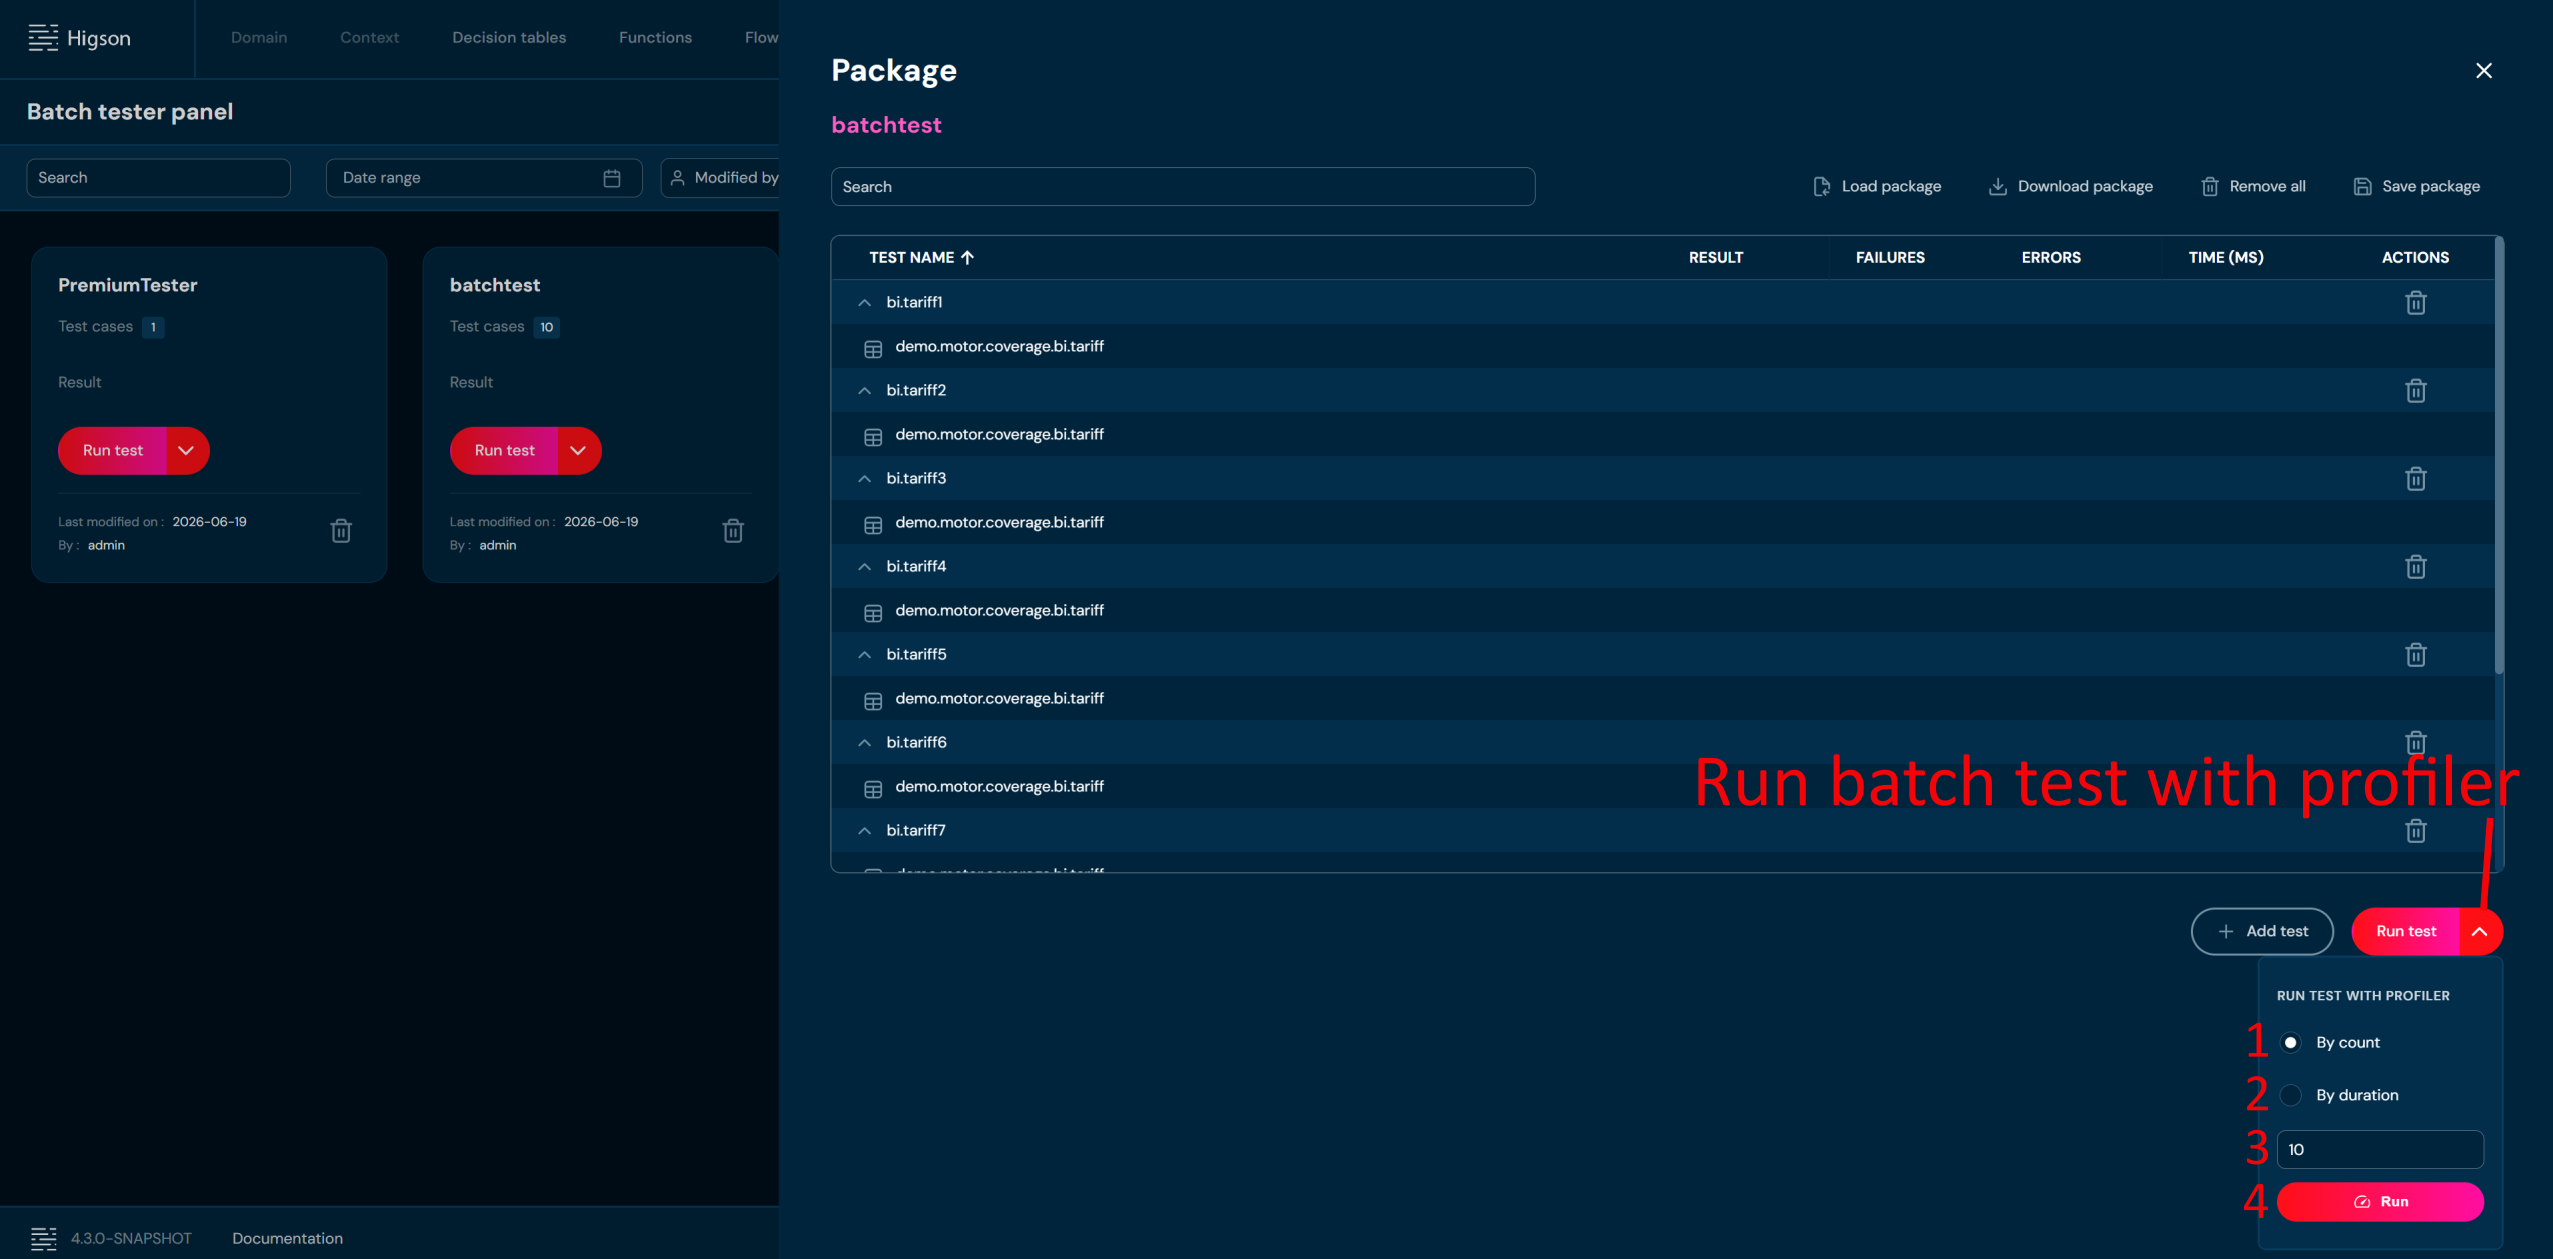
| No. | Name | Description |
|---|---|---|
| 1. | Expand | Click to expand the Run test with profiler options. |
| 2. | By count | Select to run the batch test a specified number of times. |
| 3. | By duration | Select to run the batch test for a specified duration in seconds. |
| 4. | Count/Duration | Enter the number of iterations or duration [s] for the profiler run. |
| 5. | Run | Click to start the batch test with profiler using the selected settings. |
-
For each unit test a result status will show:
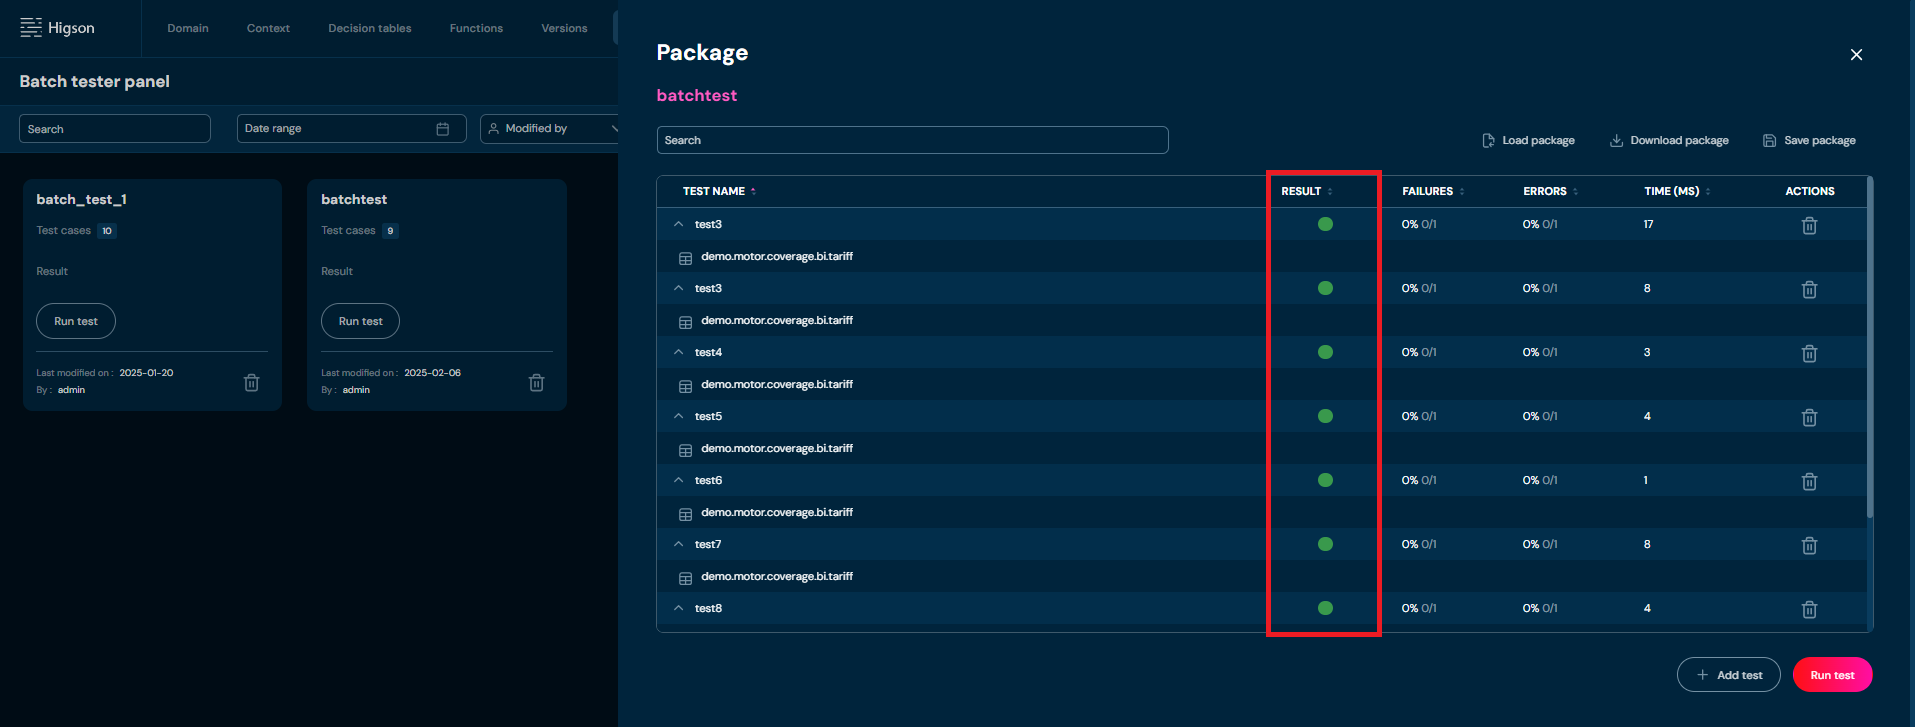
All possible statuses are described here:
No. Status Description 1. Success Green label. When unit test performs without problems and result value is equal to expected value. 2. Failure Red label. Can occur in two situations:
- The result value is not equal to expected value
- The Error occur during performing the unit test -
Beside Status there are other information given by batch tester

| No. | Column name | Description |
|---|---|---|
| 1. | Result | Test case status (Success/Failure) depending on whether test was performed with positive result. |
| 2. | Failures | Number of failures within unit test case. Where evaluated value differs from expected value. |
| 3. | Errors | Number of errors which occurred during the unit test. |
| 4. | Time (ms) | Time taken to perform the unit test. |