In Domain configuration we can create instances of domain types and configure their attributes with use of Decision tables or Functions.
If you are new to Higson Domain, you may want to read the introductory section Introduction to Domain.
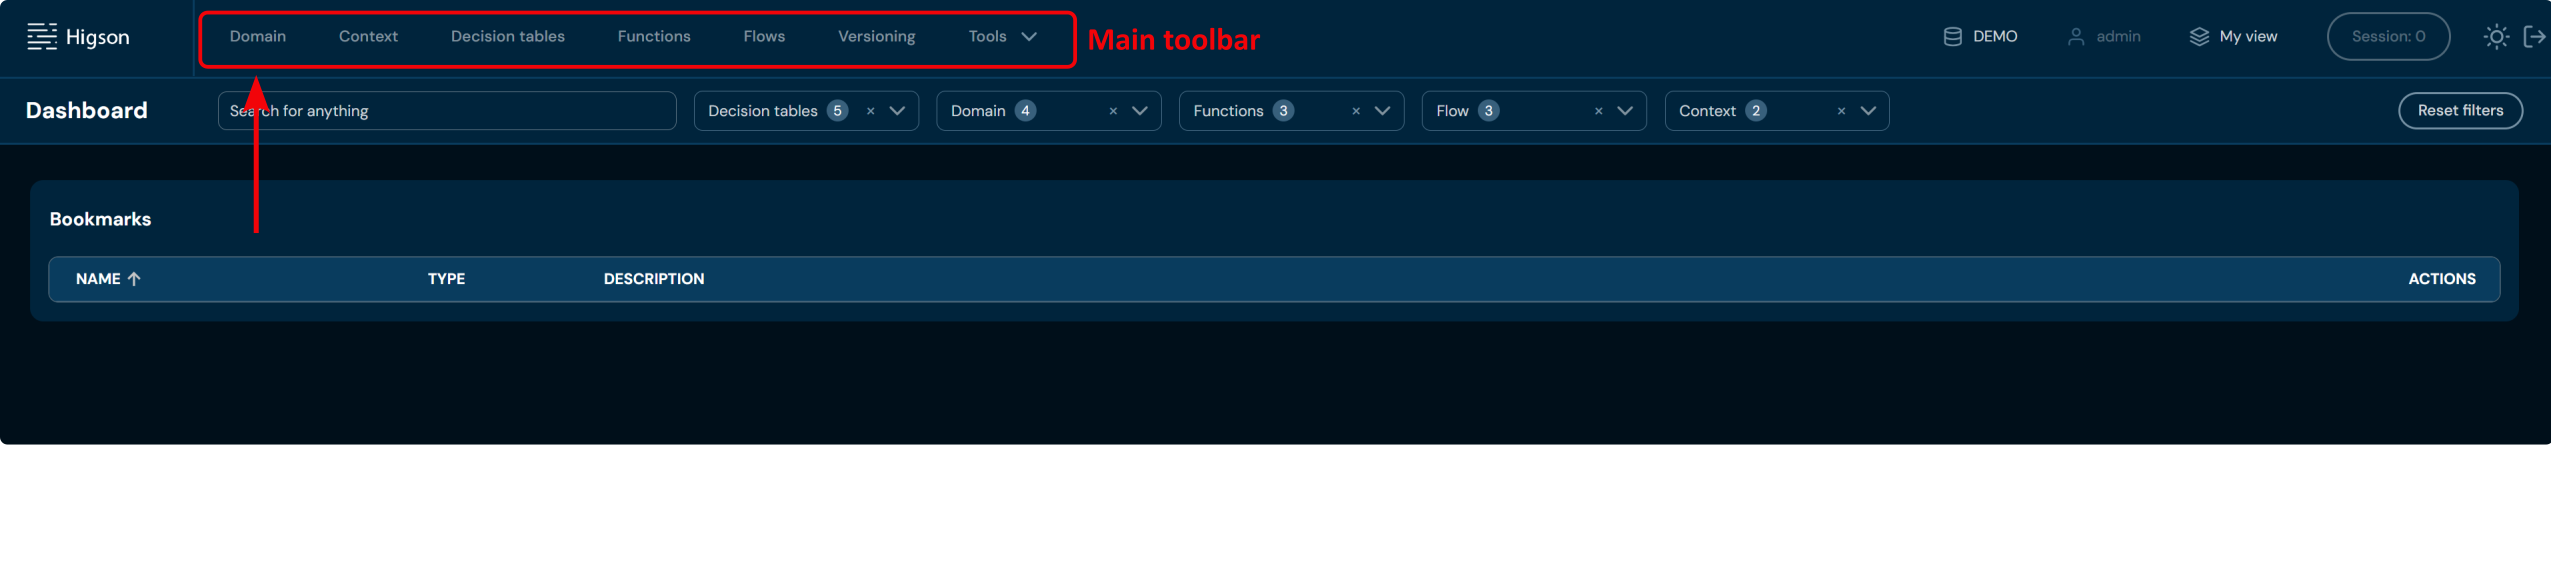
In order to see Domain Configuration, select Domain in Main Toolbar.
After you enter Configuration you will see screen of configuration from ROOT perspective:
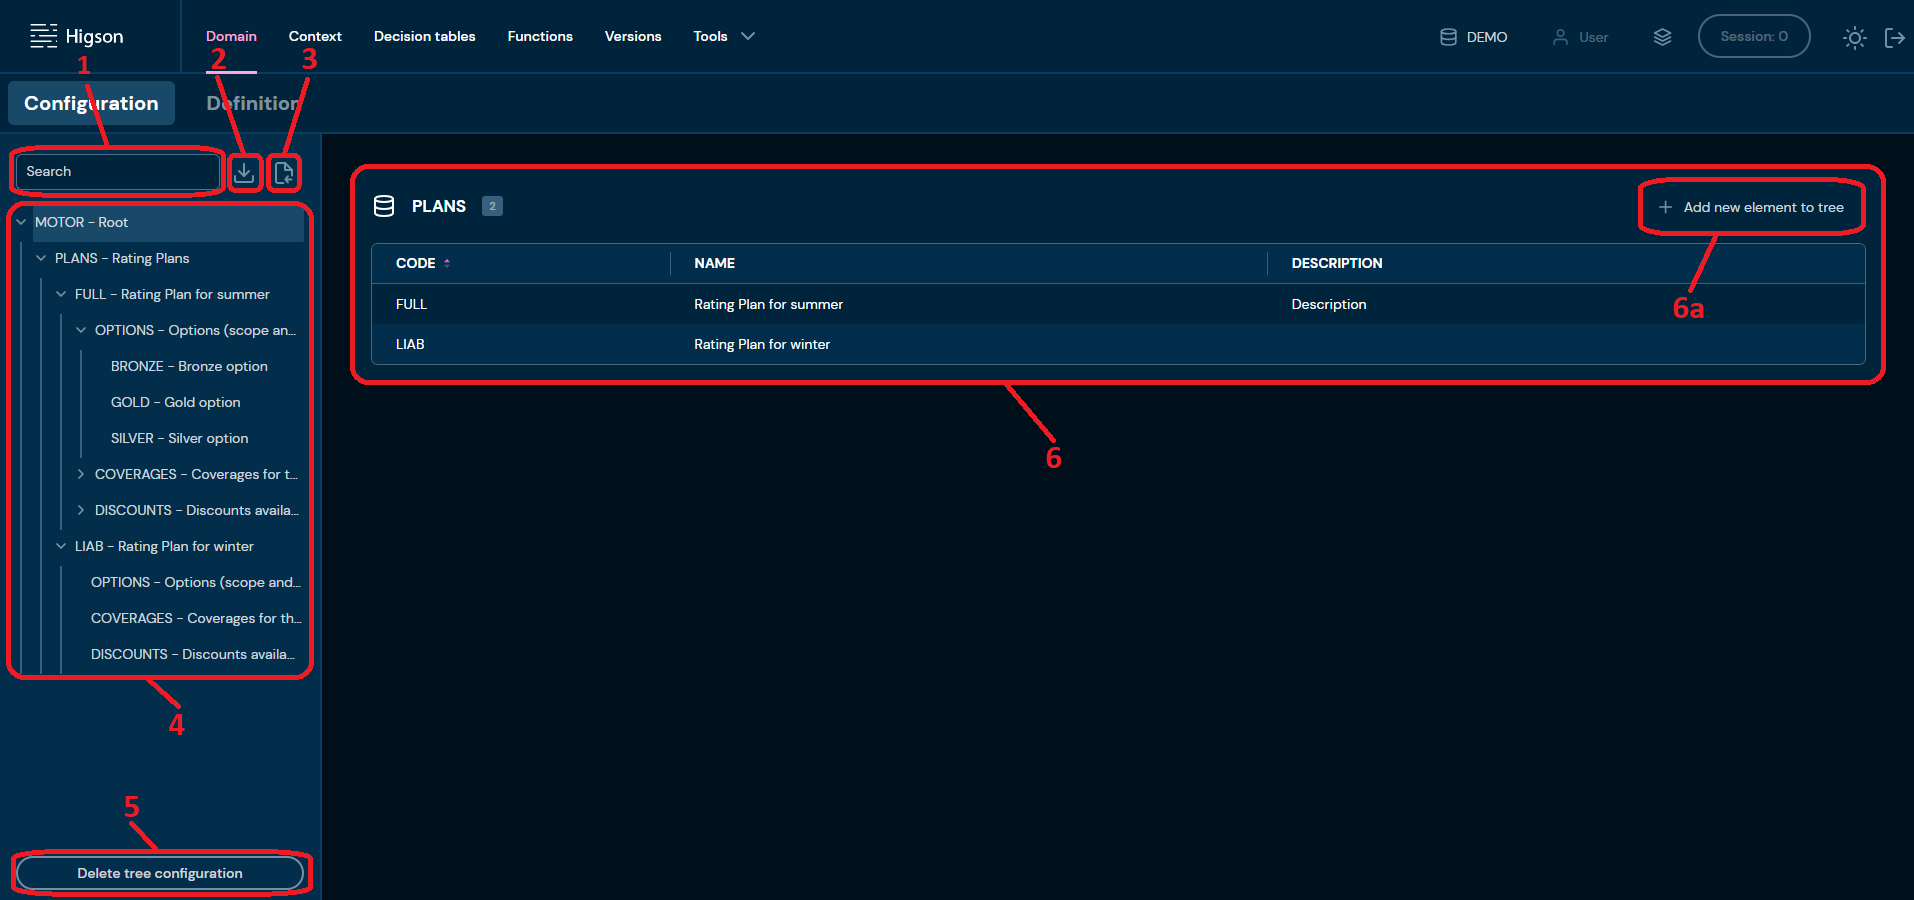
| No. | Name | Description |
|---|---|---|
| 1. | Tree search field | Filter by any string provided by user. Configuration tree navigates to all Elements matching the provided criteria. |
| 2. | Download Domain | Downloads a XML file that contains entire Domain Configuration. To learn more about downloading Configuration go here |
| 3. | Upload Domain | Allows to upload Domain Configuration from a XML file. To learn more about uploading Configuration go here |
| 4. | Configuration tree | Tree structure of your product. |
| 5. | Delete tree | Deletes all Configuration Elements. To learn more about delete all Configuration elements go here |
| 6. | Collection | Collections with all created elements. |
| 6a. | Add new element to tree | Allows to create new Configuration Elements. To learn more about adding Configuration Elements go here |
User can Expand/Collapse a tree by clicking on the arrows.
Configuration Collection:#
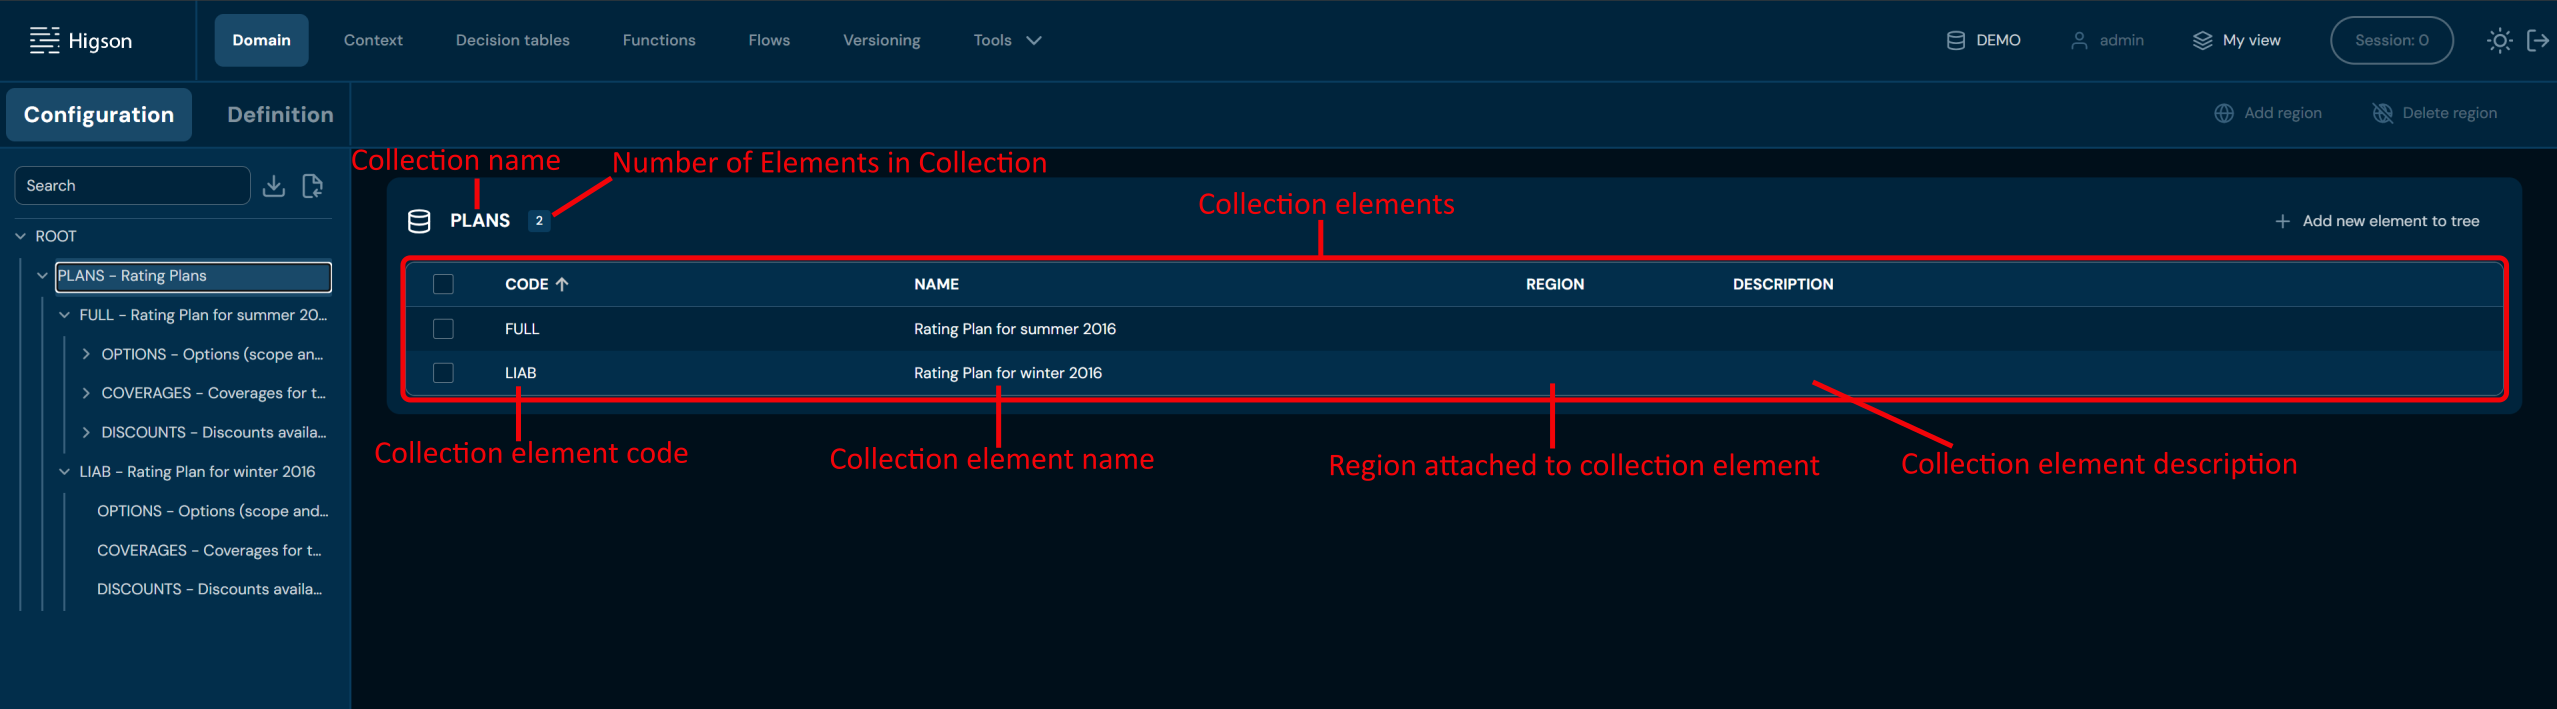
Add New Collection Elements#
If you want to add a new collection elements, follow these steps:
-
Choose Domain in Main toolbar.
-
Navigate to Collection you want to add new elements to.
-
Choose Add new elements to tree in desired Collection.
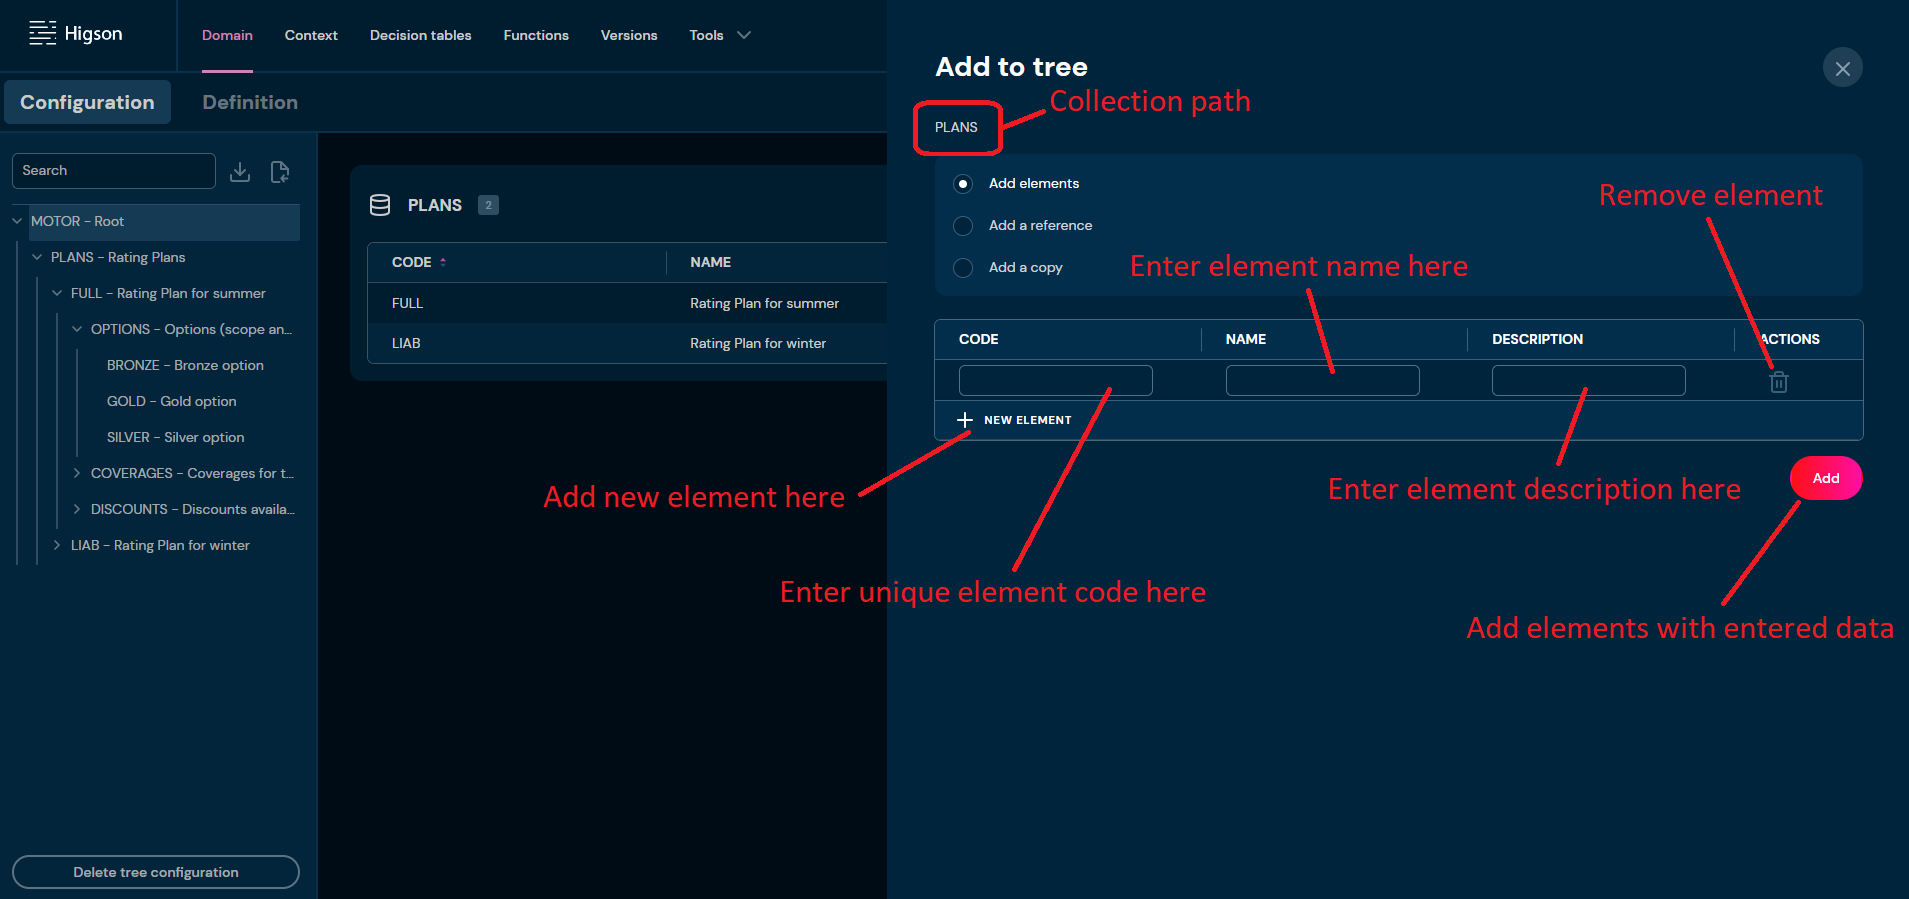
a. Choosing Add new elements to tree brings up Add to tree screen.
-
Choose Add elements radiobutton.
-
On this screen, you:
a. need to provide unique Element code. Code can contain only characters from collection a-z; 0-9; “-”; “_”; “+” and it can’t start with “-”.
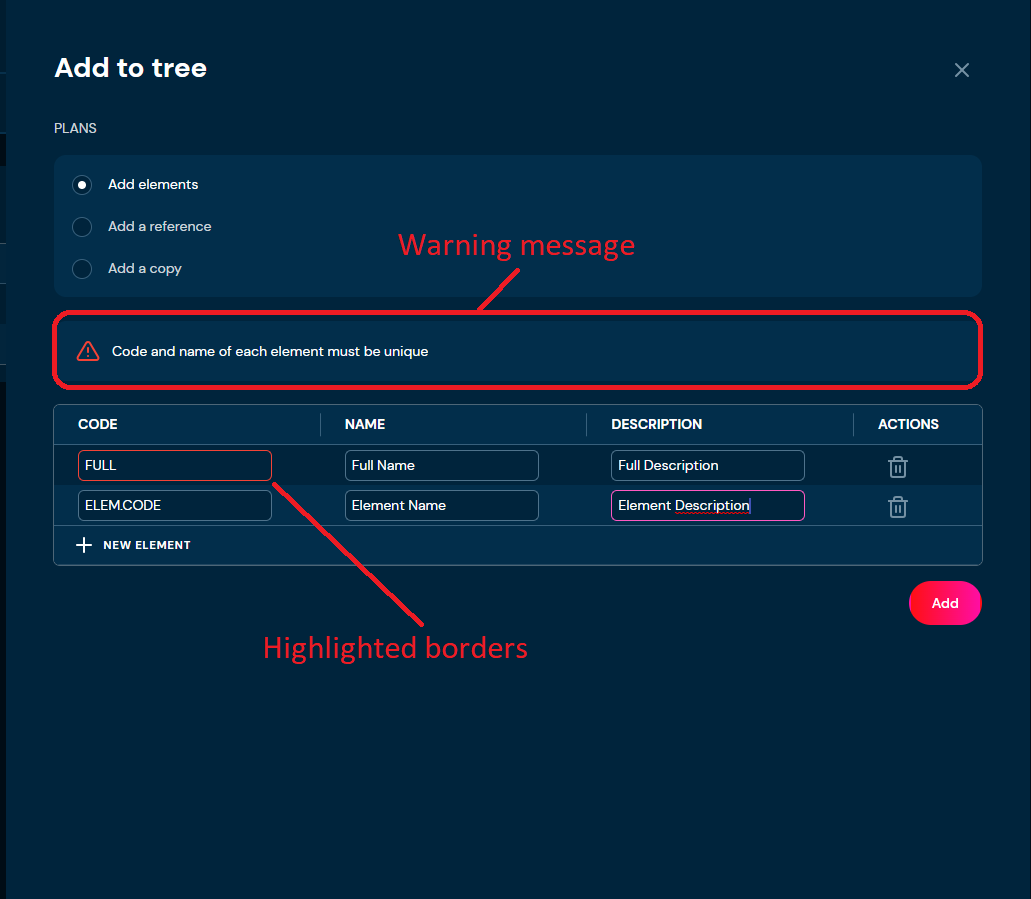
i. If the code you provided is not unique, then borders will be highlighted with red color and warning message will appear.
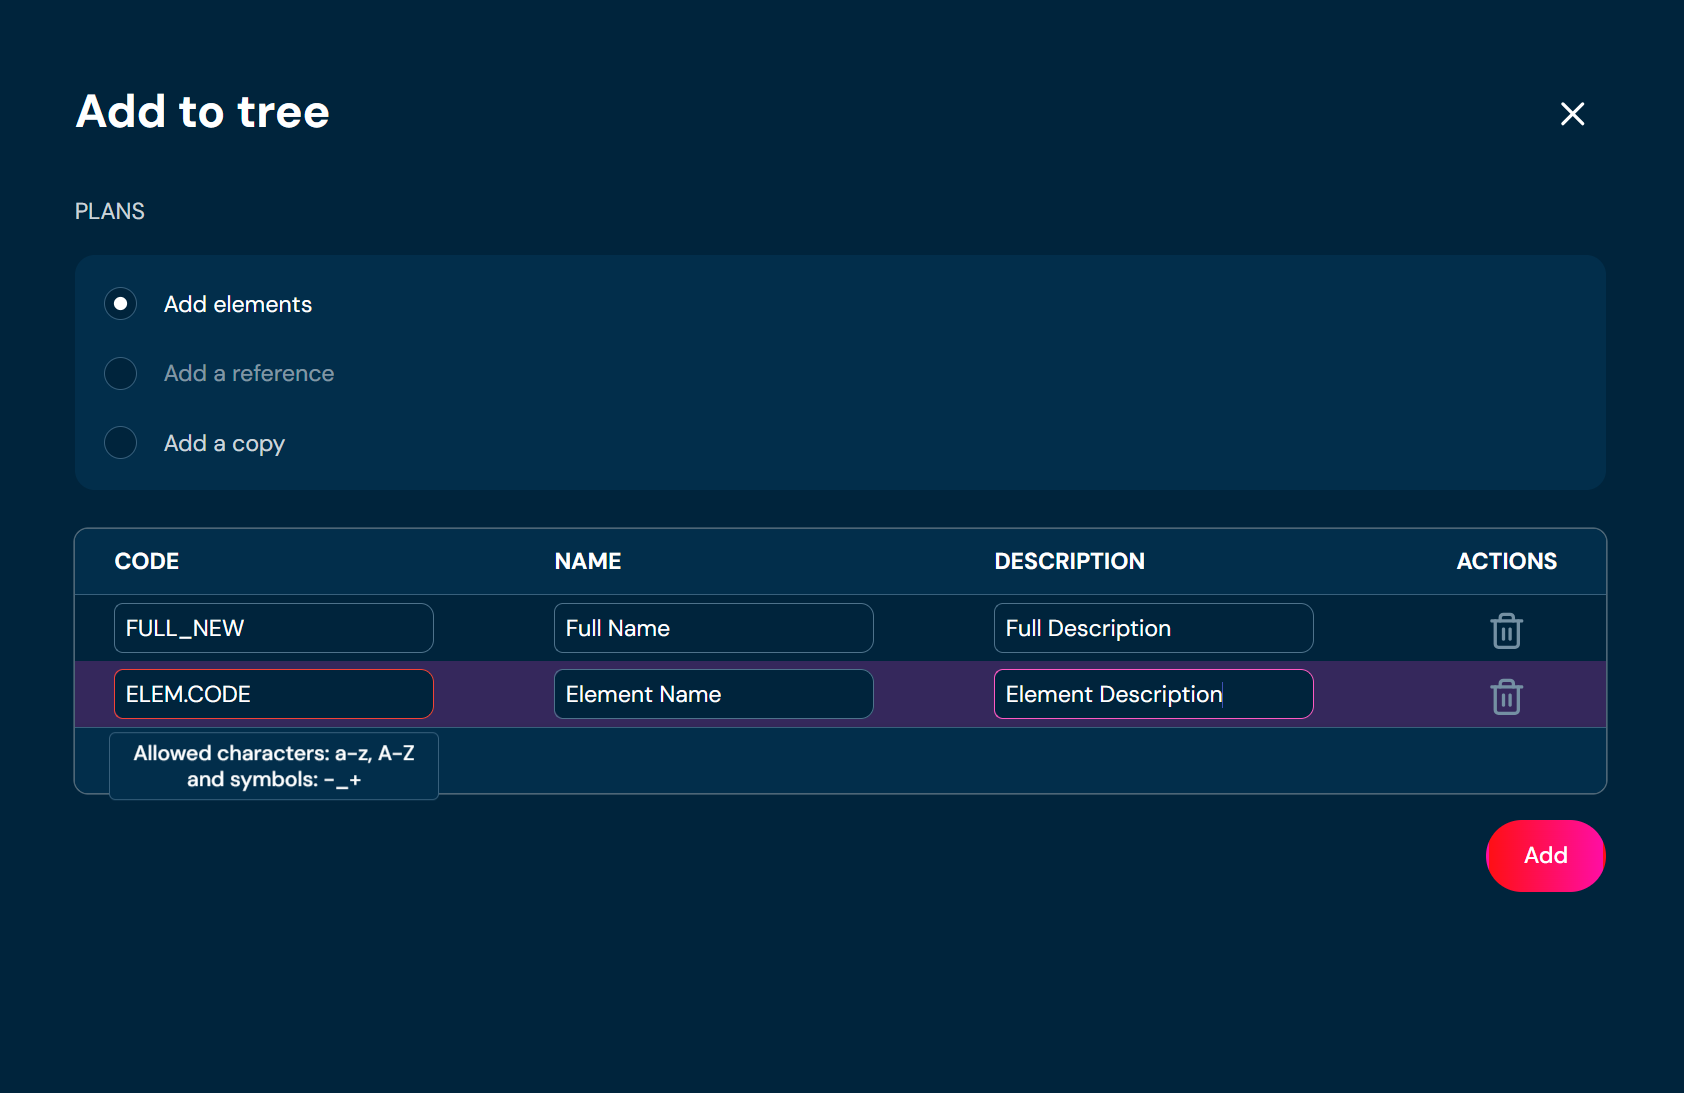
ii. If you enter illegal characters, then borders will be highlighted with red color. Hover on the field to see tooltip with more information.
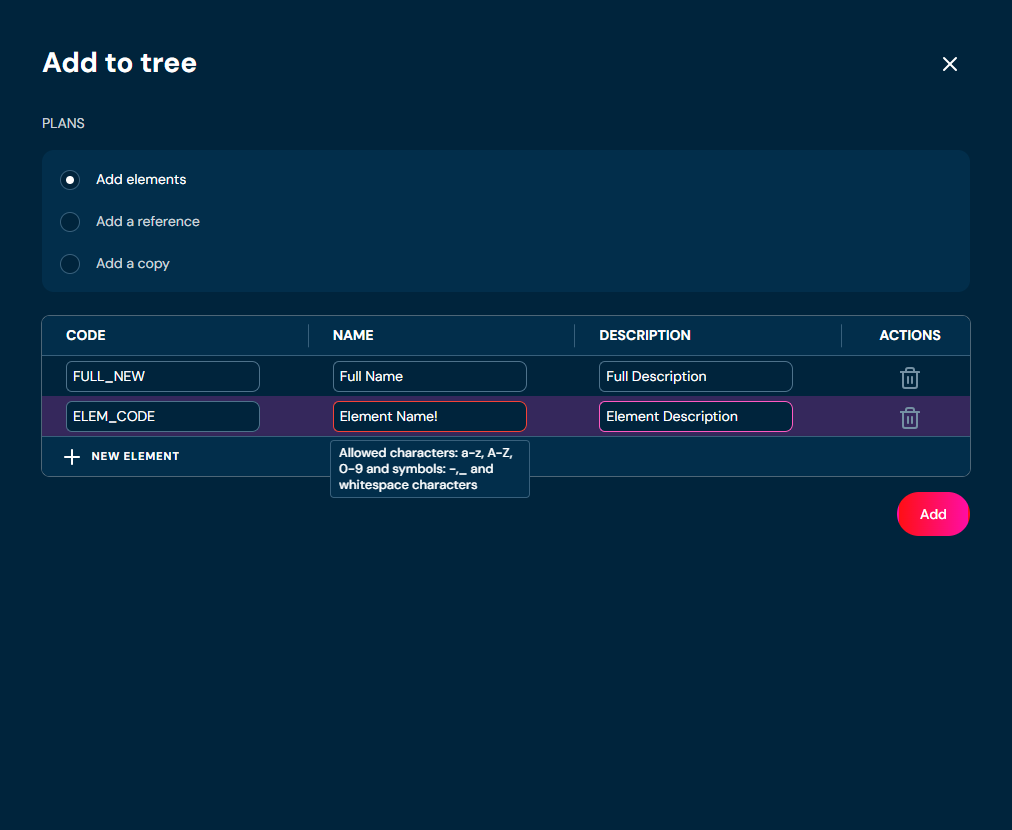
b. need to provide Element name. Name can contain only characters from collection a-z; A-Z; 0-9; “-”; “_” and white-space characters.
i. If you enter illegal characters, then borders will be highlighted with red color. Hover on field to see tooltip with more information.
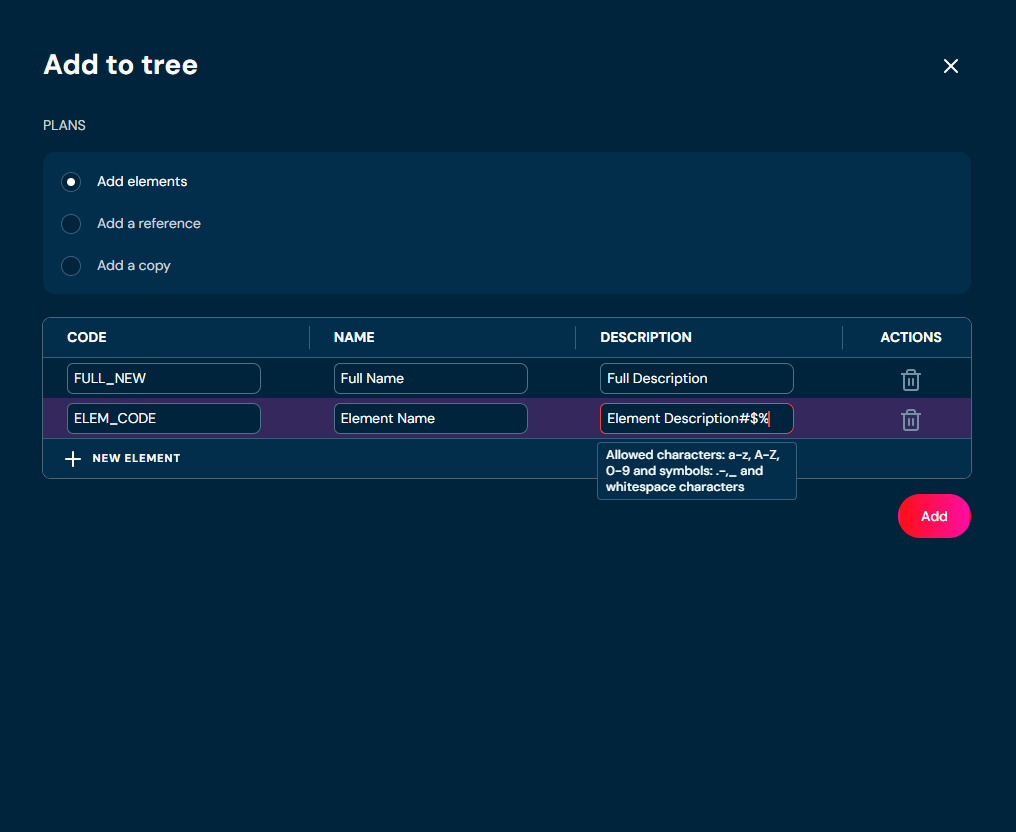
c. can provide Element description. Description can contain only characters from collection a-z; A-Z; 0-9; “:”; “.”; “,”; “-”; “_” and white-space characters.
i. If you enter illegal characters, then borders will be highlighted with red color. Hover on field to see tooltip with more information.
d. can add additional Elements by clicking + NEW ELEMENT.
-
Choose Add.
a. Elements with data you provided are created.
Add Reference#
If you want to add a reference, follow these steps:
-
Choose Domain in Main toolbar.
-
Navigate to the Collection for which you want to create reference.
-
Choose Add new elements to tree in desired Collection.
a. Choosing Add new elements to tree brings up Add to tree screen.
-
Choose Add a reference radiobutton.
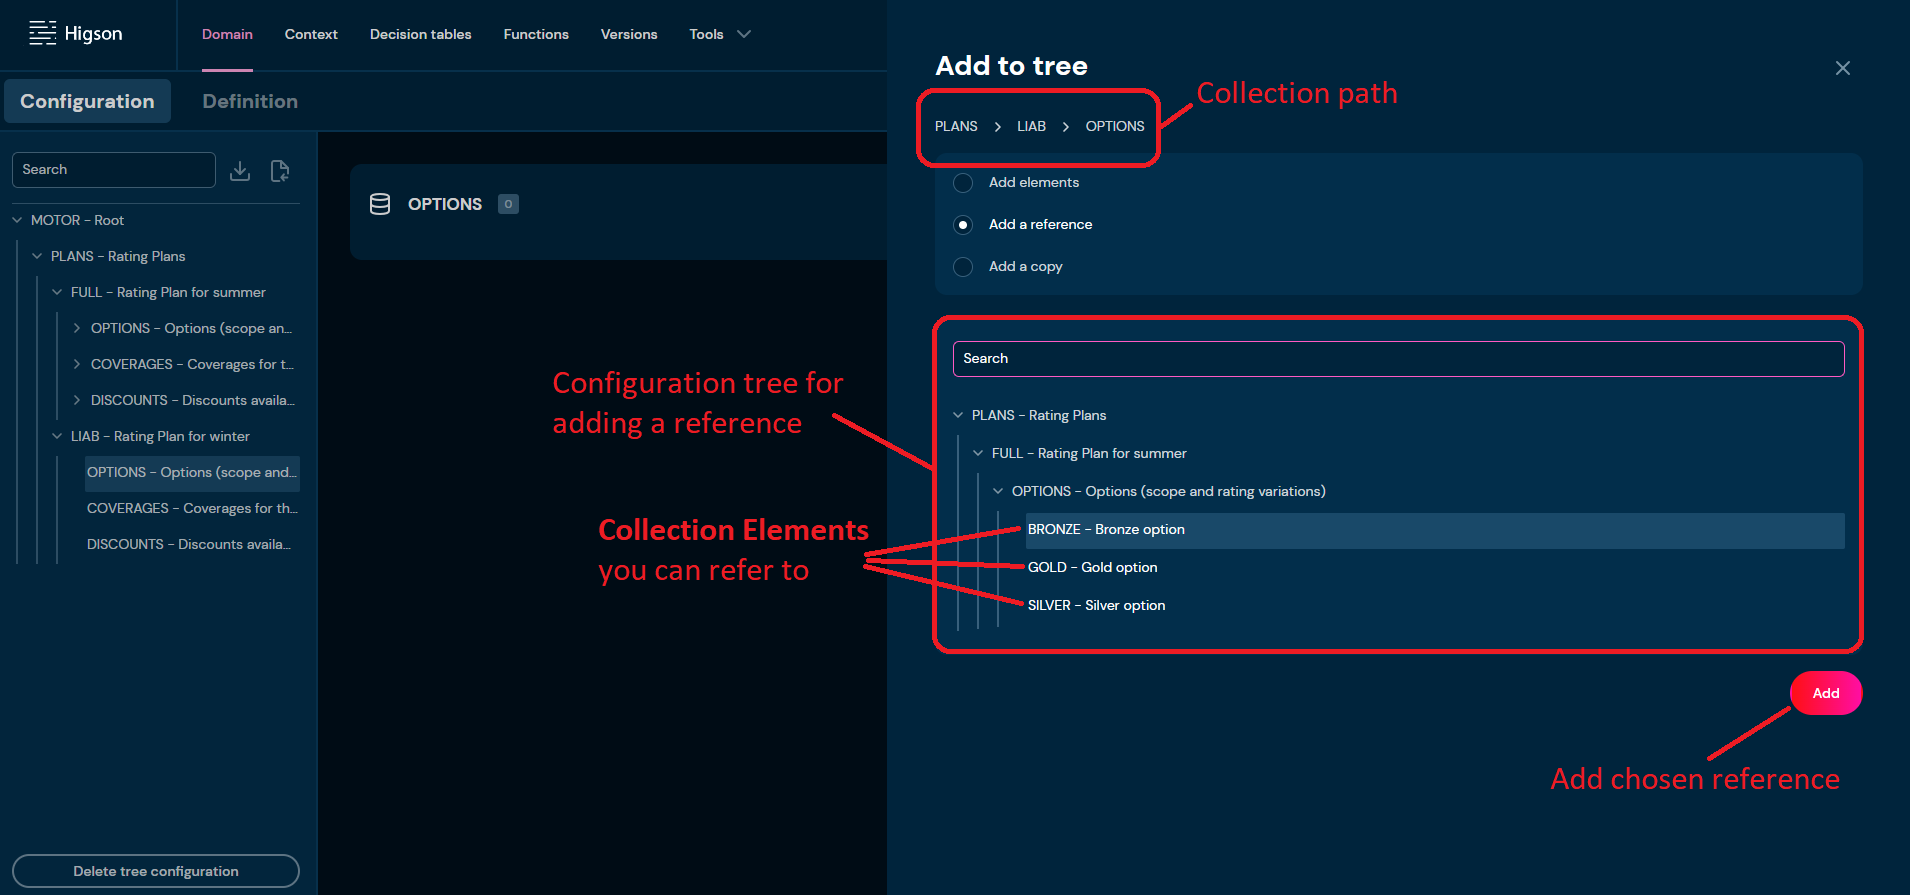
a. If the Add button is greyed out, it means that you have not chosen any Collection Element to refer to yet.
-
Choose Collection Element you want to create a reference to.
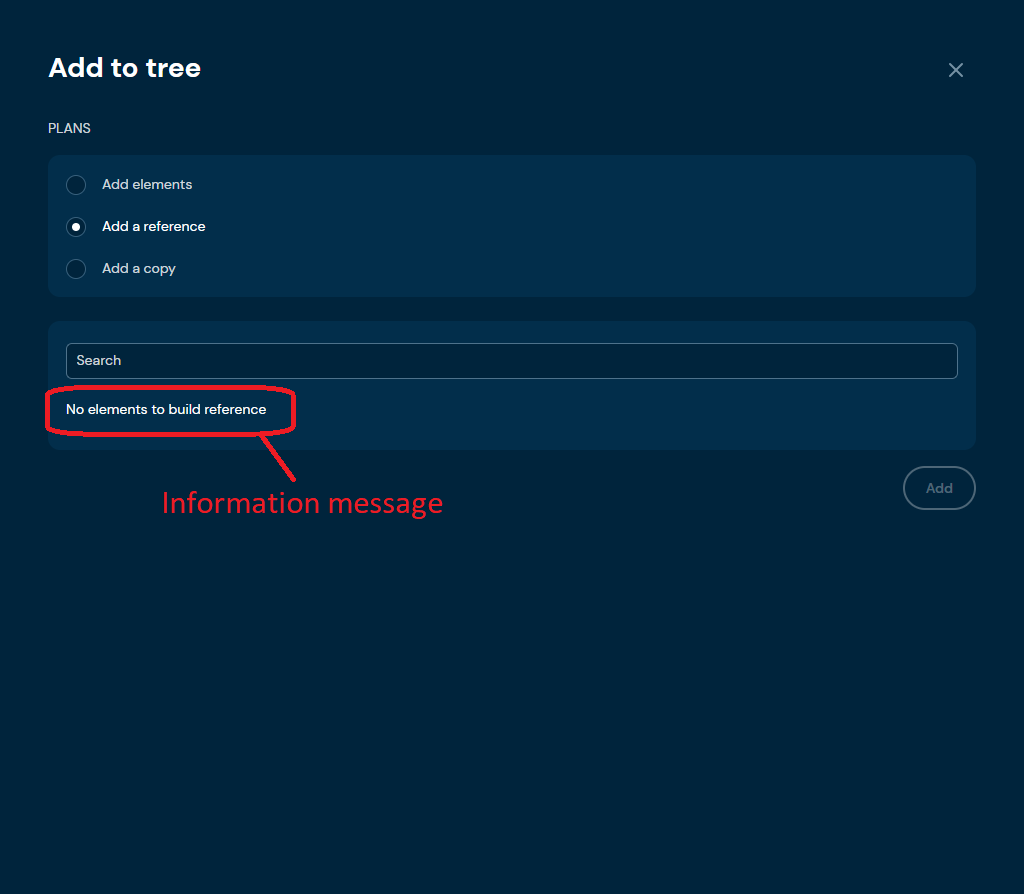
a. If there are no Elements to refer to, then an information message will be placed instead of the configuration tree.
-
Choose Add.
a. Reference to chosen Element is created.
Add a Copy#
If you want to copy Collection or Collection Element, follow these steps:
-
Choose Domain in Main toolbar.
-
Navigate to the Collection for which you want to copy Elements.
-
Choose Add new elements to tree in desired Collection.
a. Choosing Add new elements to tree brings up Add to tree screen.
-
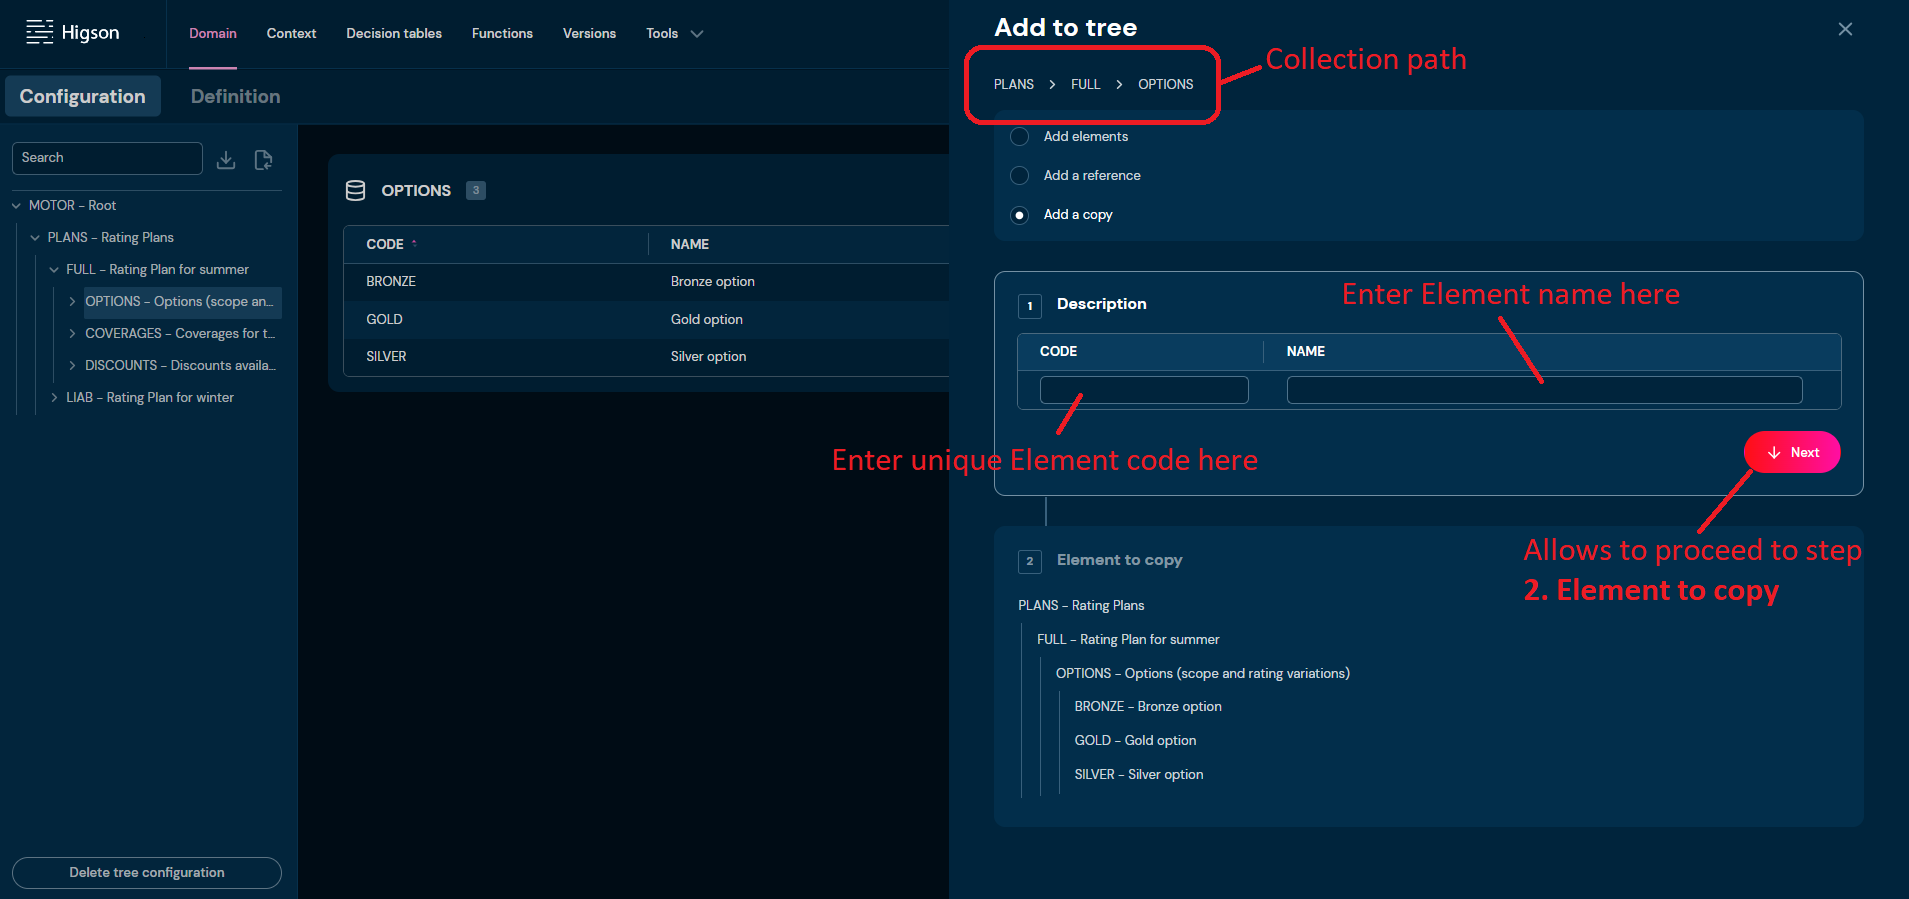
Choose Add a copy radiobutton.
-
In step 1. Description, you:
a. need to provide unique Element code. Code can contain only characters from collection a-z; 0-9; “-”; “_”; “+” and it can’t start with “-”.
i. If the code you provided is not unique, then borders will be highlighted with red color and warning message will appear.
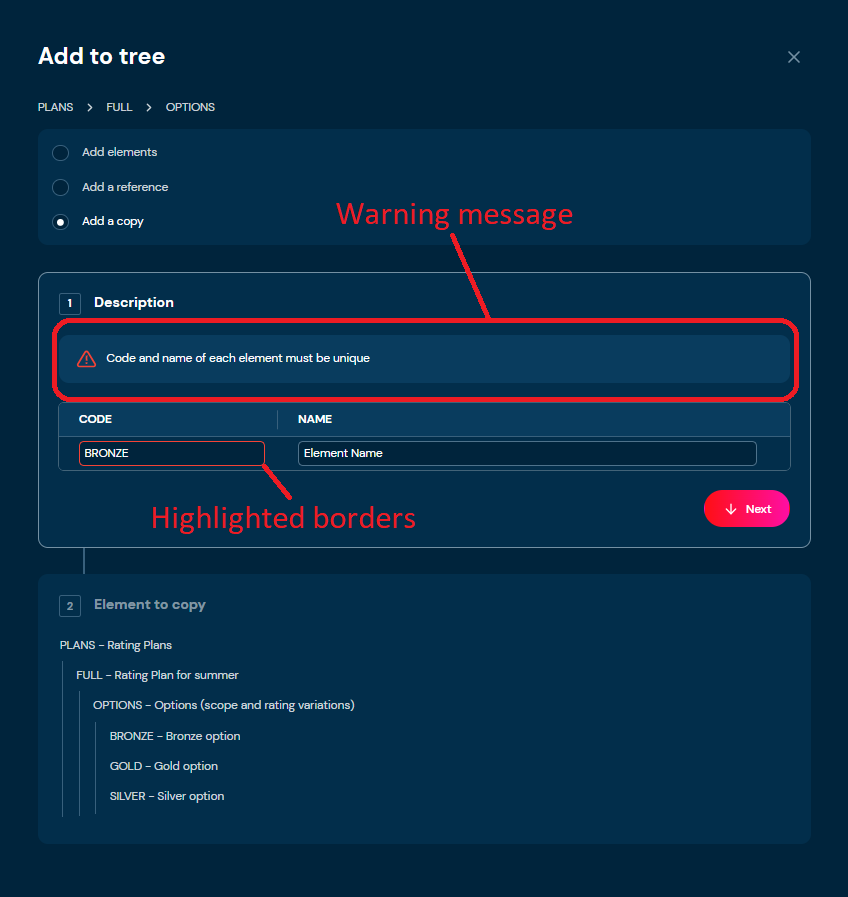
ii. If you enter illegal characters, then borders will be highlighted with red color. Hover on field to see tooltip with more information.
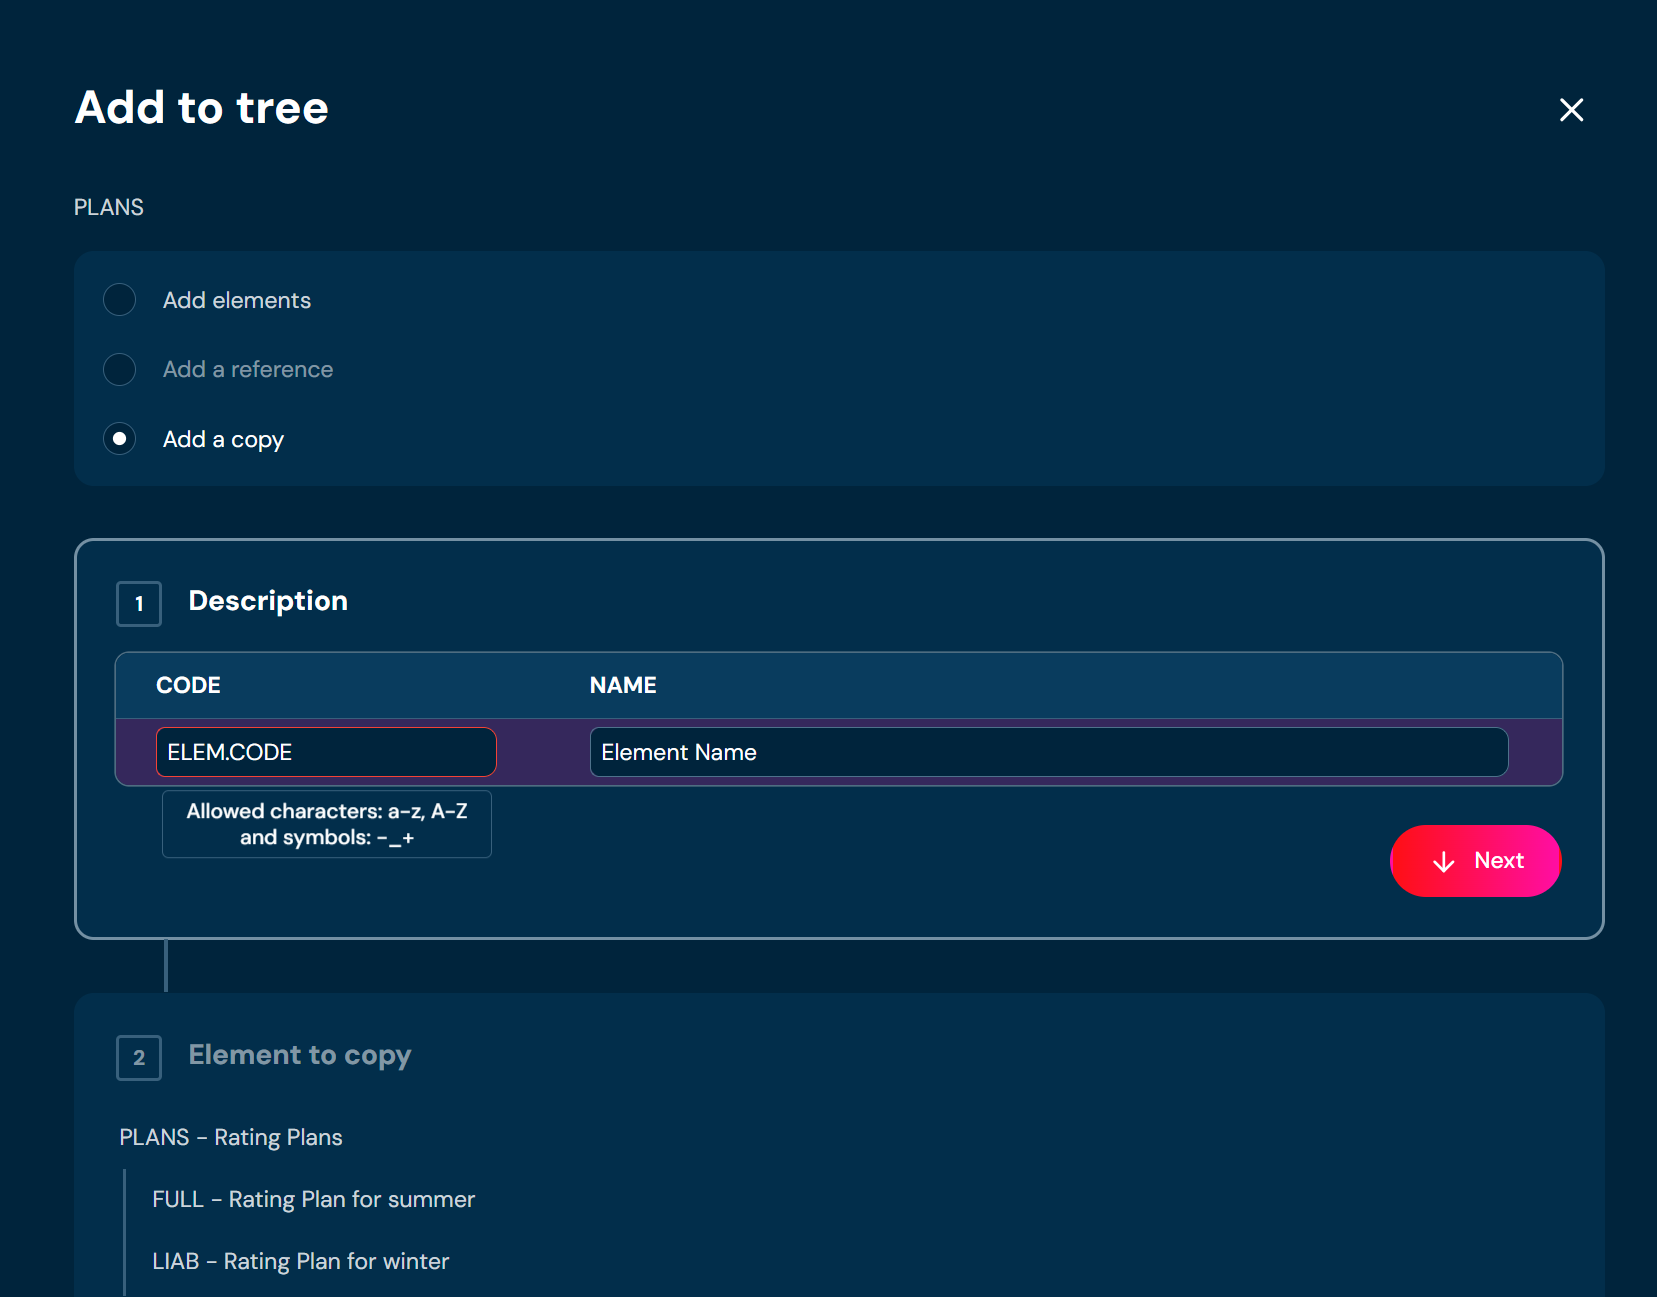
b. need to provide unique Element name. Name can contain only characters a-z; A-Z; 0-9; “-”; “_” and white-space characters.
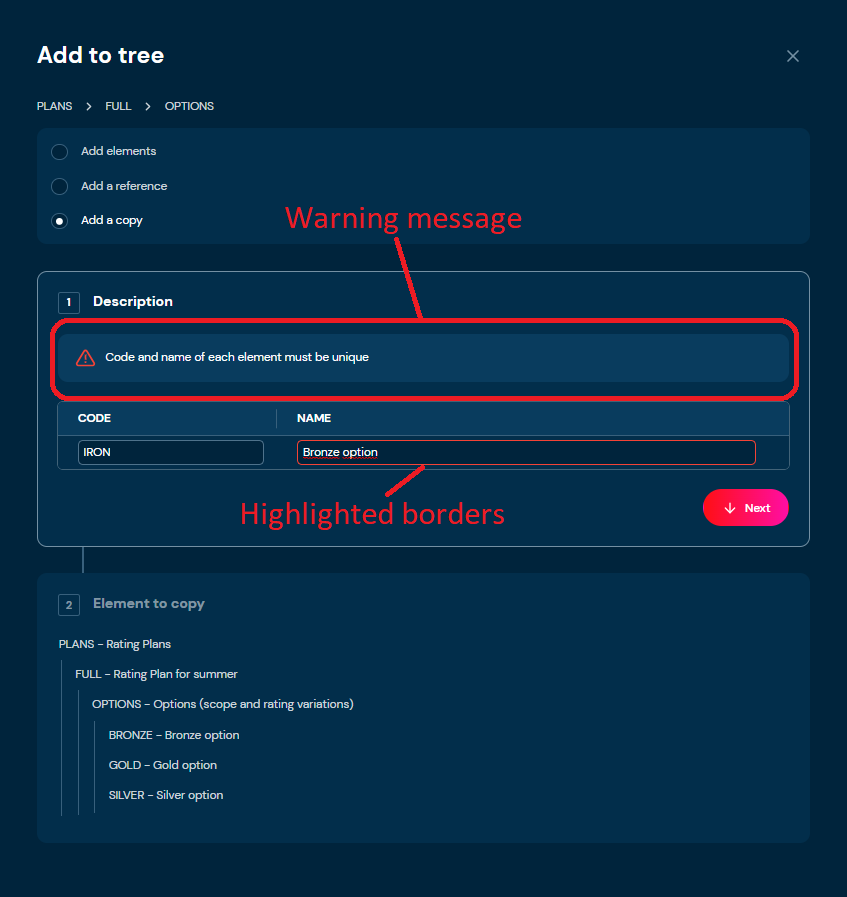
i. If the name you provided is not unique, then borders will be highlighted with red color and warning message will appear.
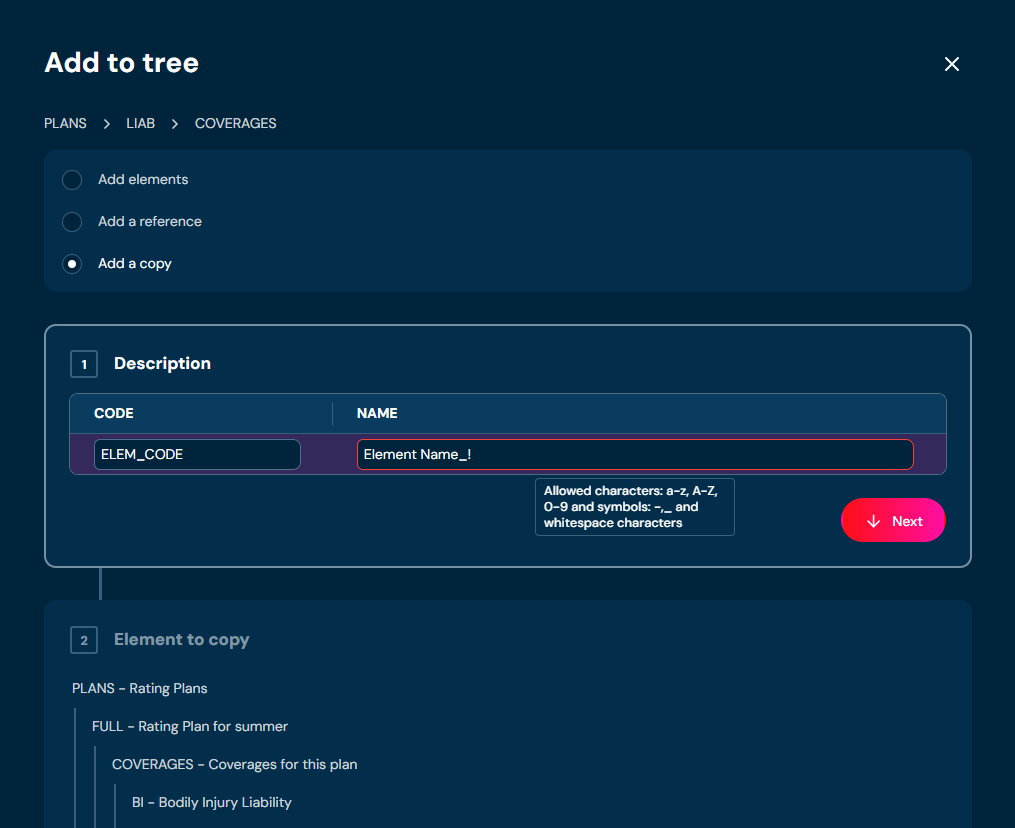
ii. If you enter illegal characters, then borders will be highlighted with red color. Hover on field to see tooltip with more information.
-
Choose Next.
-
In step 2. Element to copy you need to choose which Collection Element you want to copy.
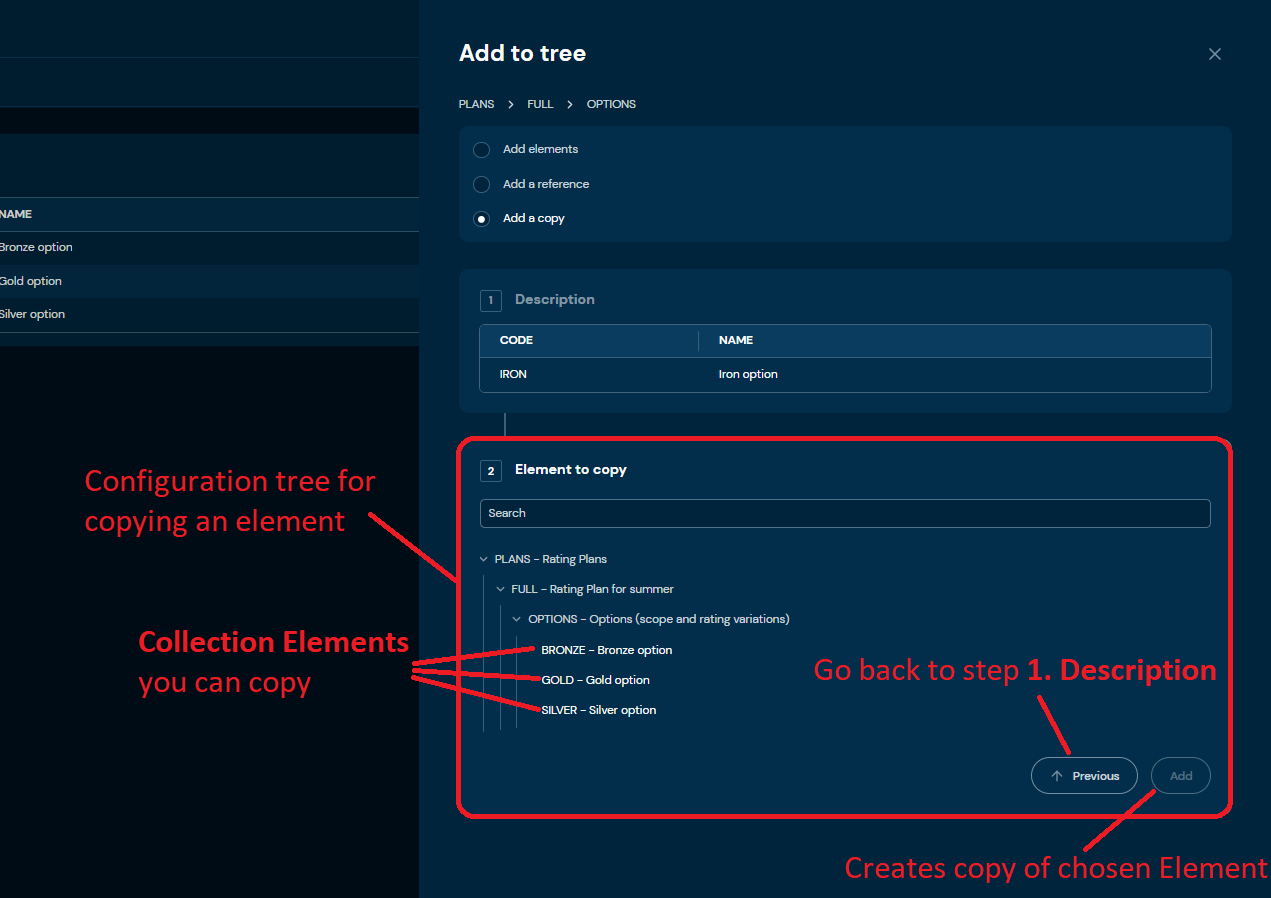
a. If the Add button is greyed out, it means that you have not chosen any Collection Element to copy.
-
Choose Add.
a. Copy of chosen Collection Element is created.
Download Domain Configuration#
If you want to download Domain Configuration, follow these steps:
-
Choose Domain in Main toolbar.
-
Choose Download Domain Configuration in Configuration tree.
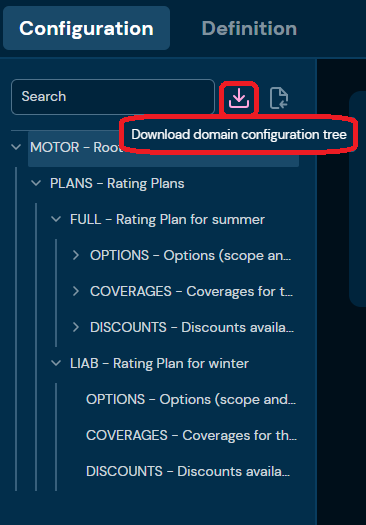
a. Choosing Download Domain Configuration downloads an XML file that contains all configuration Collections, Collection Elements, Definition Types and all dependencies between them.
Upload Domain Configuration#
If you want to upload Domain Configuration, follow these steps:
-
Choose Domain in Main toolbar.
-
Choose Upload Domain Configuration in Configuration tree.
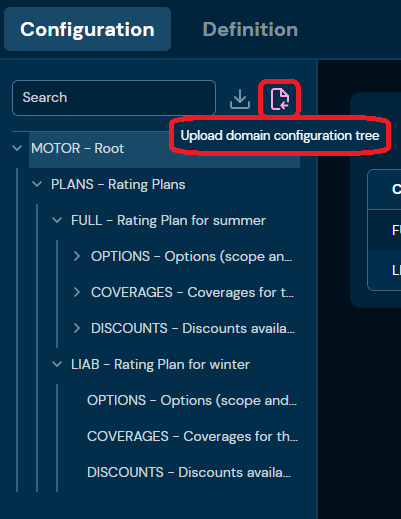
a. Choosing Upload Domain Configuration brings up Import from XML screen.
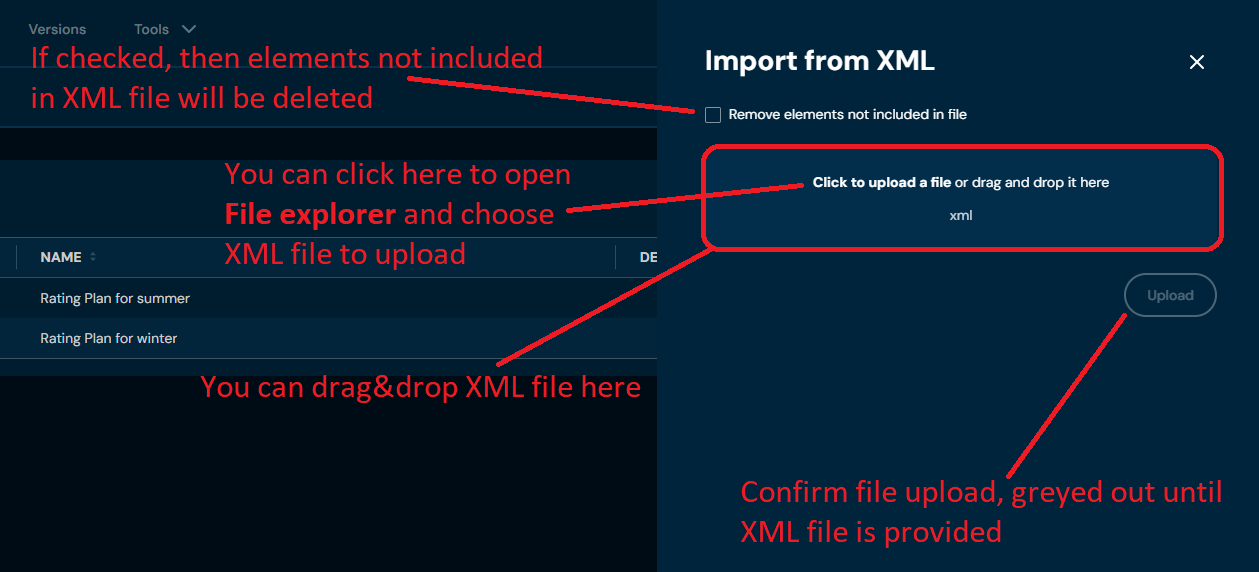
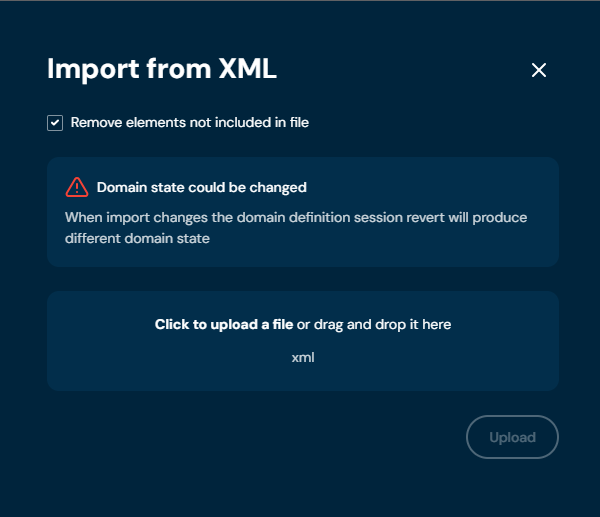
b. If you select checkbox Remove elements not included in file, then warning will appear.
-
Drag&drop desired file or Click to upload a file and choose file in File explorer.
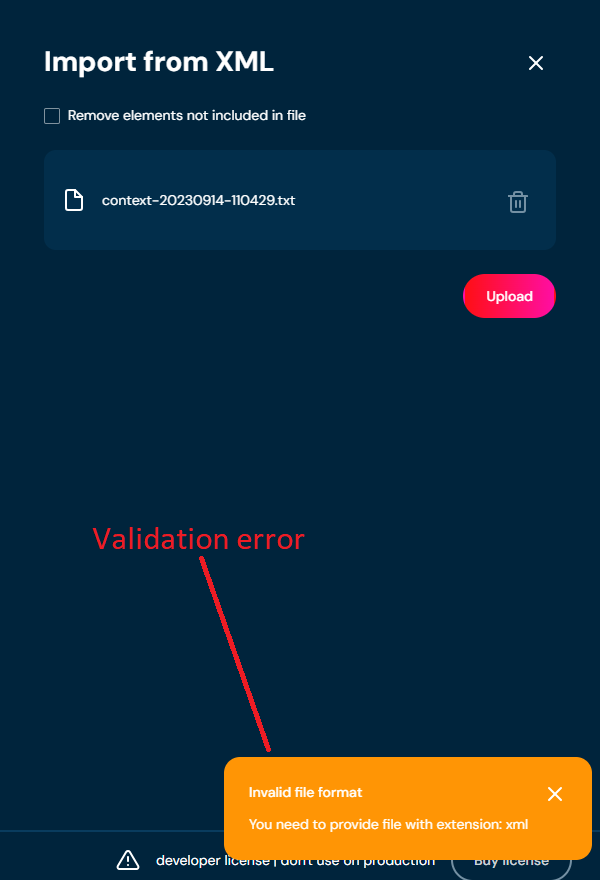
a. If you choose a file with extension other than XML, then validation error will pop up
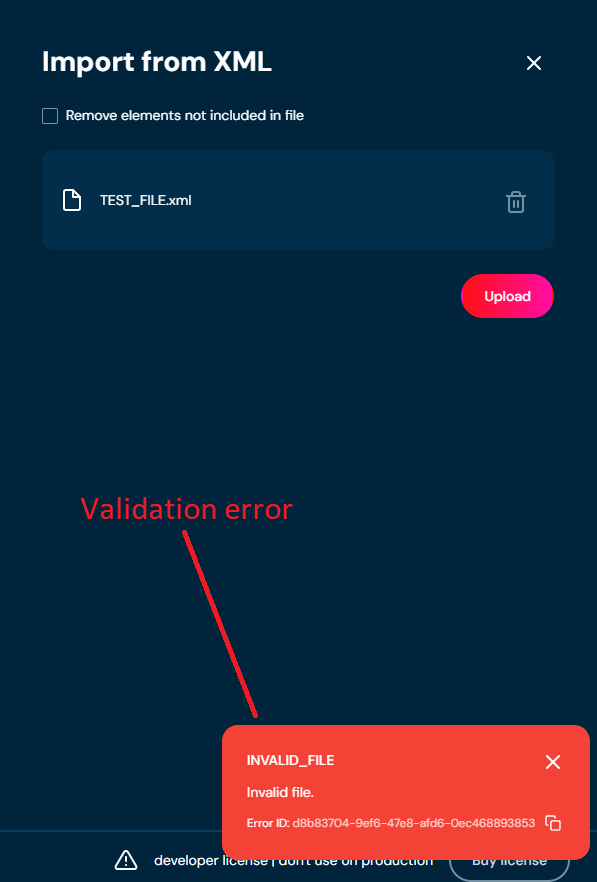
b. If there is something wrong with data in XML file, then validation error will appear.
-
Choose Upload
-
When the progress bar reaches 100%, it means that domain definition was uploaded correctly.
a. If a validation error occurs (see above), then an upload process is being aborted.
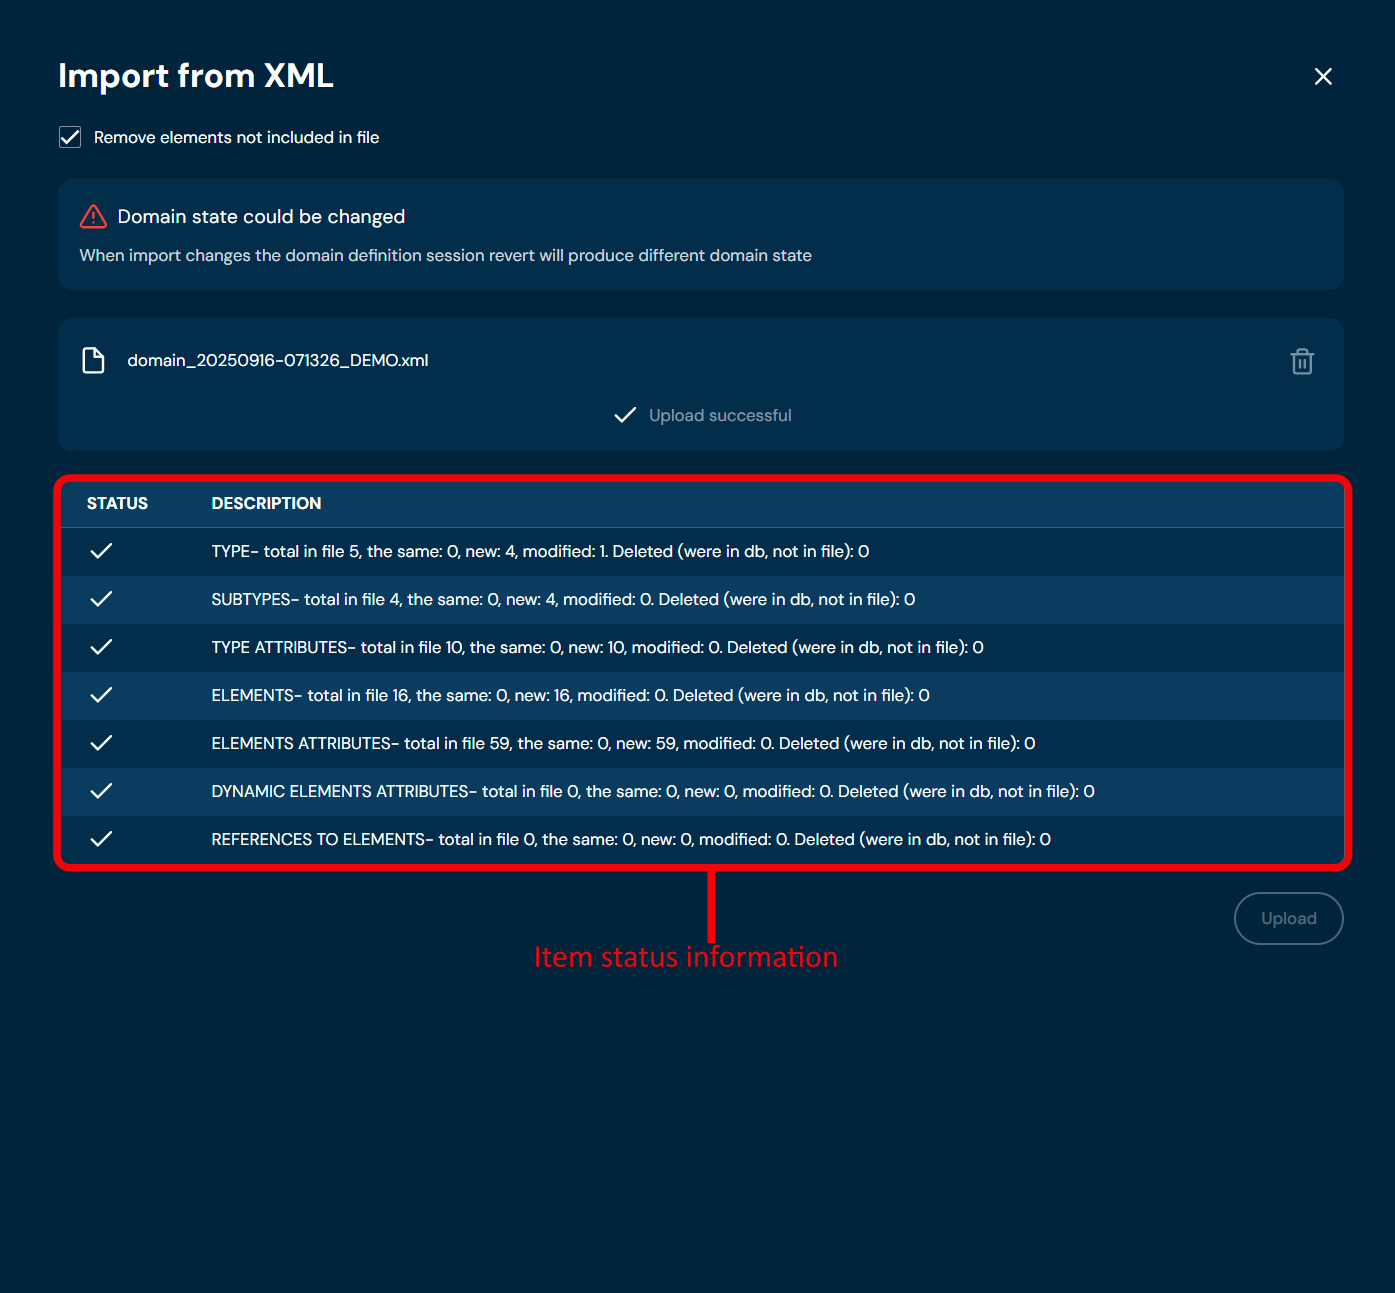
b. If you checked checkbox Remove elements not included in file in step 2, then adequate information about changes will appear after uploading a file.
Delete Configuration Tree#
If you want to delete the entire Domain Configuration, follow these steps:
-
Choose Domain in Main toolbar
-
Choose Delete configuration tree.
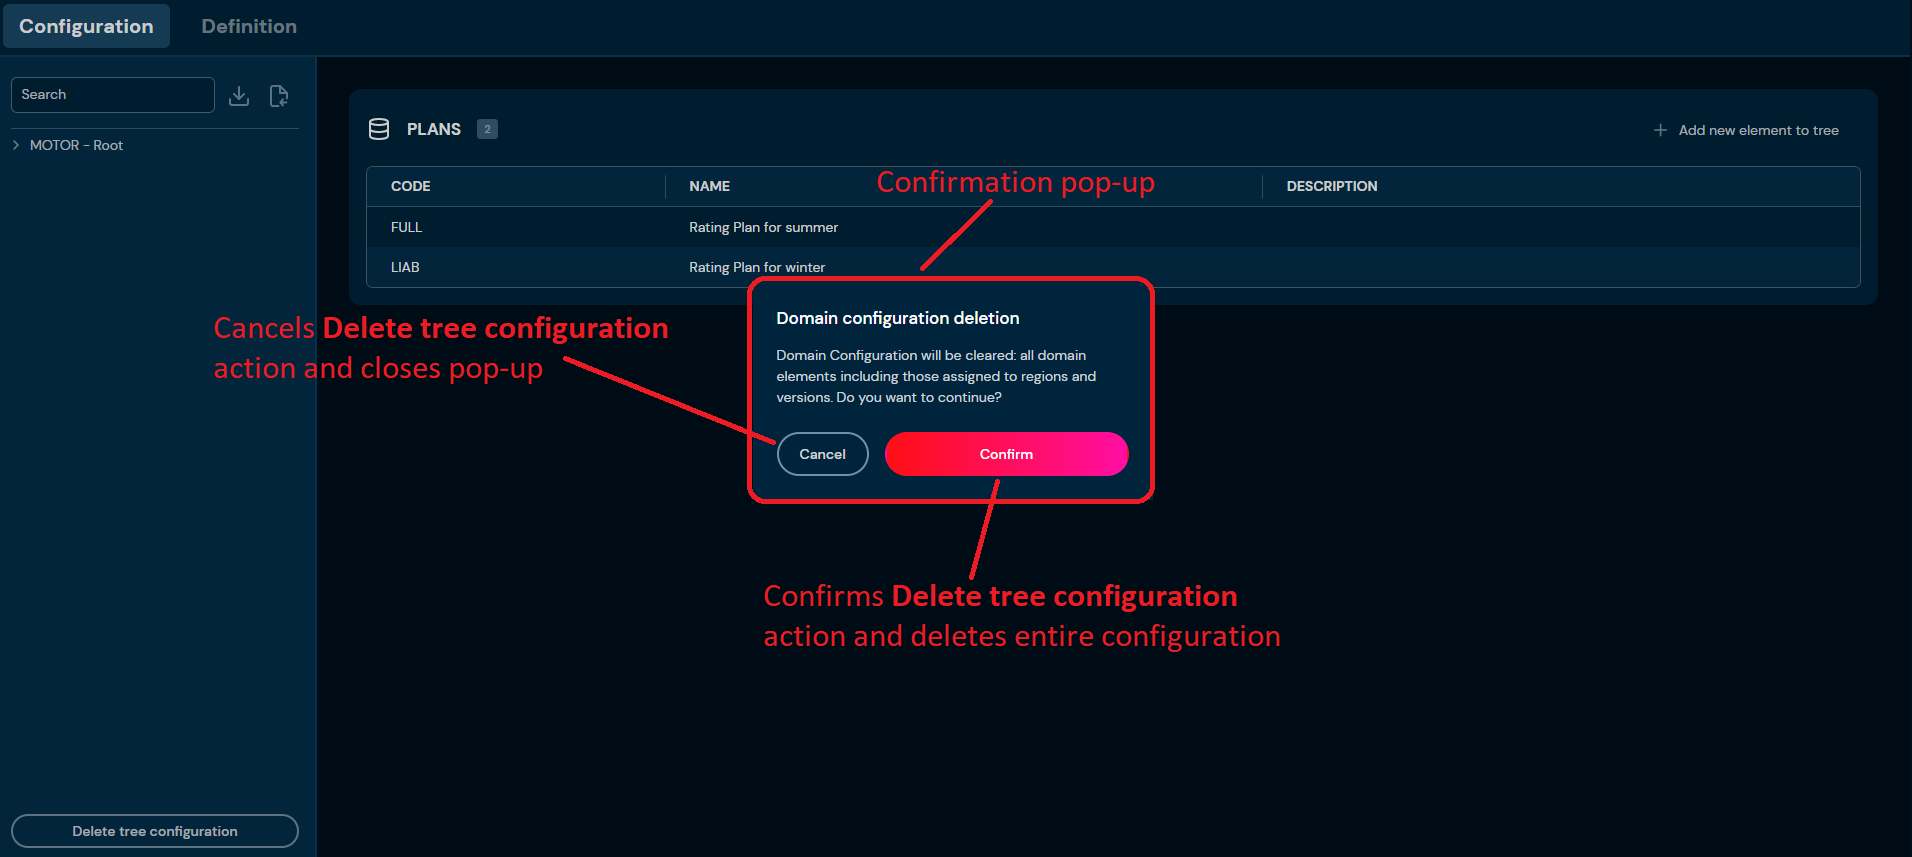
a. After choosing Delete configuration tree button, confirmation pop up will appear.
-
Choose Confirm.
a. The Entire Domain Configuration is deleted from the environment.
-
Choose Session.
a. After choosing Session button, Session preview screen will appear.
-
Choose Publish changes.
Collection Element Details Screen#
You can access Collection Element details by left-clicking on the specific Element in the Domain Configuration tree.
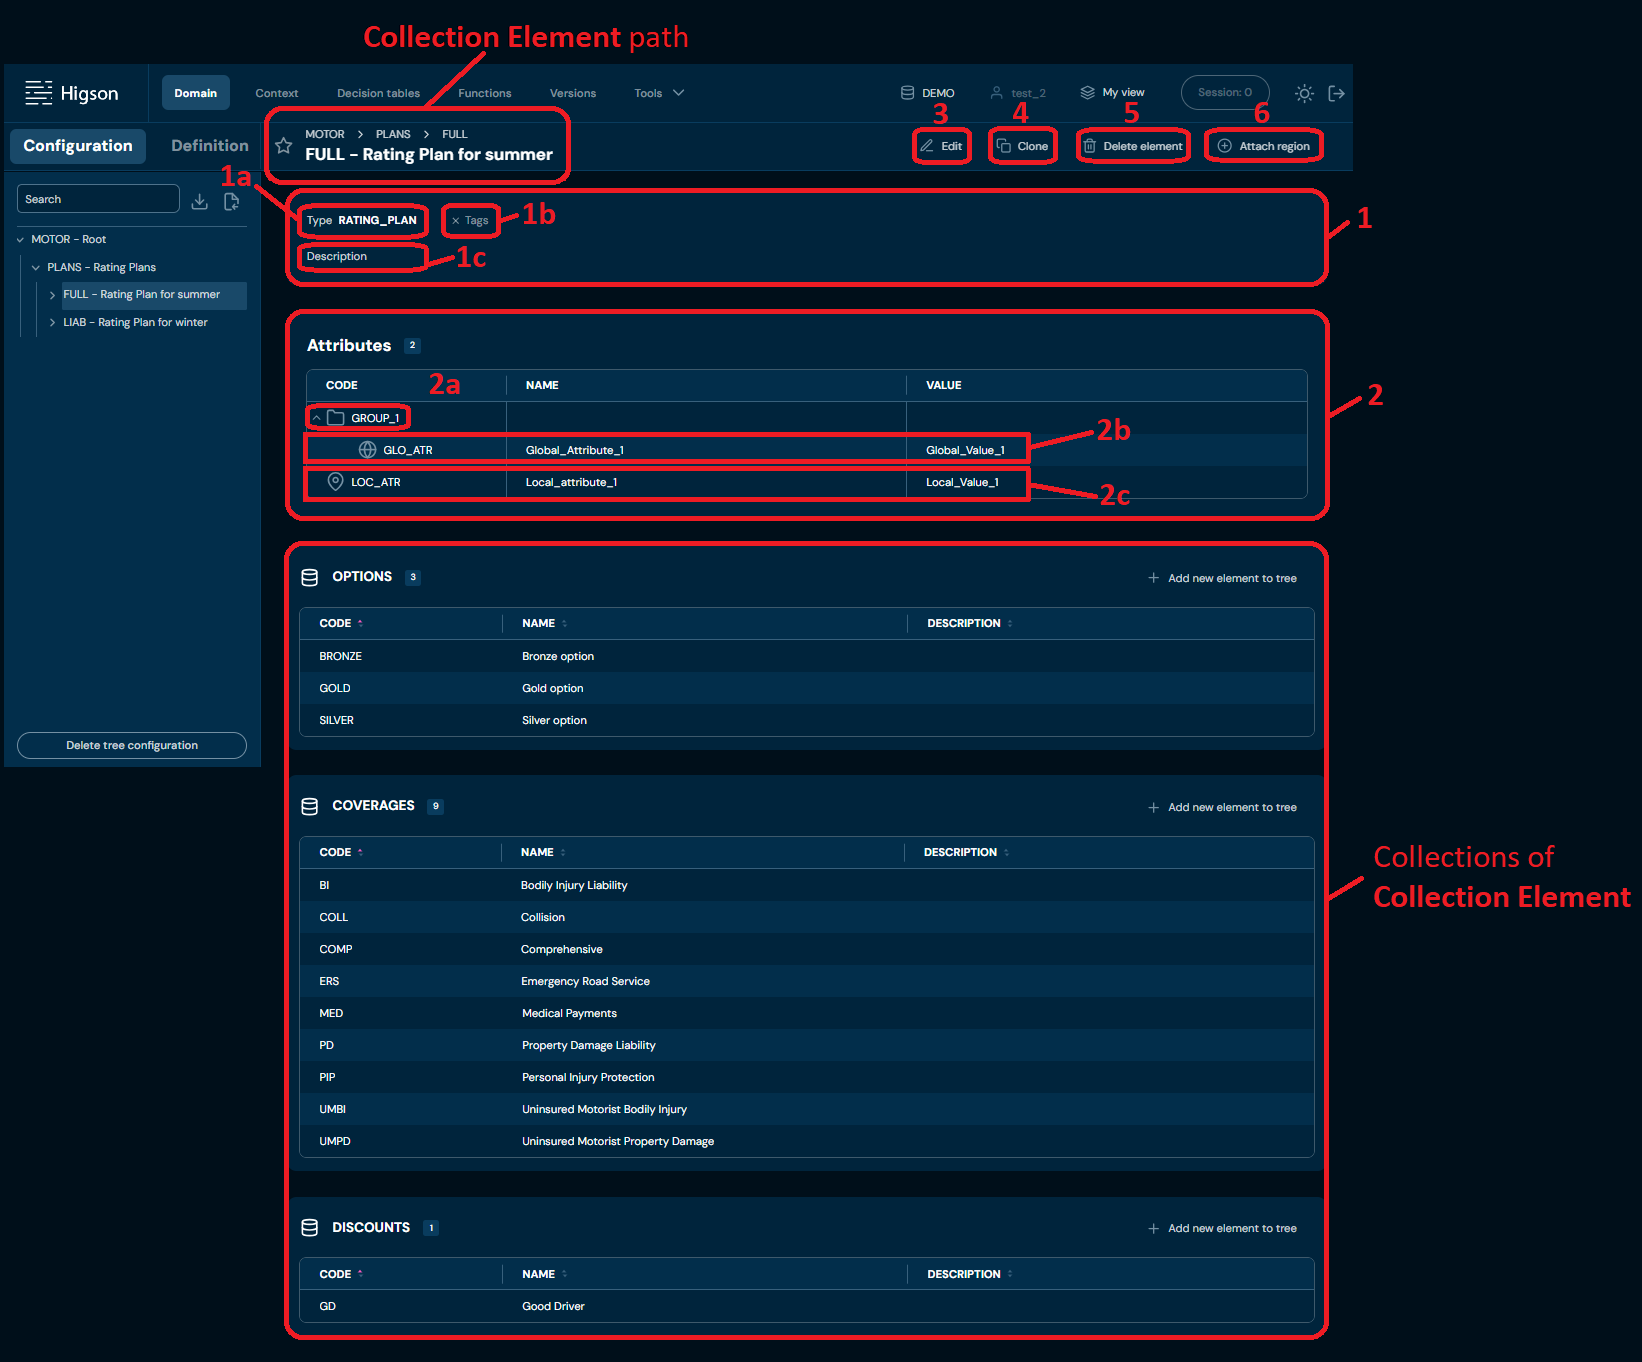
| No. | Name | Description |
|---|---|---|
| 1 | Collection Element details | Collection Element details include information about assigned Region, assigned Tags and description of Collection Element. |
| 1a | Definition Type code | Type code from Domain Definition. |
| 1b | Assigned Tags | List of all Tags assigned to the Element. |
| 1c | Collection Element | Description of Collection Element. |
| 2 | Collection Element attributes | List of all Global and Local Attributes created in Collection Element. |
| 2a | Attributes Group name | Name of Attributes Group. |
| 2b | Global Attributes | Global Attributes are defined by Types in Domain Definition. |
| 2c | Local Attributes | Local Attributes are created in Collection Element by User. |
| 3 | Edit | Enables Collection Element edit mode. To learn more about editing collection element go here |
| 4 | Clone | Allows to clone Collection Element. To learn more about cloning collection elements go here |
| 5 | Delete element | Deletes Collection Element. To learn more about deleting collection element go here |
| 6 | Attach/Detach region | Allows you to add/remove a region to/from the Collection Element. - Attach region is available if there are no regions added to Collection Element - Detach region is available if there is a region added to Collection Element If User has opened session, then button is greyed out. |
Edit Element#
If you want to edit data in specific Collection Element, follow these steps:
-
Choose Domain in Main toolbar.
-
In the Configuration tree, left-click on Collection Element you wish to edit.
-
Choose Edit.
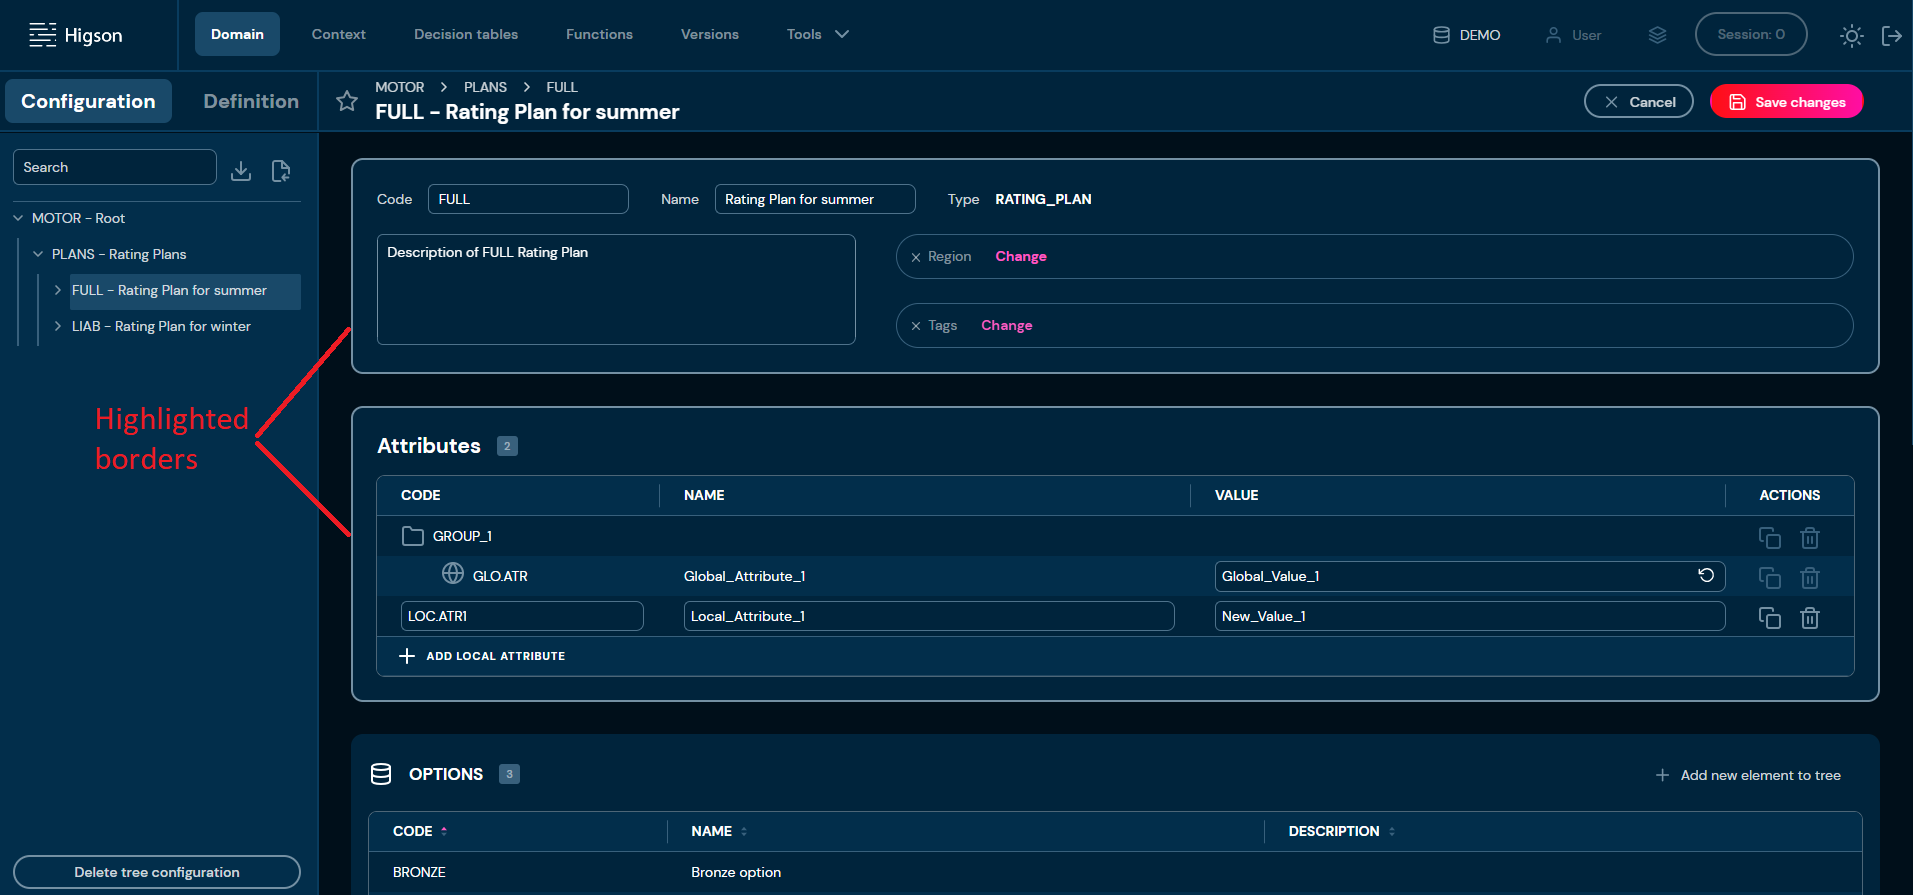
a. Highlighted borders indicate that edit mode is active.
-
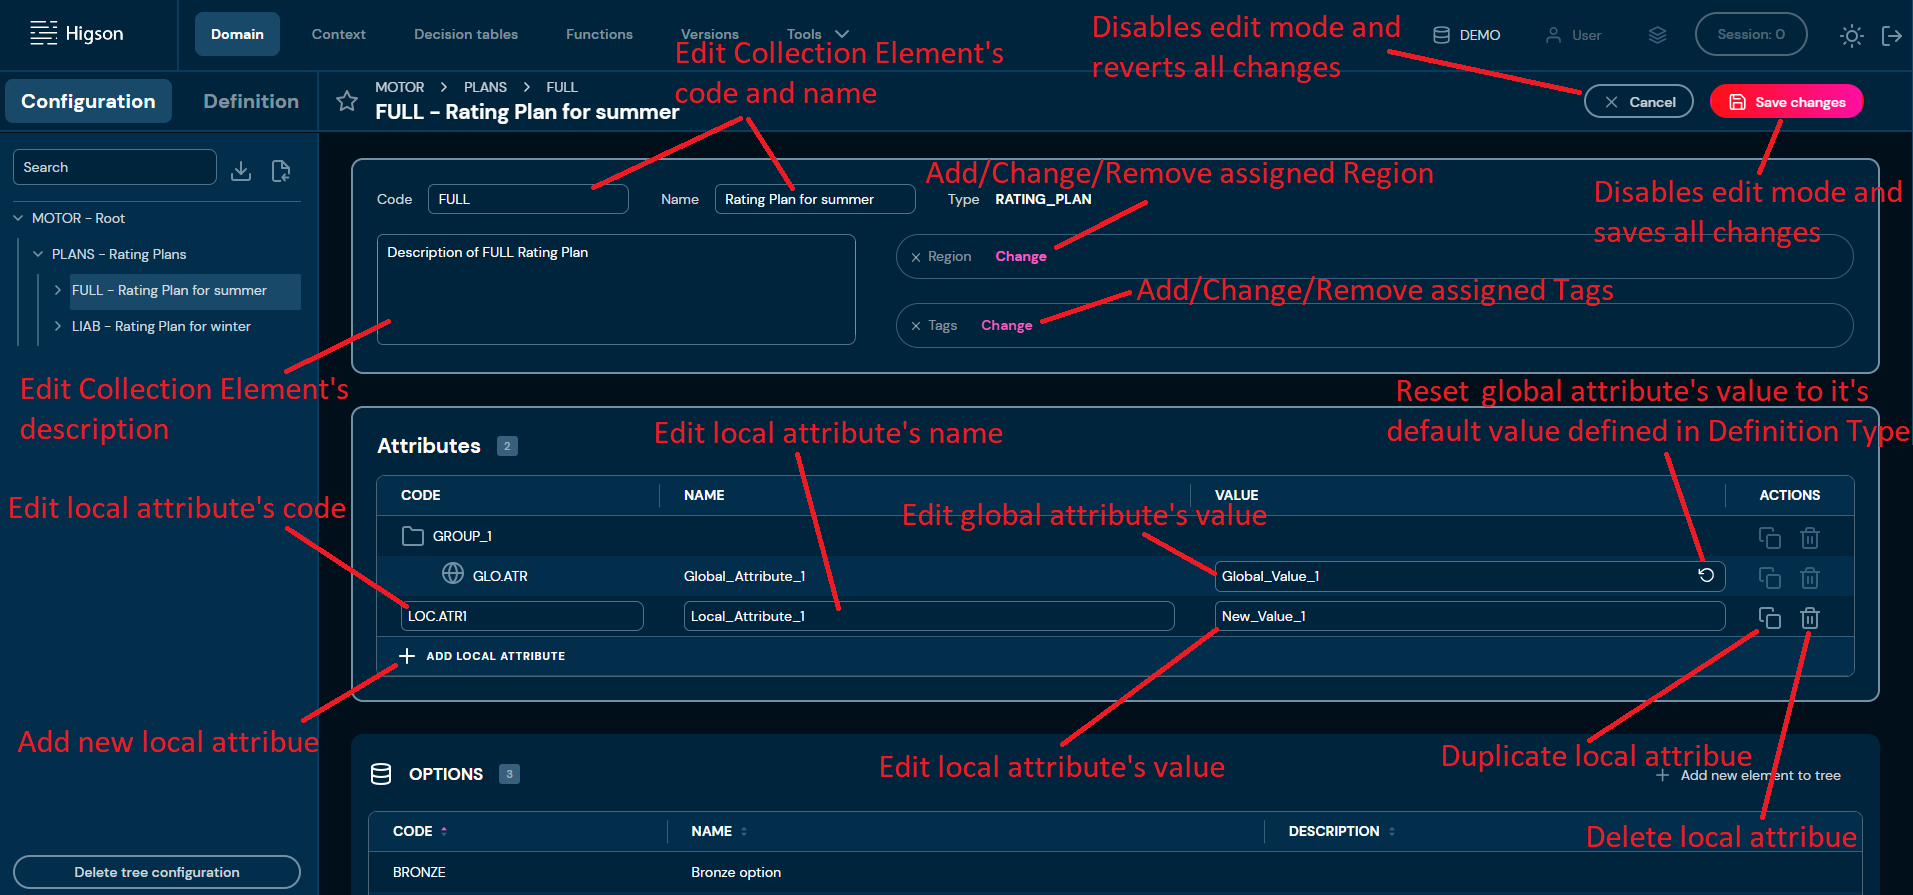
Edit any data you need.
-
Choose Save changes to save all changes made in Collection Element.
a. Cancel reverts all changes made in the Collection Element.
Add Local Attribute#
-
Choose Domain in Main toolbar.
-
In the Configuration tree, left-click on Collection Element you wish to add local attribute.
-
Choose Edit.
-
Choose Add local attribute and you:
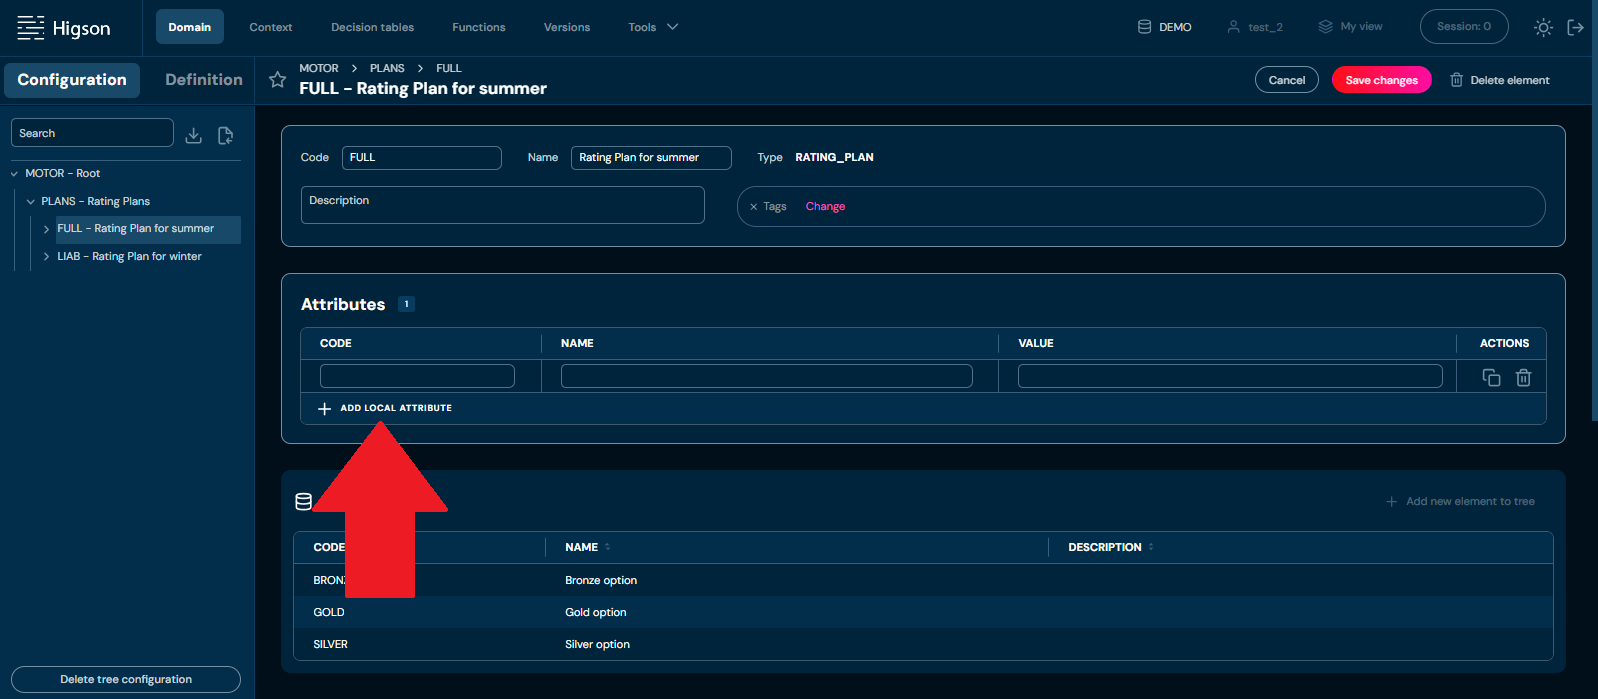
a. need to provide unique Attribute code. Code can contain only characters from collection “a-z”; “A-Z”; “-”; “_”.
i. If you entered the same code in at least two attributes, then borders will be highlighted with red color, and you will not be able to save changes.
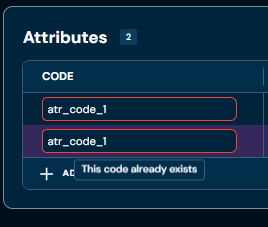
ii. If you enter illegal characters, then borders will be highlighted with red color. Hover on field to see tooltip with more information.
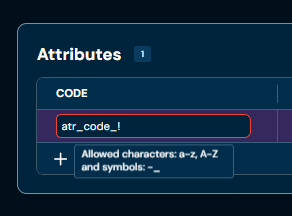
b. need to provide Attribute name. Name can contain only characters from collection “a-z”; “A-Z”; “0-9”; “-”; “_” and white-space characters.
i. If you enter illegal characters, then borders will be highlighted with red color. Hover on field to see tooltip with more information.
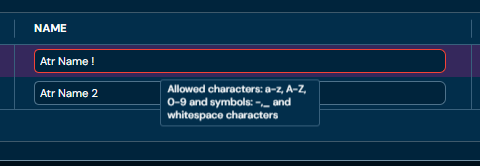
c. need to provide Attribute value. Value can contain any characters.
-
Choose Save changes.
Reset to Default Value#
-
Choose Domain in Main toolbar.
-
In the Configuration tree, left-click on Collection Element you wish to add local attribute.
-
Choose Edit.
-
Choose Reset to default value for specific Global Attribute.
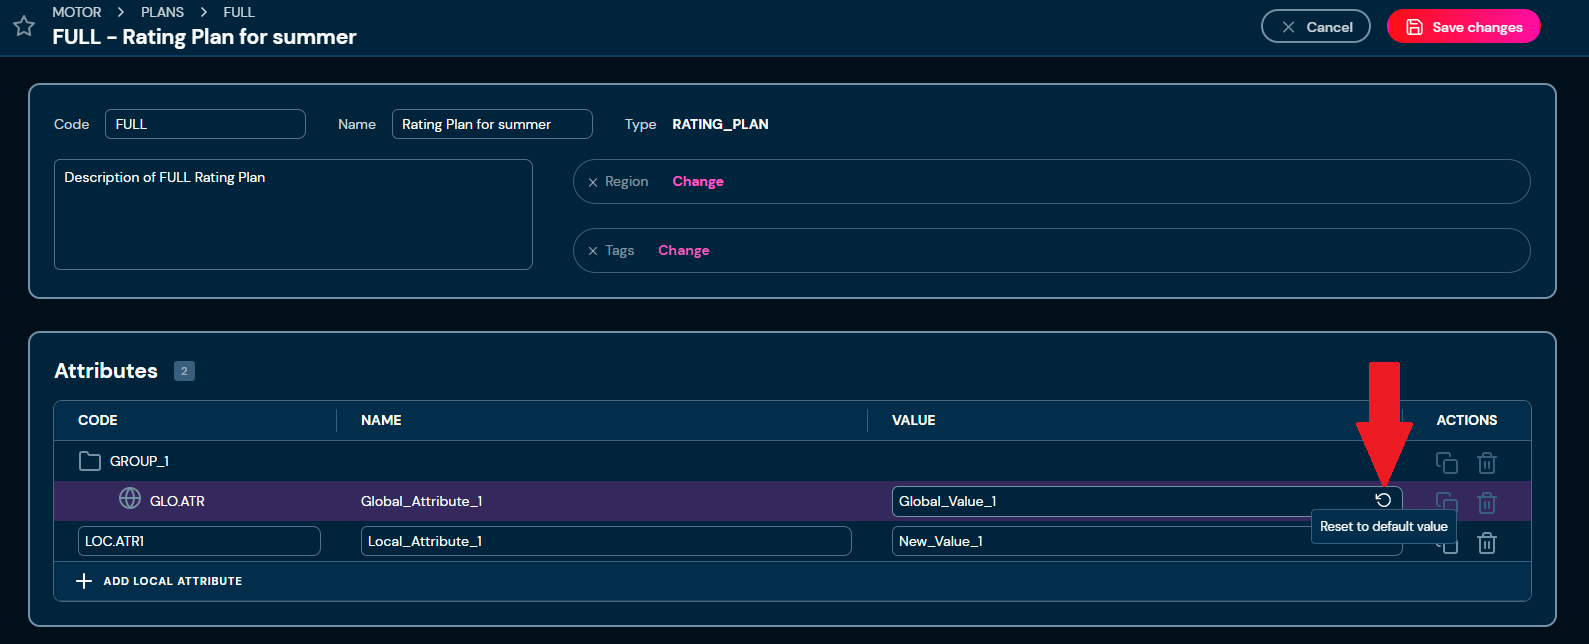
a. Attribute’s value is changed to the value defined in the appropriate Definition Type.
-
Choose Save changes.
Clone Element#
If you want to clone specific Collection Element, follow these steps:
-
Choose Domain in Main toolbar.
-
In the Configuration tree, left-click on Collection Element you wish to clone.
-
Choose Clone.
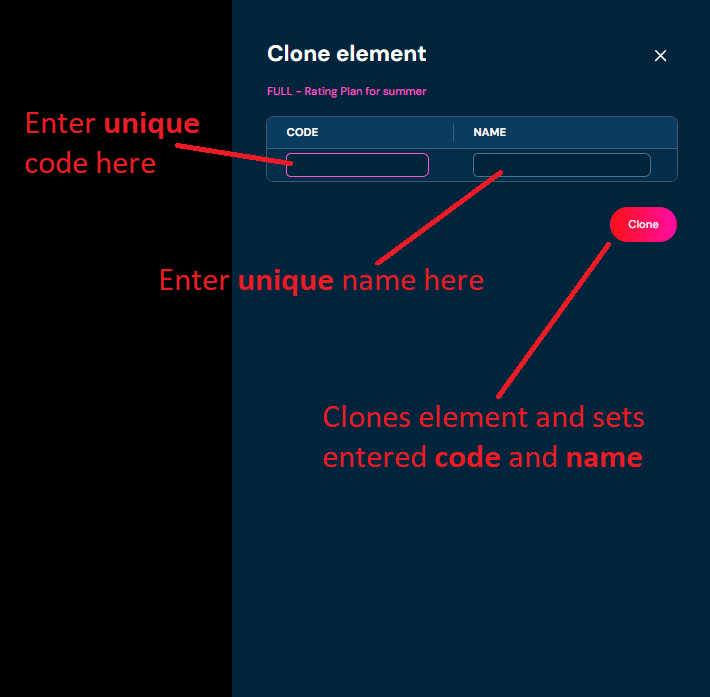
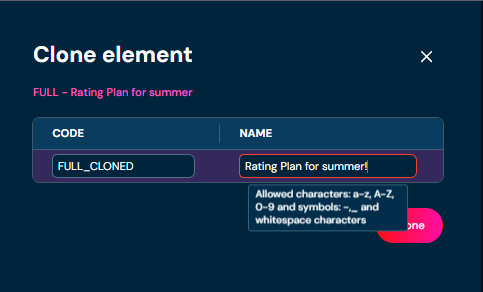
a. Choosing Clone brings up the Clone element screen.
-
You need to provide:
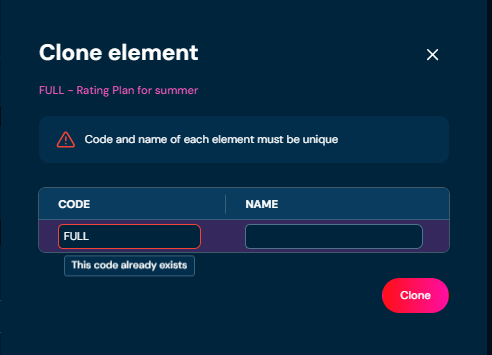
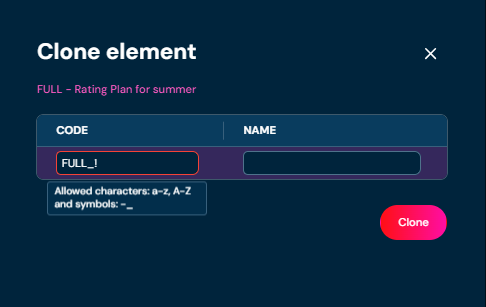
a. unique code. Code can contain only characters from collection “a-z”; “A-Z”; “-”; “_”.
i. If the code you entered is not unique, then borders will be highlighted with red color and warning message will appear.
ii. If you enter illegal characters, then borders will be highlighted with red color. Hover on field to see tooltip with more information.
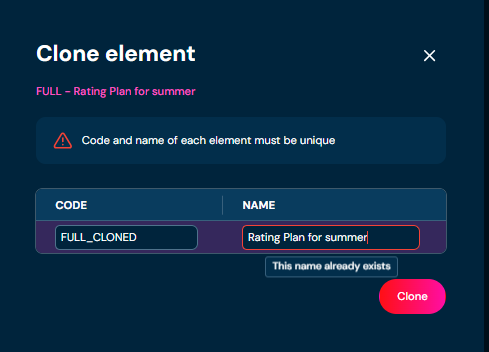
b. unique name. Name can contain only characters from collection"a-z"; “A-Z”; “0-9”; “-”; “_” and white-space characters.
i. If the code you entered is not unique, then borders will be highlighted with red color and warning message will appear.
ii. If you enter illegal characters, then borders will be highlighted with red color. Hover on field to see tooltip with more information.
-
Choose Clone.
a. Collection Elements are being cloned.
Delete Element#
If you want to delete specific Collection Element, follow these steps:
-
Choose Domain in Main toolbar.
-
In the Configuration tree, left-click on Collection Element you wish to delete.
-
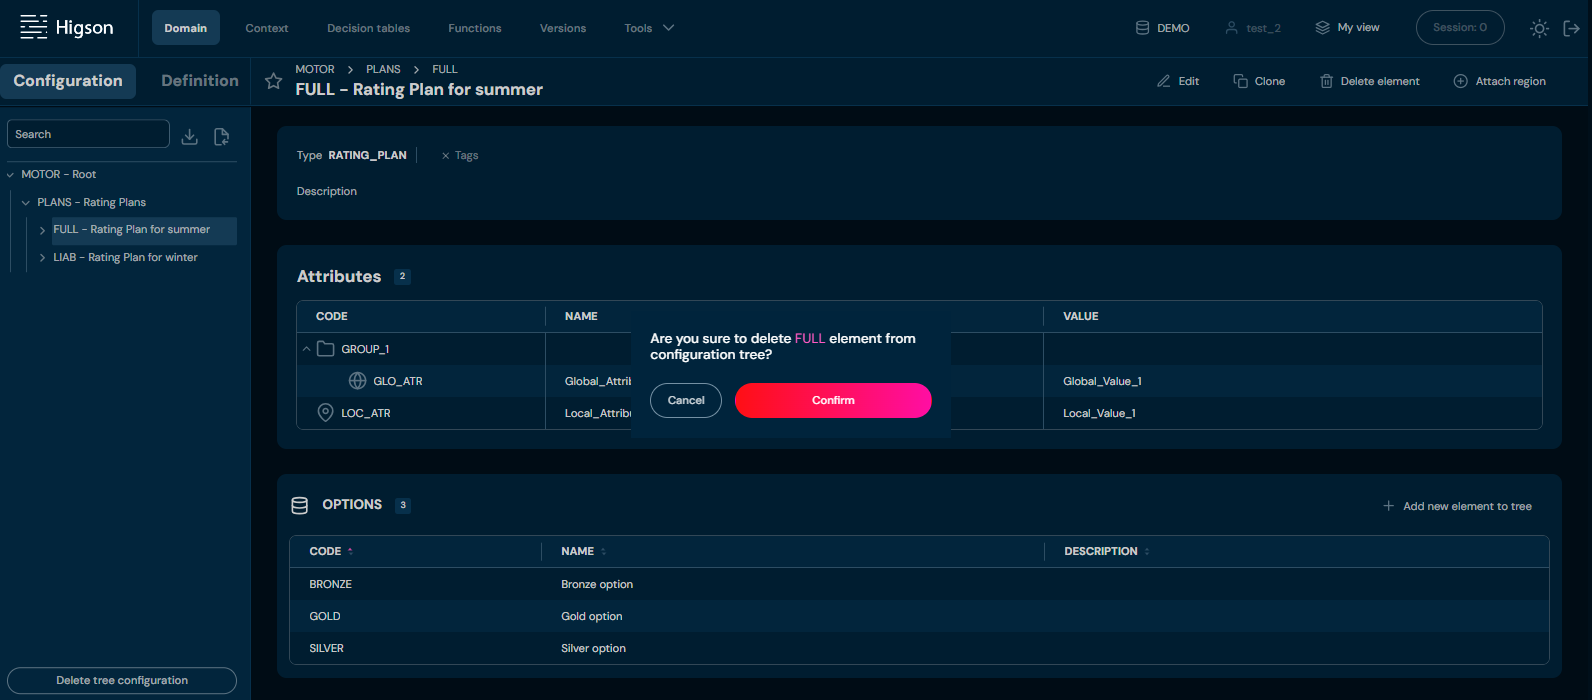
Choose Delete element.
a. After choosing Delete element action, confirmation pop up will appear.
-
Choose Confirm.
a. Collection Element is deleted from the environment.
Attach Region#
If you want to attach a region to Collection Element, follow these steps:
-
Choose Domain in Main toolbar.
-
In the Configuration tree, left-click on Collection Element with no region assigned you want to attach a region.
-
Choose Attach region
a. If Attach region action is greyed out, it means that user has active open session.
b. If Detach region action is available, it means that Collection Element has assigned reason already. You need to Detach region before you will be able to attach a new region.
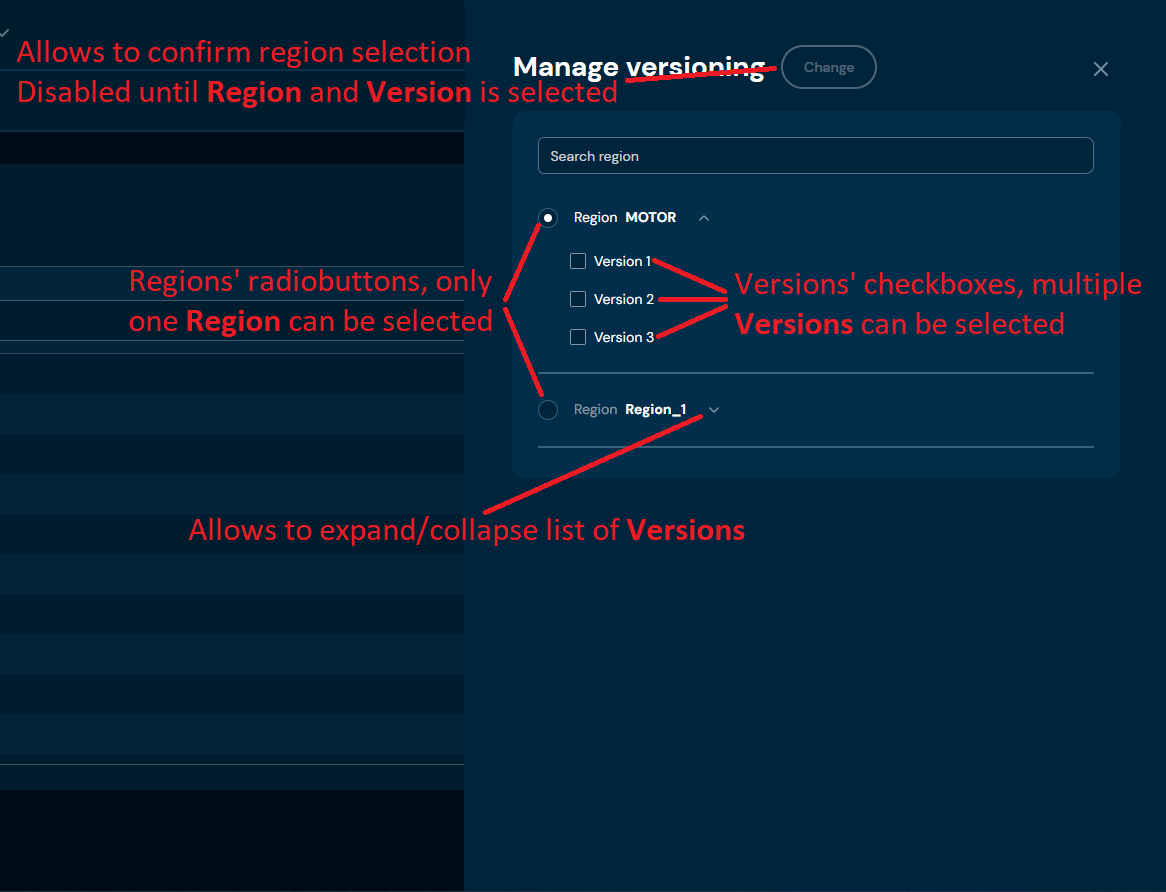
c. Choosing Attach region brings up Manage versioning screen.
-
Select Region and one or more Version.
-
Choose Change.
a. Region is being assigned to the Collection Element.
Detach Region#
If you want to detach a region from Collection Element, follow these steps:
-
Choose Domain in Main toolbar.
-
In the Configuration tree, left-click on Collection Element with a region assigned you want to detach a region.
-
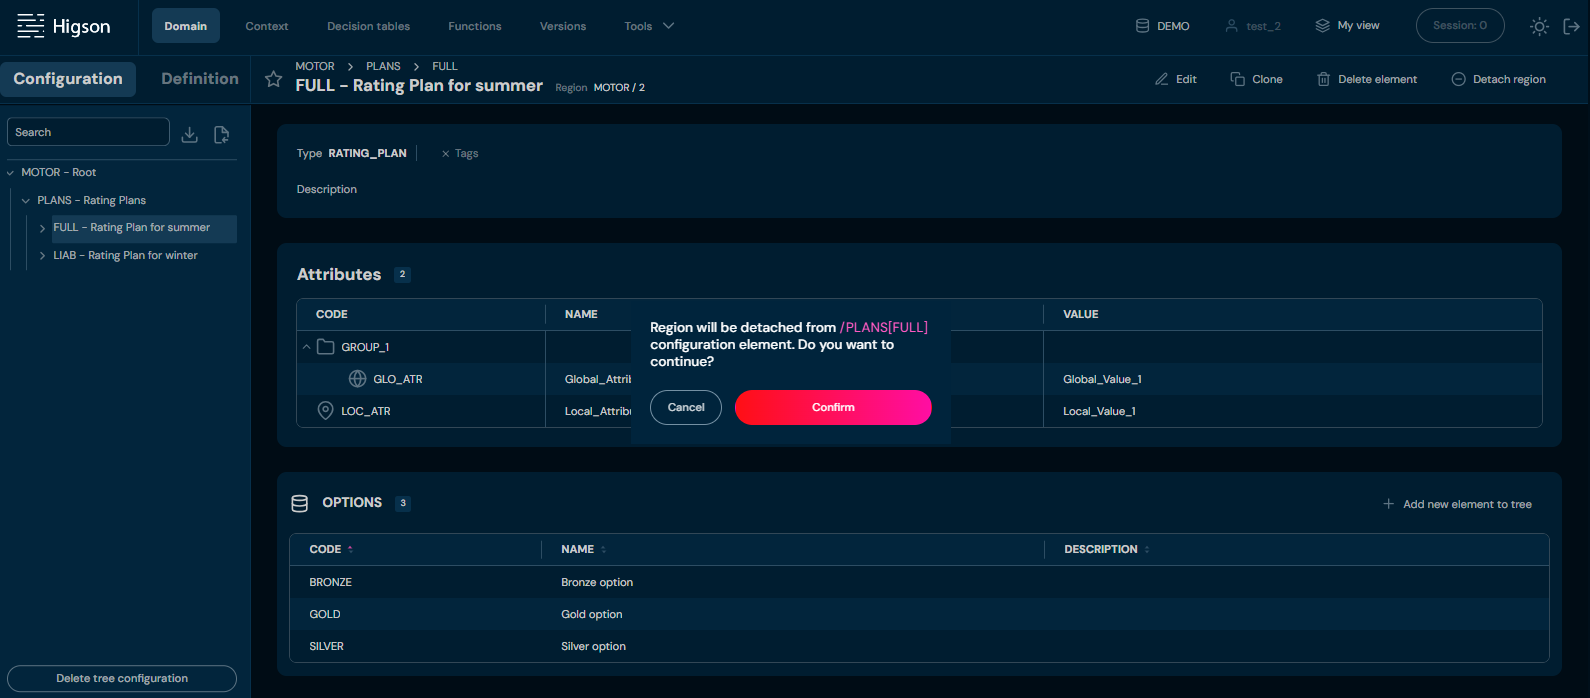
Choose Detach region.
a. If Detach region action is greyed out, it means that user has active open session.
b. If Attach region action is available, it means that Collection Element has no region assigned.
c. After choosing Detach region action, confirmation pop up will appear.
-
Choose Confirm.
a. The Region is being detached from Collection Element.