Decision tables and functions answer the question of how you want to parameterize. Context answers the question of what the parameterization may depend on. And last but not least - domain answers the question of what you want to parameterize.
Indeed, domain model is what we want to be configurable.
- Using
Menu-Domain-Definitionwe can design domain types, their relationships and attributes. - Using
Menu-Domain-Configurationwe can create instances of domain types and configure their attributes with use of functions or decision tables.
Example#
To explain what domain definition and configuration is, it is best to use an example. Imagine we want to configure life insurance products:
- Each life insurance product consists of covers and funds,
- Each cover has different maximum insurance sum, availabilty logic, premium logic etc.,
- Each fund has different transfer fee etc.
We can use Domain definition to define types for our domain, for instance:
type:       Product
attributes: none
elements:
  - covers: Cover[]     // each Product has a collection of Cover elements
  - funds:  Fund[]      // each Product has a collection of Fund elements

type:       Cover
attributes:
  - max_insurance_sum   // value we want to configure
  - is_available        // boolean - we want to make cover unavailable for some contexts
  - base_premium        // decimal value that we want to calculate with our tariff algorithm

type:       Fund
attributes:
  - transfer_fee
  - ...
The above example domain definition says that:
- would be able to configure transfer_fee for each Fund
- would be able to configure max_insurance_sum for each Cover
- would be able to configure is_available for each Cover
- would be able to configure base_premium for each Cover.
Next, we can use Domain configuration to create configuration tree with domain elements and their attributes:
Product [code = PR1]
  covers
    * Cover[CA]
       - max_insurance_sum   =  10000
       - is_available        =  yes
       - base_premium        =  50.0
    * Cover[CB]
       - max_insurance_sum   =  from decision table : 'pr1.covers.maxInsuranceSum'
       - is_available        =  yes
       - base_premium        =  from function       : 'pr1.premium.calculate'
     ...

Product [PT3]
  covers
    * Cover[DB]
       - max_insurance_sum   =  from function       : 'default.maxInsuranceSum'
       - is_available        =  from decision table : 'pt3.cover.isAvailable'
       - base_premium        =  from decision table : 'pt3.tariff.basePremium'
     ...

and so on...
Now an application connected to Higson can use any defined logic solely through the domain layer. Here are some example scenarios:
- getting all products from domain tree,
- getting all covers for product
PR1, - getting all covers for product
PT3with attributeis_availableequal totrue, - calculate premium for given cover - just by getting value from
base_premiumattribute.
For larger projects, we do not recommend using decision tables and functions directly in your application code. Instead, we recommend using parameterization only through the domain layer.
This approach, which we call polymorphic configuration, makes the application even better decoupled from the business logic.
For detailed information on defining and working with domain, see Domain Definition and Domain Configuration.
In Domain definition we can design domain types, their relationships and attributes.
If you are new to Higson Domain, you may want to read the introductory section Introduction to Domain.
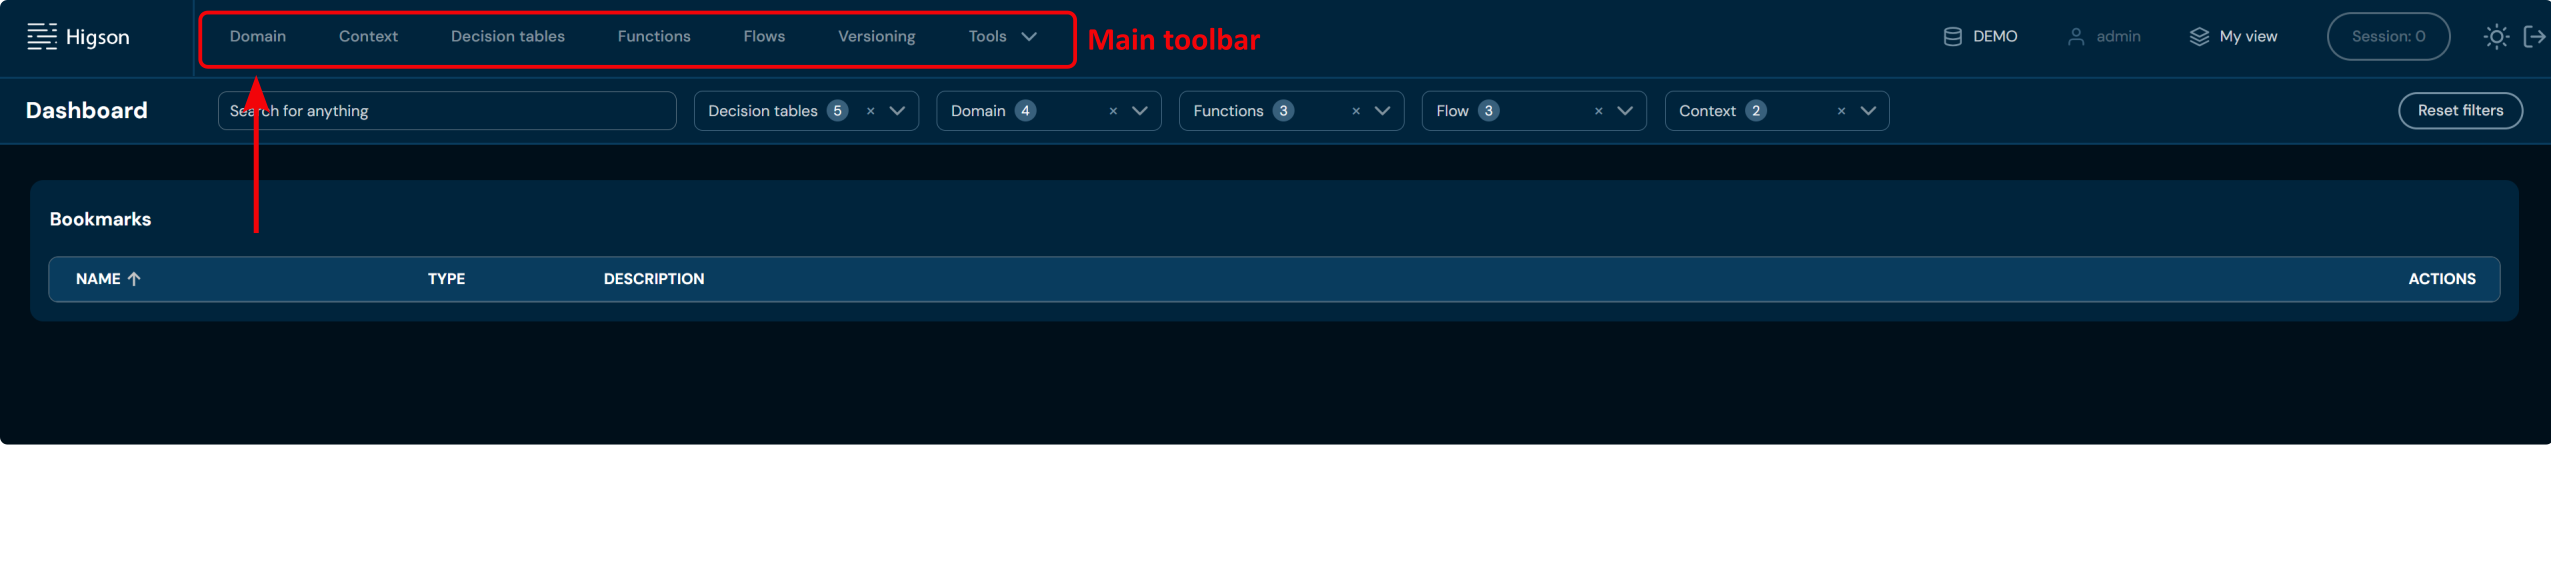
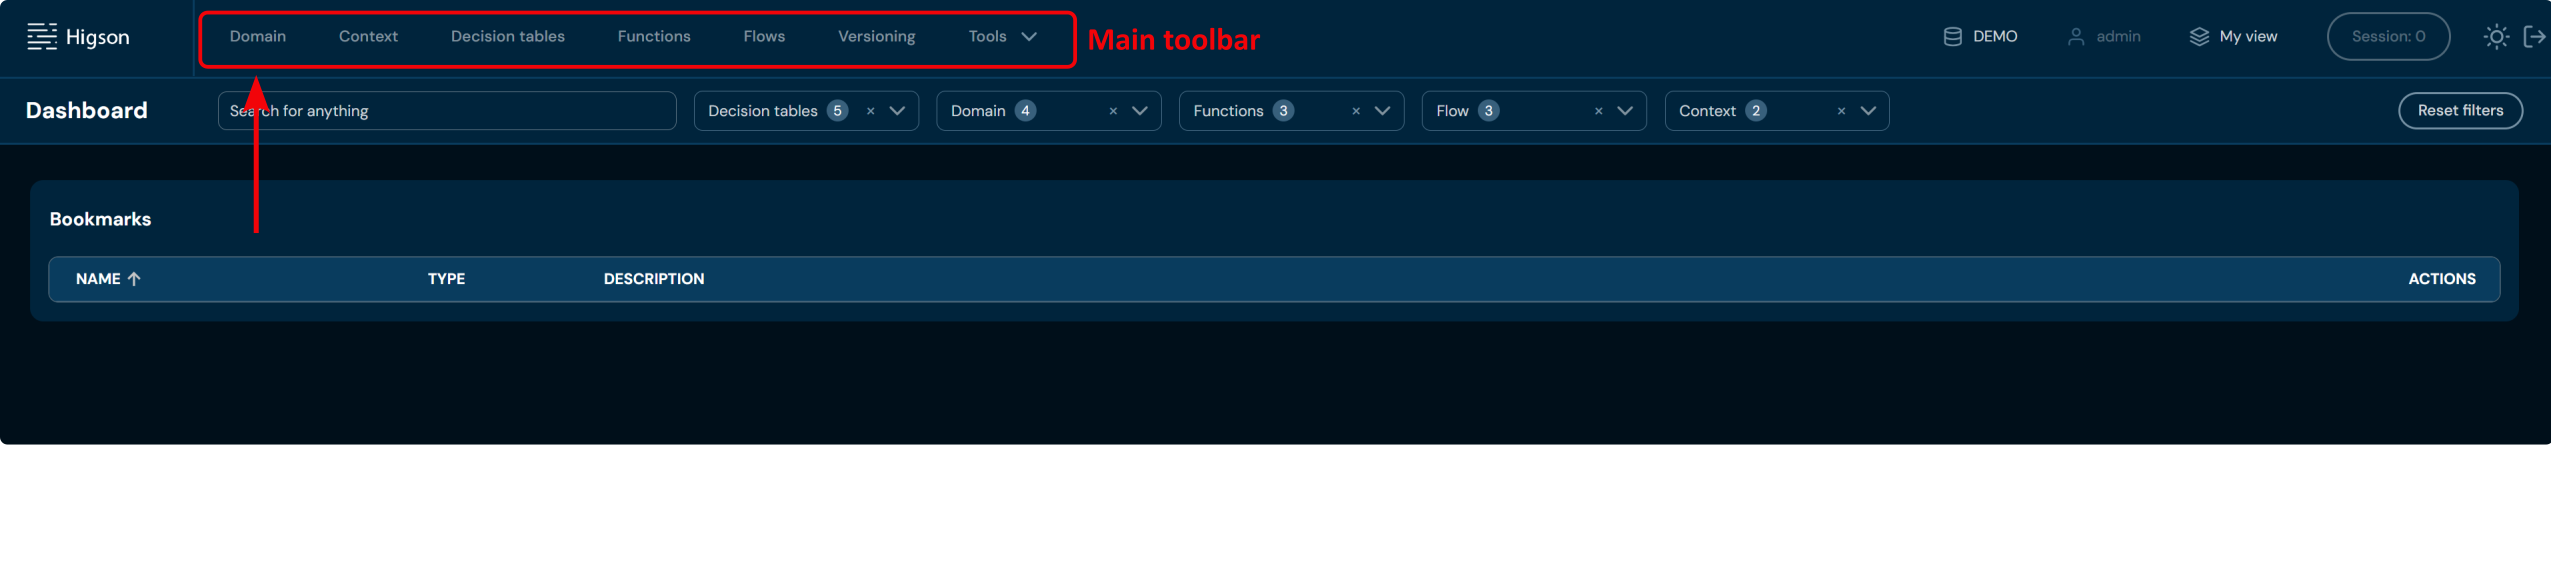
In order to see Domain Definition, select Domain in Main Toolbar.
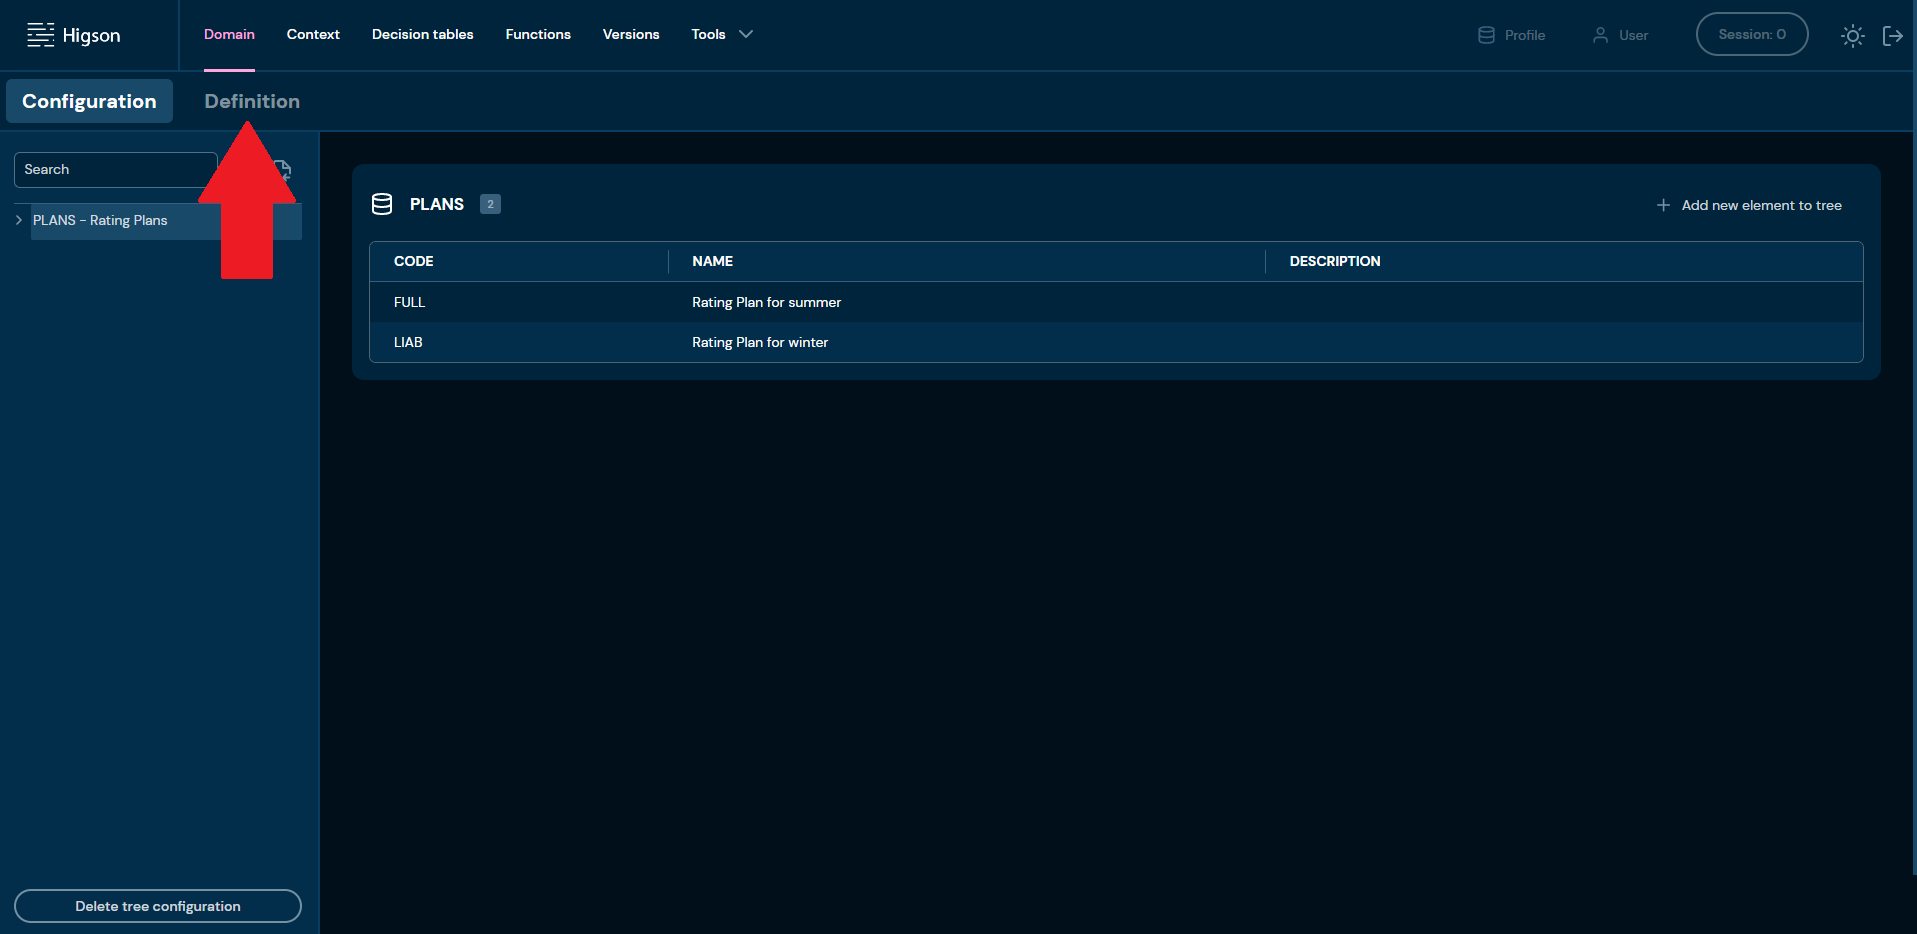
Select Definition tab.
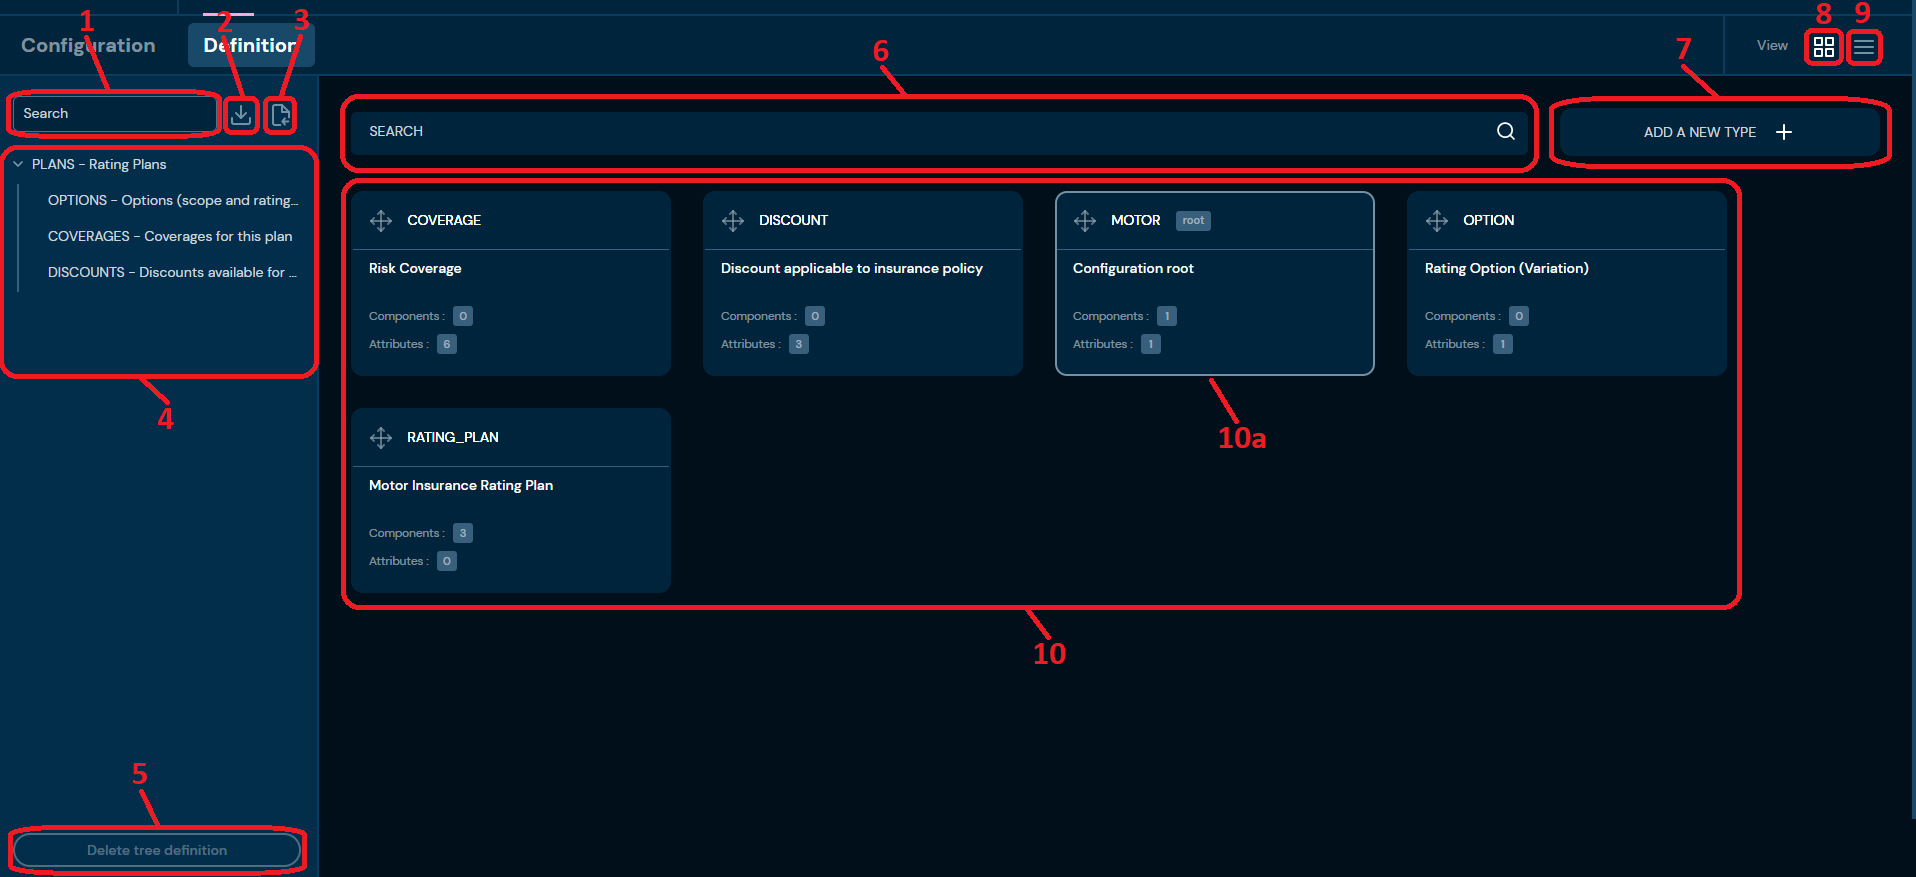
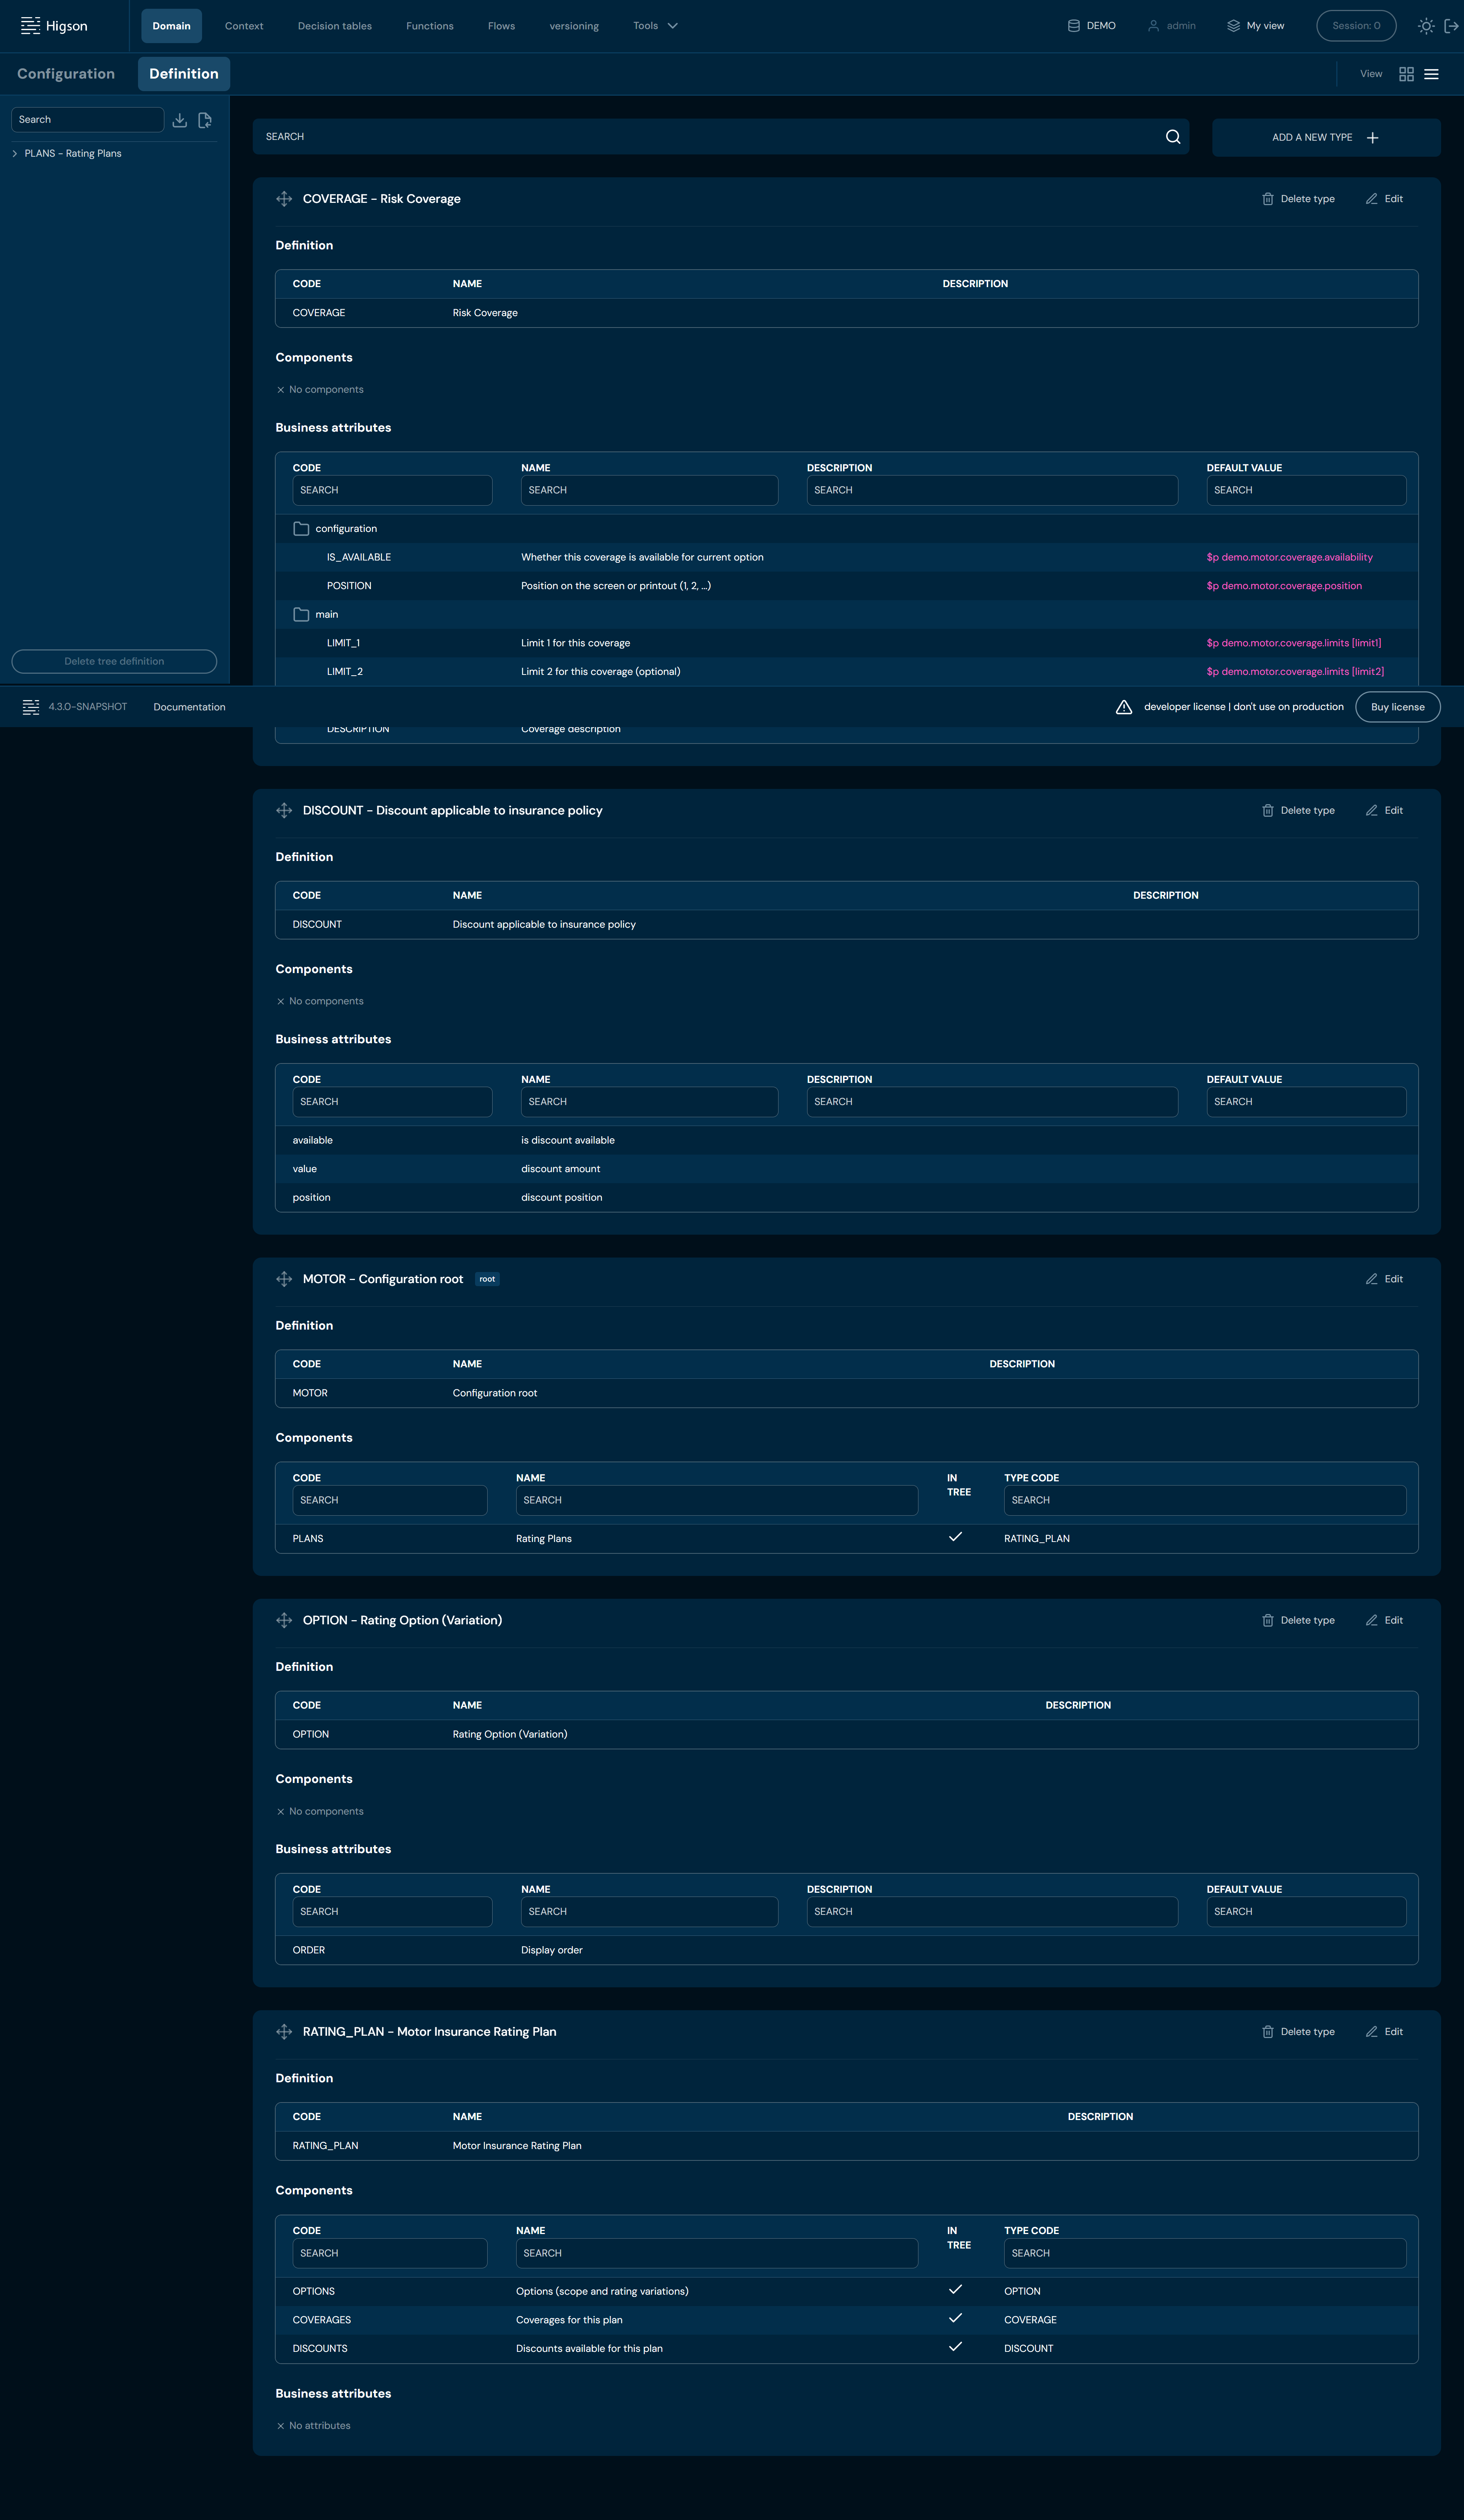
After you enter Definition you will see screen of all definition types:
| No. | Name | Description |
|---|---|---|
| 1. | Tree search | Filter by any string provided by the user. Definition tree navigates to all Types matching the provided criteria. |
| 2. | Download | Downloads an XML file that contains the entire Domain Definition. To learn more about downloading the Definition, go here. |
| 3. | Upload Domain | Allows uploading Domain Definition from an XML file. To learn more about uploading the Definition, go here. |
| 4. | Definition tree | A visual representation of dependencies between Definition Types. |
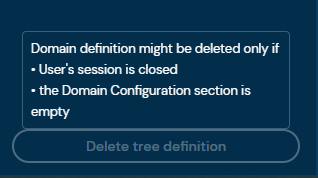
| 5. | Delete tree | Deletes all Definition Types. Action is available only if: - User’s session is closed, - The Domain Configuration section is empty. Otherwise, the action is greyed out. |
| 6. | Types search | Type any phrase to find the right type. |
| 7. | Add a new Type | Allows creating new Definition Types. To learn more about adding Definition Types, go here |
| 8. | Tiles view | Enables viewing Definition Types as tiles. |
| 9. | List view | Enables viewing Definition Types as a list. |
| 10. | All Definition Types | Every Definition Type created is visible here. |
| 10a. | Configuration ROOT | Configuration ROOT is marked more distinctively from other Definition Types. Borders of ROOT are highlighted, and the label “root” is visible. |
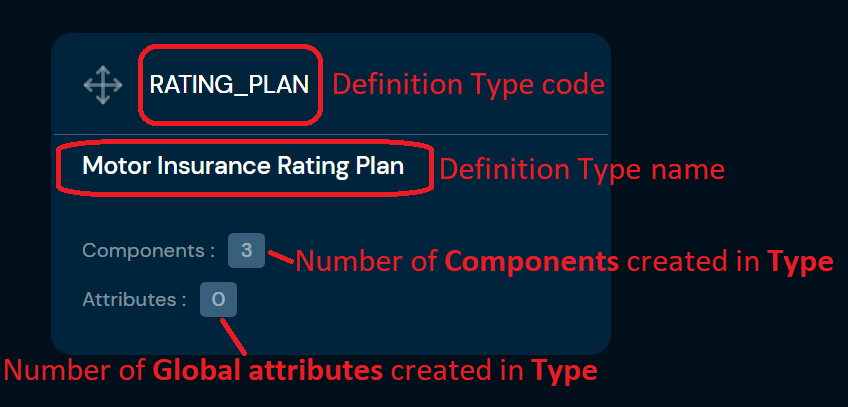
Definition Type Tile#
List View of Definition Types#
Add a New Type#
If you want to add a new definition type, follow these steps:
-
Choose Domain in Main toolbar.
-
Choose Definition tab.
-
Choose ADD A NEW TYPE +
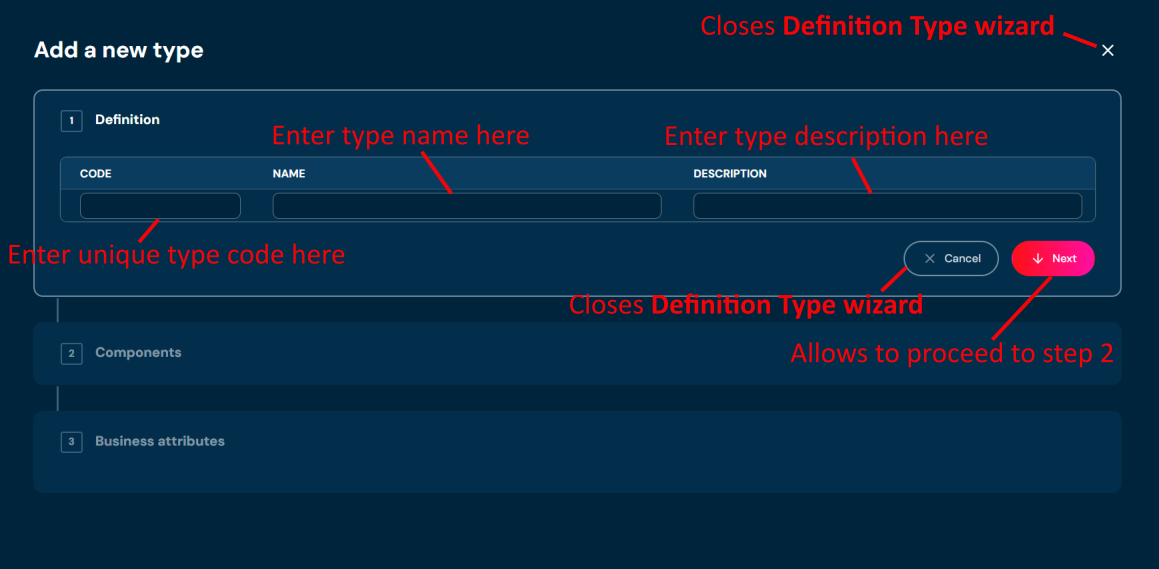
a. Choosing ADD A NEW TYPE + opens a step-by-step Definition Type wizard.
-
In step 1. Definition, you:
a. need to provide unique Type code. Code can contain only characters from collection a-z; 0-9; “-”; “_” and it can’t start with “-”.
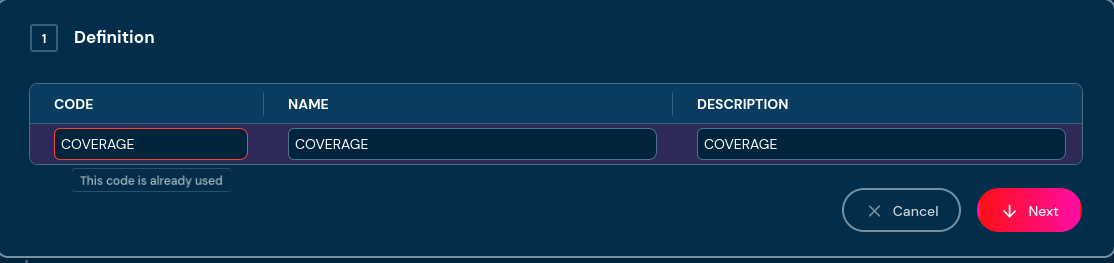
i. If entered code in step 1. Definition is already used by another type, then validation error will appear.
b. need to provide Type name. Name can contain only characters from collection a-z; 0-9; “-”; “_” and it can’t start with “-”.
c. can provide Type description. Description cannot contain characters like “<”; “>”; “@”; “$”; “|” and it * cannot* start with any “special character”, for example “!”
d. If you change your mind and don’t want to create a new type, you can choose Cancel in step 1. Definition.
-
Choose Next.
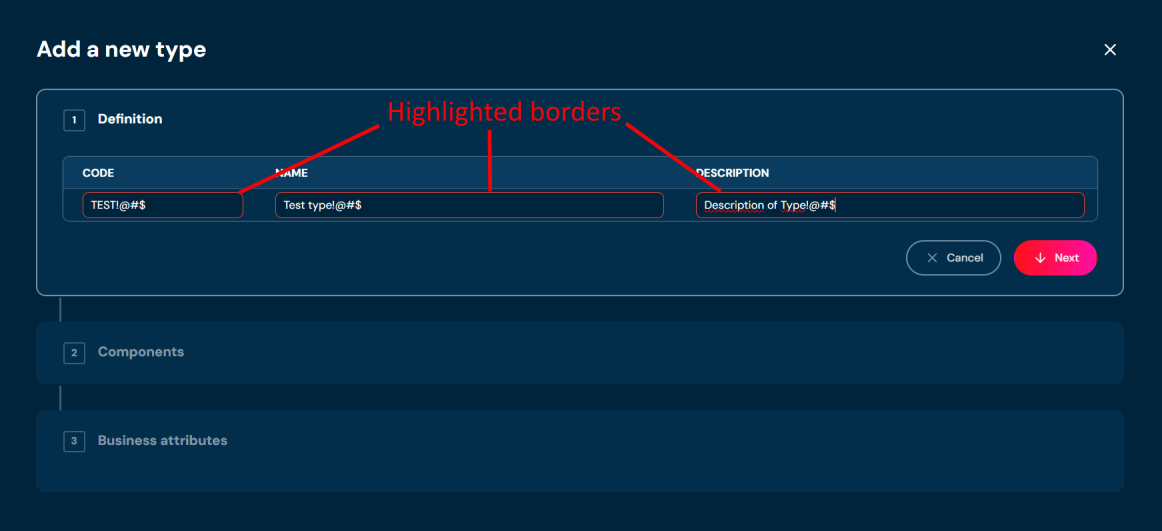
a. If you enter illegal characters in code, name or description field, then borders will be highlighted with red color, and you will not be able to proceed to the next step. Hover mouse over the field to see tooltip with more details.
-
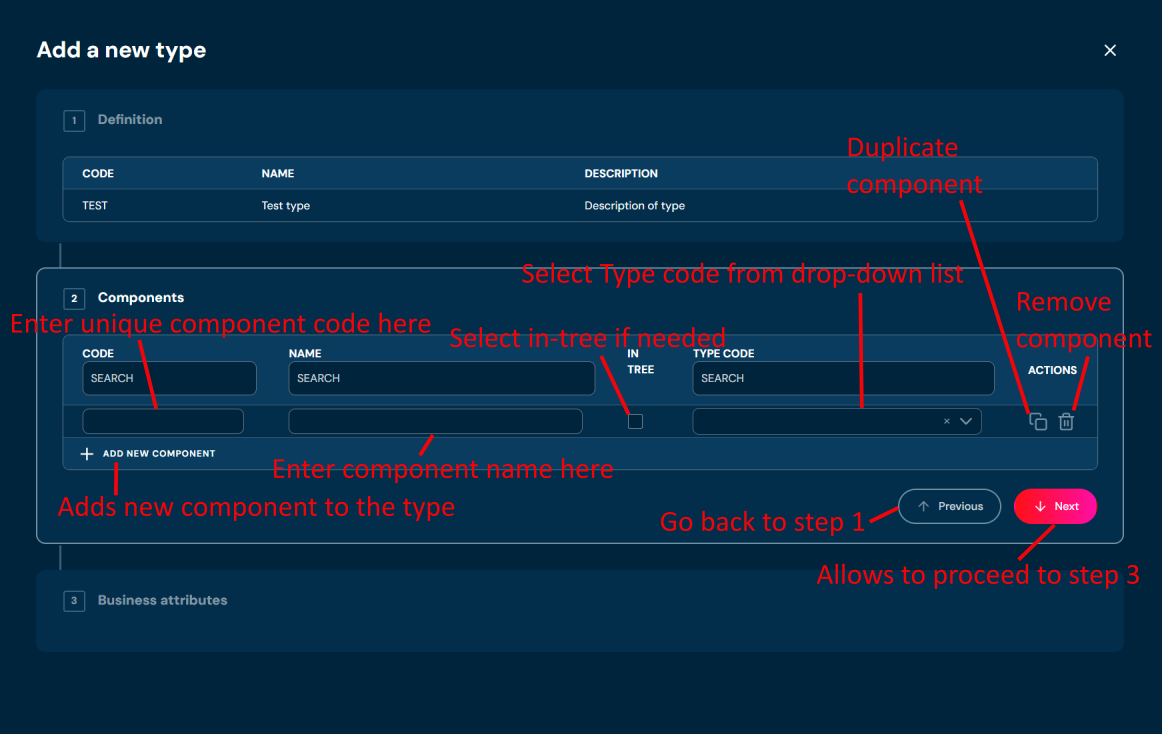
In step 2. Components you may add/duplicate/remove components. This data is not necessary to save a type.
a. If you decide to add a component, you must provide code (unique), name and type code.
i. Type code is a drop-down list with codes of all types
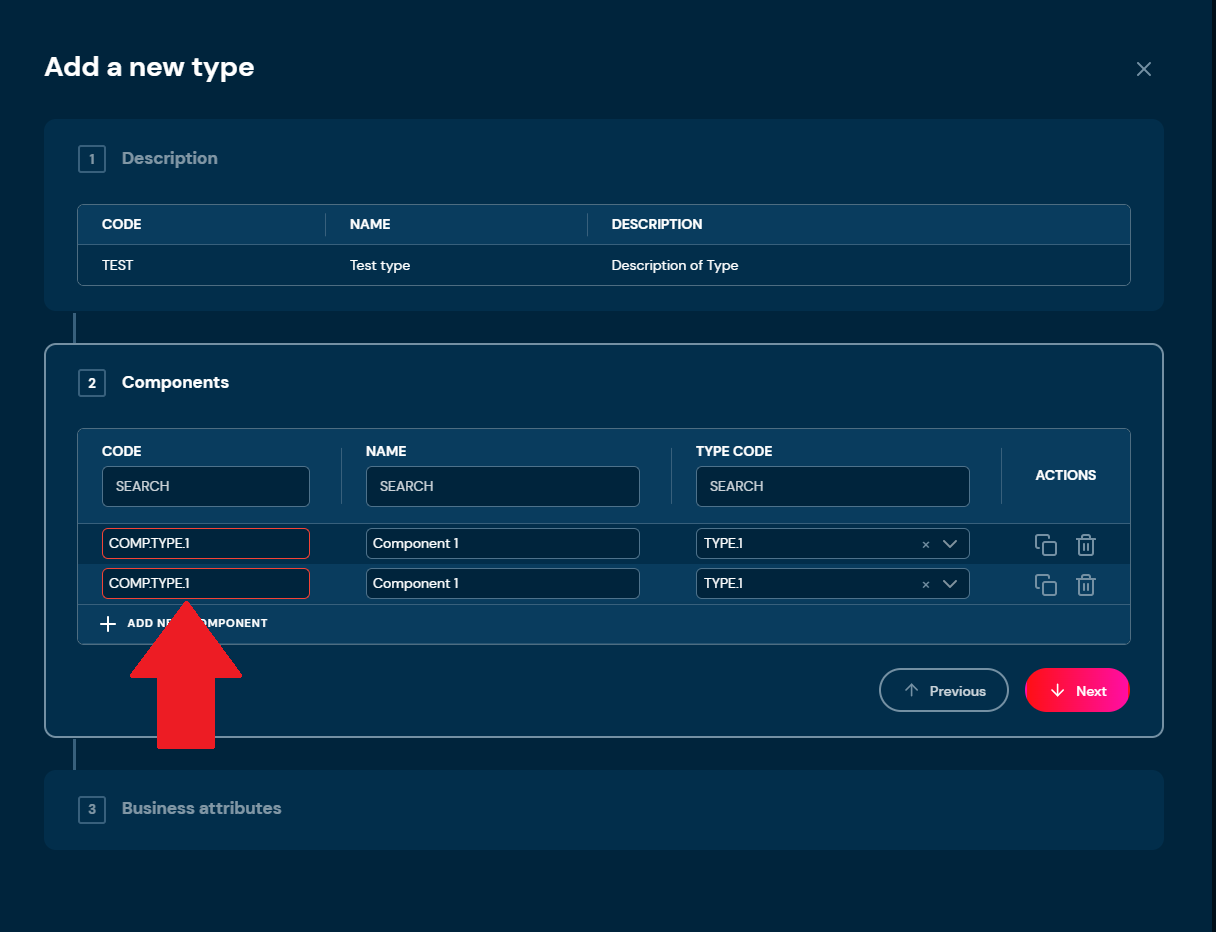
b. If you entered the same code in at least two components, then borders will be highlighted with red color, and you will not be able to proceed to step 3. Business attributes
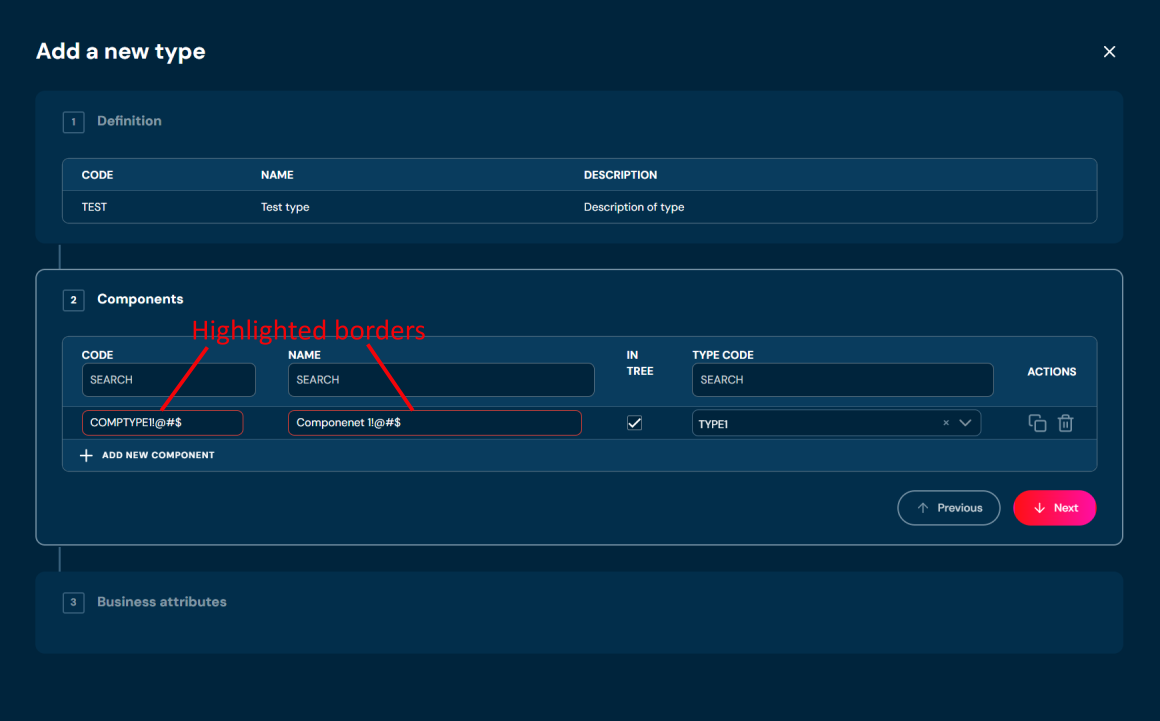
c. If you enter illegal characters in code or name field, then borders will be highlighted with red color, and you will not be able to proceed to the next step. Hover mouse over the field to see tooltip with more details.
d. If you choose Previous you will go back to step 1. Definition
-
Choose Next.
-
In step 3. Business attributes you may add/duplicate/remove global attributes. This data is not necessary to save a type.
a. If you decide to add business attributes, you must provide code unique name. Providing default value is optional.
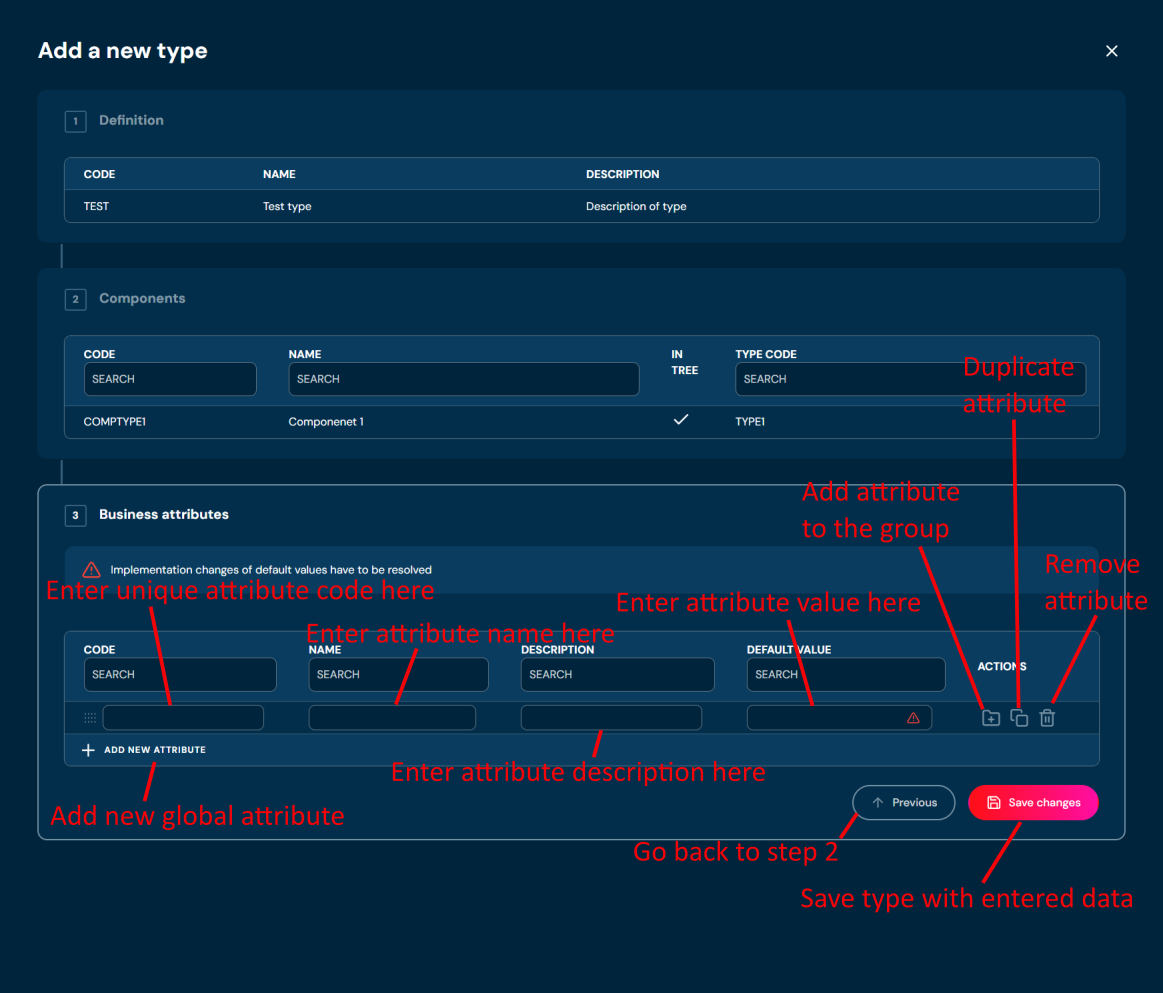
b. If you entered the same code in at least two attributes, then borders will be highlighted with red color, and you will not be able to save a type.
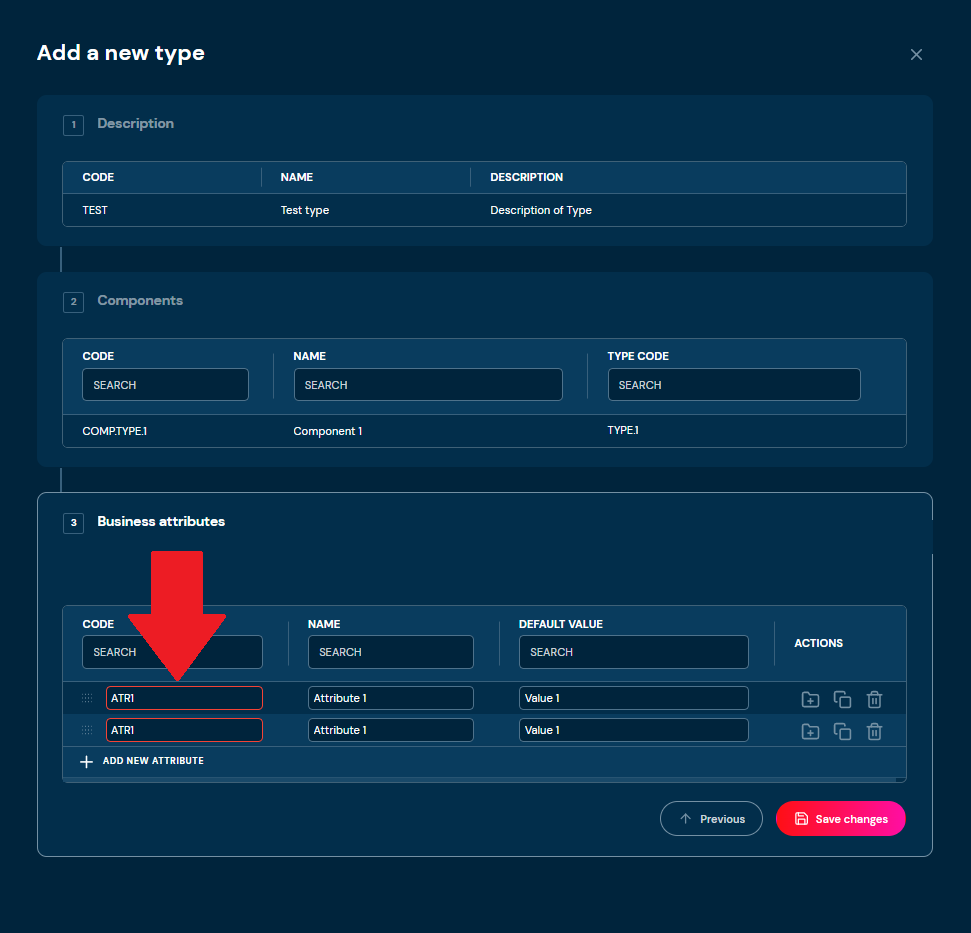
-
In Default Value field, you must click on red exclamation mark to indicate where do you want to implement changes.
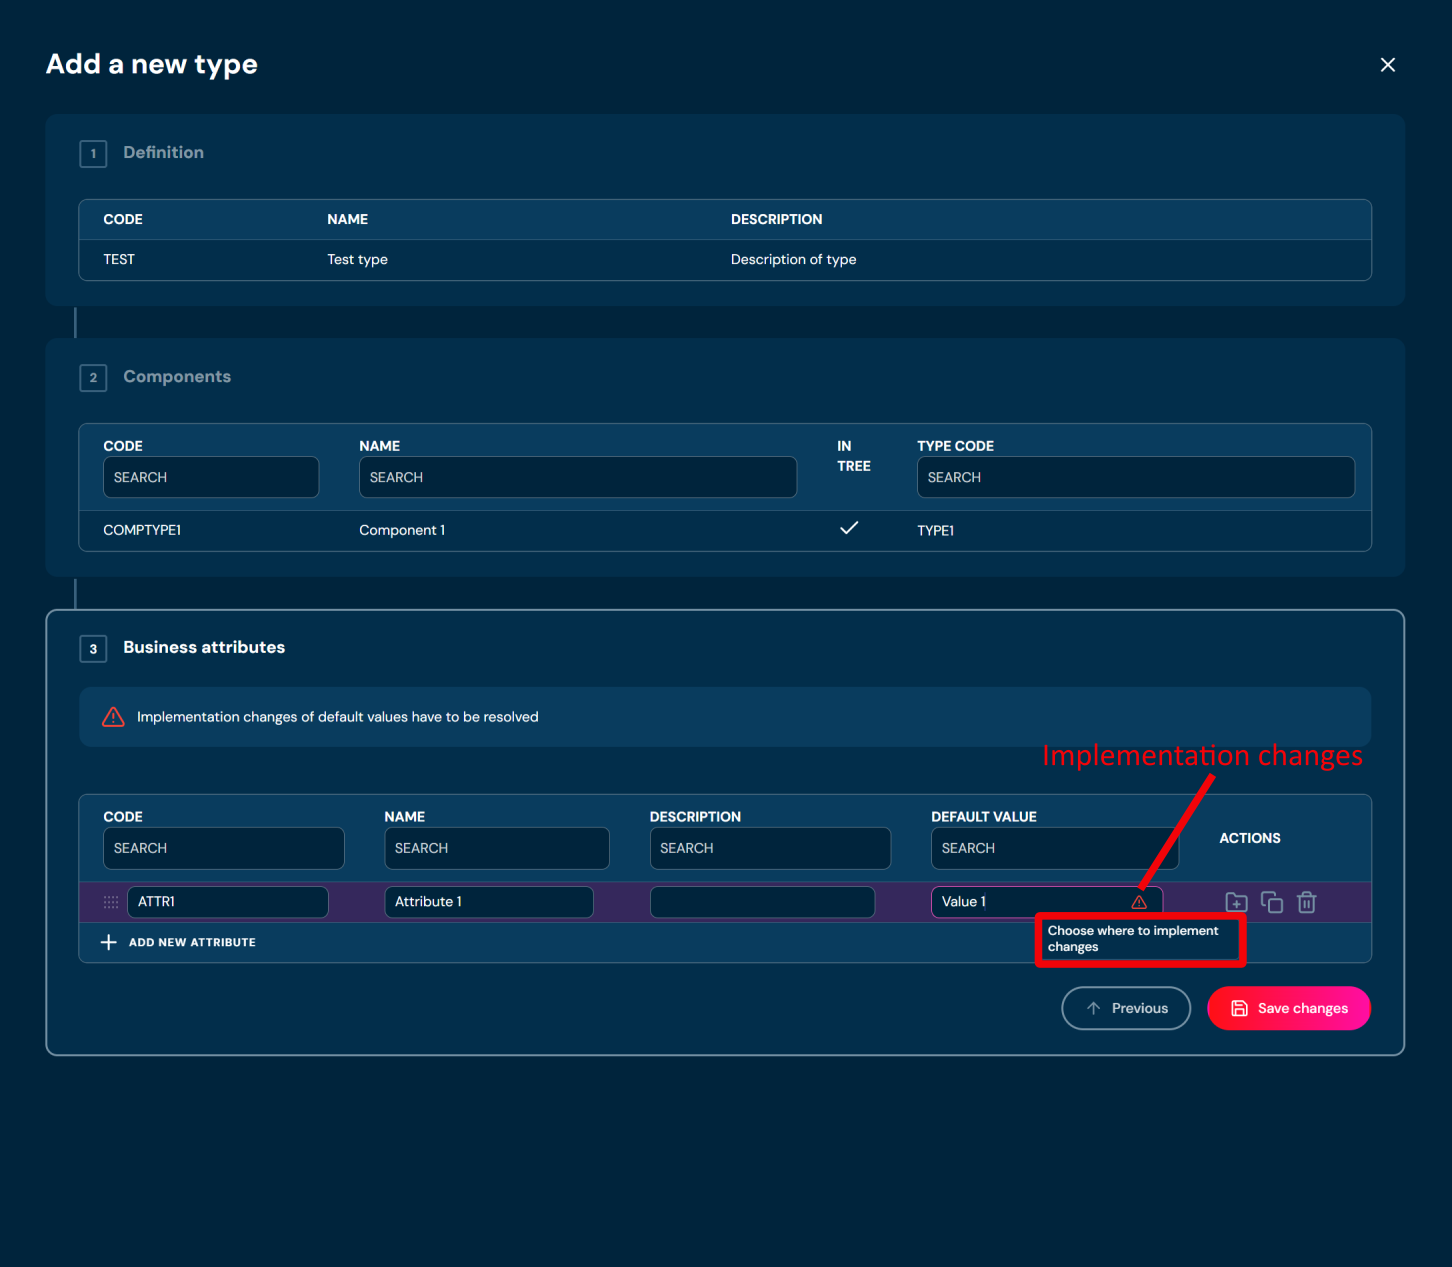
a. The pop up will appear, choose one of the available options and click Save changes
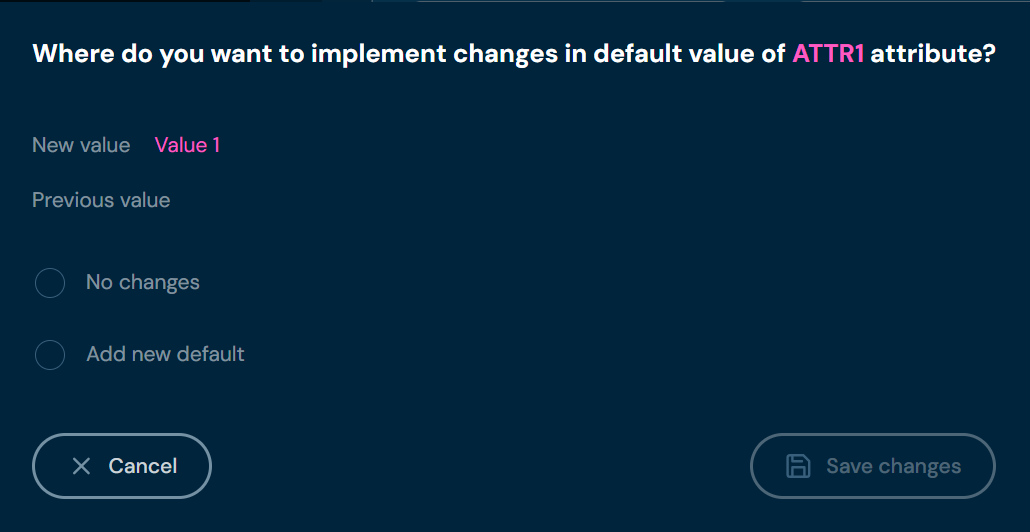
-
Choose Save changes.
Download Domain Definition#
If you want to download Domain Definition, follow these steps:
-
Choose Domain in Main toolbar.
-
Choose Definition tab.
-
Choose Download Domain Definition in Definition tree.
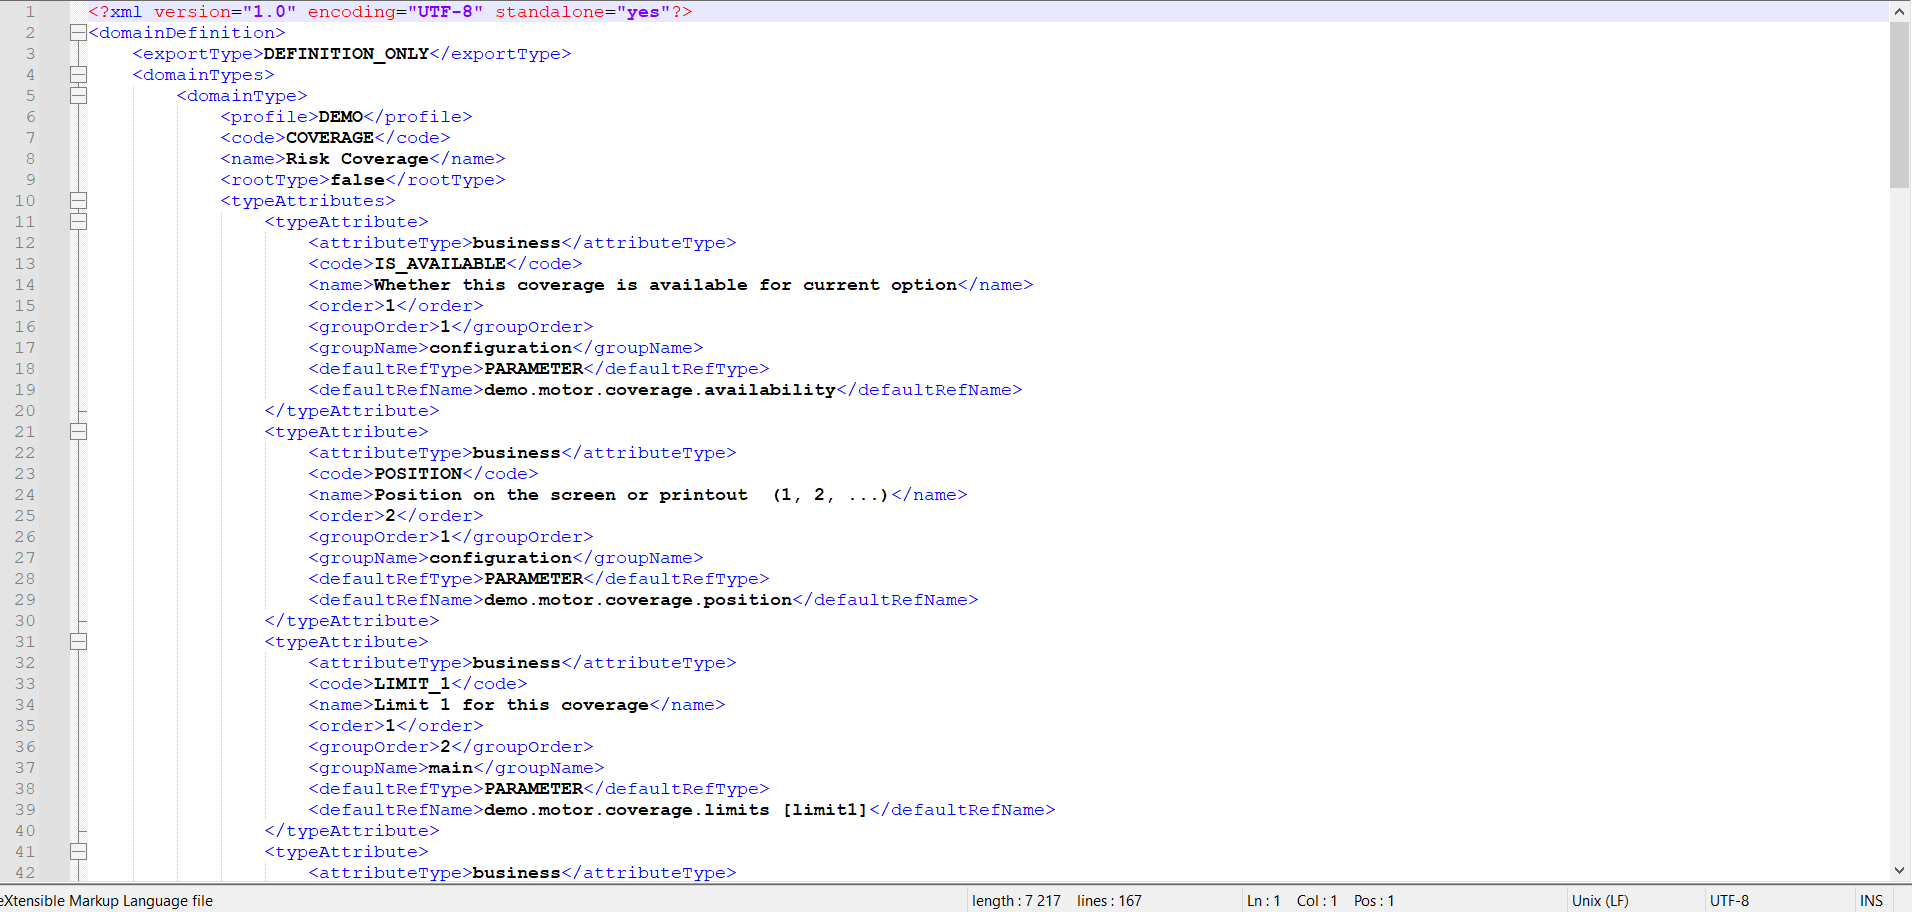
a. Choosing Download Domain Definition downloads an XML file that contains all definition types and all dependencies between definition types. Example file:
Upload Domain Definition#
If you want to upload Domain Definition, follow these steps:
-
Choose Domain in Main toolbar.
-
Choose Definition tab.
-
Choose Upload Domain Definition in Definition tree.
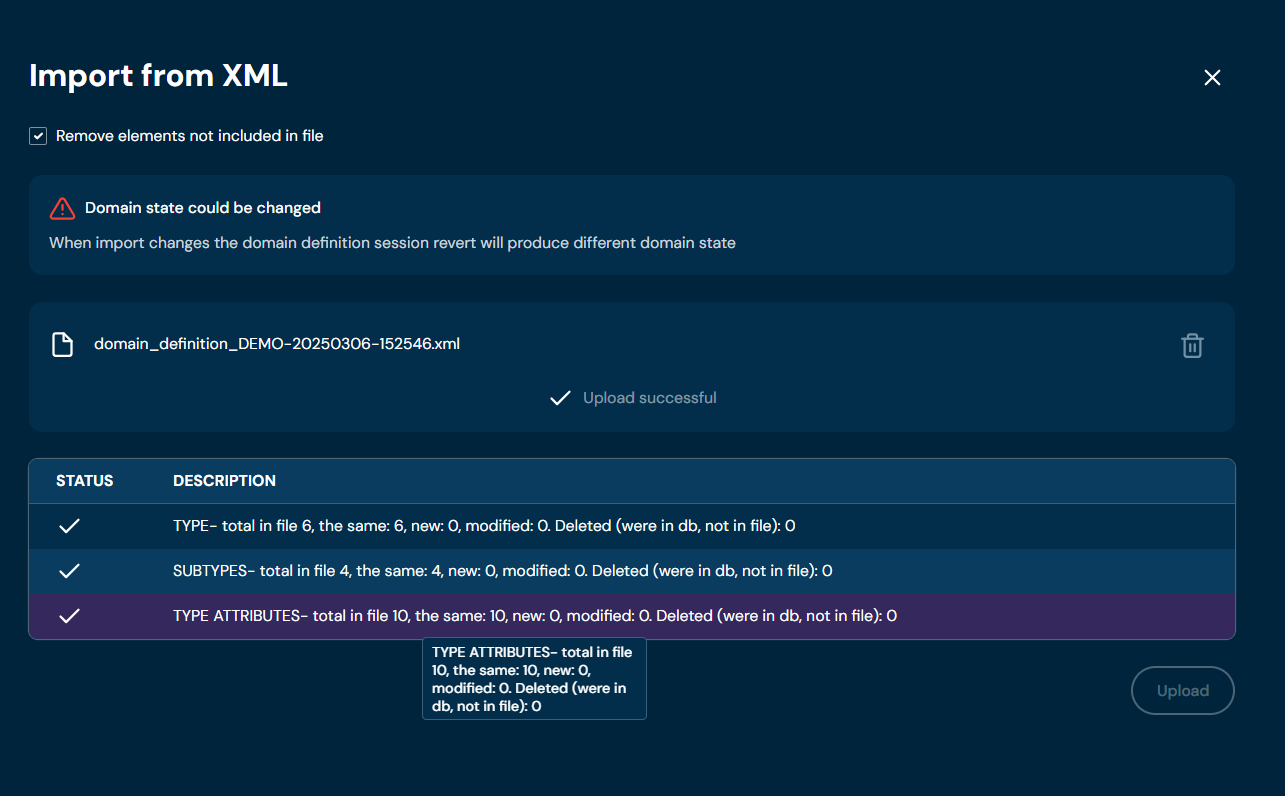
a. Choosing Upload Domain Definition brings up Import from XML screen.
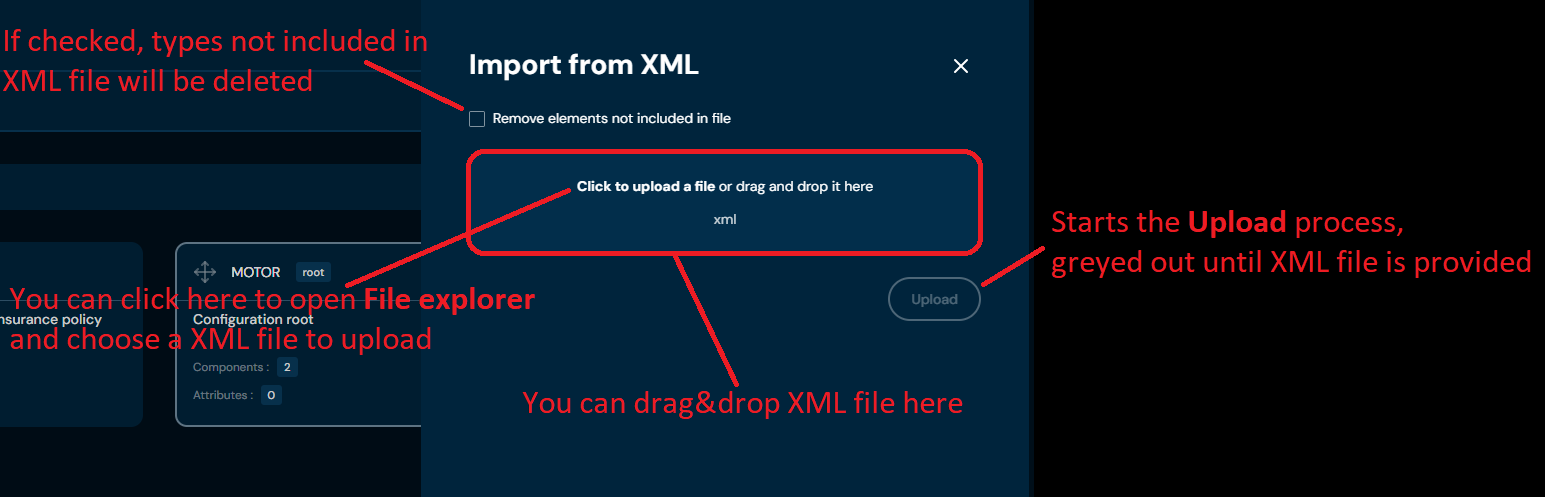
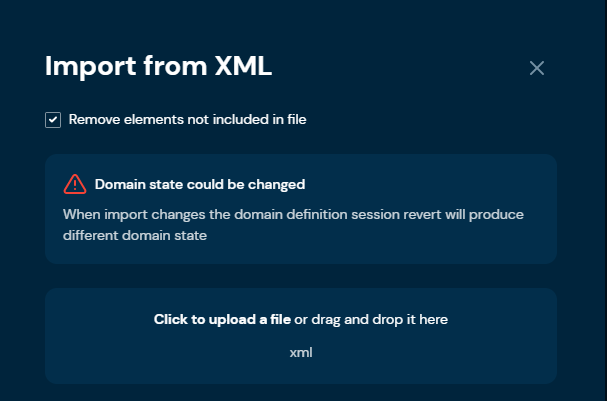
b. If you select checkbox Remove elements not included in file, then warning will appear.
-
Drag&drop desired file or Click to upload a file and choose file in File explorer.
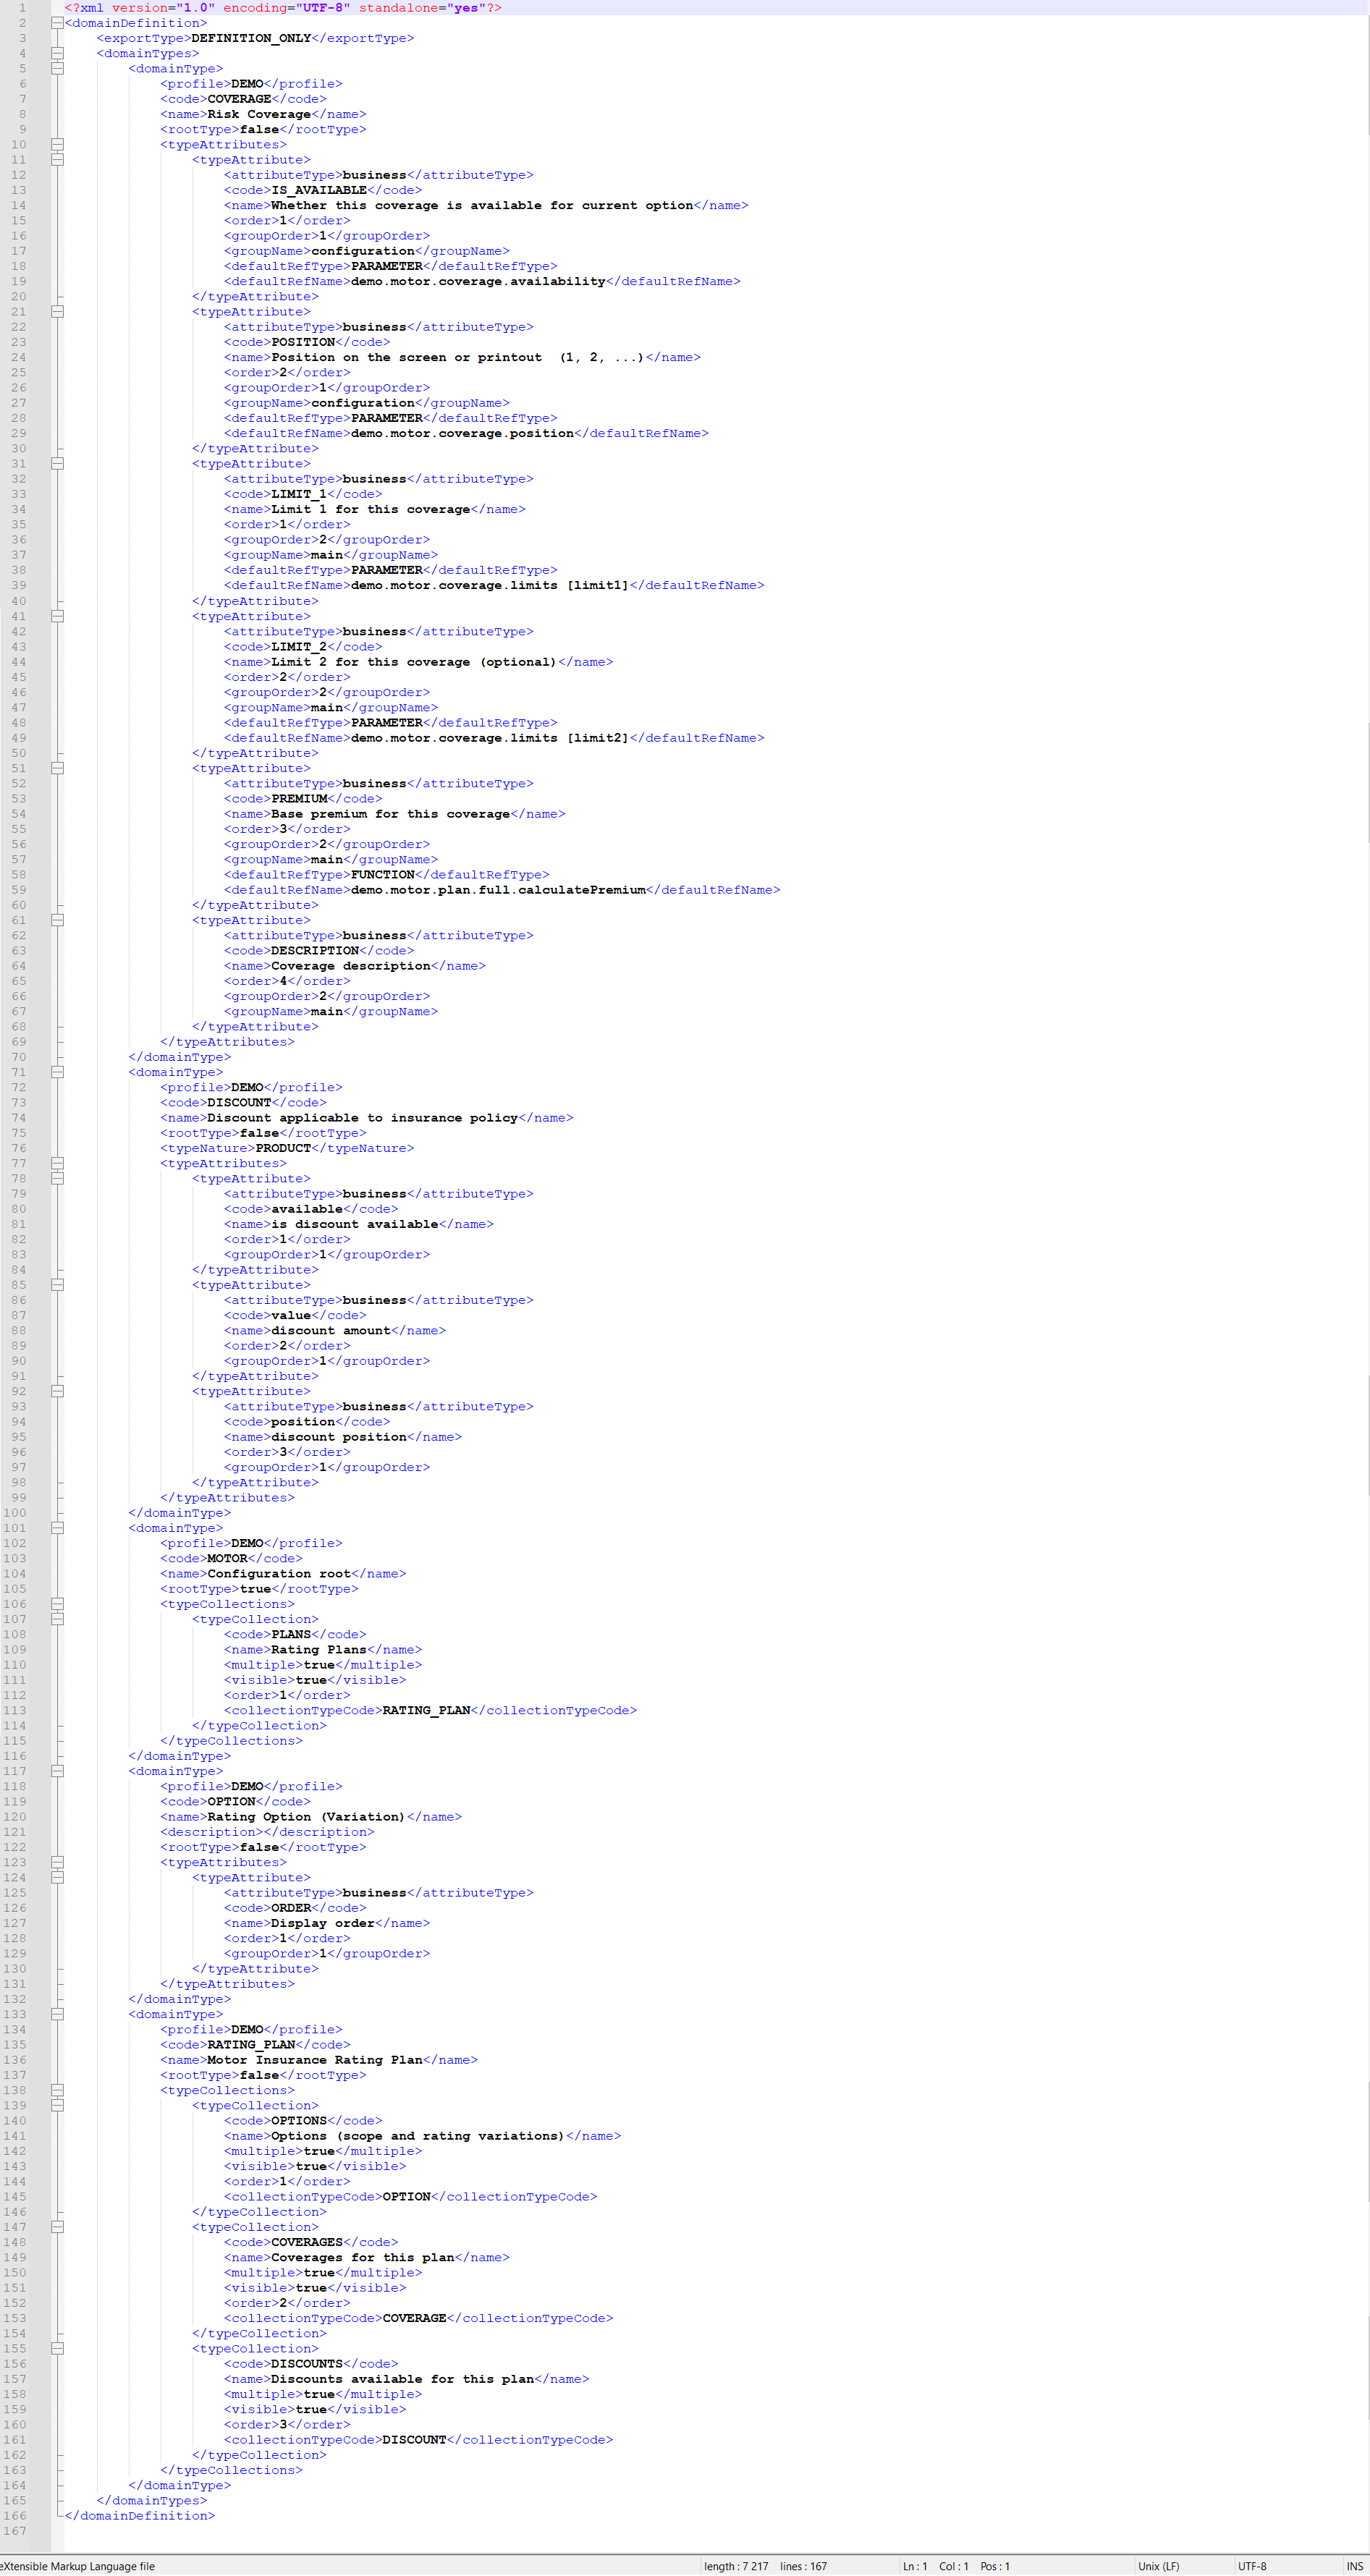
a. Correct XML file should look like this:
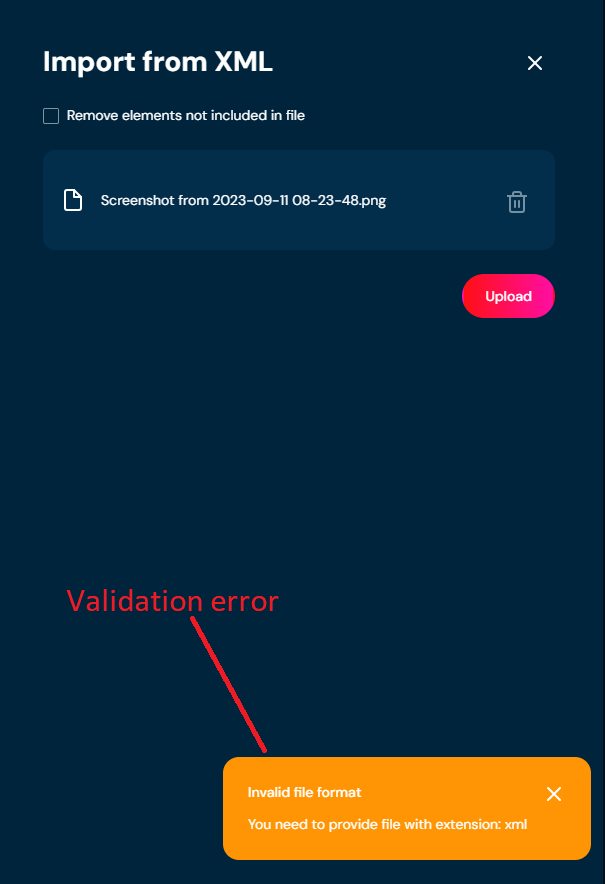
b. If you choose a file with extension other than XML, then validation error will pop up
-
Choose Upload.
-
The domain definition is uploaded correctly when the message Upload successful appears, as well as a report containing import statistics.
a. If validation error occurs (see above), then an upload process is being aborted.
b. If you checked checkbox Remove elements not included in file in step 3, then adequate information about changes will appear after uploading a file.
Delete Definition Tree#
If you want to delete the entire Domain Definition, follow these steps:
-
Choose Domain in Main toolbar.
-
Choose Definition tab.
-
Check the status of Delete definition tree buton:
a. If button is greyed out, continue from step 4. Before deleting entire domain definition, you need to delete entire domain configuration first and publish session.
b. If buton is available, continue from step 11.
-
Choose Configuration tab.
-
Choose Delete tree configuration.
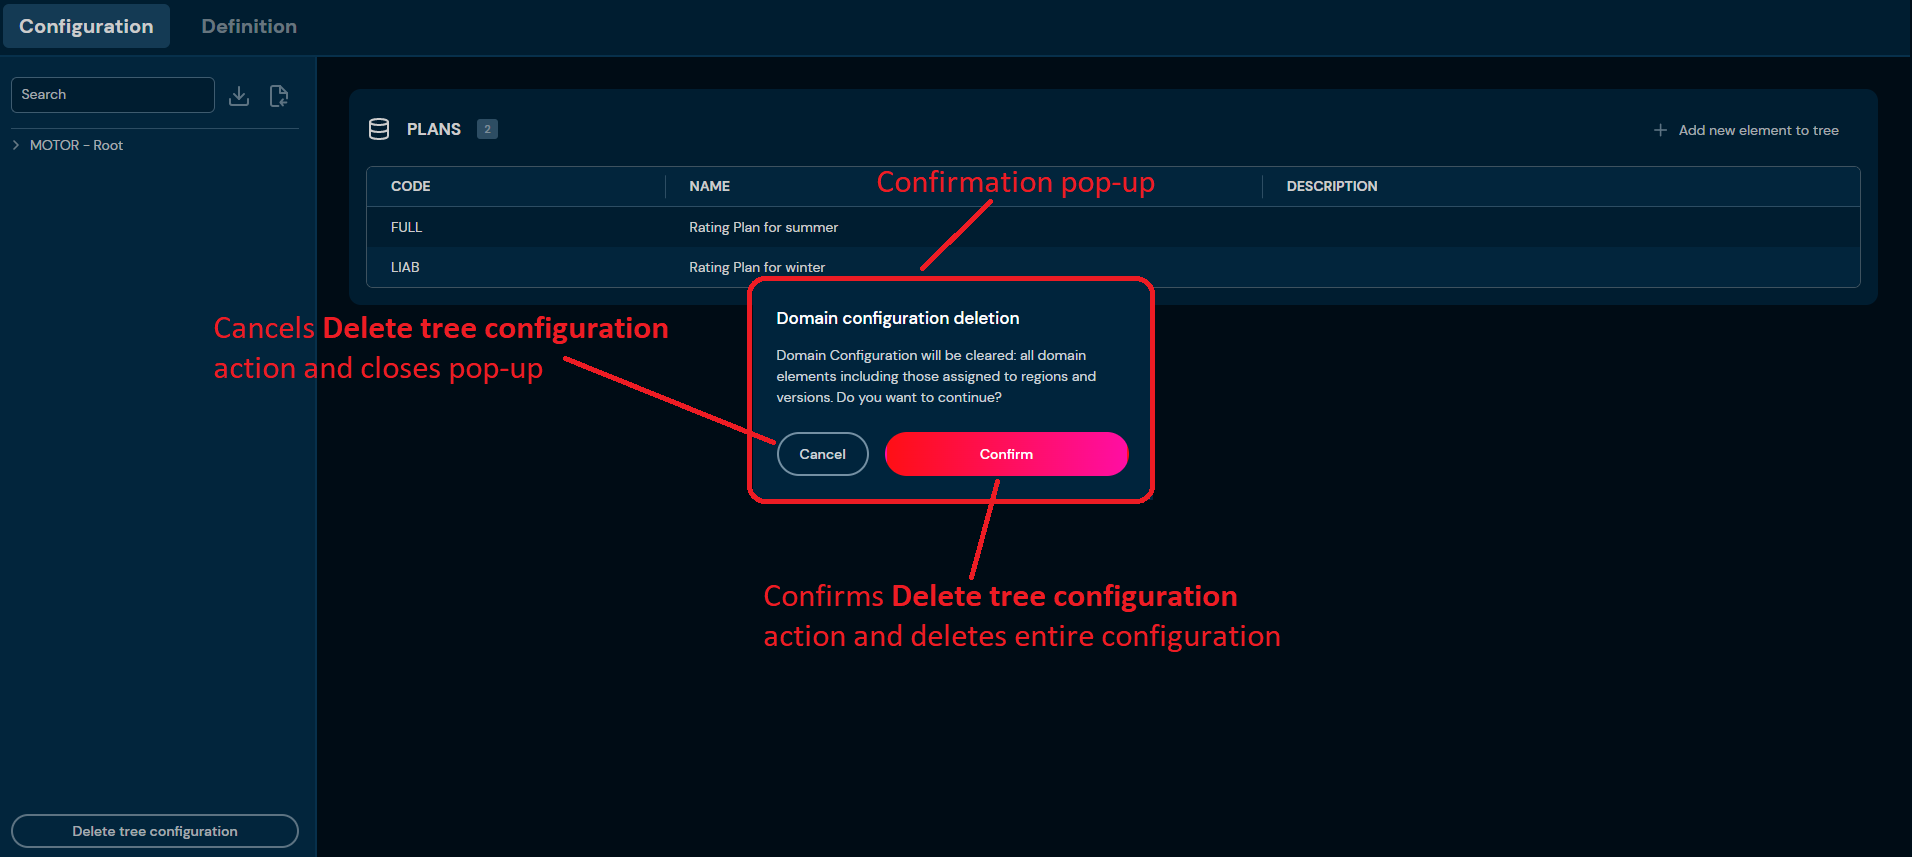
a. After choosing Delete tree configuration button, confirmation pop-up will appear.
-
Choose Confirm.
a. The Entire Domain Configuration is deleted from the environment.
-
Choose Session.
a. After choosing Session button, Session preview screen will appear.
-
Choose Publish changes.
-
Choose Domain in Main toolbar.
-
Choose Definition tab.
-
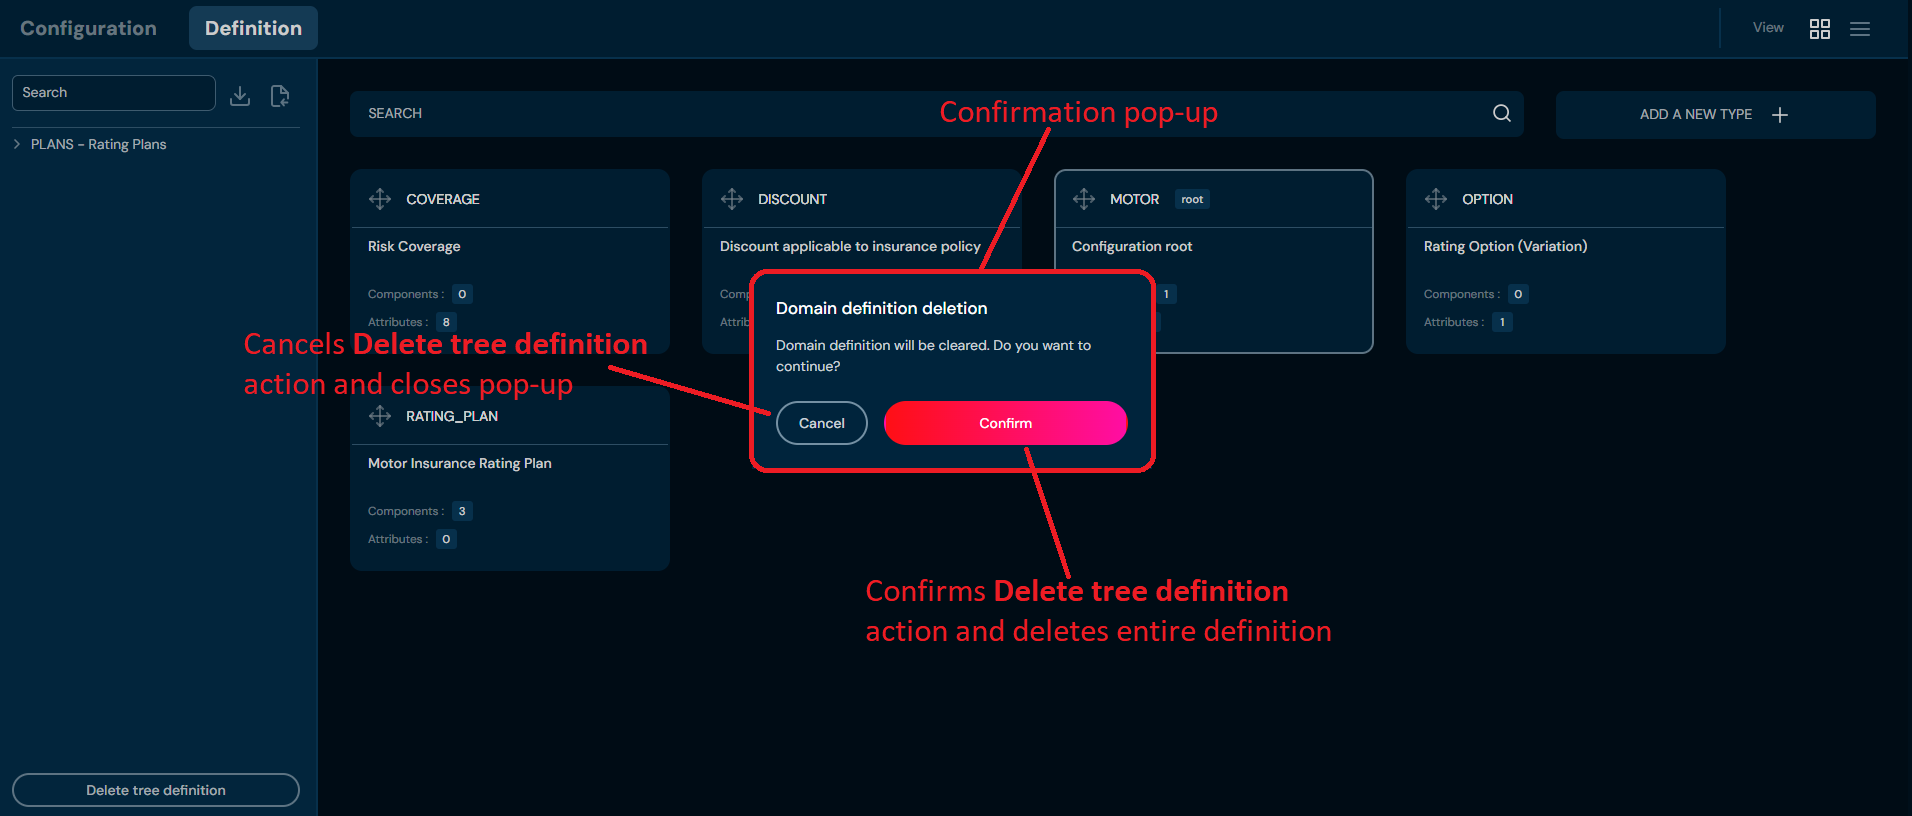
Choose Delete definition tree button.
a. After choosing Delete tree configuration button, confirmation pop-up will appear.
-
Choose Confirm.
a. The Entire Domain Definition is deleted from the environment.
Definition Type Details Screen#
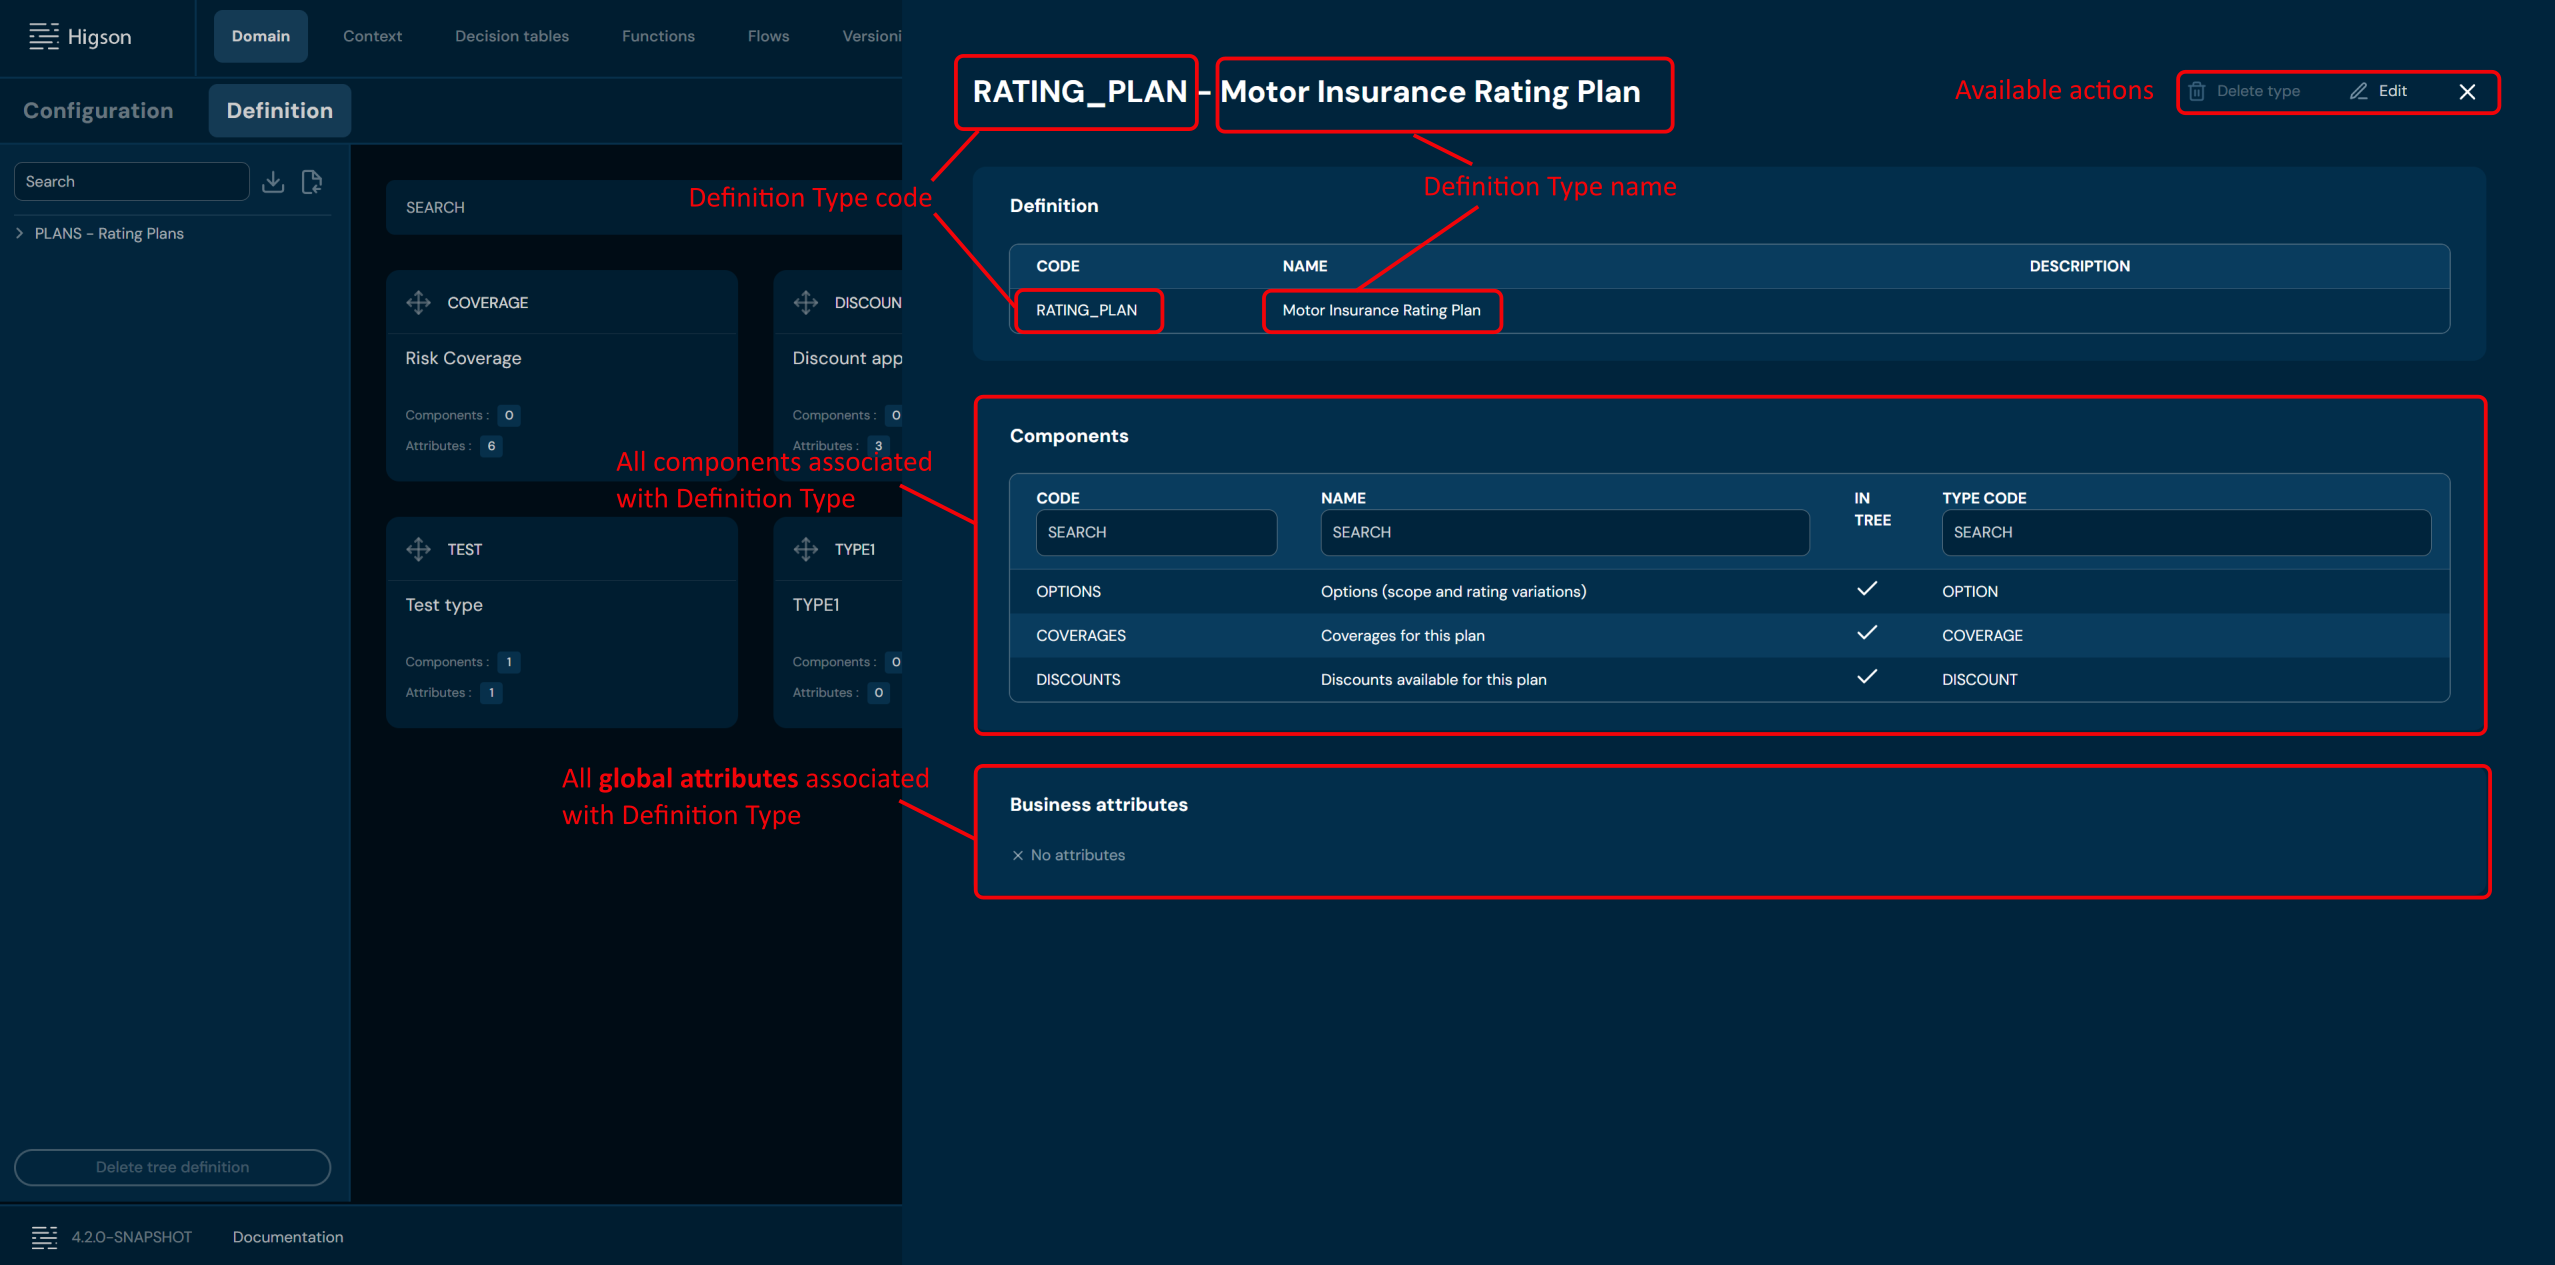
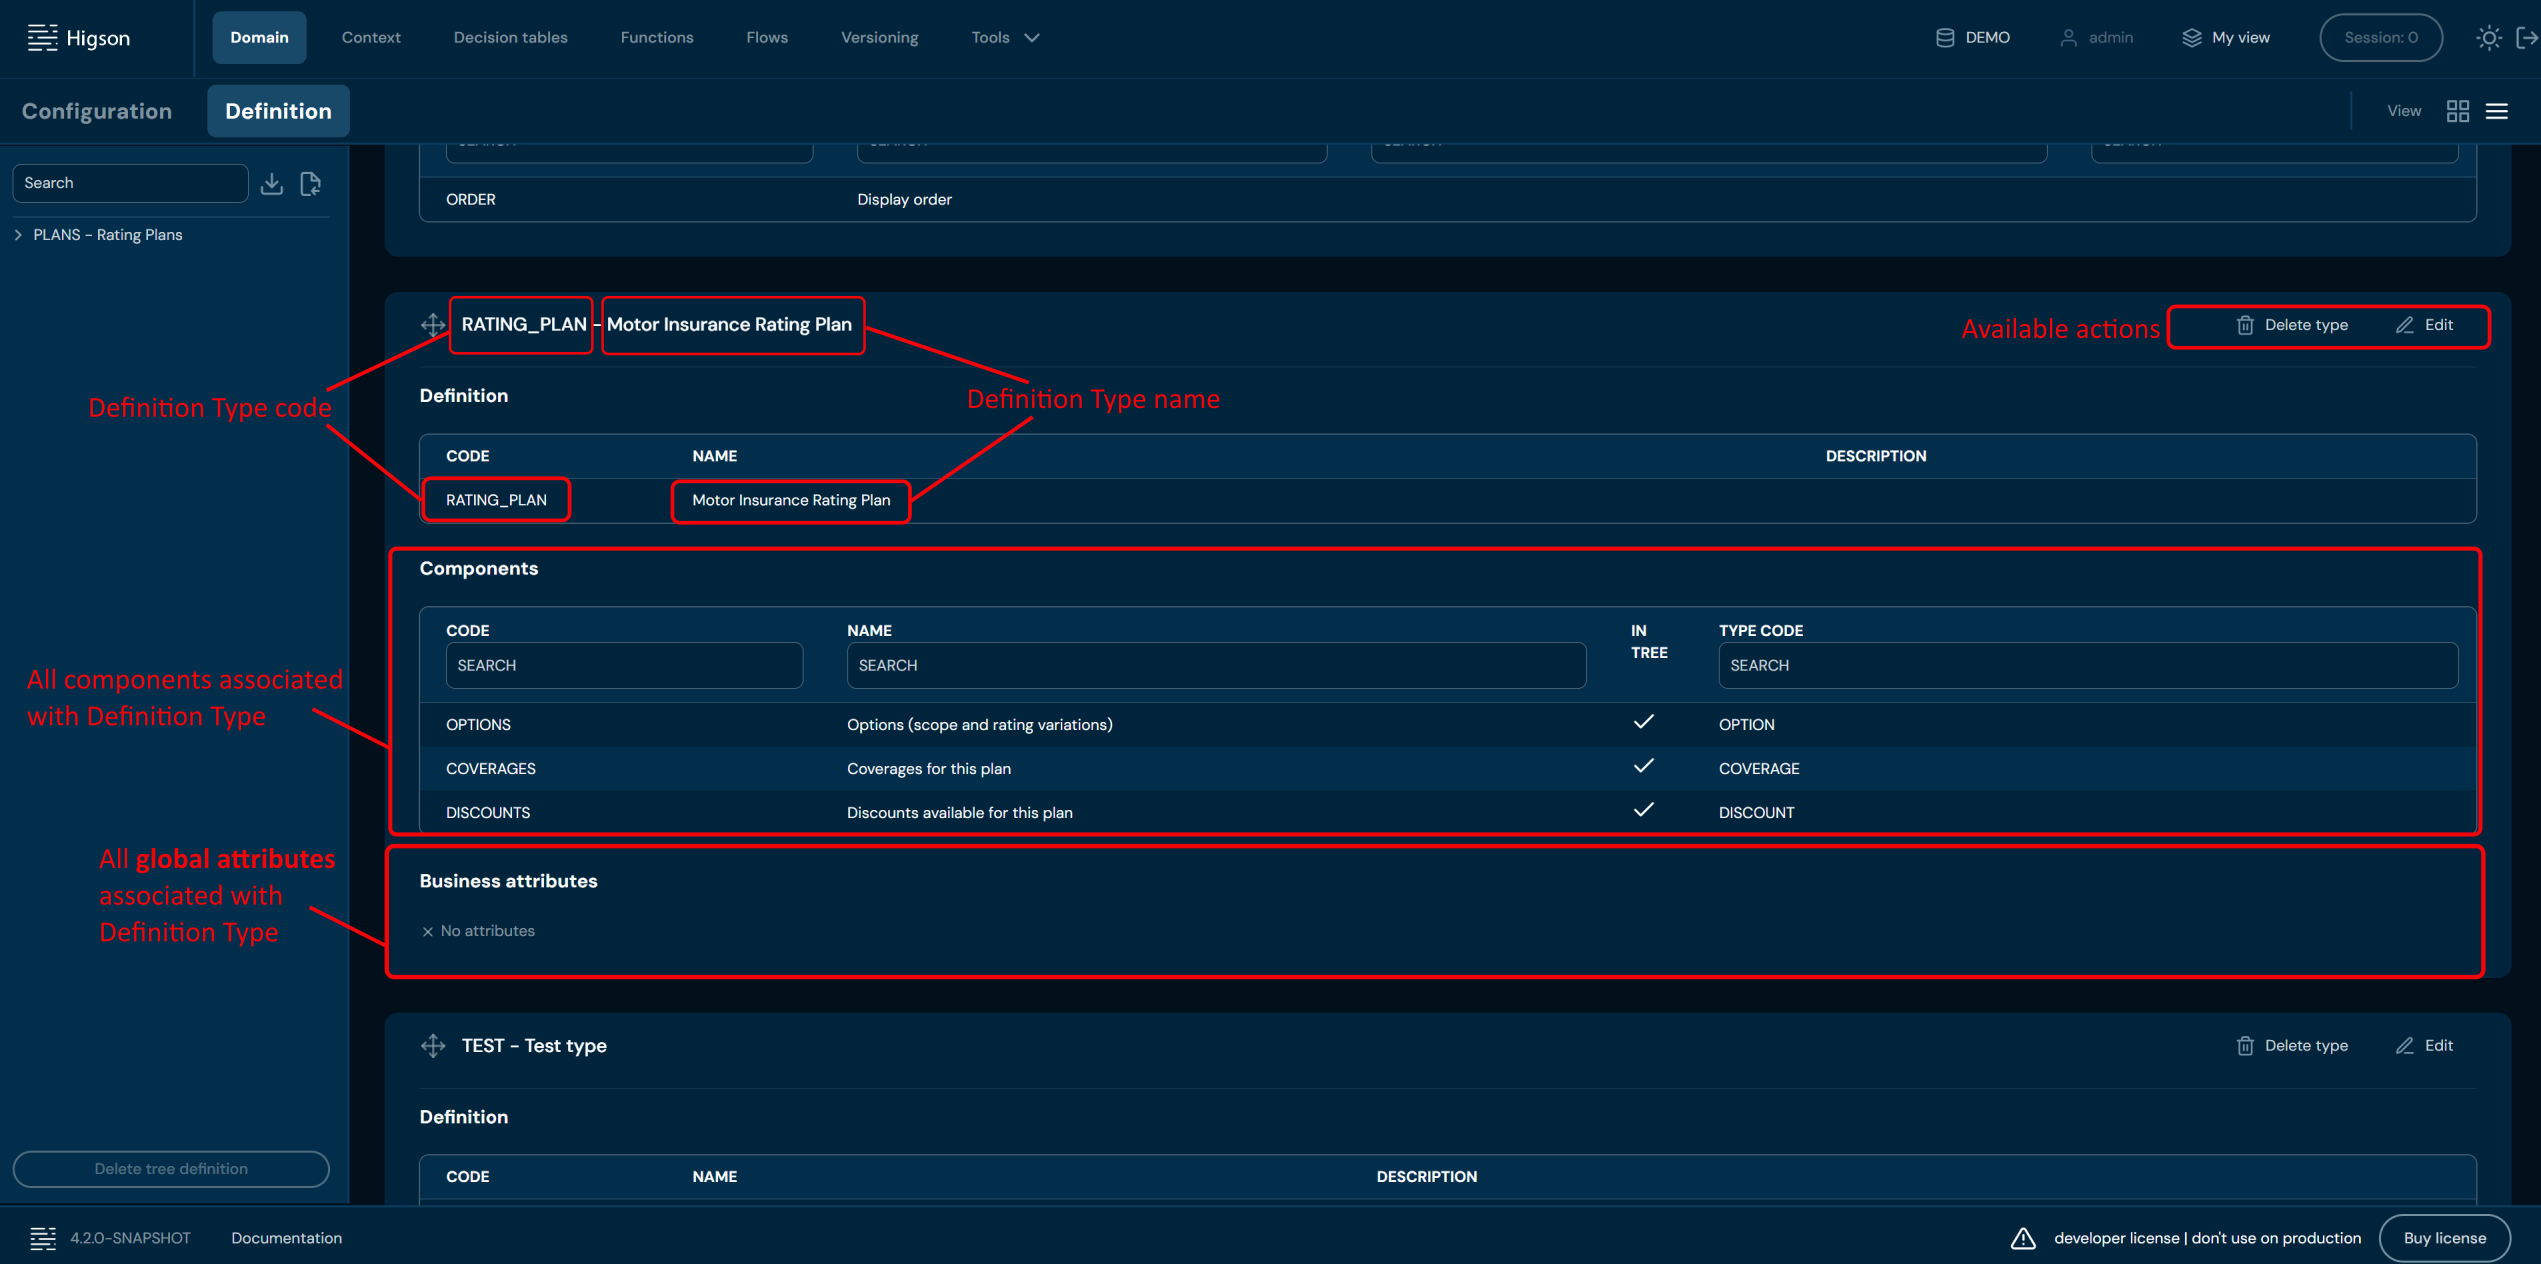
You can access Definition Type details by left-clicking on the specific type tile in the Domain Definition tab. You can also see Definition Type details by changing from Tiles view to List view.
Tiles view:
List view:
You can see Available actions for the Definition Type below:
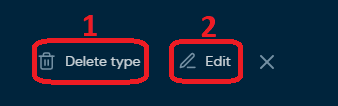
| No. | Action | Description |
|---|---|---|
| 1. | Delete type | Deletes definition type. To learn more about deleting definition type, go here. |
| 2. | Edit | Enables definition type edit mode. To learn more about editing definition type, go here |
Delete Type#
If you want to delete a specific Definition Type, follow these steps:
-
Choose Domain in Main toolbar.
-
Choose Definition tab.
-
Left-click on a definition type you wish to delete.
a. Left-clicking on a definition type brings up Definition Type details screen.
-
Choose Delete type.
a. After choosing Delete type action, confirmation pop-up will appear.
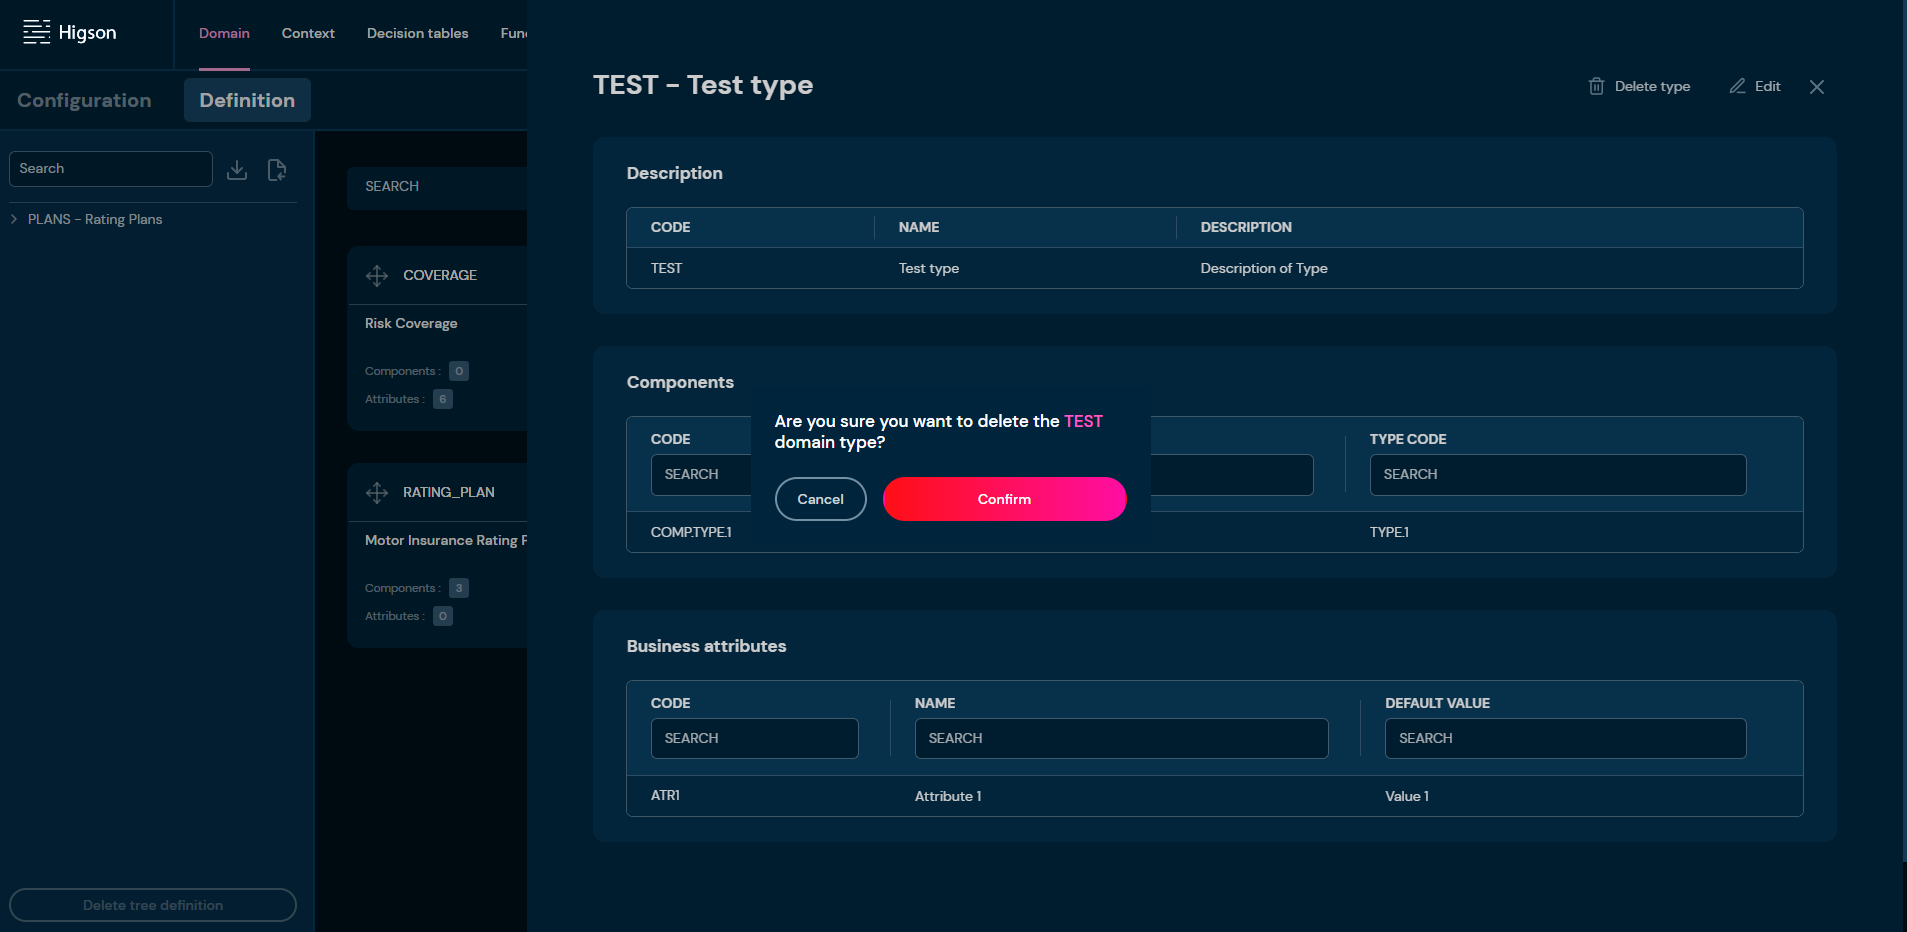
-
Choose Confirm.
a. Definition type is deleted from the environment.
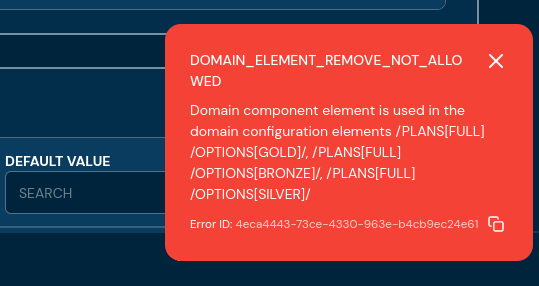
b. If a definition type is used in the Domain Configuration, then validation error will appear.
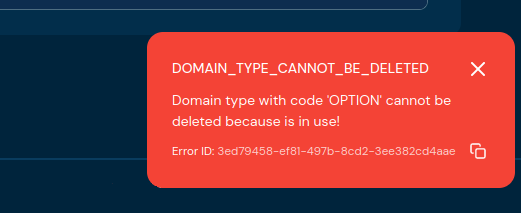
Edit Type#
If you want to edit data in specific definitione type, follow these steps:
-
Choose Domain in Main toolbar.
-
Choose Definition tab.
-
Left-click on a definition type you wish to edit.
a. Left-clicking on a definition type brings up Definition Type details screen.
-
Choose Edit.
a. Highlighted borders indicate that edit mode is active.
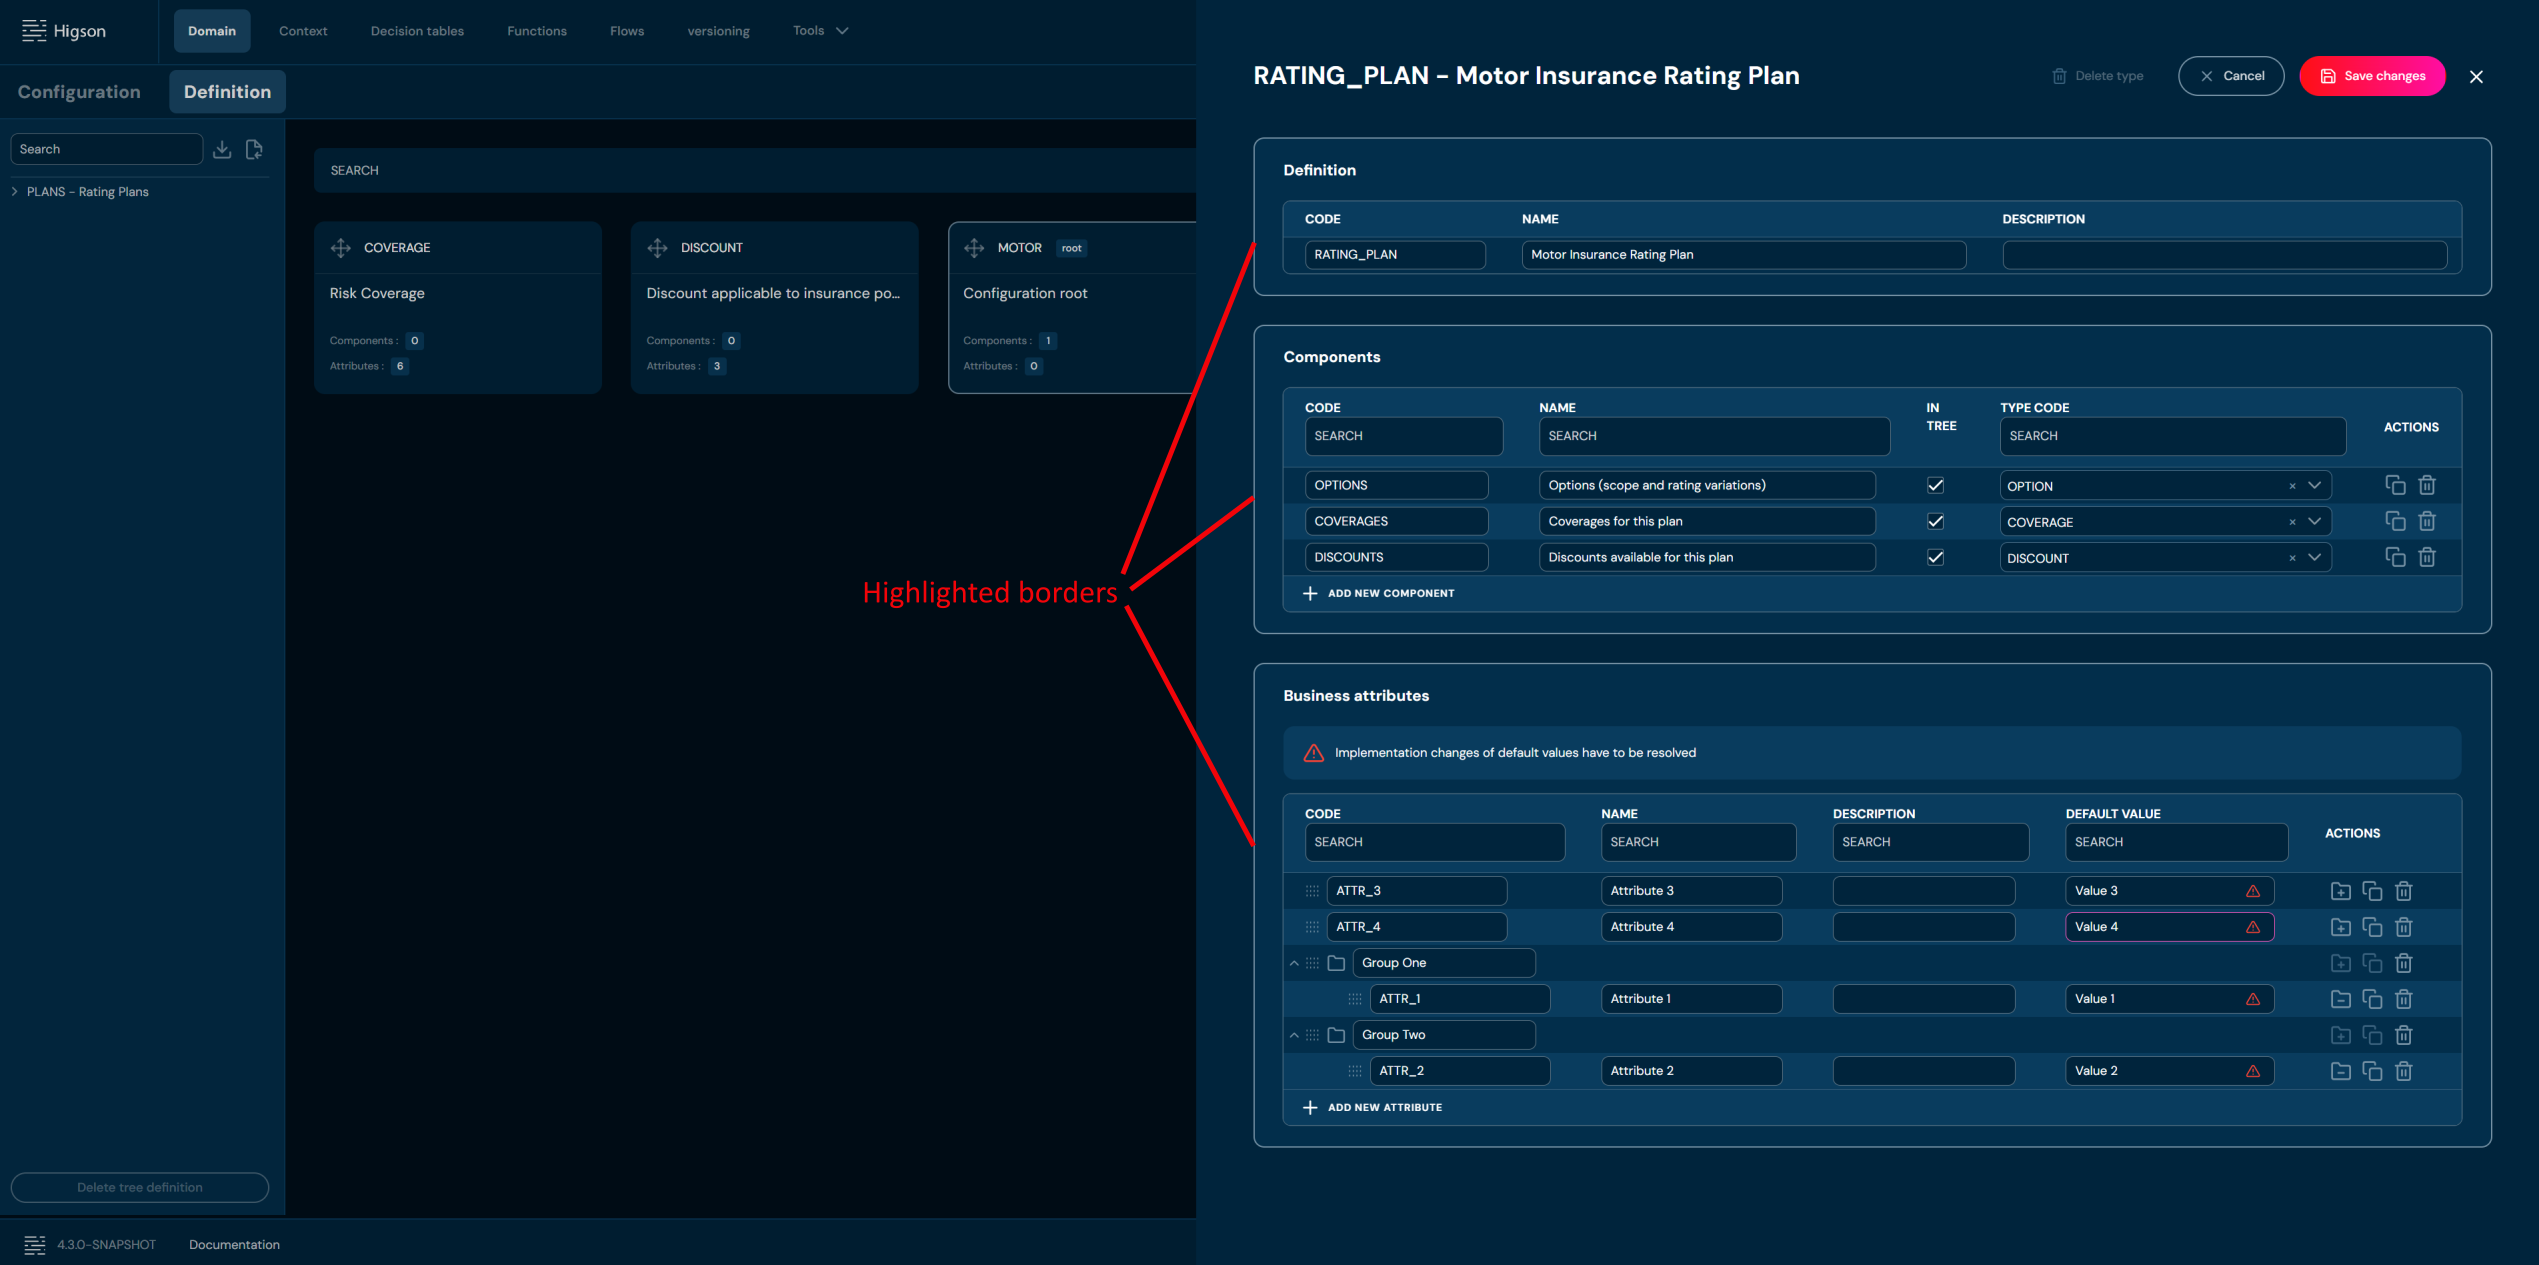
-
Edit any data you need.
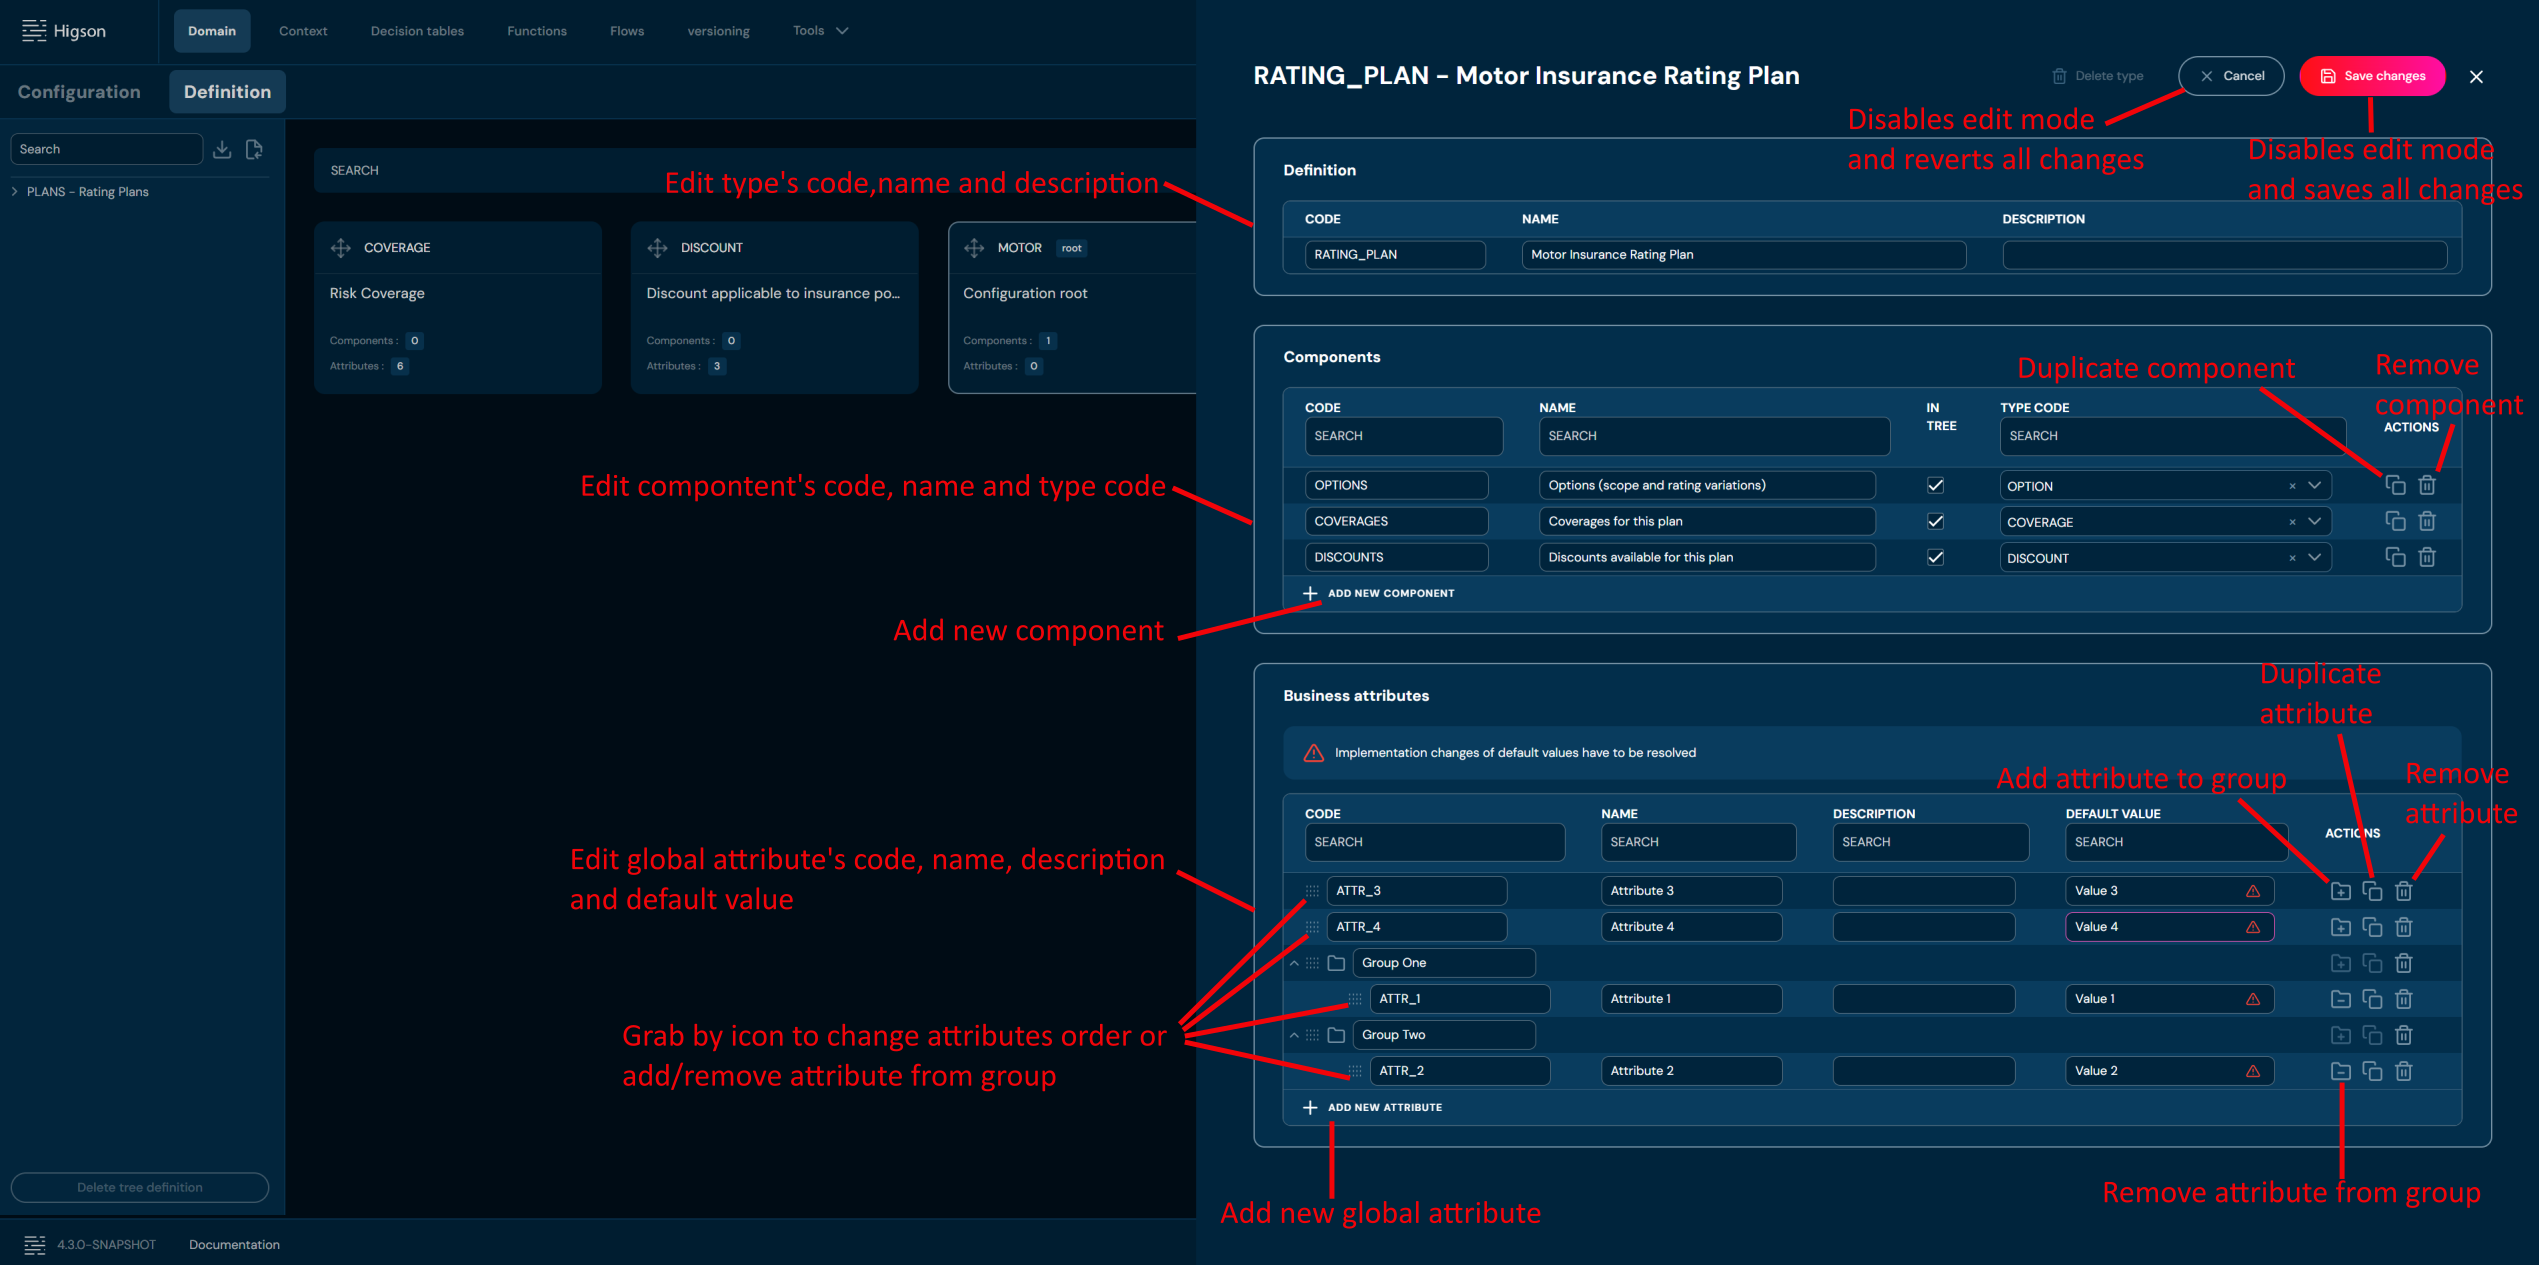
-
Choose Save changes to save all changes made in definition type.
a. Cancel reverts all changes made in the definition type.
b. If components you edit are used in Domain Configuration, then validation error will appear.
In Domain configuration we can create instances of domain types and configure their attributes with use of Decision tables or Functions.
If you are new to Higson Domain, you may want to read the introductory section Introduction to Domain.
In order to see Domain Configuration, select Domain in Main Toolbar.
After you enter Configuration you will see screen of configuration from ROOT perspective:
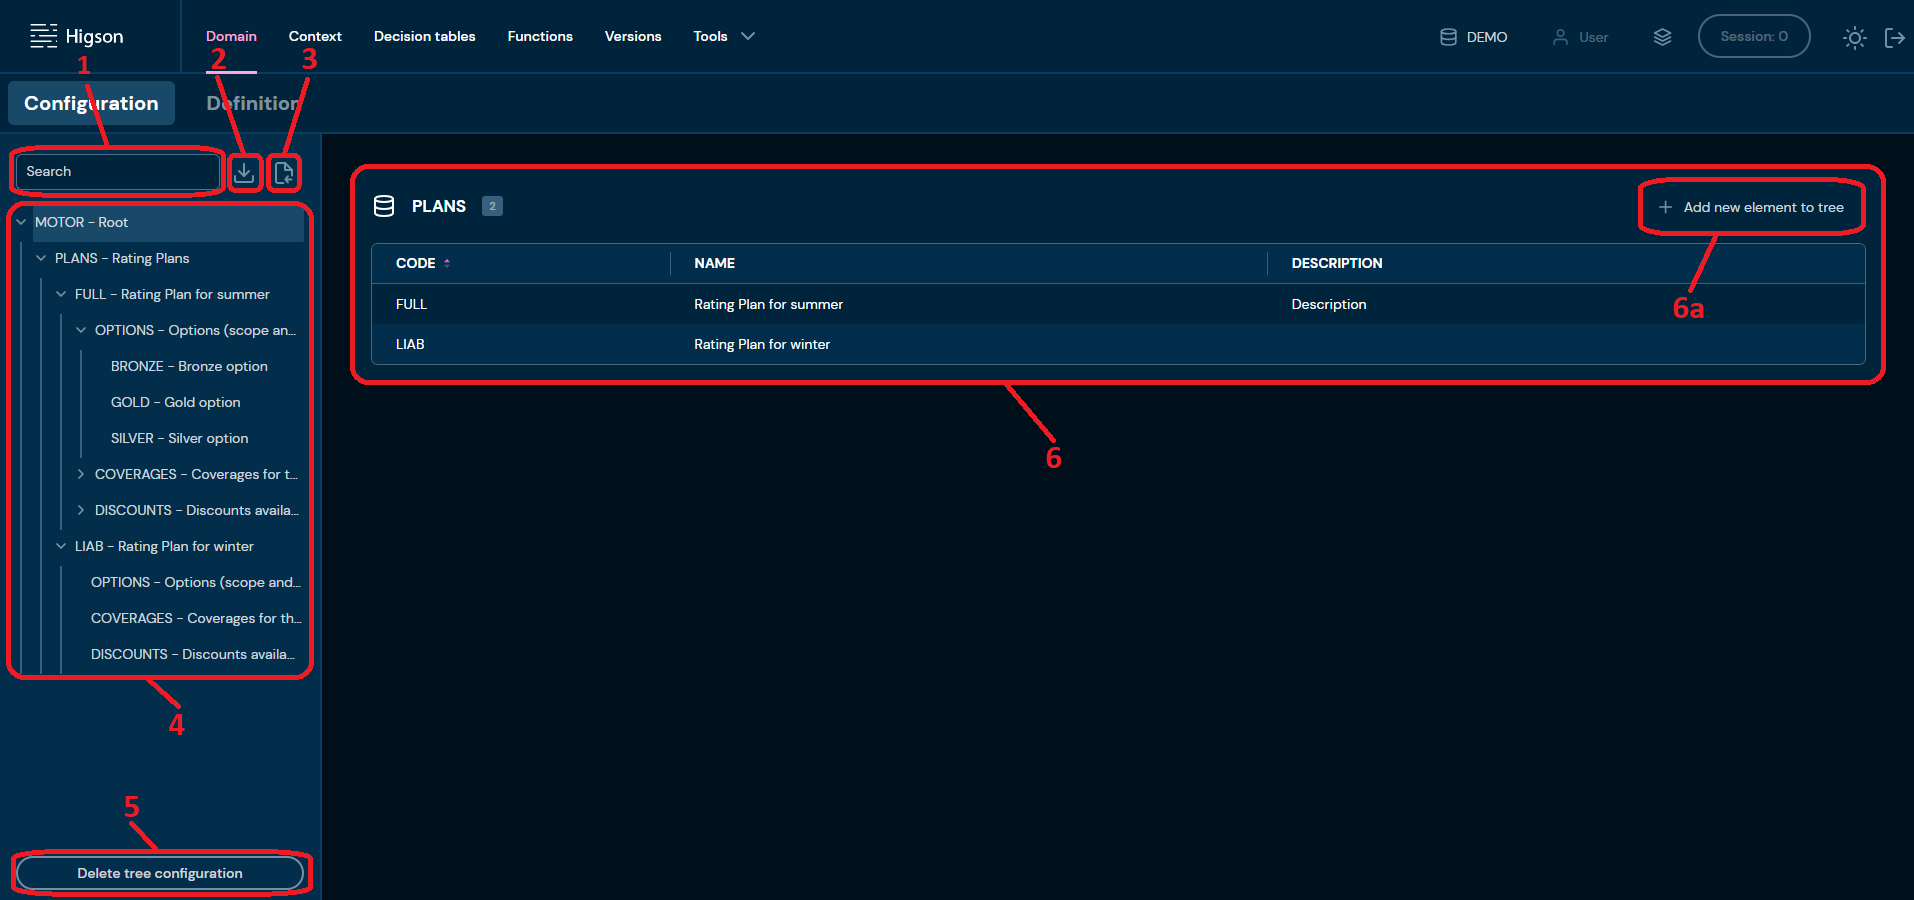
| No. | Name | Description |
|---|---|---|
| 1. | Tree search field | Filter by any string provided by user. Configuration tree navigates to all Elements matching the provided criteria. |
| 2. | Download Domain | Downloads a XML file that contains entire Domain Configuration. To learn more about downloading Configuration go here |
| 3. | Upload Domain | Allows to upload Domain Configuration from a XML file. To learn more about uploading Configuration go here |
| 4. | Configuration tree | Tree structure of your product. |
| 5. | Delete tree | Deletes all Configuration Elements. To learn more about delete all Configuration elements go here |
| 6. | Collection | Collections with all created elements. |
| 6a. | Add new element to tree | Allows to create new Configuration Elements. To learn more about adding Configuration Elements go here |
User can Expand/Collapse a tree by clicking on the arrows.
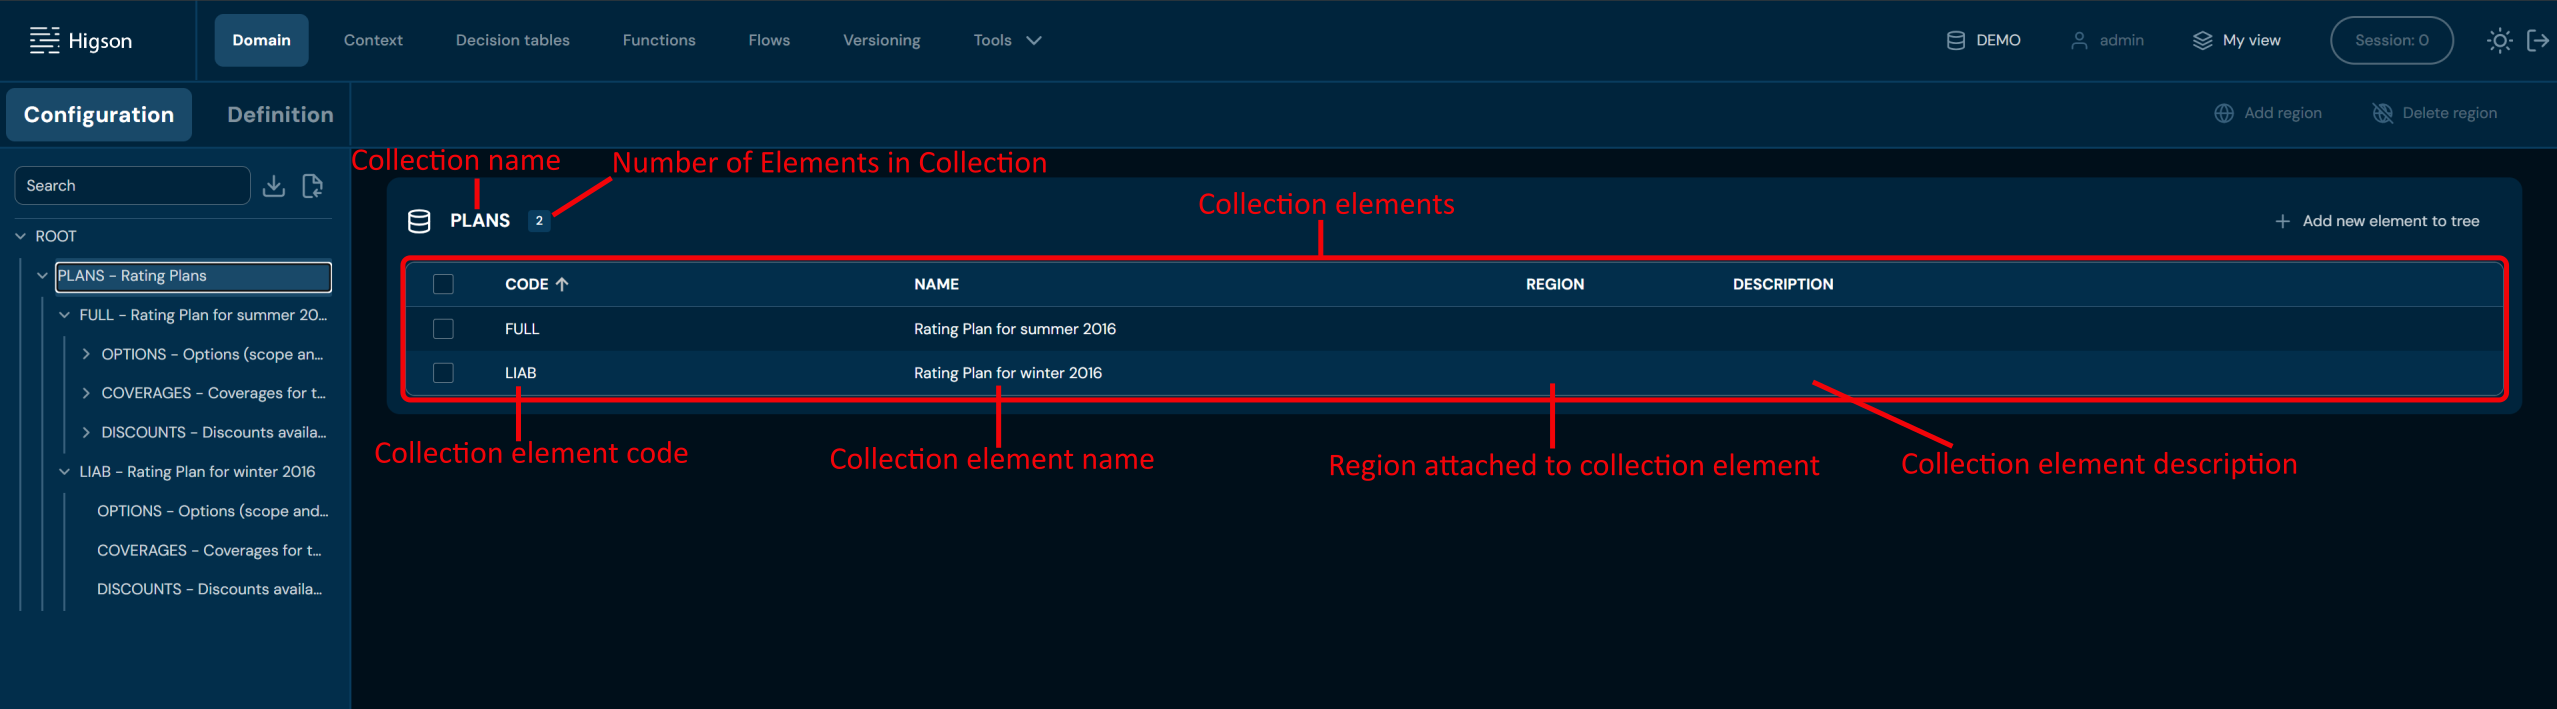
Configuration Collection:#
Add New Collection Elements#
If you want to add a new collection elements, follow these steps:
-
Choose Domain in Main toolbar.
-
Navigate to Collection you want to add new elements to.
-
Choose Add new elements to tree in desired Collection.
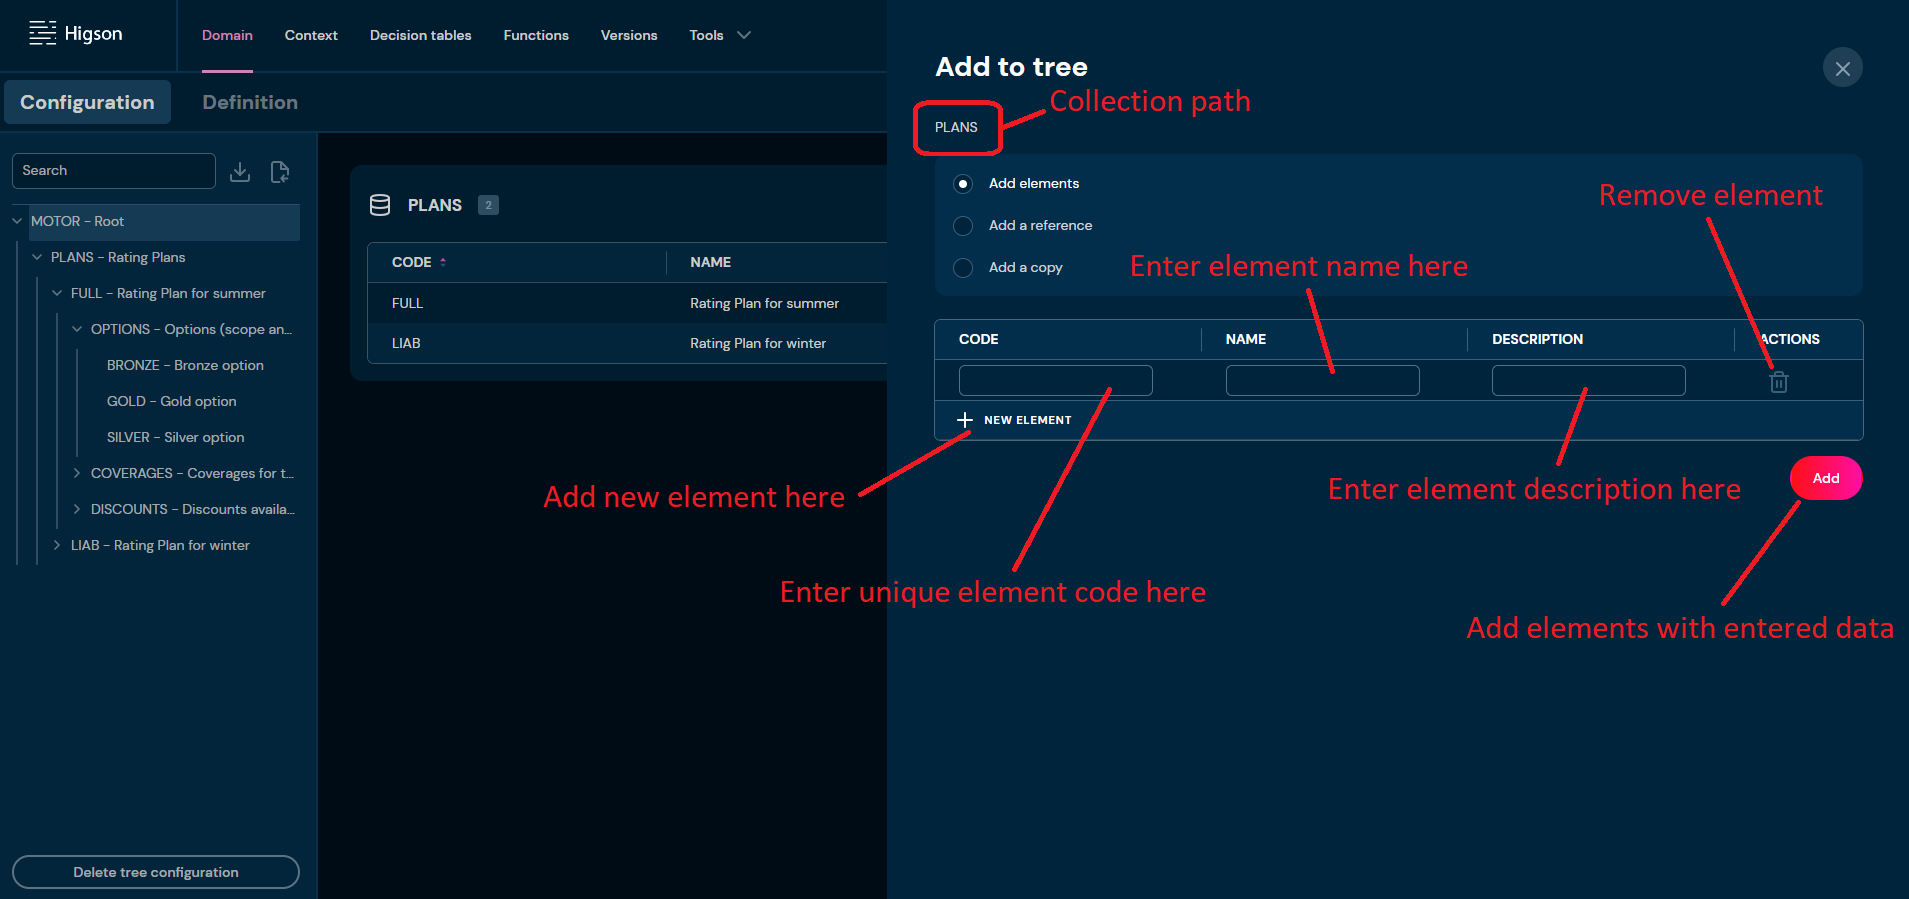
a. Choosing Add new elements to tree brings up Add to tree screen.
-
Choose Add elements radiobutton.
-
On this screen, you:
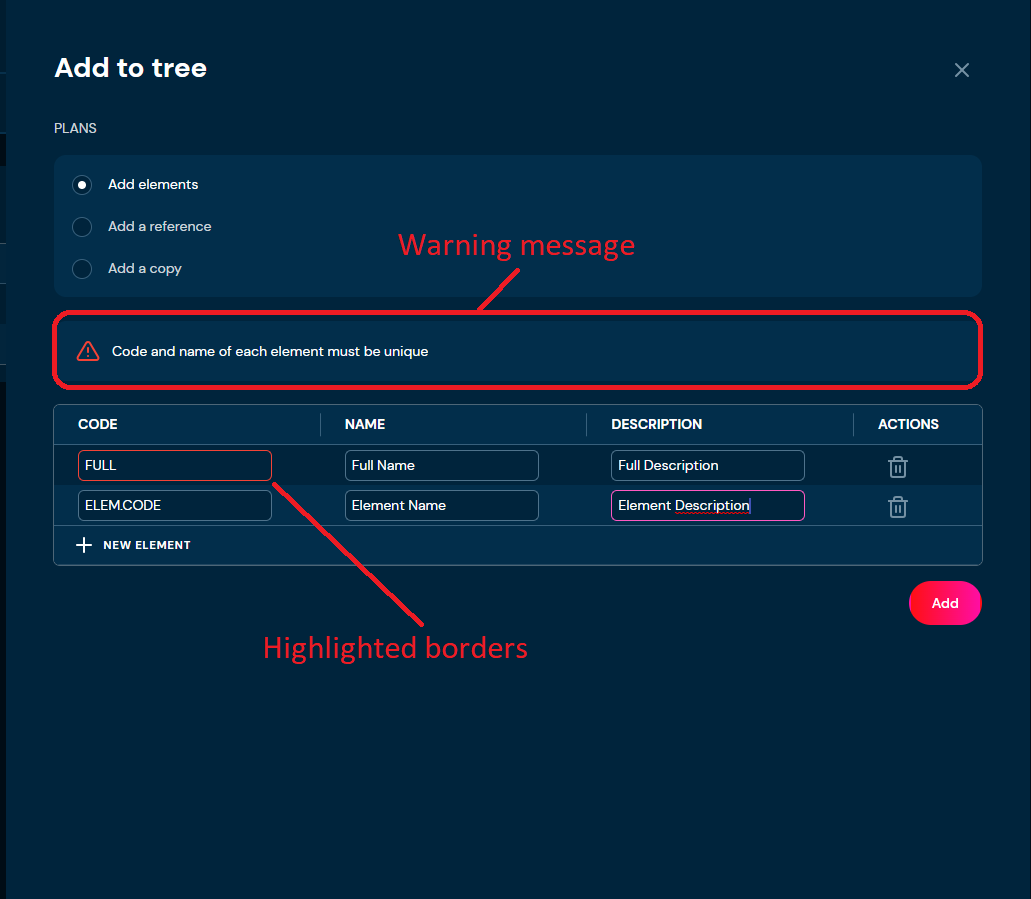
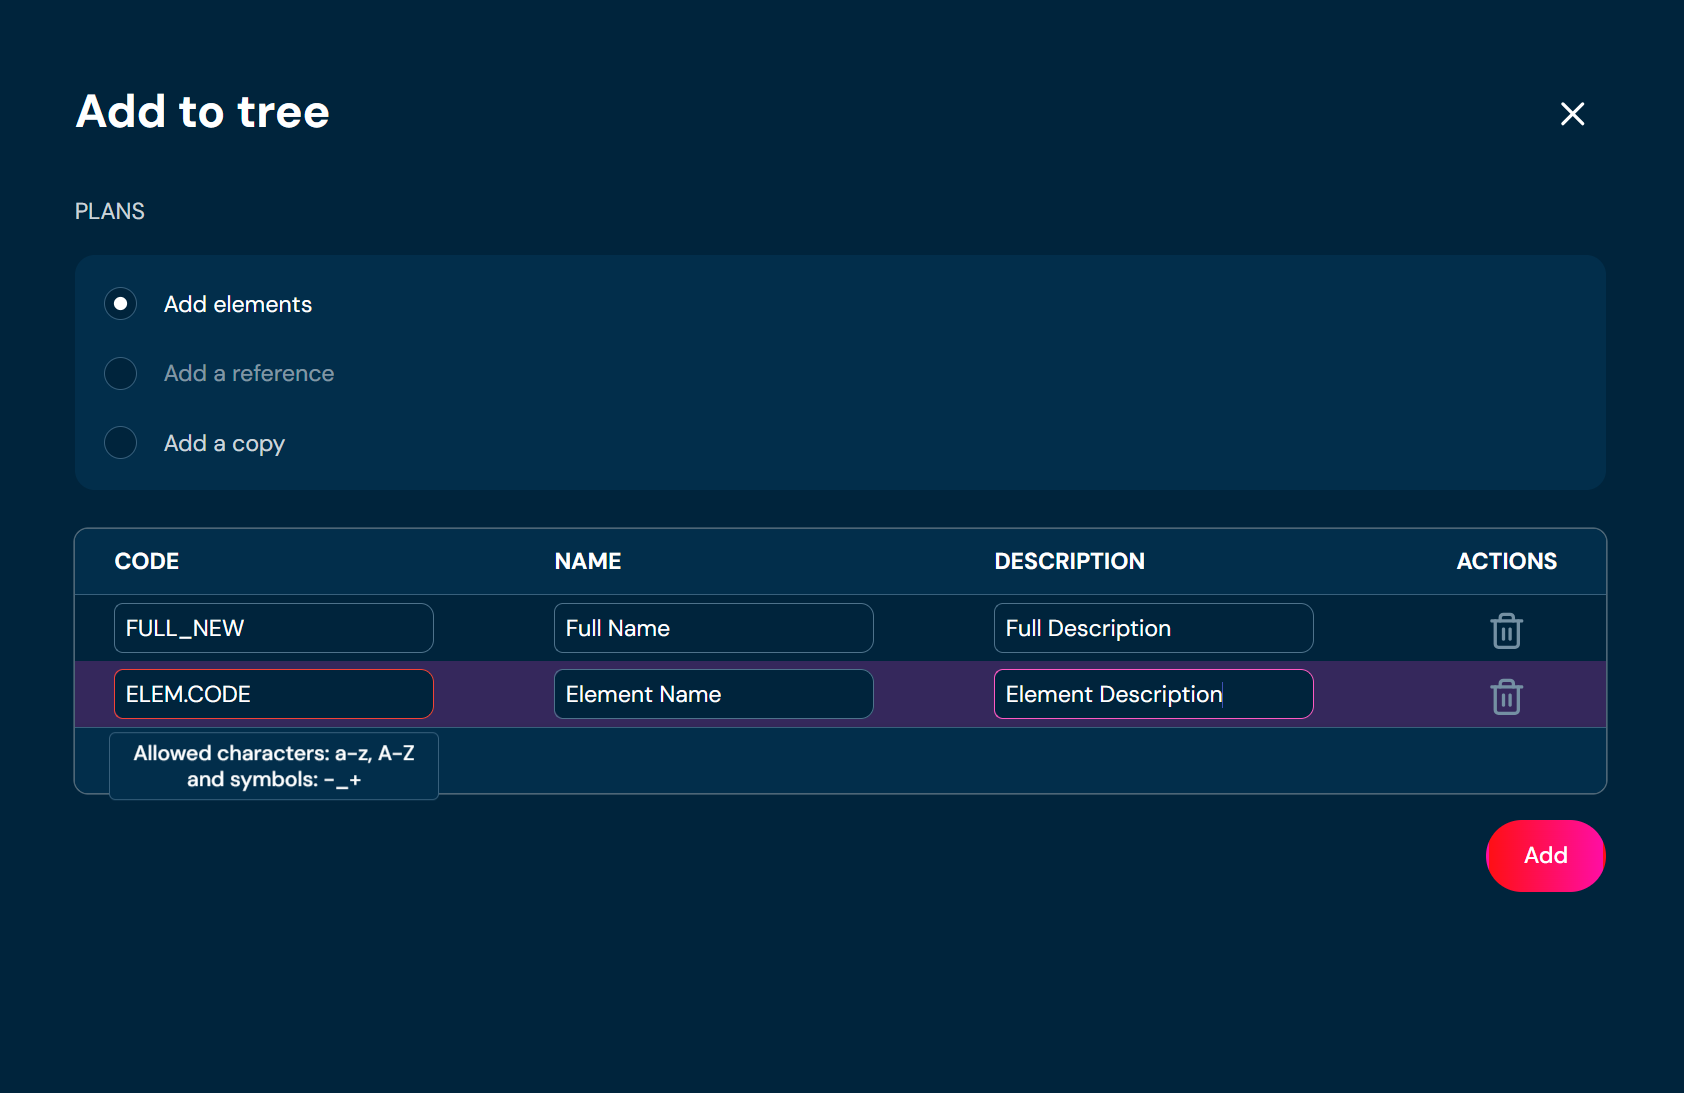
a. need to provide unique Element code. Code can contain only characters from collection a-z; 0-9; “-”; “_”; “+” and it can’t start with “-”.
i. If the code you provided is not unique, then borders will be highlighted with red color and warning message will appear.
ii. If you enter illegal characters, then borders will be highlighted with red color. Hover on the field to see tooltip with more information.
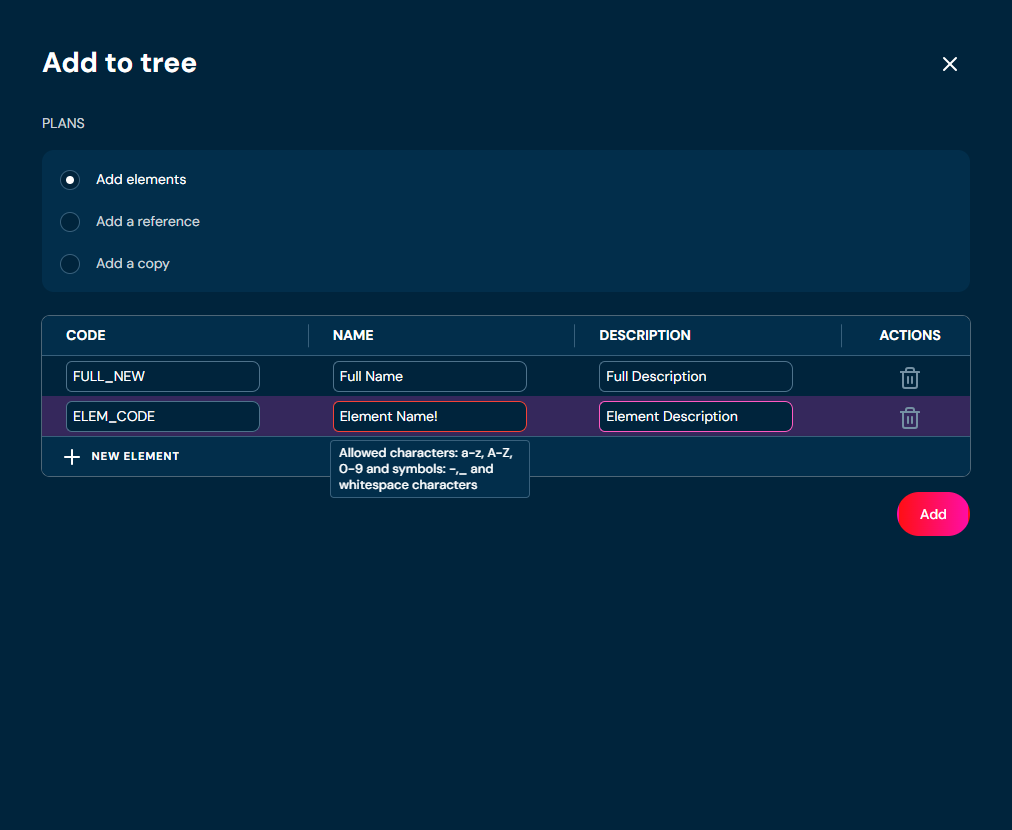
b. need to provide Element name. Name can contain only characters from collection a-z; A-Z; 0-9; “-”; “_” and white-space characters.
i. If you enter illegal characters, then borders will be highlighted with red color. Hover on field to see tooltip with more information.
c. can provide Element description. Description can contain only characters from collection a-z; A-Z; 0-9; “:”; “.”; “,”; “-”; “_” and white-space characters.
i. If you enter illegal characters, then borders will be highlighted with red color. Hover on field to see tooltip with more information.
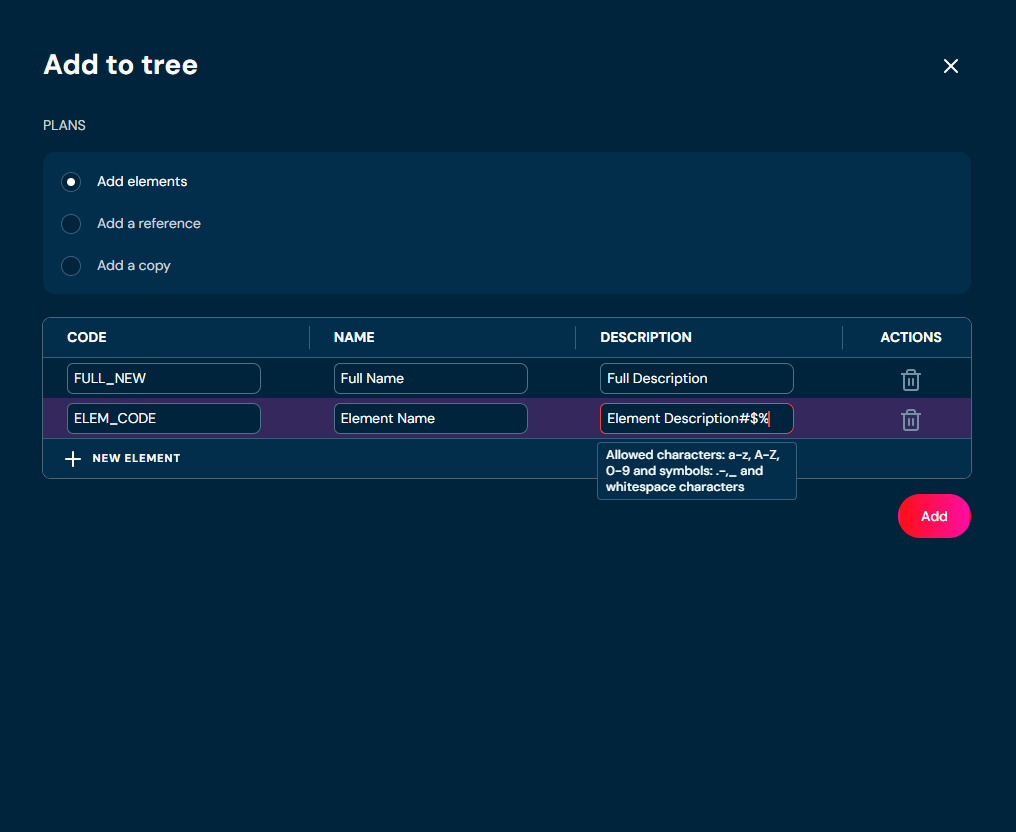
d. can add additional Elements by clicking + NEW ELEMENT.
-
Choose Add.
a. Elements with data you provided are created.
Add Reference#
If you want to add a reference, follow these steps:
-
Choose Domain in Main toolbar.
-
Navigate to the Collection for which you want to create reference.
-
Choose Add new elements to tree in desired Collection.
a. Choosing Add new elements to tree brings up Add to tree screen.
-
Choose Add a reference radiobutton.
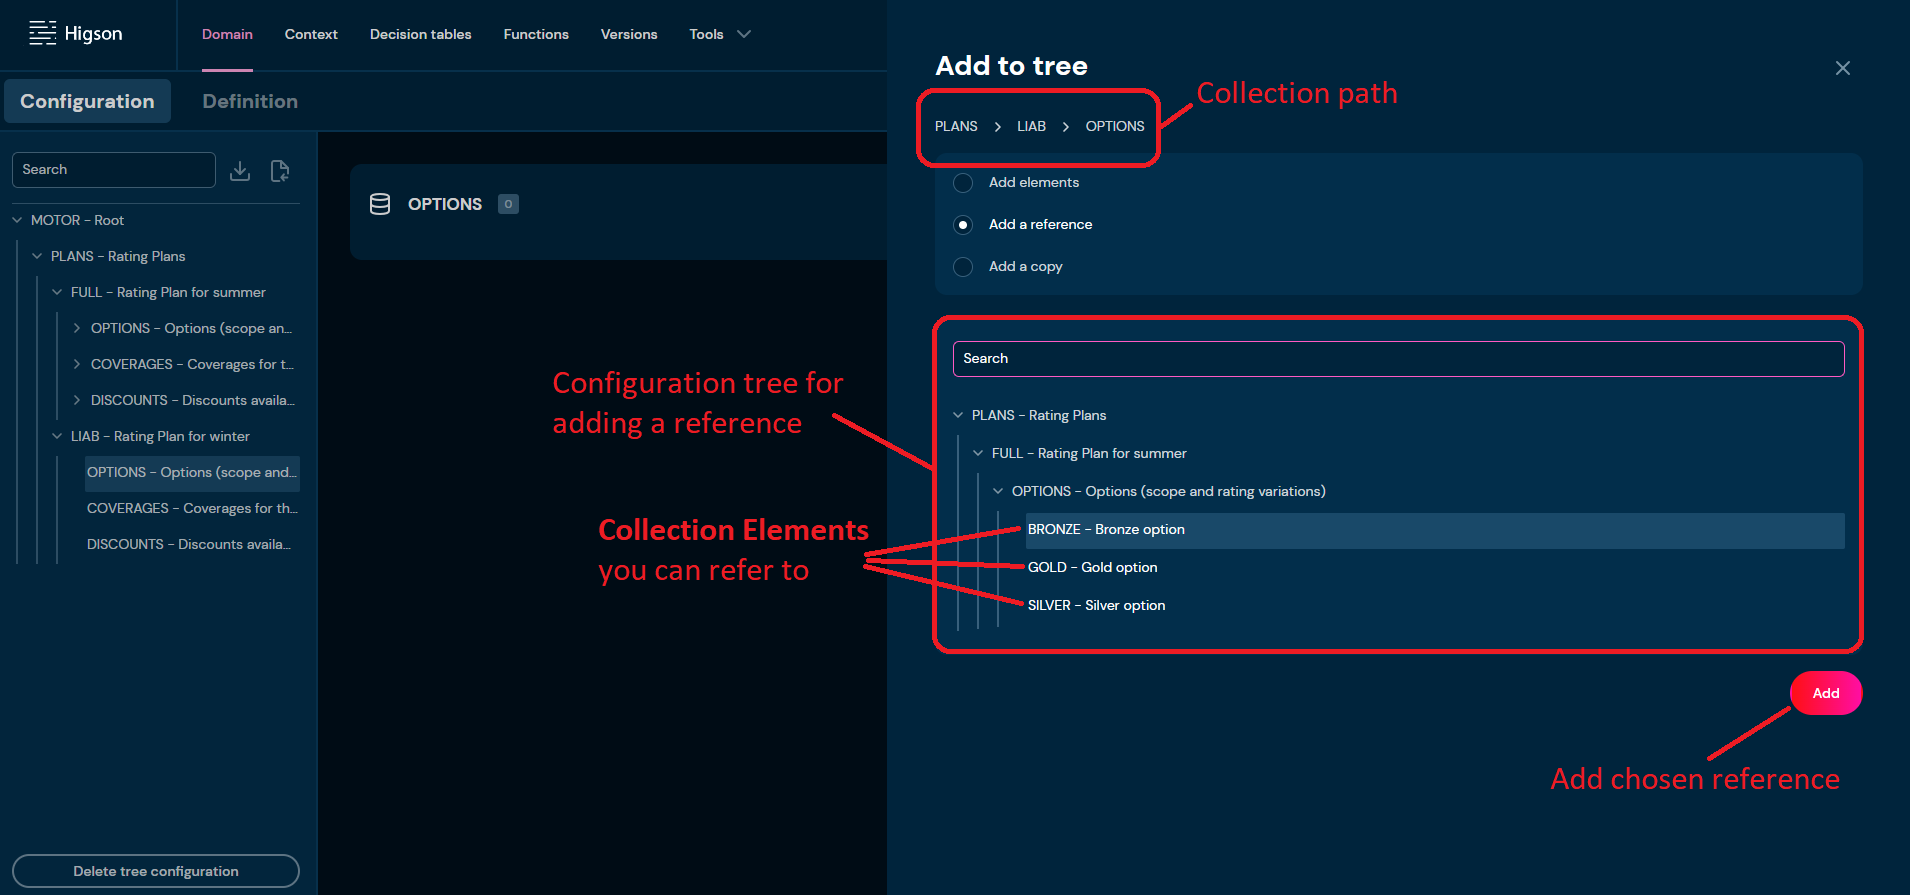
a. If the Add button is greyed out, it means that you have not chosen any Collection Element to refer to yet.
-
Choose Collection Element you want to create a reference to.
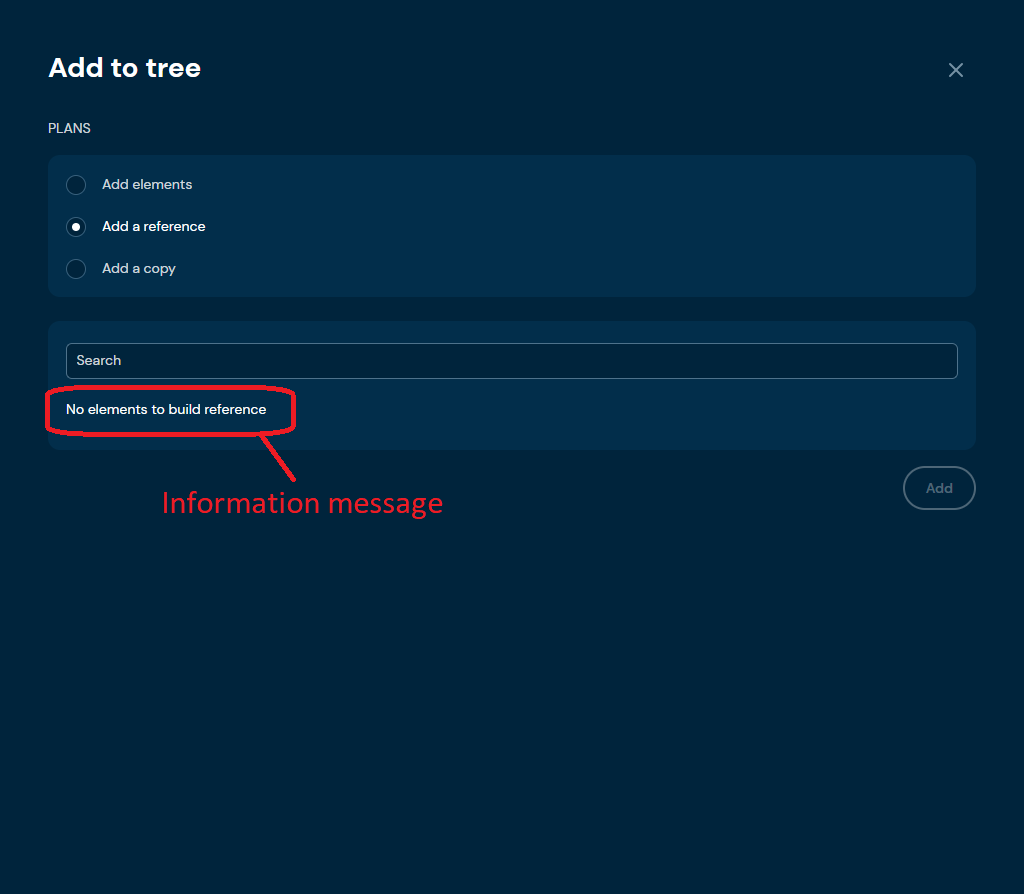
a. If there are no Elements to refer to, then an information message will be placed instead of the configuration tree.
-
Choose Add.
a. Reference to chosen Element is created.
Add a Copy#
If you want to copy Collection or Collection Element, follow these steps:
-
Choose Domain in Main toolbar.
-
Navigate to the Collection for which you want to copy Elements.
-
Choose Add new elements to tree in desired Collection.
a. Choosing Add new elements to tree brings up Add to tree screen.
-
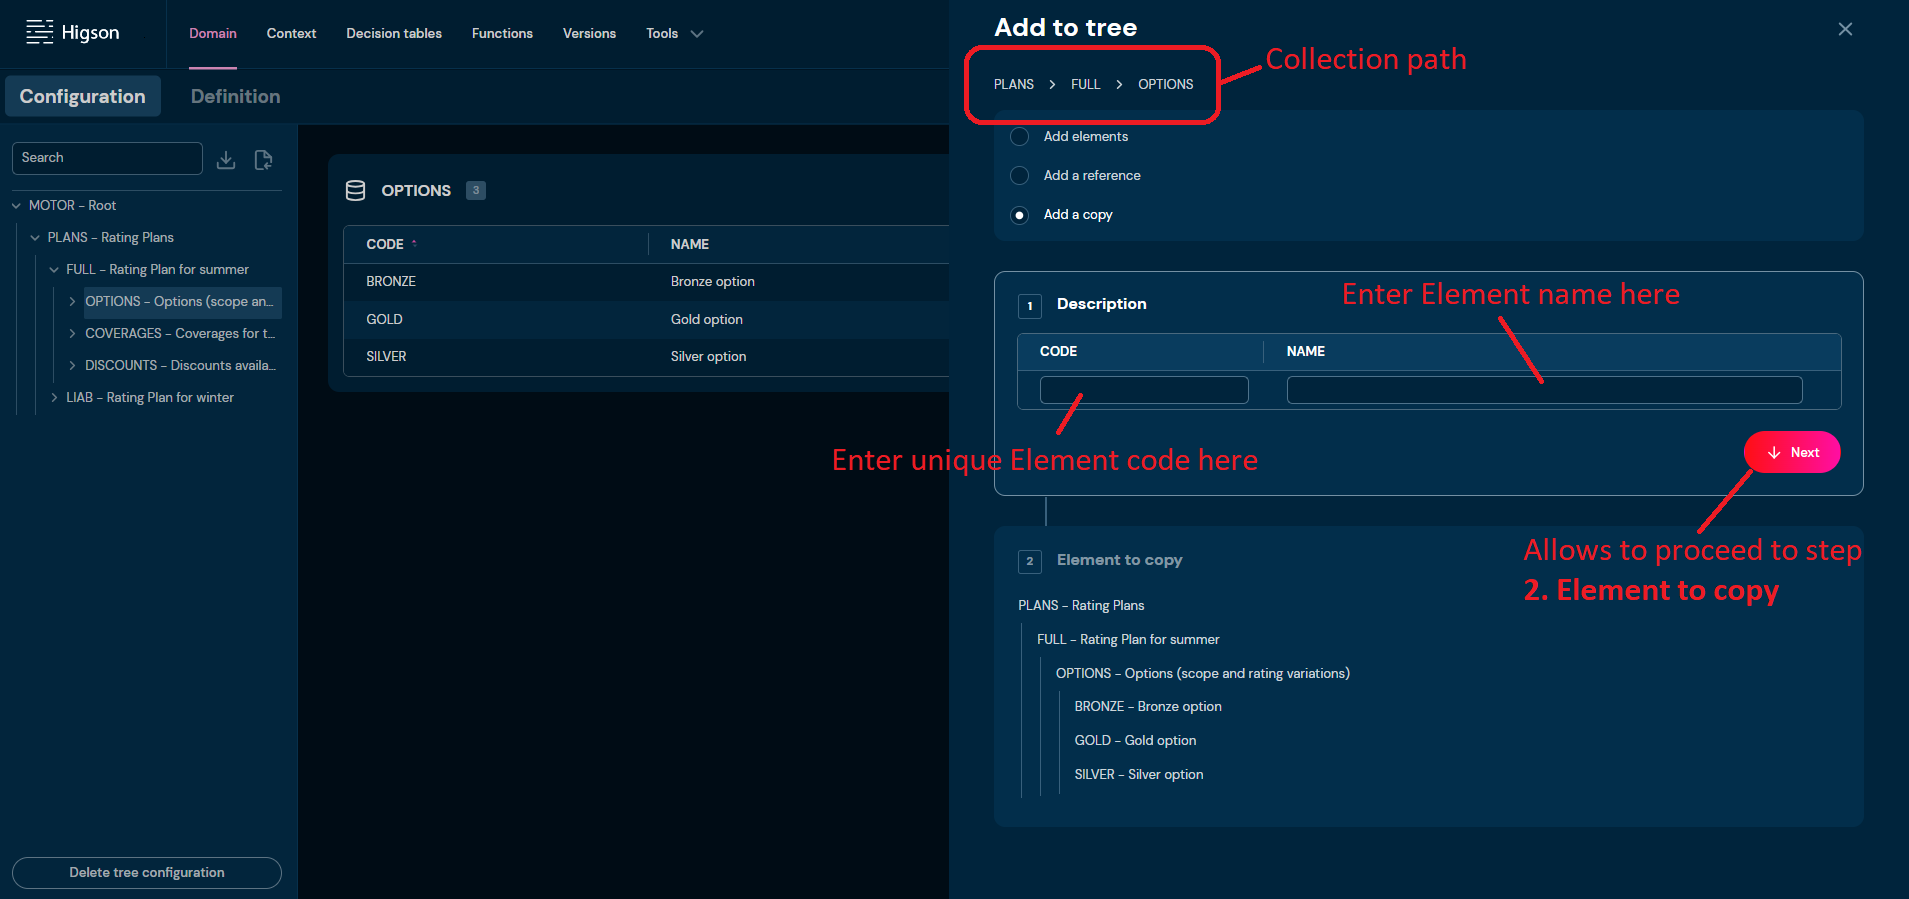
Choose Add a copy radiobutton.
-
In step 1. Description, you:
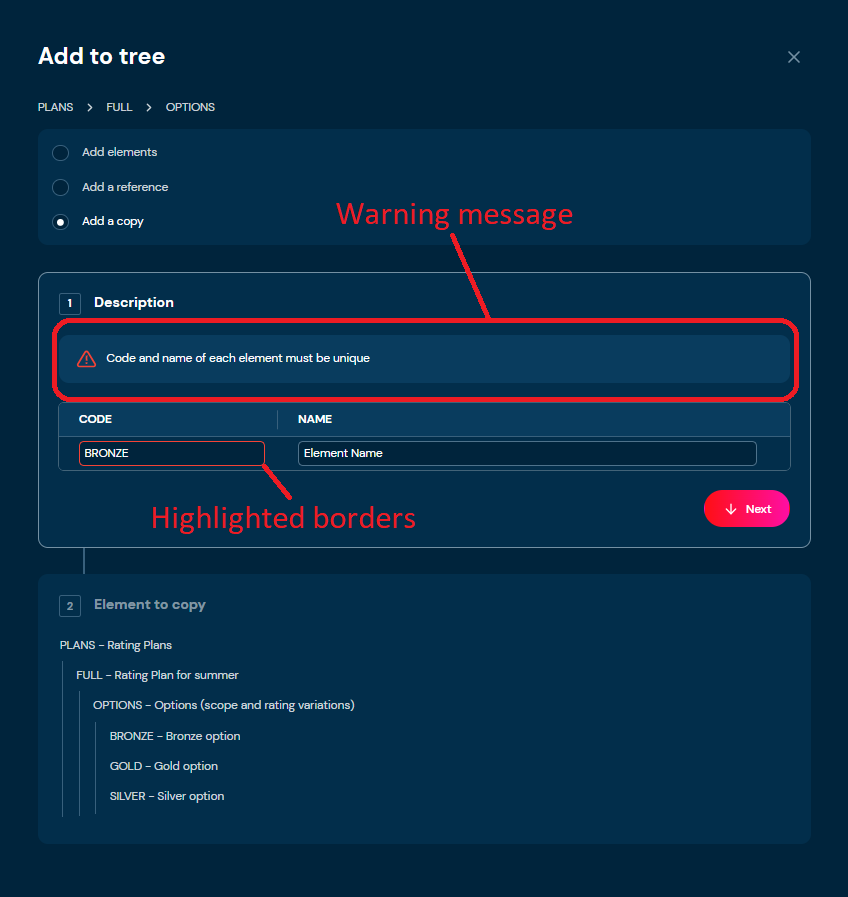
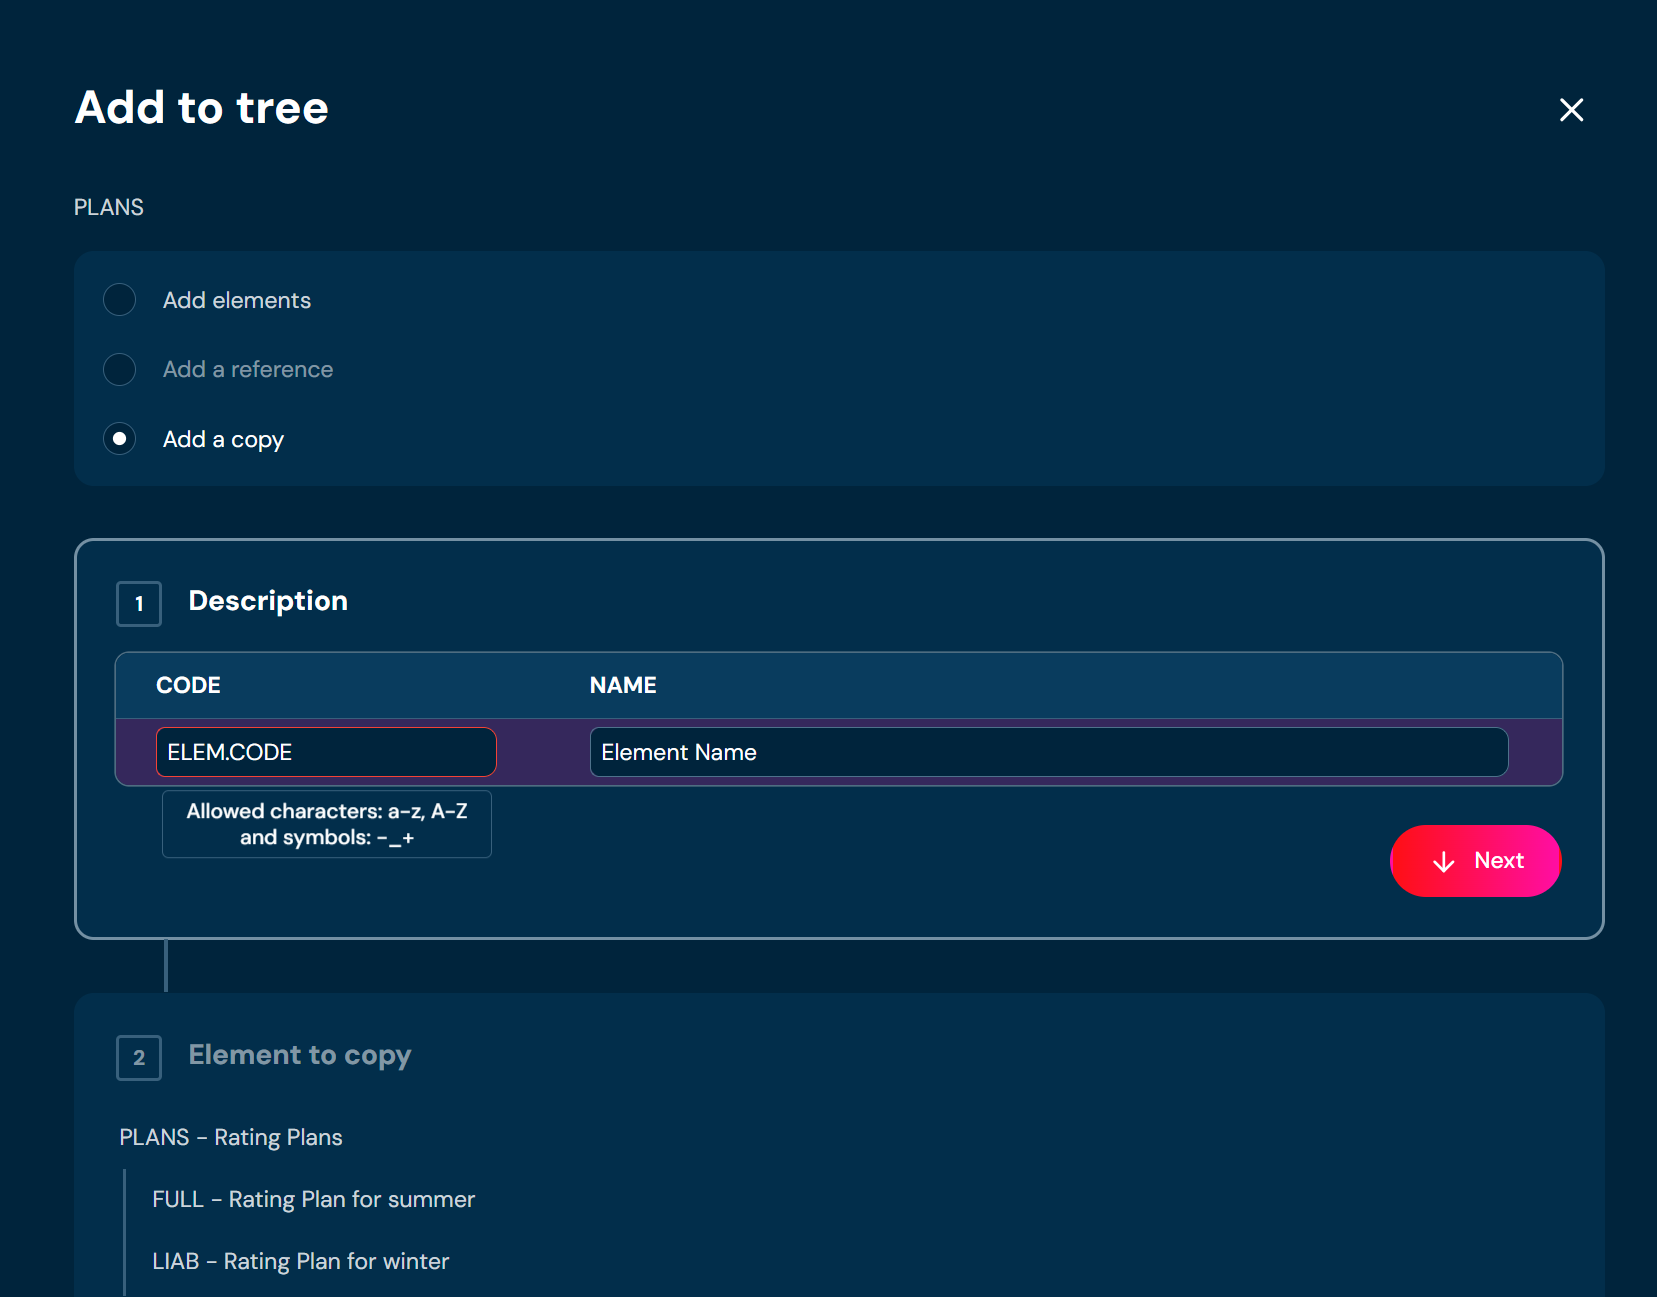
a. need to provide unique Element code. Code can contain only characters from collection a-z; 0-9; “-”; “_”; “+” and it can’t start with “-”.
i. If the code you provided is not unique, then borders will be highlighted with red color and warning message will appear.
ii. If you enter illegal characters, then borders will be highlighted with red color. Hover on field to see tooltip with more information.
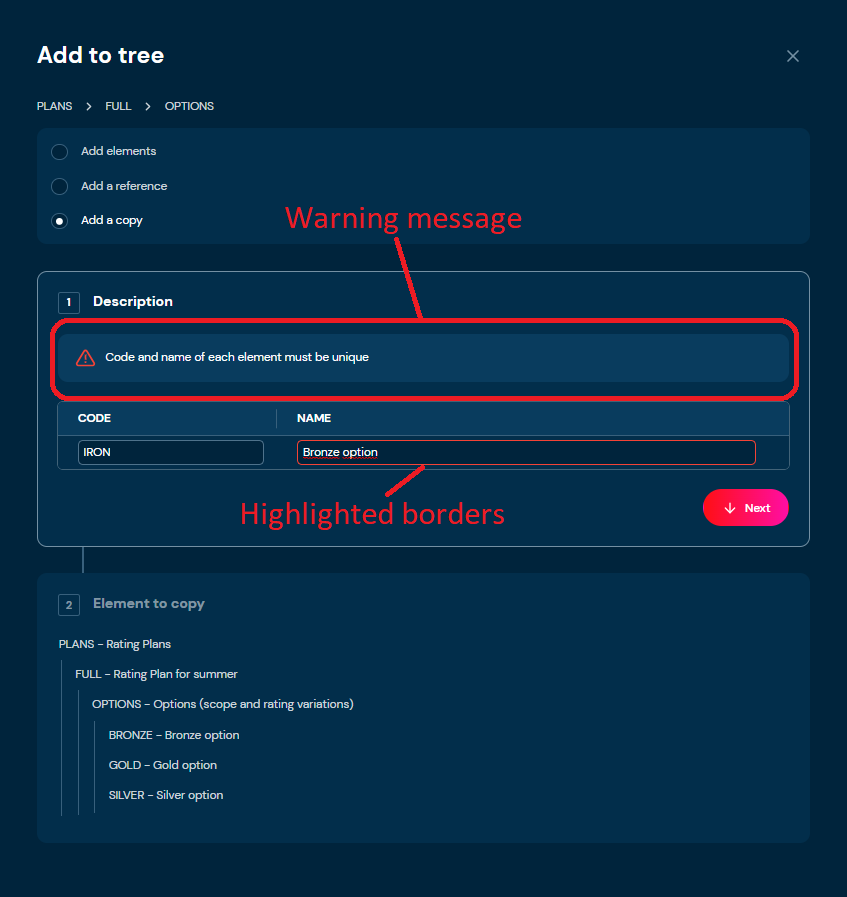
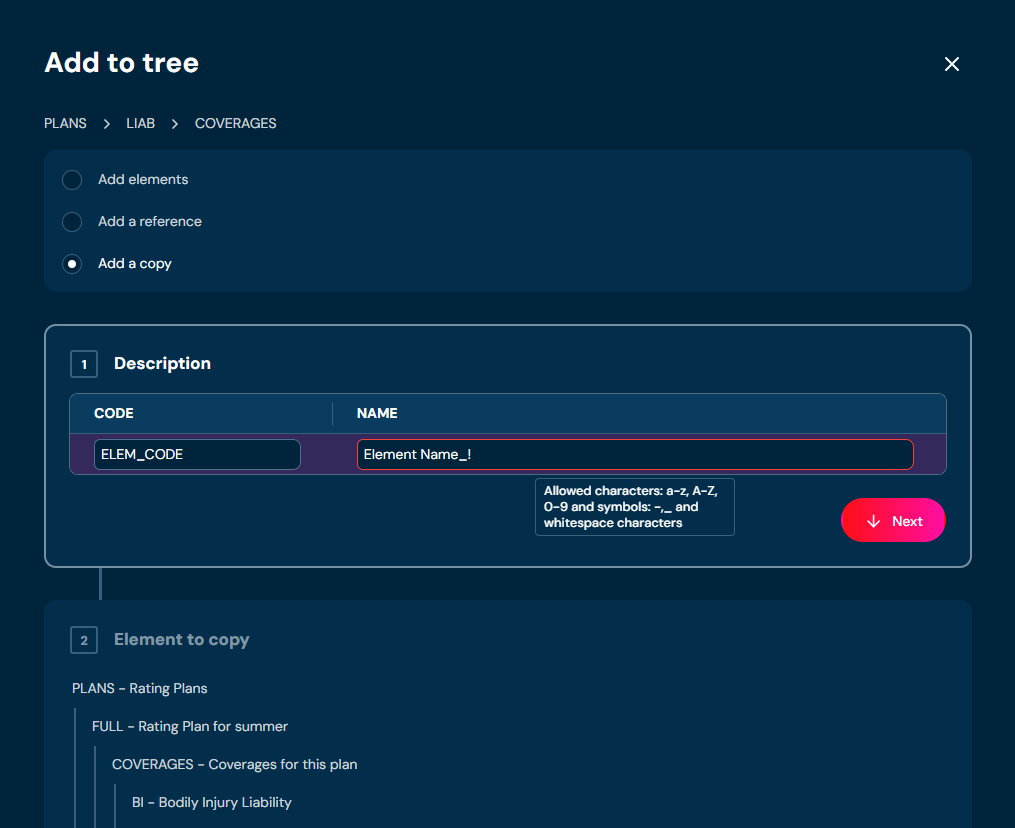
b. need to provide unique Element name. Name can contain only characters a-z; A-Z; 0-9; “-”; “_” and white-space characters.
i. If the name you provided is not unique, then borders will be highlighted with red color and warning message will appear.
ii. If you enter illegal characters, then borders will be highlighted with red color. Hover on field to see tooltip with more information.
-
Choose Next.
-
In step 2. Element to copy you need to choose which Collection Element you want to copy.
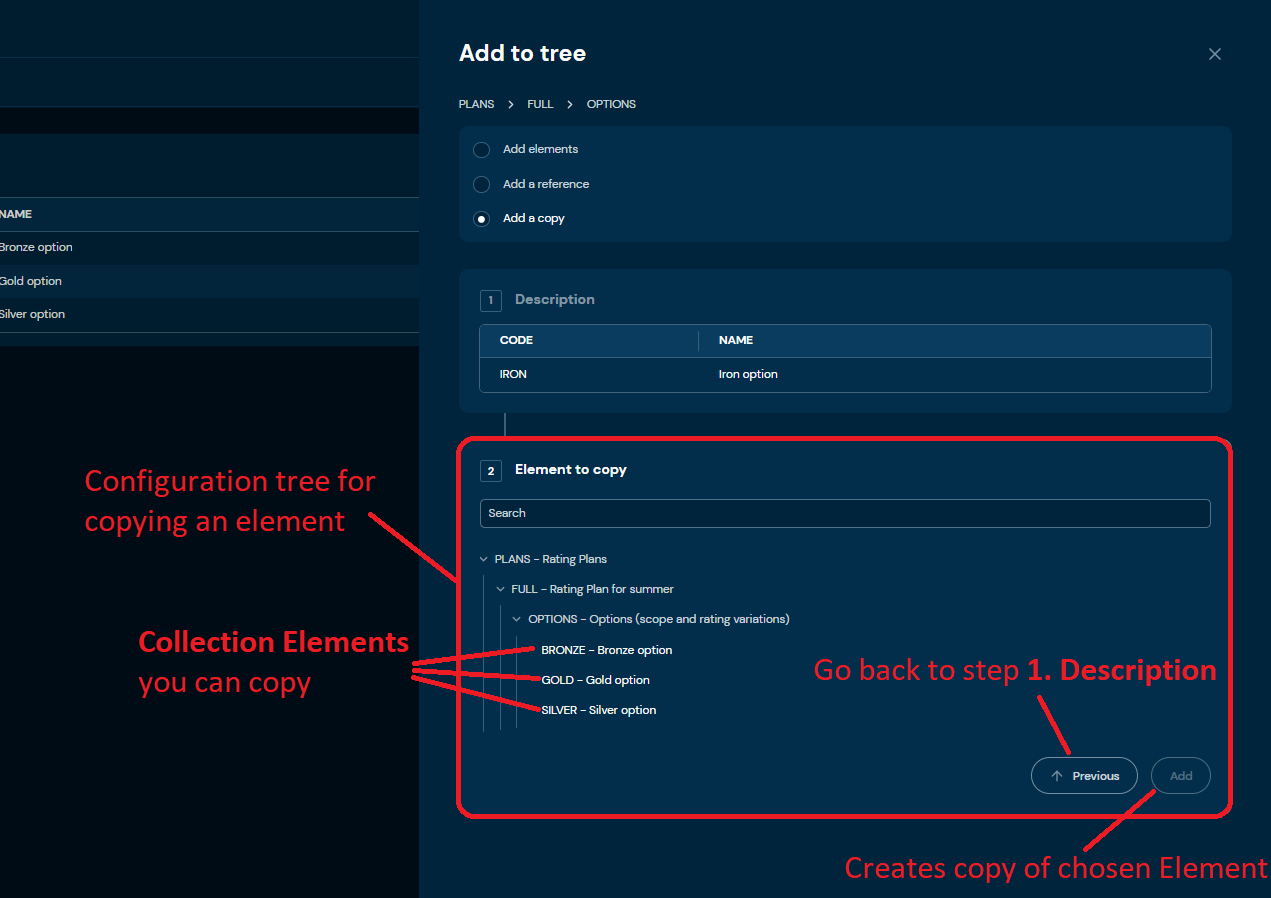
a. If the Add button is greyed out, it means that you have not chosen any Collection Element to copy.
-
Choose Add.
a. Copy of chosen Collection Element is created.
Download Domain Configuration#
If you want to download Domain Configuration, follow these steps:
-
Choose Domain in Main toolbar.
-
Choose Download Domain Configuration in Configuration tree.
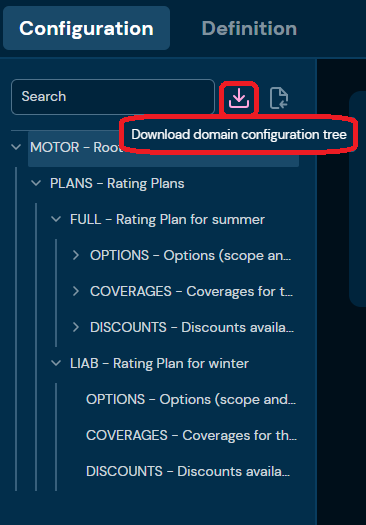
a. Choosing Download Domain Configuration downloads an XML file that contains all configuration Collections, Collection Elements, Definition Types and all dependencies between them.
Upload Domain Configuration#
If you want to upload Domain Configuration, follow these steps:
-
Choose Domain in Main toolbar.
-
Choose Upload Domain Configuration in Configuration tree.
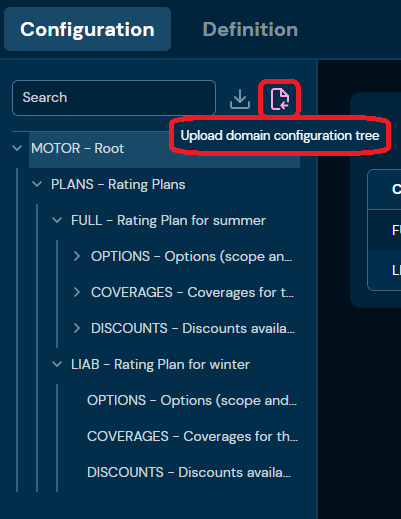
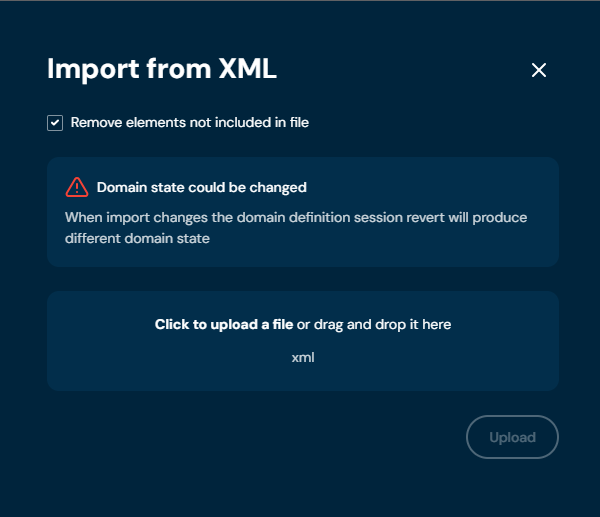
a. Choosing Upload Domain Configuration brings up Import from XML screen.
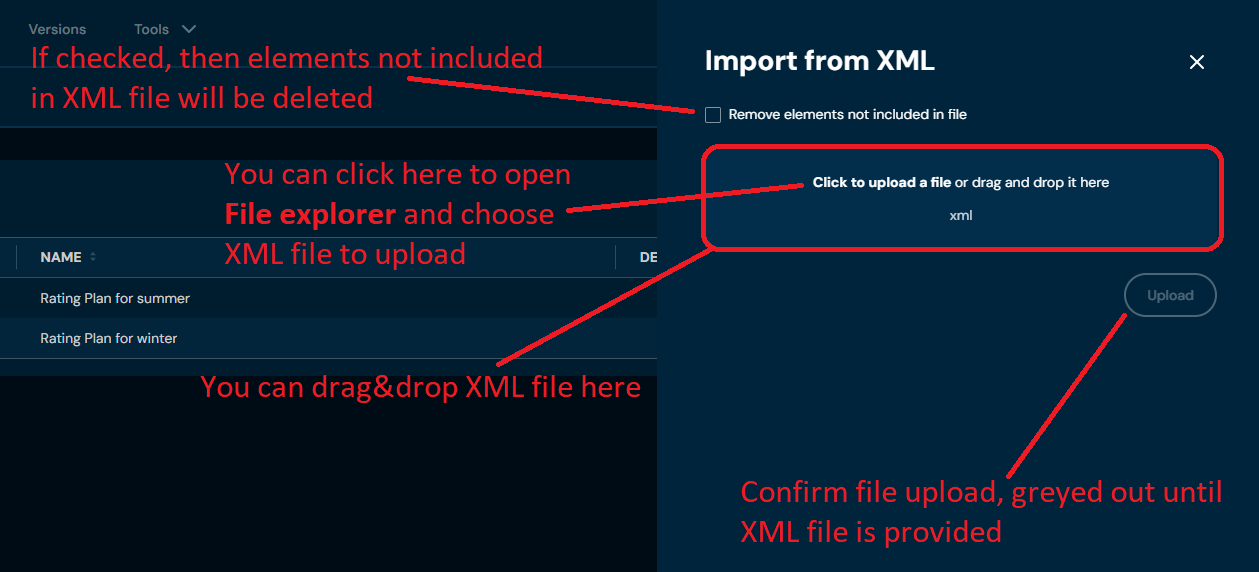
b. If you select checkbox Remove elements not included in file, then warning will appear.
-
Drag&drop desired file or Click to upload a file and choose file in File explorer.
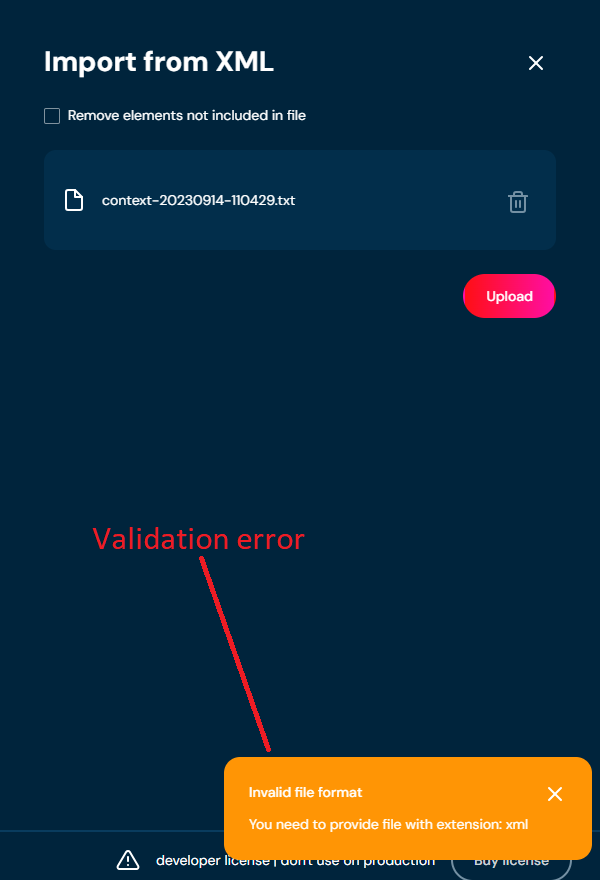
a. If you choose a file with extension other than XML, then validation error will pop up
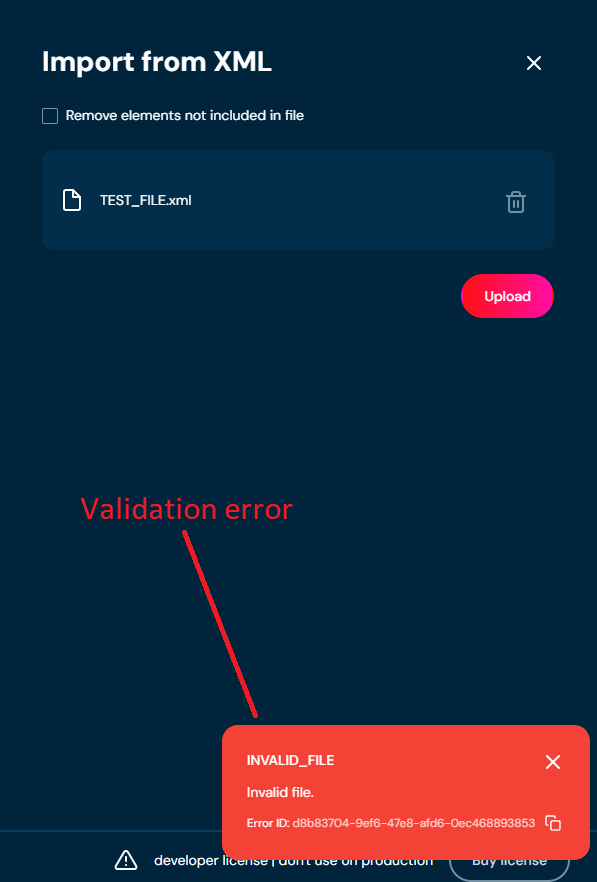
b. If there is something wrong with data in XML file, then validation error will appear.
-
Choose Upload
-
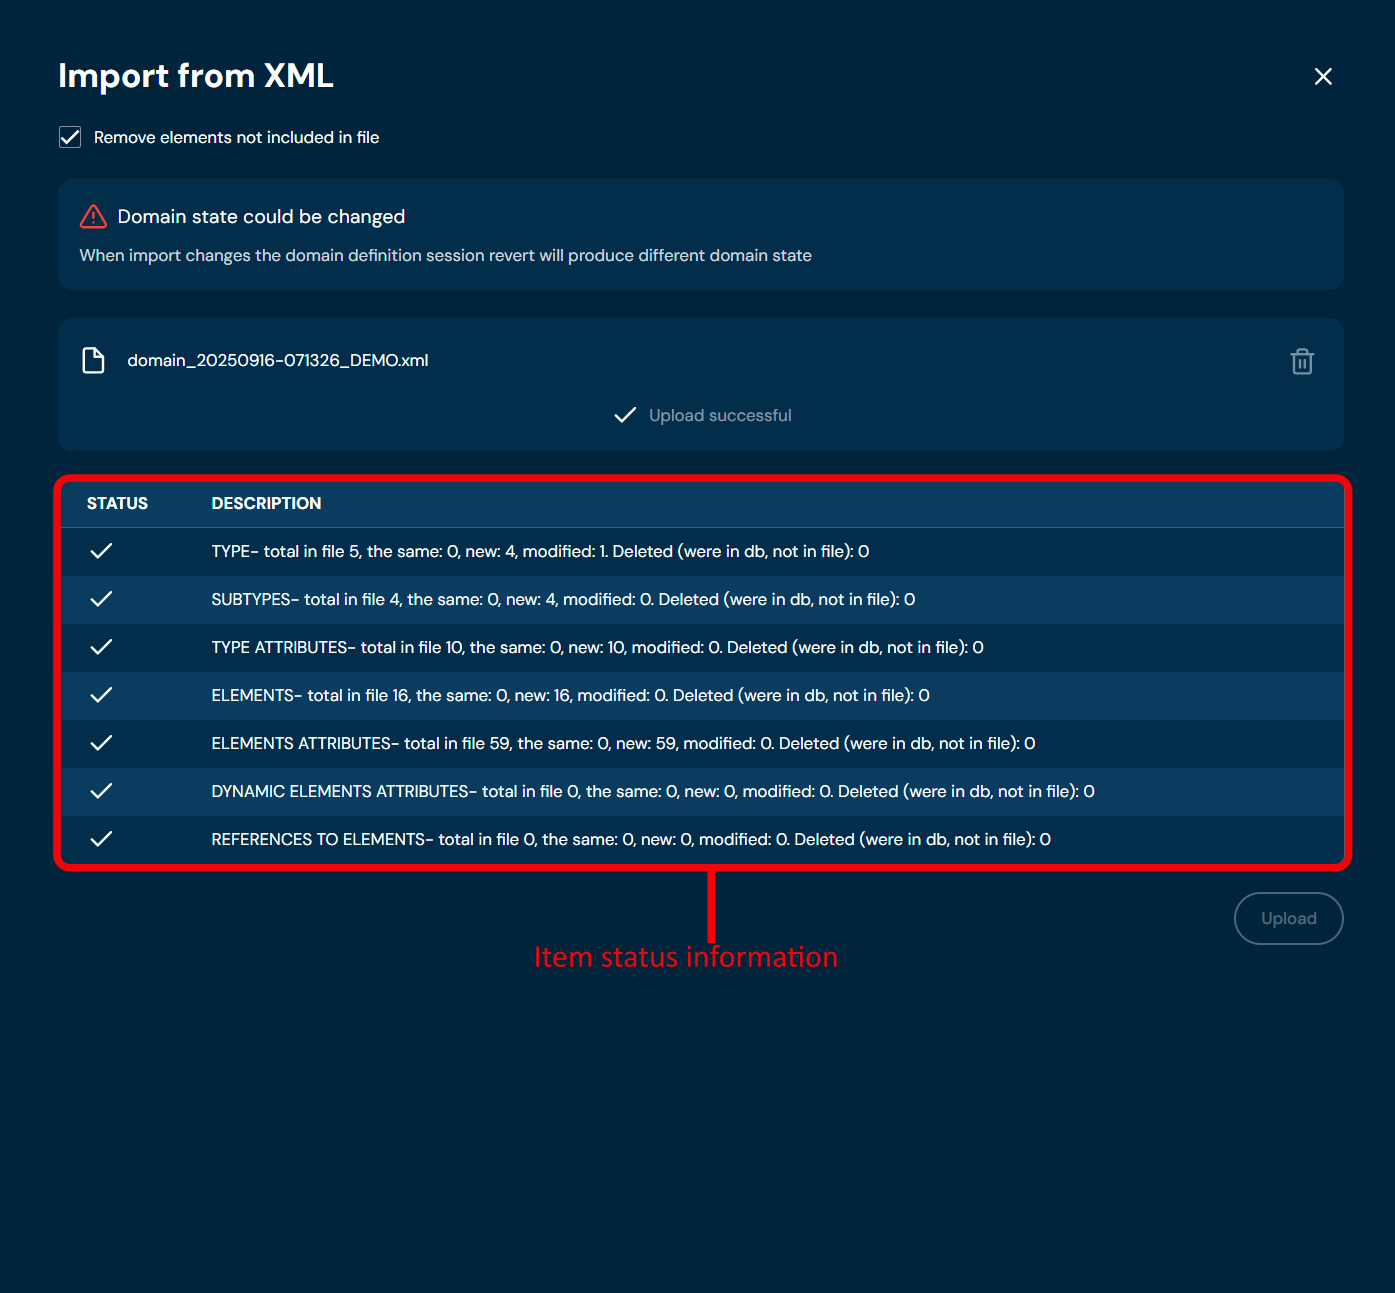
When the progress bar reaches 100%, it means that domain definition was uploaded correctly.
a. If a validation error occurs (see above), then an upload process is being aborted.
b. If you checked checkbox Remove elements not included in file in step 2, then adequate information about changes will appear after uploading a file.
Delete Configuration Tree#
If you want to delete the entire Domain Configuration, follow these steps:
-
Choose Domain in Main toolbar
-
Choose Delete configuration tree.
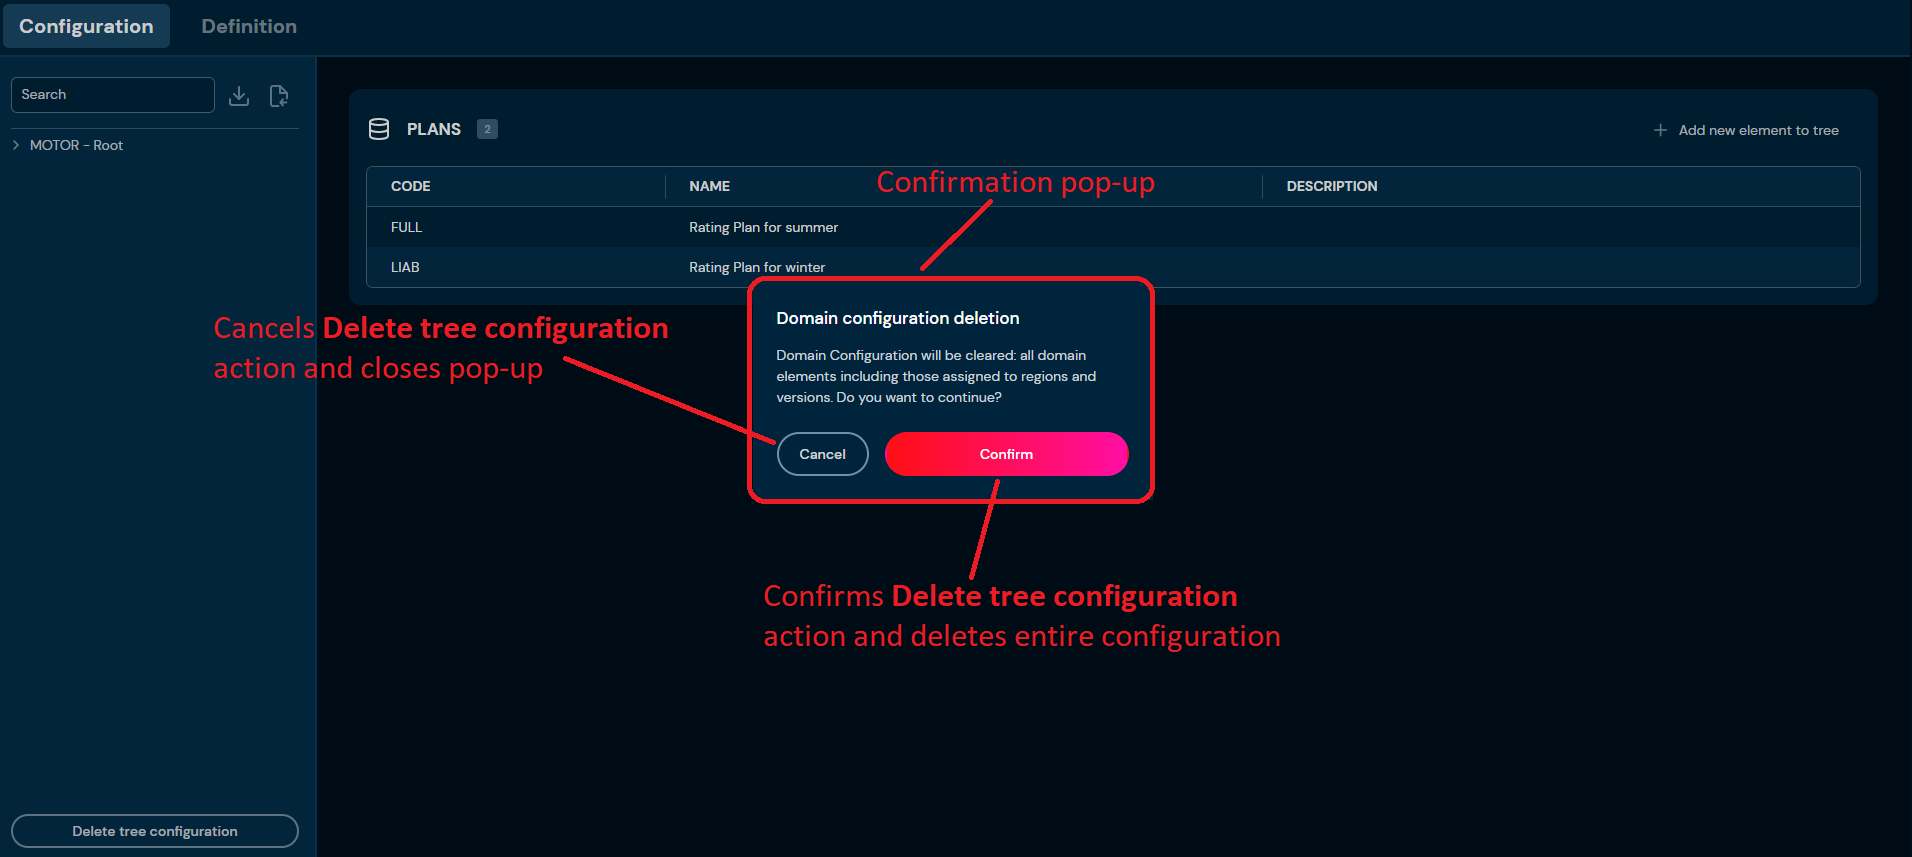
a. After choosing Delete configuration tree button, confirmation pop up will appear.
-
Choose Confirm.
a. The Entire Domain Configuration is deleted from the environment.
-
Choose Session.
a. After choosing Session button, Session preview screen will appear.
-
Choose Publish changes.
Collection Element Details Screen#
You can access Collection Element details by left-clicking on the specific Element in the Domain Configuration tree.
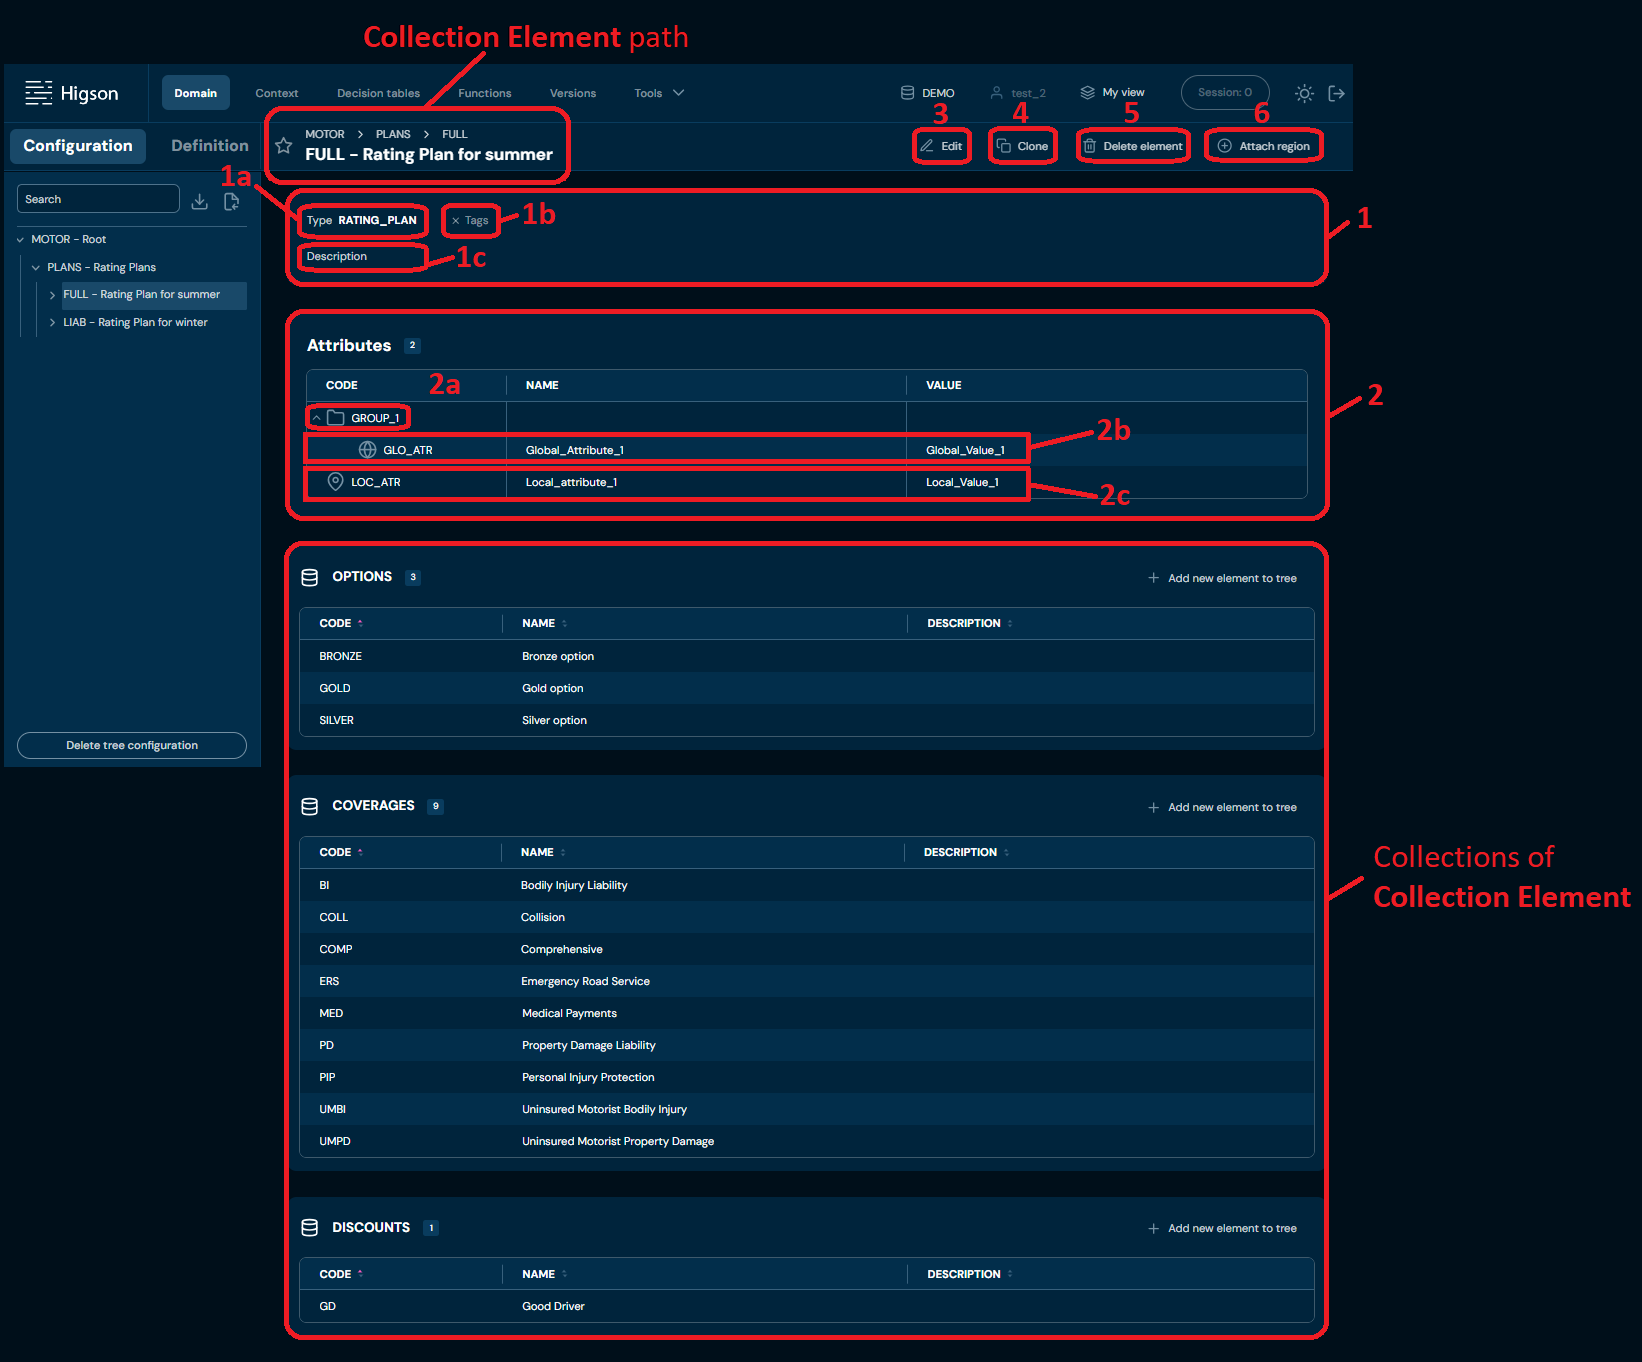
| No. | Name | Description |
|---|---|---|
| 1 | Collection Element details | Collection Element details include information about assigned Region, assigned Tags and description of Collection Element. |
| 1a | Definition Type code | Type code from Domain Definition. |
| 1b | Assigned Tags | List of all Tags assigned to the Element. |
| 1c | Collection Element | Description of Collection Element. |
| 2 | Collection Element attributes | List of all Global and Local Attributes created in Collection Element. |
| 2a | Attributes Group name | Name of Attributes Group. |
| 2b | Global Attributes | Global Attributes are defined by Types in Domain Definition. |
| 2c | Local Attributes | Local Attributes are created in Collection Element by User. |
| 3 | Edit | Enables Collection Element edit mode. To learn more about editing collection element go here |
| 4 | Clone | Allows to clone Collection Element. To learn more about cloning collection elements go here |
| 5 | Delete element | Deletes Collection Element. To learn more about deleting collection element go here |
| 6 | Attach/Detach region | Allows you to add/remove a region to/from the Collection Element. - Attach region is available if there are no regions added to Collection Element - Detach region is available if there is a region added to Collection Element If User has opened session, then button is greyed out. |
Edit Element#
If you want to edit data in specific Collection Element, follow these steps:
-
Choose Domain in Main toolbar.
-
In the Configuration tree, left-click on Collection Element you wish to edit.
-
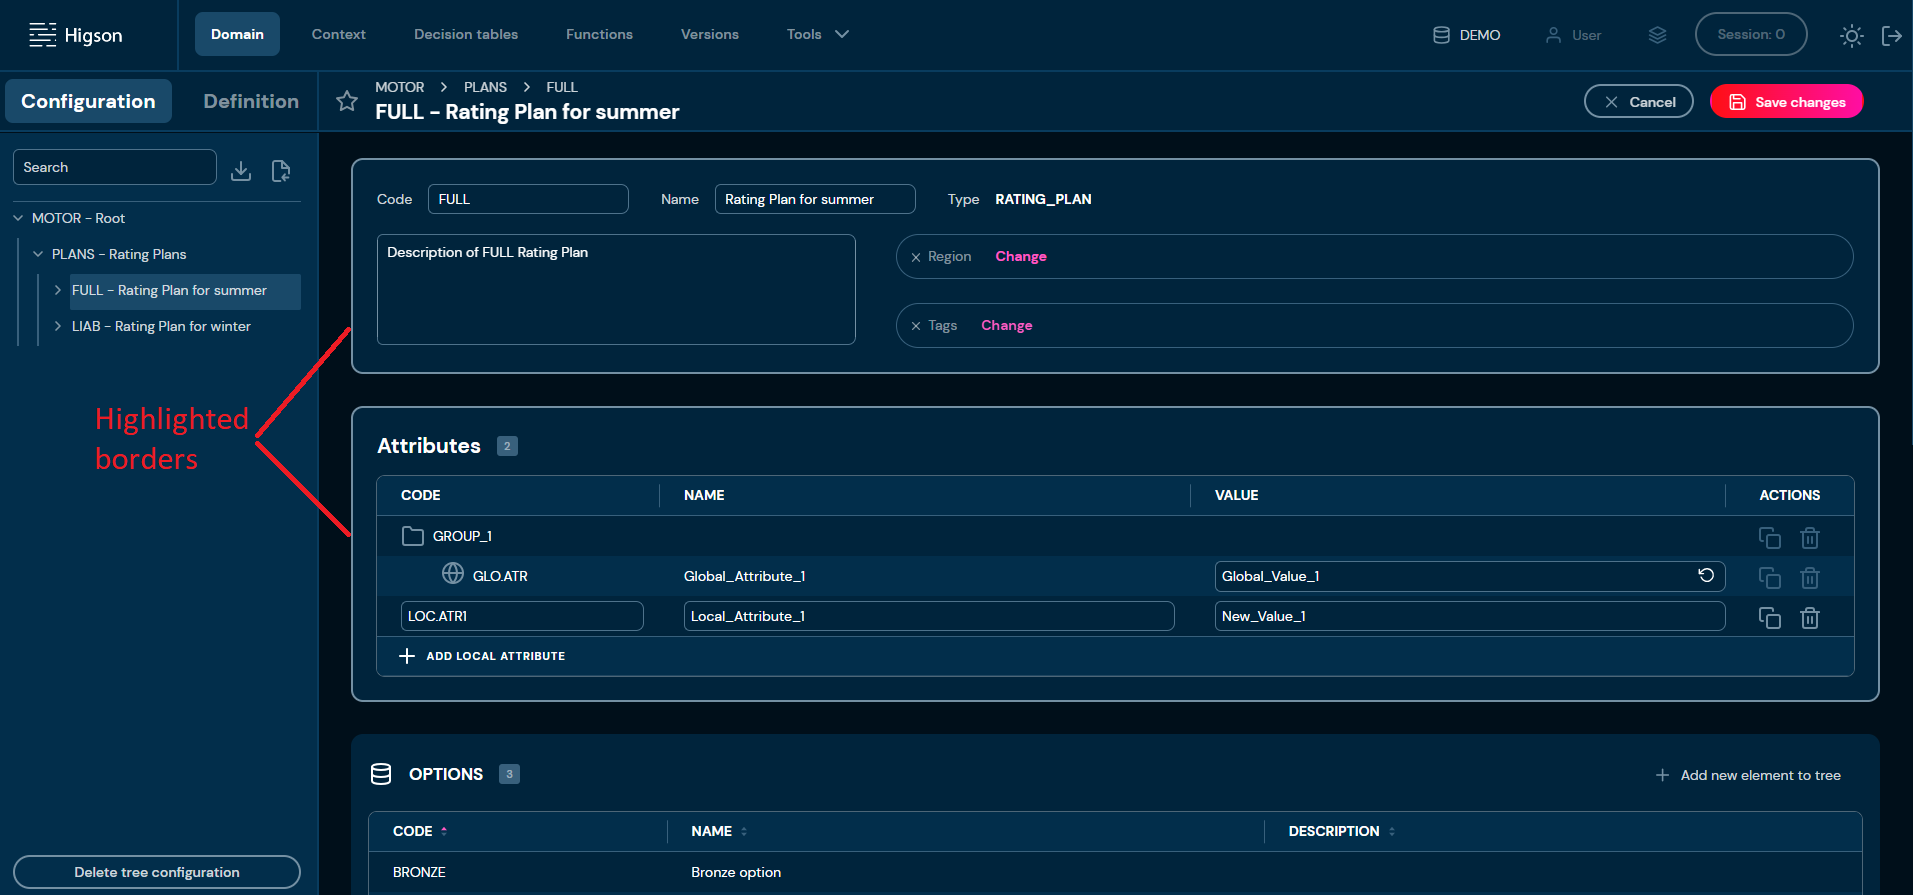
Choose Edit.
a. Highlighted borders indicate that edit mode is active.
-
Edit any data you need.
-
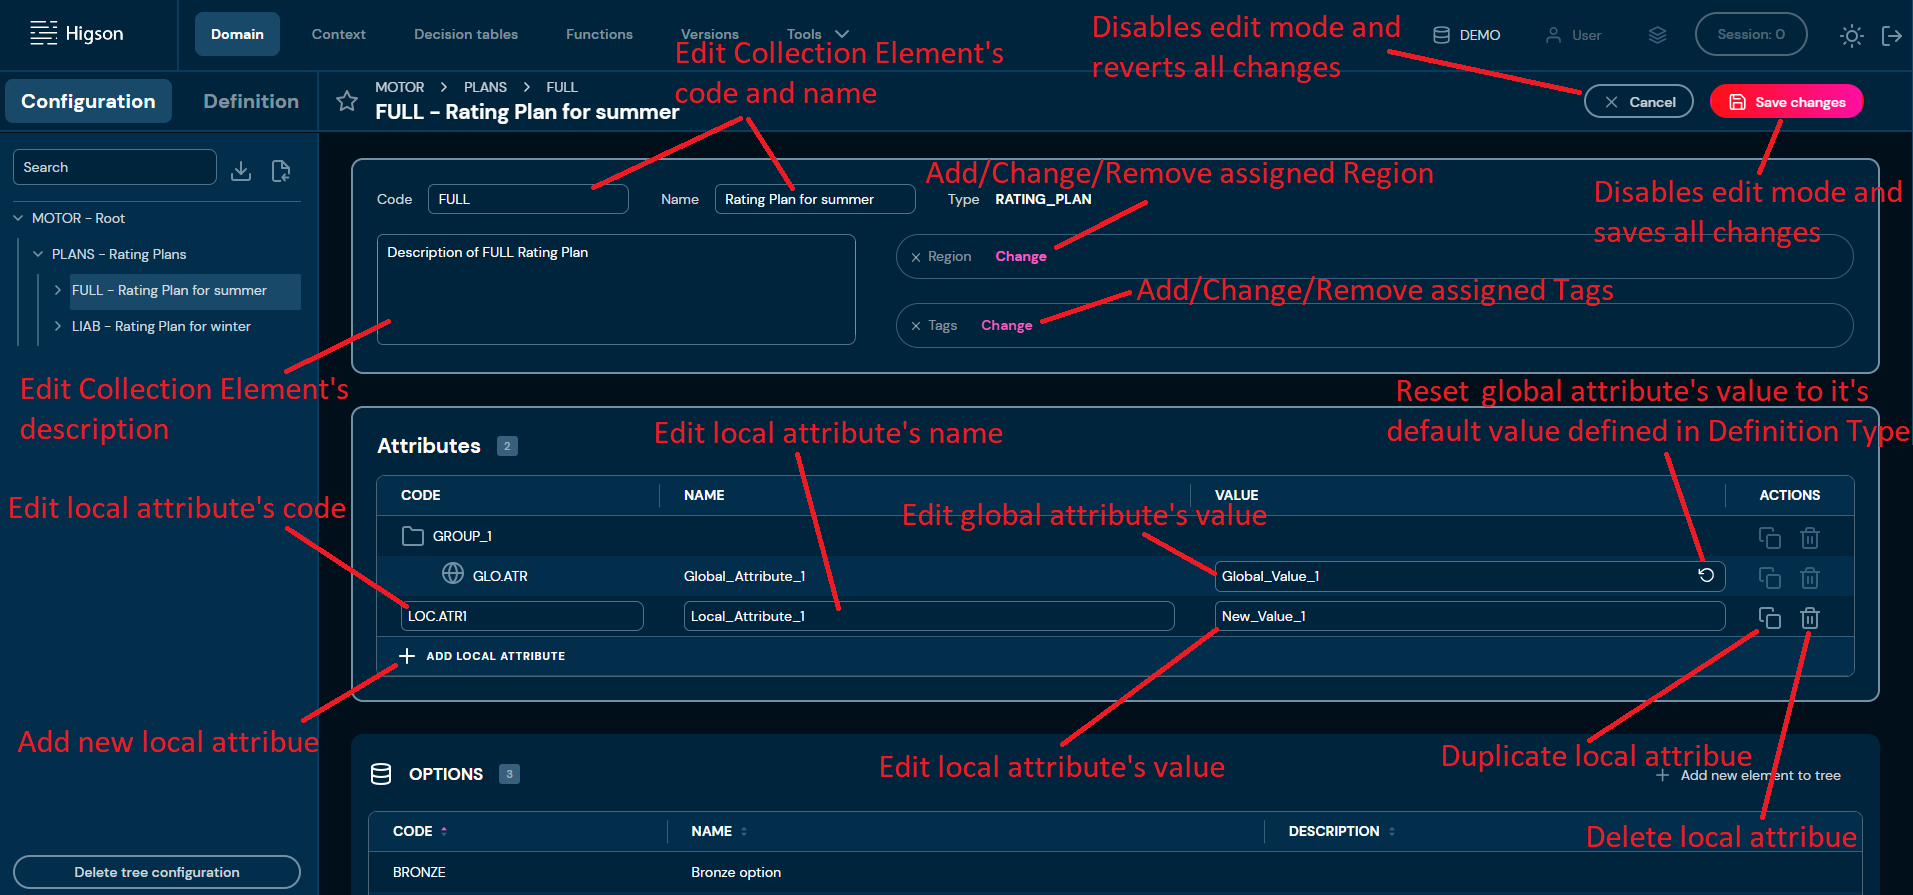
Choose Save changes to save all changes made in Collection Element.
a. Cancel reverts all changes made in the Collection Element.
Add Local Attribute#
-
Choose Domain in Main toolbar.
-
In the Configuration tree, left-click on Collection Element you wish to add local attribute.
-
Choose Edit.
-
Choose Add local attribute and you:
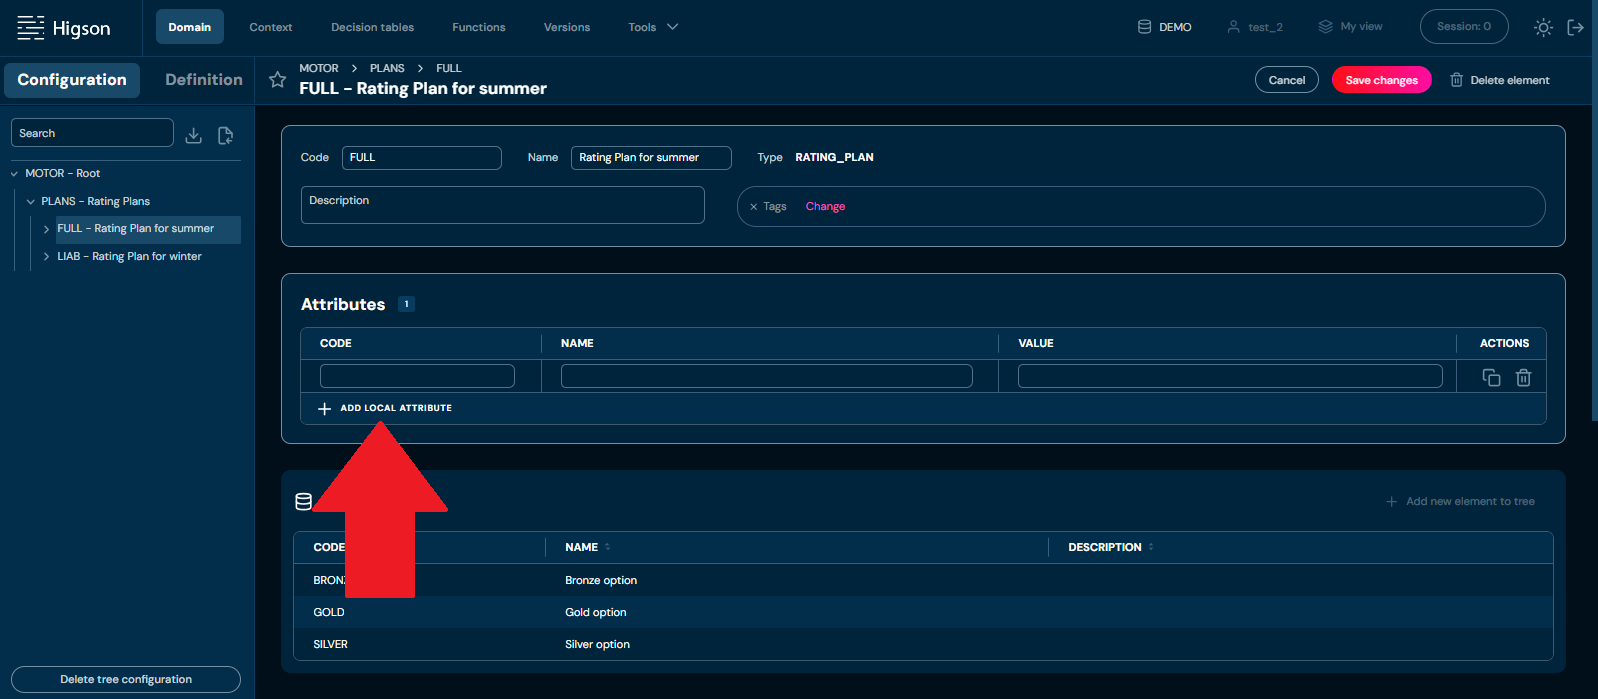
a. need to provide unique Attribute code. Code can contain only characters from collection “a-z”; “A-Z”; “-”; “_”.
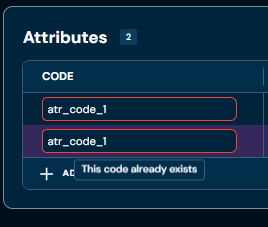
i. If you entered the same code in at least two attributes, then borders will be highlighted with red color, and you will not be able to save changes.
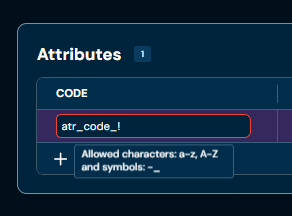
ii. If you enter illegal characters, then borders will be highlighted with red color. Hover on field to see tooltip with more information.
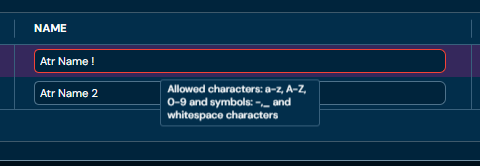
b. need to provide Attribute name. Name can contain only characters from collection “a-z”; “A-Z”; “0-9”; “-”; “_” and white-space characters.
i. If you enter illegal characters, then borders will be highlighted with red color. Hover on field to see tooltip with more information.
c. need to provide Attribute value. Value can contain any characters.
-
Choose Save changes.
Reset to Default Value#
-
Choose Domain in Main toolbar.
-
In the Configuration tree, left-click on Collection Element you wish to add local attribute.
-
Choose Edit.
-
Choose Reset to default value for specific Global Attribute.
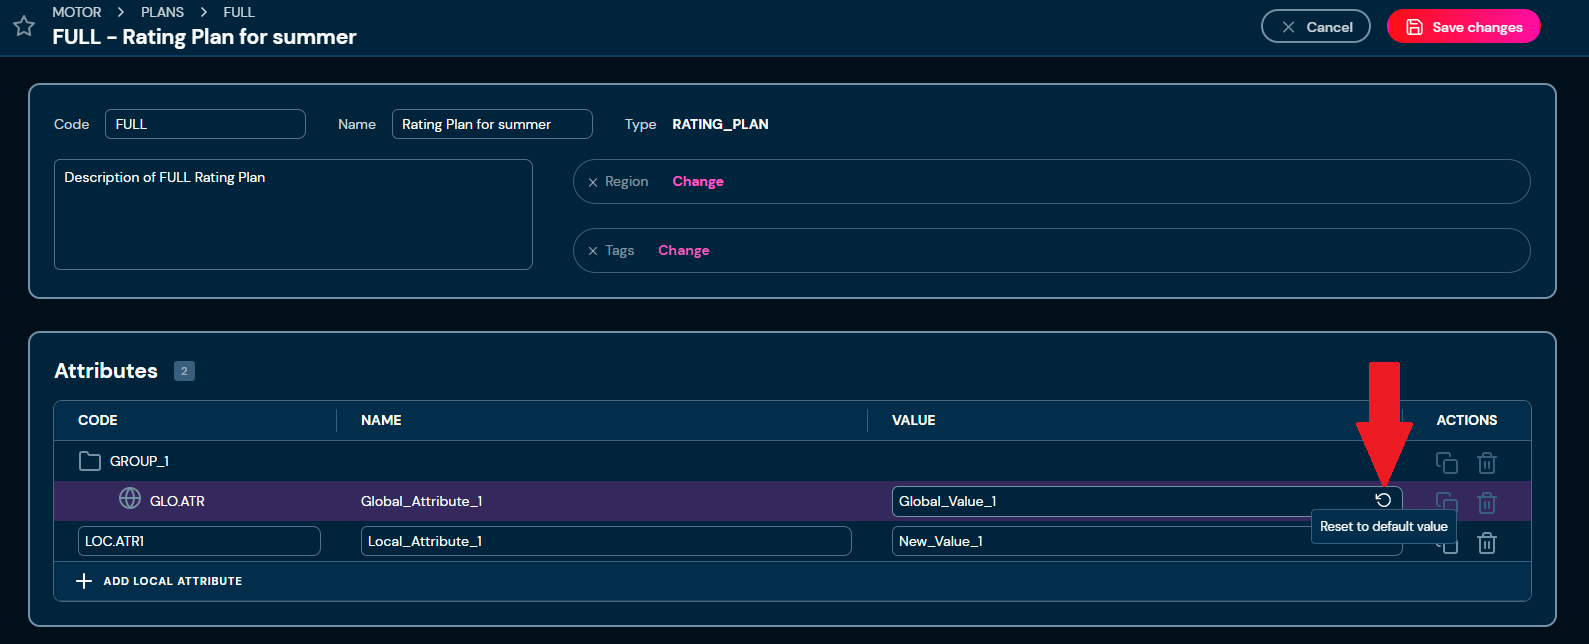
a. Attribute’s value is changed to the value defined in the appropriate Definition Type.
-
Choose Save changes.
Clone Element#
If you want to clone specific Collection Element, follow these steps:
-
Choose Domain in Main toolbar.
-
In the Configuration tree, left-click on Collection Element you wish to clone.
-
Choose Clone.
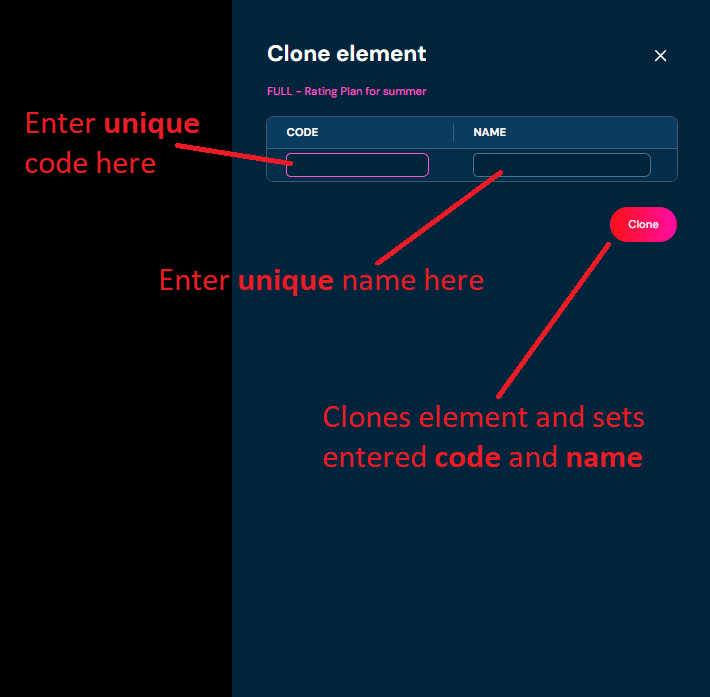
a. Choosing Clone brings up the Clone element screen.
-
You need to provide:
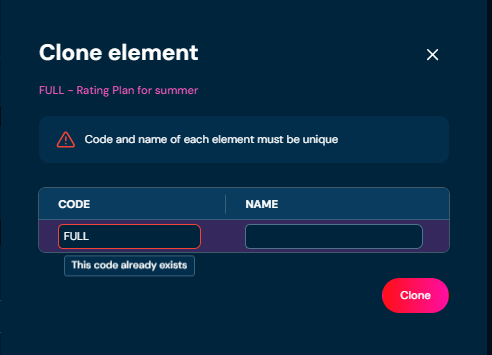
a. unique code. Code can contain only characters from collection “a-z”; “A-Z”; “-”; “_”.
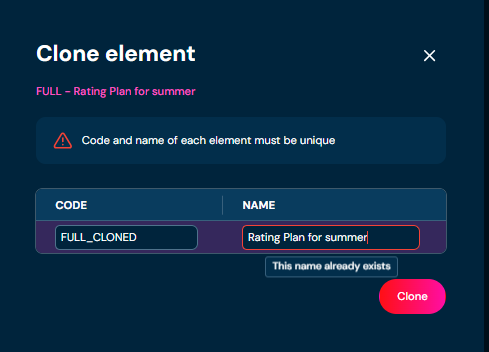
i. If the code you entered is not unique, then borders will be highlighted with red color and warning message will appear.
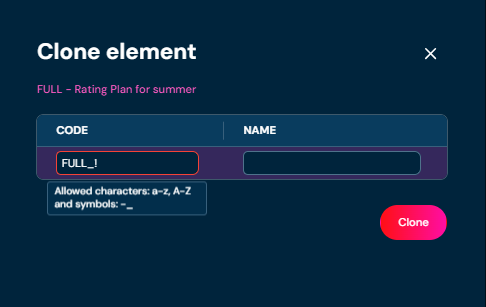
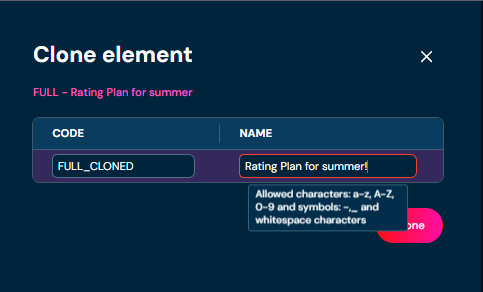
ii. If you enter illegal characters, then borders will be highlighted with red color. Hover on field to see tooltip with more information.
b. unique name. Name can contain only characters from collection"a-z"; “A-Z”; “0-9”; “-”; “_” and white-space characters.
i. If the code you entered is not unique, then borders will be highlighted with red color and warning message will appear.
ii. If you enter illegal characters, then borders will be highlighted with red color. Hover on field to see tooltip with more information.
-
Choose Clone.
a. Collection Elements are being cloned.
Delete Element#
If you want to delete specific Collection Element, follow these steps:
-
Choose Domain in Main toolbar.
-
In the Configuration tree, left-click on Collection Element you wish to delete.
-
Choose Delete element.
a. After choosing Delete element action, confirmation pop up will appear.
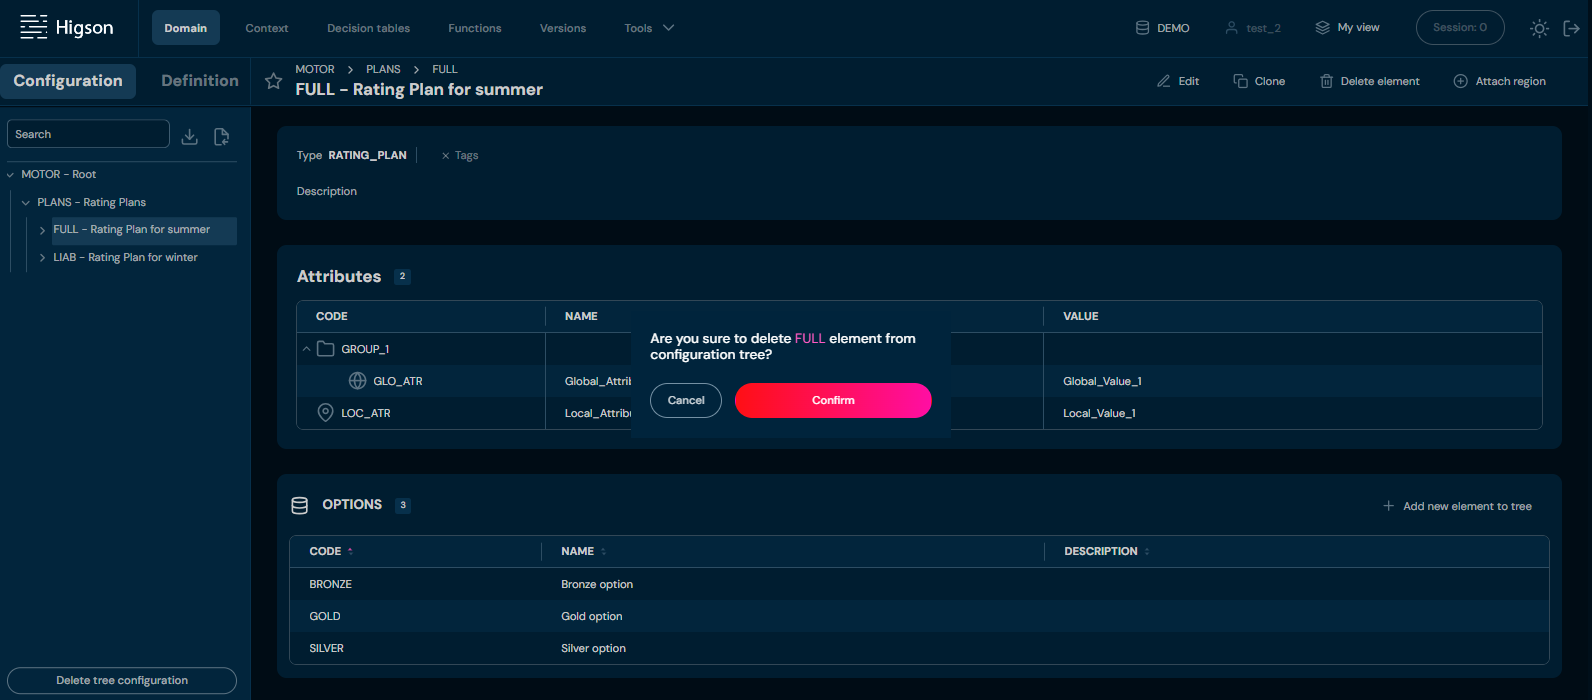
-
Choose Confirm.
a. Collection Element is deleted from the environment.
Attach Region#
If you want to attach a region to Collection Element, follow these steps:
-
Choose Domain in Main toolbar.
-
In the Configuration tree, left-click on Collection Element with no region assigned you want to attach a region.
-
Choose Attach region
a. If Attach region action is greyed out, it means that user has active open session.
b. If Detach region action is available, it means that Collection Element has assigned reason already. You need to Detach region before you will be able to attach a new region.
c. Choosing Attach region brings up Manage versioning screen.
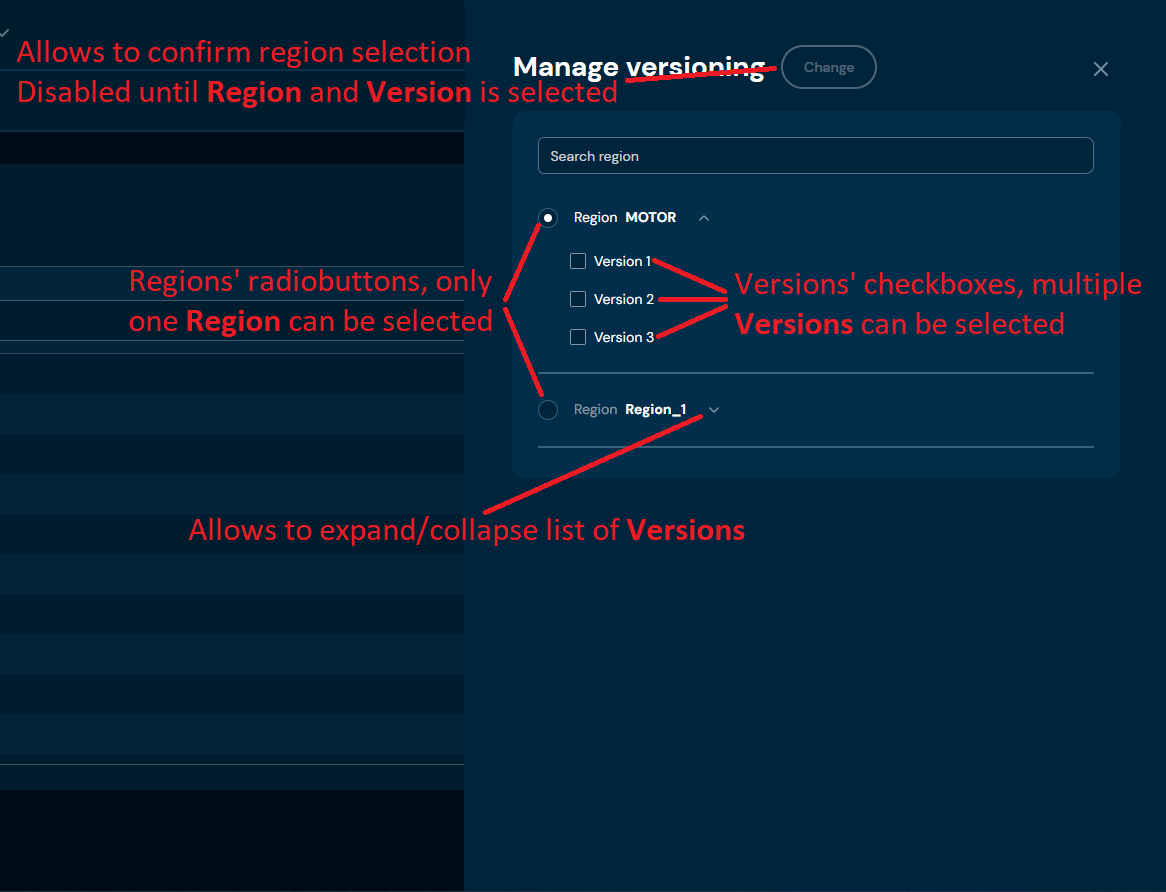
-
Select Region and one or more Version.
-
Choose Change.
a. Region is being assigned to the Collection Element.
Detach Region#
If you want to detach a region from Collection Element, follow these steps:
-
Choose Domain in Main toolbar.
-
In the Configuration tree, left-click on Collection Element with a region assigned you want to detach a region.
-
Choose Detach region.
a. If Detach region action is greyed out, it means that user has active open session.
b. If Attach region action is available, it means that Collection Element has no region assigned.
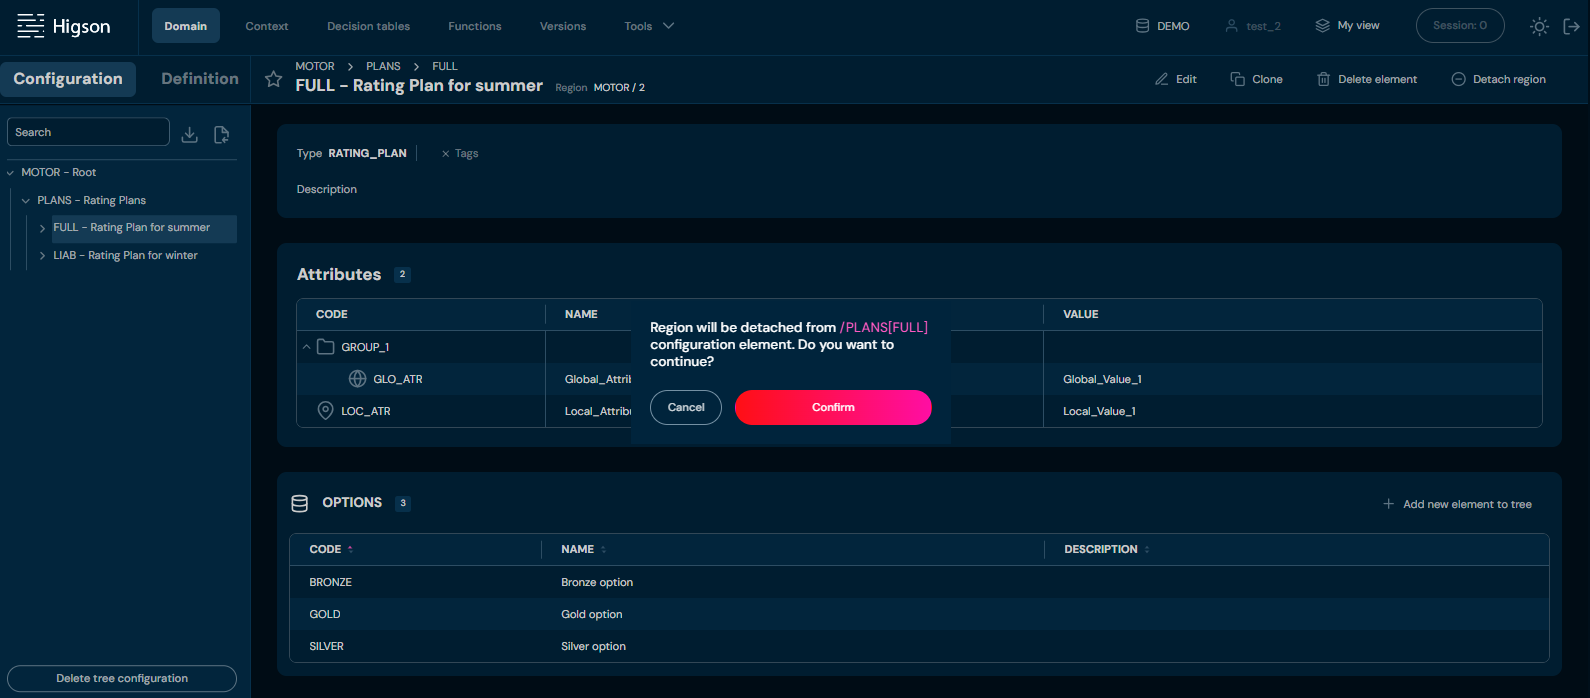
c. After choosing Detach region action, confirmation pop up will appear.
-
Choose Confirm.
a. The Region is being detached from Collection Element.