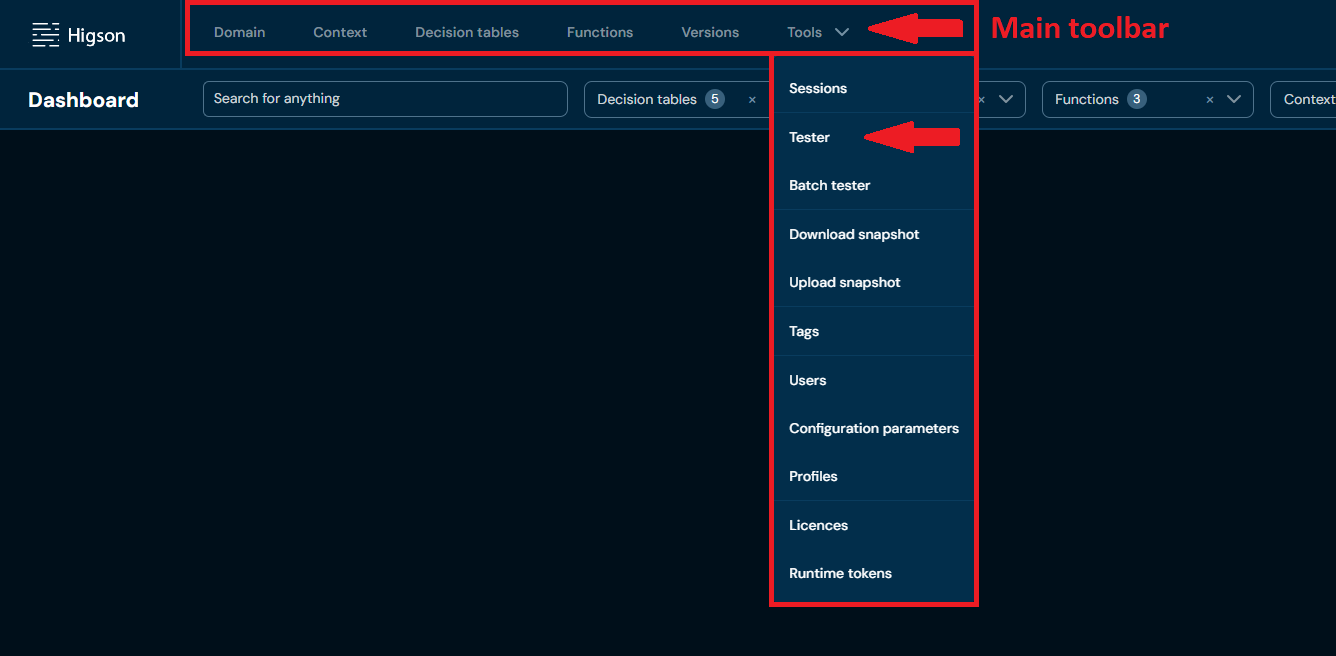
Tester allows you to verify if the created Decision Table, Function and Domain Elements are working as intended. In order to see Tester, select Tools → Tester in Main Toolbar.
After you enter Tester you will see Test panel with a list of all tests:
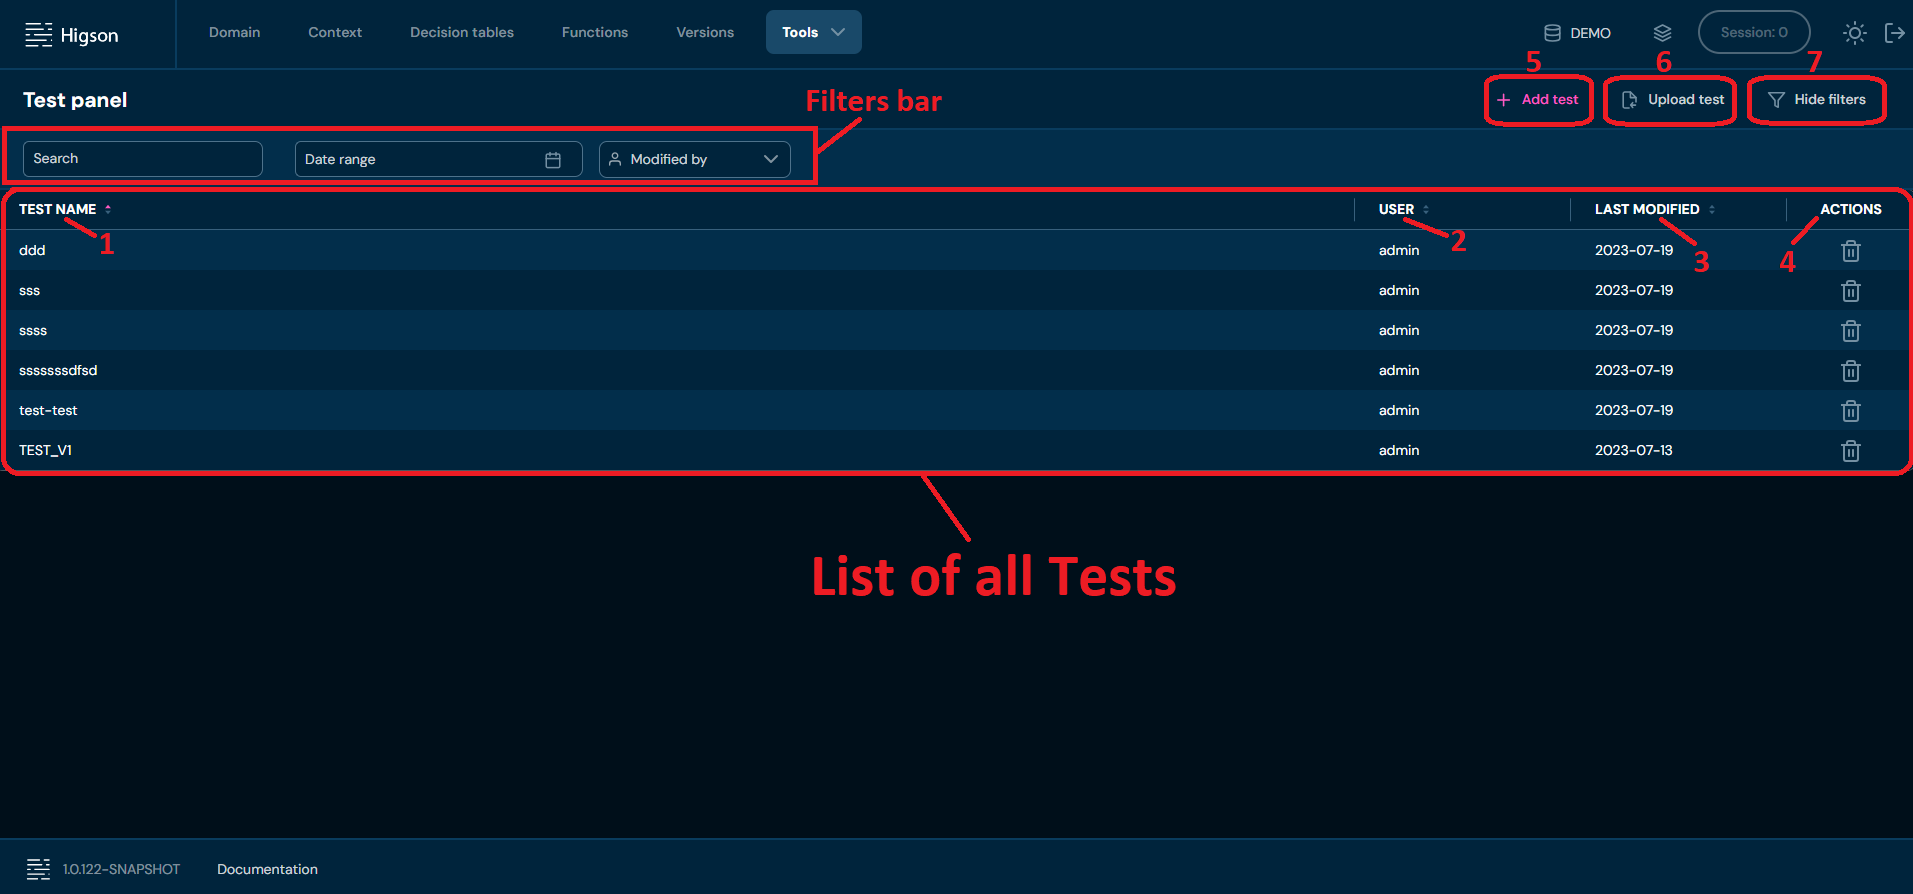
| No. | Column/Action Name | Description |
|---|---|---|
| 1. | Test Name | Full test case name. You can sort this column by left-clicking on the arrows visible next to the label. |
| 2. | User | User’s login that made the last modification in the test case. You can sort this column by left-clicking on the arrows visible next to the label. |
| 3. | Last Modified | The last modification date of the test case. You can sort this column by left-clicking on the arrows visible next to the label. |
| 4. | Actions | List of quick access actions. Currently only the Remove action (bin icon) is available here. The Remove action deletes the desired test case. To learn more about removing a specific test case, go here. |
| 5. | + Add Test | Allows creating a new Test case. To learn more about adding Test cases, go here. |
| 6. | Upload Test | Allows uploading Test case from an XLSX file. To learn more about uploading Test cases, go here. |
| 7. | Hide/Show Filters | Hides or reveals the Filters bar accordingly. If the Filter bar is visible, then the action Hide filters is available. If it’s hidden, then the action Show filters is available. - is visible, then action Hide filters is available. - is hidden, then action Show filters is available. |
You can see all Filters available in a Test panel below:
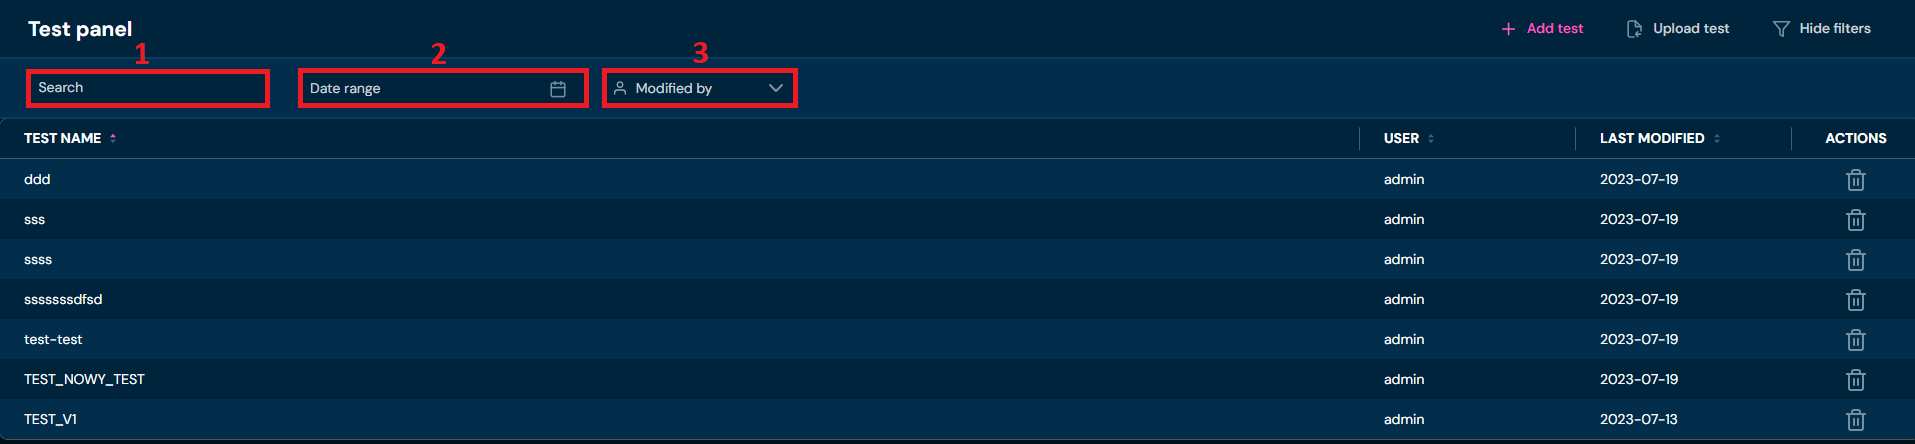
| No. | Filter Name | Description |
|---|---|---|
| 1. | Search Text Field | Filter by any string provided by the user. |
| 2. | Date Range | Filter by last modified date in format YYYY/MM/DD-YYYY/MM/DD. |
| 3. | Modified By | Filter by users who made the last modification in test cases. |
Number in Hide/Show filters action indicates how many filters are active.

Tester - Upload test#
If you want to upload a test case from Test panel screen, follow these steps:
-
Choose Tools → Tester in Main toolbar.
-
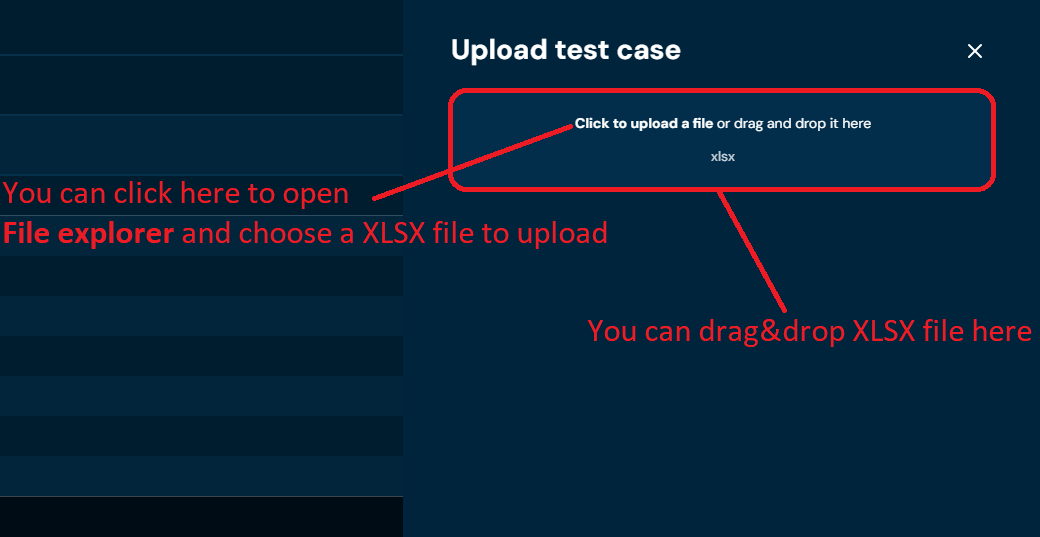
Choose Upload test.
a. Choosing Upload brings up Upload test case screen.
-
Drag&drop desired file or Click to upload a file and choose file in File explorer.
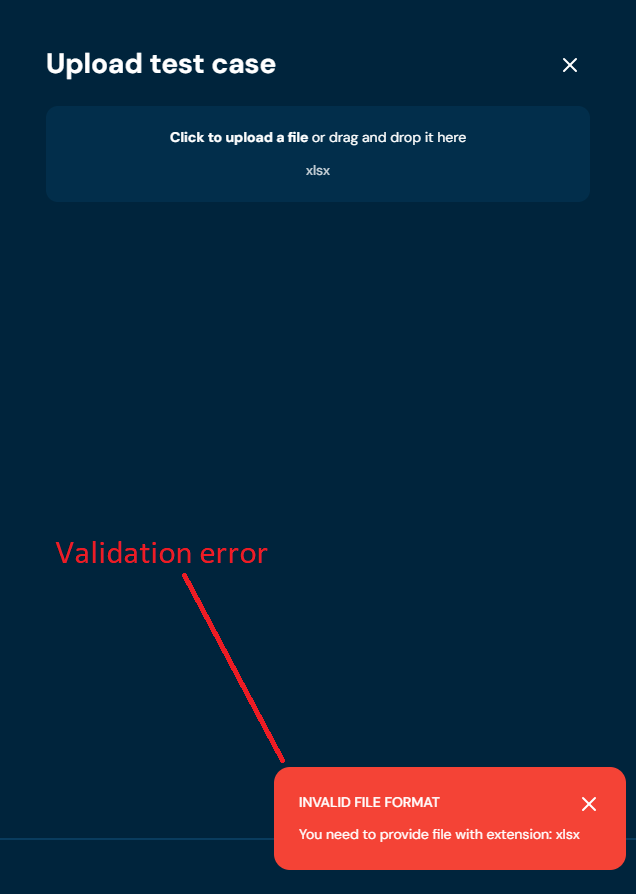
a. If you choose a file with extension other than XLSX, then validation error will pop up.
-
When the progress bar reaches 100%, it means that test was uploaded correctly.
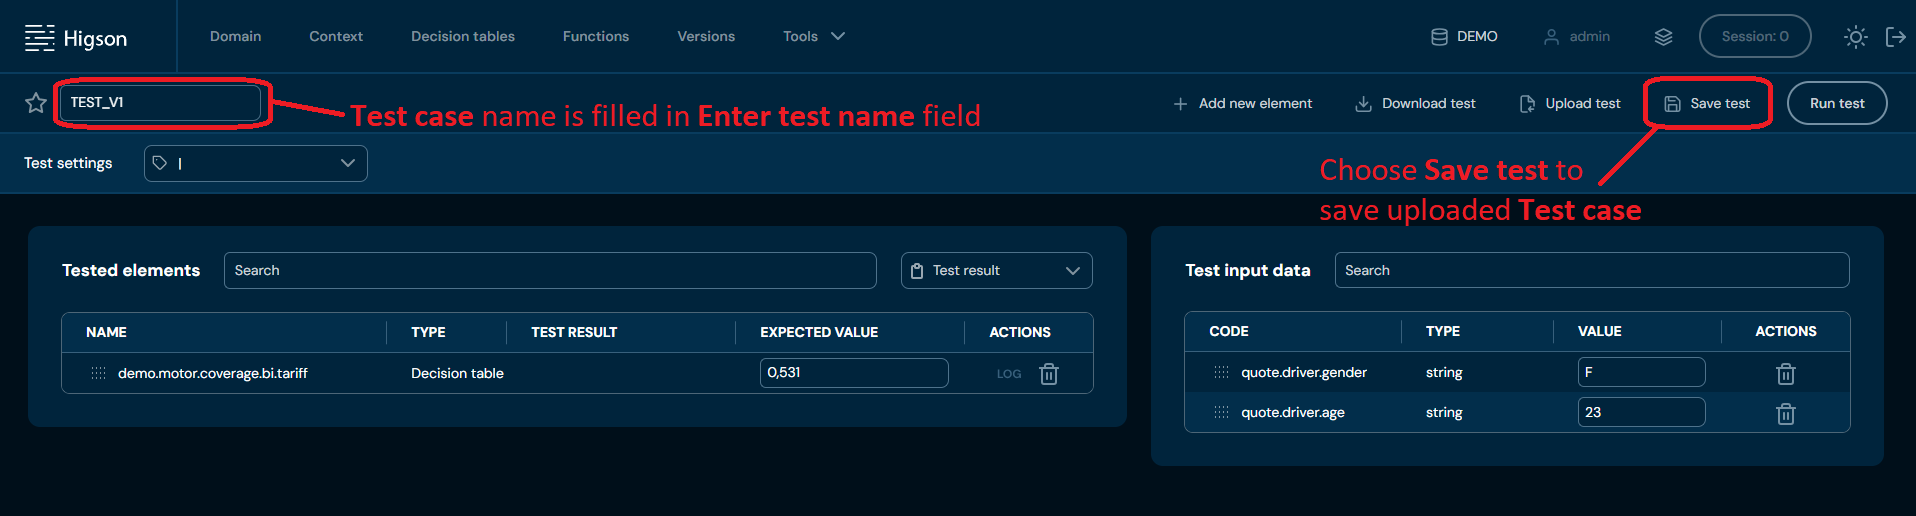
a. You will be redirected to the uploaded Test case screen. Bear in mind, that Test case has not been saved yet. In order to save uploaded Test case, choose Save test.
b. If validation error occurs (see above), then an upload process is being aborted.
Tester - Add test case#
If you want to add a new test case, follow these steps:
-
Choose Tools → Tester in Main toolbar.
-
Choose + Add test.
a. Choosing + Add test opens New Test case screen.
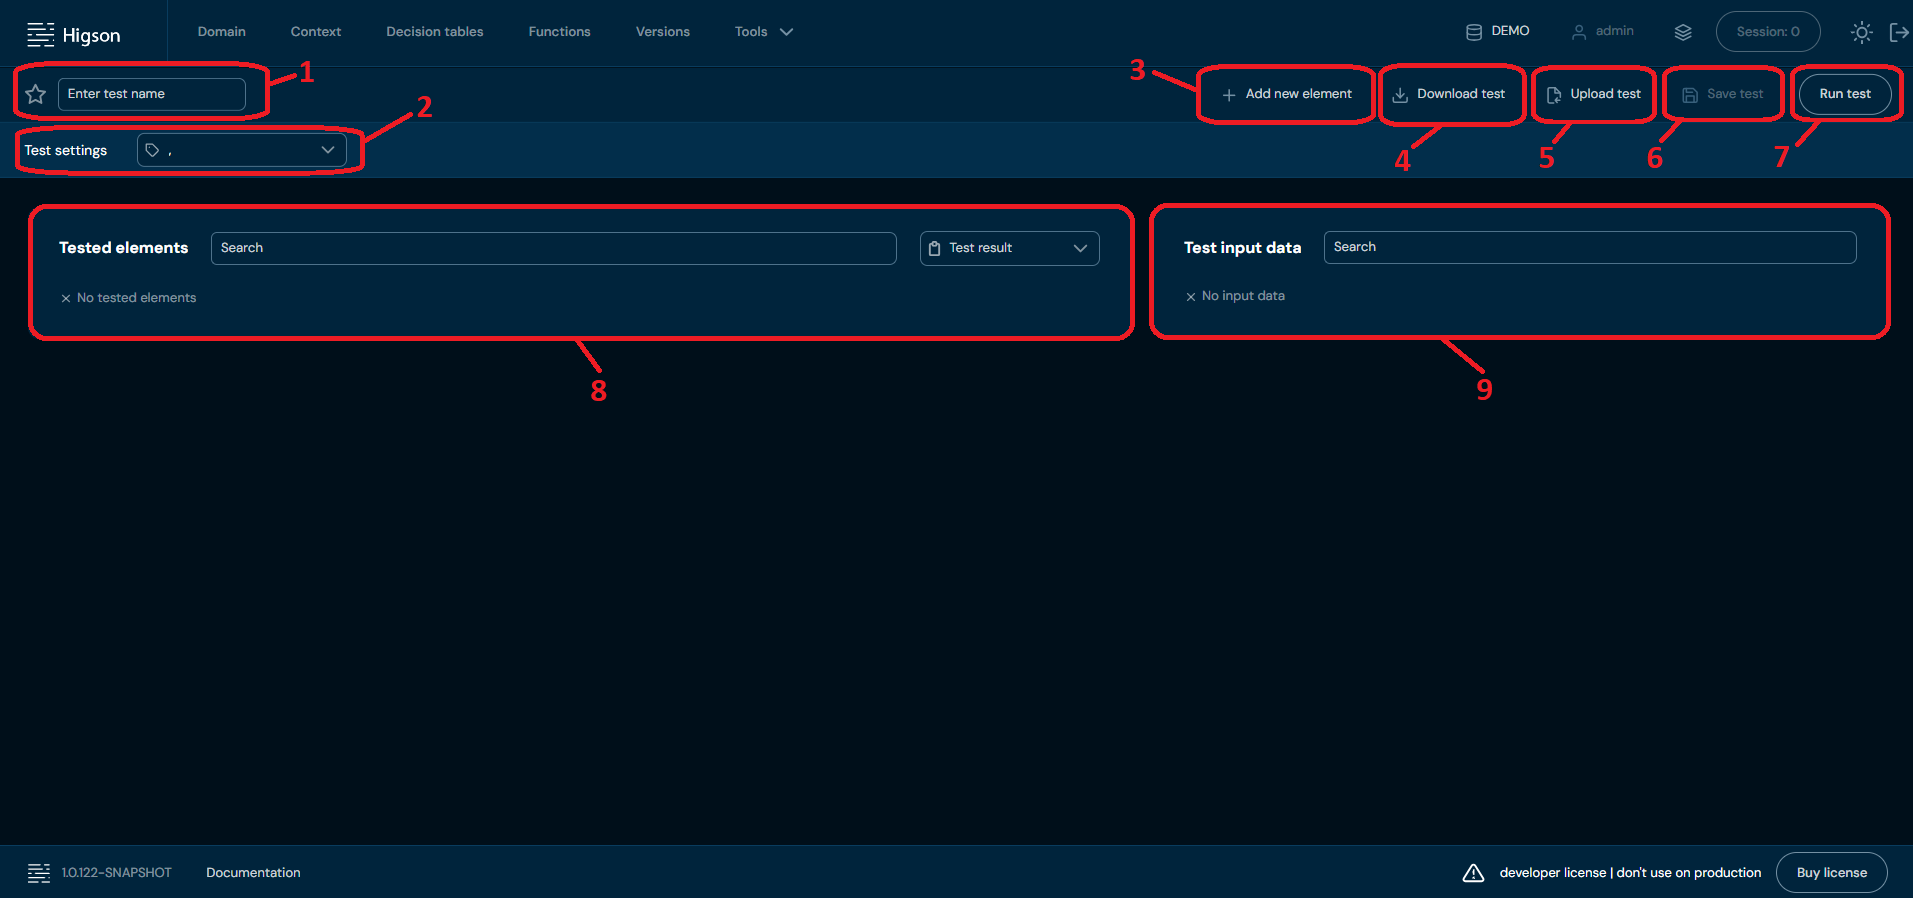
No. Name Description 1. Enter Test Name Enter unique test case name here. Test case name can contain only characters from collection a-z; 0-9; “-”, “_”, and it can’t start with “-”. 2. Test Settings Bar Allows configuring delimiter - choose which delimiter ("," or “|”) will be used in the expected value. Default delimiter is “,”. 3. + Add New Element Opens Add New Element screen. You can choose here which elements will be added to the Test Case. Available elements are: - Decision Tables - Functions - Domain Configuration Elements 4. Download Test Downloads an XLSX file that contains all data from the currently opened Test Case. 5. Upload Test Allows uploading Test Case from an XLSX file. To learn more about uploading Test Cases, go here. 6. Save Test Allows saving Test Case. Action is grayed out until Tested Elements are provided. 7. Run Test Runs the currently opened Test Case with set Test Settings. When the process is finished, then Test Results will be updated for each Tested Element. 8. Tested Elements List of all elements added to the Test Case. 9. Test Input Data List of all available Test Input Data for Tested Elements. -
Choose + Add new element. This step is necessary to save Test case.
a. Choosing + Add new element brings up New element screen.
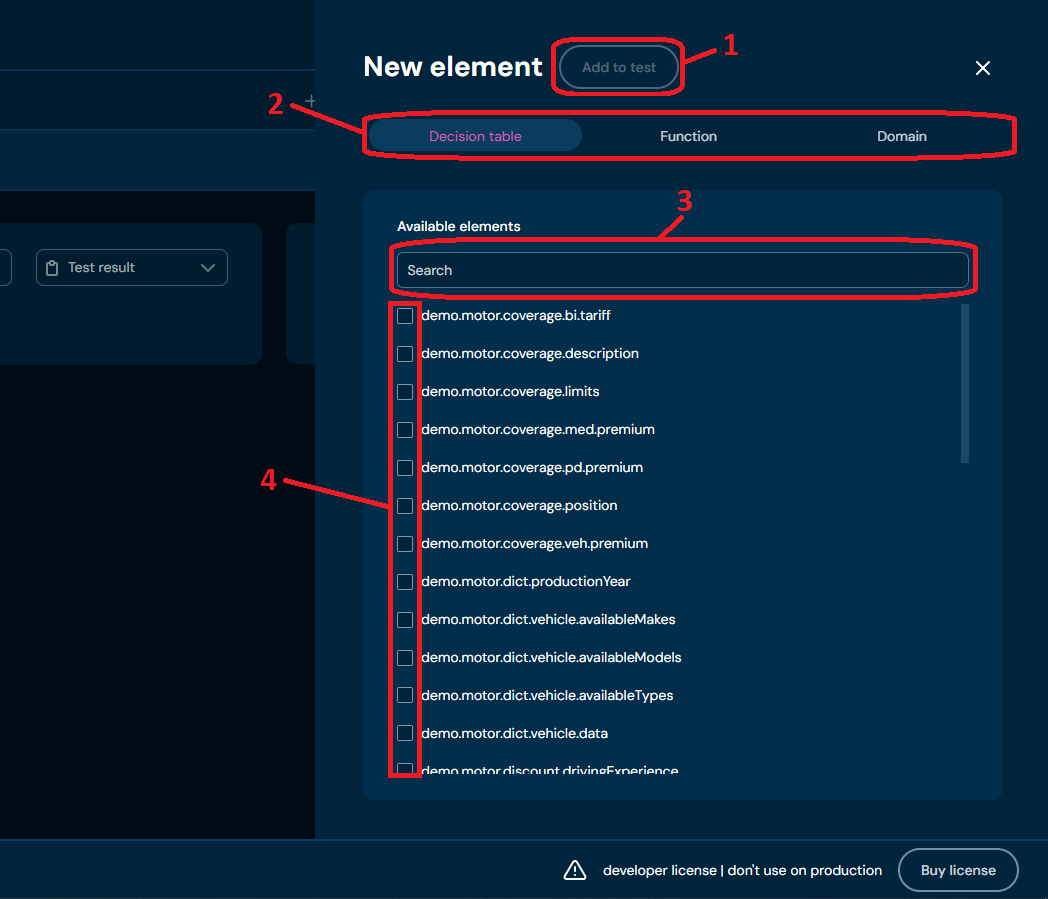
No. Name Description 1. Add to Test Add selected elements to the Test Case. Greyed out until at least one element is selected. 2. Element Type Bar Allows switching between visible Element Types. Note that switching between different tabs will not uncheck already-checked elements. 3. Elements Search Field Filters visible elements by any string provided by the user. 4. Checkboxes Select one or multiple checkboxes to add elements to the Test Case. -
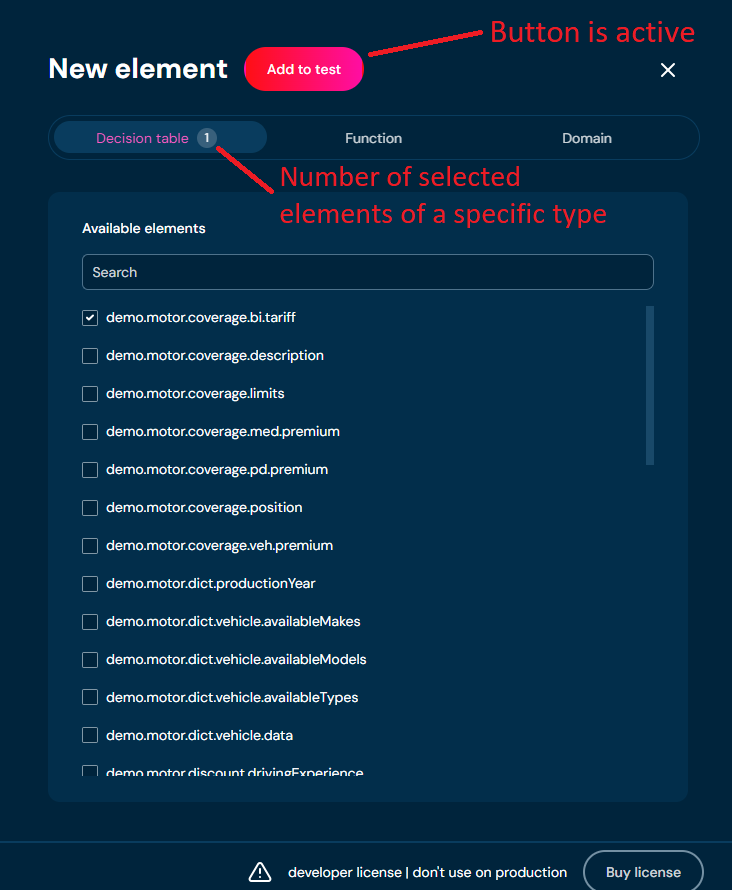
Select elements you wish to add to Test case.
a. After you select at least one element, then Add to test button will activate.
-
Choose Add to test.
a. Selected elements are added to the Test case.
b. Test input data is added automatically based on selected elements.
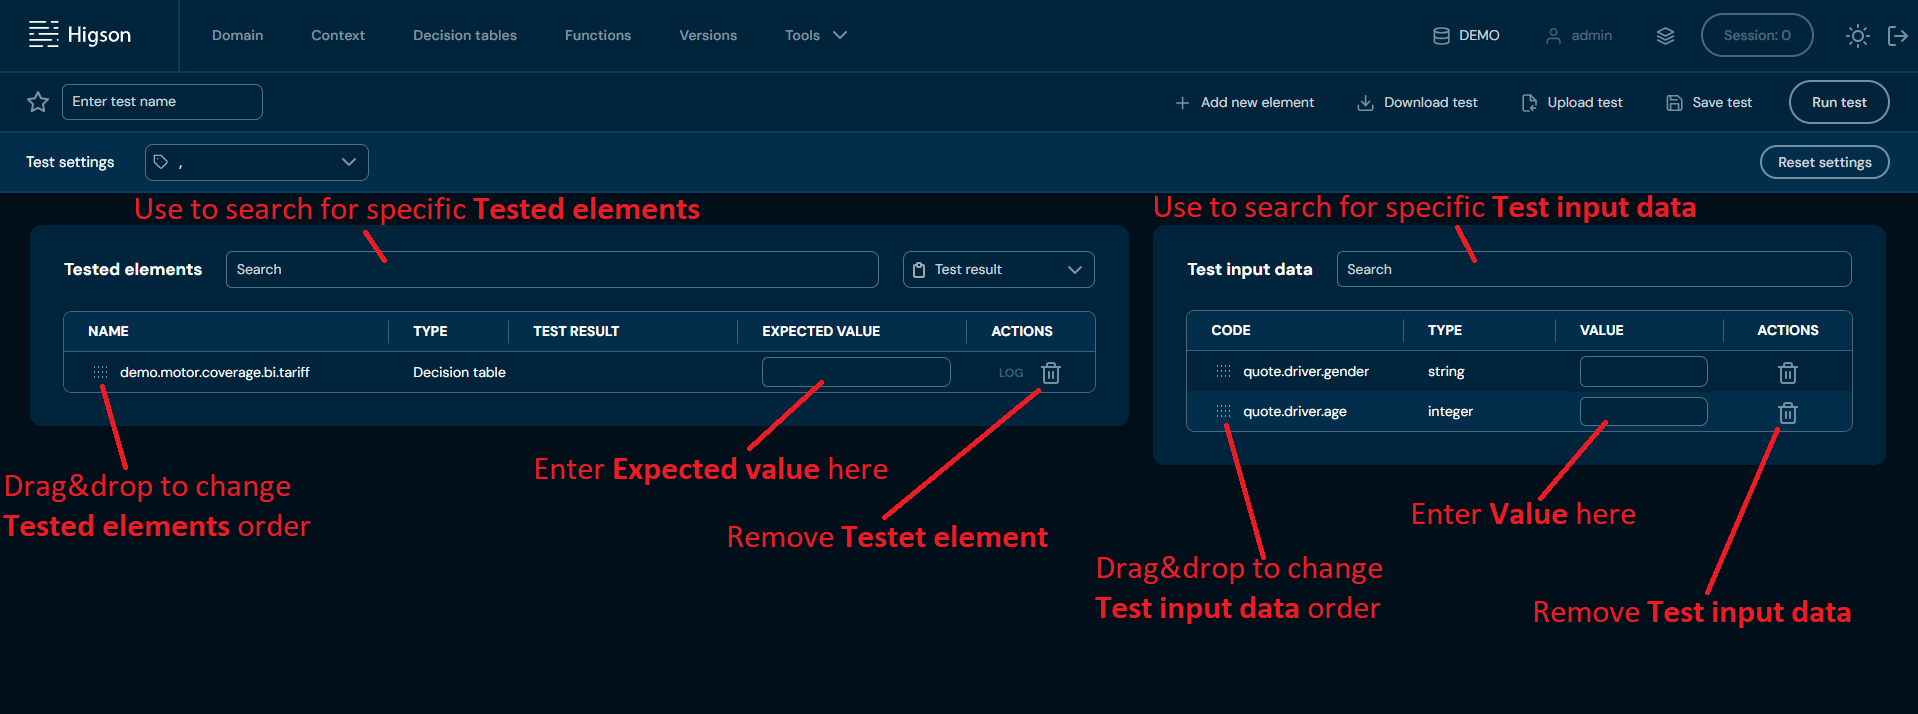
c. If the context allows the use of a collection of elements, the tester displays the $size attribute, which specifies the number of elements in the collection. The individual elements are then numbered from 0…n. For example, if the collection contains 4 elements, then $size = 4, and the elements are labeled as [0], [1], [2], and [3].
-
In Enter test name field enter unique test name.
-
In Expected value field enter value you expect. This step is optional to save a test case.
-
In Test input data table fill Value fields accordingly. This step is optional to save a test case.
-
Configure Test settings. This step is optional to save a test case.
-
Choose Save test.
a. Test case with data you provided is saved.
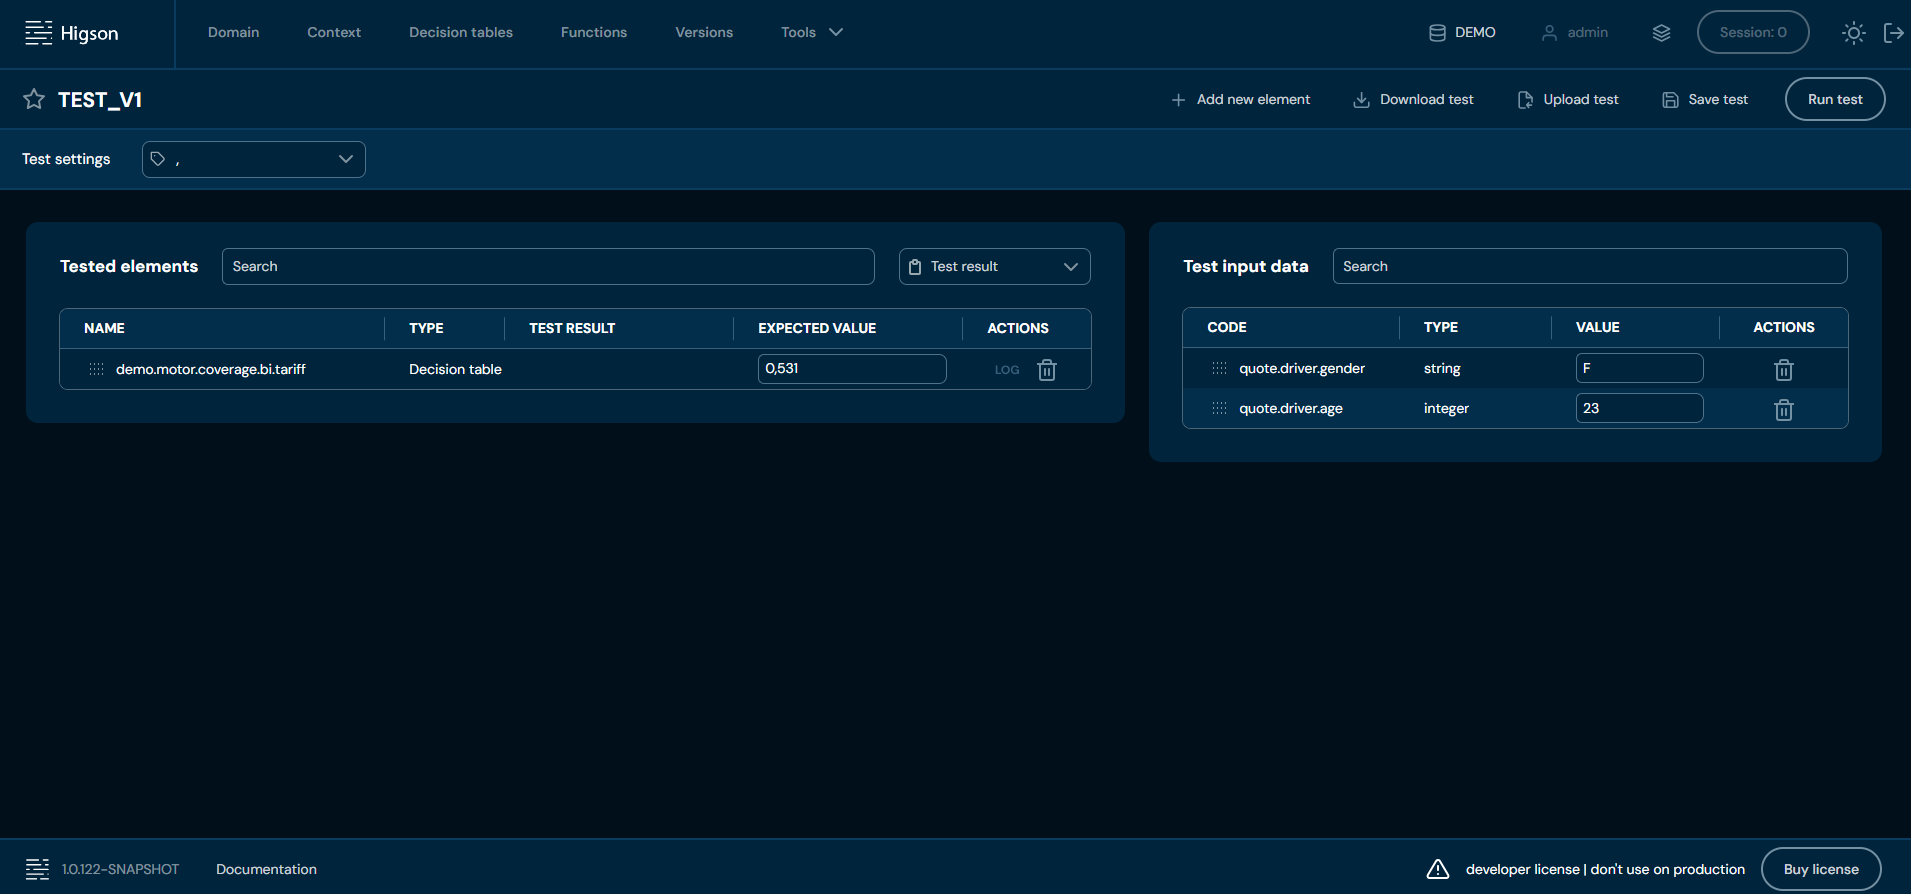
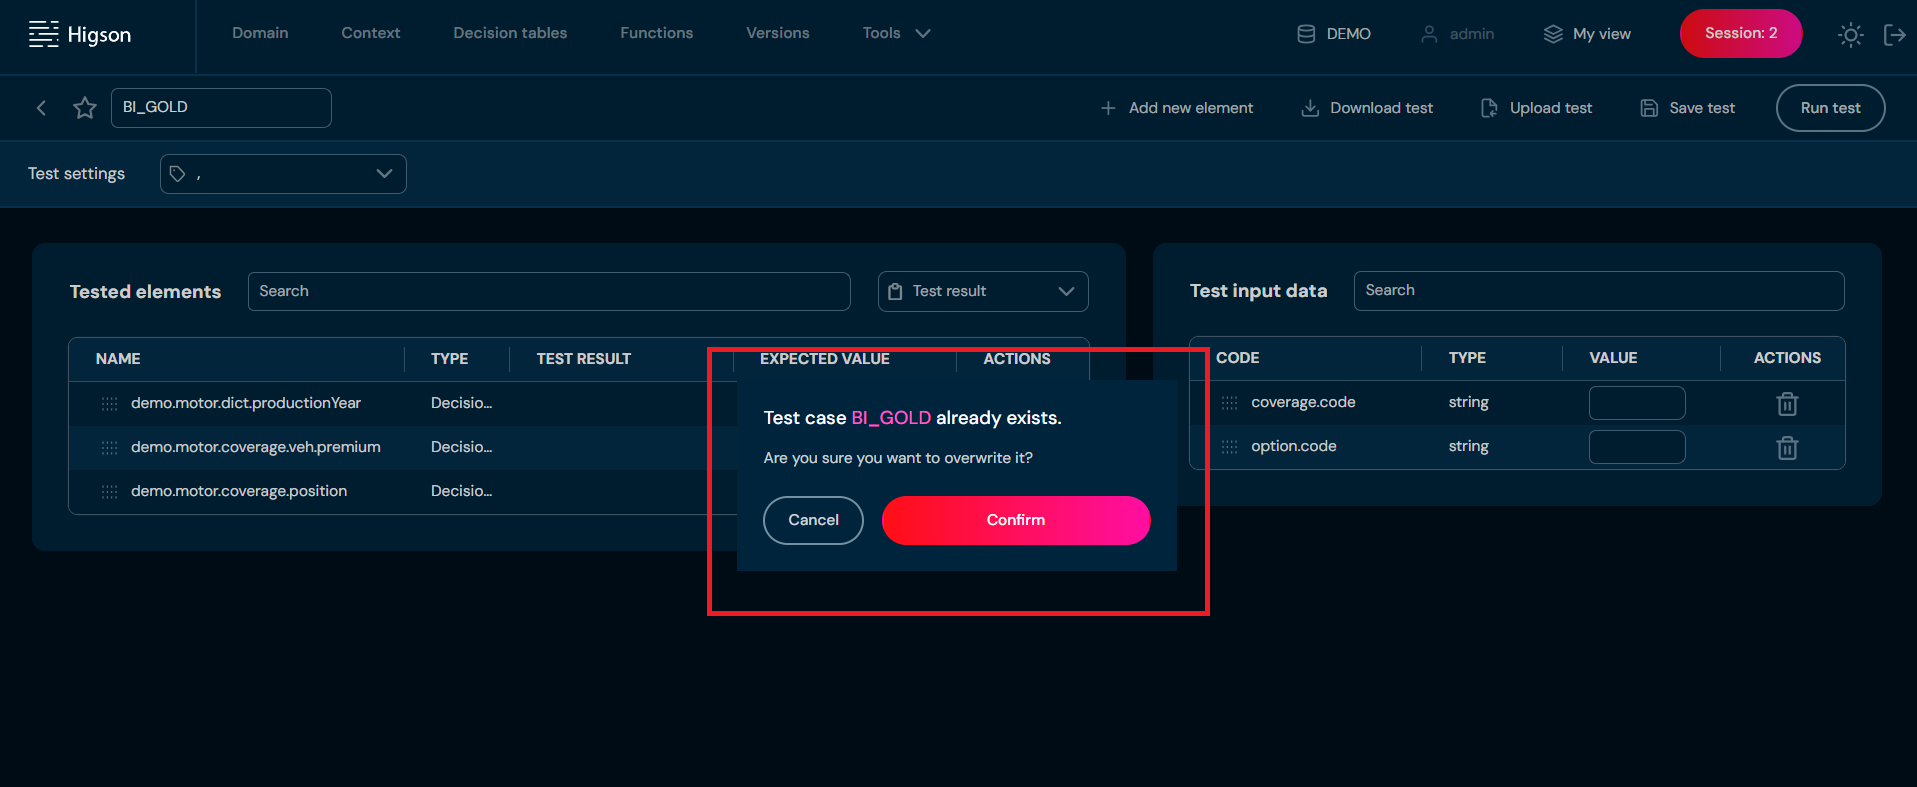
b. If you enter the same name as one of the Test cases already created, then validation error will appear.
Tester - Remove test case#
If you want to remove a specific test case, follow these steps:
-
Choose Tools → Tester in Main toolbar.
-
Choose Remove action (bin icon) for Test case you want to delete.
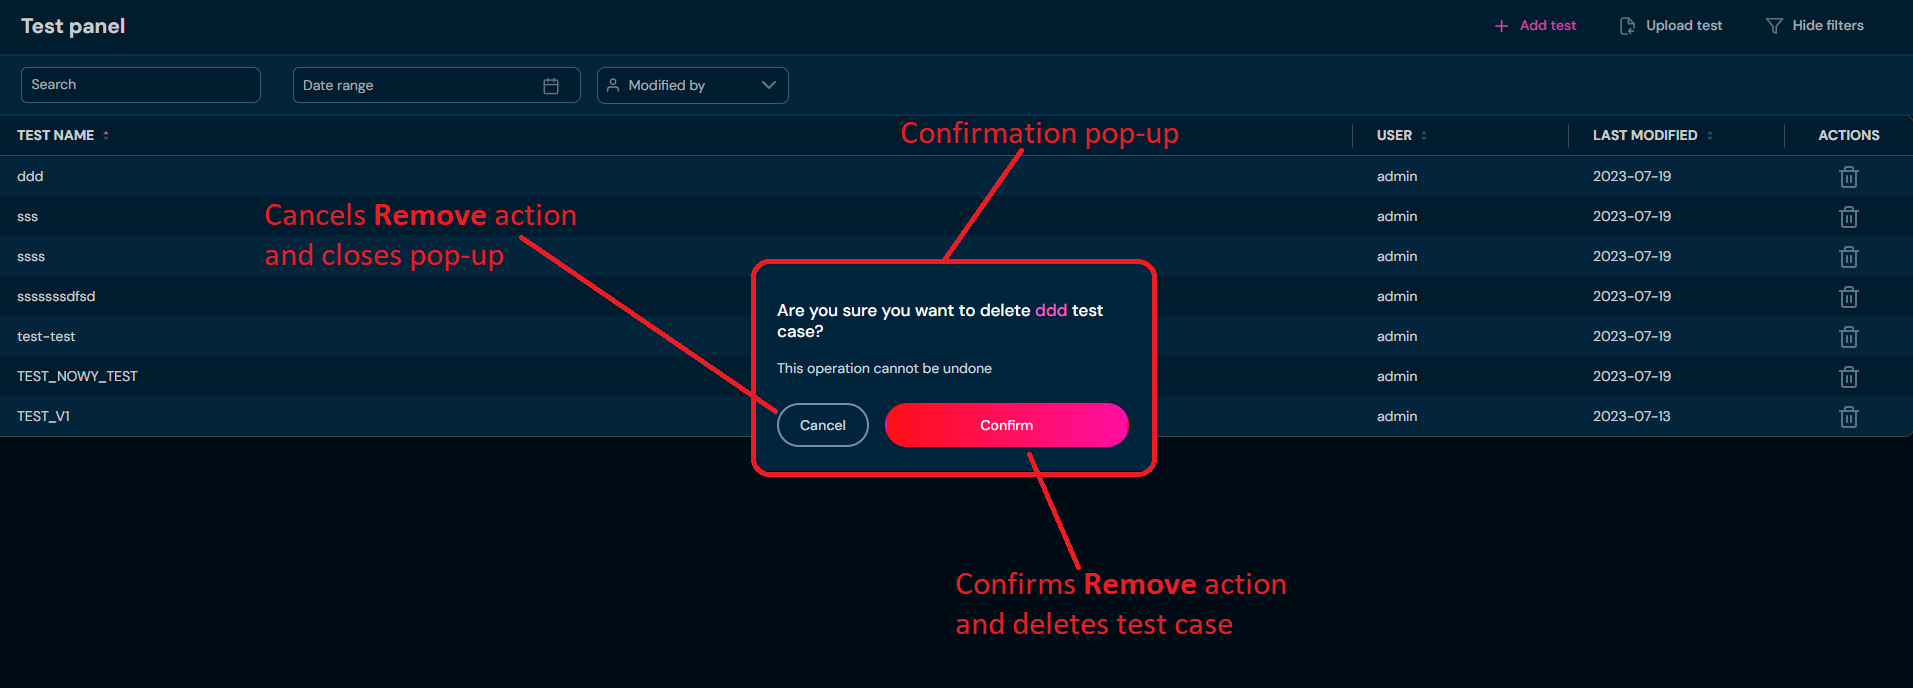
a. After choosing Remove action, confirmation pop up will appear.
-
Choose Confirm.
a. Specific Test case is being removed from the environment. This action is irreversible.
Test case details screen#
You can access Test case details screen by left-clicking on specific Test case in Test panel. Test case details screen looks exactly the same as New test screen.
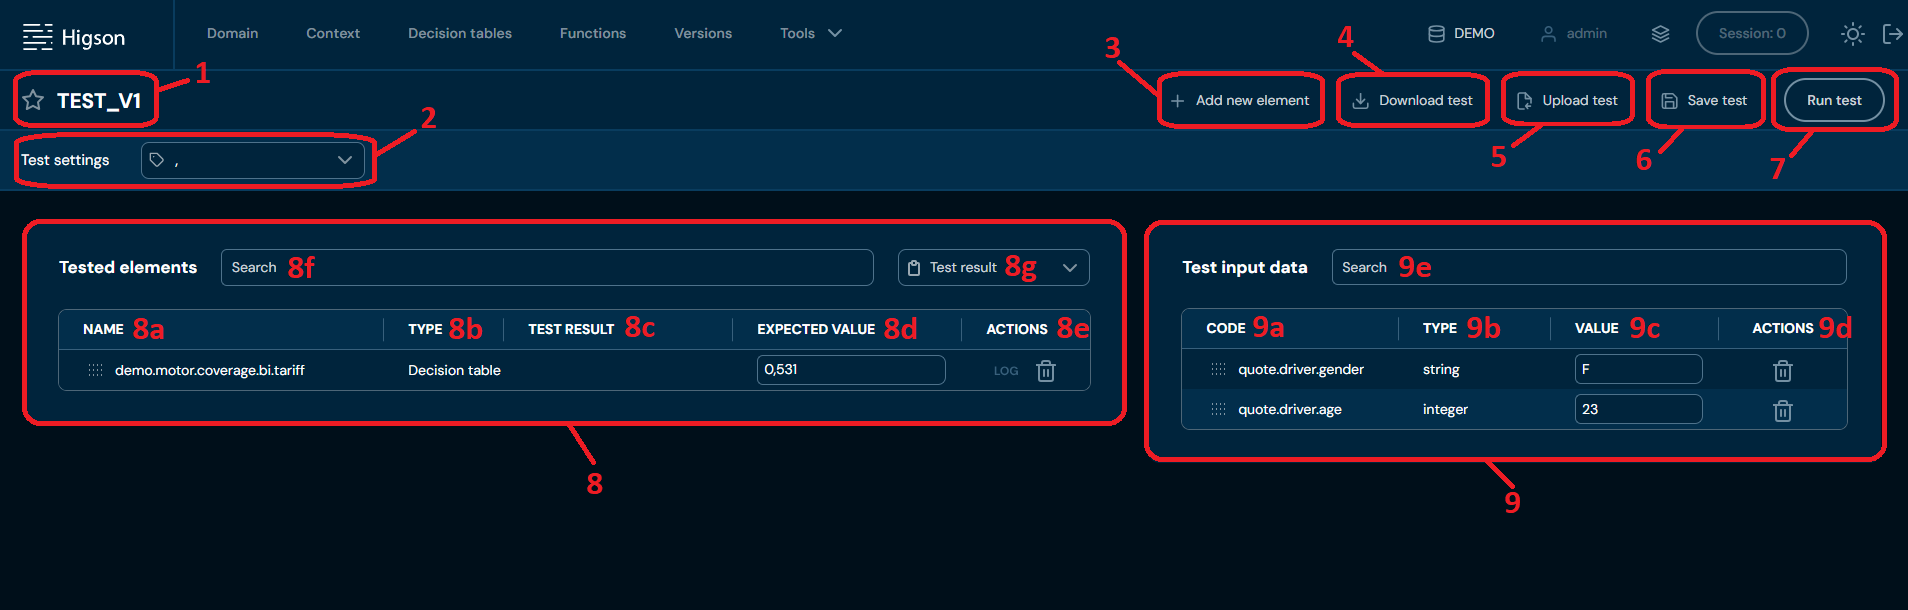
| No. | Name | Description |
|---|---|---|
| 1. | Test case name | Enter unique test case name here. Test case name can contain only characters from the collection a-z; 0-9; “-”, and “_”, and it can’t start with ‘-’. |
| 2. | Test settings bar | Allows configuring the delimiter - choose which delimiter ("," or “|”) will be used in the expected value. Default delimiter is “,”. |
| 3. | + Add new element | Opens the Add new element screen. You can choose here which elements will be added to the Test case. Available elements are: - Decision Tables - Functions - Domain Configuration Elements |
| 4. | Download test | Downloads an XLSX file that contains all data from the currently opened Test case. To learn more about downloading Test cases, go here. |
| 5. | Upload test | Allows uploading a Test case from an XLSX file. To learn more about uploading Test cases, go here. |
| 6. | Save test | Allows saving the Test case. Action is greyed out until Tested elements are provided. |
| 7. | Run test | Runs the currently opened Test case with set Test settings. When the process is finished, then Test results will be updated for each Tested element. |
| 8. | Tested elements table | List of all elements added to the Test case. - Name: Full code/name/path of the tested element. You can change the order of Tested elements by drag & dropping each element. - Type: Type of the tested element: Decision table, Function, or Domain. - Test Result: When the Run test process is finished, then the Test result column will be updated for each Tested element. Test result can take statuses as: - Success: Expected value matches value returned by the system based on Test input data values. - Failure: Expected value does not match the value returned by the system based on Test input data values. - Error: An error occurred while running the test for a specific Tested element. Check LOG in ACTIONS column for more information. - No expected value: Run test process finished with no errors, but there is no Expected value to compare with the value returned by the system based on Test input data values. - Expected Value: Value expected by the user. After the Run test process is started, then the Expected value will be compared with the value returned by the system based on Test input data values. - Actions: Available actions for each Tested element: - LOG: Informs about problems that occurred in Run test process for Tested element. If there are no LOGS to display, then the action is greyed out. - Remove (bin icon): Removes the Tested element from the Test case. |
| 8a. | Name | Full code/name/path of the tested element. You can change the order of Tested elements by drag & dropping each element. |
| 8b. | Type | Type of tested element: Decision table, Function, or Domain. |
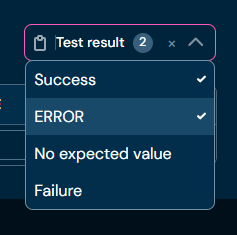
| 8c. | Test result | When Run test process is finished, then Test result column will be updated for each Tested element. Test result can take status as: - Success: Expected value matches value returned by the system based on Test input data values. - Failure: Expected value does not match the value returned by the system based on Test input data values. - Error: An error occurred while running the test for a specific Tested element. Check LOG in ACTOINS column for more information. - No expected value: Run test process finished with no errors, but there is no Expected value to compare with the value returned by the system based on Test input data values. |
| 8d. | Expected value | Value expected by the user. After Run test process is started, then Expected value will be compared with value returned by system based on Test input data values. |
| 8e. | Actions | Available actions for each Tested element: - LOG: Informs about problems that occurred in Run test process for Tested element. If there are no LOGS to display, then action is greyed out. - Remove (bin icon): Removes Tested element from Test case. |
| 8f. | Tested elements | Filter Tested elements by any string provided by the user. Filtered by Name column. |
| 8g. | Test result drop-down list | Filter Test results by test results status. |
| 9. | Test input data table | List of all available Test input data for Tested elements. |
| 9a. | Code | Full Test input data code. You can change the order of Test input data by drag & dropping each of them. |
| 9b. | Type | Type of Test input data i.e. string, integer, date etc. |
| 9c. | Value | Value of Test input data entered by the user. |
| 9d. | Actions | Available action for each Test input data: - Remove (bin icon): Removes Test input data from Test case. Bear in mind, that deleting Test input data may cause errors in test results. |
| 9e. | Test input data search field | Filter Test input data by any string provided by the user. Filtered by Code column. |
Test case details - Download Test case#
If you want to download a specific test case, follow these steps:
-
Choose Tools → Tester in Main toolbar.
-
Left-click on Test case you wish to download.
a. Left-clicking on Test case opens Test case details screen.
-
Choose Download test.
a. Choosing Download test downloads an XLSX file that contains data from currently opened Test case.
Test case details – Upload Test case#
If you want to upload a test case from Test case details screen, follow these steps:
-
Choose Tools Tester in Main toolbar.
-
Choose + Add test or left-click on existing Test case in Test panel.
a. choosing + Add test and left-clicking on Test case opens New Test case screen or Test case details screen accordingly.
-
Choose Upload test.
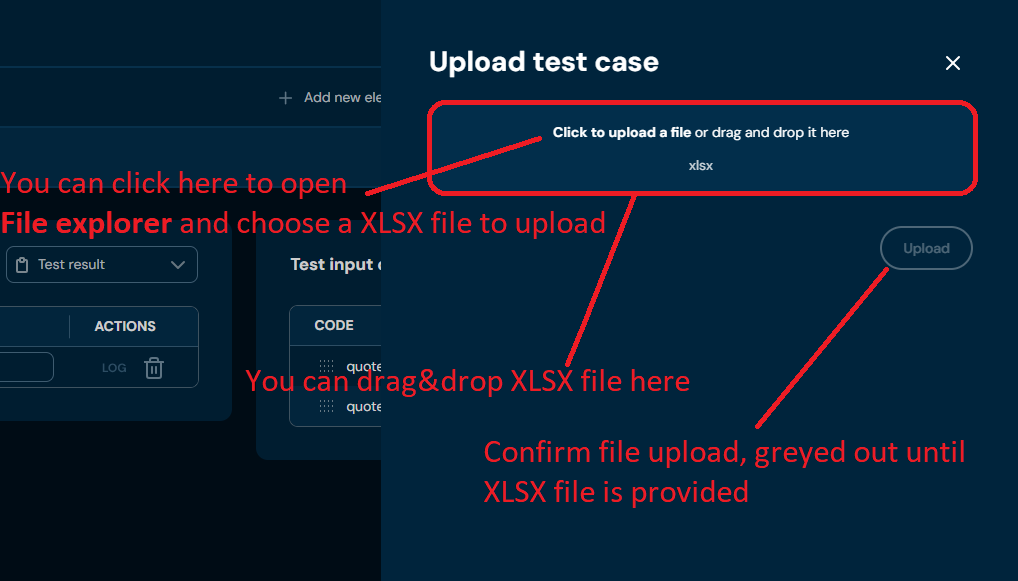
a. Choosing Upload test brings up Upload test case screen.
-
Drag&drop desired file or Click to upload a file and choose file in File explorer.
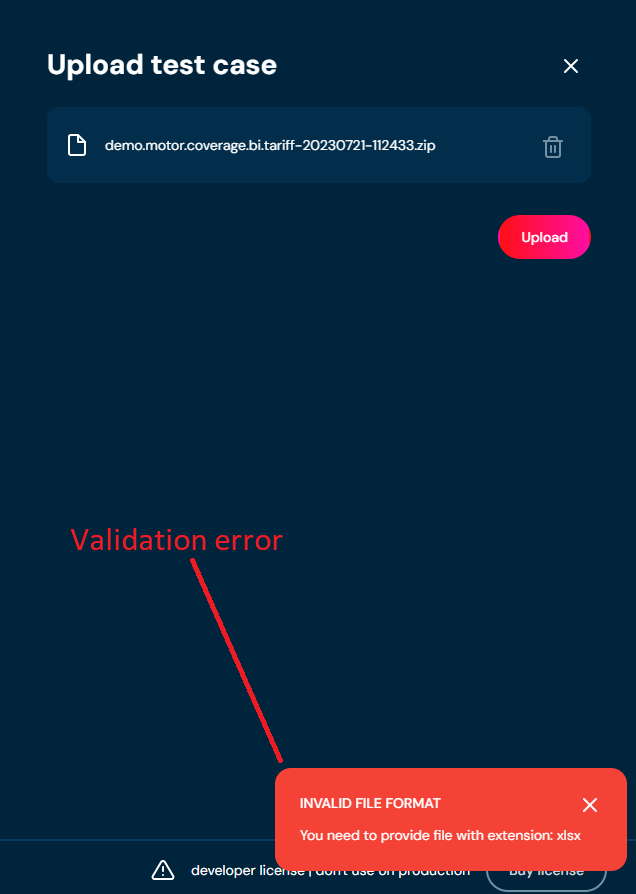
a. If you choose a file with extension other than XLSX, then validation error will pop up.
-
When the progress bar reaches 100%, it means that Test case was uploaded correctly.
a. If a validation error occurs (see above), then an upload process is being aborted.
b. Bear in mind, that if in step 2 you chose existing Test case, then uploaded Test case will overwrite it.
Test case details - Run test case#
If you want to run a test case, follow these steps:
-
Choose Tools Tester in Main toolbar.
-
Left-click on Test case you wish to Run test for.
-
Choose Run test.
a. When Run test process is finished, then Test result column will be updated for each Tested element.
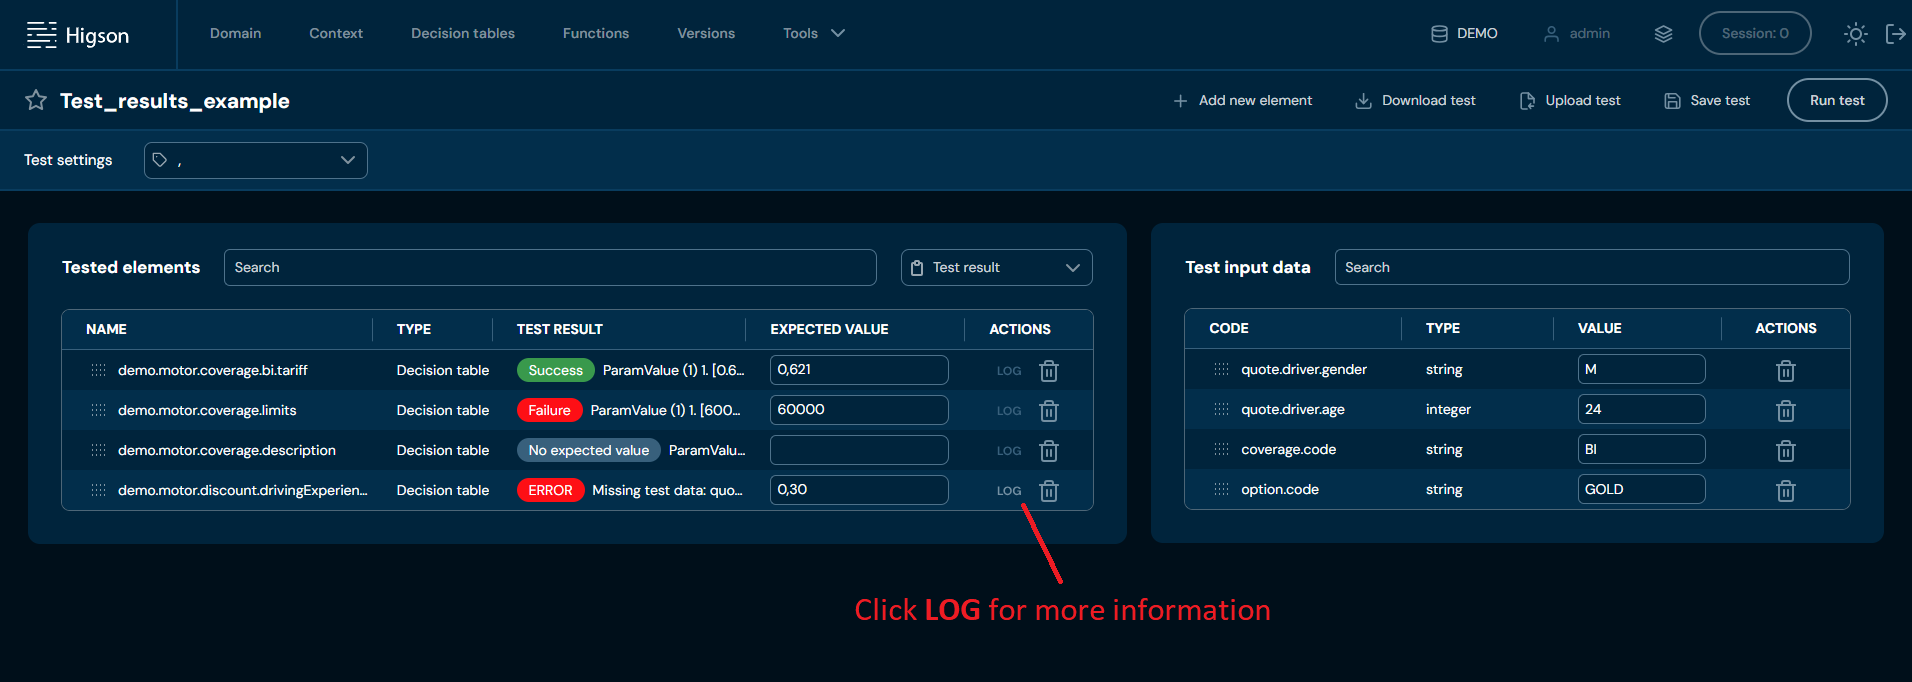
Test result can take status as:
i. Success - Expected value matches value returned by system based on Test input data values
ii. Failure - Expected value does not match value returned by system based on Test input data values
iii. Error - an error occurred while running test for specific Tested element. Check LOG in ACTIONS column for more information

iv. No expected value - Run test process finished with no errors, but there is no Expected value to compare with value returned by system based on Test input data values.
You can mouse over on test results for each Tested element to see value returned by system.
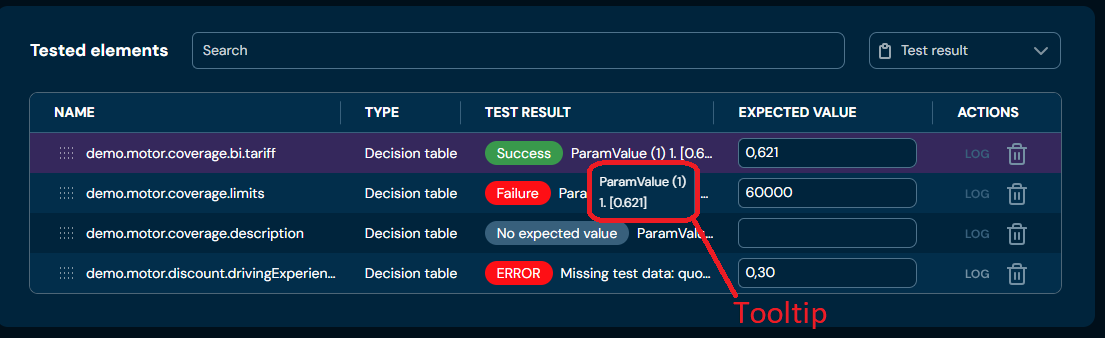
b. You can filter Tested elements by selecting test result status in Test result drop-down list. The Number indicates how many statuses are selected.