A decision table presents values in rows and columns. Each row describes a situation when given inputs (columns) result in certain outputs (also columns). In other words, a decision matrix displays decisions based on certain criteria. You can create a decision table in Higson (so-called a parameter), where you define input and output columns and then populate data with values in rows.
In order to see all Decision Tables select Decision Tables in the Main Toolbar.

After that, when you enter Decision tables, you will see a screen of Decision Tables
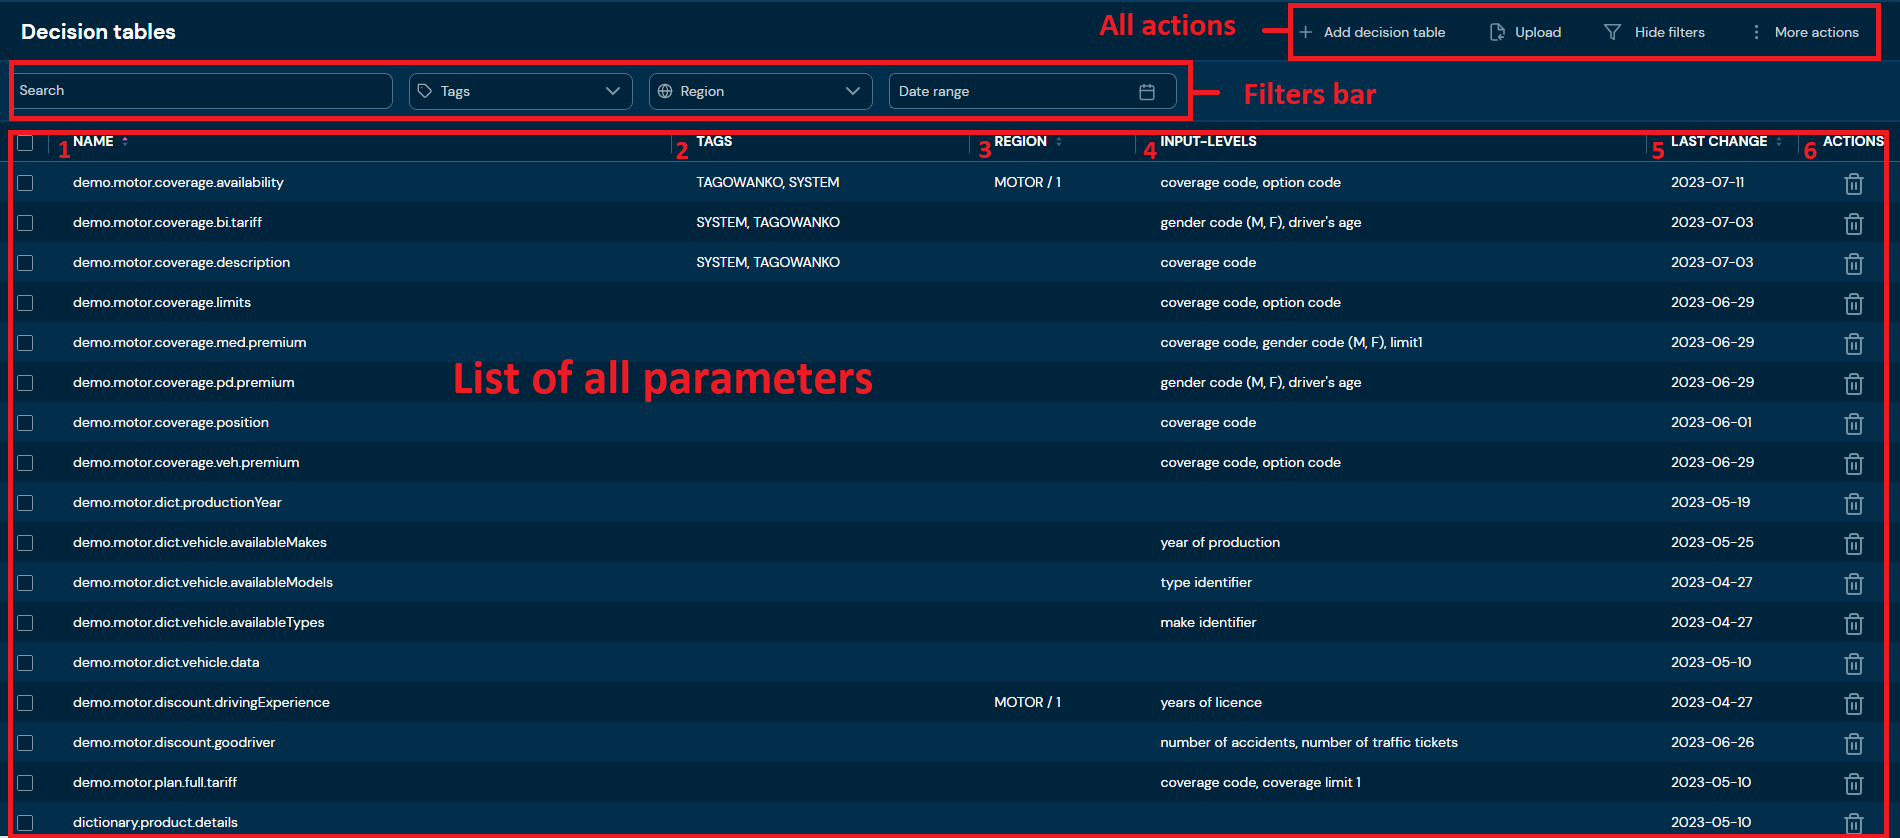
| No. | Column name | Description |
|---|---|---|
| 1. | Name | Full name of Decision table. |
| 2. | Tags | List of all Tags assigned to the Decision table |
| 3. | Region | List of all Regions the decision table are assigned to |
| 4. | Input levels | List of input levels for business data |
| 5. | Last change | The last modification date of the decision table |
| 6. | Actions | List of quick access actions. Currently only remove action is available here. Remove action deletes decision table |
On this screen, you can apply Filters to search for specific decision table or to narrow down the number of displayed decision tables. You can also perform actions on one or multiple decision tables.
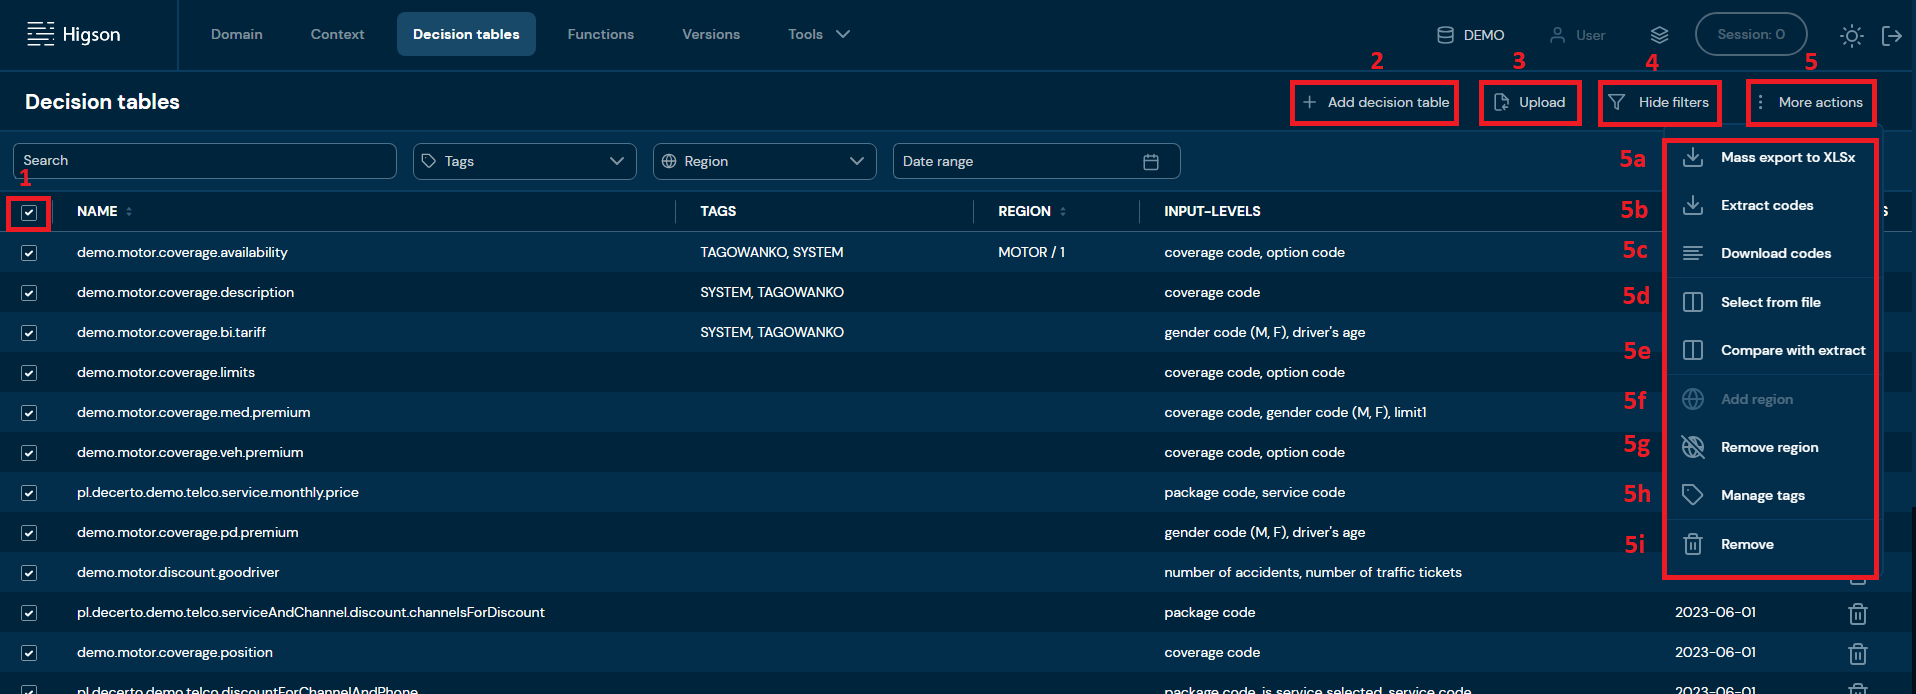
You can see All Actions available for the decision tables below:
| No. | Action | Description |
|---|---|---|
| 1 | Checkboxes | Select the top checkbox to select all decision tables in the view or select individual checkboxes to group decision tables for actions 5a, 5b, 5c, 5f, 5g, 5h, 5i. |
| 2 | + Add decision tables | Opens a step-by-step decision tables wizard. Allows you to create new decision tables. |
| 3 | Upload | Allows importing decision table’s from a ZIP file. |
| 4 | Hide filters | Hides or reveals the Filters bar accordingly. If Filter bar is visible, then action Hide filters is available. If it’s hidden, then action Show filters is available. |
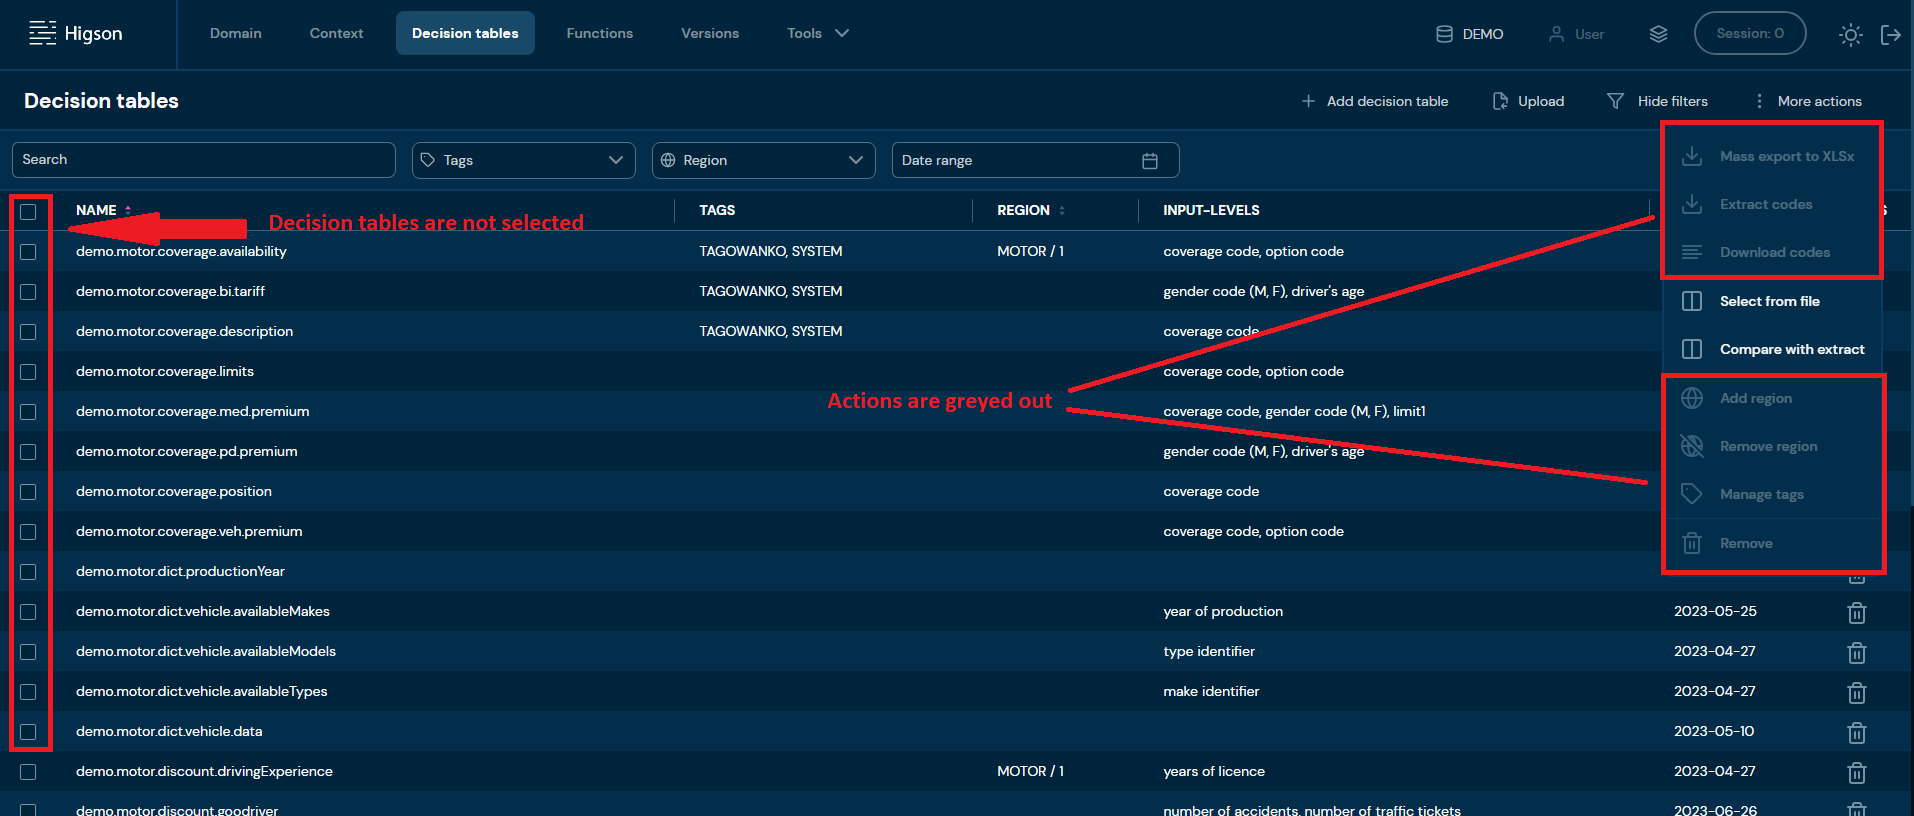
| 5 | More actions | The drop-down menu that contains actions 5a-5i. Bear in mind that actions 5a, 5b, 5c, 5f, 5g, 5h, and 5i are available only if at least one decision table is selected (at least one checkbox is checked). Otherwise, the mentioned actions will be greyed out (see picture below the table). |
| 6 | Mass export to XLSx | Downloads a ZIP file that contains XLSX file and files with decision tables body. |
| 7a | Extract codes | Downloads an XLSX file that contains decision tables extract. |
| 7b | Download codes | Download a TXT file with decision tables names. |
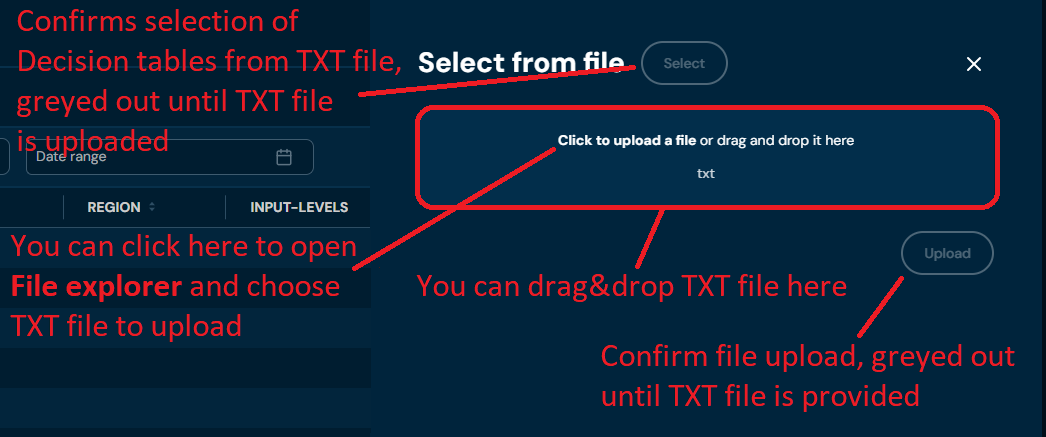
| 7c | Select from file | Allows uploading a TXT file with decision tables. After uploading, all decision tables present in the file will be selected. |
| 7e | Compare with extract | Allows uploading an XLSX file with decision tables extract. Makes comparison between the provided file and the environment. |
| 7f | Add region | Adds regions to all selected decision tables. |
| 7g | Remove region | Removes regions from all selected decision tables. |
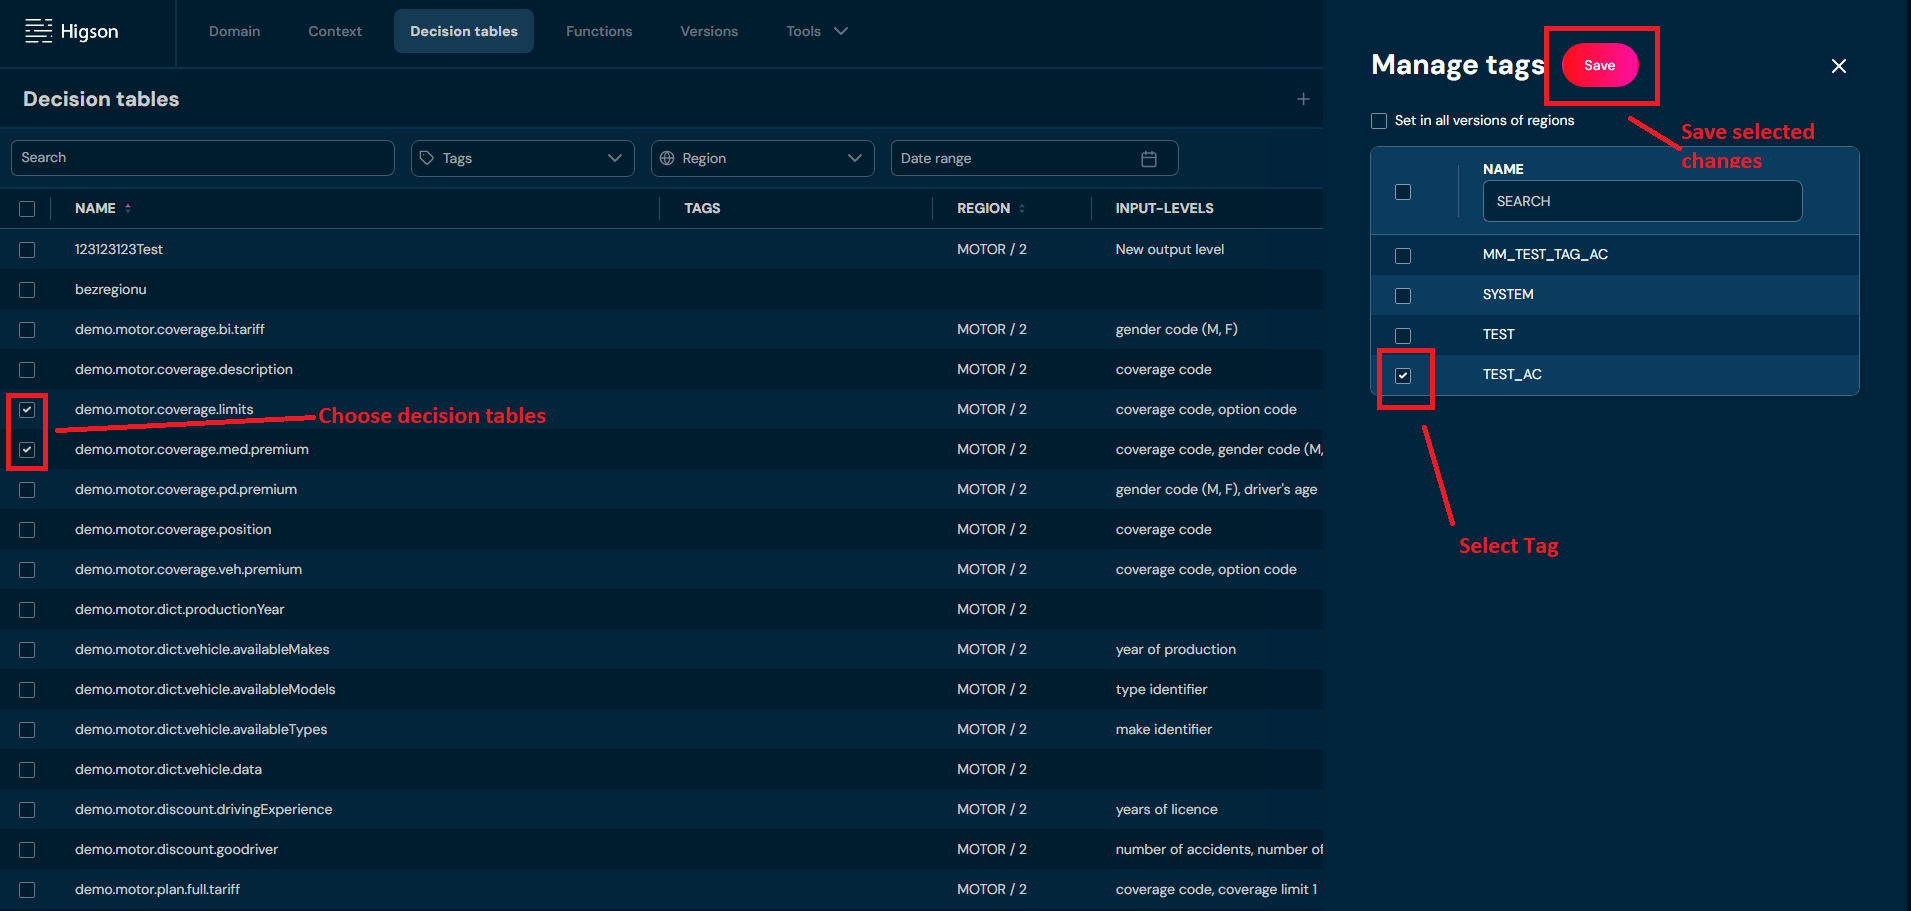
| 7h | Manage tags | Allows adding/removing tags to/from selected decision tables. |
| 7i | Remove | Delete all selected decision tables. |
Now we can see More actions drop-down menu, when no decision tables are selected
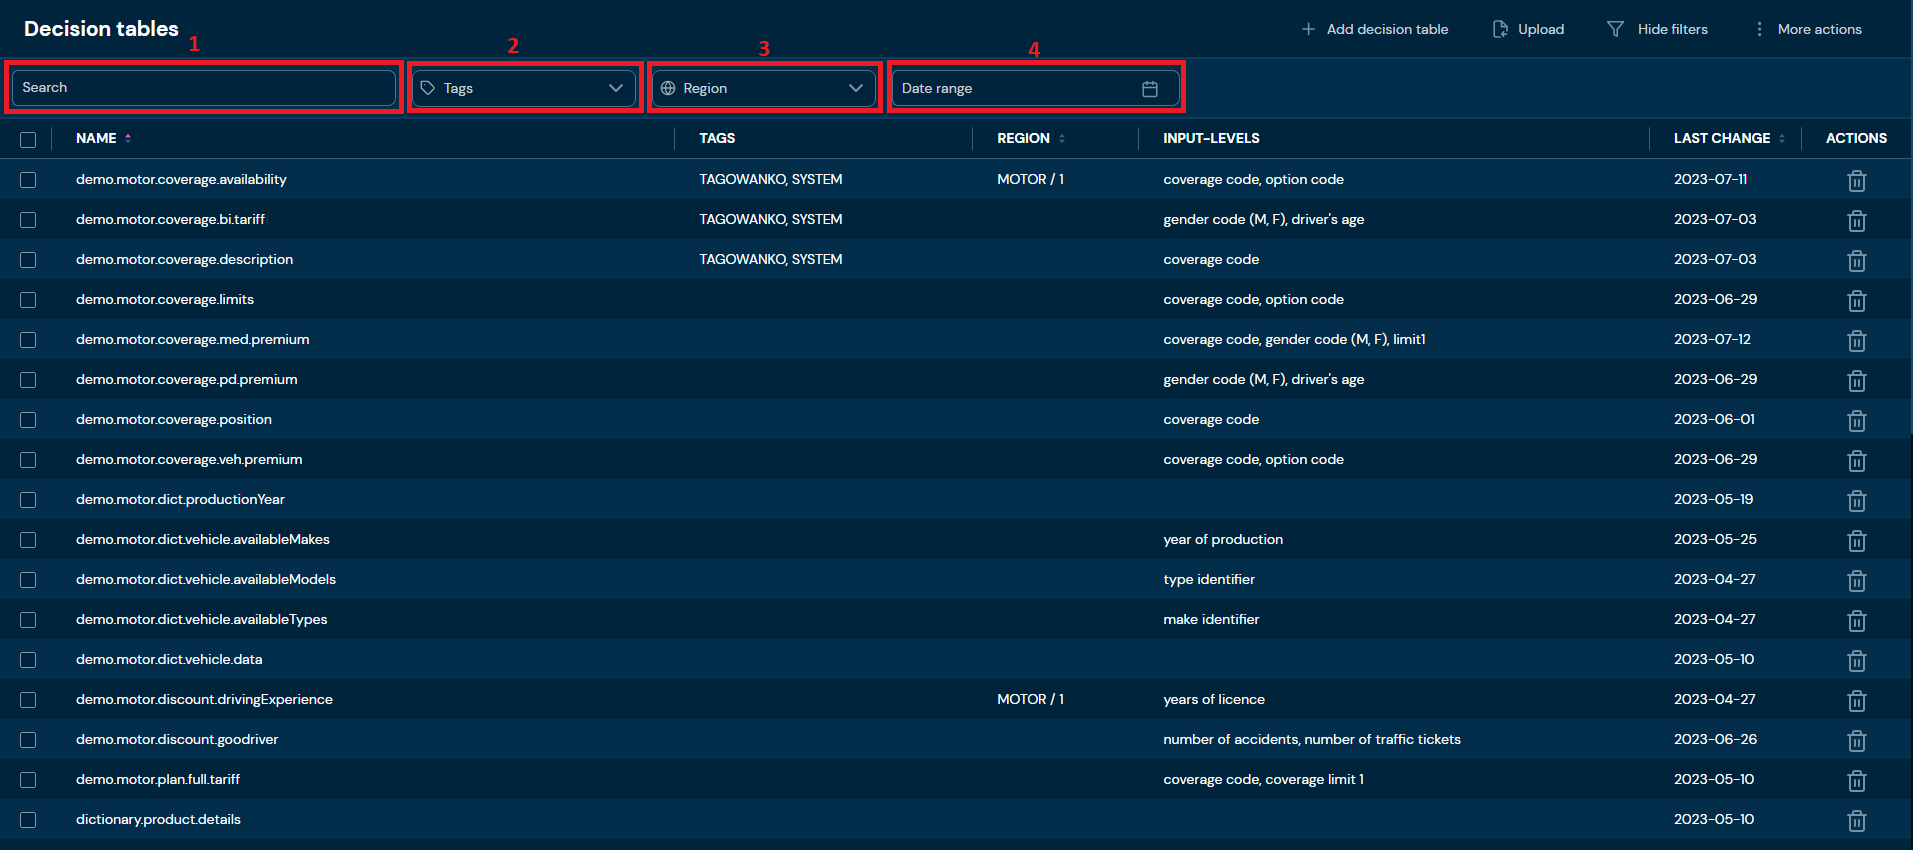
You can see all Filters available for decision tables below:
| No. | Filter name | Description |
|---|---|---|
| 1 | Search text field | Filter by any string provided by the user. |
| 2 | Tags | Filter by assigned tags; only tags assigned to at least one decision table are visible for selection. |
| 3 | Region | Filter by assigned regions; only regions assigned to at least one decision table are visible for selection. |
| 4 | Date range | Filter by last change date in format YYYY/MM/DD - YYYY/MM/DD. |
Decision tables - Add Decision table#
If you want to add Decision tables follow these steps:
-
Choose Decision tables in Main toolbar.
-
Choose + Add Decision tabl in All actions bar.
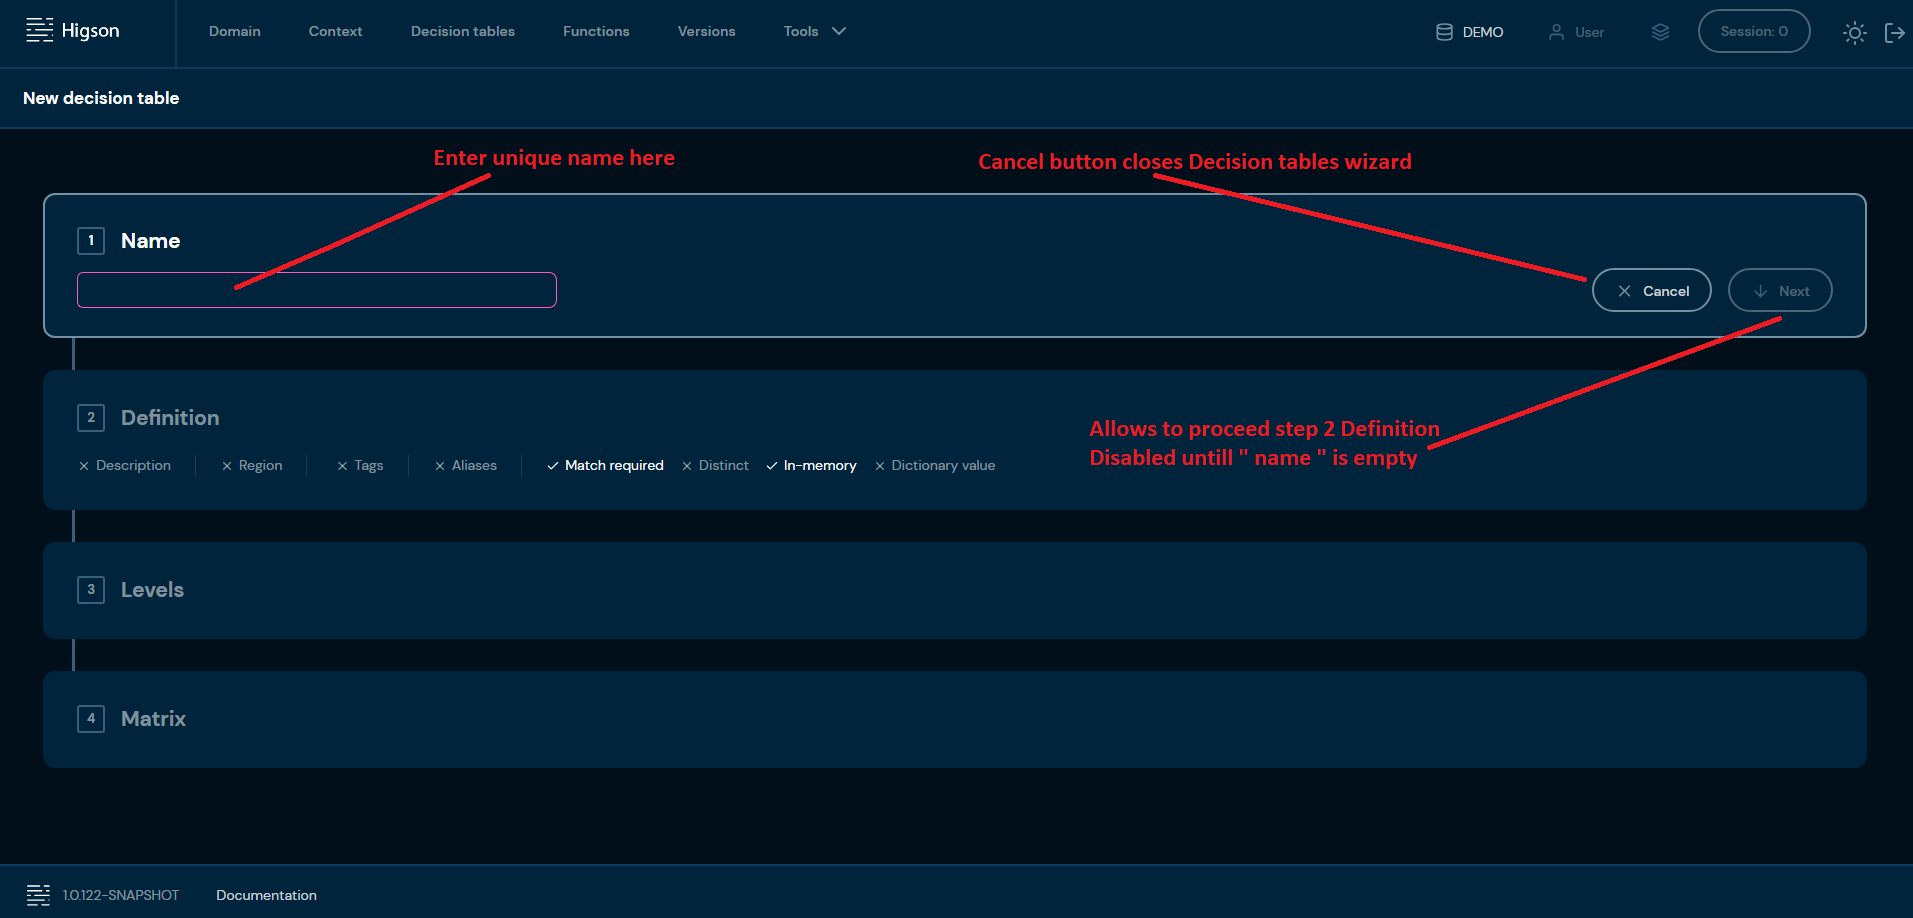
a. Choosing + Add Decision table opens a step-by-step wizard.
-
In step 1. Name, you need to provide a unique decision table code/name. Name can contain only characters from collection a-z; 0-9; “.”; “-”; “_” and it can’t start with “-”.
a. If you changed your mind and don’t want to create a new decision table, you can choose Cancel in step 1. Name.
-
Choose Next.
a. If you enter illegal characters, then the validation error will appear

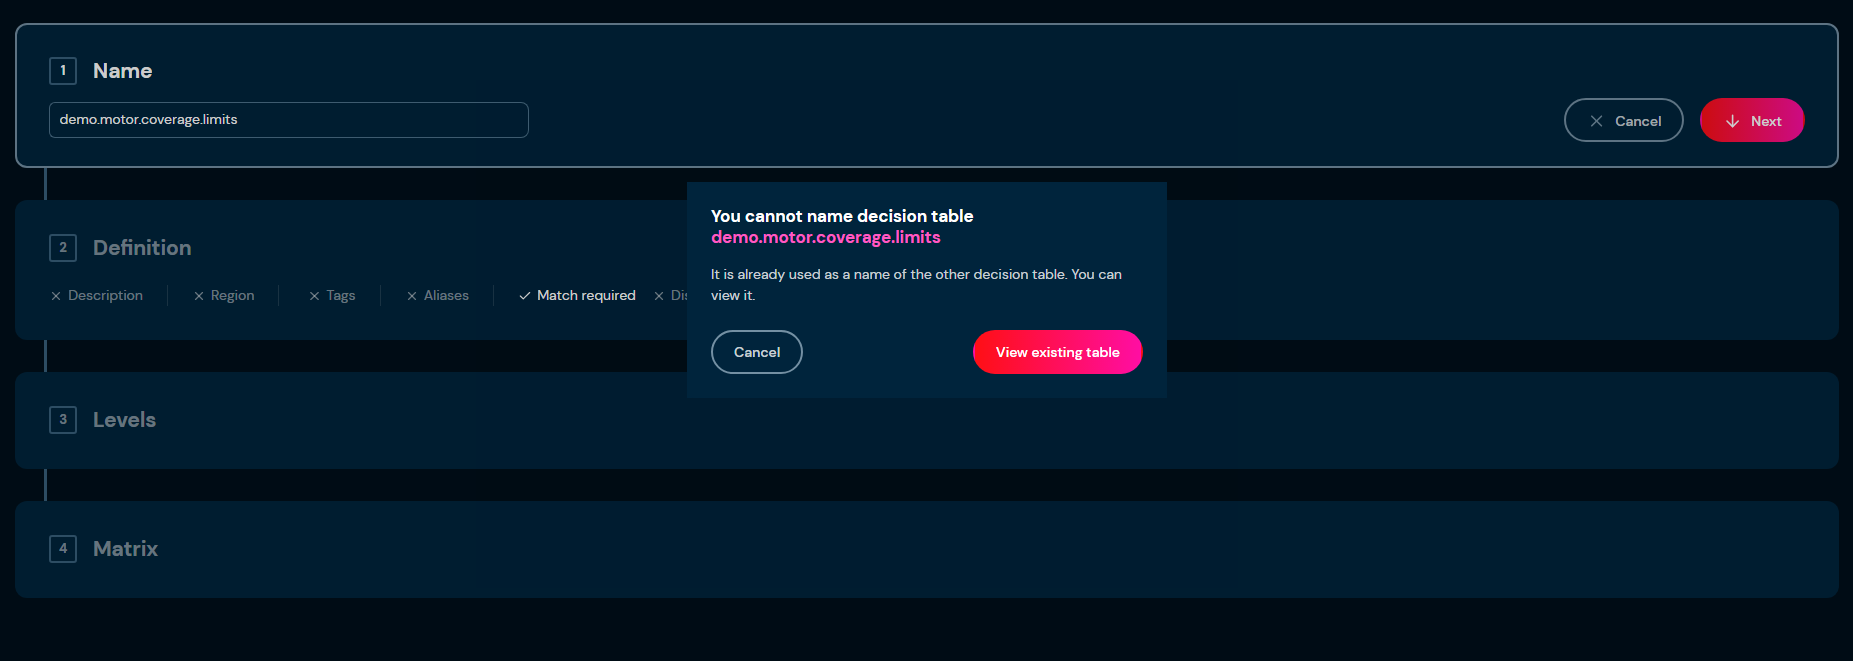
b. If the name you provided is already used by another decision table, then warning will appear in lower right corner and application will not allow you to proceed.
-
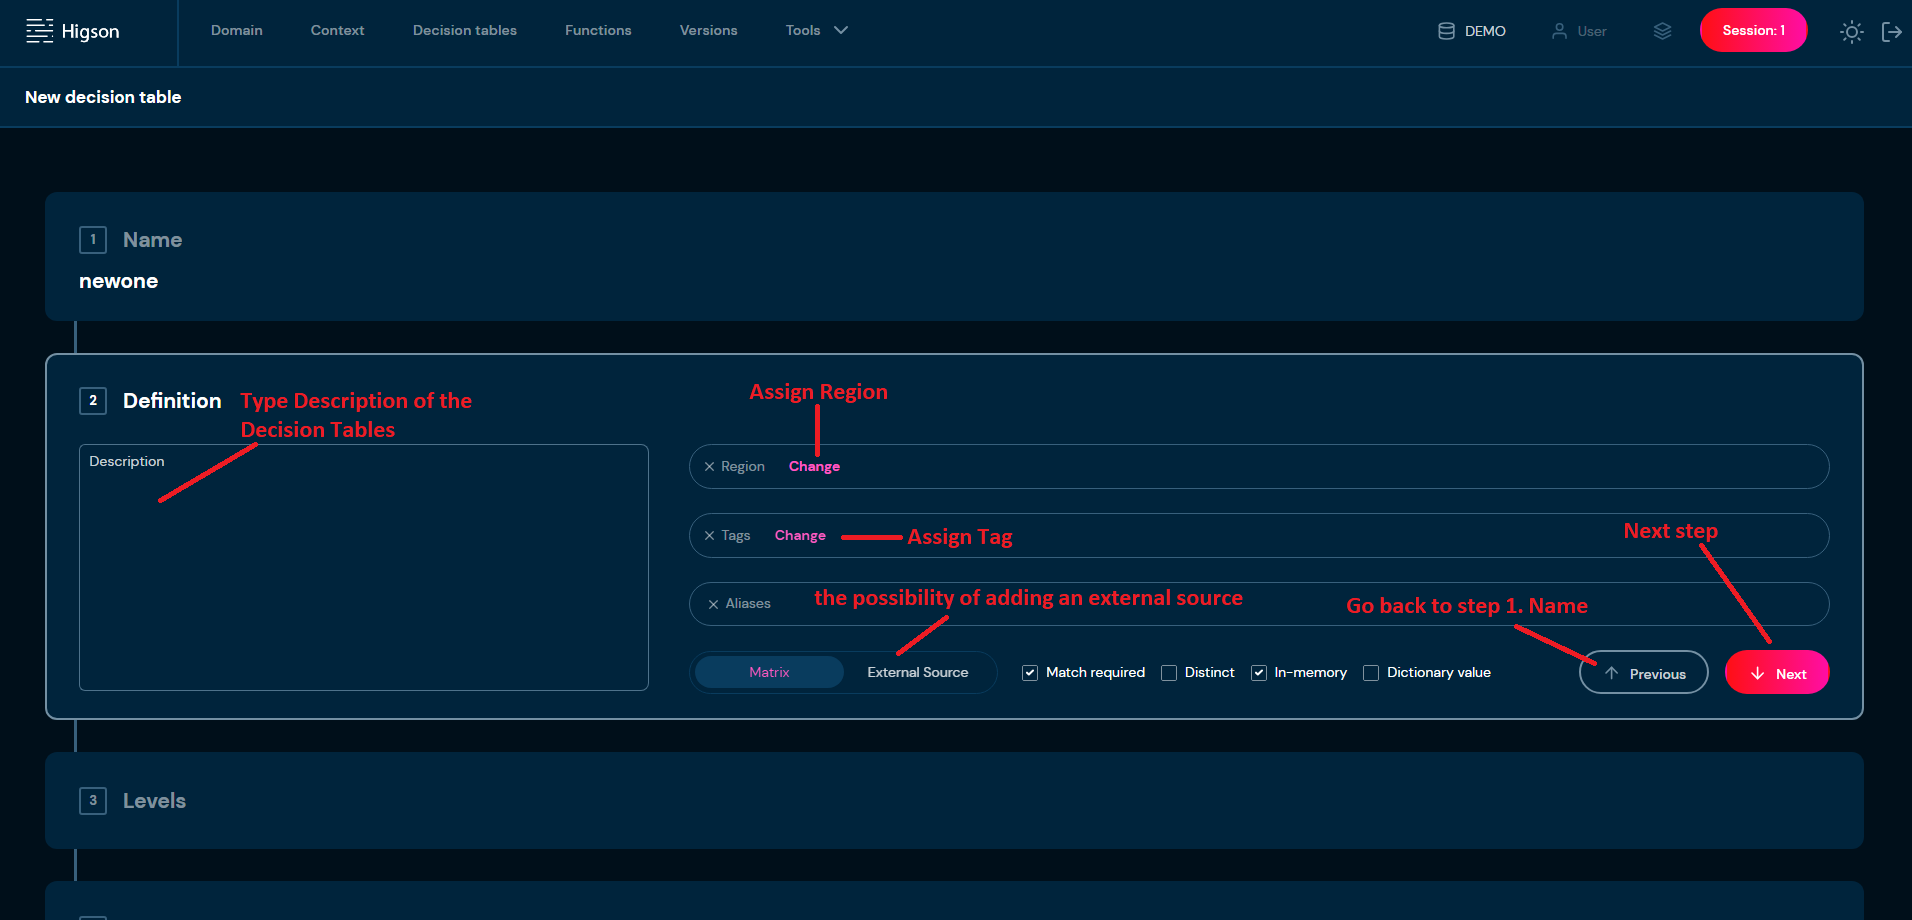
In step 2. Definition you may add a description, and assign regions and tags, but this is not necessary to proceed to the next step. When you check the option for external sources in the next step, you will be able to add them.
-
Besides, we have the following selections to choose from
During creating decision tables, we have the options described in points 1-4

No. Name Description 1 Match required If checked: when in matrix value won’t be found, it will return an error; if checked and no match is found in the matrix, the decision table will return null. 2 Distinct filters Removes duplicated records from the result list. 3 In memory index If not checked, then with every call to that decision table, its definition and matrix must be reloaded from the database. This checkbox is flagged if the decision table should be stored in the application cache. 4 Dictionary value To define the decision table as a dictionary, there is a checkbox “Dictionary” that needs to be marked. -
Choose Next.
-
In step 3. Levels you may add IN and OUT columns, but this is not necessary to proceed to the next step.
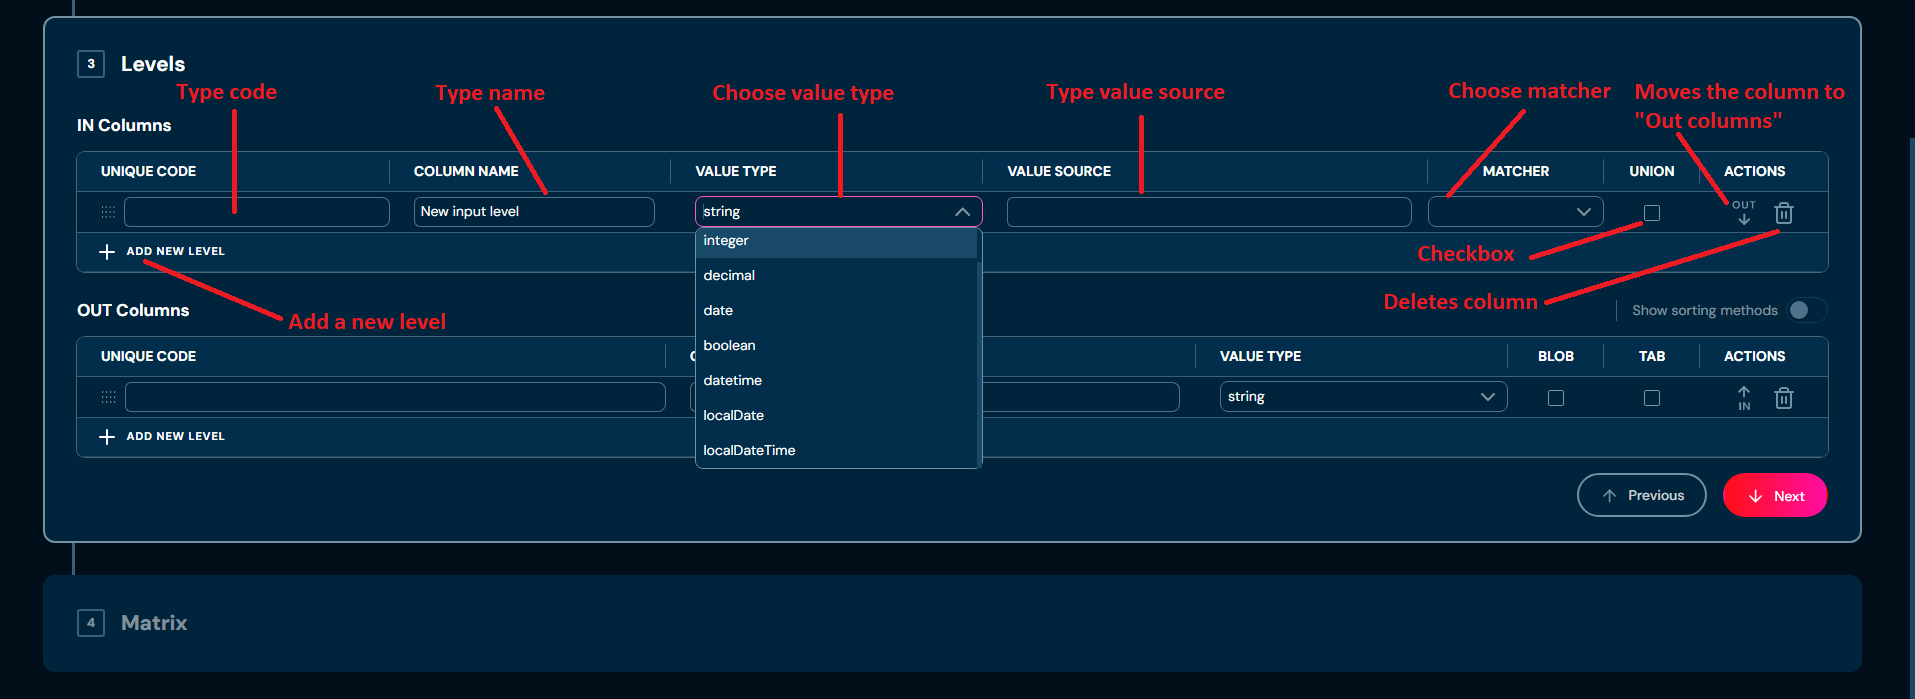
When selecting the “date” value type, be sure to use the correct recording format: yyyy-MM-dd.
When selecting the “data time” value type, be sure to use the correct notation format: yyyy-MM-dd HH:mm:ss
-
Choose Next.
-
In step 4. Matrix you may add matrix cells, but this is not necessary to proceed to the next step.

-
Choose Save changes.
a. Decision table with data you provided is created. You will be redirected to Decision table’s details screen.
Decision tables - upload#
If you want to upload decision tables from a ZIP file, follow these steps:
-
Choose Decision Tables in the Main Toolbar.
-
Choose Upload in the “All Actions” bar.
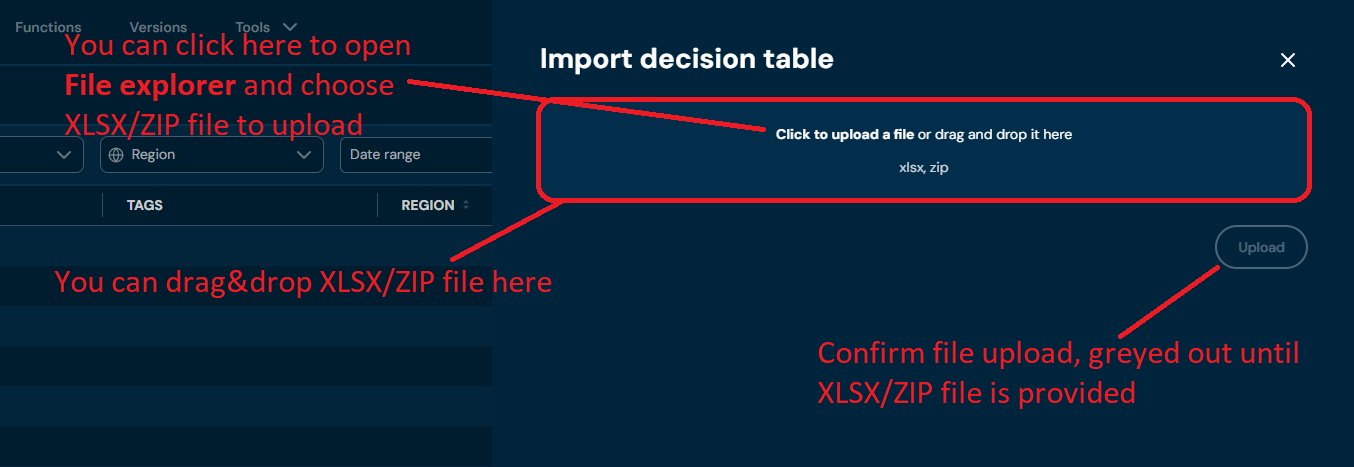
a. Choosing Upload brings up the Import decision table screen.
-
Drag and drop the desired file or Click to upload a file and choose file in File Explorer.
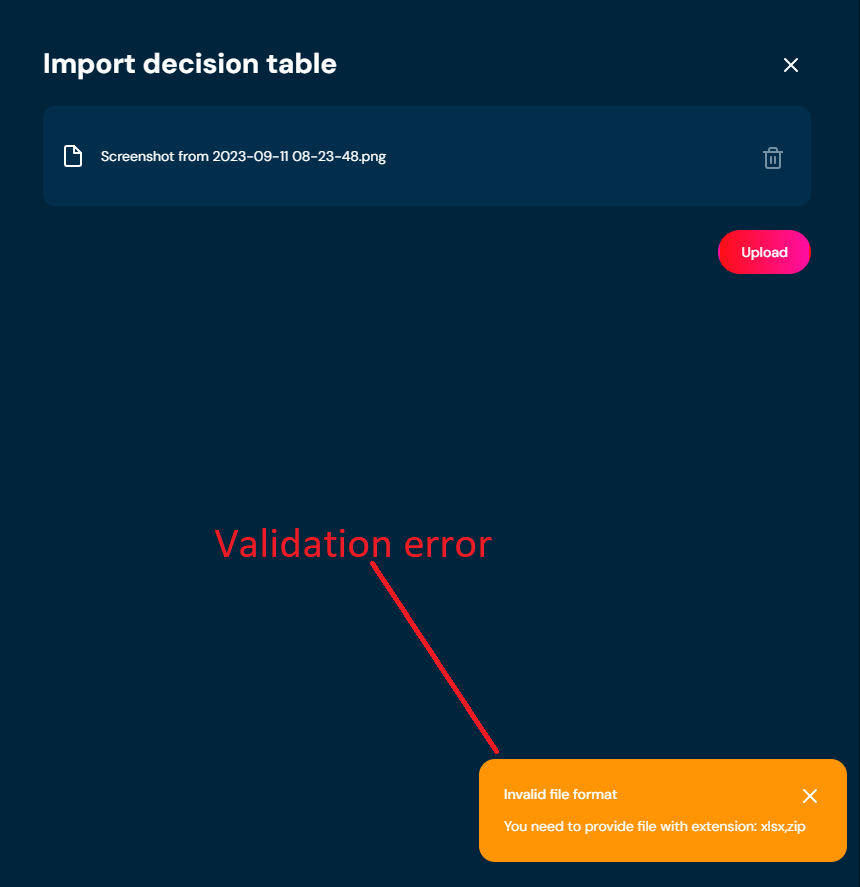
a. If you choose a file with an extension other than ZIP, then a validation error will pop up.
-
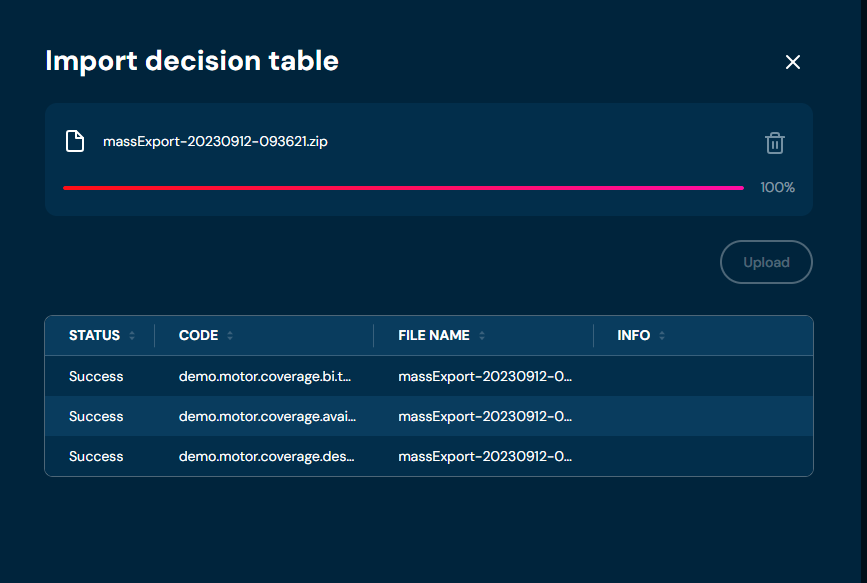
When the progress bar reaches 100%, it means that all decision tables were uploaded correctly.
Decision tables - Mass export to XLSX#
If you want to download one or more decision tables, follow these steps:
-
Choose Decision Tables in the Main Toolbar.
-
Select one or more.
a. Select the top checkbox to select all decision tables in the view, or select individual checkboxes to select one or multiple
-
From the drop-down menu More actions: choose Mass export to XLSx.
a. If action Mass export to XLSx is grayed out, it means that no decision tables have been selected.
b. Choosing Mass export to XLSx downloads a ZIP file that contains files with decision tables.

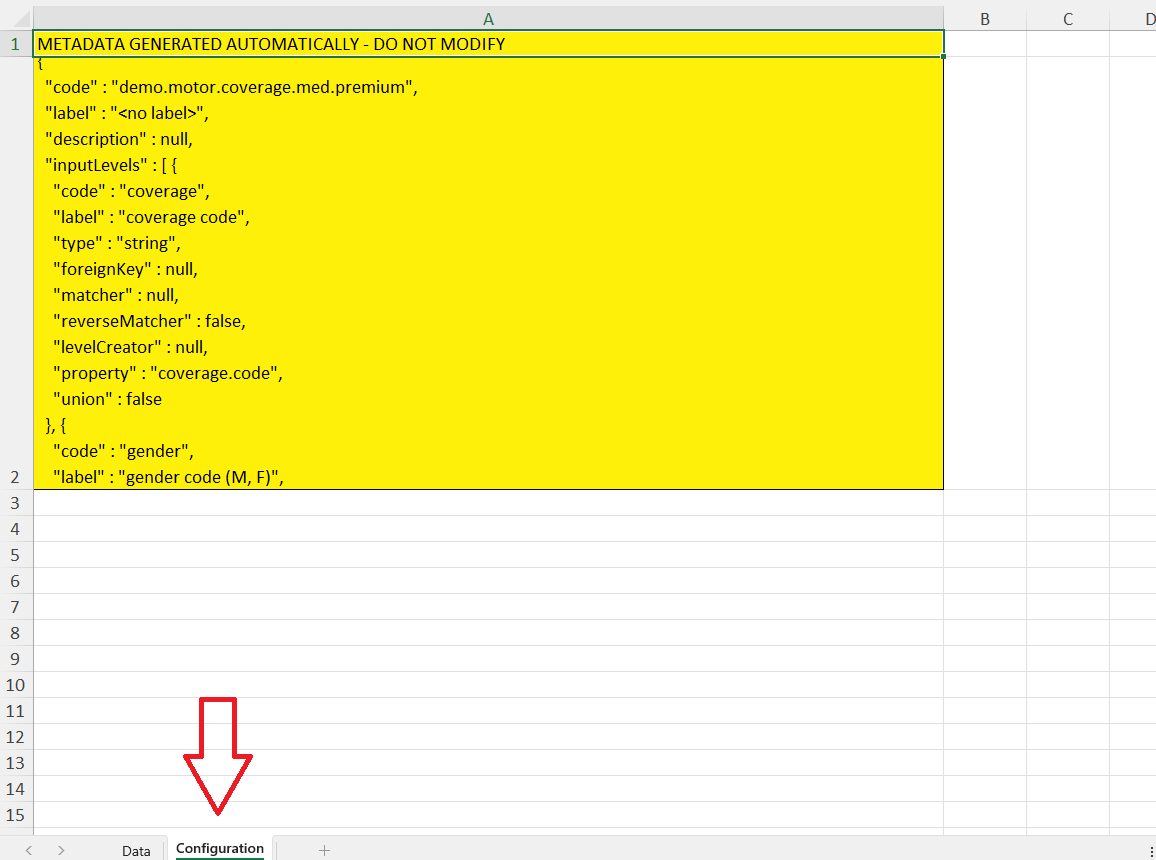
Details of zip
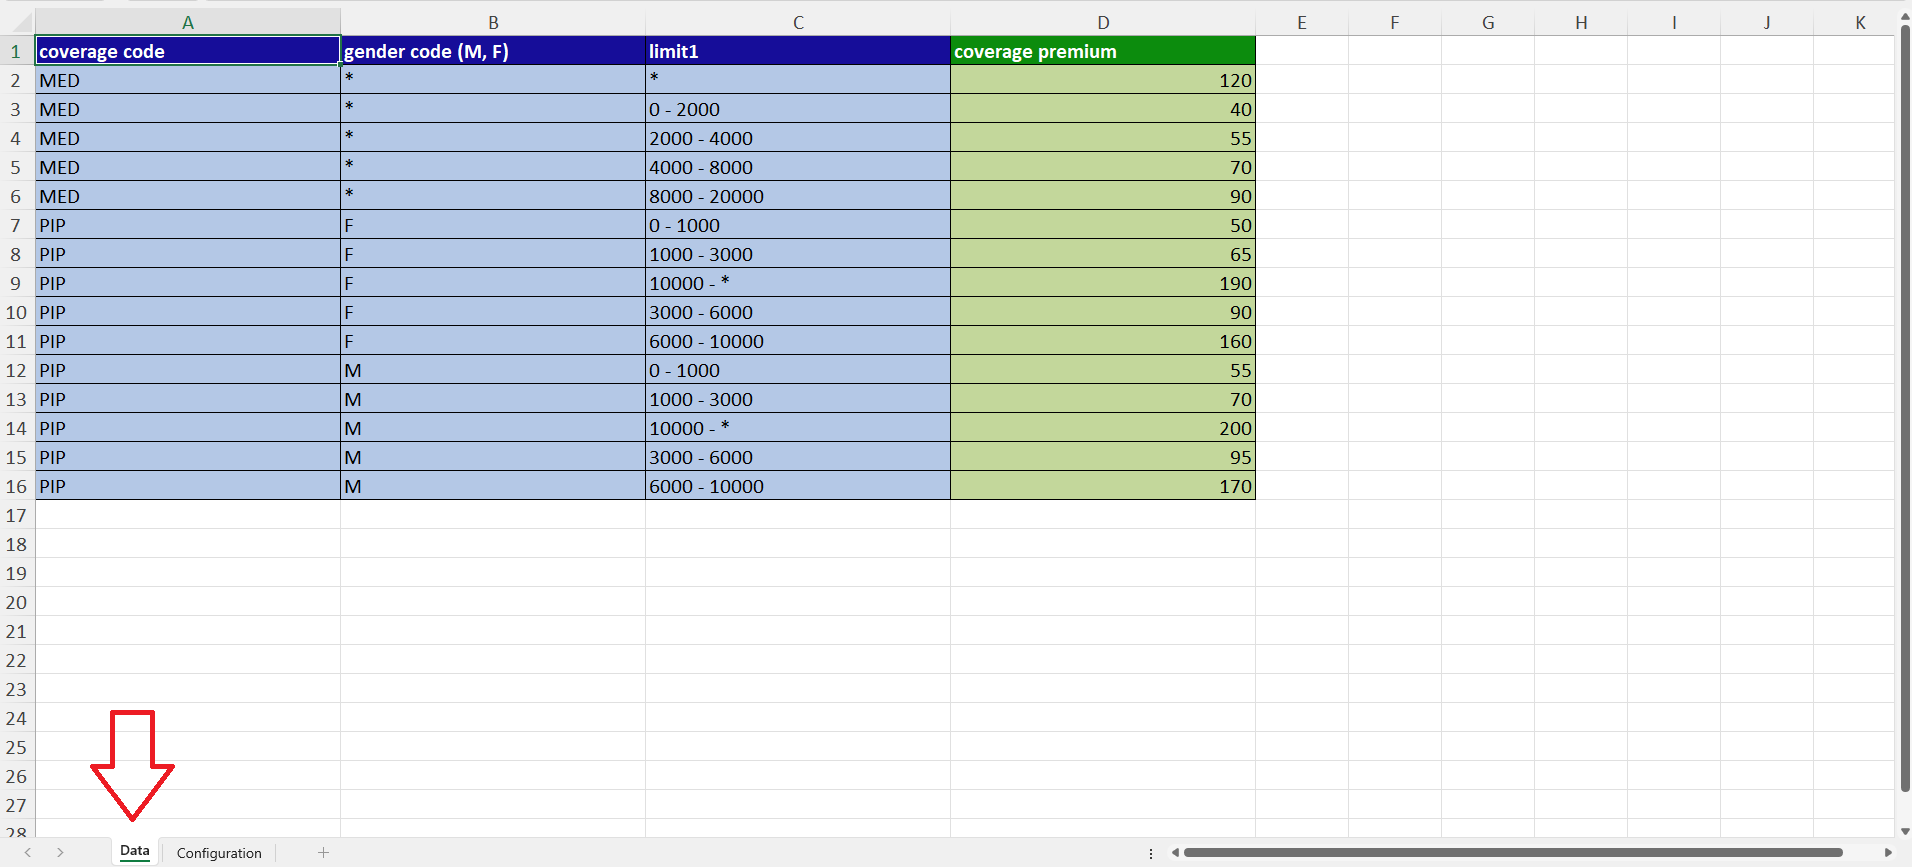
And view of
Decision tables - Extract codes#
If you want to extract one or more decision tables, follow these steps:
-
Choose Decision tables in Main toolbar.
-
Select one or more decision tables
a. Select the top checkbox to select all decision tables in the view or select individual checkboxes to select one or multiple.
-
From drop-down menu More actions choose Extract codes
a. If action Extract codes is greyed out, it means that no decision tables have been selected.
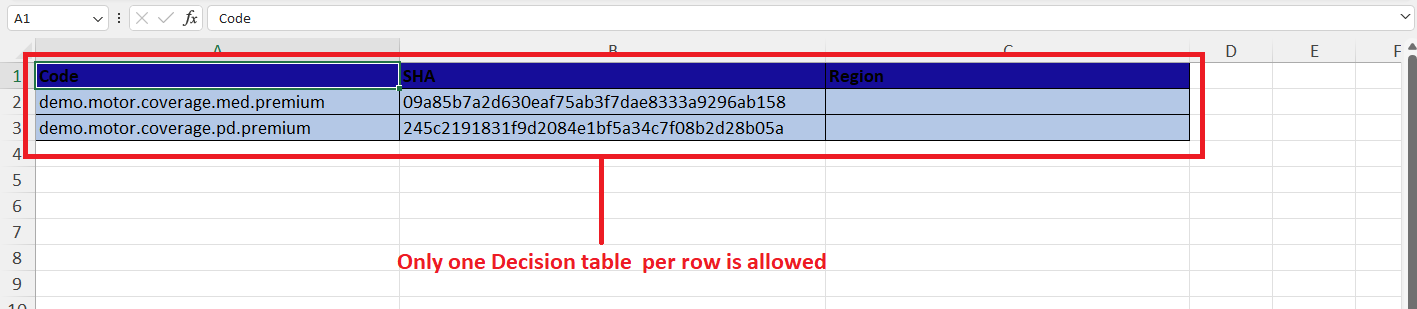
b. Selecting Extract codes downloads a XLSX file that contains Code, SHA and Region columns
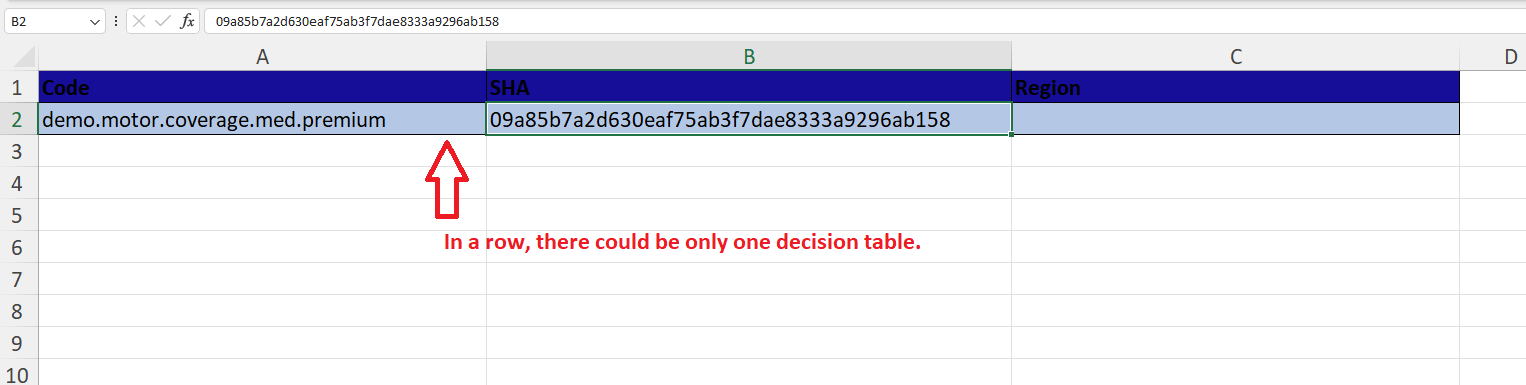
Decision tables - download codes#
If you want to download one or more decision tables codes, follow these steps:
-
Choose decision table in Main toolbar.
-
Select one or more decision tables.
a. Select the top checkbox to select all decision tables in the view, or select individual checkboxes to select one or multiple
-
From drop-down menu More actions choose Download codes
a. If Download codes action is greyed out, it means that no decision tables have been selected.
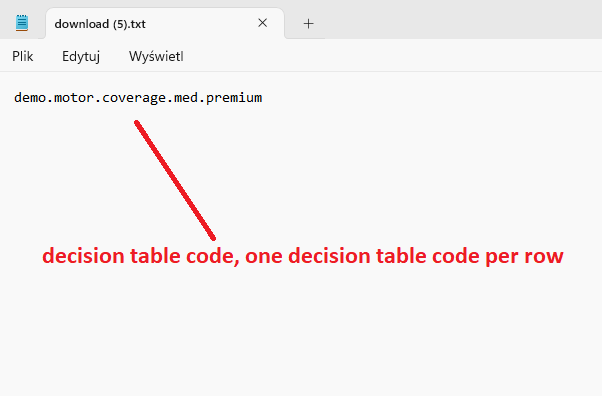
b. Selecting Download codes downloads a TXT file that contains decision tables’ codes

Decision tables - Select from file#
If you want to select one or more Decision tables from the file, follow these steps:
-
Choose Decision tables in Main toolbar.
-
From drop-down menu More actions choose Select from file
a. Choosing Select from file brings up the Select from file screen
-
Drag and drop the desired file or Click to upload a file and choose file in File explorer.
a. Correct TXT file should look like this:
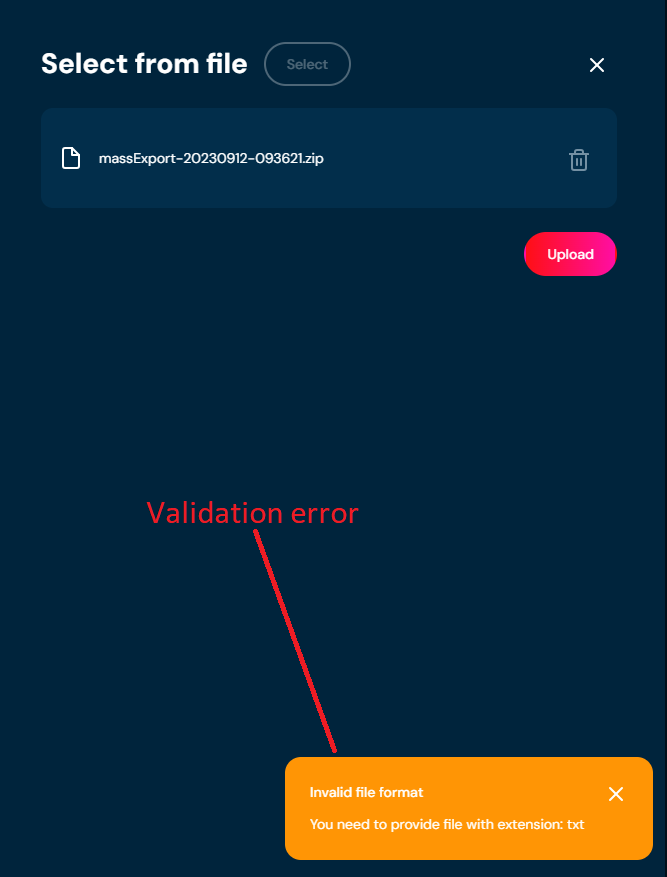
b. If you choose a file with an extension other than TXT, then a validation error will pop up.
-
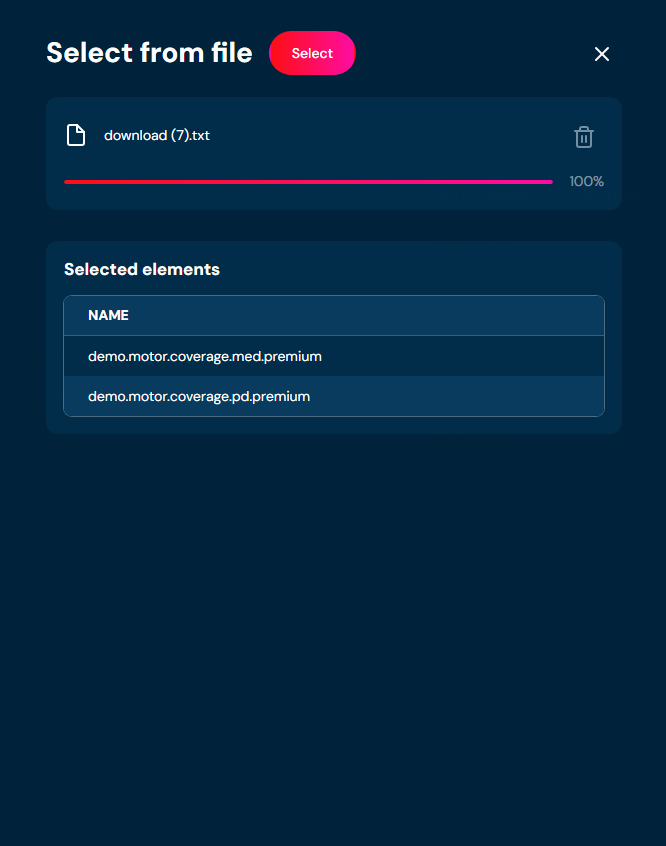
When the progress bar reaches 100%, you will be informed which decision tables will be selected.
-
Choose Select.
a. All decision tables that were present in the Selected Elements table get selected.
Decision tables - Compare with extract#
Makes a comparison between the file and the environment, and gives information on which elements are the same, and which changes are only in the file or only in the environment.
-
Choose Decision tables in Main toolbar.
-
From drop-down menu More actions choose Compare with extract.
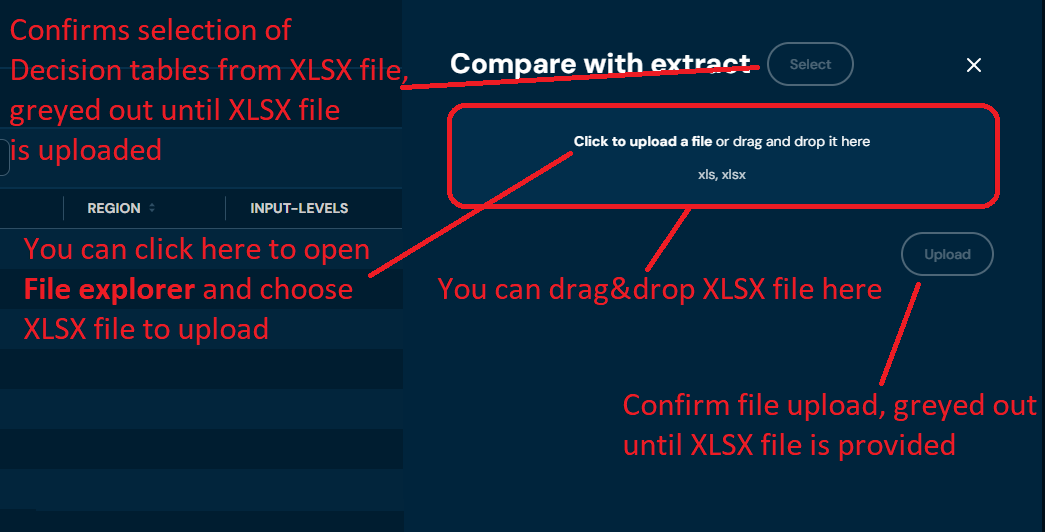
a. Choosing Compare with extract brings up the Compare with extract screen.
-
Drag and drop the desired file or Click to upload a file and choose file in the File explorer.
a. Correct XLS/XLSX file should look like this
b. If you choose a file with extension other than XLS/XLSX, then validation error will pop up
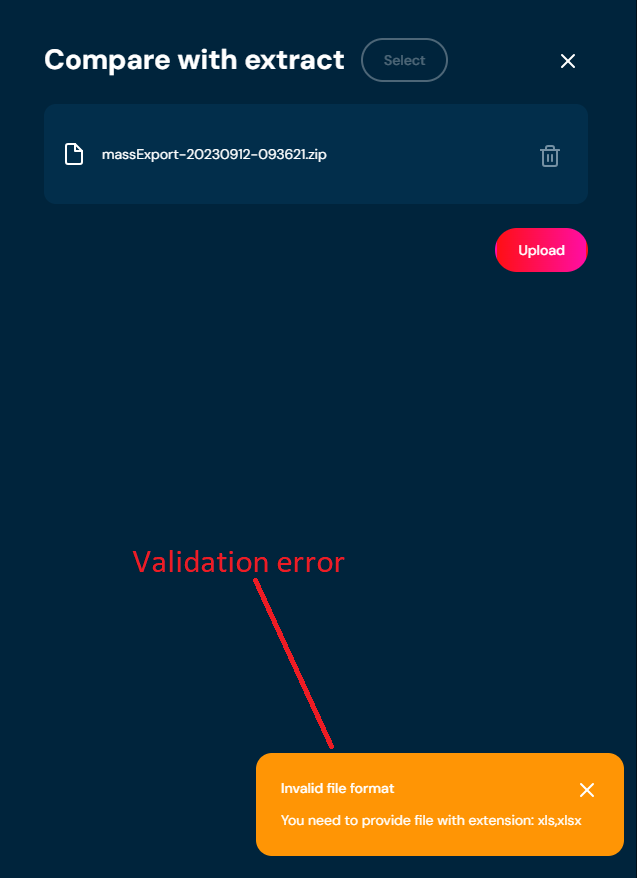
-
When the progress bar reaches 100%, you will be informed about the status of all decision tables present in the environment and the extract file you provided.
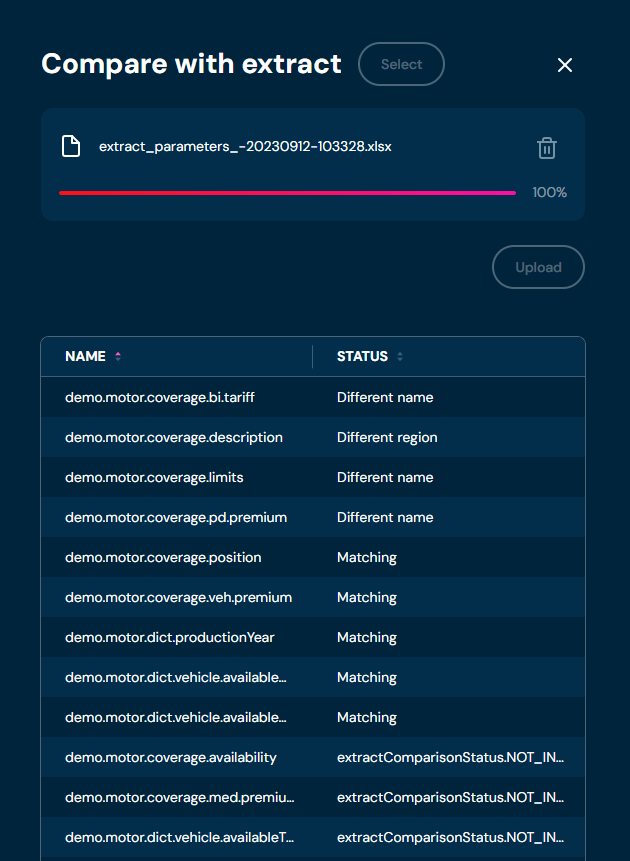
-
In the Select section (visible below the table with decision table status), choose which Decision tables will be selected.
a. You can select multiple options.
b. Matching: decision tables that are equal between the environment and the extract file will be selected.
c. Different regions: decision tables that are equal but with different regions between the environment and the extract file will be selected.
d. Different name: decision tables that are equal but with different names between the environment and the extract file will be selected.
e. Missing from extract: decision tables that are present in the environment but absent from the extract file will be selected.
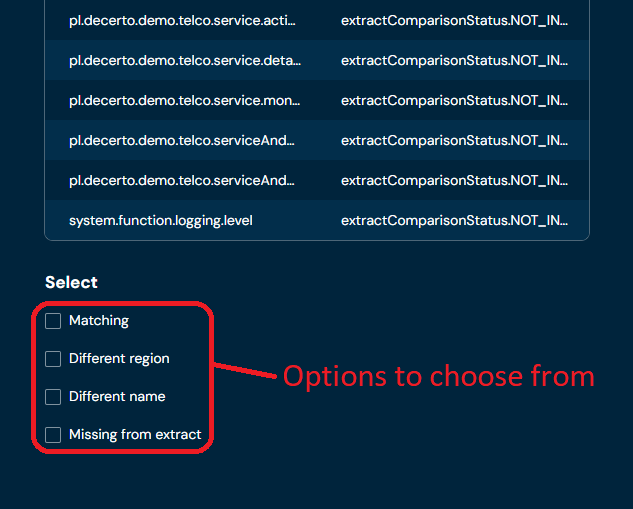
-
Choose the Select Button.
a. If the Select button is grayed out, it means that no checkboxes were selected in step 5.
b. All Decision Tables that match the criteria provided in step 5 are selected.
Decision tables - Add region#
If you want to add a region to one or more decision tables, follow these steps:
-
Choose Decision Tables in the Main Toolbar.
-
Select one or more decision tables without a Region.
a. Select the top checkbox to select all decision tables in the view or select individual checkboxes to select one or multiple decision tables.
-
From the drop-down menu More actions, choose Add region.
a. If action Add region is grayed out, it means that no decision tables have been selected.
b. Choosing Add Region brings up the Manage Versioning screen.
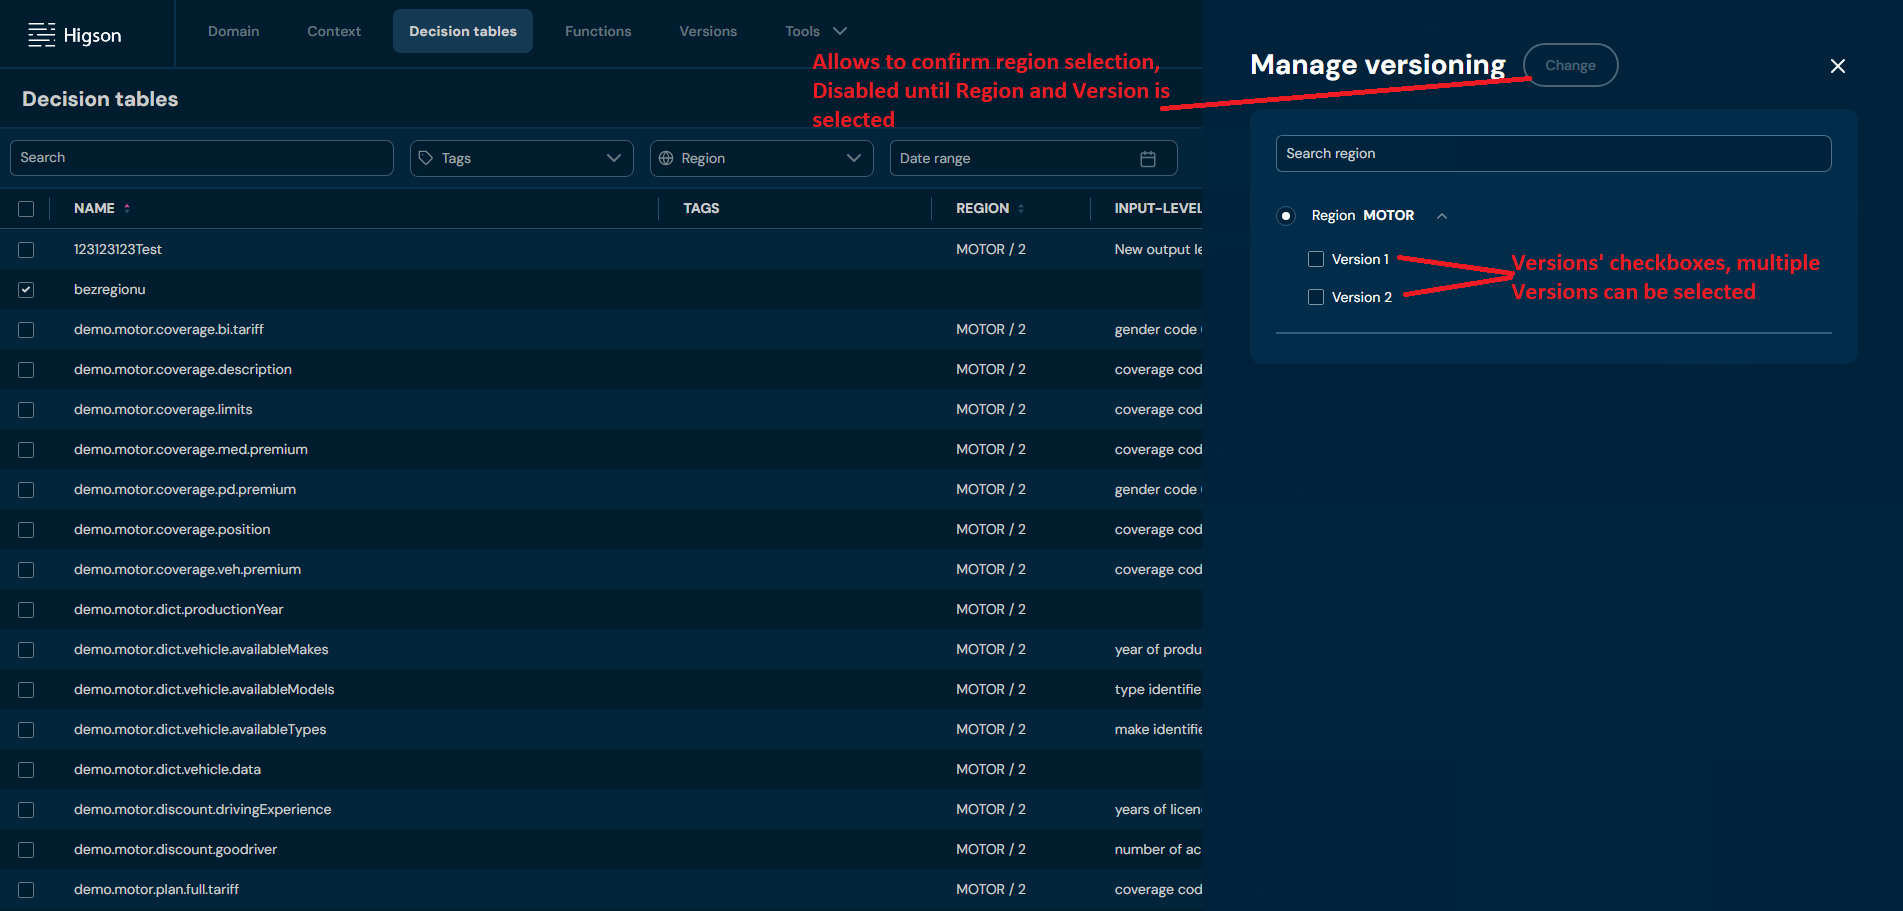
-
Select a Region and one or more versions.
-
Select Change.
-
The region has been assigned to the decision tables
Decision tables - Remove region#
If you want to remove a region from one or more decision tables, follow these steps:
-
Choose Decision tables in Main toolbar.
-
Select one or more Decision tables with a Region.
a. Select the top checkbox to select all decision tables in the view or select individual checkboxes to select one or multiple.
-
From drop-down menu More actions choose Remove region.
a. If action Remove region is greyed out, it means that no function has been selected.
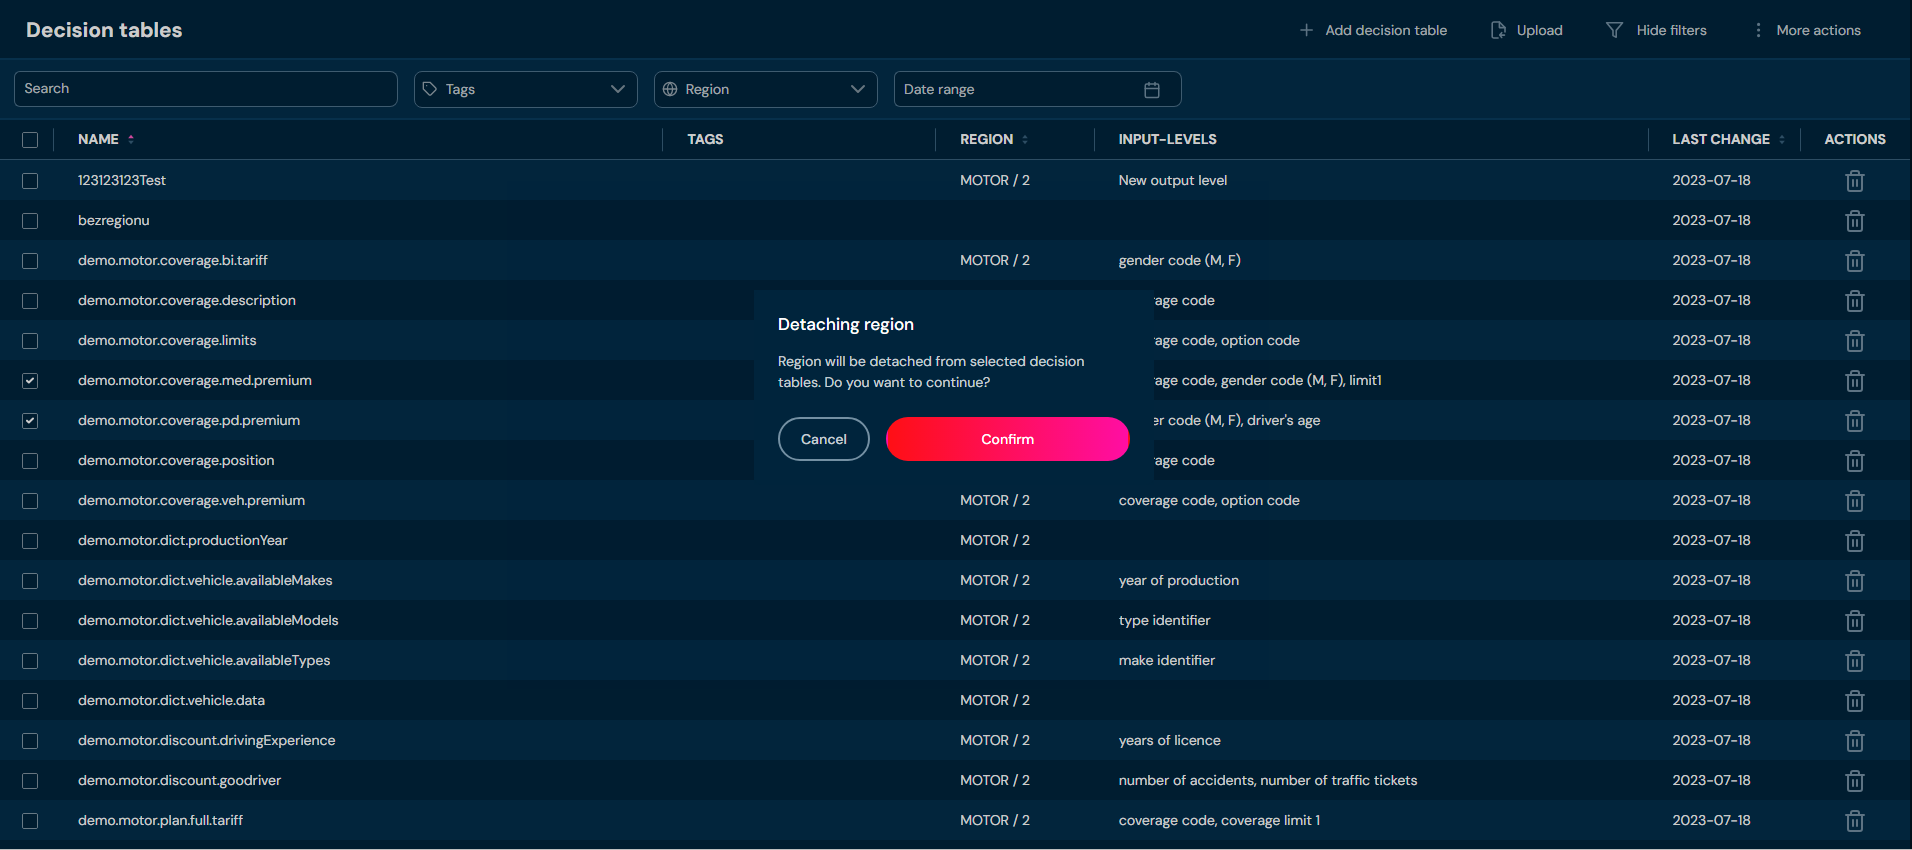
b. After choosing Remove region action, confirmation pop-up will appear.
-
Choose Confirm.
a. Regions are being removed from all selected decision tables.
Decision tables - Manage tags#
If you want to manage tags from one or more decision tables, follow these steps:
-
Select the decision tables on the main toolbar.
-
Select one or more untagged decision tables.
-
From the More Actions drop-down menu, select Manage Tags.
-
Select the tags you are interested in and click Save.
Decision tables - remove#
If you want to delete one or more decision tables, follow the steps below:
-
Choose the Decision tables in the Main toolbar.
-
Select one or more decision tables.
a. Select the top checkbox to select all decision tables in the view, or select individual checkboxes to select one or multiple
-
From the drop-down menu More actions, choose Remove.
a. If action Remove is grayed out, it means that no decision tables have been selected.
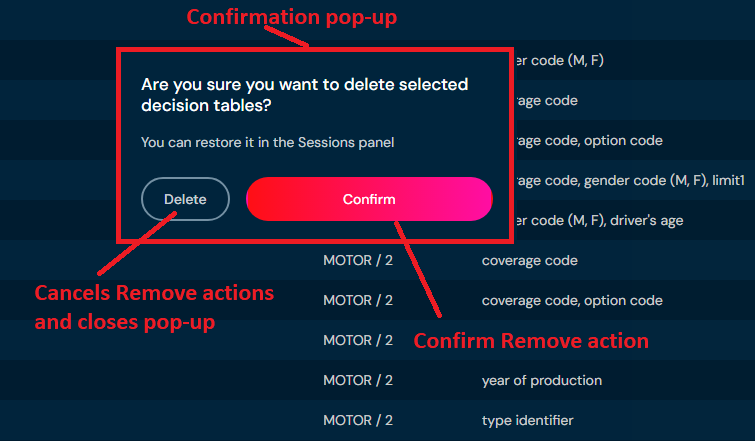
b. After choosing Remove action, a confirmation pop-up will appear.
-
Choose Confirm.
-
All selected decision tables are deleted from the environment
Decision tables details#
You can access decision table details by left-clicking on the specific decision table in the List of all decision tables. The decision tables details screen contains all information about the decision tables, including their description, assigned regions, tags, and others.
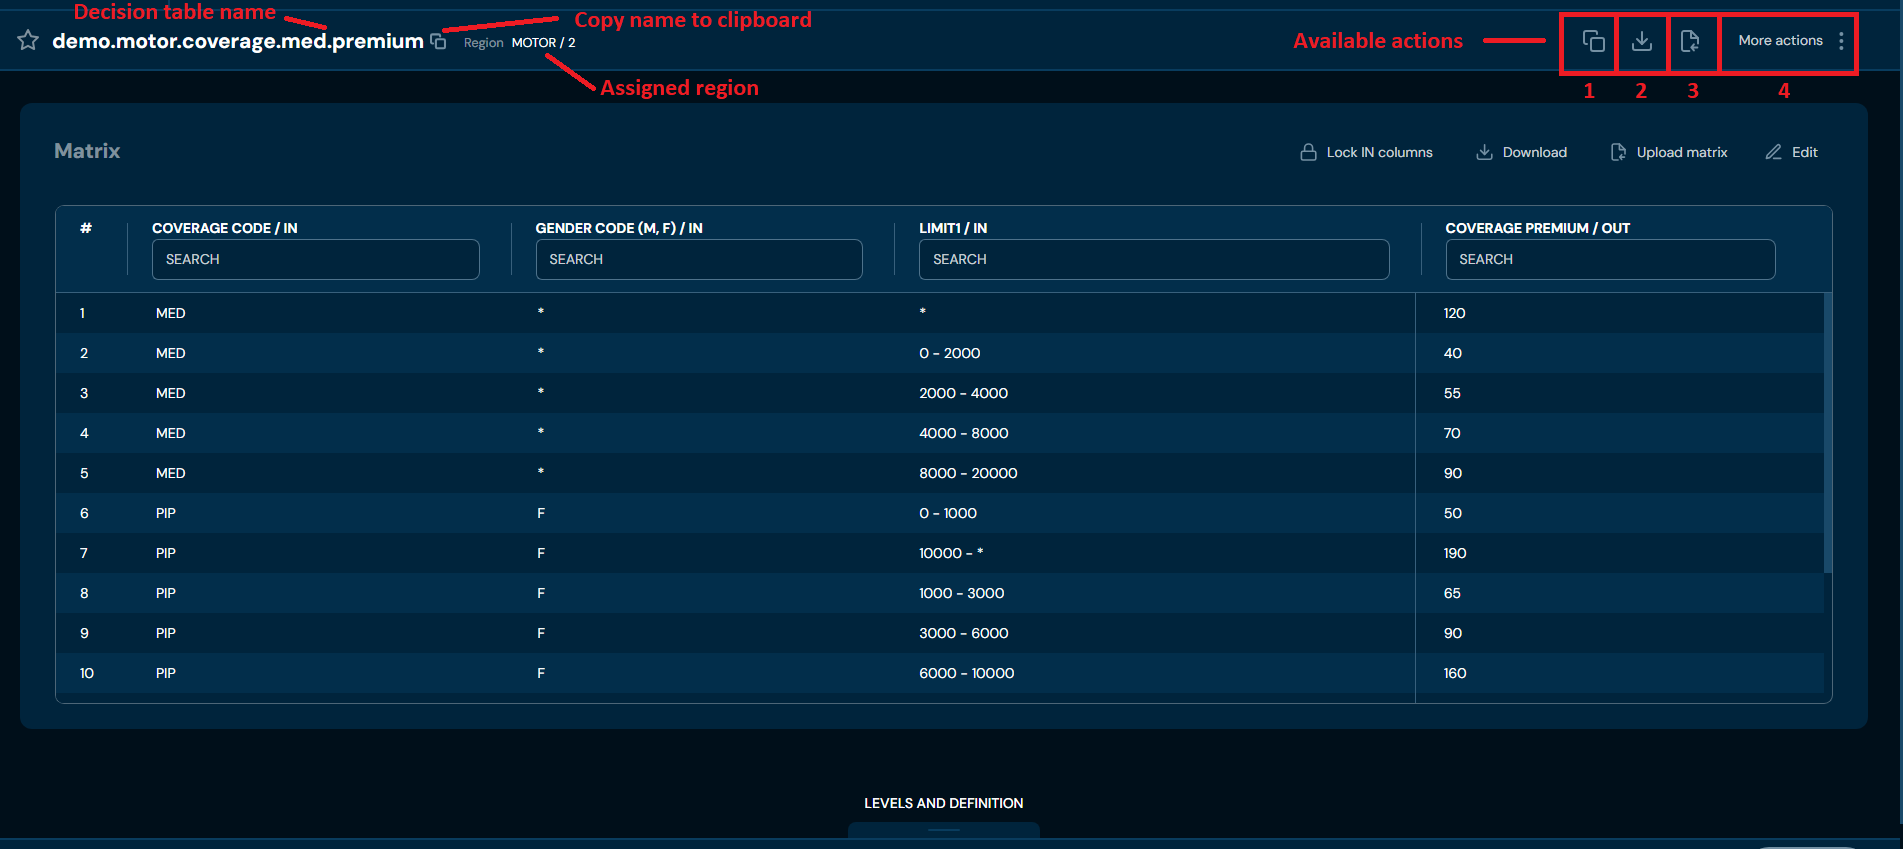
And you can see the available actions below:
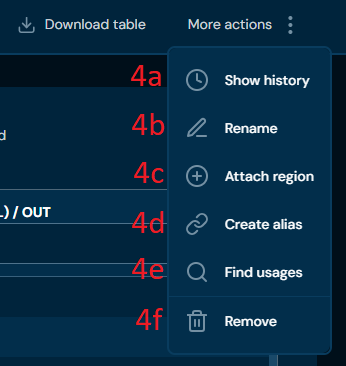
| No. | Name | Description |
|---|---|---|
| 1 | Duplicate | Allows to duplicate decision table. |
| 2 | Download | Downloads XLSX file with decision table. |
| 3 | Import table | Allows to upload file XLSX or ZIP. |
| 4 | More actions | Drop-down list that contains actions 4A-4G. |
| 4A | Shows history | Opens a new screen with a table of all modifications made on the decision table. |
| 4B | Rename | Allows you to change the name. |
| 4C | Attach/Detach | Allows you to add/remove a region to/from the Decision table. Attach region is available if there are no regions added to the Decision table. Detach region is available if there is a region added to the Decision table. |
| 4D | Create Alias | Creates a copy of the decision table with its own code. |
| 4E | Find usages | Redirects you to global search where you may find every reference to that decision table. |
| 4F | Remove | Action removes the decision table. |
Left-click on LEVELS AND DEFINITION to see more details about the Decision table.
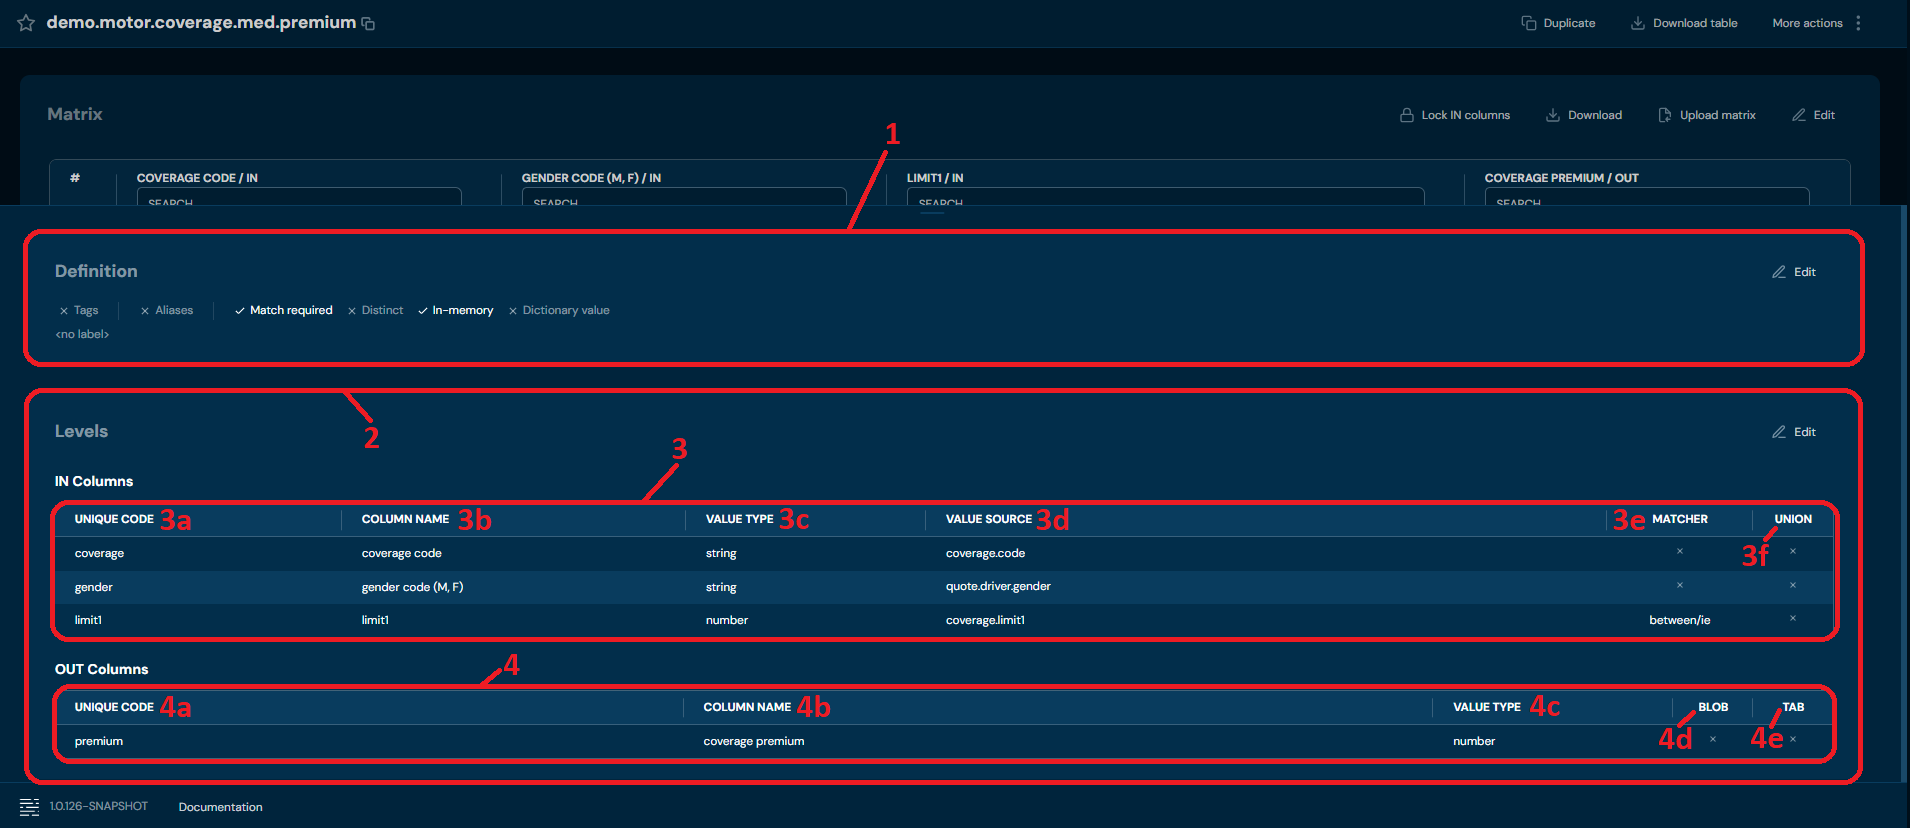
| No. | Name | Description |
|---|---|---|
| 1 | Definition section | Definition of Decision table. Contains information such as: - Description of Decision table - Assigned Tags - Created Aliases |
| 2 | Levels section | Levels of Decision table. Contains information about created IN Columns and OUT Columns. |
| 3 | IN Columns section | IN Columns table contains all IN Columns created in Decision table. |
| 3a | Unique Code | Unique Code of IN Column. |
| 3b | Column Name | Name of IN Column. |
| 3c | Value Type | Informs about Value Type of IN Column. |
| 3d | Value Source | Value Source of IN Column. |
| 3e | Matcher | Informs about the selected matcher for IN Column. |
| 3f | Union | Informs if Union checkbox was selected for IN Column. |
| 4 | OUT Columns section | OUT Columns table contains all OUT Columns created in Decision table. |
| 4a | Unique Code | Unique Code of OUT Column. |
| 4b | Column Name | Name of OUT Column. |
| 4c | Value Type | Informs about Value Type of OUT Column. |
| 4d | Blob | Informs if Blob checkbox was selected for OUT Column. |
| 4e | Tab | Informs if Tab checkbox was selected for OUT Column. |
Value source#
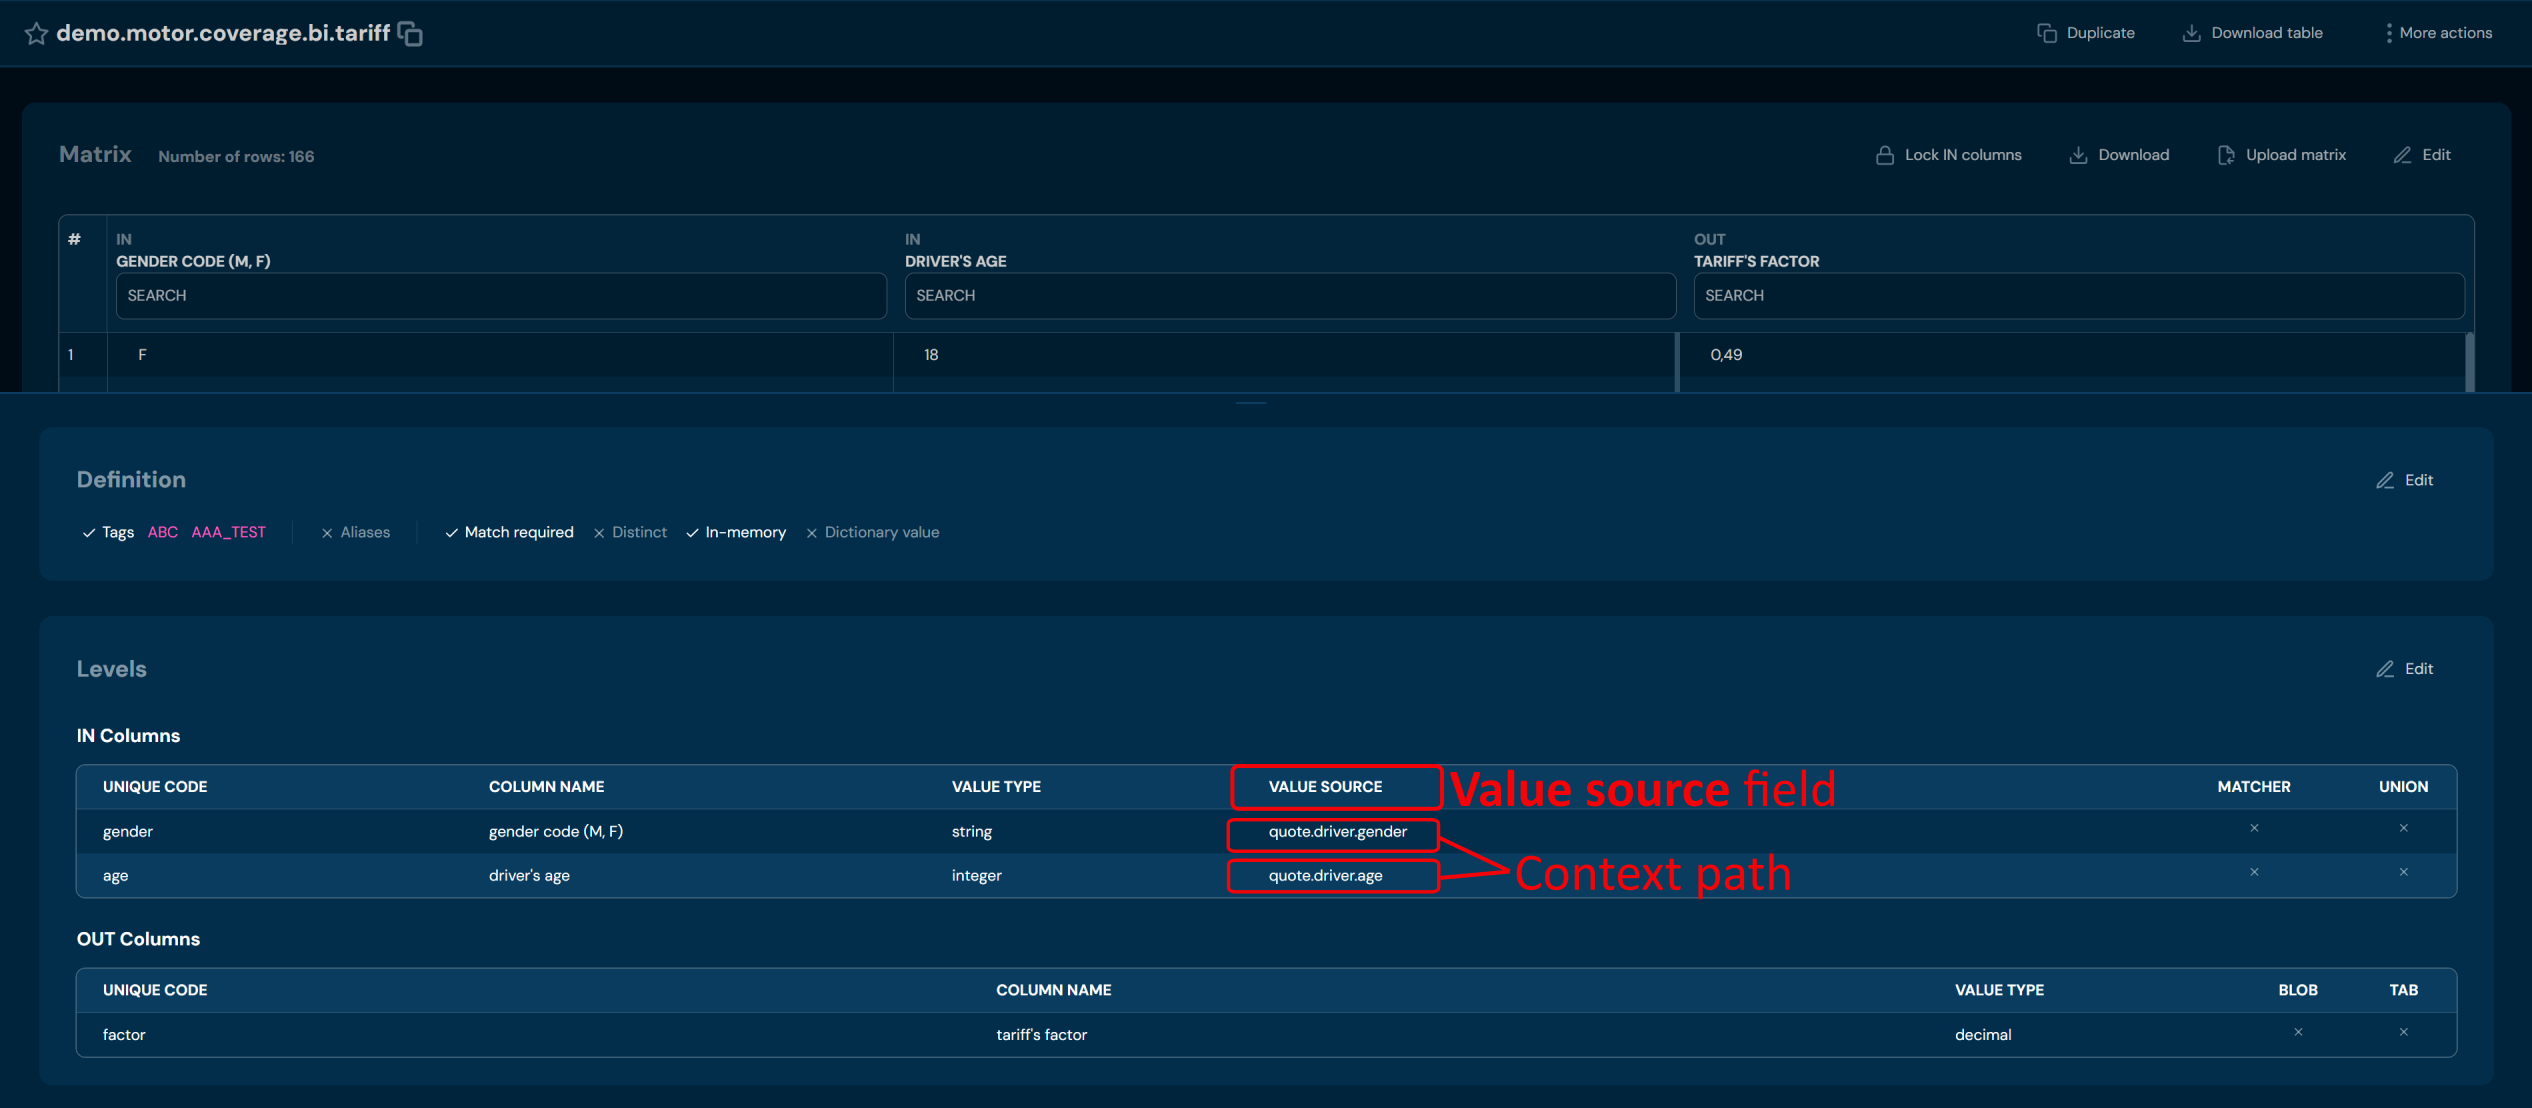
The Value Source field is used to define the source of a value for an IN level in a decision table. It can accept two types of references:
- context paths,
- functions.
Context Paths in the Value Source Field
If the value in the IN level should be read from the context, an appropriate context path must be provided, for example: quote.driver.age.
In this example, the value of the age attribute is read from the Driver type, which is a subtype of the Quote type.
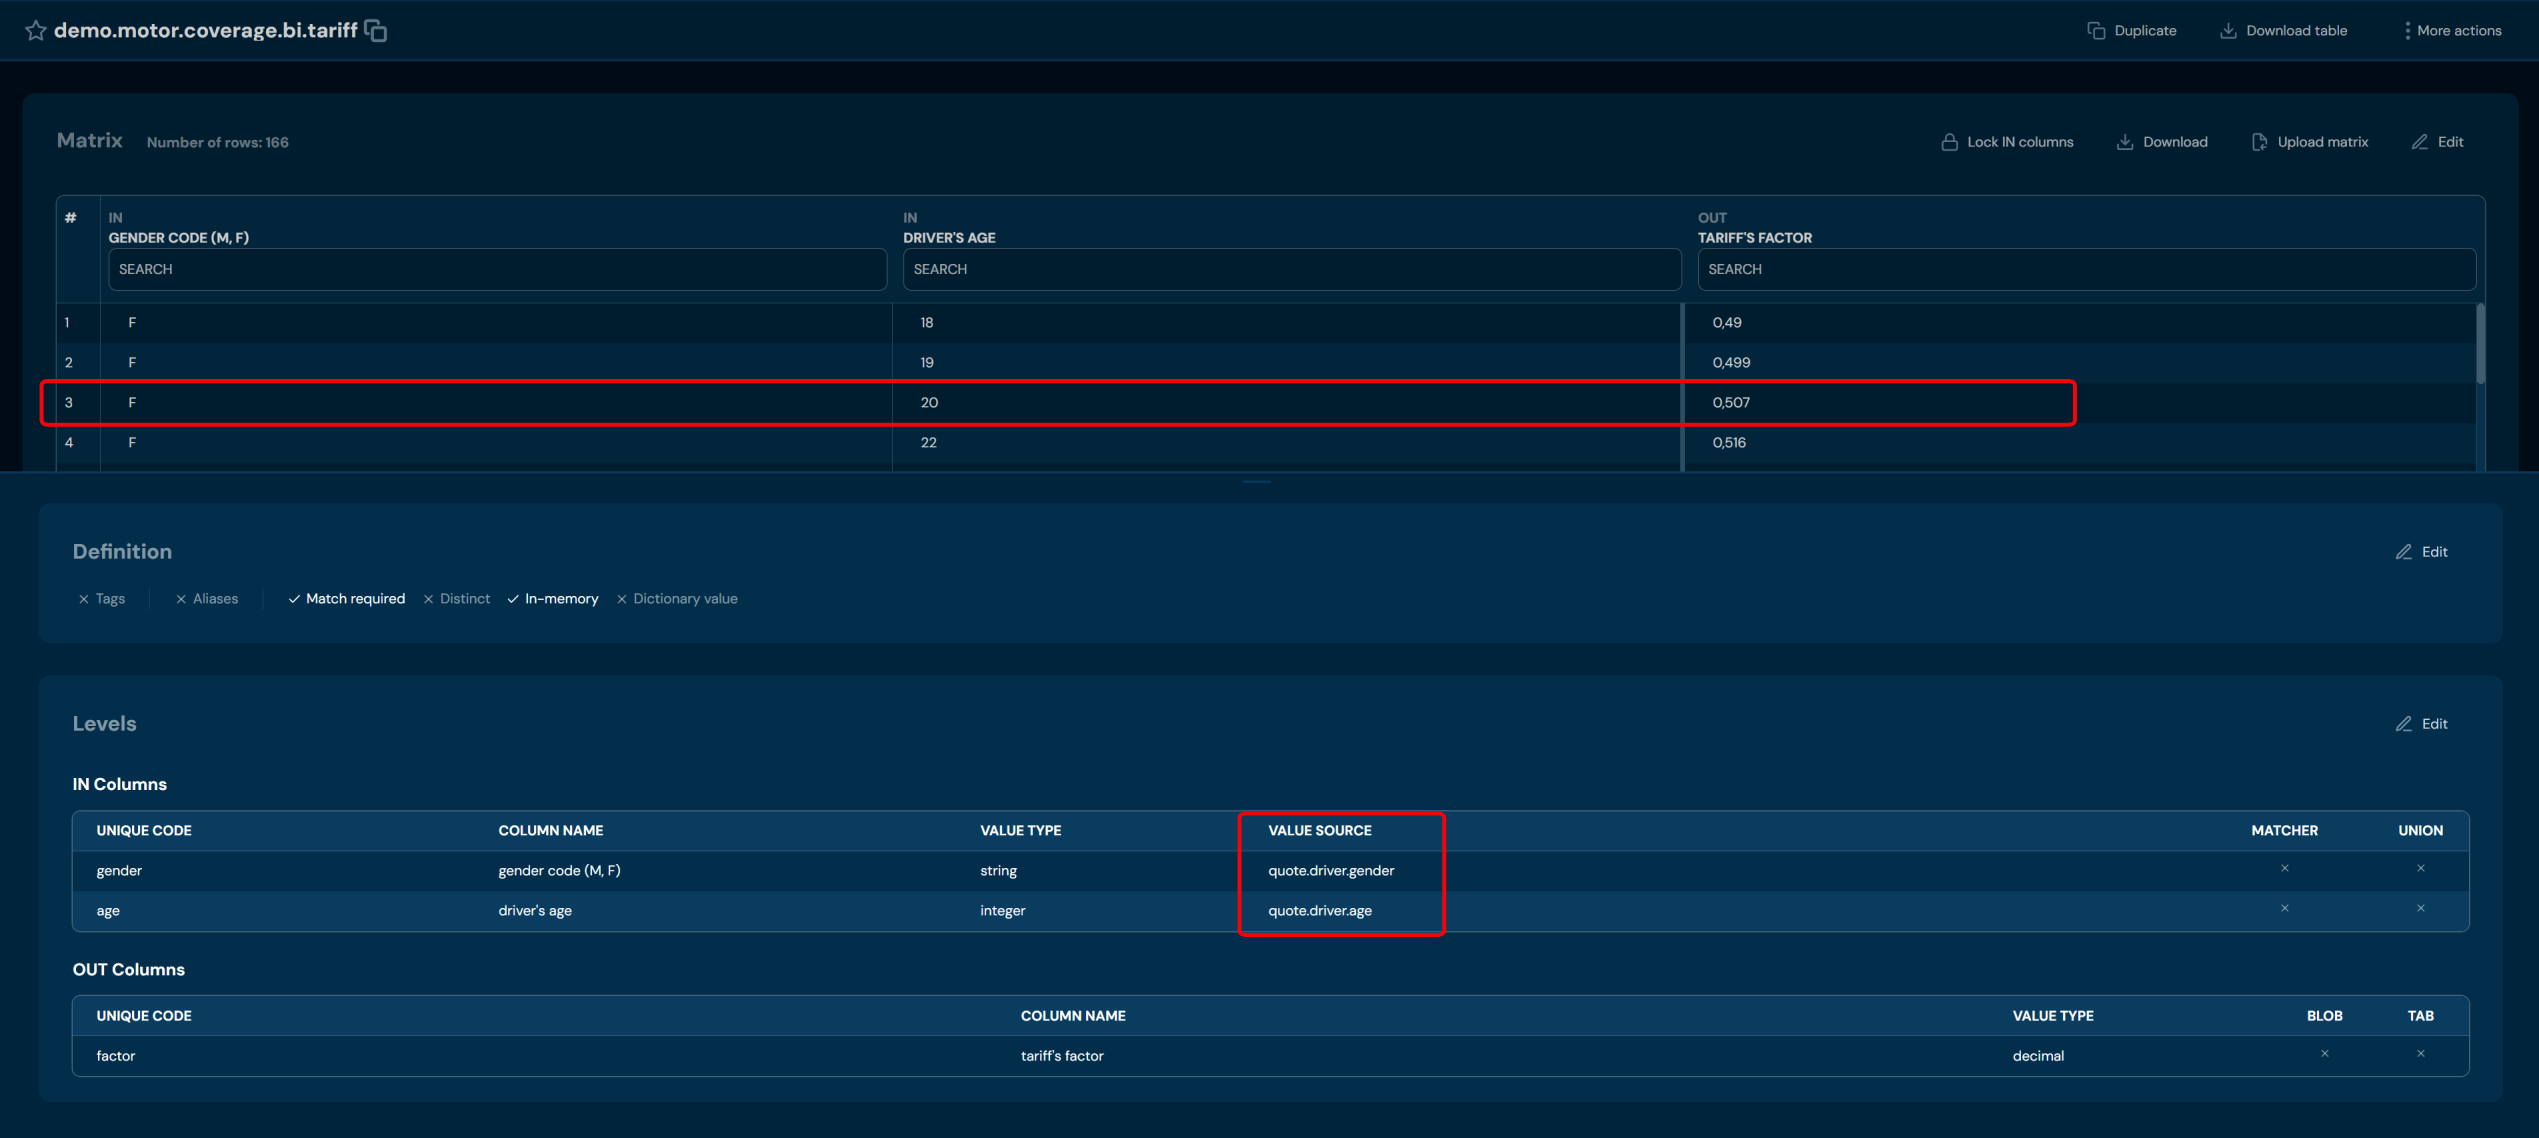
EXAMPLE
For the following data taken from the context:
quote.driver.gender = F
quote.driver.age = 20
the resulting Tariff’s factor is 0.507.
Functions in the Value Source Field
The Value Source field also supports references to functions using the $f notation. In this case, the value evaluated in the decision matrix is the result of a function execution.
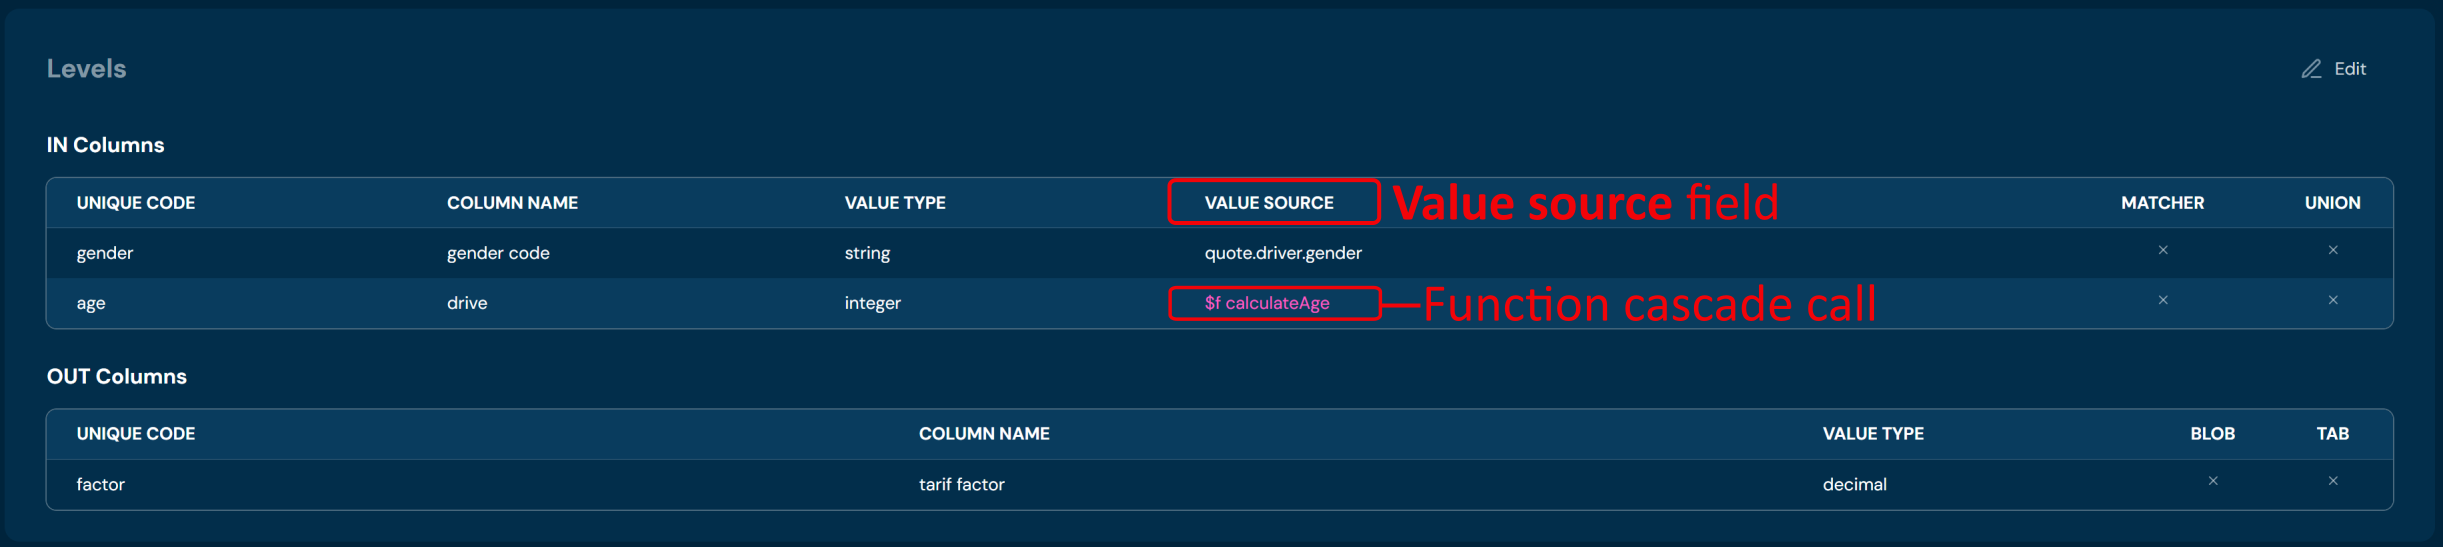
Decision tables details - Duplicate#
If you want to duplicate specific Decision table, follow these steps:
-
Choose Decision tables in Main toolbar.
-
Left-click on the Decision table you wish to duplicate.
a. Left-clicking on Decision table opens Decision table details screen.
-
Choose Duplicate in Available actions.
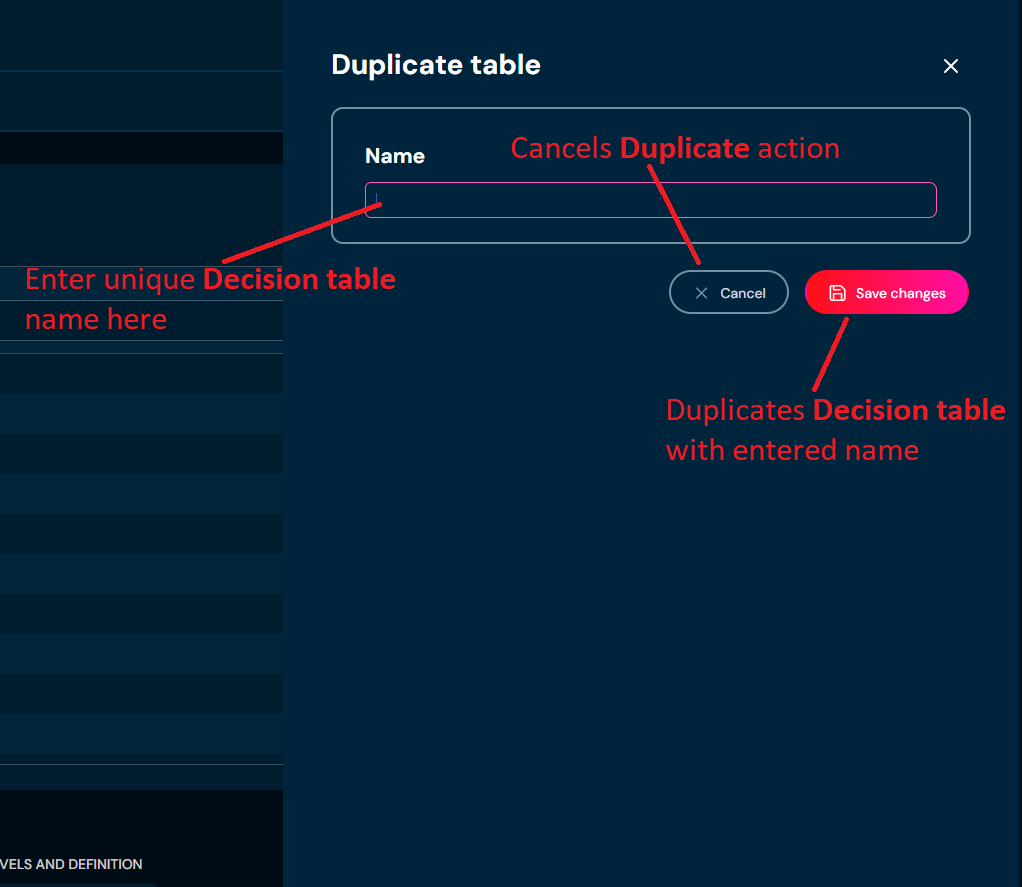
a. Choosing Duplicate brings up the Duplicate table screen.
-
Enter unique Decision table name. Name can contain only characters from collection a-z; 0-9; “.”; “-”; “_” and it can’t start with “-”.
-
Choose Save changes.
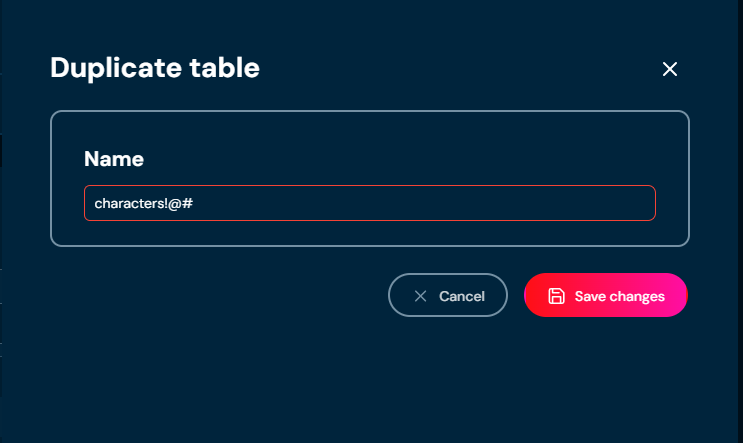
a. If you entered illegal characters, then name filed will highlight with red color.
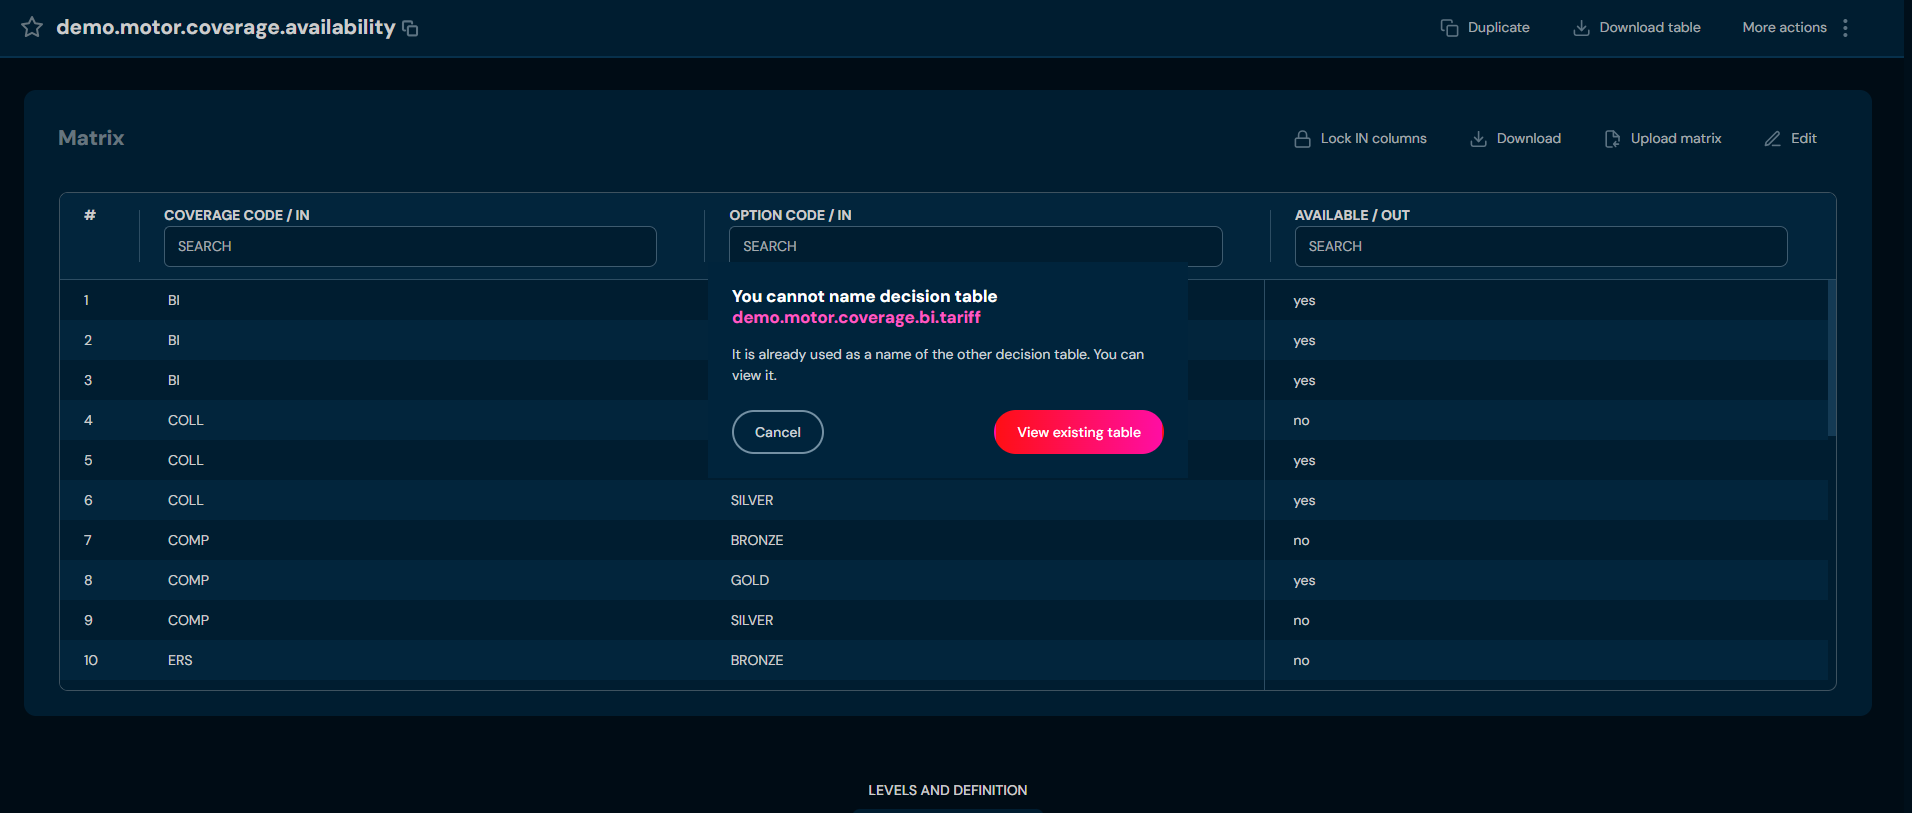
b. If the name you provided is already used by another Decision table, then pop-up dialog will appear. You can either close the pop-up by clicking Cancel or you can click View existing Decision table, that will redirect you to the appropriate Decision table.
Decision tables details - Download#
If you want to download a specific Decision table, follow these steps:
-
Choose Decision tables in Main toolbar.
-
Left-click on the Decision table you wish to download.
a. Left-clicking on Decision table opens Decision table details screen.
-
Choose Download in Available actions.
a. Choosing Download downloads an XLSX file that contains data of Decision table.
Decision tables details - Show history#
If you want to check all modifications made on Decision table, follow these steps:
-
Choose Decision tables in Main toolbar.
-
Left-click on the Decision table you want to check.
a. Left-clicking on Decision table opens Decision table details screen.
-
From drop-down menu More actions choose Show history.
a. Choosing Show history brings up the Decision table history screen.
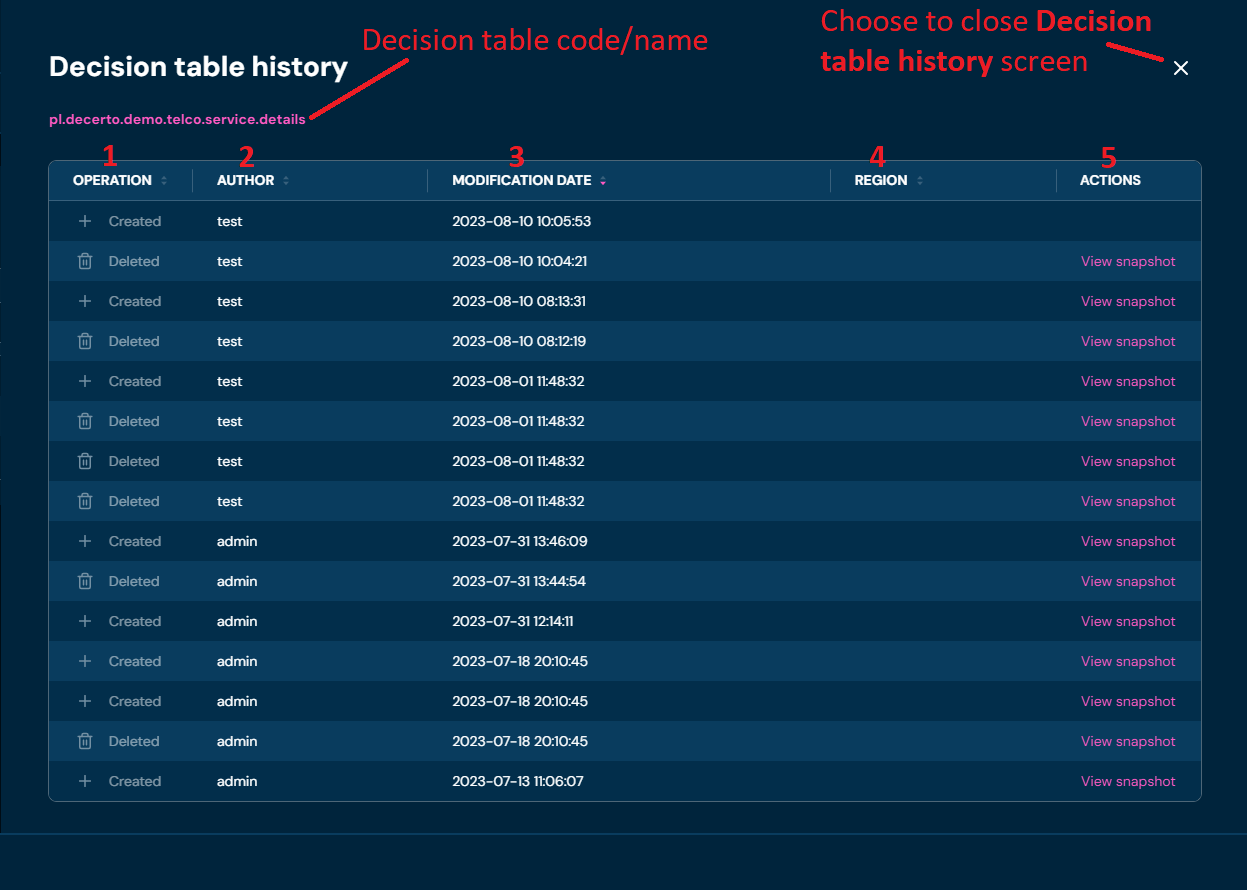
No. Column name Description 1 Operation Type Type of operation made on the Decision table. 2 Author User’s login that made an operation. 3 Modification Date Date of the published session that made an operation. 4 Region Region and version assigned to the Decision table at the time of modification. 5 Actions View redirects to an archived version of the Decision table. In this screen, you can choose Restore to restore that version of the Decision table.
Decision tables details - Rename**#
If you want to rename a Decision table, follow these steps:
-
Choose Decision tables in Main toolbar.
-
Left-click on the Decision table you wish to duplicate.
a. Left-clicking on Decision table opens Decision table details screen.
-
From drop-down menu More actions choose Rename.
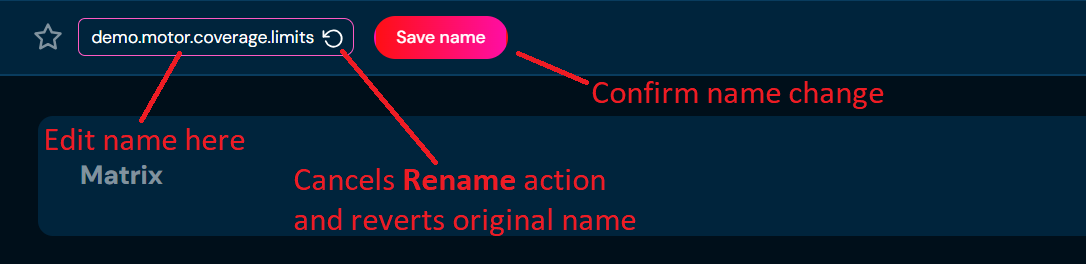
a. The Highlighted border around the Decision table name indicates that the name is editable.
-
Enter unique Decision table name. Name can contain only characters from collection a-z; 0-9; “.”; “-”; “_” and it can’t start with “-”.
-
Choose Save name.
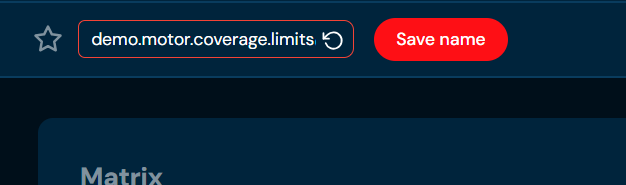
a. If you enter illegal characters, then the rename field will highlight with red color.
b. If the name you provided is already used by another decision table, then warning will appear in lower right corner and application will not allow you to proceed.
Decision tables details - Attach region#
If you want to attach a region to a specific Decision table from Decision table details level, follow these steps:
-
Choose Decision tables in Main toolbar.
-
Left-click on Decision table with no region assigned you want to attach a region.
a. Left-clicking on Decision table opens Decision table details screen.
-
From drop-down menu More actions choose Attach region
a. If Detach region action is available, it means that the Decision table has assigned the region already. You need to Detach region (hyperlink) before you will be able to attach a new region.
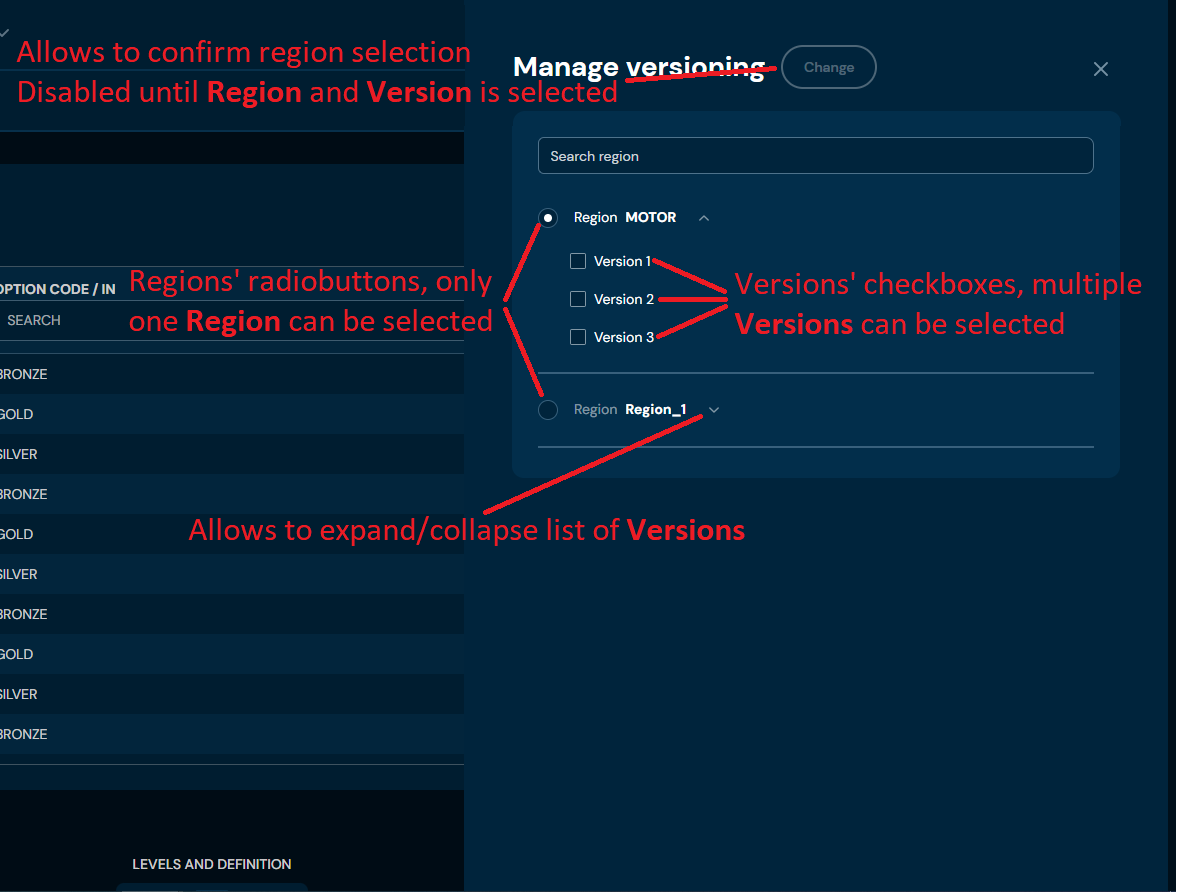
b. Choosing Attach region brings up Manage versioning screen.
-
Select Region and one or more Version.
-
Choose Change
a. The Region is being assigned to the Decision table.
Decision tables details - Detach region#
If you want to detach a region from a specific Decision table from
Decision table details** level, follow these steps:#
-
Choose Decision tables in Main toolbar.
-
Left-click on the Decision table with a region assigned you want to detach region.
a. Left-clicking on Decision table opens Decision table details screen.
-
From drop-down menu More actions choose Detach region.
a. If Attach region action is available, it means that the Decision table has no region assigned.
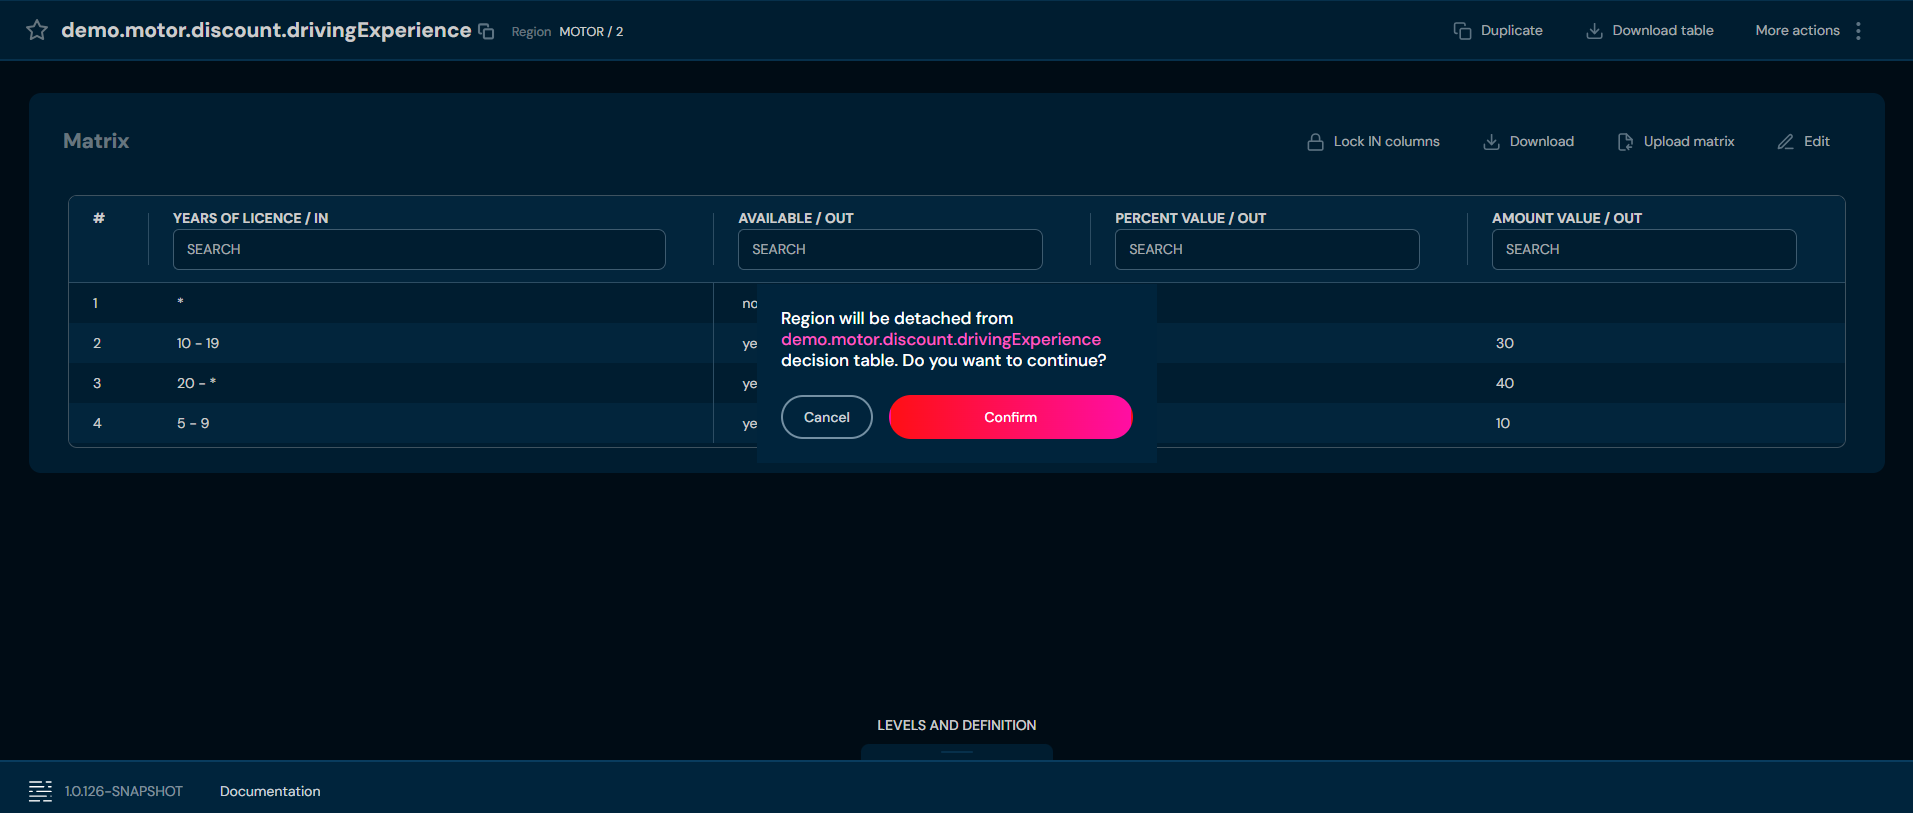
b. After choosing Detach region action, confirmation pop-up will appear.
-
Choose Confirm.
a. The Region is being detached from the Decision table.
Decision tables details - Create alias#
If you want to create an alias to specific Decision table, follow these steps:
-
Choose Decision tables in Main toolbar.
-
Left-click on Decision table you want to create alias.
a. Left-clicking on Decision table opens Decision table details screen.
-
From drop-down menu More actions choose Create alias.
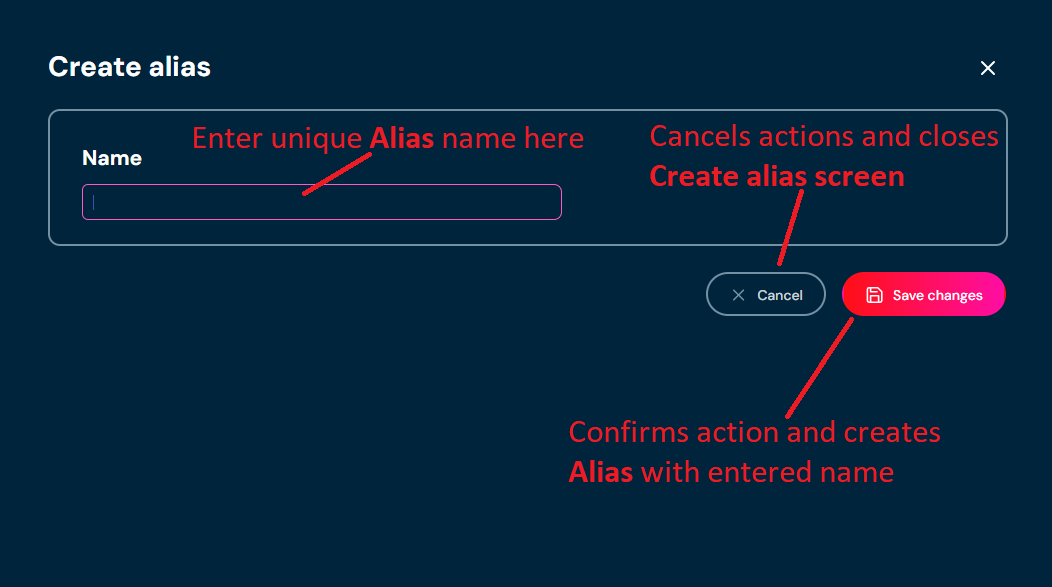
a. Choosing Create alias brings up the Create alias screen.
-
Enter unique alias name. Name can contain only characters from collection a-z; 0-9; “.”; “-”; “_” and it can’t start with “-”.
-
Choose Save change.
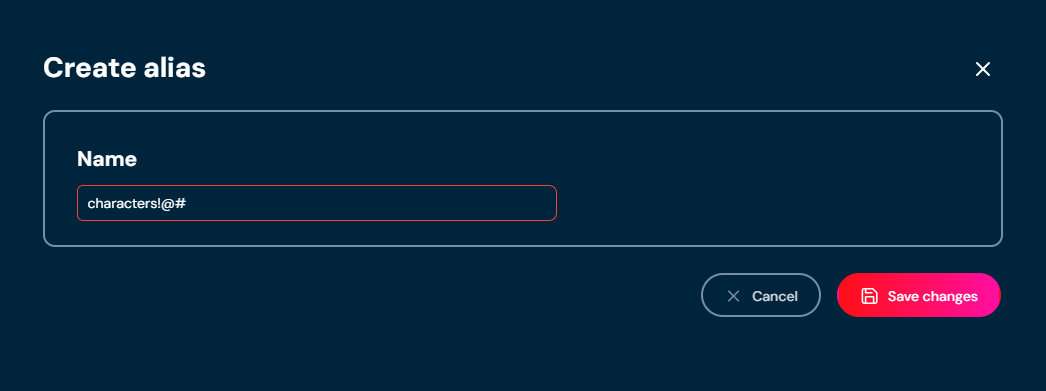
a. If you enter illegal characters, then the rename field will highlight with red color.
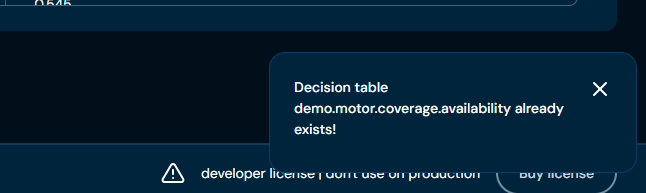
b. If the name you provided is already used by another Decision table, then a pop-up message will appear.
Decision tables details - Find usages#
If you want to check where Decision table is used, follow these steps:
-
Choose Decision tables in Main toolbar.
-
Left-click on the Decision table you want to check.
a. Left-clicking on Decision table opens Decision table details screen.
-
From drop-down menu More actions choose Find usages.
a. Choosing Find usages brings up the Find usages screen.
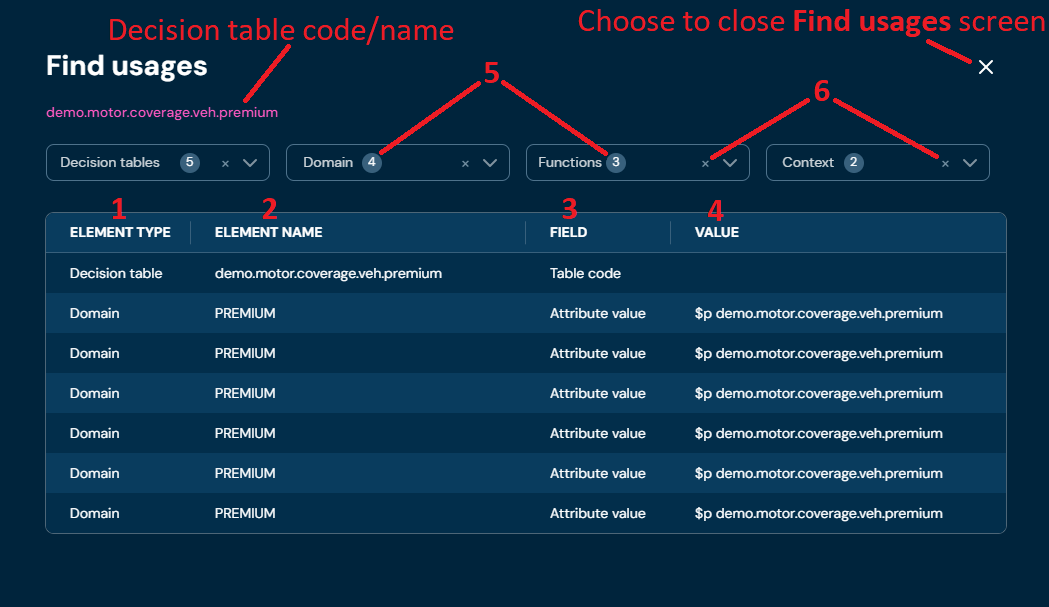
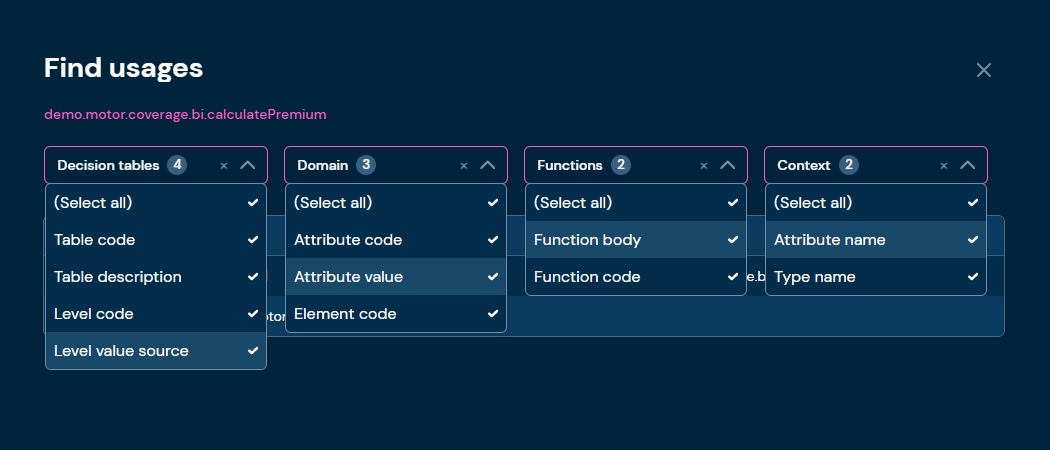
No. Column name Description 1 Element Type Type of element that uses this Decision table. 2 Name Name of the element that uses this Decision table. 3 Value Value of the element that uses this Decision table. This column is filled only for Attribute value element; for other elements, this column is empty. 4 Field Informs about the type of field where the Decision table is used. 5 Number of applied filters Informs the user how many filters of a specific type are applied. 6 Unselect all filters Unselects all filters of a specific type inside. b. You can apply filters to narrow down the displayed results. All available filters are visible in the picture below.
Decision tables details - Remove#
If you want to delete specific Decision table from Decision table details level, follow these steps:
-
Choose Decision tables in Main toolbar.
-
Left-click on the Decision table you wish to remove.
a. Left-clicking on Decision table opens Decision table details screen.
-
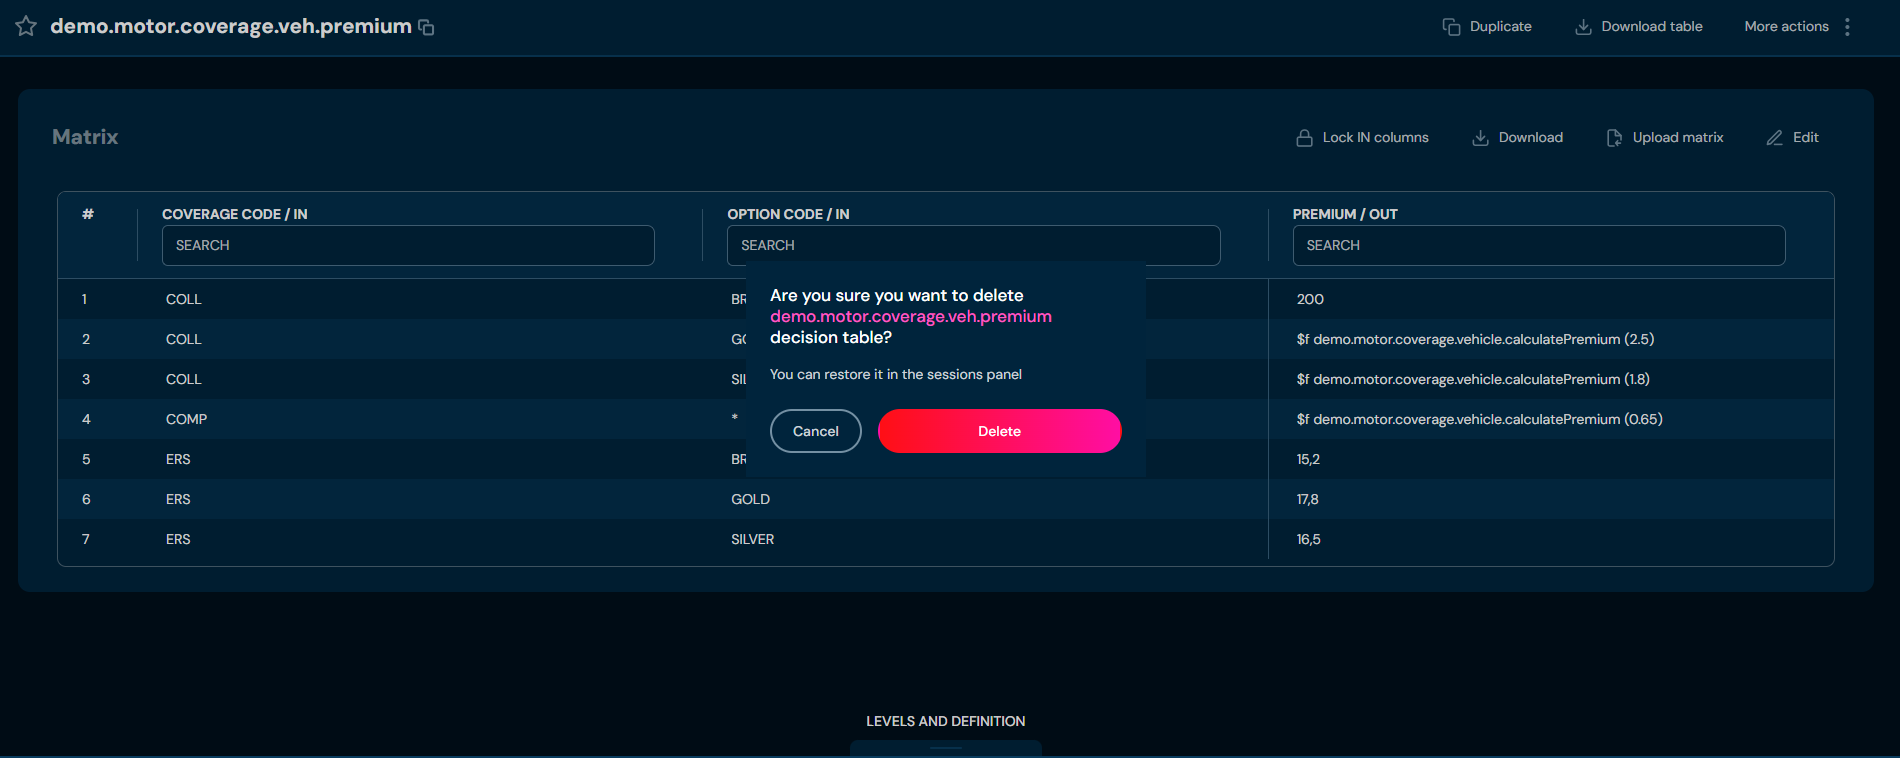
From drop-down menu More actions choose Remove.
a. After choosing Remove action, confirmation pop-up will appear.
-
Choose Confirm.
a. The Decision table is deleted from the environment.
Decision tables details - Edit Matrix#
If you want to edit matrix in a specific decision table, follow these steps:
-
Choose Decision tables in Main toolbar.
-
Left-click on the Decision table you wish to edit.
a. Left-clicking on the Decision table opens the details screen.
-
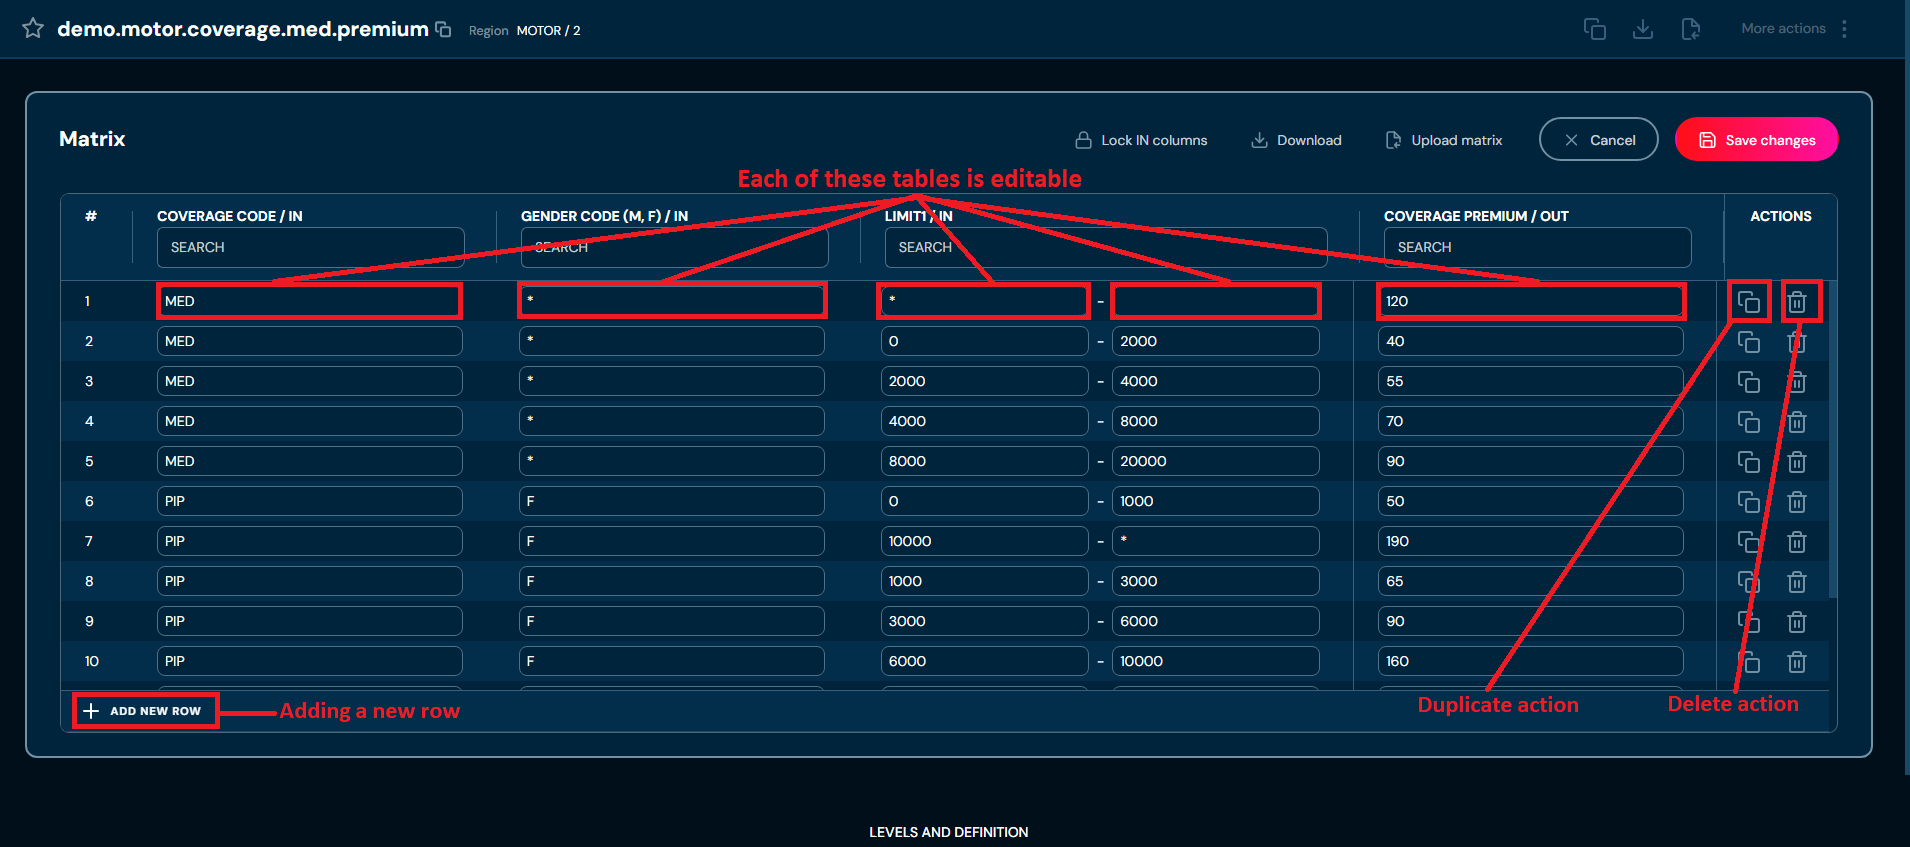
Choose Edit in Matrix section.
a. Highlighted borders indicate that the edit mode is active.
-
Edit any data you need.
-
Choose Save changes to save all changes made in the Decision table.
a. Cancel reverts all changes.
Decision tables - Edit Levels and Definition#
If you want to edit levels or definition in a specific decision table, follow these steps:
-
Choose Decision tables in Main toolbar.
-
Left-click on the Decision table you wish to edit.
a. Left-clicking on Decision table opens Decision table details screen.
-
Expand LEVELS AND DEFINITION
-
Choose Edit in Definition section or in Levels section. Only one section can be edited at given time.
a. Edit mode for Definition section.
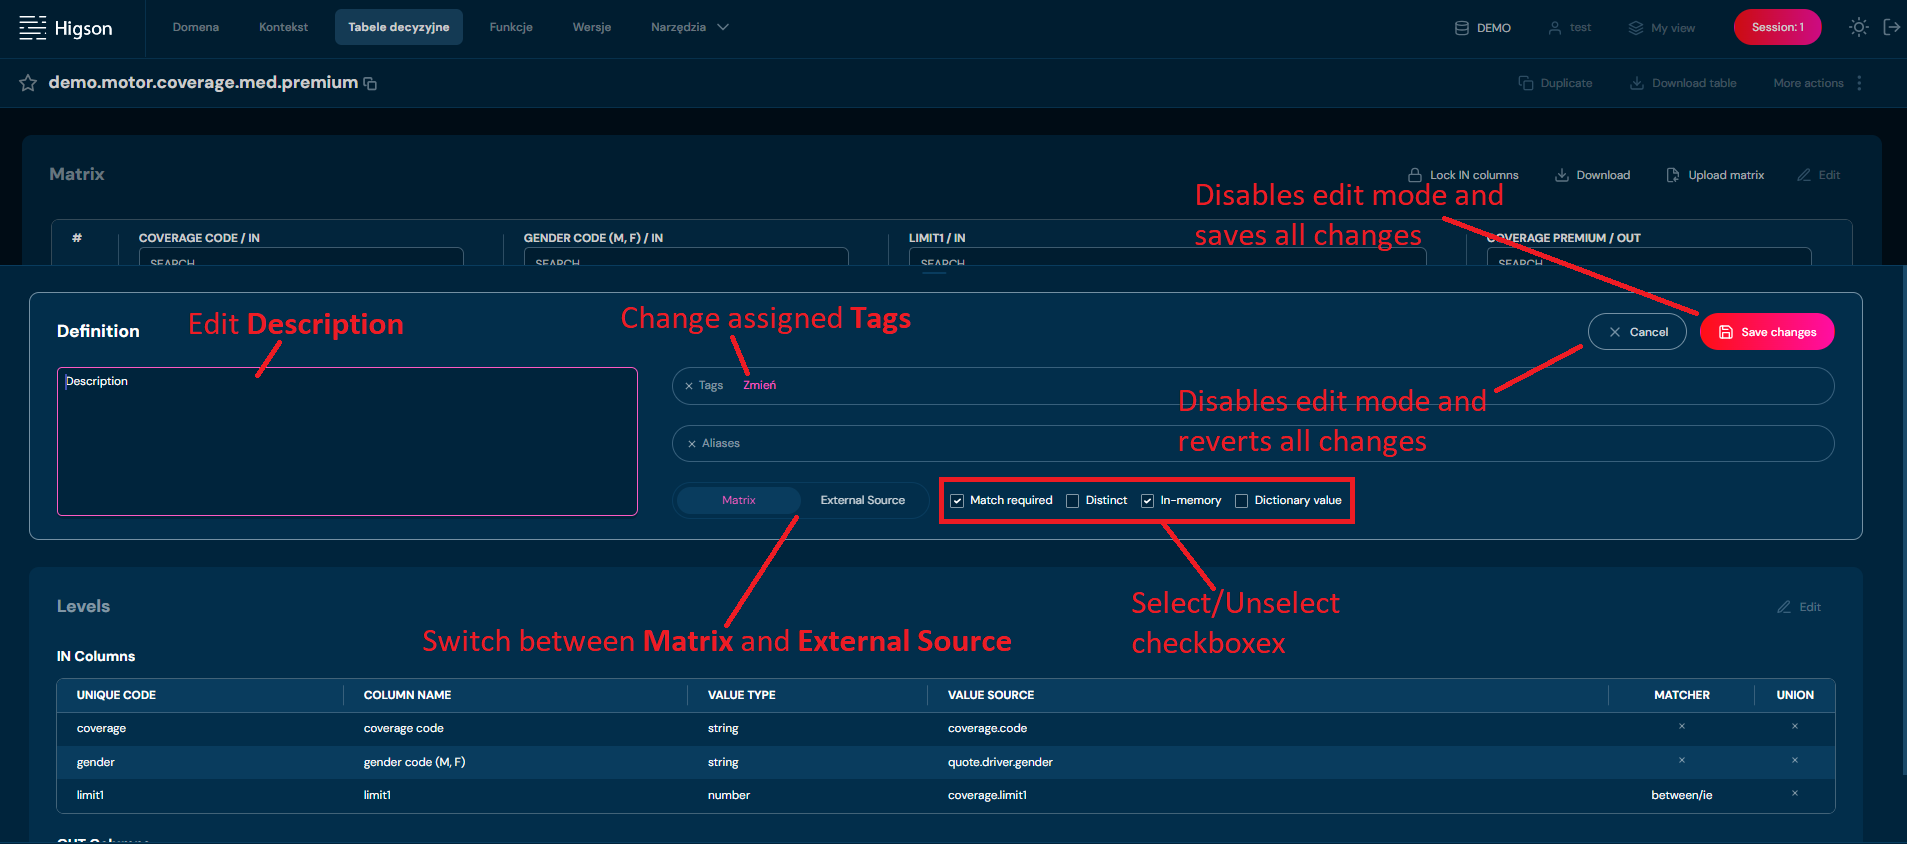
b. Edit mode for Levels section.
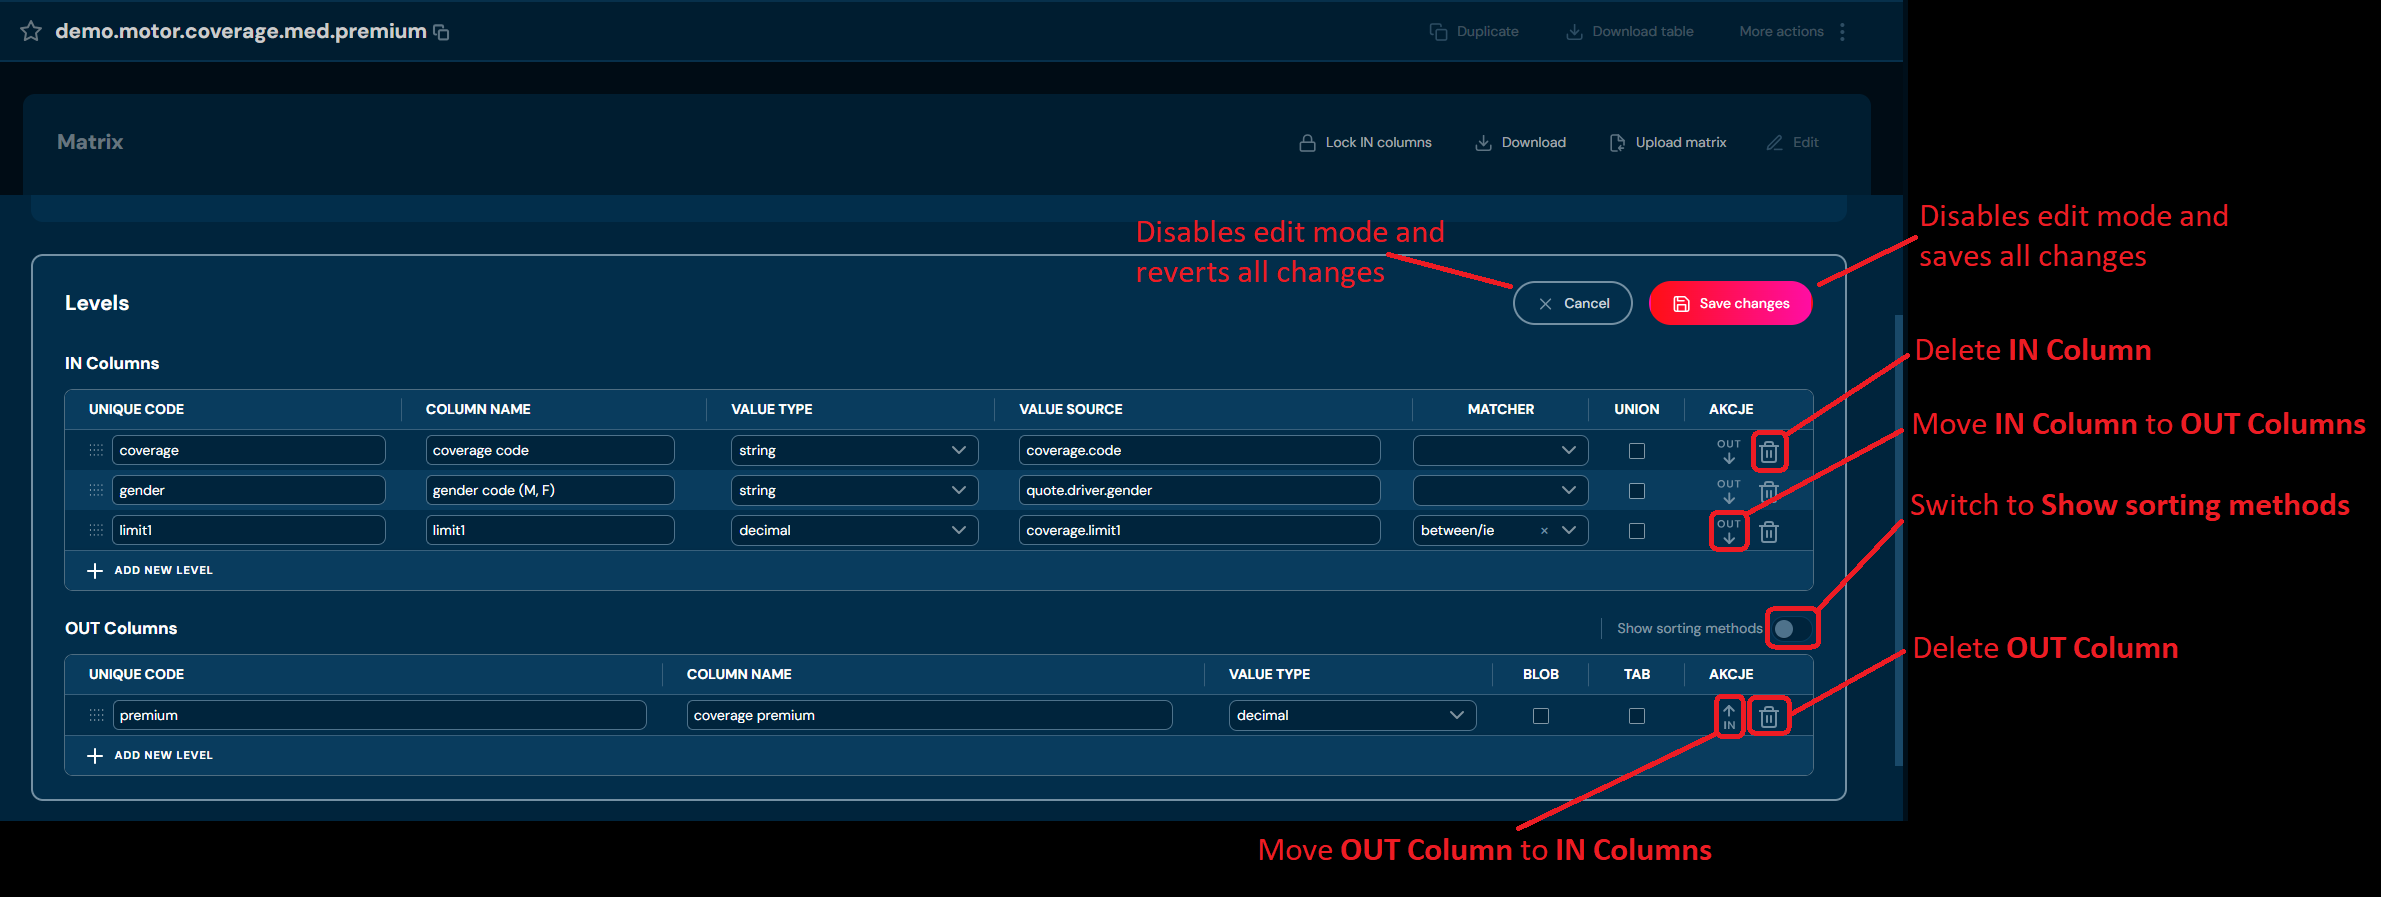
-
Edit any data you need.
-
Choose Save changes to save all changes made in the Decision table.
a. Cancel reverts all changes.