Technical Documentation
Bootstrap
Higson Studio is a Java application and can be run at JVM machine equipped with:
- at least Java 17 JRE,
- 4 GB of RAM,
- 2 CPU,
- Linux, Windows or macOS machine.
Docker#
Higson Studio distribution does not contain JDBC drivers other than H2 database. Every image contains description how to configure JDBC driver.
Full docker repository is available here.
Prerequisites:
- Java 17
- Maven 3.x
- Higson Studio
We will show how to configure Higson Engine using Spring Boot configuration
Maven configuration#
Apart from standard spring boot dependencies, you need to include higson-runtime dependency, available in Maven Central.
|
|
Another needed dependency is the JDBC driver to the database of choice, e.g., h2, oracle, mssql, postgresql and database connection pool managing library:
|
|
Properties#
Add Higson Runtime data source properties to application.properties file.
|
|
Properties are available here
Spring configuration#
Add required beans to your java class annotated with @Configuration:
|
|
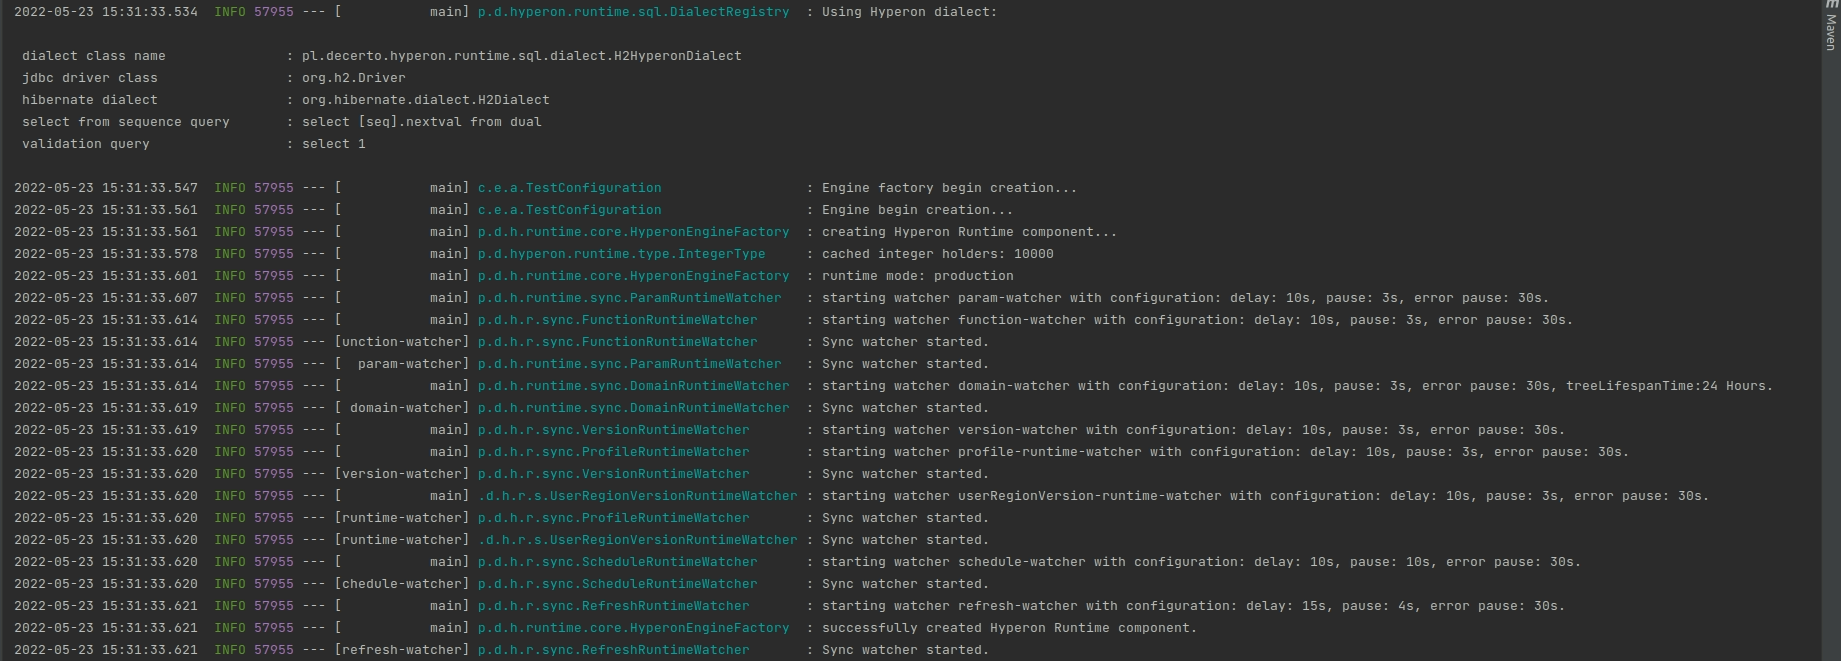
The application is ready to start. After successfully starting the application, you can see similar log output:
Prerequisites#
- Java 17
- Maven 3.x
- Spring Boot
Maven configuration#
Apart from standard spring boot dependencies, you need to include higson-runtime-spring-boot-starter dependency,
available in Maven Central.
Add higson-runtime-spring-boot-starter dependency to pom.xml file:
|
|
Another needed dependency is the JDBC driver to the database of choice, e.g., h2, oracle, mssql, postgresql:
|
|
Properties#
With the above setup, all the configuration that is needed is application.properties file with database properties:
|
|
If required properties are not available, higson-runtime-spring-boot-starter will return an adequate message.
To configure external sources, you have to set comma separated list of external sources names and connection properties for each of them. You can do it by using the properties below.
|
|
Using auto-configured HigsonEngine#
After successfully configuring properties while starting the application, spring will create HigsonEngine bean available in the spring application context, then which can be injected anywhere:
|
|
Overriding default configuration#
To override default auto-configuration, you need to define HigsonEngine bean in the @Configuration class:
|
|
Existing auto-configured DataSource and HigsonRuntimeProperties can be used simply by injecting them:
|
|
Disabling Higson#
If you want to disable higson temporarily for some reason, you can do it with property higson.runtime.enabled set
to false.
|
|
Higson Runtime REST is a web application that provides REST API for decision table/function/domain access. It is a REST implementation of Java’s Higson Runtime jar. It is available in two forms:
- Spring boot’s executable jar, available here: https://mvnrepository.com/artifact/io.higson/higson-runtime-rest
- Docker image, available here: https://hub.docker.com/repository/docker/decerto/higson-runtime-rest
Environment#
Higson Runtime REST is a Java application and can run with any Java 8 or higher on Windows, MacOS X and Linux/Unix.
CLI#
To run Runtime-Rest from cli you must pass four properties:
- loader.path - path to jdbc driver
- higson.database.url
- higson.database.username
- higson.database.password
Download latest version of higson runtime rest and database driver (postgresql for example)
|
|
Docker#
To run Higson Runtime REST as a docker image, there is need to build a separate docker image based on decerto/higson-runtime-rest image, add your database driver jar and run Higson Runtime REST jar with additional path.
Example:
|
|
Additionally, you need to pass 3 properties:
- higson.database.url
- higson.database.username
- higson.database.password
An invocation example:
|
|
Using Higson Runtime REST#
This short tutorial will guide you through the process of running Higson Runtime REST as a docker image and invoking decision table/function/domain element.
Prerequisites#
In order to run examples from this article you will need:
- running docker. See https://docs.docker.com/installation/#installation for details on setting Docker up for your machine.
- a favorite REST API Client to send requests such as Postman
- a favorite internet browser
Setting up a docker images#
The tutorial will be based on our motor insurance. It consists of the insurance web application, Higson Studio, and Higson Runtime REST modules. There is a docker-compose.yml file that makes the whole application easy to run. Just download a project from GitHub, open terminal in that directory, and run the following command:
|
|
If you look closely inside the docker-compose.yml file, you will see that Higson Runtime REST docker image needs three additional properties to be passed to run properly:
- higson.database.url : JDBC url to Higson’s database
- higson.database.username : Higson’s database username
- higson.database.password : Higson’s database password
If you want to connect to other database types such as Oracle, Postgres, MsSQL or MySQL, then you must build your own docker image and provide your database driver. Here’s a Docker file example that copies custom database driver and runs Runtime REST application:
|
|
- Demo app should be available at
localhost:48080/demo - Higson Studio should be available at
localhost:38080/higson/app - Higson Runtime REST should be available at
localhost:8081
To access higson services use followed credentials: User: admin Password: admin
Getting decision table value#
We will be using decision table examples from this article. Let’s get the value of a demo.motor.coverage.position decision table for the “BI” coverage code. Here’s the request we’re going to use:
|
|
It consists of 2 main parts: ctx and elements. The former represents the input values we want to pass to Higson. We can pass there simple as well as complex objects. The latter is a list of Higson elements to invoke.
When we send this request to the localhost:8081/api/execution/invoke url, we should receive the following response:
|
|
We receive a list of executed Higson elements with corresponding values.
Let’s see how the response will look like if more than one row will be returned from the decision table. In this example, we are going to use the demo.motor.dict.vehicle.available decision table. Here’s the request:
|
|
Besides a new decision table code and context property, you can see how to invoke more than one Higson element in a single JSON request. Let’s see the response:
|
|
As we see, each element has its own JSON section in returned array. What’s more, each row in the decision table’s matrix corresponds to one complex element in the resultValue array.
Calling function#
Let’s get the computed value of the demo.insurance.calc.premium function. Here’s the request we’re going to use:
|
|
It’s basically the same request as the one used in the decision table section. However, we pass here three context key-value pairs instead of one. Here’s the response we should get by calling the localhost:8081/api/execution/invoke endpoint:
|
|
Again, the same response format as in the decision table’s.
Accessing domain attributes#
Last but not least, let’s see how to access domain attributes through invoke API. We’ll be using examples from this article. Let’s see how to evaluate a position attribute of a coverage BI domain element:
|
|
The main difference between domain element and decision table/function is the presence of 2 additional attributes: profileCode and attributeCode, which names are self-describing. Let’s look at the response:
|
|
As we see, the response format is the same as in the decision table/function section.
If you want to learn more or discover other available endpoints, there is a Runtime REST swagger online documentation available at: http://localhost:8081/swagger-ui/index.html.
Accessing Swagger UI#
The Swagger UI link is generated automatically based on the installation type (Docker or Bundle). The Swagger UI is accessible at the following address format:
http://[host]:[port]/[appname]/[apiname]/swagger-ui/index.html
For Docker-based Deployments#
When the application is running in a Docker environment, the URL components are determined as follows:
- host: localhost (or the container’s IP address if accessed externally)
- port: retrieved from the server.port property (e.g., 8080)
- apiname: the value of server.servlet.context-path from the application’s configuration (e.g., /api)
Example: http://localhost:8080/api/swagger-ui/index.html
For Bundle Installations#
In the case of a bundle installation:
-
host: localhost
-
port: retrieved from the conf/server.xml configuration file by locating a line such as:
<Connector port="38080" protocol="HTTP/1.1" ... />In this example, the port is 38080.
-
appname and apiname: determined based on the directory structure within the webapps folder. For version 4.1, the typical folder name is higson#api, which translates to:
- appname = higson
- apiname = api
Example: http://localhost:38080/higson/api/swagger-ui/index.html
By following these rules, you can easily determine the correct Swagger UI URL regardless of the deployment method.
Run Higson using AMI#
Launch the AMI#
The latest Higson versions are available as AMI (Amazon Machine Images) at Amazon Marketplace.
Higson Studio#
Visit the Higson Studio Amazon Marketplace. You can read basic information about Higson Studio. Click Continue to subscribe and read Terms and Conditions. After getting yourself familiar with the license, click Continue to configuration. On the next screen, you can choose the Higson Studio version and region you want to launch your instance in. Next, click Continue to launch. Select Launch through EC2 in the Choose Action section.
Higson Runtime#
Visit the Higson Runtime Amazon Marketplace. You can read basic information about Higson Runtime. Click Continue to subscribe and read Terms and Conditions. After getting yourself familiar with the license, click Continue to configuration. On the next screen, you can choose the Higson Runtime version and region you want to launch your instance in. Next, click Continue to launch. Select Launch through EC2 in the Choose Action section.
Configure#
This step is required to be able to specify the user-data script, which allows passing environment variables to the application without the need to log in to the instance.
AWS Systems Manager Parameter Store#
By default, Higson Studio uses AWS Systems Manager Parameter Store to fetch properties at the start of the application. You need to specify AWS_ACCESS_KEY_ID and AWS_SECRET_KEY in the user-data script to connect to the AWS Systems Manager Parameter Store. If you do not define those properties, Studio will not launch.
Default configuration:#
- key: /config/higson-studio/higson.database.url
description: JDBC address of dedicated postgresql database
value: jdbc:postgresql://address_to_your_postgressql_server:port/postgres?currentSchema=public - key: /config/higson-studio/higson.database.username
description: username for application’s connection to the dedicated database
value: admin - key: /config/higson-studio/higson.database.password
description: password for application’s connection to the dedicated database
value: admin
If you prefer to connect to H2 database in order not to setting up a standalone database - you can set up following properties:
-
key: /config/higson-studio/higson.database.url
description: JDBC address of dedicated postgresql database
value: jdbc:h2:/home/ec2-user/higson.test.db;AUTO_SERVER=TRUE;NON_KEYWORDS=VALUE -
key: /config/higson-studio/higson.database.username
description: username for application’s connection to the dedicated database
value: sa -
key: /config/higson-studio/higson.database.password
description: password for application’s connection to the dedicated database
value: sa
Environment properties#
To set up environment variables for containers you can manually create a /home/ec2-user/environment.conf file or prepare user-data-script like in the example below. Both are available and its main aim is to configure instance system environments.
|
|
AWS_ACCESS_KEY_ID and AWS_SECRET_KEY you will be able to generate from your IAM page.
Both are needed if you want to use your AWS Parameter Store to pass your configuration.
You can inject this script directly into your container in EC2 console using:
Actions -> Instance settings -> Edit user data button.
Following script add 2 environment variables to your container.
You can learn more about bootstrapping AWS EC2 instance here.
Configure without AWS Parameter Store#
If you don’t want to use AWS Parameter Store simply turn this off with AWS_PARAMSTORE_ENABLED=FALSE
Now you have to pass HIGSON_DATABASE_URL, HIGSON_DATABASE_USERNAME, HIGSON_DATABASE_PASSWORD properties in your user-data script
Properties customization precedence#
Higson Studio allows you to define properties in several locations. The properties are processed in the order as defined below. This implies that the last one overwrites other overlapping properties if you define the same property in two different locations.
- /home/ec2-user/conf/application.properties
- /home/ec2-user/higson-studio/conf/mpp-sensitive.properties
- /home/ec2-user/higson-studio/conf/application.properties
- /home/ec2-user/application.properties
- /home/ec2-user/higson-studio/conf/higson.properties
- “HIGSON_CONFIG_PATH” environment variable (can be defined in user-data script)
- environment variables (from/home/ec2-user/environment.conf)
- AWS Systems Manager Parameter Store
Instance Launch Options#
Below, you can find a few instance launch options:
- version - by default you should launch the latest version available on Amazon Marketplace.
- region - select the region you would like to launch your instance in. The image is available in all of Amazon’s publicly available regions.
- EC2 Instance Type - select the instance type you would like to use for your launched Higson Studio.
- Security Groups - Expose ports to access EC2 instances and Higson Studio:
- TCP/22 – SSH - used to administrate your instance remotely.
- TCP/38080 – default port for Higson Studio, this is the port on which you can access Higson Studio
- Key Value pair settings - generate or use an existing one key and secret pair that will be needed later to access the EC2 instance.
Connect the instance#
In order to log in, you can use the following command:
ssh-i PATH_TO_PEM_FILE ec2-user@IP_HERE
You need to use a PEM file with a public key downloaded while creating the EC2 Instance.
Type the ssh command in a terminal. Application is deployed at /home/ec2-user/higson-studio-X.X.X where X.X.X is the version of
deployed Studio.
Systemd service is configured to manage the Higson Tomcat instance. You can use standard systemctl commands to
disable or check status such as sudo systemctl status higson-studio
All logs can be found under the following path /home/ec2-user/higson-studio-x.x.x/logs/
Log in to running Higson Studio#
Studio stores temporary password at higson.log file. Login to your EC2 instance and grep a string ‘Copy password’ in the log file using:
|
|
as a result, you will find a string similar to: Copy password from file 'gifzWEZl' in home directory, where the filename
is different every time higson is bootstrapped. This file contains an admin user password. Copy the password. Now go to a browser and
open a page: http://IP_HERE:38080/higson/app . At login page please fill form with credentials: pass username: admin and password:
copied string here. You will be asked to change your temporary password. After that, you can login to higson as an admin with a
new set password
Supported Databases#
Higson supports various SQL databases, including PostgreSQL, Oracle, MySQL, Microsoft SQL and H2. By default, we have built the AMI with PostgreSQL and H2 support. This means that the PostgreSQL and H2 JDBC drivers are present in the Tomcat lib directory, and we only need you to provide the URL and credentials for the database. If you want to connect to another database, then add a proper JDBC driver to the Tomcat lib directory, which is located under the path: /home/ec2-user/higson-studio/lib
Run Higson using ECS#
It is possible to run the Higson application in Amazon Elastic Container Service (ECS). The following steps will allow you to quickly and easily run Higson Studio or Higson Runtime REST:
- Log in to AWS Management Console
- Go to Elastic Container Service
- Create a Cluster:
- Define the cluster name (this is the only required field), e.g.: higson-cluster
- Verify the remaining optional settings
- Finish the process by creating a cluster
- Create a Task definition (using the configuration form):
- Define the task definition family name, e.g.: higson-studio or higson-runtime-rest
- Define the container name and the application image URI - an official DockerHub images for decerto/higson-studio or decerto/higson-runtime-rest are available at https://hub.docker.com/r/decerto/ (e.g.: decerto/higson-studio:4.0.20 or decerto/higson-runtime-rest:4.0.20)
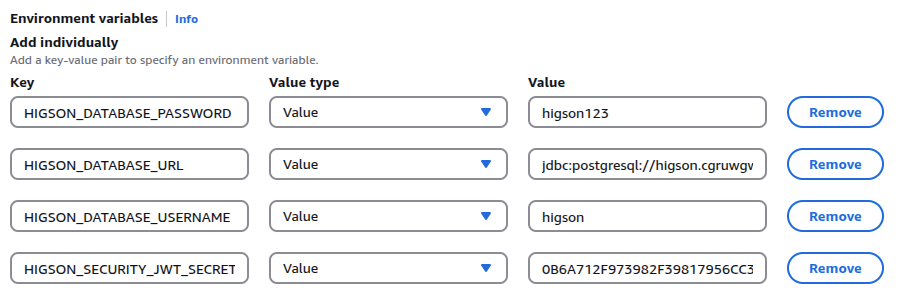
- Define environment variables (check the list of required properties). Remember of correct environment variables notation!
- Configure log collection, e.g.: select Amazon CloudWatch
- Verify the remaining optional settings
- Finish the process by creating a task definition
- Go to cluster and create a service:
- Select task definition family, e.g.: previously created higson-studio or higson-runtime-rest
- Define service name, e.g.: higson-studio-service or higson-runtime-rest-service
- Finish the process by creating a service
- Verify the status of deployment and start using application!
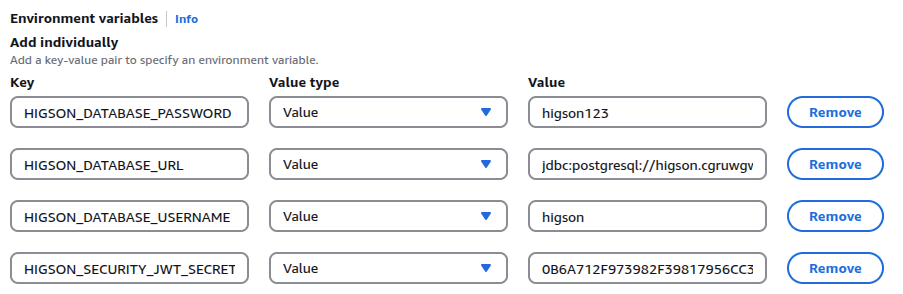
If you would like to use Higson Studio and Higson Runtime REST both must have configured environment variable: HIGSON_SECURITY_JWT_SECRET_KEY with the same key value!
See an example of minimal required environment variables for Higson Studio:
See an example of minimal required environment variables for Higson Runtime REST:
Properties
Higson gives user a possibility to configure and overwrite internal application properties. They are stored in dedicated file, named application.yml . File should be placed in container or may be pass using environment properties
|
|
Configurable properties#
| Property | Description | Default value |
|---|---|---|
| Database | ||
| higson.database.dialect | Database dialect to use. Predefined dialects available in Higson: oracle,hsqldb, h2, mssql2012, postgresql, mysql | oracle |
| higson.database.hbm2ddl-mode | proxy for hibernate property hibernate.hbm2ddl.auto | validate |
| higson.database.autoddl-action | Action to be taken during Higson Studio startup with respect to database schema update:check - verify whether schema is correctupdate - chcek database schema and update, if neededskip - do nothing | update |
| higson.database.url | JDBC connection url | THIS PROPERTY MUST BE SET AT SYSTEM START BY THE USER |
| higson.database.username | Username that Higson will use to connect to database defined in mpp.database.url | THIS PROPERTY MUST BE SET AT SYSTEM START BY THE USER |
| higson.database.password | Password that Higson will use to connect to database defined in mpp.database.url | THIS PROPERTY MUST BE SET AT SYSTEM START BY THE USER |
| higson.database.schema | Database schema wherein Higson tables exist | |
| Environment | ||
| higson.studio.instance-name | Id identifying specific Higson Studio Instance. It is visible in Higson Studio below menu toolbar | 1.5.0 |
| higson.studio.url | Higson Studio url used in few places, for example to create url for authentication token reset, CAS authentication etc. | http://localhost:8080/higson/app |
| higson.studio.ui.header-color | CSS style (e.g. rgb(27, 140, 204)) defining Studio header color. If not set, default color is used | |
| higson.studio.ui.text-color | CSS color (e.g. #7f8c8d) used on text existing in start pages. | |
| higson.studio.ui.chart-colors | Collection of rgb colors separated by semicolon used in Higson Studio Simulation View to differentiate datasets | 190,210,250;110,150,240;20,80,220; 170,230,250;70,200,240;15,150,190; 190,250,205;60,240,110;10,150,50 |
| higson.studio.region.updater.task-cron | CRON expression used to schedule job updating system region versions in Higson Studio | 0 1 0 * * * |
| higson.studio.session.require-message | Flag determining whether session message is required when publishing session | false |
| Security | ||
| higson.security.password-encoder.name | Name of using password encoder | bcrypt |
| higson.security.password-encoder.complexity | Password encoder complexity | 5 |
| higson.security.jwt.authentication-server | Determines if studio server works as authentication provider | true |
| higson.security.jwt.secret-key | Secret to sign and decode JWT token (up to 256-bytes chars). To communicate with UI and Runtime Rest client. | THIS PROPERTY MUST BE SET AT SYSTEM START BY THE USER |
| higson.security.jwt.algorithm | Determines JWT token sign algorithm (only HMAC256 supported) | HMAC256 |
| higson.security.jwt.access-token-lifetime.value | Access token lifetime value | 5 |
| higson.security.jwt.access-token-lifetime.unit | Access token lifetime unit | Minutes |
| higson.security.jwt.refresh-token-lifetime.value | Refresh token lifetime value | 7 |
| higson.security.jwt.refresh-token-lifetime.unit | Refresh token lifetime unit | Minutes |
| higson.security.jwt.persist-refresh-token | Should persist refresh token to database (session idempotent) | true |
| Features | ||
| higson.studio.mail.host | Mailer server host. If host and port are not set - mailer is not loaded | "" |
| higson.studio.mail.port | Mailer server port. If host and port are not set - mailer is not loaded | "" |
| higson.studio.mail.username | Mailer server username | "" |
| higson.studio.mail.password | Mailer server username’s password | "" |
| higson.studio.mail.from | Mailer from metadata | "" |
| higson.studio.global-search.history-limit | limit of history searches to keep in Higson Studio memory | 60 |
| higson.studio.external-environments.codes | Name for the connected environment, to SEND snapshots and Superpacks to | prod |
| higson.studio.external-environments.%s.url | Url to the connected environment API | |
| higson.studio.external-environments.%s.username | Username to data source. %s is env code from property above. | admin |
| higson.studio.external-environments.%s.password | Password to data source. %s is env code from property above. | admin |
| higson.studio.snapshot.param.matrix.writer.order-by-all-level | Should sort by all levels during export decision table to file. Available: true/false | true |
| higson.studio.max-file-size | Specifies the size of the snapshot that can be uploaded | 100MB |
RUNTIME#
Available for runtime or runtime-rest apps
| Property name | Description | Default Value |
|---|---|---|
| Database | ||
| higson.database.dialect | Database dialect to use. Available values: oracle, hsqldb, h2, mssql2012, postgresql, mysql | oracle |
| higson.database.url | JDBC connection url | THIS PROPERTY MUST BE SET AT SYSTEM START BY THE USER |
| higson.database.username | Username that Higson will use to connect to database defined in mpp.database.url | THIS PROPERTY MUST BE SET AT SYSTEM START BY THE USER |
| higson.database.password | Password that Higson will use to connect to database defined in mpp.database.url | THIS PROPERTY MUST BE SET AT SYSTEM START BY THE USER |
| higson.database.schema | Database schema wherein Higson tables exist | |
| Environement | ||
| higson.runtime-rest.url | URL of Higson Runtime Rest | |
| Authentication | ||
| higson.runtime-rest.security.type | Defines security type for runtime rest. Possible values: jwt, active-directory. When not set basic authentication is enabled | |
| higson.security.jwt.secret-key | Secret key to decrypt runtime rest token | THIS PROPERTY MUST BE SET AT SYSTEM START BY THE USER |
| higson.security.active-directory.domain | Active Directory main root | |
| higson.security.active-directory.url | Active Directory server url | |
| higson.security.active-directory.root-dn | AD root domain | |
| Other | ||
| higson.runtime.function.validate-arguments | flag determining whether function arguments data types should be validated before execution | false |
| higson.runtime.normalization.throw-on-exception | flag determining whether an exception should be thrown when matrix value can’t be normalized | false |
| higson.runtime.external-datasource.sql.names | Names of data sources list. | |
| higson.runtime.external-datasource.sql.%s.url | Url to data source. %s is name of datasource from property above. | |
| higson.runtime.external-datasource.sql.%s.username | Username to data source. %s is name of datasource from property above. | |
| higson.runtime.external-datasource.sql.%s.password | Password to data source. %s is name of datasource from property above. | |
| higson.runtime.parameter.value-never-null | Flag responsible for managing global support of nullable decision table’s results in Higson Engine. If true, decision table will return instance of pl.decerto.higson.runtime.core.EmptyParamValue when no match found. If set to false, decision table return null. | true |
| higson.runtime.watchers.enabled | Flag determining whether runtime watchers should start automatically | true |
| higson.runtime-rest.openapi.servers | Comma separated list of servers URLs used in try it function in OpenAPI GUI. If not filled, URL will be generated automatically. |
Please contact service@higson.tech
Authentication
Standard / JWT Authentication#
No extra actions needed to use it, it is available by default.
SAML#
Configuration steps:
- Configure Tomcat to use HTTPS (if needed).
- Fill properties:
|
|
- Generate Studio metadata and import in your Identity Provider
On your IDP:
- Configure Identity Provider to send attributes with assertion response.
- Check that Identity Provider configuration for Assertion Consumer Service URL and Logout Service URL is correct.
Important! SAML Response signature must include message and assertions!
Attributes mapping#
SAML Response must contain following attributes:
- Name ID (this is used as user login)
- firstname
- lastname
- roles
Roles#
- if higson.studio.security.saml.roles-origin=saml is specified roles are taken from assertion response therefore Identity Provider must be configured to send it with response. internal means Studio will take roles from database instead of SAML assertion response to authorize user.
Active Directory#
- Fill properties:
|
|
Requirements for Access Directory user:#
Login - not empty, min size: 1, max size: 200
First name - not empty, min size: 1
Last name - not empty, min size: 1
E-mail address - if empty Higson generates default e-mail consistent with schema: ’login@local.com’
Roles - min one role consistent with Higson role.
Roles defined in Active Directory must be compatible with roles in Higson structure.
Hierarchy of roles in Higson:#
MPP_ADMIN - Higson Administrator
MPP_USER - Higson User
MPP_USER_READONLY - Readonly Higson User \
It is possible to create own roles in AD but remember to create same roles in Higson structure. It’s necessary to proper authentication process.
A refresh token is a special type of access key used to automatically renew a user session without the need to log in again. It is used together with an access token. It is used to ensure user convenience, as it means that users do not have to constantly log in to the application.
The following properties define the lifetime of tokens:
higson.security.jwt.access-token-lifetime.unit=Minutes
higson.security.jwt.access-token-lifetime.value=5
higson.security.jwt.refresh-token-lifetime.unit=Minutes
higson.security.jwt.refresh-token-lifetime.value=7
The refresh token has a longer lifespan and is used to obtain a new access token. The access token is included in requests and enables authorized access to the API. Once the access token expires, the browser automatically uses the refresh token to retrieve a new access token. If the refresh token also expires, the user will be logged out of the system. Modifying the access token lifetime affects how often it needs to be refreshed — in other words, how frequently the system must generate a new access token. Meanwhile, the refresh token lifetime determines how long a user can remain logged in, that is, how long they can obtain new access tokens without having to log in again.
It’s important to remember that when an automatic logout occurs, any unsaved changes will be lost.
Standard / Basic Authentication#
No extra actions needed to use it, it is available by default. You can choose from the following password encoder security algorithms: bCrypt (default) or Pbkdf2
To select a Pbkdf2 algorithm, you must set higson.security.basic.password-encoder=Pbkdf2 property in the application.properties
You can choose the complexity of BCrypt algorithm by setting a property higson.security.basic.bcrypt.complexity with values
between 4 and 31 are accepted, 5 is used by default. Be careful, since the bigger the value the safer algorithm is, but the
performance impact is also increasing.
Active Directory#
|
|
JWT Based authentication Token#
|
|
The property higson.security.jwt.secret-key must be set in both Studio’s and client’s side
Runtime Rest application with same string sequence
You can generate a new token in Studio. A view to see all existing tokens and to generate a new one can be found in Menu’s Tools tab.
When creating a new token, you can specify the expiry date. Admin users may also specify a user that a newly generated token will be assigned to.
To use generated token in REST API calls, you need to add an Authorization Header with the standard bearer format, such as
Authorization: Bearer your_jwt_token
Upgrade
This is wise to upgrade Higson applications (the Studio and Runtime) for a newer version as we are repairing bugs and adding new features, so let’s check how to do it in a few short steps.
IMPORTANT:
- As far higson-studio and higson-runtime are separate applications we truly recommend running them the same version.
- Higson Studio MUST BE STARTED FIRST! Higson Studio is managing the Database Schema!
- If your current version starts with 1.x and you want to bump version do 2.x line later go to this article.
Bump the Studio application first#
Download Studio#
Firstly, download application from here. After filling the form, you will get mail with a link to your download page. Depending on your needs, download the file/files (probably you use a war file with your tomcat).
Shut down old Studio.#
Turn off the Studio App. You probably want to stop all running applications which are using higson-runtime,
because we need to modify its database schema.
Remember to create a database backup!#
Due to the fact, there might occur database updates, it would be very helpful if you prepare a Higson’s database backup.
Switch .war files at your tomcat /webapps directory#
Start the Studio Application#
You should be able to see a standard login page
(by default: https://{serverUrl}/higson/app)
Bump the Runtime in your applications#
Since Runtime is available at Maven Central repositories, you should only bump its version at your building script, ie: build.gradle, pom.xml etc.
Bump the Studio application#
Download new Studio
The first step you should do is to head for new applications here. Search for version of 4.0
Shut down the Studio
Turn off the Studio App. You probably want to stop all running applications which are using higson-runtime,
because we need to modify its database schema.
Remember to create a database backup!
Due to the fact, there might occur database updates, it would be very helpful if you prepare a Higson’s database backup.
Check out new properties
In a Higson Studio 4.x there were a lot of changes with properties.
Take a look at your property source (by default: {your_tomcat_dir}/conf/application.properties) and change them
regarding the table followed the link
Copy files to your tomcat.
- replace file conf/server.xml,
- copy conf/Catalina directory to your tomcat
- remove old .war file from webapps and copy new higson#api.war and higson#app directory.
Start the Studio App
You should be able to see a standard login page
(by default: https://{serverUrl}/higson/app)
Bump the Runtime in your applications#
Since Runtime is available at Maven Central repositories, you should only bump its version at your building script, ie: build.gradle, pom.xml etc. Check out the new properties for Runtime App since there were a lot of changes.
Enabling a developer mode feature allows seeing all unpublished changes of a defined user by the Runtime application, which leads to faster development. Developer mode is disabled by default.
Enabling devmode programmatically#
|
|
Enabling devmode using property file#
Configuration that is needed in application.yml to enable developer mode:
|
|
Using HigsonEngineFactory excludes a possibility to use application.yml.
Caching bundle saved or read by Higson Persistence may be configured in three different ways.
1. Automatically generated EhCache#
If cache is not configured on sight then Higson Persistence creates its own EhCache with the name : gmo and
idleTime=10 minutes
2. Use selected EhCache region#
You may configure it to use selected EhCache region
|
|
- if it is defined ehcache “abc” then it uses that
- if it is not defined ehcache, then it will create ehcache with name “abc” in default configuration
3. Add your own implementation#
On HigsonPersistanceFactory may add your own implementation of cache (based on map or other cache) using
HigsonPersistanceFactory.setCache(BundleCache) method
If you want to turn the cache off (for example for testing purposes) you need to give your cache implementation like follow:
|
|